1
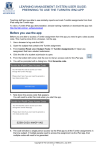
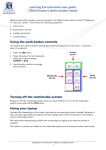
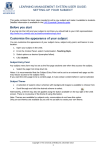
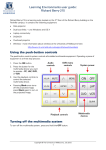
Learning Environments user guide:
USB memory sticks
This guide refers to connecting USB memory sticks to dual boot Mac computers installed in
shared teaching spaces at the University of Melbourne.
Your office or home computer may not be configured in the way described in this guide.
Connecting USB memory sticks to a dual boot Mac
1. Locate the USB ports for the computer.
There will a USB cable that is either:
located next to the computer.
------OR-----attached to the keyboard drawer.
2. Insert your memory stick into the USB port.
Accessing your files using Windows
You can browse the contents of your memory stick as you would a floppy disc, CD or DVD.
To browse the contents of your memory stick:
1. Double-click the Computer icon.
2. Double-click the memory stick icon.
3. Copy the file(s) you want to use to your documents folder.
Location of USB memory stick on a computer using Windows 7
Copyright © The University of Melbourne, March 2013
1
Learning Environments user guide: USB memory sticks
Removing your memory stick
Remember to correctly eject your memory stick when you have finished using it. Failure to do so
may result in the loss of files from your memory stick.
To eject your memory stick:
1. Click the USB device icon on the taskbar (located
in the bottom right-hand corner of the screen).
2. Click the eject message corresponding to your
USB memory stick that pops up.
3. Remove your memory stick from the computer.
Accessing your files using OS X
USB memory sticks act in the same way as all discs do when using OS X (CD’s, DVD’s and hard
drives) - they mount on the desktop.
You can tell if a disc has successfully mounted because a disc icon will appear on the desktop.
1. When you attach your memory stick, a
disc icon appears on the desktop.
2. To access your files, double click this
icon.
3. Copy the file(s) you want to use to your
documents folder.
USB memory stick mounted on the desktop of a
computer using OS X
Copyright © The University of Melbourne, March 2013
2
Learning Environments user guide: USB memory sticks
Removing your memory stick
Remember to correctly eject your memory stick when you have finished using it. Failure to do so
may result in the loss of files from the memory stick.
To eject your memory stick:
1. Click on the memory stick icon & drag it to
the Trash, releasing the memory stick when
you reach the Trash.
Trash is located in the dock at the bottom of
the screen.
The Trash icon will change into an eject icon
while you do this.
2. You can now safely remove your memory
stick.
Ejecting a USB memory stick using OS X
Report any errors or omissions in this user guide to:
[email protected]
The University of Melbourne has used its best endeavours to ensure that material contained in this publication was correct at the time of printing. The
University gives no warranty and accepts no responsibility for the accuracy or completeness of information and the University reserves the right to make
changes without notice at any time in its absolute discretion. Users of this publication are advised to reconcile the accuracy and currency of the
information provided with the relevant department of the University before acting upon or in consideration of the information. Copyright in this publication
is owned by the University and no part of it may be reproduced without the permission of the University
Copyright © The University of Melbourne, March 2013
3