1
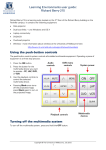
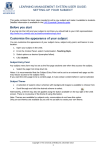
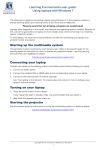
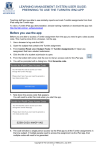
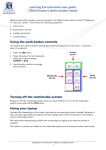
Learning Environments user guide:
David Caro-PP206
David Caro-PP206 is a student workshop (BYO laptop), located on the 2nd floor of the Physics
Podium section of the David Caro building on the Parkville campus. It contains the following
equipment:
•
Data projector
•
Push-button controls
•
Laptop connectivity
•
DVD/VCR player
•
Overhead projector
•
Wireless - more information about wireless at the University of Melbourne here:
http://www.its.unimelb.edu.au/support/networks/wireless
Using the push-button controls
Push-button controls are located on the right hand side of the whiteboard.
The push-button control system controls all installed multimedia equipment. Operating multimedia
equipment involves the following steps:
1. Browsing multimedia devices
using the u and U buttons.
Pressing the u and U buttons
scrolls through a list of available
multimedia equipment.
The name of the selected
multimedia device displays on
the LCD screen in the centre of
the controls.
2. Selecting a device by pressing
the Select button.
Selecting a device turns on the
data projector and routes audio
to the room’s speakers.
3. Using the playback controls to control the selected multimedia device.
•
Buttons change to blue when pressed.
Turning off the multimedia system
To turn off the multimedia system:
1. Press u until “System off Press here to select” displays on the push-button controls’ LCD
screen.
2. Press the Select button.
Copyright © The University of Melbourne, July 2012
1
Learning Environments user guide: David Caro-PP206
Using your laptop
Read the user guide for connecting laptops in learning spaces at:
http://le.unimelb.edu.au/room/laptop.html
Cables to connect your laptop to the multimedia system are located below the push button
controls:
1. Connect the VGA cable to your laptops’ VGA output and the audio cable (if required) to your
laptop’s headphone output.
2. Press u until “Laptop Press here to select” displays on the push-button controls’ LCD screen.
Read “Using the push-button controls” for instructions on using the push-button controls.
3. Press the Select button.
4. Use the audio controls to adjust laptop audio.
5. When you have finished, turn off the multimedia system.
Read “Turning off the multimedia system” for instructions.
NOTE: Pressing 2 blanks the projected image - pressing Y displays the projected image.
Playing a DVD
The DVD player is part of a combination DVD/VCR player, located in the cupboard below the push
button controls.
1. Load your DVD into the DVD player.
2. Press u until “DVD Press here to select” displays on the push-button controls’ LCD screen.
Read “Using the push-button controls” for instructions on using the push-button controls.
3. Press the Select button.
4. Use the playback controls to play your DVD.
5. Use the audio controls to adjust DVD audio.
6. When you have finished, turn off the multimedia system, remembering to retrieve your DVD
before turning off the system.
Read “Turning off the multimedia system” for instructions.
NOTE: To access and operate DVD menus, use the handheld DVD/VCR remote.
Playing a video tape
The video player is part of a combination DVD/VCR player, located in the cupboard below the push
button controls.
1. Load your video tape into the video player.
2. Press u until “VHS Press here to select” displays on the push-button controls’ LCD screen.
Read “Using the push-button controls” for instructions on using the push-button controls.
3. Press the Select button.
4. Use the playback controls to play your video.
5. Use the audio controls to adjust video audio.
6. When you have finished, turn off the multimedia system, remembering to retrieve your video
tape before turning off the system.
Read “Turning off the multimedia system” for instructions.
Copyright © The University of Melbourne, July 2012
2
Learning Environments user guide: David Caro-PP206
Using the overhead projector
Switch on the overhead projector (OHP) using the switch on the front of the unit.
If the OHP does not appear to be working, it may have blown a bulb.
•
Use the globe changing switch located on the front of the OHP to change to the spare globe.
Report any errors or omissions in this user guide to:
[email protected]
The University of Melbourne has used its best endeavours to ensure that material contained in this publication was correct at the time of printing. The
University gives no warranty and accepts no responsibility for the accuracy or completeness of information and the University reserves the right to make
changes without notice at any time in its absolute discretion. Users of this publication are advised to reconcile the accuracy and currency of the
information provided with the relevant department of the University before acting upon or in consideration of the information. Copyright in this publication
is owned by the University and no part of it may be reproduced without the permission of the University
Copyright © The University of Melbourne, July 2012
3