1
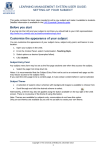
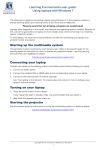
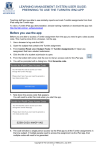
Learning Environments user guide:
Giblin Eunson Library project rooms
Giblin Eunson Library project rooms are located in the Giblin Eunson Library in the ICT building at
111 Barry St, Carlton. They contain the following equipment:
•
LCD screen
•
Push-button controls
•
Laptop connectivity
•
Auxiliary input.
Using the push-button controls
The push-button control system controls the multimedia equipment in this room. To operate a
piece of equipment:
1. Press the ON button.
2. Press the button for the multimedia
device you want to display –
LAPTOP or AUX.
3. Use the audio controls to change
device volume.
Turning off the multimedia system
Please turn off the multimedia system when you have finished. To turn off the multimedia
system, press and hold the OFF button.
Using your laptop
Laptops differ depending on the model, manufacturer and operating system installed. Because of
this, we cannot guarantee your laptop will work straight away when connecting it to the project
room's multimedia system.
We recommend familiarising yourself with connecting your laptop to an external monitor or
projector.
The cables to connect your laptop to the multimedia system are in the project room’s desk cavity.
Copyright © The University of Melbourne, September 2011
1
Learning Environments user guide: Giblin Eunson Library project rooms
1. Connect the VGA cable to your laptops’ VGA output.
Depending on what model laptop you have (e.g. Apple Mac), you
may need a VGA adapter.
VGA output
2. Connect the audio cable (if required) to your laptop’s headphone output.
3. Connect the network cable (if required) to your laptop’s LAN input, indicated by
this symbol.
Your laptop must be configured to obtain an IP address automatically.
LAN input
4. Press ON on the push-button controls.
Read “Using the push-button controls” for instructions on using the push-button controls.
5. Press LAPTOP on the push-button controls.
6. Use the Vol + and Vol - buttons on the push-button controls to adjust volume.
7. When you have finished, turn off the multimedia system.
Read “Turning off the multimedia system” for instructions.
NOTE: Pressing stop on the push-button controls blanks the LCD screen. Press play to start
displaying again.
Using the auxiliary input
Auxiliary input cables are located in the desk cavity. Use the auxiliary inputs to connect usersupplied equipment (e.g. digital camera) to the multimedia system. Video and audio inputs are
available.
1. Connect the auxiliary input cables to your device’s audio and/or video outputs.
2. Press ON on the push-button controls.
Read “Using the push-button controls” for instructions on using the push-button controls.
3. Press AUX on the push-button controls.
4. Use the Vol + and Vol - buttons on the push-button controls to adjust volume.
5. When you have finished, turn off the multimedia system.
Read “Turning off the multimedia system” for instructions.
NOTE: Pressing stop on the push-button controls blanks the LCD screen. Press play to start
displaying again.
Report any errors or omissions in this user guide to:
[email protected]
The University of Melbourne has used its best endeavours to ensure that material contained in this publication was correct at the time of printing. The
University gives no warranty and accepts no responsibility for the accuracy or completeness of information and the University reserves the right to make
changes without notice at any time in its absolute discretion. Users of this publication are advised to reconcile the accuracy and currency of the
information provided with the relevant department of the University before acting upon or in consideration of the information. Copyright in this publication
is owned by the University and no part of it may be reproduced without the permission of the University
Copyright © The University of Melbourne, September 2011
2