1
HiPath 2000
HiPath 3000
HiPath 4000
optiPoint WL 2 professional
Administrator Manual
Safety Precautions
Safety Precautions
The optiPoint WL 2 professional IP phone conforms to the European standard EN 60 950
which governs the safety of information technology equipment including electronic office
equipment. Special emphasis was placed on personal and product safety when developing
this telephone.
$
Only use the power supply provided as indicated on the underside of the charging unit.
Only use recommended rechargeable batteries. Never use other battery types
or non-rechargeable batteries as this can cause serious damage to your health
and property.
‹
Œ
Insert the rechargeable battery making sure the poles are facing in the correct
directions and use the battery as described in the operating manual.
The handset can interfere with medical equipment. Please refer to the technical
specifications applicable to the relevant environment (medical practice,
for instance).
The handset can cause unpleasant humming in hearing aids.
Do not install the charging unit in bathrooms or shower rooms. The handset and
charging unit are not splash-protected.
Do not operate your handset in environments where there is risk of explosion
(paintshops, for instance).
Œ
Remember to include all relevant documentation when passing on your handset
to third parties.
Never open your handset. In the event of problems, consult your service personnel.
Use only original Siemens accessories. The use of other accessories is dangerous and will invalidate the warranty and the CE mark.
2
Safety Precautions
Location of the Telephone
•
•
•
•
•
The telephone should be operated in a controlled environment with an ambient temperature between 5 °C and 40 °C (41 °F and 104 °F).
To ensure good handsfree talking quality, the area in front of the microphone should be
kept clear. The optimum handsfree distance is 20 inches (50cm).
Do not install the telephone in a room where large quantities of dust accumulate; this
can considerably reduce the service life of the telephone.
Do not expose the telephone to direct sunlight or any other source of heat, as this is
liable to damage the electronic equipment and the plastic casing.
Do not operate the telephone in damp environments such as bathrooms.
Labels
The device conforms to the EU Guideline 1999/5/EG, as attested by the GE
mark.
This device has been manufactured in accordance with our certified environmental management system (ISO 14001). This process ensures that energy
consumption and the use of primary raw materials are kept to a minimum,
thus reducing waste production.
All electrical and electronic products should be disposed of separately from
the municipal waste stream via designated collection facilities appointed by
the government or the local authorities.
The correct disposal and separate collection of your old appliance will help
prevent potential negative consequences for the environment and human
health. It is a precondition for reuse and recycling of used electrical and electronic equipment.
For more detailed information about disposal of your old appliance, please
contact your city office, waste disposal service, the shop where you
purchased the product or your sales representative.
The statements quoted above are only fully valid for equipment which is installed and sold in the countries of the European Union and is covered by
the directive 2002/96/EC. Countries outside the European Union may have
other regulations regarding the disposal of electrical and electronic equipment.
3
Contents
Contents
Safety Precautions. . . . . . . . . . . . . . . . . . . . . . . . . . . . .2
Location of the Telephone. . . . . . . . . . . . . . . . . . . . . . . . . . . . . . . . . . . . 3
Labels . . . . . . . . . . . . . . . . . . . . . . . . . . . . . . . . . . . . . . . . . . . . . . . . . . . 3
General Information. . . . . . . . . . . . . . . . . . . . . . . . . . . .6
About the Manual . . . . . . . . . . . . . . . . . . . . . . . . . . . . . . . . . . . . . . . . . .
Product Identification. . . . . . . . . . . . . . . . . . . . . . . . . . . . . . . . . . . . . . . .
Echo Effect . . . . . . . . . . . . . . . . . . . . . . . . . . . . . . . . . . . . . . . . . . . . . . .
Overview . . . . . . . . . . . . . . . . . . . . . . . . . . . . . . . . . . . . . . . . . . . . . . . . .
Notes and Symbols . . . . . . . . . . . . . . . . . . . . . . . . . . . . . . . . . . . . . . . . .
Safety. . . . . . . . . . . . . . . . . . . . . . . . . . . . . . . . . . . . . . . . . . . . . . . . .
References to Process Steps . . . . . . . . . . . . . . . . . . . . . . . . . . . . . .
Using the Telephone . . . . . . . . . . . . . . . . . . . . . . . . . . . . . . . . . . . . .
6
6
6
7
8
8
8
9
Setting Up the Telephone . . . . . . . . . . . . . . . . . . . . . .10
Preparing the handset . . . . . . . . . . . . . . . . . . . . . . . . . . . . . . . . . . . . . .
Inserting the rechargeable batteries . . . . . . . . . . . . . . . . . . . . . . . .
Placing the handset into the charger and charging the batteries. . .
Preparing for operation . . . . . . . . . . . . . . . . . . . . . . . . . . . . . . . . . . . . .
Activating/deactivating the handset . . . . . . . . . . . . . . . . . . . . . . . . .
Activating/deactivating the keypad lock . . . . . . . . . . . . . . . . . . . . . .
Set up WLAN Profile . . . . . . . . . . . . . . . . . . . . . . . . . . . . . . . . . . . . . . .
Set up and activate new profile . . . . . . . . . . . . . . . . . . . . . . . . . . . .
Setting up additional profiles . . . . . . . . . . . . . . . . . . . . . . . . . . . . . .
Hidden "Service" menu . . . . . . . . . . . . . . . . . . . . . . . . . . . . . . . . . . . . .
Accessing the hidden "Service" menu . . . . . . . . . . . . . . . . . . . . . . .
10
10
10
11
11
11
12
12
14
15
15
Administration . . . . . . . . . . . . . . . . . . . . . . . . . . . . . . .19
Web Interface . . . . . . . . . . . . . . . . . . . . . . . . . . . . . . . . . . . . . . . . . . . .
General Information . . . . . . . . . . . . . . . . . . . . . . . . . . . . . . . . . . . . .
Preparation. . . . . . . . . . . . . . . . . . . . . . . . . . . . . . . . . . . . . . . . . . . .
"Admin" Main Menu . . . . . . . . . . . . . . . . . . . . . . . . . . . . . . . . . . . . .
Handset . . . . . . . . . . . . . . . . . . . . . . . . . . . . . . . . . . . . . . . . . . . . . .
Network . . . . . . . . . . . . . . . . . . . . . . . . . . . . . . . . . . . . . . . . . . . . . .
Profile Selection . . . . . . . . . . . . . . . . . . . . . . . . . . . . . . . . . . . . . . . .
Audio Settings . . . . . . . . . . . . . . . . . . . . . . . . . . . . . . . . . . . . . . . . .
Dialling settings . . . . . . . . . . . . . . . . . . . . . . . . . . . . . . . . . . . . . . . .
LDAP Settings . . . . . . . . . . . . . . . . . . . . . . . . . . . . . . . . . . . . . . . . .
DLS Settings . . . . . . . . . . . . . . . . . . . . . . . . . . . . . . . . . . . . . . . . . .
Location Server . . . . . . . . . . . . . . . . . . . . . . . . . . . . . . . . . . . . . . . .
VPN settings . . . . . . . . . . . . . . . . . . . . . . . . . . . . . . . . . . . . . . . . . .
4
20
20
21
22
23
24
24
29
29
30
30
31
31
Contents
Quality of Service. . . . . . . . . . . . . . . . . . . . . . . . . . . . . . . . . . . . . . .
System settings . . . . . . . . . . . . . . . . . . . . . . . . . . . . . . . . . . . . . . . .
FTP Transfer . . . . . . . . . . . . . . . . . . . . . . . . . . . . . . . . . . . . . . . . . .
HTTP Transfer . . . . . . . . . . . . . . . . . . . . . . . . . . . . . . . . . . . . . . . . .
Factory Reset. . . . . . . . . . . . . . . . . . . . . . . . . . . . . . . . . . . . . . . . . .
Certificates. . . . . . . . . . . . . . . . . . . . . . . . . . . . . . . . . . . . . . . . . . . .
Diagnostics . . . . . . . . . . . . . . . . . . . . . . . . . . . . . . . . . . . . . . . . . . .
32
33
34
36
36
37
37
Alphabetic Reference . . . . . . . . . . . . . . . . . . . . . . . . . 39
Functions . . . . . . . . . . . . . . . . . . . . . . . . . . . . . . . . . . . . . . . . . . . . . . . . 39
Abbreviations and Technical Terms. . . . . . . . . . . . . . . . . . . . . . . . . . . . 59
Administration Scenarios . . . . . . . . . . . . . . . . . . . . . 67
Setup failed . . . . . . . . . . . . . . . . . . . . . . . . . . . . . . . . . . . . . . . . . . . . . .
Determine the Software Version . . . . . . . . . . . . . . . . . . . . . . . . . . . . .
Check Connections . . . . . . . . . . . . . . . . . . . . . . . . . . . . . . . . . . . . . . . .
Set up FTP server . . . . . . . . . . . . . . . . . . . . . . . . . . . . . . . . . . . . . . . . .
Installation and configuration . . . . . . . . . . . . . . . . . . . . . . . . . . . . . .
Improve Voice Quality . . . . . . . . . . . . . . . . . . . . . . . . . . . . . . . . . . . . . .
Error Messages and Troubleshooting . . . . . . . . . . . . . . . . . . . . . . . . . .
67
67
67
68
68
69
70
Editors . . . . . . . . . . . . . . . . . . . . . . . . . . . . . . . . . . . . . . 72
Pre-defined entry fields . . . . . . . . . . . . . . . . . . . . . . . . . . . . . . . . . . . . .
Integer Editor . . . . . . . . . . . . . . . . . . . . . . . . . . . . . . . . . . . . . . . . . .
IP Number Editor . . . . . . . . . . . . . . . . . . . . . . . . . . . . . . . . . . . . . . .
Options Editor . . . . . . . . . . . . . . . . . . . . . . . . . . . . . . . . . . . . . . . . .
Text Editor . . . . . . . . . . . . . . . . . . . . . . . . . . . . . . . . . . . . . . . . . . . . . . .
72
72
72
72
73
Appendix . . . . . . . . . . . . . . . . . . . . . . . . . . . . . . . . . . . . 74
Functions of Passwords and PINs. . . . . . . . . . . . . . . . . . . . . . . . . . . . .
Technical Data . . . . . . . . . . . . . . . . . . . . . . . . . . . . . . . . . . . . . . . . . . . .
Operating / Charging Hours . . . . . . . . . . . . . . . . . . . . . . . . . . . . . . .
Factors influencing standby and talk times . . . . . . . . . . . . . . . . . . . . . .
74
74
75
75
Index . . . . . . . . . . . . . . . . . . . . . . . . . . . . . . . . . . . . . . . 76
5
General Information
General Information
About the Manual
This Administration Manual will help you in administering and maintaining
the optiPoint WL 2 professional. The instructions contain important information for safe and proper operation of the optiPoint WL 2 professional.
Follow them carefully to avoid improper operation and get the most out of
your multi-function telephone in a network environment.
You can set up and activate a WLAN profile on your
optiPoint WL 2 professional Page 12. We recommend to administer the
optiPoint WL 2 professional via the wev interface Page 20 or using the
Deployment Tool (see the Administration Manual of the Deployment Tool).
Telephone functions (local and communication platform) are described in
the User Manual. A Quick Reference Guide provides short and reliable descriptions of frequently used functions.
Product Identification
The identification details of your telephone are given on the nameplate.
The nameplate is located inside the battery compartment and contains the
exact product label and serial number. Please have these ready whenever
you call our service department in case of trouble with or defects on the
unit itself.
Echo Effect
In some cases, while using the telephone you may hear an echo, which
can be quite strong. This is not due to any design defect or other fault with
your IP telephone, but caused by the other client.
For example, if a user reports an echo effect occuring during a teleconference, it may be that the loudspeakers and microphones need to be repositioned.
6
General Information
Overview
The Access Point (AP) is the central component in the WLAN (Standard
802.11b). It manages network functions centrally and is connected to the
cabled networks (e.g. HiPath 3000 or HiPath 4000) via a gateway.
The Access Point maintains both the radio connections to other nodes in
the network and to wireless terminal devices (e.g.
optiPoint WL 2 professional); it also determines the coverage area (the radio cell Page 60). Depending on the size of the area to be covered, there
may be more than one Access Points installed.
In order to make the wireless communication possible, you have to set up
and activate a network profile ( Page 12) in the
optiPoint WL 2 professional.
7
General Information
Notes and Symbols
Safety
Information that is important for preventing injury or damages is marked
specially, as they are important instructions for correct use of the unit.
This symbol indicates a hazard. Failure to follow the instructions giv-
7 en may result in injury or in damage to the unit.
This symbol indicates key information important for the proper use
of the telephone.
References to Process Steps
The following symbols indicate various process descriptions:
Use the icons/keys on the optiPoint WL 2 professional.
Use the web interface.
8
General Information
Step-by-Step
Using the Telephone
Press the "talk" key.
Press the "end call" key.
Õ Conduct a call.
Enter a telephone number or code.
S or C Press the settings keys on the telephone.
Profile 1
OK The option appears on the display.
Press the B softkey to confirm your selection.
WLAN Settings
OK Search for an option.
Press the control key until the option appears on the
display.
Then press the B softkey to confirm your selection.
9
Setting Up the Telephone
Setting Up the Telephone
This chapter describes how to set up ( Preparing the handset) and prepare the optiPoint WL 2 professional for operation ( Preparing for operation) as well as how to set up a WLAN profile for the
optiPoint WL 2 professional ( Set up WLAN Profile).
Preparing the handset
Inserting the rechargeable batteries
Please see the optiPoint WL 2 professional User Manual.
Only use the rechargeable batteries recommended by Siemens
Page 74! Never use conventional (non-rechargeable) or other battery types as this may cause significant damage to health or property. For example, the jacket of the battery could be destroyed or the
battery could explode. The phone could also malfunction or be damaged.
Placing the handset into the charger and charging the batteries
1. Connect the power cord of the charger with a power outlet.
2. Place the handset into the charger with the display up.
Initial charging and discharging the batteries
The battery charging status is only displayed correctly after a complete
charge/discharge cycle.
For the initial charge we recommend a continuous, uninterrupted charging
period of five hours. After this, remove the handset from the charger and
only put it back into the charger once the batteries are completely discharged.
After the initial charge/discharge cycle you can replace your handset into
the charger after each call.
•
•
•
10
You have to repeat this procedure whenever you remove the batteries from the handset or reinsert them.
The batteries heat up during charging. This is normal and not
dangerous.
After a while the charge capacity of the batteries will decrease
for technical reasons.
Setting Up the Telephone
Preparing for operation
Please follow the procedure described below for preparing the
optiPoint WL 2 professional.
The preparation procedure below describes the default configuration. Network configurations may be different and require additional
steps.
In case of problems with the initial setting up or questions regarding individual settings please refer to the following chapters:
• For specialist information regarding the administration of the
optiPoint WL 2 professional please go to "Alphabetic Reference"
Page 39.
• For descriptions of configuration scenarios please go to "Administration
Scenarios" Page 67.
• For error messages in the optiPoint WL 2 professional display please
refer to "Error Messages and Troubleshooting" Page 70.
Activating/deactivating the handset
Press the "end call" key and hold.
Enter the PIN (if set up - see the optiPoint WL 2 professional User Manual).
Activating/deactivating the keypad lock
Press the "hash" key and hold.
11
Setting Up the Telephone
Step-by-Step
Set up WLAN Profile
We recommend to set up network profiles via
the web interface Page 24.
Set up and activate new profile
After switching on the optiPoint WL 2 professional tries
to establish a connection to the Access Point.
No Access Point
As you have not set up a profile, an error message is displayed.
Press the control key to the right and enter the Administrator PIN Page 39.
You are now in the "Profile Selection" menu.
New Entry
OK Confirm by pressing OK.
The cursor is placed in the field "Profile Name".
AP 1
Enter a name for the new profile.
Scroll down to "WLAN Settings".
Copy settings from an existing profile
¨ Press softkey.
Copy from profile
OK Select and confirm.
Profile 3
OK Select and confirm.
¨ Press softkey.
Save Settings
OK Select and confirm.
or Manual input
The cursor is placed in the field "SSID:".
Main Building
Enter the "SSID".
<none>
Go the the "Authentication:" menu and select the de-
<none>
Go to the "Encryption Type:" menu and select the de-
<On>
Go to the "DHCP:" menu.
sired method Page 13.
sired method Page 13.
Save Press the softkey.
AP 1
12
‰ OK Confirm by pressing OK to activate the profile.
Setting Up the Telephone
Step-by-Step
or
<Off>
Switch off DHCP and enter additional settings manually
Page 14.
Select Authentication Mode
Select a security protocol in the "Authentication" menu
( 802.1x or WPA) and enter the specifications.
<LEAP>
Go to the "EAP Type" menu and select the desired
method:
• LEAP
• TLS
Go to the field "Login-Name:" and enter the login name.
Go to the field "Password:" and enter a password.
Save Press the softkey and enter additional settings in the
"Profile Selection" menu.
Select the Encryption Type
Select an encryption method to protect wireless data
transmissions in the "Encryption Type:" menu:
1. Encryption using WEP Page 44
– WEP 64 or WEP 128 ( WEP mode)
In this menu you also select the desired Authentication
Mode Page 39.
<Hexadezimal>
<ASCII>
Select the desired Password mode.
or
Enter the WEP key.
<Shared key>
or
<Open System>
2. Encryption using WPA PSK Page 44
– WPA PSK TKIP ( TKIP)
Enter the Pre-Shared Key.
Save Press the softkey and enter additional settings in the
"Profile Selection" menu.
13
Setting Up the Telephone
Step-by-Step
If there is no DHCP server available
<Off>
Select "DHCP:".
Go to the field "IP Address:"
[000.000.000.000]
and enter the IP address of the gateway.
Go to the field "Subnet Mask:"
[000.000.000.000]
and enter the IP address.
Go to the field "Gateway:"
[000.000.000.000]
and enter the IP address of the
optiPoint WL 2 professional.
Save Press the softkey.
AP 1
‰ OK Confirm by pressing OK to activate the profile.
Setting up additional profiles
In order to enable fast and simple access in case of multiple parallel WLANs you can set up a maximum of 16
different network profiles.
Prerequisite: The handset must be in idle mode.
Open the main menu.
Enter the ID,
or
Settings
OK select the ID and confirm by pressing OK.
Access Profile
OK Confirm by pressing OK.
Press the control key to the right and
enter the Administrator PIN ( Page 39).
<New Entry>
OK Confirm by pressing OK.
Complete the profile as described under "Set up and activate new profile" Page 12.
14
Setting Up the Telephone
Step-by-Step
Hidden "Service" menu
This menu contains information about the WLAN connection, various settings of your
optiPoint WL 2 professional as well as information for
the services personnel.
Accessing the hidden "Service" menu
As you will have to press multiple keys simultaneously, we recommend that you place the
handset onto a solid surface (e.g. your desk).
Prerequisite: The handset is switched of.
Press the key.
M Press and hold keys simultaniously.
Short press the key.
The LEDs of the speakerphone key and mailbox key
start blinking.
"Service" appears on the display.
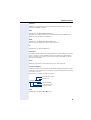
Enter Code "76200".
Network Scan
The following information is displayed for all available
profiles:
• Field strength: Signal strenth of the connection to
the access point
• SSID Page 50
• Channel Page 40
• MAC adress
OK Confirm.
Network Scan
Re-Scan Scan for all available profiles.
-43
13
Profile 01
1A:2B:3C:DD:44:5E
Select desired profile.
Go Back Close "Service" menu.
Other settings in the "Service" menu
Enter again Code "76200".
Leave "Service" menu
Long press key. The handset makes a restart.
15
Setting Up the Telephone
Step-by-Step
SW Release
The following information about the handset is displayed:
• SW Release: Version of the telephone software
• MAC Address: MAC adresse of the handset
Prerequisite: You are in the hidden "Service" menu
Page 15.
SW Release
OK Select and confirm.
Î Back to menu.
Go Back Close "Service" menu.
QS-Data
This entry contains information regarding quality control
during manufacturing (for service personnel only).
Prerequisite: You are in the hidden "Service" menu
Page 15.
QS-Data
OK Select and confirm.
Î Back to menu.
Go Back Close "Service" menu.
Speechpath test
Using this funciton the service personnel can do a quick
check of the accoustic paths.
Prerequisite: You are in the hidden "Service" menu
Page 15.
Activate
Speechpath test
OK Select and confirm.
Deactivate
Speechpath test
‰ OK Select and confirm.
Î Back to menu.
Go Back Close "Service" menu.
16
Setting Up the Telephone
Step-by-Step
Working time
Displays the entire operating hours of your
optiPoint WL 2 professional.
Prerequisite: You are in the hidden "Service" menu
Page 15.
Working time
OK Select and confirm.
Î Back to menu.
Go Back Close "Service" menu.
Contrast
This function is used to set the display contrast for your
handset. Possible values: 1 (low) to 9 (high).
Prerequisite: You are in the hidden "Service" menu
Page 15.
Contrast
OK Select and confirm.
Select the desired value.
Save Save settings.
Î Cancel, back to menu.
WPS
The WLAN Positioning System is a positioning system
using access points. If this function is activated, a WPS
server can identify the location of a handset using the
data transmitted by the handset.
Prerequisite: You are in the hidden "Service" menu
Page 15.
Activate
WPS
OK Select and confirm.
Deactivate
WPS
‰ OK Select and confirm.
Î Back to menu.
Go Back Close "Service" menu.
17
Setting Up the Telephone
Step-by-Step
Factory default
This function resets all adminstration and user parameters to the factory default values.
You can also access this function via the web interface
Page 44.
Prerequisite: You are in the hidden "Service" menu
Page 15.
Factory default
OK Select and confirm.
Yes Confirm.
The handset makes a restart.
No Cancel, back to menu.
Clean up
This function deletes all user-initiated entries in the:
• phone book
• call list
• ringer tones
You can also access this function via the web interface
Page 40.
Prerequisite: You are in the hidden "Service" menu
Page 15.
Clean up
OK Select and confirm. A warning message is displayed.
Yes Confirm.
The handset makes a restart.
No Cancel, back to menu.
Backlight Switch
Using this function you can set the backlight duration
when the handset is not used.
Possible values: 5 to 60 seconds.
Prerequisite: You are in the hidden "Service" menu
Page 15.
Backlight Switch
OK Select and confirm.
Select desired value.
Î Cancel, back to menu.
Save Save setting.
18
Administration
Administration
The execution of administration tasks requires a good general know-how
about networking (similar to the know-how of network administrators).
The chapter "Alphabetic Reference" Page 39 provides more background
information.
The web interface provides unlimited access to all aministration menus.
• "Web Interface" Page 20
There are some limitations for local administration via the telephone.
• "Set up WLAN Profile" Page 12
If you use the Deployment Tool (see the Administration Manual for the Deployment Tool), you also have unlimited access to all adminstration menus.
Administration of an optiPoint WL 2 professional is only possible
while the telephone is in idle mode.
19
Administration
Step-by-Step
Web Interface
General Information
The optiPoint WL 2 professional is equipped with a
HTTP web server that permits the mapping of information from the handset to a web browser on a PC integrated into the WLAN ("web interface").
The IP data for the optiPoint WL 2 professional
and the PC must be configured correctly (please
contact your administration staff).
The web interface contains the following form elements:
Admin Click this link to access the relevant page.
Click this button to accept the changes in the current
form. This transfers the changes to the
optiPoint WL 2 professional.
Click this button to reset the changes in the current
form to the values currently stored in the
optiPoint WL 2 professional.
Select an option from the list field.
Click a checkbox or radio button to activate/deactivate a
function.
20
Administration
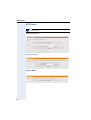
Preparation
Open the web interface
To evoke the web interface, open a web browser and enter the following
URL:
http://[IP of the optiPoint WL 2 professional]
Web browser settings:
• Java Script activated
• Frame Support active
• Popup windows permitted
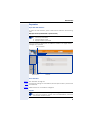
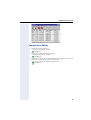
The start screen is displayed in an additional window. The page "Status"
( Page 23) is opened:
User selection
Main menu
Content
User Selection
Status See "Handset" Page 23.
User User-specific settings for the handset (see the optiPoint WL 2 professional
User Manual).
Admin Administration of the handset Page 22.
Logout
When you have finished editing the settings, leave the Administration section through the "Logout" link in the Main Menu; otherwise
the handset remains locked.
21
Administration
"Admin" Main Menu
•
•
Network
– Profile Selection Page 24
– Profile Name Page 24
– IP Addresses Page 25
– IP routing1 Page 25
– WLAN Page 26
– WLAN Security Page 26
– Gatekeeper Page 28
Audio Settings Page 29
Dialling settings Page 29
LDAP Settings Page 30
DLS Settings Page 30
Location Server Page 31
VPN settings Page 31
Quality of Service Page 32
– Protocol Settings Page 32
– Monitoring Settings Page 32
System Settings
– Handset PIN Page 33
– Reset User Data Page 33
– Admin PIN Page 33
– Handset Restart Page 33
– SNMP settings Page 33
FTP Transfer
– FTP Settings Page 34
– Backup and Restore Page 34
– Firmware Update Page 35
– LDAP Update Page 35
HTTP Transfer
– Backup and Restore Page 36
– Firmware Update Page 36
Factory Reset Page 36
Certificates Page 37
Diagnostics
– Diagnostics Page 37
– RTP Statistics Page 38
Logout Page 21
1.
is only displayed if no DHCP server is available.
•
•
•
•
•
•
•
•
•
•
•
•
•
22
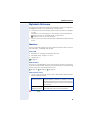
Administration
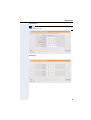
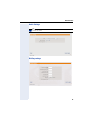
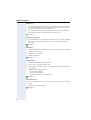
Handset
Click a field in one of the screenshots to obtain more information
about the field.
23
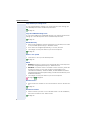
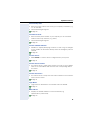
Administration
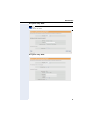
Network
Click a field in one of the screenshots to obtain more information
about the field.
Profile Selection
Profile Name
24
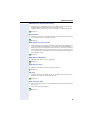
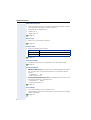
Administration
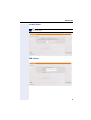
IP Addresses
Click a field in one of the screenshots to obtain more information
about the field.
IP Routing
25
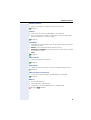
Administration
WLAN
Click a field in one of the screenshots to obtain more information
about the field.
WLAN Security
Encryption using "WPA-PSK"
26
Administration
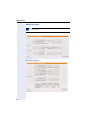
Encryption using "WEP"
Click a field in one of the screenshots to obtain more information
about the field.
Encryption using "WPA"
27
Administration
Gatekeeper
28
Administration
Audio Settings
Click a field in one of the screenshots to obtain more information
about the field.
Dialling settings
29
Administration
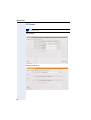
LDAP Settings
Click a field in one of the screenshots to obtain more information
about the field.
DLS Settings
30
Administration
Location Server
Click a field in one of the screenshots to obtain more information
about the field.
VPN settings
31
Administration
Quality of Service
Click a field in one of the screenshots to obtain more information
about the field.
Protocol Settings
Monitoring Settings
32
Administration
System settings
Click a field in one of the screenshots to obtain more information
about the field.
Handset PIN
Reset User Data
Admin PIN
Handset Restart
SNMP settings
33
Administration
FTP Transfer
Click a field in one of the screenshots to obtain more information
about the field.
FTP Settings
Backup and Restore
34
Administration
Firmware Update
Click a field in one of the screenshots to obtain more information
about the field.
LDAP Update
35
Administration
HTTP Transfer
Click a field in one of the screenshots to obtain more information
about the field.
Backup and Restore
Firmware Update
Factory Reset
36
Administration
Certificates
Click a field in one of the screenshots to obtain more information
about the field.
WLAN Client, WLAN Root, VPN
Diagnostics
Diagnostics
37
Administration
RTP Statistics
Click a field in one of the screenshots to obtain more information
about the field.
38
Alphabetic Reference
Alphabetic Reference
This glossary provides basic information required to perform configuration
and diagnostic tasks on the optiPoint WL 2 professional.
•
The section "Functions" explains terms found in the menus in alphabetic order.
Clicking the icons will bring you to the relevant function descriptions:
Using the icons on the optiPoint WL 2 professional
Using the icons via the web interface
•
After this section you will find the chapter "Abbreviations and Technical
Terms".
Functions
For more information please see the relevant documents about "networking technology", " WLAN" and " VoIP".
Admin PIN
•
Password for accessing the administrator area.
•
Permitted values: integer or no entry
•
Length max.: 4
Page 33
Authentication
This task- or user-dependant access control feature protects system functions from being misused. Authentication ensures that the communicating
partner really is the one he/she claims to be.
Page 26,
Page 27,
Page 27,
Authentication mode
•
This is where you activate the process of identification (authentication
mode) of WLAN stations.
Shared key
(secure process)
During authentication the Access Point (AP)
checks whether a valid key is available via a challenge/response process. Associated stations can
only transfer data after the check was completed
successfully.
Open system
(default process)
Any station can associate with an Access
Point (AP) and receive unencrypted data.
Page 13
Page 26
39
Alphabetic Reference
Backup and Restore via FTP or HTTP
•
Click "Backup" to save your personal settings in a file on your PC.
•
If a HTTP connection is available, click "Browse" to locate and load the
file you want.
•
Click "Restore" to re-load the previous settings for your
optiPoint WL 2 professional.
•
In case of an FTP connection the following parameters must be set up
or known:
– File name
FTP Server Address
FTP Account Name
FTP User Name, FTP Password
Page 34,
Page 36
Certificate
•
Select the desired certificate here.
Page 27
Channel
To make sure that different WLANs do not interfere with each other,
the frequency range is divided into channels (recommended distance: 3 channels). All devices associated with a WAN have to use
the same channel!
The channel used by the handset for transmission is predetermined
by the access point. The handset scans for an access point with the
SSID set in the handset. If there are several access points using the
same SSID on different channels within the coverage of the handset, the channel setting determines the selection of the access
point. The driver first attempts to locate the access point using the
desired SSID on the desired channel. If this is not found, the driver
searches the other channels.
•
up to 13 channels
•
Select the channel set in the access point.
Page 26
Clear all user data
•
This function deletes all user-initiated entries in the
optiPoint WL 2 professional (including phone book entries). Settings
for handset and network are not deleted.
Page 33
40
Alphabetic Reference
Codec
•
Select the desired audio transmission method from the list.
Codec
Audio Mode
G.722 preferred
(high quality)
Usage
Suitable for broadband intranet
connections and mobile telecommunication networks.
G.711 preferred
(normal quality)
uncompressed
Use uncompressed voice transmission ( G.711).
G. 723 preferred
(low bandwidth)
compressed
only
Suitable for low bandwidth connections.
G. 729 A/B preferred compression
(low bandwidth)
preferred
Suitable for connections using different bandwidths.
G. 723 only
(low bandwidth)
G. 729 A/B only
(low bandwidth)
Page 29
Compressing Codec type
•
Compressed Codec
•
Lost packets (in per thousand): These packets were lost during the
transmission. The value is the ratio of packets lost to the total number
of packets.
– Permitted values: 1 ... 255
– Default value: 10
•
Consecutive lost packets (unit: no. of packets): This function counts
how many packets were lost "in a row" (i.e. without interruption by
transmitted packets). If the value counted is higher than the selected
value, the threshold value has been exceeded.
– Permitted values: 1 ... 255
– Default value: 2
•
Consecutive good packets (unit: no. of packets): This function counts
how many packets were transmitted "in a row" (i.e. without interruption
by lost packets). If the value counted is lower than the selected value,
the threshold value has been excedeed.
– Permitted values: 1 ... 255
– Default value: 8
Page 32
41
Alphabetic Reference
Copy Gatekeeper settings from
To copy the gatekeeper settings of an existing profile when setting up a
new WLAN profile select the desired profile here.
Page 24
Copy IP and WLAN settings from
To copy the IP addresses and WLAN settings of an existing profile when
setting up a new WLAN profile select the desired profile here.
Page 24
Default Gateway
•
Enter the IP Address that was assigned to your PBX ( if this value
is not provided dynamically by a DHCP server).
•
If the value was assigned dynamically, it can only be read.
•
The change will only have effect if you restart the phone.
Page 25
Define a new profile
•
Click "New" to set up a new WLAN profile.
Page 24
DHCP
•
Enabled: Activate this option if the required IP data of the telephone
should be assigned dynamically by a DHCP server.
•
Disabled: If no DHCP server is available in the IP network, please deactivate this option. In this case the data corresponding to the
Handset IP Address, Subnet Mask, DNS Addresses (Preminary/Secondary) (Preminary/Secondary), and Default Gateway must
be defined manually.
•
The change will only have effect if you restart the phone.
Page 12
Page 25
DLS Server Port
•
Enter the Port number for the communication with the DLS server.
Page 30
DLS Server Address
•
Select whether you want to use a DNS name or an IP Address;
then enter the data for the DLS server.
Page 30
42
Alphabetic Reference
DNS Addresses (Preminary/Secondary)
•
Only enter the IP Addresses of the DNS server if these are not
assigned dynamically by a DHCP server and if the
optiPoint WL 2 professional is not connected to a PBX via HFA.
Page 25
Domain Name
•
Only enter the name of the domain if the optiPoint WL 2 professional
is not connected to a PBX via HFA.
Page 25
Drop Preference Levels for Voice
•
There are four priority classes ( DSCP Class for Voice) defined for Assured Forwarding. Independently, ressources (data rate/bandwidth,
buffer memory) are reserved for these classes. In case of an overload,
excess data packets are lost (packet loss). Using this function you can
set the packet loss probability for each class (Assured Forwarding 1-4):
Low, Medium, High.
Page 32
DSCP Class for Signalling
•
DiffServ Code Point Class for Signalling.
Page 32
DSCP Class for Voice
•
DiffServ Code Point Class for voice transmission.
Page 32
EAP Type
•
Activate one of the methods TLS or LEAP for encryption of the
authentication data in the EAP protocol.
Page 27
External Access Code
•
Enter the number that has to be dialled before an external phone number, e.g. "0".
•
Canonical Format Page 61.
Page 29
43
Alphabetic Reference
Emergency Number
•
Special parameter for use in the USA.
•
Enter the number that is to be dialled automatically after 1 second.
•
Length max.: 20
Page 28
Encryption WEP
•
Security feature based on a RC4 encoding. For each WLAN device
(e.g. optiPoint WL 2 professional) a secure key has to be stored. The
PMK is static and has to be entered manually on each client.
Page 13
Page 27
Encryption WPA
•
Security feature using an external RADIUS server for authentication
of the users.
Page 27
Encryption WPA-PSK
•
Security feature using a PSK for authentication. The PMK is static
and has to be entered manually on each client.
Page 13
Page 26
Encryption Type
•
Select one of the two encryption options: TKIP oder AES.
Page 26,
Page 27
Factory Reset
•
This function resets all administration parameters to the default factory
settings.
The reset can cause a complete failure of all functions of the
optiPoint WL 2 professional. Please make sure you have all the necessary information for setting up the system again Page 10.
Page 36
44
Alphabetic Reference
Firmware Update via FTP or HTTP
•
This function updates the telephone software of your
optiPoint WL 2 professional. The current Firmware Version is displayed under "Current firmware:".
•
In case of a Download via HTTP klick "Browse" to search for the relevant file.
•
In case of a Download via FTP the following parameters must be set
up or known:
– File name of the file to download
FTP Server Address
FTP Account Name
FTP User Name, FTP Password
•
Click "Update" to download the new firmware.
Page 35,
Page 36
Firmware Version
•
Displays the current version of the telephone software. This display includes information about the functions of the
optiPoint WL 2 professional and can change after an update of the telephone software ( Firmware Update via FTP or HTTP).
Page 23
Fragmentation Threshold
•
This value determines whether and at what size data packets are fragmented. In a 802.11-WLAN packets with sizes above this threshold are
fragmented, i.e. broken down into smaller pieces for transmission.
Packets with sizes below the specified threshold are not fragmented.
If the transmission error rate is increasing, you should increase the
fragmentation threshold. A low fragmentation threshold may reduce
the transmission performance.
•
Permitted Values: 256-2346 bytes
•
Default Value: 2346
Page 26
FTP Account Name
•
Length min.: 1 character
•
Length max.: 32 characters
Page 34
45
Alphabetic Reference
FTP Password
•
Enter the password defined in the FTP server as password for accessing this server.
•
The password must correspond to the FTP User Name.
•
Length min.: 1 character
•
Length max.: 32 characters
Page 34
FTP Port
•
Enter the Port number for the communication with the FTP server.
Page 34
FTP Server Address
•
Select whether you want to use a DNS name or an IP Address
and enter the corresponding data of the FTP server in order to be
able to execute uploads and downloads from and to the
optiPoint WL 2 professional.
Page 34
FTP User Name
•
Enter the name defined in the FTP server as user for accessing the
server.
•
The name must correspond to the FTP Password.
•
Length min.: 1 character
•
Length max.: 32 characters
Page 34
Gatekeeper address
•
Select whether you want to use a DNS name or an IP Address
and enter the corresponding data of the PBX the
optiPoint WL 2 professional is connected to.
Page 28
Gatekeeper Port
•
Enter the Port number for the communication with the Gatekeeper.
Page 28
46
Alphabetic Reference
Handset IP Address
•
Enter the IP Address for the optiPoint WL 2 professional unless this
value is provided dynamically by a DHCP server ( DHCP).
•
The change will only have effect if you restart the phone.
Page 25
Hanset PIN
•
Change the User PIN.
•
Permitted Values: numeric
•
Length min.: 4
•
Length max.: 9
Page 33
Handset Restart
•
This function triggers a restart of the optiPoint WL 2 professional.
Page 33
Hardware Version
•
This function displays the current hardware version of the
optiPoint WL 2 professional.
Page 23
Handset Name
•
This function displays the name you assigned to your
optiPoint WL 2 professional (see User Manual).
Page 23
Handset State
•
This function displays the current state of the
optiPoint WL 2 professional.
Page 23
International Access Code
•
Enter the prefix number for international phone numbers, e.g. "001".
•
Canonical Dialling Page 61.
Page 29
47
Alphabetic Reference
IP Routing
•
To have constant access to network subscribers of other domains you
can enter (in addition to the Default Gateway) a total of two more
network destinations (Route 1 and Route 2).
•
An IP Address of the domain and gateway and a Subnet Mask
must be entered for any other domain you wish to use.
Page 25
LDAP Server Address
•
If an LDAP server is used, select whether you want to use a DNS
name or an IP Address and then enter the corresponding data for
this server.
Page 30
LDAP Port
•
If an LDAP server is used, enter the Port number for the communication with this server.
•
Valid values: 1 ... 65535.
•
Default value: 389
Page 30
LDAP Update
•
This function loads an LDAP template.
•
Click "Load" to load the template file.
•
To complete the load procedure, the following parameters must be set
up or known:
– Name of the LDAP template
FTP Server Address
FTP Account Name
FTP User Name, FTP Password
Page 35
Local Area Code
•
Enter the local area code for your company location, e.g. "972" for Dallas/TX.
•
Canonical Dialling Page 61.
Page 29
48
Alphabetic Reference
Local Country Code
•
Enter the country code for the country your company is located in, e.g.
"+1" for the USA.
•
Canonical Dialling Page 61.
Page 29
Local District Code
•
Enter the main phone number of your company (i.e. the front desk
number without any extension, e.g. "443").
•
Canonical Dialling Page 61.
Page 29
Location Identifier Number
•
Number for uniquely identifying a location. In case of e.g. an emergency this number can be used to identify where the emergency call was
initiated.
Page 28
Location Server
•
Mark Enable if a location server is integrated into your system.
Page 31
Location Server Address
•
If a location server is used, select whether you want to use a DNS
name or an IP Address and then enter the corresponding data for
this server.
Page 31
Location Server Port
•
If a location server is used, enter the Port number for the communication with this server.
Page 31
Login Name
•
Login name for identification of a handset within the WLAN.
Page 27
MAC Address
•
Displays the MAC address of a network device (e.g.
optiPoint WL 2 professional).
Page 23
49
Alphabetic Reference
Minimal Session length
•
If the session (e.g. a call) is shorter than the defined minimum lenght,
no QoS report is sent.
Page 32
Mobility Password
•
If you forgot to cancel the subscriber number at the "host" telephone,
you can catch up on this at your "home" telephone after entering the
mobility password.
•
Permitted Values: alphanumeric
•
Length min.: 6
•
Length max.: 32
Page 28
National Access Code
•
Enter the number that has to be dialled before an external phone number within your country, e.g. "0".
•
Canonical Dialling Page 61.
Page 29
Network Name (SSID)
•
Enter a name for the WLAN profile.
If you scanned for existing SSIDs and selected an available SSID
( SSID Scan), the corresponding name as well as all settings are
already entered; this can be used as a basis (overwrite is enabled).
•
To enable access to the WLAN, all stations have to be configured
with the correct SSID (Network name). If the SSIDs do not match,
the user is denied access to the network.
•
Permitted Values: alphanumeric
•
Length max.: 32 characters
Page 26
Non-Compressing Codec type
•
non-compressing Codec.
•
Explanation Page 41.
Page 32
Output power
•
Specification (in percent) of the transmitting power.
Page 26
50
Alphabetic Reference
Password
•
Password for access to the WLAN.
Page 27
PING Test
•
Run this PING test to check whether a server or another terminal device (e.g. the optiPoint WL 2 professional) can be reached in the network. Available addresses from the list:
– Gatekeeper address
– DLS address
– FTP server address
– SNMP Trap server address
– LDAP server
– Gateway
– DNS 1
– DNS 2
•
other Ping test:
Select whether you want to use a DNS name or an IP Address.
•
Enter the address or the name of the test target.
•
Click "Ping" to test the connection.
Page 37
Preamble Type
•
Define the length of the CRC to detect errors in data transmissions.
Page 26
Prefer Preparation Editor
•
Using this checkbox you can change the function of the talk key in idle mode.
Checkbox marked
short press: open redial list
long press: start dial (normal)
Checkbox unmarked short press: start dial (normal)
long press: start "dial preparation"
Page 29
Pre-Shared Key
•
Enter the PSK here.
•
Permitted Values: alphanumeric
•
Length min.: 8 characters
•
Length max.: 32 characters
Page 13
Page 26
51
Alphabetic Reference
Priority for Signalling
•
Can only be set if VLAN Mode is active.
•
Select a value from the list to set the priority for signalling.
•
Permitted Values: None, 0-7
Page 32
Priority for Voice
•
Can only be set if VLAN Mode is active.
•
Select a value from the list to set the priority for voice transmissions.
•
Permitted Values: None, 1-7
Page 32
Profile list
•
Displays all profiles set up (max. 16) and the most important data about
these profiles.
•
Click "Edit" to edit one of the profiles.
•
Mark the checkbox "Active" to activate one of the profiles.
•
Click "Delete" to delete a profile without being asked for confirmation.
Page 24
Profile Name
•
Enter the name for the new profile.
•
Permitted Values: alphanumeric
•
Length max.: 32
Page 24
Profile number
•
You can set up up to 16 profiles.
•
Select the number of the profile to be edited.
Page 24
QCU server address
•
Select whether you want to use a DNS name or an IP Address
and then enter the corresponding data for the QCU server that will be
used for logging the QoS data.
Page 32
52
Alphabetic Reference
Redial list
•
Mark this checkbox to store the last 10 numbers dialled from the
optiPoint WL 2 professional in a redial list.
Page 29
Report interval
•
Time interval (in seconds) after which reports are sent.
•
A QoS report is sent for each report interval if the report mode ( Send
a report (report mode)) was set accordingly.
•
Valid values: 10 ... 3600.
Page 32
Retrieve a certificate
•
Select a page from the main menu to load the appropriate certificates
for your Ihr optiPoint WL 2 professional:
– WLAN client
– WLAN server
– VPN
•
Click "Browse" to select the corresponding file on your PC.
•
Click "Update" to load the file.
Page 37
Roaming Threshold
•
If the WLAN comprises multiple access points using the same SSID
and the same channel, the handset can change between the access
points without interrupting the connection. In case the handset is moved outside of the coverage of an access point it is supposed to set up
a connection with the next access point of the WLAN.
•
Set the minimum value for the signal strength from the access point.
•
Permitted Values: integers from 0 - 100 (mW)
Page 26
RTS/CTS Threshold
•
This is a virtual collision recognition method. One station tells all the
other stations how long it will use the line to send a data frame and receive the acknowledgment.
•
Enter the packet size at which the RTS/ CTS method shall be triggered.
•
Permitted Values: 1-2347 bytes
Page 26
53
Alphabetic Reference
RTP Packet Size
•
Depending on the Codec selected you can select the RTP packet
size here. In case of "G.723 preferred/only" there is no selection possible - the value is determined automatically.
Page 29
RTP Statistics
•
Displays statistical data about RTP that can be retrieved by entering
the report number.
Page 38
Select a certificate
•
Select a page from the main menu to delete certificates no longer
needed:
– WLAN client
– WLAN server
– VPN
•
Select the appropriate certificate from the list.
•
Click "Delete".
Page 37
Send a report (report mode)
•
Select the mode for report generation:
– OFF: deactivate report mode
– EOS Threshold exceeded: A report will be sent at the end of the
session only if the threshold was exceeded.
– EOR Threshold exceeded: A report will be sent at any report interval ( Report interval) if the threshold was exceeded.
– EOR (End of Report Interval): At the end of each session a report
will be sent.
– EOS (End of Session): A report will be sent at any report interval
( Report interval).
Page 32
Send to QCU
•
Select Yes if a QCU server is set up and if the QoS data are to be
logged on this server.
Page 32
Send SNMP Traps
•
Select Yes if errors occurring in network components are to be logged.
Page 32
54
Alphabetic Reference
Set logout time
•
Set the time interval after which the optiPoint WL 2 professional shall
leave the administration mode automatically if there is no activity.
Page 33
Silence Suppression
•
Mark this switch to suppress the background noise during breaks in a
communication.
Page 29
SNMP Password
•
Specify the password that was defined in the SNMP server as the
password for accessing this server.
•
Permitted Values: alphanumeric
Page 33
SNMP Trap Server Address
•
If an SNMP server exists in the network, select whether you want
to use a DNS name or an IP Address and enter the corresponding
data for this server.
Page 33
SSID Scan
•
Click "Scan" to display the existing SSIDs ( SSID (Network name)).
Select the desired SSID from the list. All settings are displayed; this can
be used as a basis (overwrite is enabled).
Page 26
Subnet Mask
•
Enter the Subnet Mask for the optiPoint WL 2 professional if this
value is not provided dynamically by a DHCP server ( DHCP).
•
The change will only have effect if you restart the phone.
Page 25
Subscriber number
•
Enter the subscriber number for the optiPoint WL 2 professional.
•
The number can be between 1 and 20 digits.
•
The subscriber number is the number that is used as the internal calling
number.
Page 28
55
Alphabetic Reference
Subscriber Password
•
Using this password you can transfer the subscriber number including
the configuration settings to another telephone.
•
Permitted Values: alphanumeric
•
Length min.: 6
•
Length max.: 32
Page 28
System type
•
Select your communication platform.
Page 28
Transfer mode
•
Select the WLAN transfer mode:
Mixed Mode
various modes
only 802.11b
802.11b only (11 Mbit/s)
only 802.11g
802.11g only (up to 54 Mbit/s)
Page 26
Transmission Rate
•
The WLAN transmission rate depends on the Transfer mode.
Page 26
Threshold settings
•
Maximum jitter (in ms): The jitter value is checked against this threshold. The jitter value is measured between two consecutive RTP
packets.
– Valid Values: 1 ... 255
– Default Value: 15 ms
•
Average Round Trip Delay (in ms): Round Trip Delay is the total of the
transmission duration in both directions.
– Valid Values: 1 ... 65535
– Default Value: 100 ms
Page 32
User Settings
•
This function deletes all user settings in the
optiPoint WL 2 professional. Phone book entries and network settings
will be maintained.
Page 33
56
Alphabetic Reference
Validate Certificate
•
Mark this checkbox to validate the selected certificate.
Page 27
VLAN id
•
Can only be set if the VLAN Mode is set to "Manual".
•
Enter a value from 0 to 4094. If VLANs are used, this value determines the affiliation to a certain VLAN.
Page 32
VLAN Mode
•
•
•
•
Determine the location from where the VLAN id shall be retrieved if
VLANs are used.
Manual: The ID entered under VLAN id is used.
Automatic (over DHCP): If a DHCP server is used, the ID provided
by this server is used.
None:
Page 32
VPN Certificate
•
Select the appropriate certificate.
Page 31
VPN settings
•
Use this function if you want to secure your WLAN using a VPN.
Page 31
VPN User Name and Password
•
This option is only displayed if VPN settings are activated.
Page 31
WEP key
•
•
•
Enter the WEP key.
Permitted Values: alphanumeric
Length max.: 26, length depends on the WEP mode
Page 13
Page 27
57
Alphabetic Reference
WEP mode
•
Select the desired encryption (64 or 128 bit) for the WEP key.
WEP encryption 128 Bit in the optiPoint WL 2 professional is defined with 13/26 characters. This value has to match the number of
characters defined for the WEP encryption of the access point used.
Please read the section about WEP encryption in the access point
documentation!
Example: The optiPoint WL 2 professional is set to WEP encryption
128 bit. In the optiPoint WL 2 professional, this is defined as 13/26
characters.
In the access point WB500, however, 16/32 characters are defined
for WEP encryption using 128 bit. The number of characters in the
optiPoint WL 2 professional and the WB500 do not match. Therefore, set the WEP encryption in the WB500 to 104 bit as this matches the number of characters of 13/26.
Page 13
58
Page 27
Alphabetic Reference
Abbreviations and Technical Terms
For further information please refer to the literature available about network technologies and VoIP.
802.1x
Port Based Network Access Control. This standard defines client-server
based access control and authorization and prevents access of unauthorized clients to networks using public ports.
Access Point (AP)
The AP in a WLAN transports data packets between the various participants and is the "bridge" to cabled networks. The AP has a wireless connection to all associated network nodes, and handles central functions
such as filtering, roaming, and security.
AES
Abbreviation for "Advanced Encryption Standard".
Symmetric encryption algorithm specifying three different key sizes (128,
192 and 256 bit).
Codec
Software or hardware entity that converts audio or video signals in realtime
based on a predefined method.
CRC
Abbreviation for "Cyclic Redundancy Check".
Error correction method that creates checksums for binary numbers by calculating the sums of data blocks prior to transmission.
CTS
Abbreviation for "Clear to send".
Port control signal. A station with data to send transmits an RTS packet.
If the path to the target is free, it receives a CTS packet in response.
DHCP
Abbreviation for "Dynamic Host Configuration Protocol".
Dynamic assignment of IP addresses for endpoints in an IP network using
a central DHCP server.
DLS
Abbreviation for "Deployment License Service".
DLS is a HiPath Management application for the administration of workpoints (optiPoint telephones and optiClient installations) in HiPath- and
non-HiPath networks.
59
Alphabetic Reference
DNS
Abbreviation for "Domain Name System".
Internet service for the translation of human-readable hostnames into IP
Addresses.
EAP
Abbreviation for "Extensible Authentication Protocol".
The EAP protocol is a basic component for secure centralized environments. It is an extension of the PPP protocol which in turn is based on
802.1x.
E.164
An addressing standard for telephone numbers according to the international ITU standard using a maximum of 15 digits. Usually, these numbers
comprise: CC (Country Code), NDC (National Destination Code), and SN
(Subscriber Number).
FTP
Abbreviation for "File Transfer Protocol".
Is used for transferring files in networks, e.g. to update telephone software
Page 45.
Radio Cell
A radio cell is the geographical area covered by a cellular telephone transmitter.
G.711
Audio protocol for uncompressed voice transmission. Requires a bandwidth of 64 kbit/s.
G.722
Audio protocol for uncompressed voice transmission. Requires a bandwidth of 128 kbit/s. This voice transmission method provides best quality.
G.723
Audio protocol for compressed voice transmission. The quality is lower
than in G.711 and G.729. Requires a bandwidth of about 6 kbit/s.
G.729
Audio protocol for compressed voice transmission. The quality is lower
than in G.711 and higher than in G.723. Requires a bandwidth of
about 8 kbit/s.
60
Alphabetic Reference
Gateway
Mediation component between two different network types, e.g. IP
network and ISDN network.
HFA
Abbreviation for "Hicom Feature Access".
Provides the connection between IP telephones and a PBX via a
gateway (e.g. HG 1500 or HG 3530) .
HTTP
Abbreviation for "Hypertext Transfer Protocol".
Protocol for the transfer of data in IP networks.
IP
Abbreviation for "Internet Protocol".
IP Address
Also abbreviated to IP. The unique address of a termial device in the network. It consists of four number blocks of 0 to 255 each, separated by
dots. To simplify the notation voice names can be translated into IP addresses by a DNS.
Jitter
Runtime fluctuations in data transmissions in IP networks.
Canonical dialling
Canonical format is an international standard for dialling numbers. In order
to be able to dial numbers in this format, certain rules (conversion information) have to be set.
Example for a number in canonical format:
Local District Code
Direct Line
+49 (89) 72212345
Phone Number
Local Area Code
Country Code
LAN
Abbreviation for "Local Area Network".
61
Alphabetic Reference
Layer 2
2nd layer (Data Link Layer) of the 7-layer OSI model for describing data
transmission interfaces.
Layer 3
3rd layer (Data Link Layer) of the 7-layer OSI model for describing data
transmission interfaces.
LDAP
Abbreviation for "Lightweight Directory Access Protocol".
Simplified protocol for accessing standardized directory systems, e.g. a
company telephone directory.
LCD
Abbreviation for "Liquid Crystal Display".
Display of numbers, text or graphics using liquid crystal technology.
LEAP
Abbreviation for "Lightweight Extensible Authentication Protocol".
LEAP is an authentication method using a common user name and password for the server and the wireless client.
LED
Abbreviation for "Light Emitting Diode".
Cold light illumination in different colors at low power consumption.
MAC
Abbreviation for "Medium Access Control Address".
A 48 bit address with the help of which any terminal device in a network
(e.g. IP telephone or network card) identifies itself uniquely all over the
world.
MIB
Abbreviation for "Management Information Base".
Database containing descriptions and error messages of the devices and
functions within a network.
PBX
Abbreviation for "Private Branch eXchange".
Private telephone system that connects the different internal devices to
the ISDN network.
62
Alphabetic Reference
PING
Abbreviation for "Packet Internet Groper".
Program used for testing whether a connection to a specific IP target
can be established. In this test, data are sent to the target and sent back
by the target. The result displays success/failure of the transmission and if available - additional information such as duration of the transmission.
PKI
Abbreviation for "Public Key Infrastructure".
Environment providing services for encryption and digital signatures based
on public key methods.
Port
Ports are used in IP networks to enable several communication connections simultaneously. Different services often have different port numbers.
PMK
Abbreviation for "Pairwise Master Key".
PSK
Abbreviation for "Pre-Shared Key".
Common key. A key is a pre-generated bit combination; this is used - on
the sender’s side - to convert normal text into an encrypted text and - on
the receiver’s side - to convert the encrypted text back into normal text.
QoS
Abbreviation for "Quality of Service".
Describes the quality (performance) of a voice connection via IP networks. Factors determining the QoS are e.g. packet loss rate, round trip
delay, reserved bandwidth, type of bitrate (variable, constant or unspecified), or bitrate.
RAM
Abbreviation for "Random Access Memory".
Memory with read / write access.
RADIUS
Abbreviation for "Remote Authentification Dial-In User".
Client-server based security protocol for authentification and checking network access rights.
63
Alphabetic Reference
RC4
Symmetric encryption algorithm where keys are generated by a random
number generator. RC4 uses a secret key known only to sender and destination. The key can be up to 2,048 bits long. Every character is individually
encrypted. Although RC4 is quite straightforward, it is considered very secure.
ROM
Abbreviation for "Read Only Memory".
Memory with read only access.
RSA
Abbreviation for "Rivest Shamir Adleman".
Asymmetric encryption algorithm named after it’s inventors.
RTP
Abbreviation for "Realtime Transport Protocol".
This protocol is used for network-based video and audio communication.
The protocol detects and corrects missing, duplicate or incorrectly sequenced data packets using a 16-bit sequence number.
RTS
Abbreviation for "Request To Send".
SIP
Abbreviation for "Session Initiation Protocol".
Protocol standard for initializing calls in IP networks.
VLAN
Abbreviation for "Virtual Local Area Network".
Division of a IP network in separately managed sections (domains). One
option for identification of membership in a VLAN is the use of VLAN
ids.
SNMP
Abbreviation for "Simple Network Management Protocol".
This protocol is used to communicate with servers executing network
management functions, e.g. logging of errors in network components (SNMP traps).
SNTP
Abbreviation for "Simple Network Time Protocol".
This protocol is used between time servers and terminal devices in a network to synchronize the time settings of the terminal devices.
64
Alphabetic Reference
SRSR
Abbreviation for "Small Remote Sites Redundancy".
SSID (Network name)
Abbreviation for "Service Set Identification".
Network key in a WLAN. The Access Point (AP) sends the SSID at regular intervals.
Subnet Mask
Classifies networks into type A, B, and C networks. Each class comprises
a subnet mask, masking out the relevant bits. 255.0.0.0 for Class A,
255.255.0.0 for Class B, and 255.255.255.0 for Class C. Example: In a
Class C network 254 IP Addresses are available.
Switch
Switching center in a network.
TKIP
Abbreviation for "Temporal Key Integrity Protocol".
Encryption standard using (like WEP) the RC4 algorithm. The key
changes on the fly when a data packet of 10 KB was transmitted. Is used
in WPA.
TLS
Abbreviation for "Transport Layer Security".
Security protocol using a 128 bit encryption technology. In WLANs, TLS is
used in combination with the EAP protocol to provide a secure exchange of authorization data. EAP-TLS requires certification from both client and server.
URL
Abbreviation for "Uniform Resource Locator".
A URL is an address format for a file that can be accessed via the internet.
The type of file is determined by the access protocol (not the file type!).
The HTTP protocol, for example, supports HTML pages, Java applets, CGI
scripts, etc. The URL consist of:
•
the access protocol;
•
a host name (the domain);
•
a specific filename.
VoIP
Abbreviation for "Voice over IP".
Voice transmission using IP technology.
65
Alphabetic Reference
VPN
Abbreviation for "Virual Private Network".
Virtual private networks are set up to ensure secure data transfer via the
insecure internet. For the transmission an encrypted connectsion (VPN
tunnel) is set up.
WAP
Abbreviation for "Wireless Application Protocol".
Synonym for graphical applications on mobile phones, organizers and other
suitable terminal devices which are transferred according to the standards
of the wireless application protocol.
WEP
Abbreviation for "Wired Equivalent Privacy".
Encryption method used in a WLAN.
WLAN
Abbreviation for "Wireless LAN".
Wireless local network based on radio or infrared transmission.
WPA
Abbreviation for "WiFi Protected Access".
Encryption method used in a WLAN. WPA provides higher security than
WEP.
WPS
Abbreviation for "WLAN Positioning System".
66
Administration Scenarios
Administration Scenarios
Setup failed
Check your configuration against one or more of the following questions:
Is the optiPoint WL 2 professional operated within a VLAN?
•
Enter the VLAN ID manually or (if a DHCP server is used) set "VLAN
Mode" Page 57 to "DHCP" so that the VLAN ID provided by the
DHCP server is used.
– For more information about "VLAN id" Page 57.
Page 32
Is the optiPoint WL 2 professional operated behind a Gateway?
•
Enter the IP Address of the gateway in the Default Gateway field.
Page 25
Determine the Software Version
You can determine which software version the optiPoint WL 2 professional
is operating on, e.g. before an upcoming software update.
Page 20
Check Connections
•
Check the connections using the PING test.
– For more information about the "PING Test" Page 51.
Page 24
67
Administration Scenarios
Set up FTP server
There are various upload / download options for for the
optiPoint WL 2 professional.
•
Using a web interface in an internet browser (e.g.
Internet Explorer 5.5),
Page 20.
•
Using the "Deployment Tool" (part of HiPath Manager E).
This is useful for managing more than one telephone simultaneously.
For more information see the Administration Manual of the Deployment Tool.
In both cases you need a fully configured FTP server to exchange data via
FTP. The server program must be running on a computer (e.g. PC) in the
same LAN as the optiPoint WL 2 professional.
The following section describes (as an example) the setup of the server
program "3CServer" produced by "3Com".
Installation and configuration
1. Install the software (e.g. "3CServer", can be downloaded from http://
www.3com.com).
2. Start the server program.
3. You can set up user profiles or enable anonymous access (as in the example). This is the easier version; however, assigning different rights
for different users is not possible in this case.
Select File → Config → FTP configuration and enter a directory path
and name into the field Anonymous Upload/Download directory;
this is the directory that will be used for data exchange.
4. Confirm with OK.
In the main window of the program you see the connection data as
soon as there is a data transfer.
68
Administration Scenarios
Improve Voice Quality
•
Change the QoS parameters.
– For more information QoS.
–
Page 32
•
Change the audio compression setting.
– For more information Codec
–
Page 29
•
Activate the suppression of background noise during breaks in a communication for the optiPoint WL 2 professional.
– For more information Silence Suppression
–
Page 29.
69
Administration Scenarios
Step-by-Step
Error Messages and Troubleshooting
No IP Address
No IP address
The DHCP cannot assign an IP address to the handset
Page 47.
Possible solution:
Check the DHCP server.
No Network
No Network
The handsed cannot find the network.
Possible solution:
Check the network profile.
Registration failed
No System
Invalid PBX number Page 46, subscriber number
Page 55, and/or subscriber password Page 56.
Possible solution:
Change gateway address Page 46.
Change subscriber number Page 55.
Change subscriber password Page 56.
FTP error messages
Error:
<Error string>
FTP parameter missing
EXIT?
Error during file upload/download:
There was an error during the data transmission. The
display shows a corresponding error message.
Not all of the necessary FTP parameters are set.
Possible solution:
Enter FTP Account Name Page 45.
Enter FTP Password Page 46.
Enter FTP User Name Page 46.
70
Administration Scenarios
Step-by-Step
Other Error Messages
No Database
The connection to or the registration with the database
failed.
PABX not found
No IP connection to the gateway.
Client not registered
The telephone is not properly set up for the PABX.
Reject cause unknown
No client licenses available in the gateway.
(Empty display) Power failure Page 10.
71
Editors
Editors
Most entry fields are pre-defined or offer options for selection (exception:
Text Editor).
Navigation in entry fields
The blinking signal shows the current position of the cursor.
During entry pre-defined numbers or wildcards are overwritten.
Press this key to move the cursor to the left.
Press this key to move the cursor to the right.
Cancel an entry
The entry is cancelled without saving.
Î Press the display key.
Press the end call or talk key.
Pre-defined entry fields
Integer Editor
Permitted: Q ... O, if necessary .
Q Press key long to enter "+" (only available at the first place place in the entry field).
Example: International country code +22
W Press the display key to delete highlighted characters.
IP Number Editor
Permitted: Integer values from 0 to 255
Pre-defined default value: 000.000.000.000
Example: 192.168.001.050
Options Editor
Permitted: Pre-defined values
Select value.
Save Press the display key to save the selected option.
72
Editors
Text Editor
Character entry is performed by multiple presses of the keypad keys according to the following tables. This also applies to the entry of alphanumeric passwords.
Example: "R" = press the key 1x time and the key M 3x times.
Key
I
L
M
N
O
Q
1x 2x 3x 4x 5x 6x 7x 8x 9x 10x 11x 12x 13x 14x 15x
[1]
1 â £ $ ¥ ¤
a b c 2 ä á à â ã ç
d e
f
3 ë é è ê
g h
i
4
ï
í
ì
î
j
k
l
5
m n o 6 ö ñ ó ò ô õ
p q
r
s 7 ß
t
u v 8 ü ú ù û
w x y z 9 ÿ ý æ ø å
.
,
?
! 0 + : ¿
¡
/
"
'
;
_
[2] [3]
*
# @ \ & §
[1]Space
[2]Next character as capital letter (max. active for 1 second)
[3]Switch to numeric input
73
Appendix
Appendix
Functions of Passwords and PINs
Password
Function
User PIN
Saves the user-specific settings in the
optiPoint WL 2 professional.
Administrator PIN
Protects the adminstration area from unauthorized access.
FTP Password
Protects file transfers (e.g. firmware downloads).
HiPath Password
Protects the settings for communication
with other HiPath devices.
SNMP Password
(Community string)
Protects the SNMP server (e.g. error protocol evaluation) from unauthorized access.
Subscriber Password
Protects the transfer of the subscriber number (incl. configuration settings) to another
telephone.
Cancel Mobility Password
Protects cancellation if the subscriber number was transferred to another telephone.
Technical Data
WLAN Standard
802.11g (Fall-Back to 802.11b)
Frequency range
2,4 - 2,497 GHz
Selectable channels
13 (ETSI) or 11 (North America)
Distance[1]
up to 300 m outside of buildings,
up to 30 m inside buildings
Power requirements
Li-Ion-Akku 3,7 V
Environmental specifications
operating)
+5 °C to +45 °C;
20 % to 75 % humidity
Physical dimensions handset
132 x 52 x 22 mm (L × B × H)
Weight handset incl. batteries
approx. 110 g
[1]The distance depends on the environment, in particular the materials between the Access
Point and the WLAN telephone.
74
Appendix
Operating / Charging Hours
Stand-by time
up to 60 hours[1]
Operating hours
up to 4 hours[1]
Charging hours
approx. 2 hours[1]
[1]These values are only valid if the recommended batteries are used.
Factors influencing standby and talk times
Standby time is the time when the handset is not in use (for example, no
calls or other user operation). Talk time is the time the handset is used for
making calls
Both periods are influenced by the battery charging status and the following factors:
• Field strength: he handset's range is heavily influenced by its surroundings and particularly by materials located between the access
point and the WLAN phone.
The further away the handset is from the WLAN access point, the
shorter the standby and talk times.
• Display lighting: Frequently activating the display for long periods of
time reduces standby time.
• Vibration alarm: Activating the vibration alarm reduces standby and
talk times.
• Codec: Power consumption is influenced by the packet length used for
voice transmission. In the case of G.711, for example, processing packet lengths of 10 ms requires more power than processing packet
lengths of 20 ms.
• Volume setting: Je lauter ein Parameter eingestellt ist, desto geringer
ist die Standby- und Sprechzeit.
• Further factors: Environmental conditions (for example, temperature)
also influence standby and talk times.
75
Index
Index
D
The colored page numbers take you to the
description of the operation via the following device/interface:
• Red: optiPoint WL 2 professional
• Green: web interface
• Bold: Explanation in the Alphabetic
Reference
Numerics
802.11x
Authentication mode
WEP key
WEP mode
39
57
58
59
67
39
39
B
Backup and restore
Batteries
Battery power
40
10
75
C
Certificate
select
Channel
Charging hours
Check connections
Clear all user data
Codec
Compression
Contrast setting
Create backup file
21
42
42
67
42
51
16
17
16
30, 42
42
43
43
43
E
A
Abbreviations
Administration Scenarios
Administrator PIN
Authentication mode
Deactivate lock
Default Gateway
Define a new profile
Determine the Software Version
DHCP
Dial with preparation editor
Display MAC address
Display operating hours
Display software version
DLS Server Address
DLS Server Port
DNS Addresses
Domain Name
Drop Preference Levels for Voice
54
40
75
67
40
29, 41
29
17
40
E.164 (Subscriber number)
EAP
Echo effect
Emergency number
Encryption mode
Error messages
Explanation of technical terms
External Access Code
28, 55
60
6
28, 44
44
70
59
29, 43
F
Factory settings
password,Function
Firmware update
Firmware Version
Fragmentation Threshold
FTP
Account Name
Password
Port
Server Address
Username
74
45, 48
45
45
34, 45
34, 46
46
34, 46
34, 46
G
G722 codec
Gatekeeper address
Gatekeeper Port
Gateway Port
76
29
28, 46
46
28
Index
H
Handset IP Address
Handset Name
Handset PIN
Handset restart
Handset State
Handset Version
Hardware Version
Hidden menu "Service"
47
23, 47
47
47
23, 47
23
47
15
10
48
K
Keypad lock
11
L
LDAP
Port number
Server address
Local Area Code
Local Country Code
Local District Code
Location Identifier Number
Location Server
Location Server Address
Location Server enable
Location Server Port number
Logout
30, 48
30, 48
29, 48
29, 49
29, 49
28, 49
31, 49
49
49
49
21
23, 49
50
N
Nameplate
National Access Code
National Dial Prefix
Navigation in entry fields
Network mode
50
8
O
Operating hours
Output power
75
50
Packet size
Password
Phone Identity
PING Test
Positioning system
Preamble Type
Profile list
Profile Name
Profile number
Profile selection
29
39
23
37, 51
17
51
52
52
52
24
Q
QCU server address
QoS for Ethernet
Priority for Signalling
Priority for Voice
QoS for IP
Drop Preference Levels for Voice
DSCP Class for Signalling
DSCP Class for Voice
52
52
52
43
43
43
R
M
MAC Address
Mobility Password
50
P
I
Installation of the telephone
IP Routing
Network Name
Non-compressing Codec Threshold
Values
Notes
6
50
29
72
50
Redial list
Release handset
Report interval
Report mode
Reset to factory default
Reset User Data
Reset user parameters
Restart Handset
Restore to factory defaults
Retrieve certificate
Roaming Threshold
RTS/CTS Threshold
53
21
53
54
18
33
18
33
36, 44
53
53
53
77
Index
S
Safety precautions
Serial number
Service menu
Access
Service menu, hidden
Set backlight duration
Set logout time
Set up FTP server
Set up profile
Setting Up
Setting Up the Telephone
Settings for WLAN profile
Setup failed
Silence Suppression
SNMP
active
Password
Server Address
Trap Port
SSID
Standby time
Subnet Mask
Subscriber number
Subscriber Password
Symbols
System Type
U
2
6
15
15
18
55
68
39, 43
10
10
26
67
29, 55
33
33, 55
33, 55
33
50
75
55
28, 55
28, 56
8, 39
56
T
Talk time
Technical Data
optiPoint WL 2 professional
Technical terms
Telephone software update
Threshold Settings
TLS
Transfer mode
Transmit rate
78
75
74
59
45
56
65
56
56
User PIN
User Settings
47
56
V
VLAN
ID
Mode
VPN
IP Address
VPN settings
57
57
57
57
31
W
WEP
Authentication mode
WEP key
WEP mode
WLAN
Settings
WLAN Profile
WPA
Encryption type
Group Rekey Intervall
WPA-PSK
Encryption type
Group Rekey Intervall
Pre Shared Key
39
57
58
26
24
44
47
44
47
51
www.siemens.com/hipath
The information provided in this document contains merely general
descriptions or characteristics of performance which in case of actual
use do not always apply as described or which may change as a result
of further development of the products.
An obligation to provide the respective characteristics shall only exist if
expressly agreed in the terms of contract.
The trademarks used are owned by Siemens AG or their respective
owners.
© Siemens AG 2005
Siemens Communications
Hofmannstr. 51 • D-81359 München
Ref. No.: A31003-A2056-W200-2-76A9
Subject to availability. Right of modification reserved.
Printed in the Federal Republic of Germany.
05.12.05