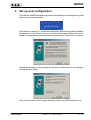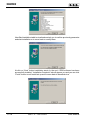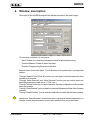
1
WINRDS
User Manual
Manufactured by
Italy
File Name:
CAPITOLI_EN.P65
Version:
1.0
Date:
10/07/2003
Revision History
Version
1.0
Date
Reason
10/07/2003
First version
Editor
G. De Donno
WINRDS - User Manual
Version 1.0
© Copyright 2003
R.V.R. Elettronica SpA
Via del Fonditore 2/2c - 40138 - Bologna (Italia)
Telefono:
+39 051 6010506
Fax:
+39 051 6011104
Email:
[email protected]
Web:
www.rvr.it
All rights reserved
Printed and bound in Italy. No part of this manual may be reproduced,
memorized or transmitted in any form or by any means, eletronic or
mechanic, including photocopying, recording or by any information
storage and retrieval system, without the permission of the copyright
owner.
WINRDS
Table of Contents
1.
1.1
1.2
1.3
2.
3.
4.
4.1
4.2
4.3
5
5.1
5.2
5.3
5.4
5.5
5.6
5.7
5.8
5.9
5.10
5.11
General Description
RDS system description
RDS encoder description
WINRDS software description
Minimums system requirement
Set up and configuration
Window description
Menù Toolbar
Encoder Address Toolbar
Encoder Programming Parameters Window
Parameters Setting
The Wizard
Site Address
DSN and PSN setting
RDS setting (PI/PSN/PTY/FLAG)
Time and Date (CT)
Radio Text setting (RT)
Frequencies setting (AF)
Groups configuration
PS Message setting
TDC setting
Free Format Group
User Manual
Rev. 1.0 - 10/07/2003
1
1
2
2
4
5
7
8
8
9
10
10
11
11
12
13
13
14
15
16
17
18
i
WINRDS
This page was intentionally left blank
ii
Rev.1.0 - 10/07/2003
Usem Manual
WINRDS
1. General Description
The necessity to immediately know the working parameters of several device in a
system or to transmit with all the several units which have to manage a firm, is a more
and more greater need in all circles.
The cordless broadcasting , for its simple installation and its great pliability, appears
as the more suitable solution in many circles.
In the broadcasting field too, the necessity to transmit not only the radio signals, but
also data package of different kinds, is already strongly felt for many years, because
it allows to better the quality and the reliability of the available services and at the end
to implement the new ones.
This necessity is also felt in the international field, so much that a proper research
team has constituted itself to identify the different necessities and to determine a
broadcasting standard which would appear more proper for the sector.
The team has reached the "RADIO-DATA-SYSTEM (RDS)", which appears todays
the data broadcasting system more used in the radio field.
1.1
RDS system description
The RADIO-DATA-SYSTEM is proper for the transmission of information in mono/
stereo programs of VHF/MF (87.5-108 Mhz).
It satisfies the requested requirements to the transmission of supplementary data on
radio programs:
1) Compatibility with the current mono/stereo transmissions;
2) Absence of interferences towards the adjacent programs;
3) Compatibility with other identification systems which are already working.
The system, selected by an international specialistic team, allows the data transmission
at a speed of 1187.5 bit/sec with phase modulation on 57 MHz.
The broadcasted binary signal is in advance put out on a differential codification.
The registry of transmission is at packages of lenght 104 bits (87.6 ms) named
GROUPS, each of them composed of 4 blocks of 26 bits. Every block is composed
of 16 bits of information and of 10 bits of protection, which are properly studied to
allow the recovery of an erroneous word with a maximum of 5 wrong bits. They are
provided with 16 separete blocks of which 6 are still not defined; every group begins
with a PI identification code (Program Identification) which has the double intent to
synchronize the receiver and to identify the channel which transmits the signal.
PI is the identification code of the radio program.
The complete definition of protocol RDS is contained in the CENELEC EN
50067:1998 standard.
User Manual
Rev. 1.0 - 10/07/2003
1 / 18
WINRDS
1.2
RDS encoder description
The machine that it generates signal in base band, in conformity with standard RDS,
is called “encoder RDS”.
R.V.R. Elettronica produces two kind of apparatuses for RDS codifies:
- RDS Coder stand-alone (p. es. TRDS4001)
- Exciter with RDS Coder integrated (p. es. PTXLCD/TRDSP)
The stand-alone coder generates RDS signal and transmit it to transmitter that arrange
it with audio signal or MPX signal ready to transmit. For details (about connection ,
ecc.) you can see specific User Manual .
The integrated coder has got inside a RDS signal generator and independently it
supplies to its radio transmission.
1.3
WINRDS software description
Before being used, RDS coder must be set up: code identification program (PI),
alternative frequencies list (AF), ecc.
Usually, RDS encoder programming is done through serial input using SPB490RDS Universal Encoder Communication Protocol.
PC and RDS encoder connection, that it can be on writing and on reading, is between
serial input COM and RS232 connector. You can select 4 COM doors and you can
choose a connection velocity between 1200 e 19200 Baud.
WINRDS software, supplied with encoder made by R.V.R. Elettronica, can set up it
according to the own necessities.
WINRDS software allows to programming a lot of parameters moving through different
tab:
1. List of Site/Encoder Address
2. Data Set Numer - Program Service Number
3. Flag (PI/PS/PTY/DI)
4. Clock Time
5. Radio Text
6. Alternative Frequencies
7. Group Sequence
8. Message
9. TDC
10.F.F.G.
2 / 18
Rev. 1.0 - 10/07/2003
User Manual
WINRDS
You can choose between italian or english software languages and with “Help” you
can find all information you need for a exact programming.
User Manual
Rev. 1.0 - 10/07/2003
3 / 18
WINRDS
2. Minimums system requirement
You can install WINRDS software on every IBM compatible personal computer, with
Windows O.S. and with next minimums system requirement:
4 / 18
-
Processor: Pentium III 500 MHz
-
O.S.: Windows 95, Windows 98, Windows 2000, Windows XP
-
Ram: 128 MB
-
Hard Disk free space: 20 MB
-
Connection: serial COM
Rev. 1.0 - 10/07/2003
User Manual
WINRDS
3. Set up and configuration
The software WINRDS installation procedure is subdivided in more steps and a guide
helps you to set up parameters.
At double clic on setup_211.exe file the configuration start and the guided installation
tab appears for a few second, than you can see software presentation with version
release, copyright law and information about software set up. Press “Next” to continue.
Next table indicates you the program file destination folder and you can change it
clicking “Browse” button.
Than enter the name of the Program Manager group to add RDS software icons.
User Manual
Rev. 1.0 - 10/07/2003
5 / 18
WINRDS
Now Start Installation table is visualized and ask you to confirm previously parameter
and start installation or to come back to modify them.
At click on “Next” button installation starts. In the end, if RDS software has been
successfully installed, “Installation Complete” tab will appear you and you can click
“Finish” button to exit install set up and to come back to standard view.
6 / 18
Rev. 1.0 - 10/07/2003
User Manual
WINRDS
4. Window description
At the start of the WINRDS program the standard window is like next image:
This window is divided in 3 main parts:
·
Menù Toolbar for connection management and for parameters saving.
·
Encoder Address Toolbar to select encoder.
·
Encoder Programming Parameters Window.
Beyond these three main parts, 7 push buttons for the parameters management
appear:
Through “Read All” and “Write All” buttons you can read or write all parameters from
encoder or to encoder.
Through “Read Selected” and “Write Selected” buttons you can read or write only
selected parameters in tab (for ex. CT, AF, ecc.)
Through “Wizard” button you run a procedure for the easy configuration of the encoder
basic parameters.
Through “Read Release” you can read from encoder Release and Date of the firmware
onboard.
Through “Reset Encoder” you can reset the data of the encoder with the factory setting.
!
Attention to “Reset Encoder” function becouse it will reset all ecoder parameters, so
is better to read the parameters, to save them and therefore to run the Reset.
User Manual
Rev. 1.0 - 10/07/2003
7 / 18
WINRDS
4.1
Menù Toolbar
Menù Toolbar is divided in more menù as you can see in next picture:
In File menù you can save current parameters in a file through “Save” or pushing
<CTRL+S>. The file is saved in the Directoy SAVE of program folder.
And than you can load parameters previously saved pushing <CTRL+L> or selecting
“Load”. A new window with the list of file previously saved will open.
In left side of the list there is the name assigned to the configuration (“Empty” if no
name is assigned) and in right side of the list there is the file name associated. On
double click of the left mouse button or pushing <ENTER> button you can select the
file you want and load his parameters. Clicking “Exit” you can stop it.
Click <Alt+x> or select “Exit” to end running program.
In “Select COM” you can select the input door where encoder is connected, you can
choose between 4 option (COM1, COM2, COM3, COM4).
In “Select Baud” you can choose encoder connection speed.
In “Continent” you can select the continent where you use the encoder, so “Country
Code” list will be refresh.
In “Language” you can select the language of program view. Selecting language
every text in windows or in menù will be refresh.
Clicking “Help” or <F1> button “Guida in Linea” will start. It will open a new window
with information about everything is under mouse cursore.
4.2
Encoder Address Toolbar
Next picture represents the Encoder Address Toolbar that is divided into 3 parts:
“Site Adr” where you can select an address if encoder “List of Site Address” is
checked, “Encoder Adr.” where you can select an encoder if “List of Encoder Address”
is checked and than “Encoder Name”.
The site address set up two kind of informations:
1. Encoder address.
2. Name to assign to encoder set up parameters.
8 / 18
Rev. 1.0 - 10/07/2003
User Manual
WINRDS
The Encoder Address is important to every encoder writing or reading. The site
address selected will be necessarily checked in “List os Site Address”. If it is no
checked will be not possible reading or writing the encoder.
The “0,0” address is the generic address and you can read and write to every encoder.
Before writing or reading make sure that the address is true.
The encoder name is important when you are saving file and it will be showed on
opening saved in Load file list.
4.3
Encoder Programming Parameters Window
Next picture represents the Encoder Programming Parameters Window , through
this you can change all encoder programming parameters:
As you can see there are some tabs:
1. Site/Encoder Address
2. Data Set Numer - Program Service Number
3. Flag (PI/PS/PTY/DI)
4. Clock Time
5. Radio Text
6. Alternative Frequency
7. Group Sequence
8. Message
9. TDC
10.F.F.G.
User Manual
Rev. 1.0 - 10/07/2003
9 / 18
WINRDS
5. Parameters Setting
You can set parameters moving through table and changing singularly them or moving
through “Wizard” that is a step by step guide to parameters setting.
5.1
The Wizard
Through Wizard guide you can set most important encoder parameters.
In the first step you can select from list your Country.
Remember that if the selected continent is wrong you can exit this procedure and
select the continent from the “Continent” menù. Then restart wizard procedure.
In step two you can select from list the Area covered by your radio diffusion (Local,
International, National, Extra Regional,...).
In next step you insert a number from 0 to 255 that identify your radio. This number
should be univoche and assigned by an autorizzated organizzation.
Now is time to insert the name of the radio for maximum of 8 characters. This is the
name that is visualized appear on display in a car radio decoder.
Then select from list the kind of your radio transmission (News, Current Affairs,
Information,...).
In next step you can select about Mono/Stero transmission, traffic information like
street situation, incident, music or speech transmission, informations about time and
date.
In step 10 insert the list of RT message that you want the encoder transmit: you can
input up 16 message for 64 character maximum.
In step 11 insert the alternative frequency of your radio if you have it and in the end of
wizard if you want you can insert long messages using the PS Group.
With this informations the parameters will be set up, but after you can modify them
through specific windows.
10 / 18
Rev. 1.0 - 10/07/2003
User Manual
WINRDS
5.2
Site Address
In this window there are two list:
1. List of Site Address
2. List of Encoder Address
The address site list can be enabled for an encoder list. By selecting a check box
you enable the corresponding address. By pressing “Write All” or “Write Selected”
you can transmit this enabled address inside the encoder. The “0” general address
is always enabled.
The encoder address list is used to enable an encoder list, or only one encoder, that
will be connected to software information. Checking address it will be enable. The
“0” general address is always enabled.
Pressing “Write All” or “Write Selected” you can transmit address inside the encoder.
5.3
DSN and PSN setting
In this tab you can set data DSN and data PSN.
Now this function table is disable.
User Manual
Rev. 1.0 - 10/07/2003
11 / 18
WINRDS
5.4
RDS setting (PI/PSN/PTY/FLAG)
In this window there are most important RDS transmission parameters.
“PI code” is the identification code of the radio. Its more important application is to
allow the receiver, in case of bad reception, to implement the "Automatic Frequency
Change"; this happens when there is a signal with the same PI and and with better
level than the syntonized one.
You can change it through “New PI” box, clicking <ENTER> button “Country Code”,
“Area Code” and “Programme Number” will be changed becouse they depend from
PI code. So, if one of those is modified PI code will change.
PS text is the radio station name. It is 8 characters visualized text on the receiver
display. You can change it through “New PS” box (so you modify the text on radio
display). By pressing “Write All” or “Write Selected” update encoder parameters.
In “Country Code” insert the name of the Country you are, in “Area Code” select the
kind of radio trasmission (Local, International, National, Extra Regional...), in
“Programme Number” insert the identification number (0-255) of the radio that be
unique. Should be assigned by an organizzation that control it.
“PTY Code” is the identification of the "Program Type" which is on air (example
News, Sport, Rock, etc.). It’s used to qualify on the receiver the automatical research
of the program type desired.
Other information are required: “DI code” is the decoder identification characteristics
and information about Traffic Announcement, Traffic Programme, Music and Speech
in “Traffic and Music Speech”.
12 / 18
Rev. 1.0 - 10/07/2003
User Manual
WINRDS
5.5
Time and Date (CT)
Here you can change everything about time and date information.
If “Enable CT” is checked every minute the encoder generates 4A group necessary
to transmit date and hour to decoder. Remember that is very important to give encoder
exact date and time becouse some radio car visualize them on display.
You can read and write data and time in their box and then push “Refresh Date/Time”
button.
If CT is enable is advisable to refresh time periodically to guarantee an exact time
transmission.
5.6
Radio Text setting (RT)
In this window you can insert and modify Radio Text programming, they are text
messages mainly for the domestic application (house receivers):
User Manual
Rev. 1.0 - 10/07/2003
13 / 18
WINRDS
You can insert until 16 different RT and you can set up the number of repetitions for
single message. Through “A/B Flag Toggle” box enable you can manage A/B flag on
message sending. In this way the receiver cleans up the RT buffer before receiving
the new one buffer.
If “Disable” check box is checked it cleans up RT buffer and disable his transmission.
“Space Filler Code” check box allow to insert space characters in blank zone. There
are some receivers who do not manage the “0x0D” filling character standard, so is
better use space character.
5.7
Frequencies setting (AF)
The “Alternative Frequencies” list is the frequencies list of different transmitters which
transmit the same program in the adjacent receiving areas. The list is memorized by
the receiver and used to reduce the commutation time beetwen different transmitters
of the same program.
You can insert until 1000 alternative frequencies in 25 frequencies groups. You can
use A or B method to insert them.
To insert alternative frequencies do this:
1.
Push “New” button to insert a new frequencies set.
2.
Select frequencies set you want.
3.
Pushing “Add” or “Change” buttons you can insert or change frequency in
frequencies list. Push “Delete” botton to delete a checked frequency. Check a
frequency from “Frequency List” and push “Change” button after selected new
frequency to change it. Remember that insert MF or LF frequencies fill up two box
even if on display is only one.
There are two ways to insert frequencies:
14 / 18
Rev. 1.0 - 10/07/2003
User Manual
WINRDS
A method
In A method you can insert until 25 alternative frequencies. There is a single
frequencies set and you can insert 25 alternative frequencies. In this way there is no
need to check frequency box from frequencies list.
B method
In B method you can insert over 25 alternative frequencies. And more it supplies
frequency transmission informations.
Check “Metodo B” box to enable it and insert a new frequencies set pushing “New”,
so you can insert here until 12 alternative frequencies. WINRDS software automatically
set up new data insert in this method. If check a frequency box in frequency list it
mean that frequency is a regional varying of tuning frequency and software use it to
set up data group.
5.8
Groups configuration
In this table you can set up the list of groups transimission sequence.
You can set up groups transmission order. Remember that if 4A group is checked
(Clock Time) it is transmitted to encoder every minute.
Select group you want from Group A or Group B and click for two time mouse left
button to insert selected group in Group Sequence. Select group from Group
Sequence and push <Canc> to delete it.
Remember that 11 group are transmitted to encoder in 1 second, so a lot of group
will be transmitted in a lot of time.
User Manual
Rev. 1.0 - 10/07/2003
15 / 18
WINRDS
5.9
PS Message setting
You can set up dynamic PS for user messages. User message is a 128 characters
message that overwrite standard PS. This kind of message can be transmitted in
“scrolling” mode or in 8 characters groups mode. User message is used to transform
RDS static PS in RDS dynamic PS.
Remember that this kind of message is not recognized from standard EN50067
delle specifiche RDS. Dynamic PS is a no standard optional.
You can set up until 8 timer groups messages and for each one 16 messages or a
128 character long message.
Next procedure will guide you to enable one or more messages:
1.
Check the group box (from 1 to 8) to select group you want.
2.
Push ENTER button to insert the message start time. Remember that format
time is hh:mm where hh are the hours and mm are minutes.
3.
Now choose between two way:
·
Only one 128 Long Message in scrolling. Select “<--” or “-->” to enable this.
Now box below is enable to insert message text and in Rep (sec) you can insert
automatic scrolling speed. If only “<--” box is checked message scroll from right to
left and at the end restart from first character. If “<--” and “-->” are checked at the end
of scrolling the message scrolls back from the other side.
·
Series of messages (until 16) of 8 timed characters. If “<--” or “-->” box are no
checked “Message” box and “Rep.” box are enable and you can insert there until 16
messages of 8 characters and insert their repetition in seconds.To insert message
select “Message” list and push “Ins” button. Insert text you want (max 8 car.) and push
<ENTER> button. This text will be displayed in list “Message” and in “Rep” box you
can see 2 seconds default value. To change it select it and push <ENTER> button. To
change message select it and push <DEL> button.
16 / 18
Rev. 1.0 - 10/07/2003
User Manual
WINRDS
4.
To end procedure click “Write Selected” button.
To disable this kind of function select off all group in “Message Groups” list. So encoder
will transmit PS standard.
For a correct messages programming remember to enable CT and to refresh time
and date.
5.10
TDC setting
Transparente Data Channel is used for the data transmission and it could be free
used, for example, to send messages on a brighltly sign.
In “Encoder Telemetry” list there are next data:
1 Release Hardware.
2 Release Software.
3 Digital input state. (only 8 MSB)
4 Digital input state. (unused)
5 Analogic input 1.
6 Analogic input 2.
7 Analogic input 3.
8 Analogic input 4.
9 Analogic input 5.
10 Analogic input 6.
11 Analogic input 7.
12 Analogic input 8.
In analogic input the value is visualized in exaecimal type, voltage conversion from 0
to 5V and percentage from 0 to 100%.
User Manual
Rev. 1.0 - 10/07/2003
17 / 18
WINRDS
In right list “TDC Data” you can set and read other TDS 104 byte value. This byte are
programmed by user.
Selecting data and pushing “ENTER” button or double click on mouse left button you
go in editing mode. If you enter a sigle character WINRDS change it ASCII code
ready to transmit. If you enter a number from 0 to 255 it is ready to be transmitted.
Remember that if you enter a number from 0 to 9 you will edit 00, 01, 02, 03..... ecc.
5.11
Free Format Group
This table allows a personalized management of the groups programming. In
particular, it allows to insert personalizes data in group sequence standard, for
example TMC management. The inserted list groups are trasmitted in queue to
WINRDS standard groups sequence.
To add a group you select it from “Group” list and enter data in “Byte” box in decimal
format (0 - 255) or ,if you write “&H” before data code, in exadecimal format. After
inserted data and transmission frequence (single or continous) push “Add to list”
button.
!
18 / 18
Warning: don’t enter already automatically inserted group in WINRDS programming
in F.F.G. list. For example, if CT management is enable (4A group), don’t enter 4A
group in F.F.G. list to to avoid anomalies and malfunctioning.
Rev. 1.0 - 10/07/2003
User Manual