1
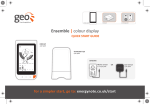
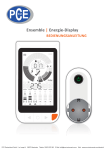
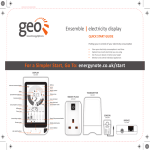
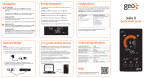
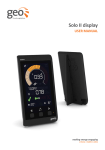
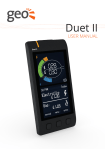
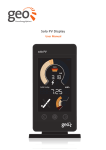
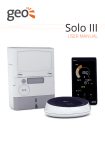
Display pack
Web pack
Smart plug pack
Ensemble | colour display
QUICK REFERENCE GUIDE
for a simpler start, go to: energynote.co.uk/start
Display overview
Display functions
Settings
Left button
Move back through list/decrease value
Internet
Comms Signal
Tariff
Speedometer
Communication
The Tick & Cross
Battery
Middle (set) button
Change viewing options (kWh, cost, CO2)
Unit of
Measurement
Right button
Move forward through list/increase value
Today Arrow
Target
Milometer
Inner & Outer
Fuel Tank
Timer Icon
Smart Plug
on/off
Smart Plug
Comms
Smart Plug
Power
Left button
Control button
Middle
(Set) button
Right button
To enter your personal settings, with the Display showing its normal
consumption screen, press and hold the ‘Set’ (centre) button. Once in
the settings menu use the centre (Set) button to skip the settings.
Setting your target consumption:
Set desired daily target in kWh, Cost or CO₂ using the
left and right buttons. Press set to continue.
Set target
Control button **
Turn smart plug(s) on/off
Setting the tariff:
A tariff is the amount you pay per unit of electricity
excluding any standing charge. Set desired tariff using
the left and right buttons. Press set to continue.
Internet comms signal *
Display is connected to the internet
Battery
Replace batteries in the transmitter
Set tariff
You must as a minimum set up Tariff 1. There is an
option to add Tariff 2 and Tariff 3 if you have more than
one tariff. You can also set the times that these
additional tariffs turn on/off.
Tariff
Shows current tariff (if you have more than one)
Unit of measurement
View readings in kW, cost, CO2/h
Set tariff times
Speedometer
Real-time view of energy use
Your tariff can be found on a recent utility bill or you
can get the information from your energy provider.
Target
Energy use against target
3kW kettle
6kW kettle & power shower
10kW kettle, shower, space heater
22kW max
Speedometer
The Speedometer gives a live graphical view of
the amount of electricity you are using in your
home right now.
200W base load
750W watching TV
Fuel tanks
The fuel tanks help you keep track of your
energy consumption against your target.
The outer fuel tank shows how much
electricity you have used so far today,
based on your target.
The inner fuel tank shows your target
consumption for that time of day.
Today arrow
Energy used today
Communication
Display is connected to the transmitter
If you have a smart plug pack, this is how to
pair smart plugs to the display
Milometer
Energy consumption in kWh/cost/CO2 over past day/week/four weeks
1.
Plug the smart plug into a socket. Do not attach an appliance
until pairing is complete.
Timer **
Smart plug schedule
2.
On your display press the left and right buttons simultaneously
for a few seconds. The display will show 'PAIRMODE'.
Smart plug on/off **
3.
Select an empty Smart Plug slot using the right button to scroll
through the screens. An empty slot is shown by the number of
the smart plug flashing while the display shows 'PAIR?'
4.
While this is shown, press and hold the button on front of the
smart plug you are pairing for 10 seconds. The light on the
smart plug will then turn amber and the display will change to
'PLUGBUG' a few seconds later. Keep pressing the right button
until you reach the home screen.
Smart plug power **
Smart plug comms **
Display is connected to an appliance
Group arrow **
Shows if smart plug is in a group
horizontal
If the two fuel tanks are equal, you are meeting your target consumption
cross
You have used more electricity than your target for today
Tick
You have used less electricity than your target for today
* If you have a web pack
For any help please visit our online user manual at: www.greenenergyoptions.co.uk/ensemble-colour
** If you have a smart plug pack
ENSE-A-QRG_001_3
Display pack
Web pack
Smart plug pack
Ensemble | colour display
QUICK START GUIDE
DISPLAY
1 per pack
TRANSMITTER
1 per pack
SENSORS
Mains sensor
1 or 3 per pack
OR
Warning:
Risk of electric shock
Refer to User Manual
Part No. MS01 1042
Measuring CAT III
Max voltage 264V~
Max current 75A
Green Energy
Options Ltd.
for a simpler start, go to: energynote.co.uk/start
LED sensor
1 per pack
SAFETY FIRST
STEP 1 – DISPLAY
STEP 2 – TRANSMITTER
Your safety is very important to us. Please read the following
guidelines before installation.
1.
Insert and twist clockwise to clip the 2 pinned (EU) or 3 pinned
(UK) plug to your power supply and connect it to your display.
Your display will turn on automatically when you plug it
into the mains supply.
1.
Open the transmitter unit by pressing the button, and pulling the
outer cover away from the bottom.
2.
Remove the battery tab from the transmitter.
2.
Whenever the display is turned ON, you will see the ‘set
clock’ screen.
3.
Use the left and right buttons on the front of the display to
adjust the time and date – then press the middle (set) button
when you have finished.
Sensors
Do not install the sensor if:
• There is not enough cable for the clip to connect correctly.
• The cable is too wide for the sensor (do not force the sensor).
• The cables appear perished (cracked, burned, bare copper is
visible), loose or wet.
• You have any doubts about the condition of the cables/meter.
3.
The red light will flash to show that the unit is working.
4.
On the display, the will light to show that it is talking to the
transmitter. If the on the display is flashing please refer to the
online user manual.
1
Display
• Follow all manufacturers guidelines when installing your display.
• Keep your display away from water/liquids.
• Always disconnect before cleaning (clean with a soft, dry
cloth only).
• Contact your supplier if any of the components appear
damaged/faulty.
1
2
2
3
3
STEP 3 – SENSORS
For a single phase pack: (one mains sensor)
1.
2.
1.
Insert the other end of the sensor cable in to the socket in the
bottom of the transmitter and ensure it is fully inserted.
2.
The display will now start to show the energy you are consuming.
2
1
For a LED sensor:
For a three phase pack: (three mains sensors)
At your electricity meter, clip the sensor around the mains
live cable (please refer to the online user manual for examples of
live cables on the meter). You should hear a ‘click’ to indicate the
sensor has been tightly closed.
At your electricity meter, clip the sensors around the mains live
cables (attach one sensor per cable, please refer to the online user
manual for examples of live cables on the meter). You should hear a
‘click’ to indicate that the sensors have been securely fastened.
Insert the other end of the cable in to the socket in the
bottom of the transmitter and ensure it is fully inserted.
Your display will now start to show the energy you are consuming.
2
1
1.
Find the pulse output on your meter.
2.
Stick the square velcro around the pulse output on the meter.
3.
Place the LED sensor over the square velcro on the meter
ensuring that the GEO logo is facing you.
4.
Insert the other end of the LED cable in to the socket in the
bottom of the transmitter and ensure it is fully inserted.
5.
Check the imp/kWh value on your meter, configure this on your
display. Refer to the user manual for futher information.
1
L
L
For any help please visit our online user manual at: www.greenenergyoptions.co.uk/ensemble-colour
L1 L1 L2 L2 L3 L3
2
3
4
Pulse output
(Imp/kWh)
EENE-A-QSG_D_9
Web Pack
QUICK START GUIDE
The Web Pack is an accessory for your
In-Home Display. It:
• Connects your In-Home Display to
the Internet
GET SET UP
ENERGYNOTE ONLINE SERVICES
1. Select the correct set of pins. Insert
and twist clockwise to clip the pins
to the power supply. Plug the power
supply into a mains socket and insert
the other end into the Internet Bridge.
To access your on-line service you must
log in to the web service.
1. Open your web browser on
your computer.
2. Go to: energynote.co.uk/start
• Enables you to monitor your home
and control appliances remotely via
your Energynote web service
3. Create your personal Energynote
account and follow the online
instructions to set up your
Internet Bridge.
What’s inside the Web pack:
4. Once you have logged in, your online
dashboard will appear on screen.
Internet Bridge, Power Supply and
Ethernet cable.
SAFETY FIRST:
It is important to observe some simple safety
precautions when using this product. Safe
operation of the Web Pack is impaired if used in a
manner not specified by the manufacturer.
Keep the Web Pack content away from water and
other liquids. Disconnect before cleaning (with a
soft dry cloth only) and do not immerse in water
or other liquids. Please contact your supplier if
any components appear damaged or faulty.
The Web Pack content is designed to be used in
an indoor domestic environment only.
To protect the environment, this product must be
disposed of safely at the end of its life.
This product complies with RoHS regulations.
CE approved. This product is approved for use in
the EU.
2. Using the Ethernet cable provided,
connect the Internet Bridge to your
broadband router.
The Internet Bridge will get an IP address
automatically from your router
See and explore the various features that
the online dashboard provides.
Tip: If you would like to see what your
In-Home Display is reading while you
are away from your house you must
remember to leave the broadband router
and the Internet Bridge turned on.
Note: The dashboard features may vary
depending on your particular supplier.
TECHNICAL INFORMATION
Item:
Rated Voltage:
Input Power:
Temperature Range:
Humidity:
Web Pack
230Vac 50Hz
0.25W
0 to 40°C
85% non-condensing
Conforming Standards: EN60950-1
EN301 489-3
EN300 220-1
CE approved.
This product is approved
for use in the EU.
ENBR-A-QSG-001_4
Display Pack
Web Pack
Smart Plug Pack
Web Pack
QUICK START GUIDE
For a simpler start, go to:
energynote.co.uk/start
Making energy engaging
In-home | mobile | online