1
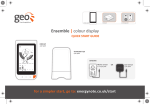
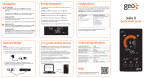
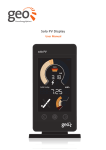
QSG (page1)
DASH RED LINE IS FOR CUTTING (ROUNDED CORNERS)
Ensemble | electricity display
QUICK START GUIDE
Putting you in control of your electricity consumption
•
•
•
•
View your electricity consumption in real time
Explore how much electricity you are using
See if you are above or below your target
Monitor and control individual appliances
For a Simpler Start, Go To: energynote.co.uk/start
DISPLAY
1 per pack
Internet communication
Battery
Tariff
Units
Speedometer (figures)
Communication
Consumption currency
Target symbol
TRANSMITTER
Today arrow
Inner fuel tank
SMART PLUGS
1 per pack
1 per pack
Outer fuel tank
Consumption units
Milometer
Timer icon
SENSOR
BRIDGE
1 per pack
Middle (Set) button
Control Button
Left, right buttons
1 per pack
Green Energy
Options Ltd.
Warning:
Risk of electric shock
Refer to User Manual
Group arrow
Smart Plug communication
Part No. MS01 1042
Measuring CAT III
Max voltage 264V~
Max current 75A
Smart Plug number
QSG (page2)
Step 1 – Display
Step 2 – Transmitter
1.
Power the Display using the power supply provided.
1.
SAFETY FIRST:
2.
Open the unit by pressing the button, and pulling the outer
cover away from the bottom.
Rest assured it is perfectly safe to clip the sensor onto the mains
cable as the cable is fully insulated, however:
Whenever the Display is turned ON, you will see the ‘set
clock’ screen.
2.
Remove the battery tab from the Transmitter.
3.
Use the left and right buttons on the front of the Display to
adjust the time and date – then press the middle (set) button
when you have finished.
3.
The red light will flash to show that the batteries are working.
4.
On the Display, the will light to show that it is talking to the
Transmitter. If the on the Display is flashing please refer to the
user manual.
•
In the event that there is not enough cable access you MUST
STOP the installation.
•
DO NOT PULL THE MAINS CABLE or try to force the sensor on
if the cable seems too wide, instead please contact our
technical support helpline (see contact details below).
•
If the cables going into your electricity meter look perished
(cracked, burned or you can see bare copper), are loose, wet,
or you have any doubts about their condition, DO NOT install
the sensors. Contact a qualified electrician to rectify
the problem.
2
2
3
1
1
3
Step 3 – Smart Plugs
Step 4 – Sensor
Online Service
1.
Plug your Smart Plug(s) into an available socket(s).
Single Phase Sensor:
1.
2.
The button on the front of the Smart Plug will show one of
two colours:
Green: power will be provided to the appliance.
Red: the Smart Plug is isolated and no power will be provided
to the appliance.
1.
3.
The
,
, or
on the Display will stop flashing to show
the Smart Plug is in range and active. If it does not, please refer
to the user manual.
1
2
2.
At your electricity meter, clip the Sensor around the mains
live cable (please refer to the user manual for examples of live
cables on the meter). You should hear a ‘click’ to indicate the
Sensor has been tightly closed.
Plug the power supply into a mains socket and insert the other
end into the power socket at the back of the bridge.
1
Plug the Sensor cable into the bottom of the Transmitter.
The Display will now start to show the energy you are consuming.
2
1
2.
Using the Ethernet cable provided, connect the bridge to
your broadband router. (The bridge uses DHCP and will get an IP
address automatically from your router)
2
Your display can communicate with up to 6 Smart Plugs.
To purchase additional units, please contact your supplier.
You will now be able to view your usage and control your devices
online. Go to: energynote.co.uk
L
L
ENSE-A-QSG_001
Ensemble | electricity display
UK: +44 (0) 8450 941 508 • [email protected] • www.greenenergyoptions.co.uk/ensemble