1
X-Survey add-on module
for X-Cart 4.3.0
User Manual
© 2009 Ruslan R. Fazliev. All rights reserved.
Company website: www.x-cart.com
Revision date: 02.11.2009
X-Survey add-on module
for X-Cart 4.3.0
User Manual
© 2009 Ruslan R. Fazliev. All rights reserved.
This User Manual is intended for X-Survey add-on module
for X-Cart v. 4.3.0. It covers most of the areas of the add-on
module's installation and use and is applicable for both
X-Cart GOLD and X-Cart PRO versions.
X-Survey add-on module for X-Cart 4.3.0. User manual.
© 2009 Ruslan R. Fazliev. All rights reserved.
All rights reserved. No part of this work may be reproduced in any form or by any means without the expressed written
permission of the copyright owner.
Products that are referred to in this document may be either trademarks and/or registered trademarks of the respective
owners. The publisher and the author make no claim to these trademarks.
While every precaution has been taken in the preparation of this document, the publisher and the author assume no
responsibility for errors or omissions, or for damages resulting from the use of information contained in this document or
from the use of programs and source code that may accompany it. In no event shall the publisher and the author be
liable for any loss of profit or any other commercial damage caused or alleged to have been caused directly or indirectly
by this document.
Printed: 02.11.2009
Contents
I
Table of Contents
..................................................................................................1
1 General Information
2 Functionality ..................................................................................................3
Overview
3 Installing and..................................................................................................5
Uninstalling X-Survey
3.1 Installing X-Survey
........................................................................................................................................... 5
3.2 Uninstalling ...........................................................................................................................................
X-Survey
6
..................................................................................................7
4 Using X-Survey
4.1 Enabling and...........................................................................................................................................
Configuring X-Survey
7
4.2 'Surveys' Section
Overview
...........................................................................................................................................
10
4.3 Creating a Survey
........................................................................................................................................... 13
4.4 Managing a...........................................................................................................................................
Survey's Mailing List
23
4.5 Customizing
the Survey Invitation Message
...........................................................................................................................................
30
4.6 Sending Survey
Invitations
...........................................................................................................................................
31
4.7 Managing Existing
Surveys
...........................................................................................................................................
34
4.8 Using X-Survey
with Sales-n-Stats
...........................................................................................................................................
36
4.9 Viewing Survey
Statistics
...........................................................................................................................................
37
Thank you for choosing X-Cart software solutions!
© 2009 Ruslan R. Fazliev. All rights reserved.
General Information
1
1 General Information
X-Survey is a commercial add-on module for X-Cart shopping cart software. It is intended for creation of
customer surveys and polls to be conducted among the visitors of an X-Cart-based store in order to obtain
customer feedback about the goods provided by the store, the store website usability and design, the quality
of service and various other aspects of the store operation.
The key features of X-Survey add-on module include:
§ Easy to use online surveys and website polls available either on separate web pages or in X-Cart's
menu boxes.
§ Wide range of question types (single choice, multiple choice and text fields for open-ended questions).
§ Automatic and manual sending of survey invitation e-mails.
§ Control over the availability of specific surveys (Surveys can be publicly available, password protected,
or available only via a direct link).
§ Unlimited questions and answers.
§ Detailed survey statistics (Printable version available).
§ Multilingual support.
X-Survey add-on module is recommended for any online store that values the opinion of its customers and
is looking for ways to improve the quality of service based on the feedback being provided by its customers
regarding their shopping experience with the store. You can purchase it at www.x-cart.com.
© 2009 Ruslan R. Fazliev. All rights reserved.
Functionality Overview
3
2 Functionality Overview
X-Survey add-on module is a very flexible survey software solution for X-Cart which can be used to create a
variety of surveys and polls with any number of questions and answer options for each question. It is
extremely easy to use, allowing even the most non-technically minded user to create, administer and collect
the results of on-line surveys.
The range of question types supported by the module is wide enough to meet the needs of most users who
will use it to create surveys: X-Survey makes it possible to create questions that respondents will answer by
selecting a single answer option, by selecting multiple options, or by providing their own textual answer.
The store administrator controls access of store visitors to specific surveys and decides whether a survey
should be available to all visitors of the store website (both registered and unregistered users), just
registered users or only a limited group of persons to whom an invitation has been sent with a direct link to
the survey page. The survey invitation message is fully customizable and can be mailed to e-mail addresses
entered by hand, imported from a CSV file, selected from the profiles of registered customers or borrowed
from an existing list of the store's newsletter subscribers. Yet another exciting option for the store
administrator is to setup X-Survey in such a way that the application will automatically send survey
invitations to the customers who purchased a specific product or placed an order for a specified amount.
Depending on the module settings, surveys can be displayed in X-Cart's menu boxes or on separate pages
within your store. A list of surveys available to the customer can be found in the 'Surveys' section of the
Customer zone (accessible via the Surveys link in the Special menu box).
A survey is entered into the database after a customer answers some or all of its questions and submits the
survey form. Precautions can be taken against multiple responses by same individuals: in addition to the
limitation according to which any survey can be completed only once per user session, it is possible to set
an IP blocked time period during which re-submitting of a survey from the same IP will be prohibited.
X-Survey gathers statistics on the survey forms being submitted, so the store administrator can easily
access the overall statistics on any specific survey as well as statistics on specific survey questions. A
printable version of the statistical data of any survey can be easily obtained. It is also possible to view
individual survey forms submitted by survey respondents.
© 2009 Ruslan R. Fazliev. All rights reserved.
Installing and Uninstalling X-Survey
5
3 Installing and Uninstalling X-Survey
Learn to install and uninstall X-Survey:
§ Installing X-Survey
§ Uninstalling X-Survey
3.1 Installing X-Survey
For successful installation and work of the module you need an already installed X-Cart 4.3.0.
The process of installing the module X-Survey is the same for X-Cart Gold and X-Cart Pro.
To install the module, take the following steps:
1. Download the module distributive from the File area. The package you need is contained in the archive
file x-survey-x.y.z.tgz, where x, y, z are your X-Cart version numbers.
2. Decompress the distribution package archive to a local directory on your system using your favorite
compression program (any archiver with support for TAR files).
3. Upload the resulting files to the server directory where your X-Cart is installed.
Note: Please make sure you keep the directory structure during unpacking and uploading, otherwise some necessary files can be
overwritten!
4. Point your browser at the location of your store with the addition of /install-xsurvey.php to launch the
Installation Wizard.
For example, if your domain name is www.example.com and your X-Cart-based store is installed in the directory /xcart off
your web root, you should enter http://www.example.com/xcart/install-xsurvey.php into your browser address line.
5. Follow the Wizard's instructions to install the add-on module at your site:
a) Step 1: License agreement.
This step provides a Software License Agreement for you to accept and requires you to enter your Auth
code.
Please read the Software License Agreement. If you agree to all of the terms of this agreement, select
the 'I accept the License Agreement' check box.
Note: By selecting the 'I accept the License Agreement' check box, you are consenting to be bound by this agreement. If
you do not agree to the terms of the agreement, do not install the software.
Use the field 'Auth code' to enter your Auth code. Auth code is a special authentication code that
protects your X-Cart installation. Such a code was issued to you when you first installed your
X-Cart-based store. If you do not remember your Auth code, you can look it up in X-Cart's file
© 2009 Ruslan R. Fazliev. All rights reserved.
6
X-Survey add-on module for X-Cart 4.3.0. User manual.
include/install.php or in the 'Summary' section of your store's Admin zone ("Your AUTH code for
re-installing skins and installing modules is: XXXXXXXX").
Click the Next button.
b) Step 2: Installing and configuring the module.
The installation script will create a directory skin1/modules/Survey and copy the module files to that
directory. It will also make changes to the database by creating the necessary database tables.
Click Next to proceed.
c) Step 3: Installation complete.
This is the final step of X-Survey installation. It notifies you that the module has been successfully
installed and provides a link to the administration back-end of the store where you can enable and
configure the module.
3.2 Uninstalling X-Survey
To uninstall X-Survey, do the following:
1. Launch the Installation Wizard (Point your browser at the location of your store with the addition of /
install-xsurvey.php)
2. At the first step of the Installation Wizard (Step 1: License agreement), select the 'Un-install the
module' radio button.
Click the Next button.
3. The Installation Wizard will remove the module files and deactivate the module (Step 2: Uninstalling the
module).
Click Next to proceed.
4. Step 3: Uninstallation complete is the final step of the uninstallation process. It notifies you that the
module has been successfully uninstalled.
After uninstalling X-Survey, be sure to remove the module distribution package from your web directory.
© 2009 Ruslan R. Fazliev. All rights reserved.
Using X-Survey
7
4 Using X-Survey
Find out how X-Survey can be activated and configured:
§ Enabling and Configuring X-Survey
Learn about the functionality of the 'Surveys' section of the Administration zone interface:
§ 'Surveys' Section Overview
Try creating a survey:
§ Creating a Survey
Read about ways of creating a mailing list for a survey and find out how an existing mailing list can be
edited:
§ Managing a Survey's Mailing List
Customize the message that will be sent to the prospective respondents of your surveys inviting them to
complete a survey:
§ Customizing the Survey Invitation Message
Find out about ways to distribute survey invitations:
§ Sending Survey Invitations
Learn how you can manage existing surveys:
§ Managing Existing Surveys
Integrate X-Survey with Sales-n-Stats to track completion of surveys by survey respondents:
§ Using X-Survey with Sales-n-Stats
Learn how you can view and manage survey statistics and access individual completed survey forms:
§ Viewing Survey Statistics
4.1 Enabling and Configuring X-Survey
Enabling X-Survey
After X-Survey add-on module is installed, you need to log into the Admin area of your store and enable it:
1. Go
to
the
'Modules'
section
of
the
store's
administration
back-end
(Administration
menu->Modules).
2. In the list of modules and add-ons, find the name 'Survey' and select the check box opposite it.
© 2009 Ruslan R. Fazliev. All rights reserved.
8
X-Survey add-on module for X-Cart 4.3.0. User manual.
3. Click the Update button at the bottom of the list.
When the module is enabled, the following elements are added to the user interface of the Admin zone:
a) Surveys item in the Management menu;
b) Survey options section in General settings->Modules options.
Configuring X-Survey
After activation, the add-on module needs to be configured:
1. Go to the section 'General settings->Modules options/Survey options':
2. Adjust X-Survey options:
a) Number of respondents to send a survey invitation to in one pass.
If you are planning to conduct surveys on relatively large groups of users and to inform the
prospective respondents of new surveys using survey invitations, you should give some thought to
how you are going to mass mail your survey invitations without putting too much load on the server.
The problem is that the process of sending email invitations usually takes up a considerable amount
of server time and resources. A large number of invitations being sent all at once can result in
significant server load reducing performance for all users. A possible way of solving the problem
© 2009 Ruslan R. Fazliev. All rights reserved.
Using X-Survey
9
might be to send emails in batches. The option 'Number of respondents to send a survey
invitation to in one pass' allows you to adjust the size of batches to be mailed. For example,
setting the value of this option to 50 means that whenever the procedure of sending email invitations
is launched either from crontab or as a result of creation of a user session, X-Cart's Mail sender will
send fifty invitations to the first fifty email addresses from the mailing list and stop. Next time it will
send another fifty invitations to the next fifty respondent email addresses. Thus invitations will be sent
intermittently in portions of a limited size until the entire queue of email invitations is sent.
b) Sending of survey invitations depends on the creation of user sessions.
This option allows you to define whether sending survey invitations should be triggered by the
creation of a user session in the database. When anyone enters the store (and accordingly a user
session is created), a portion of email invitations gets sent. If the option is not selected, the store
admin can use crontab or other scheduling services to organize sending the survey invitations.
d) If a user is added to a survey respondents list as a result of a certain event, send the
survey invitation to this user immediately.
This option determines the way in which email addresses should be handled if added to the mailing
list of a survey as a result of a certain event. If the option is disabled, an address simply gets added
to the mailing list; if it is enabled, an address gets added to the mailing list and an invitation is sent to
it.
f) IP blocked time period (days).
This option allows you to adjust the time period during which a survey respondent is not allowed to
complete the survey again from the same IP address. The value of this option should be a whole or
fractional number representing the number of days during which re-submitting of a survey from the
same IP will be prohibited.
g)Display only one survey in the menu boxes column at a time.
This option should be adjusted if you are intending to use more than one surveys simultaneously. If
this option is enabled, a single survey is displayed in the menu boxes column at any one time. If it is
disabled, the menu boxes column shows all the surveys that can be displayed according to their
current availability status.
h)Delay after an event before the invitation is sent (hours).
This option allows you to distribute load on the server more evenly by adjusting the minimum delay
between an event that causes an email address to be added to the mailing list of a survey and the
mailing of the corresponding survey invitation. The value of this option should be a number
representing the length of the delay in hours. Adjustment of this option leads to that, when the
process of mailing of survey invitations is launched, X-Cart's Mail sender sends invitations only to
those email addresses that were added to the mailing list no later than the specified amount of time
ago. For example, if, according to crontab, mailings of survey invitations are scheduled for 6:00 pm
© 2009 Ruslan R. Fazliev. All rights reserved.
10
X-Survey add-on module for X-Cart 4.3.0. User manual.
and 10:00 pm, and you set the option 'Delay after an event before the invitation is sent' to 7
hours, at 6:00 pm invitations will be sent to addresses added before 11:00 am, at 10:00 pm - to
addresses added before 3:00 pm. Note that, if the number of addresses added to the mailing list
before 11:00 am is greater than the size of the batch determined by the option 'Number of
respondents to send a survey invitation to in one pass', at 10:00 pm the Mail sender will first
send out the invitations postponed from the 6:00 pm mailing, and then it will continue to mail the
invitations meant for the addresses added from 11:00 am to 3:00 pm.
e)Email addresses per page.
This option defines the number of email addresses to be displayed on one page.
f) Completed survey forms per page.
This option defines the number of completed survey forms to be displayed on one page.
3. Click the Save button.
After the necessary module options are adjusted, it is time to move on and explore the 'Surveys' section of
the administration back-end (Please refer to the chapter 'Surveys' Section Overview).
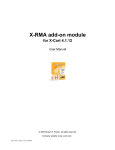
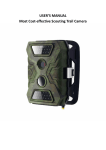
4.2 'Surveys' Section Overview
Customer surveys can be created and managed using the 'Surveys' section of the administration backend. You can access it by clicking the link Surveys in the Management menu. The section opens
displaying a dialog box titled 'Surveys':
This dialog box is a place from which you will access all the surveys in your store. As long as there are no
surveys, the surveys list will be empty. Then, as you create surveys, their names will be added to the
surveys list like this:
© 2009 Ruslan R. Fazliev. All rights reserved.
Using X-Survey
11
The surveys list is presented in the form of a table. The table columns provide the following information
regarding each of the surveys:
§ SURVEY - Survey name. The link allows you to view and edit the survey's details.
§ INVITATIONS - Number of survey invitations created and number of invitations sent. The link allows
you to edit the survey's mailing list.
§ COMPLETED - Number of survey forms submitted by respondents who participated in the survey. The
link allows you to access the survey's statistics.
§ RECENTLY COMPLETED - Date and time of the most recent completion of the survey. The link allows
you to access a list of recently submitted survey forms.
§ STATUS - Status of the survey (Public, Registered only, Hidden, Disabled).
§ ORDERBY - Position of the survey in the surveys list.
The buttons in the lower part of the dialog box allow you to perform various operations on the surveys list:
- create new surveys,
- delete selected surveys,
- change survey statuses and order of the surveys in the surveys list,
- clone existing surveys,
- send survey invitations.
For information on the above listed operations, see the chapters Creating surveys, Managing Existing
Surveys and Sending Survey Invitations.
Please note that the 'Surveys' section menu (at the top of the page) provides quick links to the sections
which may be of interest to you as you set up your surveys:
© 2009 Ruslan R. Fazliev. All rights reserved.
12
X-Survey add-on module for X-Cart 4.3.0. User manual.
§ Create survey allows you to create a new survey;
§ Surveys brings you back to the surveys list;
§ General settings/Survey options provides access to the page of X-Survey configuration settings.
© 2009 Ruslan R. Fazliev. All rights reserved.
Using X-Survey
13
4.3 Creating a Survey
Creation of a survey includes 3 easy steps:
1. Adding a new empty survey.
2. Defining the structure of the survey.
3. Defining the survey details.
This chapter provides instructions for completing each of the above steps.
Adding a new empty survey
To add a new empty survey:
1. Go to the 'Surveys' section of the administration back-end (Management menu->Surveys).
2. Do one of the following:
§ Click the button Add new at the bottom of the 'Surveys' dialog box.
or
§ Click the link Create survey in the 'Surveys' section menu.
The result of any of these actions is creation of a new empty survey titled [Unnamed survey # N].
[Unnamed survey # N] is a name automatically assigned to the survey by X-Cart. It is probably a good
idea to change this name to something more comprehensible, but do not worry about it for now - you will be
able to change it at a later time.
Defining the survey structure
After a new empty survey has been added, you need to fill it with questions. You also need to provide
possible answers for each of the questions from which the survey respondents will be able to choose or to
provide appropriate space where they will be able to write their own answers. Questions and answers can
be provided using the 'Structure' section of the survey editing dialog box. Please note that after a new
empty survey gets created, the dialog box for survey editing will be opened exactly at the section where you
can add questions and answers. Other times you will have to follow the steps described below:
© 2009 Ruslan R. Fazliev. All rights reserved.
14
X-Survey add-on module for X-Cart 4.3.0. User manual.
1. In the surveys list, find the survey for which you wish to add questions/answers and click on its name.
This opens the dialog box for editing the survey information.
2. Click the link Structure at the top of the dialog box. This opens the 'Structure' section of the dialog.
© 2009 Ruslan R. Fazliev. All rights reserved.
Using X-Survey
15
3. Click the Add new question... button. This opens the section where you can add questions and
answers.
© 2009 Ruslan R. Fazliev. All rights reserved.
16
X-Survey add-on module for X-Cart 4.3.0. User manual.
4. From the 'Language' drop-down box, select the language in which you will add survey questions and
answers.
5. Add the desired number of questions providing a list of answers for each of them.
To add a question with answers:
a) Into the field 'Question text', enter the question.
b) Use the drop-down box 'How you expect respondents to answer the question' to specify
whether the respondents will be supposed to answer the question by selecting a single option,
selecting one or more options, or providing their own textual answer.
c) (Optional) Into the field 'Number of columns in which answers should be displayed', enter the
desired number of columns.
d) (Optional) Use the field 'OrderBy' to specify the position of the question in the survey questionnaire.
e) (Optional) Use the field 'Mandatory' to select whether this question should be mandatory for
© 2009 Ruslan R. Fazliev. All rights reserved.
Using X-Survey
17
respondents or not.
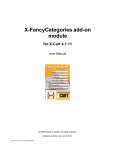
f) If the nature of your question presupposes that respondents will be supposed to choose their answer
(s) from a list of options, compose the options to be put on the answer list for the question. In the '
Answer list' section, click on the [+] icon to add as many empty rows as the number of answer
options you are going to provide; for each option, type the option description into the ANSWER TEXT
field, specify whether or not this option should include a text box by adjusting the TEXT BOX field and,
if necessary, specify the position of the option in the answer list using the ORDERBY field.
A text box provides a means to include a blank space as part of an answer option so survey
respondents can use it to type in their own answers. For example, if the question is 'What do you think
the Main page background color should be?', and you wish to set up the answer list for it like this:
- Green
- Blue
- Red
- Other color (please specify):___________ ,
the options 'Green', 'Blue' and 'Red' should be created by entering Green, Blue and Red as ANSWER
TEXT and setting the value of the TEXT BOX field to No, while the option 'Other color (please
specify):___________' should be created by entering Other color (please specify):
ANSWER TEXT and selecting Yes from the TEXT BOX field:
© 2009 Ruslan R. Fazliev. All rights reserved.
into the field
18
X-Survey add-on module for X-Cart 4.3.0. User manual.
g) Click the Apply button.
h) If necessary, create translations of the survey content into other languages (Use the 'Language' dropdown box to select a language, then replace the existing field values by values in the selected
language and click Apply).
© 2009 Ruslan R. Fazliev. All rights reserved.
Using X-Survey
19
The question gets added to the survey's list of questions (You can view it at any time in the 'Structure'
section of the survey editing dialog box).
© 2009 Ruslan R. Fazliev. All rights reserved.
20
X-Survey add-on module for X-Cart 4.3.0. User manual.
Defining the survey details
After you have created a survey and composed some questions for it, you might want to provide some
essential information as to the survey's availability, design and distribution - the survey details. This can be
done using the 'Details' section of the survey editing dialog box (accessible by clicking the link Details at
the top of the dialog box).
© 2009 Ruslan R. Fazliev. All rights reserved.
Using X-Survey
21
The 'Details' section includes two major subsections: 'Survey details' and 'Additional options'.
In the 'Survey details' subsection, you need to complete the following fields:
§ Survey name - Name of the survey.
§ Survey type - Type of the survey characterizing it from the point of view of availability and distribution:
Public - Available to all visitors of the store website.
Registered only - Available to registered users who are logged in.
© 2009 Ruslan R. Fazliev. All rights reserved.
22
X-Survey add-on module for X-Cart 4.3.0. User manual.
Hidden - Hidden from general use (No links to the survey are provided on the shop website, the survey
is accessible only via a direct URL or can be activated by events).
Disabled - Inactive.
It is recommended you first set the survey type to Disabled and keep it that way up until the moment the
survey is fully prepared for publishing.
§ Survey valid from [Date1] through [Date2] - Period during which the survey needs to be
conducted.
§ OrderBy - Position of the survey in the surveys list.
In addition to that, you need to define whether the survey results should be made available to the
respondent after the survey form is submitted (the checkbox 'Allow respondents to see the survey
results') and whether the survey should be displayed in the menu boxes column or just in the surveys list
on the special 'Surveys' page (the checkbox 'Display the survey on the front page in the menu
boxes column').
In the 'Additional options' subsection, you can adjust the survey's header and footer and create a
message that will be displayed to the survey respondent after he or she completes and successfully submits
the survey form.
If the survey needs to exist in more than one languages, be sure to provide a survey name, a header, a
footer and a survey completed message for it in each of the languages (Use the 'Languages' drop-down
box to switch between the languages).
As soon as the survey structure and details are defined, the survey is almost ready for publishing; however,
before making the survey available to your clients, it is a good idea to make sure the survey looks and
functions correctly. The Preview link at the top of the survey editing dialog box allows you to view your
survey as if you were its respondent.
Your further actions depend on how you wish to distribute your survey. If you are going to invite respondents
for the survey by email, you now need to configure the survey's mailing list - to provide X-Cart with a list of
email addresses to which invitations will be sent or to configure X-Cart to create a mailing list automatically
(Instructions for creating a mailing list are available in the chapter Managing a Survey's Mailing List of this
user manual). If, however, you do not wish to send out any survey invitations by email, all you need to do is
just activate the survey by assigning to it a proper availability status. The current status of the survey can be
easily checked and corrected using a link in the upper right-hand corner of the survey editing dialog box (
next to Preview):
§ Inactive means that the survey is disabled (which happens to surveys whose survey type is Disabled
or whose validity period has expired or has not begun yet);
§ Active means that the survey is enabled (which corresponds to the survey types Public, Registered
© 2009 Ruslan R. Fazliev. All rights reserved.
Using X-Survey
23
only or Hidden);
§ Warnings means that the survey is enabled, but misconfigured (for example, contains questions
without answers).
After a survey has been created and configured, you can edit, clone or delete it. Refer to the chapter
Managing Existing Surveys for information on survey operations.
4.4 Managing a Survey's Mailing List
Mailing list is a list of email addresses to which X-Cart will send invitations for a particular survey. A mailing
list needs to be configured only for those surveys for which you wish to send invitations.
This chapter explains how a mailing list can be created and edited.
After the mailing list for a survey is configured, you will be able to send invitations to addresses contained in
it. For details on sending survey invitations, read the chapter Sending Survey Invitations. Information on
customizing the message that is sent by email as a survey invitation is available in the chapter Customizing
the Survey Invitation Message.
Creating a mailing list
A survey's mailing list can be configured using the 'Invitations' section of the survey editing dialog box
(accessible via the link Invitations). All you need to do is add some email addresses so they are listed in
the 'Mailing list for invitations' subsection. Email addresses can be added manually or automatically.
Adding respondents to a survey's mailing list manually
Open the 'Manual invitations' subsection by clicking the Manual invitations tab.
© 2009 Ruslan R. Fazliev. All rights reserved.
24
X-Survey add-on module for X-Cart 4.3.0. User manual.
Choose how you wish to add respondent addresses to the mailing list and select the respective radio button.
Depending on your selection, use the controls of the subsection displayed at the bottom of the 'Invitations'
section to add email addresses:
§ Add respondent addresses manually
This method is convenient when the number of addresses that need to be added is relatively small. You
can add an email address by typing or pasting it into the 'E-Mail' field and clicking the Add button. It is
possible to add more than one addresses at a time: add multiple rows for email addresses using the
[+] icon and enter an email address into each of the 'E-Mail' fields, then click Add.
§ Select respondents from registered users
This method allows you to add the email addresses of some or all of your store's registered users to the
mailing list of a survey. Clicking the button Search for users produces a new window with the standard
© 2009 Ruslan R. Fazliev. All rights reserved.
Using X-Survey
25
X-Cart's user search form. You can use this form to add email addresses of the store's existing users to
the mailing list: just do a search and save the users whose addresses need to be added:
- to save only some specific users, select the check boxes next to their names and click the button
Save selected;
- to save the whole list of search results, simply click Save all.
The addresses of the selected users should be added to the mailing list at once.
§ Acquire respondent addresses from a list of news subscribers
This method allows you to add to a survey's mailing list the email addresses from the mailing list of a
specific news list (or several news lists). To be able to add email addresses using this method, you
need to have at least one news list with a non-empty list of subscribers in your store. All you need to do
is select from the 'News lists' selectbox the names of those news lists whose subscribers you wish to
take part in the survey and click Add. Please be aware that this method adds only the news list
subscriber email addresses that exist in the system by the time you click the Add button. Any email
addresses that get added to the news list subscription after that are not added to the mailing list of the
survey automatically.
§ Copy respondents from another survey
This method allows you to re-use existing survey mailing lists. If you have one or more surveys in your
store whose mailing list(s) you would like to re-use, you can copy the addresses contained in these
mailing lists to the mailing list of the survey you are currently editing. All you need to do is select from
the list of surveys in the 'Surveys' selectbox the names of those surveys whose mailing lists you would
like to add and click the Add button.
§ Import respondent addresses from a file
This method allows you to import email addresses from a file. The file needs to be a simple list of email
addresses separated by line breaks like this:
[email protected]
[email protected]
[email protected]
Note that, regardless of the method used, before adding any email addresses to the mailing list, X-Cart
checks their format and uniqueness. This means that if X-Cart finds the syntax of one or more address
entries incorrect or identifies one or more addresses as already contained in the mailing list, it will not add
them - you will be notified of the fact and provided with a list of entries that have not been added.
© 2009 Ruslan R. Fazliev. All rights reserved.
26
X-Survey add-on module for X-Cart 4.3.0. User manual.
The result of a successful addition of email addresses should be a list of email addresses in the 'Mailing
list for invitations' subsection:
© 2009 Ruslan R. Fazliev. All rights reserved.
Using X-Survey
27
Defining rules for automatic addition of respondents to a survey's mailing list
If not already open, open the 'Automatic invitations' subsection (Click the Automatic invitations tab).
Select the check box 'Allow X-Cart to add respondent addresses to the mailing list automatically'
to enable automatic creation of the mailing list. This should expand the 'Automatic invitations' subsection
providing you access to the controls that will help you set the criteria upon which email addresses of store
users will be added to the mailing list.
© 2009 Ruslan R. Fazliev. All rights reserved.
28
X-Survey add-on module for X-Cart 4.3.0. User manual.
The subsection 'Event type' allows you to specify the type of event upon which a user's address will be
added to the survey's mailing list. At present the list of events upon which an email address can be added
looks as follows:
§ Order placed
§ Order processed
§ Order completed
© 2009 Ruslan R. Fazliev. All rights reserved.
Using X-Survey
29
§ Order processed or completed
You need to select one of the listed events and configure its parameters using the 'Event parameters'
subsection.
Parameters characterize the order whose creation or status change is interpreted as an event. The
following parameters can be configured:
§ Order total equals or is greater than - Minimum total amount that the order must have.
§ Ordered products - Product or products that must be contained in the order.
§ Ordered products from categories - Category or categories products from which must be contained in
the order.
Two or more parameters can be used in combination. You can define how the parameters need to be joined
by adjusting the 'Event parameters are joined by AND/OR' drop-down box.
After you finish configuring the events and parameters, be sure to click the Update button to save the
changes.
The following examples demonstrate the usage of events and event parameters for configuring automatic
addition of respondent addresses to a survey's mailing list:
Example 1:
Selecting the event Order placed and adjusting its parameters like this:
Event parameters are joined by AND/OR: OR,
Order total equals or is greater than: $50.00,
Ordered products from categories: Books,
enables X-Cart to automatically add to the mailing list the email addresses of any customers who place an order with a total
amount of $50.00 or more or an order containing at least one product from the category Books.
Example 2:
Selecting the event Order processed or completed and adjusting its parameters like this:
Event parameters are joined by AND/OR: AND,
Order total equals or is greater than: $50.00,
Ordered products from categories: Books,
enables X-Cart to automatically add to the mailing list the email addresses of any customers whose order gets the status
Processed or Completed, provided that the order has a total amount of $50.00 or more and contains at least one product from
the category Books.
Please note that X-Cart automatically collects email addresses for a survey's mailing list only when the
survey status is other than Inactive.
Editing a mailing list
The only way to edit an existing mailing list consists in removing from it the email addresses that you do not
© 2009 Ruslan R. Fazliev. All rights reserved.
30
X-Survey add-on module for X-Cart 4.3.0. User manual.
want to be there. It is possible to remove just some specific addresses or the entire mailing list.
To remove one or more email addresses from a mailing list:
1. In the mailing list, select the check boxes next to the email addresses that need to be removed.
2. Click the Delete selected button.
To remove the entire mailing list, click the button Delete all.
4.5 Customizing the Survey Invitation Message
At present, the module X-Survey does not allow you to create a separate invitation message for each
individual survey. There is just one invitation message that is used universally for all the surveys in the
store. There is, however, a dynamic part: the name of the survey in the email subject and the link to the
page where the survey can be completed in the email body are changed automatically depending on the
survey. You do not need to do anything about the link and the survey name, but you may want to change the
message of the invitation itself. This can be done by editing the mail templates for the invitation message.
The templates that you may want to edit are the following:
Plain text mail templates for the invitation
HTML mail templates for the invitation
skin1/mail/survey_invitation.tpl
skin1/mail/html/survey_invitation.tpl
skin1/mail/mail_header.tpl
skin1/mail/html/mail_header.tpl
skin1/mail/signature.tpl
skin1/mail/html/signature.tpl
skin1/mail/survey_invitation_subj.tpl
The templates can be easily edited using X-Cart built-in template editor (Administration menu->Edit
templates).
© 2009 Ruslan R. Fazliev. All rights reserved.
Using X-Survey
31
4.6 Sending Survey Invitations
X-Cart's Mail sender can be induced to send survey invitations in one of the following three ways: by clicking
a special button in the administration back-end of your store, by issuing from the command line a command
that runs the sending of survey invitations or by connecting the sending of survey invitations to creation of
user sessions.
This chapter discusses the named ways of sending email invitations so you can choose a method that best
suits your needs.
Please note that, regardless of the method, survey invitations can be sent only for surveys that have a
configured mailing list and whose status is other than Inactive.
The results of sending survey invitations can be controlled via the STATUS column of specific mailing lists:
the status sent or queued displayed opposite an email address allows you to tell whether an invitation to
complete the survey has or has not been sent to that email address; the date and time displayed in the
same line after the word sent are the date and time when the sending of the invitation took place.
Sending invitations manually
This method is easiest to understand, but it requires significant human involvement every time invitations
are sent. Using this method, you can send invitations to all the email addresses listed in the mailing list of a
specific survey or several specific surveys, or you can send invitations just to specific respondent email
addresses from a certain mailing list.
Sending of survey invitations to the entire mailing list of a specific survey can be easily done from within the
survey editing dialog box:
1. Open for editing the survey for which invitations need to be sent.
2. Go to the 'Invitations' section of the survey editing dialog box (the link Invitations).
© 2009 Ruslan R. Fazliev. All rights reserved.
32
X-Survey add-on module for X-Cart 4.3.0. User manual.
3. Click the button Send all unsent invitations below the survey's mailing list.
X-Cart's Mail sender will begin sending invitations immediately. Invitations will be sent to all the email
addresses in the mailing list except those addresses to which an invitation regarding this survey has been
sent before.
Note: When invitations are being sent as described above, an invitation is sent to each email address just once. You can click the
button for sending invitations as many times as you like without worrying that some of the survey respondents might get an
invitation they have already gotten before.
To send survey invitations just to some specific email addresses, select the check boxes next to the email
addresses to which you want the invitations to be sent and click the button Send invitations. Invitations will
be sent to all the selected email addresses, whether or not any invitations for the current survey have been
sent to these addresses before.
© 2009 Ruslan R. Fazliev. All rights reserved.
Using X-Survey
33
Sending of survey invitations can also be performed from the surveys list. There you can select the surveys
for which you wish to send invitations and click the Send invitations button. X-Cart's Mail sender will send
survey invitations to all the email addresses listed in the mailing lists of the selected surveys except those
addresses to which an invitation has already been sent.
After the process of sending survey invitations is completed, a confirmation message is displayed in an
Information box. If, for some reason, the Mail sender cannot complete the sending of selected invitations,
error messages are output onto the screen.
Sending invitations automatically using crontab
As has been mentioned above, sending of survey invitations can be run from the command line. The
command for sending survey invitations looks like this:
<php_path>/php <xcart_root>/modules/Survey/send_invitations.php survey_id
The part <php_path>/php must be replaced with the actual PHP interpreter filepath, survey_id - with a
unique identifier of the survey for which invitations are being sent (numeric value) or all (a service word
telling the script to send out invitations for all the available surveys). Note that, to be properly interpreted, the
word all is to be typed in the lower case.
The crontab command, found in Unix and Unix-like operating systems, can be used to schedule the
mailings of survey invitations to be executed periodically. If you decide to set up sending of survey
invitations as a cron job, it is recommended you adjust the option 'Number of respondents to send a
survey invitation to in one pass' in General settings->Modules options/Survey options. You may
also find useful the option 'Delay after an event before the invitation is sent (hours)'.
Sending invitations automatically based on user sessions
This method allows you to connect sending of survey invitations to X-Cart's session mechanism. When this
method is used, the Mail sender sends out survey invitations every certain number of user sessions. To
enable the method and to adjust the number of user sessions, you need to adjust the options 'Sending of
survey invitations depends on the creation of user sessions' and 'Run the script that launches
execution of periodic tasks once per N user sessions' in General settings->General options.
Every time the Mail sender is activated to send survey invitations, it will send the number of emails
designated by the option 'Number of respondents to send a survey invitation to in one pass'.
© 2009 Ruslan R. Fazliev. All rights reserved.
34
X-Survey add-on module for X-Cart 4.3.0. User manual.
4.7 Managing Existing Surveys
Existing surveys can be easily managed via the surveys list in the 'Surveys' section of the administration
back-end (Management menu->Surveys).
Deleting surveys
Surveys that you no longer wish to use can be deleted.
To delete one or more surveys:
1. Select the check boxes next to the names of the surveys you wish to delete. Note that you can use the
Check all / Uncheck all links to select all the surveys on the page.
2. Click the Delete selected button.
Changing the statuses and the order of surveys in the list
Each survey in your store will have one of the following statuses: Public, Registered only, Hidden, Disabled.
It is possible to change the status of any existing survey at any moment directly from the surveys list.
It is also possible to control the relative positions of the surveys in the surveys list.
© 2009 Ruslan R. Fazliev. All rights reserved.
Using X-Survey
35
To change the statuses and/or order of some or all the surveys:
1. Select the desired statuses from the drop-down boxes opposite the names of the surveys whose status
needs to be changed (STATUS column).
2. Readjust the position numbers of the surveys that need to be moved (ORDERBY column).
3. Click the Update button.
Editing surveys
Any information pertaining to the structure of a survey, the survey's details or mailing list can be edited.
To edit a survey:
1. Click on the name of the survey you wish to edit.
2. Use the survey editing dialog box to edit the structure, details, mailing list for invitations or (for surveys
whose mailing list is formed automatically) events on which customer addresses are added to the mailing
list.
3. Save the changes.
Note: Please be aware that editing the survey structure after the survey has already been completed by one or more respondents
can mess up the statistical data that has been gathered up to the moment.
Cloning surveys
It is possible to quickly create new surveys on the basis of surveys that already exist in the system using
cloning.
To clone one or more surveys:
1. Select the check box next to the name of the survey you wish to clone. Note that you can use the Check
all / Uncheck all links to select all the surveys on the page.
2. Click the Clone selected button.
The result will be a survey titled 'Name (CLONE)', where Name will be the name of the survey that you
copied.
Please note that it is possible to clone more than one surveys at a time.
© 2009 Ruslan R. Fazliev. All rights reserved.
36
X-Survey add-on module for X-Cart 4.3.0. User manual.
4.8 Using X-Survey with Sales-n-Stats
Businesses using Sales-n-Stats software for monitoring their X-Cart-based websites may find useful the
action file fillSurveyAction.php which is supplied with X-Survey distribution and which can be found in the
directory <xcart_root>/modules/Survey after the installation of X-Survey. This file can be imported into
Sales-n-Stats to configure an action that will enable you to track completion of surveys by survey
respondents. Sales-n-Stats will be able to provide you with a consistent information summary regarding
each submission of a customer survey, including survey name, name of the respondent and time of
completion.
© 2009 Ruslan R. Fazliev. All rights reserved.
Using X-Survey
37
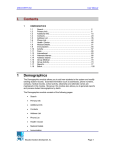
4.9 Viewing Survey Statistics
X-Survey add-on module gathers statistics on survey completion and allows you to view the statistical data
on surveys of your choice. It is possible to view both the statistics on any specific survey in general and on
specific survey questions. You can also view individual survey forms submitted by survey respondents.
Statistical data regarding any specific survey can be found in the 'Statistics' section of the survey editing
dialog box when the survey is opened for editing (the link Statistics):
The 'Survey summary' subsection provides general statistical data:
§ Survey invitations sent - Number of invitations that were mailed regarding the survey.
© 2009 Ruslan R. Fazliev. All rights reserved.
38
X-Survey add-on module for X-Cart 4.3.0. User manual.
§ Total number of survey forms submitted - Number of survey forms received from respondents.
§ Number of survey forms fully completed - Number of survey forms with 100% of questions answered.
§ First survey form submitted - Date and time of the first submission of the survey.
§ Last survey form submitted - Date and time of the latest submission of the survey.
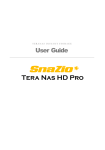
The subsection 'Survey statistics by questions' provides a list of questions from the survey with an
indication of the number of respondents who answered them. For each question that presupposes a choice
of one or more answer options a graph is provided that allows you to see the percentages of respondents
who chose this or that specific answer option. For questions that have textual answers there are links
allowing you to see the specific textual answers left by different respondents.
© 2009 Ruslan R. Fazliev. All rights reserved.
Using X-Survey
39
Please note that a special filter accessible through the link Filter survey results can be used to narrow
down the list of survey results by readjusting the span of the statistics period:
© 2009 Ruslan R. Fazliev. All rights reserved.
40
X-Survey add-on module for X-Cart 4.3.0. User manual.
The link Printable version provides access to the printable version of the page with the survey results.
The link Clear statistics allows you to clear the existing survey results.
The link Display survey forms allows you to see a list of individual survey forms submitted by
respondents:
The list is presented in the form of a table. The table columns provide the following information regarding
each of the survey forms:
§ DATE - Date and time of submission of the survey form. The link allows you to view the survey form. In
our example, clicking on the date link corresponding to the survey form submitted by the user jane_doe
would produce the following:
© 2009 Ruslan R. Fazliev. All rights reserved.
Using X-Survey
41
§ USERNAME - Login name of the store user who submitted the survey form (For respondents who are
not registered users or not logged in this will be simply Anonymous user).
§ IP - IP address from which the form was submitted.
§ COMPLETED - State of completion of the survey (Yes for fully completed survey forms; Partially - for
forms where not all of the questions are answered).
§ NOTE - Link to the order that caused the respondent to be added to the mailing list of the survey (is
provided only for respondents who came to the survey page through a link provided in a survey
invitation email and whose addresses were added to the survey's mailing list as a result of an event).
© 2009 Ruslan R. Fazliev. All rights reserved.
X-Survey add-on module for X-Cart 4.3.0. User manual.
© 2009 Ruslan R. Fazliev. All rights reserved.
Printed: 02.11.2009