1
X-FeatureComparison add-on
module
for X-Cart 4.2.2
User Manual
© 2009 Ruslan R. Fazliev. All rights reserved.
Company website: www.x-cart.com
Revision date: Jun/30/2009
X-FeatureComparison add-on module for X-Cart 4.2.2
User Manual
© 2009 Ruslan R. Fazliev. All rights reserved.
X-FeatureComparison add-on module for X-Cart 4.2.2. User manual.
© 2009 Ruslan R. Fazliev. All rights reserved.
All rights reserved. No part of this work may be reproduced in any form or by any means without the expressed written
permission of the copyright owner.
Products that are referred to in this document may be either trademarks and/or registered trademarks of the respective
owners. The publisher and the author make no claim to these trademarks.
While every precaution has been taken in the preparation of this document, the publisher and the author assume no
responsibility for errors or omissions, or for damages resulting from the use of information contained in this document or
from the use of programs and source code that may accompany it. In no event shall the publisher and the author be
liable for any loss of profit or any other commercial damage caused or alleged to have been caused directly or indirectly
by this document.
Printed: 30.06.2009
I
X-FeatureComparison add-on module for X-Cart 4.2.2. User manual.
Table of Contents
..................................................................................................1
1 General information
..................................................................................................2
2 Module Installation
..................................................................................................3
3 Setting up Feature
Comparison options
..................................................................................................4
4 Administrative
interface
4.1 Adding, updating
and deleting product classes
...........................................................................................................................................
4
4.2 Modifying product
classes
...........................................................................................................................................
9
4.2.1 Modifying.....................................................................................................................................................................
product class details
9
4.2.2 Managing
.....................................................................................................................................................................
product class options (features)
11
4.2.3 Notes on.....................................................................................................................................................................
option types
15
4.3 Assigning product
classes to products
...........................................................................................................................................
16
4.4 Searching for
products with defined product classes
...........................................................................................................................................
20
4.5 Importing/Exporting
data
...........................................................................................................................................
21
4.5.1 FeatureComparison:
.....................................................................................................................................................................
CSV Format
21
..................................................................................................24
5 Customer interface
5.1 Using feature-based
search
...........................................................................................................................................
24
5.2 Selecting products
for comparison
...........................................................................................................................................
26
5.3 Comparing products
........................................................................................................................................... 32
Thank you for choosing X-Cart software solutions!
© 2009 Ruslan R. Fazliev. All rights reserved.
General information
1
1 General information
X-FeatureComparison is an X-Cart add-on module that enables your customers to use feature-based
comparison service.
Unless a customer comes to your store with his mind set on a specific product, he is likely to browse and
compare different products trying to determine which product will be right for him.
Feature-based comparison service facilitates the process of choosing the right thing by a customer: the
user enters a desired combination of features, and the system then determines the product or products that
provide that combination. For instance, if a customer is looking for a mobile phone, but is not yet sure as to
its model, he can pick the desired mobile phone features (e.g., dual or triple band, light weight, replaceable
covers, or programmable ringtones) and immediately buy the phone that matches the requirements. Visitors
can also pick a product and compare it side by side with other products, so the customer can pick a product
that he likes, and then compare other products against it to see if there are any better choices.
Using X-FeatureComparison module provides the store admin/provider users with the following abilities:
§ to group products into product classes
§ to define features specific to product classes
§ to assign class-specific features to products
§ to create multilingual names for product classes and class-specific features.
§ to search for products by their product class
The customers get the ability:
§ to search for products by features
§ to compare products of the same class with one another
X- Feature Comparison is a reliable and up-to-date solution that makes your business competitive.
You can purchase it at www.x-cart.com.
© 2009 Ruslan R. Fazliev. All rights reserved.
2
X-FeatureComparison add-on module for X-Cart 4.2.2. User manual.
2 Module Installation
To install the module you have to perform the following actions:
1. Download the module distributive (x-fcomp-x.y.z.tgz, where x,y,z are the numbers of the module
version) from File Area.
2. Uncompress the x-fcomp-x.y.z.tgz file and copy the files to X-Cart directory.
Note: Please make sure you keep the directory structure during unpacking and uploading, otherwise some necessary files can be
overwritten!
3. Run in the browser the installation script http://www.yourhost.com/xcart_dir/install-xfcomp.php
4. Enter your authentication code, accept conditions of the License Agreement and click Next.
Note. The authentication code is issued on completion of X-Cart installation. It is used to prevent unauthorized re-installation of
X-Cart and to install X-Cart modules (if you decide to purchase them). If you forgot the code, you may look it up at any time in
include/install.php file.
5. Installation script will copy the files and make all the necessary changes in the database.
6. After module Installation is completed, you need to log in as Admin and
§ enable Feature Comparison from the Modules section
§ set the module options in General settings/Feature Comparison options.
X-Cart Gold and Pro module installations do not differ.
© 2009 Ruslan R. Fazliev. All rights reserved.
Setting up Feature Comparison options
3
3 Setting up Feature Comparison options
To set up the options affecting the work of Feature Comparison module in your store:
1. Select General settings from the Administration menu.
2. Click the Feature Comparison options link in the section menu.
3. Set up the following options:
· The product class image width in the product classes list: set the desired image width in pixels.
· Enable adding products to comparison lists for further comparing: Select this check box if you
want to enable your customers to add products they want to compare to a special list appearing in the
'Comparison list' box in the menu column. If you leave this check box unselected, the link 'Add to
comparison list' will not be displayed, so there will be no way for your customers to use the
'Comparison list' box.
· The maximum number of products in the comparison list in the menu column: Specify the
maximum number of products which a customer will be allowed to add to the Comparison list.
· Maximum number of products which can be shown on the feature-based comparisons page
and on the Product details page in the form of a select box: If the quantity of products for
comparison exceeds the number specified here, product selection will be done in a popup window:
Specify the maximum number of products for comparison that will be able to appear in a select box.
· Maximum number of products which can be compared: Specify the maximum number of products
that a customer will be allowed to compare at a time.
4. Click Save to apply the changes.
© 2009 Ruslan R. Fazliev. All rights reserved.
4
X-FeatureComparison add-on module for X-Cart 4.2.2. User manual.
4 Administrative interface
The administrative part of X-FeatureComparison module is handled by the store administrators and
providers. In X-Cart GOLD the store admin/provider fully controls the work of the module. In X-Cart PRO
providers adjust their store sections to work with the module, while the store admin regulates the work of the
module in general (by adjusting the Feature Comparison options) and carries out the function of supervision
which in case of necessity enables him to interfere and edit the providers’ settings pertaining to the module.
After X-FeatureComparison module has been installed and configured, you need to use the store
admin/provider interface to do the following:
1. Define product classes (types of products which can be compared).
2. For each of the defined product classes set up product class options, or features (parameters on the
ground of which the products belonging to the class will be compared).
3. Assign appropriate product classes and product class options to the products in your store.
Note: In X-Cart PRO each of the store providers defines his own product classes (and features) and assigns these classes to his
own products. Unless ‘Single mode’ is turned on, PRO providers are not allowed to edit the product classes defined by the other
providers. Admin account users, however, can edit any product class irrespective of the class owner.
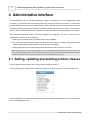
4.1 Adding, updating and deleting product classes
Product classes can be defined in the ‘Product classes’ section of the store.
X-Cart PRO providers can access this section by clicking the Product classes link in the Products menu.
X-Cart PRO admin and X-Cart GOLD admin/provider can access the same section via the Product classes
link in the Management menu.
© 2009 Ruslan R. Fazliev. All rights reserved.
Administrative interface
5
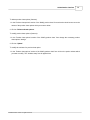
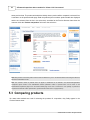
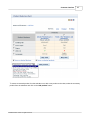
In the ‘Product classes’ section existing product classes appear in the ‘Product classes’ form.
To create a new product class:
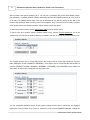
1. Click the ‘Add product class’ link in the section menu. The ‘Add product class’ form will appear.
2. If necessary, add an icon for the product class being created (Icons associated with product classes
appear on the ‘What are you looking for?’ page in the customer area along with the product class titles):
a. Click on the ‘Change image’ button below the default ‘No Image Available’ picture. Confirm you desire
to change the default image.
b. Use the ‘Image selection’ window to select the image file which you want to use as the product class
icon.
© 2009 Ruslan R. Fazliev. All rights reserved.
6
X-FeatureComparison add-on module for X-Cart 4.2.2. User manual.
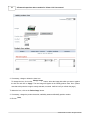
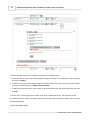
c. Click on Apply. The new image will appear in the ‘Add product class’ form, replacing the default ‘No
Image Available’ image. (Please note that at this point the image is merely selected, not saved. It will
be lost if you refresh the page.)
3. Enter a title for the product class into the ‘Product class’ field.
4. Specify whether the class should be shown to the customers or not by selecting Yes or No from the ‘
Enabled’ selectbox.
5. Specify the position number of the product class in the list of product classes (‘OrderBy’ field).
© 2009 Ruslan R. Fazliev. All rights reserved.
Administrative interface
7
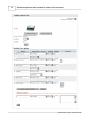
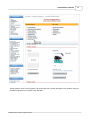
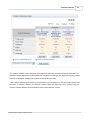
6. Click on ‘Add’. As soon as the product class is created, you will be informed about it by a message in the
‘Information’ box.
After the creation of the new product class, you can see another form appearing in the place of the ‘Add
product class’ form. This new form is titled ‘Modify product class’.
This form allows you to modify the details of the product class you have just created (if necessary) and to
© 2009 Ruslan R. Fazliev. All rights reserved.
8
X-FeatureComparison add-on module for X-Cart 4.2.2. User manual.
define product class options (features) for it. You can turn to modifying the product class details (image,
title, availability, or OrderBy position number) and defining product class options (features) at once, or put it
off till later (The ‘Modify product class’ form can be accessed at any time by clicking on the title of the
product class which you want to modify in the ‘Product classes’ form). To find out how to modify a product
class, please refer to the ‘Modifying product classes’ section of this User guide.
To add more product classes, use the ‘Add product class’ link in the section menu.
To return to the list of product classes (‘Product classes’ form), click the ‘Product classes list’ link in the
section menu. You will see the product classes you created in the form of a list in the ‘Product classes’ form.
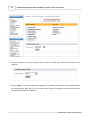
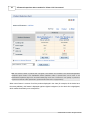
The ‘Product classes’ form in X-Cart GOLD and in the Provider area of X-Cart PRO contains a 3-column
table (PRODUCT CLASS / ENABLED / ORDERBY). In the Admin area of X-Cart PRO the table includes 4
columns (PRODUCT CLASS / ENABLED / ORDERBY / PROVIDER). The PROVIDER column allows the
store admin to find out who created this or that product class.
You can change the availability status of your product classes and the order in which they are displayed
right in the ‘Product classes’ form. To do so, select Yes or No from the ENABLED selectbox, change the
© 2009 Ruslan R. Fazliev. All rights reserved.
Administrative interface
9
product class position number in the OrderBy field opposite the title of the appropriate product class and
click on Update. The changes will be saved.
To delete a product class, select the check box next to the title of the product class you would like to delete
and click on ‘Delete selected’. The product class will be removed from the list. (You can use the Check all /
Uncheck all links to select or unselect all the check boxes).
4.2 Modifying product classes
Modification of a product class is done immediately after its creation (when the ‘Modify product class’ form is
displayed automatically) or later (by calling on the ‘Modify product class’ form with a click on a product class
title in the ‘Product classes’ list). In any case, the ‘Modify product class’ form can be used for editing the
product class details defined at the time of the class creation and for defining product class options
(features) characteristic of the class.
4.2.1 Modifying product class details
To modify the details of a product class:
1. Open the ‘Modify product class’ form.
© 2009 Ruslan R. Fazliev. All rights reserved.
10
X-FeatureComparison add-on module for X-Cart 4.2.2. User manual.
2. If necessary, change or delete the class icon.
To change the icon, click on the ‘Change image’ button, select the image with which you want to replace
the old one and click on ‘Apply’. The new image will appear in the ‘Modify product class’ form. (Please
note that at this point the image is merely selected, not saved. It will be lost if you refresh the page.)
To delete the icon, click on the ‘Delete image’ button.
3. If necessary, change the product class title, availability status and OrderBy position number.
4. Click on ‘Save’.
© 2009 Ruslan R. Fazliev. All rights reserved.
Administrative interface
11
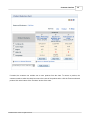
4.2.2 Managing product class options (features)
To define product class options (features):
1. Open the ‘Modify product class’ form. Scroll down to the ‘Product class options’ section of the form.
2. Use the ‘Add new option’ subsection to add product class options:
a. Enter a name for the new option (OPTION column).
b. Use the selectbox in the OPTION TYPE /FORMAT column to select the option type (Please refer to the ‘
Notes on options types’ section of this User guide to get information about the types of product class
options).
c. Select Yes or No from the selectbox in the ENABLED column to specify whether the feature should be
displayed to customers or not.
d. Enter a position number of the option in the list of product class options (ORDERBY column).
e. If applicable, specify available variants for the option being created: enter the variant names in a column,
each variant starting from a new line (VARIANTS column).
f. Click on ‘Add’. The option will be created and added to the list of options in the ‘Product class options’
section of the form.
g. If applicable, specify the format in which concrete values of the option should be displayed (OPTION
TYPE /FORMAT column, below the option type selectbox). Click on ‘Update’.
h. Repeat steps a-h to add more product class options.
© 2009 Ruslan R. Fazliev. All rights reserved.
12
X-FeatureComparison add-on module for X-Cart 4.2.2. User manual.
© 2009 Ruslan R. Fazliev. All rights reserved.
Administrative interface
13
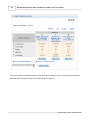
To delete product class options (features):
1. In the ‘Product class options’ section of the ‘Modify product class’ form select the check boxes next to the
names of the product class options which you want to delete.
2. Click on ‘Delete selected options’.
To modify product class options (features):
1. In the ‘Product class options’ section of the ‘Modify product class’ form change the necessary product
class options’ settings.
2. Click on ‘Update’.
To modify the variants of a product class option:
1. In the ‘Product class options’ section of the ‘Modify product class’ form click on the option variants which
you want to modify. The ‘Variants setup’ box will appear blow.
© 2009 Ruslan R. Fazliev. All rights reserved.
14
X-FeatureComparison add-on module for X-Cart 4.2.2. User manual.
2. Use the ‘Variants setup’ box to modify the contents of the variants section:
a. To rename one or more of the existing variants, change the names of the variants you want to rename
and click on ‘Update’.
b. To delete one or more of the existing variants, select the check boxes next to the names of the variants
you want to delete and click on ‘Delete selected variants’.
c. To add a new variant to the list, enter a name for the new variant in the ‘Add variant’ subsection and click
on ‘Add’.
3. Click on the X (‘Close’ sign) in the top right corner of the ‘Variants setup’ box. The box will be closed.
In a multilingual store, names of product classes, product class options and option variants can be entered
in different languages.
To enter multilingual names:
© 2009 Ruslan R. Fazliev. All rights reserved.
Administrative interface
15
1. Select the necessary language from the Language selectbox in the top right corner of the ‘Modify
product class’ form. The page will be refreshed and the product class title, product class options and
option variants fields will be emptied allowing place for you to enter new names in the selected language.
2. Enter the product class name into the ‘Product class’ field and click on ‘Save’.
3. Provide names for the product class options and click on ‘Update’.
4. Click on each of the option variants links, provide new names for the variants and click on ‘Update’.
5. If you need more languages, repeat steps 1-5.
4.2.3 Notes on option types
X-FeatureComparison module supports the following option types:
§ Text field
§ Single option selector
§ Multiple option selector
§ Numeric field
§ Boolean field
§ Date field
These types determine the way in which providers and customers will be able to input data into the fields
corresponding to product class options.
Text field is a simple text field into which custom text can be entered. Any characters entered into a field of
this type are regarded as text. This option type requires the option field format to be specified (Input box or
Text area, depending on the amount of text that needs to be entered).
Single option selector is a field displaying a predefined set of values from which only one can be selected.
This option type requires variants to be provided.
Multiple option selector is a field displaying a predefined set of values from which several values can be
selected. This option type requires variants to be provided.
Numeric field is a field that allows users to enter numeric values so they are treated as numbers (which
allows customers to search for products using number ranges). This option type requires the option field
format to be specified.
Boolean field is a field from which only one of the two values can be chosen: Yes or No (signifies presence
or absence of some feature).
Date field is a field that allows users to enter dates (customers can search for products using date ranges).
This option type requires the option field format to be specified.
© 2009 Ruslan R. Fazliev. All rights reserved.
16
X-FeatureComparison add-on module for X-Cart 4.2.2. User manual.
4.3 Assigning product classes to products
After the necessary product classes have been defined, they need to be assigned to the products for which
you want to allow comparison.
Note: It is not necessary that all the products in the store have a product class: assign product classes only to the products which
can be compared.
To assign a product class to some product:
1. Find the product and open it for modification.
2. Click the ‘Product class’ link in the section menu.
© 2009 Ruslan R. Fazliev. All rights reserved.
Administrative interface
17
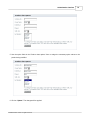
‘Assign product class’ form will appear. As the product has not been assigned to any product class yet, ‘
Undefined’ appears in the ‘Product class’ selectbox.
© 2009 Ruslan R. Fazliev. All rights reserved.
18
X-FeatureComparison add-on module for X-Cart 4.2.2. User manual.
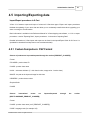
3. Use the selectbox to select the product class to which you want the product being modified to be
assigned.
4. Click on ‘Apply’. The product class will be assigned. The ‘Product class options’ form will appear below
the ‘Assign product class’ form (The set of fields in the ‘Product class options’ form corresponds to the
product class selected for the product).
© 2009 Ruslan R. Fazliev. All rights reserved.
Administrative interface
19
5. Use the option fields in the ‘Product class options’ form to assign the necessary option values to the
product being modified.
6. Click on ‘Update’. The changes will be applied.
© 2009 Ruslan R. Fazliev. All rights reserved.
20
X-FeatureComparison add-on module for X-Cart 4.2.2. User manual.
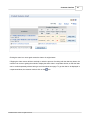
4.4 Searching for products with defined product
classes
The store administrator can search for products by product classes. When X-FeatureComparison module is
installed and enabled and at least one product class has been created, the ‘Advanced search options’
section of the search form in the Admin area includes ‘Product classes’ field. This field is a selectbox from
which you can select the product class to which the product being searched for belongs.
© 2009 Ruslan R. Fazliev. All rights reserved.
Administrative interface
21
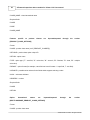
4.5 Importing/Exporting data
Import/Export procedures in X-Cart
X-Cart 4.1.x features export and import of almost all X-Cart data types. Export and import procedures
facilitate the updating of your store data and allow you to consistently transfer data when upgrading your
store or moving it to a new location.
Basic information is available in the Reference Manual for X-Cart shopping cart software, v. 4.2.2: on export
procedures - section "Exporting Data", import procedures - in the section "Importing Data".
Detailed information on X-Cart import and export can be found in the Import/Export Guide for X-Cart v4.1.x
(available for download from http://www.x-cart.com/manuals.html).
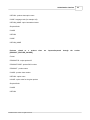
4.5.1 FeatureComparison: CSV Format
Classes of products are imported/exported through the section [PRODUCT_CLASSES].
Format
!FCLASSID - product class ID
!CLASS - product class name
!AVAIL - activeness indicator (Y - this class is active, empty value - inactive class)
!IMAGE - the path to the imported image for this class
!ORDERBY - product class number
Required fields
!CLASS
Classes
international
names
are
imported/exported
[MULTILANGUAGE_PRODUCT_CLASSES]
Format
!CLASS - product class name (conf. [PRODUCT_CLASSES])
!CODE - language code (for example: US)
© 2009 Ruslan R. Fazliev. All rights reserved.
through
the
section
22
X-FeatureComparison add-on module for X-Cart 4.2.2. User manual.
!CLASS_NAME - class international name
Required fields
!CLASS
!CODE
!CLASS_NAME
Features
specific
to
product
classes
are
imported/exported
through
the
section
[PRODUCT_CLASS_OPTIONS]
Format
!CLASS - product class name (conf. [PRODUCT_CLASSES])
!OPTIONID - product class option unique ID
!OPTION - option name
!TYPE - option type ("T" - text field, "S" - select box, "N" - numeric, "B" - Boolean, "D" - date, "M" - multiple
select box)
!FORMAT - option format (for example, a text field can have 2 formats: I - input field, T - text field).
!VARIANTS - possible value variants for the fields which suppose selecting a value
!AVAIL - activeness indicator
!ORDERBY - number
Required fields
!CLASS
!OPTION
Option
international
names
are
imported/exported
through
the
section
[MULTILANGUAGE_PRODUCT_CLASS_OPTIONS]
Format
!CLASS - product class name
© 2009 Ruslan R. Fazliev. All rights reserved.
Administrative interface
23
!OPTION - product class option name
!CODE - language code (for example: US).
!OPTION_NAME - option international name
Required fields
!CLASS
!OPTION
!CODE
!OPTION_NAME
Products
related
to
a
product
[PRODUCT_FEATURE_VALUES]
Format
!PRODUCTID - unique product ID
!PRODUCTCODE - product SKU number
!PRODUCT - product name
!CLASS - product class number
!OPTION - option name
!VALUE - option value for the given product
Required fields
!CLASS
!OPTION
© 2009 Ruslan R. Fazliev. All rights reserved.
class
are
imported/exported
through
the
section
24
X-FeatureComparison add-on module for X-Cart 4.2.2. User manual.
5 Customer interface
5.1 Using feature-based search
Feature-based search allows your customers to find products within defined product classes by certain
features specific to these products.
To use feature-based search, your customers need to click the Feature-based search link in the Special
menu.
Clicking this link opens the ‘What are you looking for?’ page where your customers can select the type of
products they are interested in (in fact, the customers select one of the product classes defined in the
admin/provider interface). For example, if the classes are named ‘Books’, ‘CD disks’ and ‘T-shirts’, and the
customer is looking for a book, he should select ‘Books’ by clicking on the appropriate link or icon.
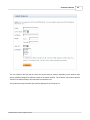
After selecting the desired product class, the customer will be provided with a form in which he will be able
to specify parameters for feature-based search (If the selected product class is ‘Books’, the form will be
called ‘Books features’).
© 2009 Ruslan R. Fazliev. All rights reserved.
Customer interface
25
The set of fields in the form will vary from one product class to another, depending on the product class
options (features) assigned to different classes in the admin interface. The customer only needs to provide
values for the fields relevant to his search and to submit the form.
The products found by the search query will be displayed in the ‘Products’ list.
© 2009 Ruslan R. Fazliev. All rights reserved.
26
X-FeatureComparison add-on module for X-Cart 4.2.2. User manual.
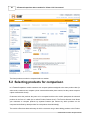
The found products can then be compared with one another.
5.2 Selecting products for comparison
In X-FeatureComparison module customers can compare products assigned to the same product class (In
other words, customers can compare a photo camera with another photo camera, but they cannot compare
a photo camera with a book).
Customers select the products they want to be compared and then the module juxtaposes the selected
products in the form of a table (the so-called ‘Product features chart’). The Product features chart allows
your customers to compare products by separate features (the features by which products can be
compared are defined by admin/provider for each product class individually).
The module offers three alternative ways in which a customer can go about adding products to the Product
© 2009 Ruslan R. Fazliev. All rights reserved.
Customer interface
27
features chart:
1. The first of the three ways is as simple as selecting the ‘Compare’ check boxes next to the products
which need to be compared and adding them directly to the Product features chart with one click on the ‘
Compare selected’ link.
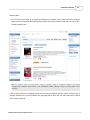
Note: The maximum number of products which a customer is allowed to select for comparison is defined in the General
settings/Feature Comparison options section of the administrative interface (‘Maximum number of products which can be
compared’)
If the customer selects for comparison products which belong to different product classes, he will receive a
warning message in the ‘Product classes’ form prompting him to select just one class with which he would
like to continue working.
© 2009 Ruslan R. Fazliev. All rights reserved.
28
X-FeatureComparison add-on module for X-Cart 4.2.2. User manual.
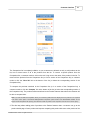
To compare the products within this product class, the customer needs to click the ‘Compare’ link
corresponding to it.
2. The second way involves using the so-called ‘Comparison list’. While browsing the Products list, a
customer selects the ‘Compare’ check boxes next to the products which need to be compared and, by
clicking the ‘Add to comparison list’ link, adds them to the ‘Comparison list’ (A special box appearing in
the menu column in which a list of products selected for comparison can be stored until the customer
requests the operation of product comparison to be carried out. The empty ‘Comparison list’ is not
displayed).
© 2009 Ruslan R. Fazliev. All rights reserved.
Customer interface
29
Another way a customer can add a product to the ‘Comparison list’ is by going to the product details page of
some product and clicking on the ‘Add to comparison list’ link there.
© 2009 Ruslan R. Fazliev. All rights reserved.
30
X-FeatureComparison add-on module for X-Cart 4.2.2. User manual.
If the products selected for comparison belong to different product classes, the Comparison list will be
divided into sections, so each of the involved product classes has its separate comparison list.
© 2009 Ruslan R. Fazliev. All rights reserved.
Customer interface
31
The Comparison list is completely editable, so your customers are allowed not only to add products to the
list, but to remove some or all of the products from the list. To remove a specific product from the
Comparison list, a customer needs to click on the red X sign next to the name of the product in the list. To
remove all the products from the Comparison list (or from a section of the Comparison list), a customer
needs to click the ‘Clear list’ link at the bottom of the list (or below the corresponding section of the
Comparison list).
To compare the products contained in the Comparison list (or in a section of the Comparison list), a
customer needs to click the ‘Compare’ link at the bottom of the list (or below the corresponding section of
the Comparison list). The products will be transferred to the Product features chart where the customer will
be able to compare them.
Note: If you want to enable the Comparison list for your customers, please select the ‘Display the list of products to be compared
in the menu column’ option in the General settings/Feature Comparison options section of the administrative interface. Do not
forget to set the Comparison list capacity (‘The maximum number of products in the comparison list in the menu column’ option).
3. The third way allows adding pairs of products to the Product features chart: a customer can go to the
product details page of some product and request comparing this product with some other product of the
© 2009 Ruslan R. Fazliev. All rights reserved.
32
X-FeatureComparison add-on module for X-Cart 4.2.2. User manual.
same product class. The product with which the initially chosen product will be compared is selected from
a selectbox on the product details page. Both the products (the one whose product details are displayed
and the one selected from the list in the select box) are added to the Product features chart when the
customer clicks the ‘Product comparison’ link next to the select box.
Note: More products of the same product class can then be added one by one to the Product features chart using the select box
below the Product features chart.
Note: The maximum number of products which can appear in selectboxes can be defined in the General settings/Feature
Comparison options section of the administrative interface (‘Maximum number of products which can be shown on the
feature-based comparisons page and on the Product details page in the form of a select box. If the quantity of products for
comparison exceeds the number specified here, product selection will be done in a popup window’).
5.3 Comparing products
No matter what method was used for selecting the products for comparison, they finally appear in the
Product features chart.
© 2009 Ruslan R. Fazliev. All rights reserved.
Customer interface
33
The ‘Product features’ column displays a list of features by which the selected products are compared. The ‘
Products’ section displays the products which are compared. According to the default chart layout, product
features are displayed vertically and products are displayed horizontally.
If the customer believes some feature is not essential for the comparison, he can remove this feature from
the chart. To remove a feature, the customer needs to select the check box next to it and to click the ‘
Remove selected features’ link at the bottom of the ‘Product features’ column.
© 2009 Ruslan R. Fazliev. All rights reserved.
34
X-FeatureComparison add-on module for X-Cart 4.2.2. User manual.
The removed features are excluded from the chart, however, they appear above the chart in the form of
links from which they can be restored. The customer can restore any of the removed features at any time by
clicking the ‘Removed features’ links corresponding to these features.
© 2009 Ruslan R. Fazliev. All rights reserved.
Customer interface
35
If needed, the customer can exclude one or more products from the chart. To remove a product, the
customer needs to select the check box next to the name of the product and to click the ‘Remove selected
products’ link at the bottom of the ‘Products’ section of the chart.
© 2009 Ruslan R. Fazliev. All rights reserved.
36
X-FeatureComparison add-on module for X-Cart 4.2.2. User manual.
The removed product is excluded from the chart, however, it is added to the list of products in the selectbox
below the chart and it can be restored from the selectbox at any time.
© 2009 Ruslan R. Fazliev. All rights reserved.
Customer interface
37
To restore a removed product from the selectbox or to add a new product to the chart, select the necessary
product from the selectbox and click on the ‘Add product’ button.
© 2009 Ruslan R. Fazliev. All rights reserved.
38
X-FeatureComparison add-on module for X-Cart 4.2.2. User manual.
Note: The maximum number of products which can appear in the selectbox can be defined in the General settings/Feature
Comparison options section of the administrative interface (‘Maximum number of products which can be shown on the
feature-based comparisons page and on the Product details page in the form of a select box. If the quantity of products for
comparison exceeds the number specified here, product selection will be done in a popup window’).
When some feature is common for all the products displayed in the chart (for example, all the books have
the same publisher), this feature is displayed against a lighter background, so the whole line is highlighted,
which makes the similarity more conspicuous.
© 2009 Ruslan R. Fazliev. All rights reserved.
Customer interface
39
For convenience the customer can hide the features common for all the products in the chart, so that only
the differences are shown. To conceal all the similarities, the customer needs to click on the
icon. The
lines with the ‘common’ features will be removed from the chart. The look of the icon will also be changed:
. Clicking the
icon, the customer can restore the lines showing similarities in the chart.
© 2009 Ruslan R. Fazliev. All rights reserved.
40
X-FeatureComparison add-on module for X-Cart 4.2.2. User manual.
Sometimes it may be convenient to rearrange the Product features chart so that the product names are
displayed vertically (in a column), and the product features are displayed horizontally next to them (in other
words, to flip the coordinate vectors of the chart). This functionality turns out especially helpful if the number of
products being compared is much greater than the number of involved features (Great numbers of products
make the chart too wide to fit into the screen. Arranging the products vertically can help the customer to deal
with the problem). To flip the coordinate vectors, the customer needs to click the
icon.
© 2009 Ruslan R. Fazliev. All rights reserved.
Customer interface
41
Clicking the same icon once again reverts the chart to its original state.
If flipping the chart vectors still does not help to make the process of working with the chart any better, the
customer can resort to getting the module to display the whole chart in a separate window, so that the chart
can be scrolled separately without having to scroll the whole store page. To get the chart to be displayed in
a separate window, the customer needs to click on the
© 2009 Ruslan R. Fazliev. All rights reserved.
icon.
X-FeatureComparison add-on module for X-Cart 4.2.2. User manual.
© 2009 Ruslan R. Fazliev. All rights reserved.
Printed: 30.06.2009