1
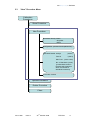
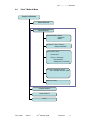
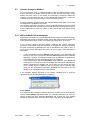
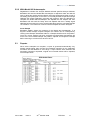
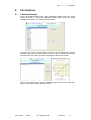
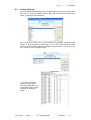
410 BlueNotes Software
TM
Operator Manual
Copyright © 2008 Sherwood Scientific Ltd.
All rights reserved.
410 91 008
Issue 2
22nd October 2008
ECN 543
1
G:\DOCUMENT CONTROL\Manuals\Flame\410\41091008 BlueNotes for M410 Operator Manual Issue 2.doc
410 BlueNotesTM Software
Contents
1.
INTRODUCTION ........................................................................................3
1.1
1.2
1.3
2.
INSTALLATION ..........................................................................................5
2.1
2.2
2.3
2.4
2.5
3.
Location ............................................................................................................ 5
Principles of Operation...................................................................................... 5
Software Installation.......................................................................................... 5
Connecting Peripheral Devices ......................................................................... 7
2.4.1 Digital Interface ...................................................................................... 7
2.4.2 M860 Autosampler ................................................................................. 7
2.4.3 Model M805 Diluter ................................................................................ 7
Supervisor Setup .............................................................................................. 8
2.5.1 Supervisor Access.................................................................................. 8
2.5.2 Options .................................................................................................. 8
SOFTWARE STRUCTURE ......................................................................10
3.1
3.2
3.3
3.4
4.
Top Level Menu Structure ............................................................................... 10
New Configuration Menu ................................................................................. 11
New Procedure Menu...................................................................................... 12
New Method Menu .......................................................................................... 13
SYSTEM AND SOFTWARE SETUP ........................................................14
4.1
4.2
4.3
5.
System Configuration...................................................................................... 14
4.1.1 Show Configuration .............................................................................. 14
4.1.2 New Configuration ................................................................................ 14
4.1.3 Delete Configuration............................................................................. 16
4.1.4 Close.................................................................................................... 16
Calibration Procedure ..................................................................................... 17
4.2.1 Show Procedure ................................................................................... 17
4.2.2 New Procedure..................................................................................... 17
4.2.3 Delete Method ...................................................................................... 18
Analysis Methods ............................................................................................ 19
4.3.1 Show Method ....................................................................................... 19
4.3.2 New Method ......................................................................................... 19
4.3.3 Delete Method ...................................................................................... 21
4.3.4 Close.................................................................................................... 21
OPERATION ............................................................................................22
5.1
5.2
5.3
6.
Operate Calibration Procedure ........................................................................ 22
5.1.1 Digital Interface .................................................................................... 22
5.1.2 Systems with an Autosampler............................................................... 23
5.1.3 Calibration Complete ............................................................................ 23
Operate Analysis Method ................................................................................ 24
5.2.1 Without Model 860 Autosampler........................................................... 24
5.2.2 With Model 860 Autosampler ............................................................... 25
Reports ........................................................................................................... 25
FILE ARCHIVES.......................................................................................26
6.1
6.2
7.
Contacts ........................................................................................................... 3
Using this Manual ............................................................................................. 4
Warranty ........................................................................................................... 4
Calibration results ........................................................................................... 26
Analysis Results.............................................................................................. 27
APPENDIX A – WARRANTY ...................................................................28
410 91 008
Issue 2
22nd October 2008
ECN 543
2
410 BlueNotesTM Software
1
Introduction
1.1
Contacting Sherwood Scientific Ltd.
1.1.1
If the 410 BlueNotes Software was supplied by a third party, i.e. a Distributor in
the UK or Overseas, the first contact should be that Distributor for all issues of
supply and operation. Please note here the details of the Company where you
purchased this unit:
Company
…………………………………………….
Tel Number
…………………………………………….
Contact Name …………………………………………….
Email
1.1.2
……………………………………………..……….
If the Software was obtained from Sherwood Scientific Ltd., contact for all issues
of supply and operation should be sent to:
[email protected]
Tel +44 (0)1223 243444
Fax +44 (0)1223 243300
410 91 008
Issue 2
22nd October 2008
ECN 543
3
410 BlueNotesTM Software
1.2
Using this Manual
This Operator Manual will inform the user how to operate the 410 BlueNotes
Software in conjunction with a Model 410 Flame Photometer fitted with a Digital
Interface and, where appropriate, the Model 805 Diluter and/or the Model 860
Autosampler.
The user will be able to:
•
•
•
•
•
•
•
•
Set up system configurations, (e.g. Model 410 Flame Photometer only &
manual sample input or Model 410 Flame Photometer with Model 860
Autosampler)
Assign Supervisors and Users
Create new Calibration Procedures (single or multipoint) and new Analysis
Methods
Assign the use of Spot Check standards and implement Auto Correction
facility
Perform Calibration Procedures and run Analysis Methods
Recall, review and reuse previous calibrations
Recall and review analyses
Automatically generate Analysis Reports
Dependent on the system configuration, the user may be required to refer to the
following additional operating manuals:
•
•
•
•
1.3
Model 410 Flame Photometer
Digital Interface for M410
Model 805 Diluter
Model 860 Autosampler
Warranty
The Sherwood Scientific warranty statement is included at Appendix A.
410 91 008
Issue 2
22nd October 2008
ECN 543
4
410 BlueNotesTM Software
2
Installation
2.1
Location
410 BlueNotes Software is supplied on a CDROM. The user requires the 16
character alphanumeric registration code or “activation key”, in order to access
the full software package which runs in Windows XP Pro SP2.
2.2
Principles of Operation
Once the 410 BlueNotes Software has been installed on a PC it requires the
following information to operate:
• The COM Port address(es) of the 410 Digital Interface and the Model 860
Autosampler (if applicable).
• A System Configuration file, to indicate sample introduction mode (Manual or
Autosampler), Model 805 Diluter use (and dilution ratio) or not, signal
selection method, measurement units and analyte. (More than one
configuration file may be stored).
• A Calibration Procedure (linked to a configuration file) including Calibrator
details; required to create a calibration graph.
• An Analysis Method (linked to a calibration procedure) including sample
details and Spot Check standard options.
NOTE: The serial number of the 410 Digital Interface to which the software
is connected must match that within the software being utilised otherwise
the two will not communicate.
2.3
Software installation
The 410 BlueNotes Software is supplied on a CD-ROM with a unique 16
character alphanumeric registration code. Insert the CD-ROM into the disk drive
of a PC. The software should auto-run and the following window appear.
Click on the required button for
English or French installation.
Click on “Install BlueNotes 410” to
load the software onto a P.C.
Once the software has loaded the
same screen will appear again. Click
on “Back to Main Screen”. Then
click on “Exit”.
410 91 008
Issue 2
22nd October 2008
ECN 543
5
410 BlueNotesTM Software
Locate the BlueNotes 410 icon on
the PC’s desktop, and open the
application by placing the mouse
pointer on the icon and clicking.
The Licence activation page will then
appear with prompts to enter the
activation key supplied with the
software disc (16 alpha-numeric
character code).
With the correct code entered the following
dialog box will appear.
Click on OK and the 410 BlueNotes Start
Page will appear. Place the mouse
pointer on “Supervisor” in the menu bar
at the top of the screen, select Access,
and then type letmein in the Enter
Supervisor Password box and click on
Log In.
Now
when
returning
to
Supervisor/Access you may enter and
save your own (new) supervisor password.
If at any time you wish to:
•
•
•
View the operating manual (Word or PDF format) or
Watch the introductory presentation of the 410 BlueNotes Software or
Download the 410 Digital Terminal; used to calibrate the digital output to the
M410 display or retrieve the Digital Interface serial number. (Users of
Windows Vista will need this facility, users operating within Windows XP
may use this facility or Windows Hyperterminal).
Click on the Help option in the top level menu on the 410 BlueNotes Start Page
and select the required option from the drop down menu.
410 91 008
Issue 2
22nd October 2008
ECN 543
6
410 BlueNotesTM Software
2.4
Connecting Peripheral Devices
2.4.1 Model 410 Flame Photometer (Digital Interface)
Connect the host PC to the 410 Digital Interface using the serial connection
cable provided. The 9 pin D-plug connects to a serial port on the PC. If the PC
does not have a spare serial port, use a serial/USB adapter.
2.4.2 860 Autosampler
The Model 860 Autosampler has a 9 way male D socket on the rear panel of the
base compartment. That socket needs to be connected to the host PC using the
null modem cable provided (part number 001 09 003) and a serial/USB adapter
(part number 001 09 004).
2.4.3 Model 805 Diluter
There is no connection between the Model 805 Diluter and the software host
PC.
410 91 008
Issue 2
22nd October 2008
ECN 543
7
410 BlueNotesTM Software
2.5
Supervisor Setup
To apply Supervisor restrictions; start the 410 BlueNotes Software by clicking on
the Sherwood Logo Icon. From the BlueNotes Start Page, select “Supervisor”
from the top menu bar to gain access to the following menu structure, then select
the Access Option.
Supervisor
Access
Supervisor Name
Options
Connections
Display
Users
2.5.1 Supervisor Access
410 BlueNotes Software has the facility to enable the set-up of System
Configuration, Calibration Procedures and Analysis Methods to be limited to a
designated “Supervisor”. This password protected facility may be set up through
the Supervisor/Access menu. If you wish to apply supervisor restrictions, enter a
password, confirm by re-entering and then click “Start in Supervisor Mode”. To
apply this new access facility, exit the BlueNotes Software, from the Start Up
page (click on file, then exit) then restart by clicking on the 410 BlueNotes
icon/Sherwood Logo. You will then be asked to enter your password.
410 91 008
Issue 2
22nd October 2008
ECN 543
8
410 BlueNotesTM Software
2.5.2 Options
2.5.2.1 Connections:
Within Supervisor Options, the
user must indicate which COM
port the 410 Digital Interface is
connected to or if keyboard entry
of data is required. If a Model 860
Autosampler is to be used, enable
it here and select the appropriate
PC COM port. The 410 Digital
Interface serial number shown
here must correspond to the
Digital Interface in the Model 410
Flame Photometer. If the serial
number is not correct for the
interface the 410 BlueNotes
Software will not work.
Note: If you are unsure which COM ports the 410 Digital Interface (and/or
Autosampler) is connected to; with the cable(s) connected to the PC and the
Flame Photometer (and Autosampler) switched on, click on START (Microsoft
Windows XP), then Control Panel, then System, then Hardware, then Device
Manager and then open up Ports. The COM port connections should be visible
there).
410 Interface Serial No: To determine this (if necessary), with the Interface
connected to a PC serial port, access HyperTerminal, use these settings:9600 baud, 8 bit, No parity, Stop bit 1, Flow Control None.
Then switch on the Model 410, the serial number will appear on the PC Screen.
HyperTerminal is available in Windows operating software packages prior to
Vista. To access HyperTerminal and set it up to communicate with your new 410
Interface Module, from the START menu on the Task Bar: Select All Programs,
Accessories, Communications, HyperTerminal, New Connection, and enter
Name (e.g. M410 Flame), Coms1, Port Settings, Bits per Second 9600, Data
Bits 8, Parity None, Stop Bits 1, Flow Control None and then Apply.
PCs operating within Windows Vista do not offer Windows HyperTerminal. For
those operators we have provided the 410 Digital Interface Terminal Facility
which may be downloaded from the 410 BlueNotes Software disc. This facility
may also be used within other Windows Operating systems.
2.5.2.2 Display
Use Display to set the default parameters for
the real time chart recorder displayed during
operation of an Analysis Method. There is a
choice of coloured highlights for the result
tables to ”flag” sample results that gave either
a calculated value above the Max
Concentration defined in the Calibration
Procedure or an unstable reading to indicate
samples that might warrant re-analysis.
2.5.2.3 Users:
Within this page of the software User names
may be added or deleted. The requirement to
enter a User name before an analysis method
is run can be requested or disabled.
410 91 008
Issue 2
22nd October 2008
ECN 543
9
410 BlueNotesTM Software
3
Software Structure
3.1
410 BlueNotes “Top Level” Menu Structure
Top Level
410 BlueNotes
File
System Configuration
Calibration Procedures
Analysis Methods
Calibration Results
Analysis Results
M410 Setup Instructions
410
410 & 805
Exit
410 & 860
Supervisor
410 & 805 & 860
Access
Options
Help
About
Word document
User Guide
PDF Document
Release Notes
BlueNotes Presentation
410 91 008
Issue 2
22nd October 2008
ECN 543
10
410 BlueNotesTM Software
3.2
“New” Configuration Menu
System Configuration
Show Configuration
New Configuration
Configuration Identity: Name
Originator
Memo
Sample Introduction: Manual
Autosampler: Dwell
Wait
Post Standard Rinse
Diluter: None
Red Tube (~1:50):
Delay
Orange Tube (~1:200) Delay
Peak Selection: Manual
Automatic: Peak Timeout
Instrument: Warm-Up (Minutes)
Readings (Units): ppm, mg/l, mmol/l, meq/l
Configuration Locked
Delete Configuration
Close
410 91 008
Issue 2
22nd October 2008
ECN 543
11
410 BlueNotesTM Software
3.3
“New” Procedure Menu
Calibration
Procedures
Show Procedure
New Procedure
Procedure Identity: Name
Originator
Memo
Configuration: (choose from dropdown list)
Standard Details: Analyte
(select)
Format
(select)
Max Conc. (enter value)
No. of Standards (enter)
(put standard values in
the table which appears
when the number of
standards is entered)
Procedure Locked
Operate Procedure
Delete Procedure
Close
410 91 008
Issue 2
22nd October 2008
ECN 543
12
410 BlueNotesTM Software
3.4
“New” Method Menu
Analysis Methods
Show Method
New Method
Method Identity: Name
Originator
Memo
Calibration: Name (Select)
Always Calibrate?
Spot Check: None
First & Last
Every “x” Samples
Concentration
Sample Auto correction
Number of Samples (enter)
Fill in sample names in table
Method Locked
Operate Method
Delete Method
Close
410 91 008
Issue 2
22nd October 2008
ECN 543
13
410 BlueNotesTM Software
4
System and Software Setup
Before the Model 410 Flame Photometer is blanked and calibrated in preparation
for sample analysis the 410 BlueNotes Software needs information about the
instrument configuration being used and other parameters pertinent to the
calibration and subsequent analysis to be performed.
The software allows storage of multiple System Configurations, Calibration
Procedures and Method Analyses for recall as required which can be setup by a
Supervisor and then locked (if required) to prevent alteration.
4.1
System Configuration
From the BlueNotes Start Page, select System Configuration using the mouse
pointer and click. There is a choice:
Show (an existing) Configuration
New (create) Configuration
Delete Configuration
Select an option using the mouse pointer and click.
4.1.1 Show Configuration
Show Configuration allows the user to review an existing configuration; any
changes made will prompt BlueNotes to note that the configuration details have
been modified and ask if the changes should be saved.
If a supervisor has locked a configuration then a regular User will see the greyed
out details and no changes can be made. If a supervisor clicks to show a
configuration they have already locked then they will be able to unlock the
configuration here.
4.1.2 New Configuration
To set up a new configuration click to reveal the following:
410 91 008
Issue 2
22nd October 2008
ECN 543
14
410 BlueNotesTM Software
Configuration Identity:
Enter a new Name, indicate the Originator of the new Configuration and record
any required comments in the Memo text box.
Note: date and time created/modified are shown but cannot be altered.
Sample Introduction:
Select Manual or Autosampler by clicking the appropriate button. If you are using
a Model 410 Flame Photometer with a Model 860 Autosampler, select the
Autosampler option. The Dwell and Wait times become active and allow you to
set them as required. Dwell sets the time the autosampler probe will be
immersed within (suck up) a sample. Wait sets the time period between the
probe exiting one sample and entering the next sample (the gap between
samples).
When setting up a method using the Autosampler some experimentation will
normally be required to establish appropriate Dwell and Wait times depending on
the use of the Model 805 Diluter and sample characteristics.
Selecting Autosampler enables the Post Standard Rinse feature to become
available. Selecting Post Standard Rinse instructs the Model 860 Autosampler to
rinse the probe and tube briefly in the blank solution every time it leaves the
standard in position ‘S’; the highest or spot check standard. No data is collected
from this rinse solution, but the rinses are shown in the sample table.
Diluter:
Indicate here if a Model 805 Diluter is in use. If it is, the button selected indicates
the dilution ratio used: the Red tube is for a 1:50 dilution and the Orange tube is
for a 1:200 dilution (relates to the tubes used on the Diluter). The Delay time
relates to the time the 410 BlueNotes Software “waits” before it begins to monitor
for a stable signal and is particularly important if Automatic Peak Selection is
requested so that the software then determines when to take the reading from
the Flame Photometer for standards and samples (see below).
When setting up a new procedure it is usual to perform a certain amount of
experimentation to determine the best Delay time: set too short and the signal
from the detector of the Model 410 Flame Photometer will be climbing after the
sample introduction and poor precision may result.
Peak Selection:
Determines how a reading is taken.
Selecting “Manual” means the user decides when a stable signal has been
achieved and then presses the print button on the Model 410 Flame Photometer
Digital Interface to send the displayed reading immediately to the software.
Selecting “Automatic” means the software determines when the signal in the
flame has stabilised after sample introduction. In “automatic” mode, the signal
monitoring process is initiated when:
• the user presses the print button on the Digital Interface immediately the
sample uptake tube attached to the Atomiser or Diluter is placed in the
sample, or
• the Autosampler probe enters a sample or standard.
Peak Timeout time is used to give a time limit to the search for a stable reading
when in Automatic Peak Selection mode. Samples that give rise to unstable
reading are highlighted in the analysis report.
410 91 008
Issue 2
22nd October 2008
ECN 543
15
410 BlueNotesTM Software
Instrument Warm Up:
Enter a Warm Up time. This is the time required for the Model 410 Flame
Photometer’s flame assembly to stabilise after initial lighting. In an analysis
method, the user may override the warm up period if the flame is already stable;
i.e. the flame has already been alight for > 45 minutes.
Readings:
Select, from a dropdown list, the Units of concentration to be used to report
sample concentration after calibration conversion of recorded sample readings.
Configuration Locked:
Supervisors click on the “Configuration Locked” box to grey out user entered
variables. Alterations to the Configuration by regular Users will not be allowed.
Supervisors can unlock and make changes.
Save:
Click on Save and the Configuration will be saved under the name given in the
“Configuration Identity”. The Configuration can then be recalled from a list of
saved Configurations and used in a Calibration Procedure.
4.1.3 Delete Configuration
If a configuration has been referred to later in a Calibration Procedure then
clicking Delete Configuration will result in a dialogue box explaining that it cannot
be deleted. It is however possible to make changes to the configuration, provided
that it has not been locked by a Supervisor.
If the configuration selected for deletion has not been referenced in a Calibration
Procedure then BlueNotes will ask to the user to confirm before deleting the
configuration.
4.1.4 Close
Click Close to return to the BlueNotes Start Page.
410 91 008
Issue 2
22nd October 2008
ECN 543
16
410 BlueNotesTM Software
4.2
Calibration Procedure:
From the 410 BlueNotes Start Page, select Calibration Procedures. There is a
choice:
Show (an existing) Procedure
New (create) Procedure
Operate Procedure
Delete Procedure
Close (to return to Start Page). Select an option and click.
4.2.1 Show Procedure:
Show Procedure allows the user to review an existing Procedure; any changes
made will prompt BlueNotes to note that the Procedure details have been
modified and ask if the changes should be saved.
If a supervisor has locked a procedure then a regular User will see the greyed out
details and no changes can be made. If a supervisor clicks to show a procedure
they have already locked then they will be able to unlock the procedure here.
4.2.2 “New” Procedure:
If New Procedure option is greyed out you need to login – go to BlueNotes start
page and select Supervisor Access from top level menu.
To create a calibration procedure, select New Procedure to reveal the following:
Procedure Identity:
Enter a Name, indicate the Originator of the new procedure and record any
required comments in the Memo text box.
Note: date and time created/modified are shown but cannot be altered.
Configuration:
Choose a Configuration from the drop down options list: the details are shown to
ensure the correct one is selected for the calibration procedure to be performed.
410 91 008
Issue 2
22nd October 2008
ECN 543
17
410 BlueNotesTM Software
Standard Details:
Choose the Analyte and select required number Format from the dropdown
options. Enter the maximum concentration standard, Max Conc. to be used;
results reported above this limit will be highlighted as over range. Enter the
number of standards you intend to use. If working within the linear response
range of the analyte, a single point calibration is sufficient. For multi-point
calibrations a minimum of five standards should be used; it is unlikely that you
would need to use more than seven.
Note: if more that ten standards are used, only ten data points will be displayed
on the calibration graph, although all point are used to generate the calibration
equation.
Enter each standard value in the table, in the order they are to be analysed and
from the most concentrated first and descending in concentration. If the
standards are not entered in descending order an error message will prompt the
user to change the order. It is important that the concentration of the standards is
added accurately into the table; BlueNotes uses this information to generate the
calibration equation and from that sample concentrations are calculated.
If a configuration was selected which includes a Model 860 Autosampler, the vial
numbers appear in the table. (Note: these will be in descending order from 40,
with the first standard in position S on the carousel).
Procedure Locked:
Click on this box to prevent changes to the procedure. Supervisors click on the
Procedure Locked box to grey out user entered variables. Alterations to the
procedure by regular Users will not be allowed; Supervisors can however unlock
and make changes.
Save:
Click the Save button to save the Calibration Procedure under the name in
“Procedure Identity”. The Procedure can then be recalled and used in an
Analysis Method.
4.2.3 Delete Method
Clicking delete Method will prompt BlueNotes to ask the user to confirm before
deleting the analysis method.
410 91 008
Issue 2
22nd October 2008
ECN 543
18
410 BlueNotesTM Software
4.3
Analysis Method
From the BlueNotes Start Page, select Analysis Methods. There is a choice:
Show (an existing) Method
New (create) Method
Operate Method
Delete Method
Close (to return to Start Page):
If New Method option is greyed out you need to login – go to BlueNotes start
page and select Supervisor Access from top level menu.
4.3.1 Show Method
Show Method allows the user to review an existing Method; any changes made
will prompt BlueNotes to note that the Method details have been modified and
ask if the changes should be saved.
If a Supervisor has locked a method then a regular User will see the greyed out
details and no changes can be made. If a Supervisor clicks to show a method
they have already locked then they will be able to unlock the method here.
4.3.2 New Method
To create an analysis method, select New Method to reveal the following:
Method Identity:
Enter a Name; indicate the Originator of the Analysis Method and any required
comments in the comments Memo text box.
Note: date and time created/modified are shown but cannot be altered.
Calibration:
Select the Calibration Procedure you wish to use in association with the Analysis
Method from the drop down menu.
410 91 008
Issue 2
22nd October 2008
ECN 543
19
410 BlueNotesTM Software
Always Calibrate:
If this box is checked the software will direct the user to re-run the selected
calibration procedure immediately prior to running an analysis method.
If the method does not specify Always Calibrate then the first time the method is
run, BlueNotes will inform that no calibration data is available and a calibration
must be performed. The next time the method is run BlueNotes will provide the
calibration file and date performed and allow the user to specify whether or not to
accept this previous calibration or not. Care should be exercised when accepting
a previous calibration, it is important that no instrument settings have changed,
especially if Spot Checks (below) are not selected, as in this instance only a
blank will be set by the user.
Spot Check and Sample Auto-correction:
The 410 BlueNotes software allows standard “spot checks” to be performed
during the analysis of a series of samples,
“None”
“First and Last” or
“Every “x” samples”.
Spot Checks are particularly useful in systems where many samples may be
presented to the Model 410 Flame Photometer e.g. Autosampler systems where
40 samples may be presented to the flame photometer unattended. Each time a
Spot Check is called for, the standard is presented to the Model 410 Flame
Photometer and the response recorded.
Spot Checks are also useful in that they allow a previously saved calibration to
be used; if working in the linear range of the instrument for the analyte of interest
then single point calibrations can be reused and adjusted with the use of the Spot
Check in conjunction with the Auto Correct feature below.
If the Auto Correction facility is also selected then samples after a Spot Check
measurement will be compared to the calibration equation adjusted by that most
recent Spot Check reading. 410 BlueNotes will report the instrument reading, the
concentration according to the initial calibration and the Auto Corrected result
based on the most recent Spot Check result.
Hence any change in response due to drift in flame conditions with time may be
kept to a minimum. If Auto Correction is not selected the analysis of the Spot
Check will be reported for the user to interpret any drift.
If using a Model 860 Autosampler, the Spot Check is placed in the ‘S’ standard
position on the carousel.
Concentration:
If you select spot check, enter the Concentration of the spot check standard.
Sample Auto-correction:
Click the “Sample Auto-correction” box if you require sample result correction in
the final report, relative to the most recent spot check reading.
No. of Samples:
Set the number of samples to be analysed using the scroll box next to “No. of
Samples”. The number of rows in the sample table will expand and if the
Configuration specified includes an Autosampler, the vial numbers will appear.
At this point the user may enter sample names and/or numbers in the Identifier
column (max. 16 characters).
410 91 008
Issue 2
22nd October 2008
ECN 543
20
410 BlueNotesTM Software
Method Locked:
Supervisors click on the Method Locked box to grey out user entered variables.
Alterations to the method by regular Users will not be allowed; Supervisors can
however unlock and make changes.
Save:
Click the Save button to save the Analysis Method under the Name in “Method
Identity”. The Method can then be recalled to run an Analysis Method and
analyse samples.
4.3.3 Delete Method
Clicking delete Method will prompt BlueNotes to ask the user to confirm before
deleting the analysis method.
4.3.4 Close
Clicking close will return the user to the start page.
410 91 008
Issue 2
22nd October 2008
ECN 543
21
410 BlueNotesTM Software
5
Operation
5.1
Operate (Calibration) Procedure
To operate a procedure (run a calibration|), click on “Operate Procedure” within
the Calibration Procedure page of the software. A blue dialog box will appear
with prompts, which guide the user through each step of the procedure. Follow
the instructions as they appear bearing in mind the following points:
NOTE: don’t forget; set the 410 filter selector to the required analyte before
adjusting the reading.
5.1.1 Systems with no Autosampler
Blanking (no Autosampler)
When asked to “aspirate blank”, put the sample uptake tube of the Nebuliser or
Model 805 Diluter into the blank and adjust the blank control on the Model 410
Flame Photometer to set the display to your required setting (usually zero - but
does not have to be). If the display is negative, the software will not accept the
reading when the print button is pressed. In some cases it may be advisable to
set the display to a slight positive such that any change in flame conditions that
cause subsequent blank readings to drop slightly will still not send a negative
reading to BlueNotes.
When the displayed reading becomes stable, press the Print button on the 410
Digital Interface. The reading will be transferred to the calibration table.
Top Standard (no Autosampler)
Next, BlueNotes prompts you to aspirate your top standard. Introduce this to the
sample uptake tube and wait for the signal to stabilise. Adjust the reading if
necessary to your required level using the fine control and then press the print
button. The blank and the fine controls on the M410 must now be left alone.
If it was necessary to change the course gain setting on the M410 to achieve
your desired reading for your standard, the calibration process must be done
again as the blank reading will not be relevant.
Subsequent standards (no Autosampler)
For subsequent standards in a multipoint calibration, aspirate the standards as
instructed by BlueNotes.
•
•
410 91 008
If using a configuration that specified Manual Peak Selection you need to
press print when each standard has achieved a stable reading.
If Automatic Peak Selection was specified in the system configuration,
once the blank and top standards have been “set” the print button must be
pressed immediately the standard is aspirated. The software will then count
down the Delay then establish when a stable signal is obtained and enter the
reading for the standard in the calibration table. Continue to follow the
instructions as they appear in the blue box until the procedure is complete.
Issue 2
22nd October 2008
ECN 543
22
410 BlueNotesTM Software
5.1.2 Systems with an Autosampler
Blanking (with an Autosampler)
The Model 860 Autosampler will automatically move to aspirate the blank and
BlueNotes will instruct the user to adjust the blank control to set the display on
the M410 to the required setting (usually zero - but does not have to be). If the
display is negative, the software will not accept the reading when the print button
is pressed, in some cases it may be advisable to set the display to a slight
positive such that any change in flame conditions that cause the blank reading to
drop will still not send a negative reading to BlueNotes.
When the displayed reading achieves a stable level, press the print button on the
M410 Interface and the reading will be transferred to the calibration table in the
software.
Top Standard (with an Autosampler)
Immediately the Model 860 Autosampler will move to aspirate the top standard
and the user is instructed to adjust the reading, if necessary, to the required level
using the fine control and then press the print button; be sure to wait for the
signal to stabilise. The blank and the fine controls on the M410 must now be left
alone.
If it was necessary to change the course gain setting to achieve the desired
reading for the standard the calibration process must be restarted as the blank
reading will not be relevant.
Subsequent standards (with an Autosampler)
The Model 860 Autosampler will begin to aspirate the subsequent standards.
Once the blank and top standards have been “set”, there is nothing further for the
user to do; the software will establish when a stable signal has been achieved,
enter the reading for the standard and continue on to aspirate the next one until
all standards have been measured and their responses entered into the
calibration.
5.1.3 Calibration Complete
When the calibration is complete a dialog box will appear. The calibration graph
with it’s correlation coefficient is displayed on the right of the screen.
If the fit to the line was not good enough, the calibration will fail.
It is worth re-running the calibration procedure to see if results are improved,
alternatively fresh solutions should be prepared. See M410 Manual –
Troubleshooting.
410 91 008
Issue 2
22nd October 2008
ECN 543
23
410 BlueNotesTM Software
5.2
Operate (Analysis) Method
To run an analysis, click on “Operate method” within the Analysis Method page.
A blue dialog box will appear with prompts the user through each step. In the
bottom left hand corner of the display, the Instrument Connection Status box
confirms communication with the 410 and Model 860 Autosampler. Follow the
instructions as they appear bearing in mind the following points:
If “always calibrate” was selected in the Analysis Method setup page, the method
will start with the Calibration Procedure
The software will prompt the user to enter any sample identifiers (names), these
may have already been entered when the analysis method was set up but this is
another opportunity to edit e.g. update a daily method with new sample batch
numbers.
5.2.1 Without Model 860 Autosampler
Regardless of whether the Analysis Method selected specifies Always Calibrate,
BlueNotes will prompt to aspirate a blank. Adjust the reading with the Model 410
Flame Photometer blank control (if necessary) and press print on the 410.
If the Analysis Method specifies Always Calibrate the related calibration
procedure will progress. After the calibration is complete the user must evaluate
the graph and make an assessment of the fit and decide if they wish to use it. If
the fit is too poor the Calibration Procedure can be run again. If the calibration is
acceptable:
•
•
If the Configuration specified Manual Peak Selection, then BlueNotes will
prompt for the user to press print once a stable signal has been obtained
aspirating a sample. The displayed reading will immediately be entered into
the sample table and the calculated sample concentration.
If the Configuration specified Automatic Peak Selection, then BlueNotes
will prompt for the user to press print straight after the start of aspirating the
sample. BlueNotes will display and count down the tube Delay and then
once a steady signal is obtained, enter the reading into the sample table
along with the calculated concentration. BlueNotes will then ask for the next
sample to be aspirated and print to be pressed.
If the Analysis Method specified to not Always Calibrate then a previous
calibration file can be used, BlueNotes will prompt:
Insert Sample
If at anytime another sample requires analysis the method can be interrupted by
clicking Insert Sample. BlueNotes asks for a Sample Identifier and once the
current sample has been analysed BlueNotes will request the new inserted
sample for analysis before continuing from where it left off in the sample table.
410 91 008
Issue 2
22nd October 2008
ECN 543
24
410 BlueNotesTM Software
5.2.2 With Model 860 Autosampler
Regardless of whether the Analysis Method selected specifies Always Calibrate,
BlueNotes will send the Model 860 Autosampler to aspirate a blank and ask the
user to adjust the reading with the Model 410 Flame Photometer blank control (if
necessary) and press print on the M410. If the Analysis Method specifies Always
Calibrate the related calibration procedure will progress. After the calibration is
complete the Model 860 Autosampler will aspirate the first sample and then
BlueNotes will wait until the Delay time has elapsed and then a steady signal
obtained before entering it into the sample table along with the calculated sample
concentration. The routine will continue until all samples have been analysed.
Insert Sample
BlueNotes display shows the progress of the Model 860 Autosampler, if at
anytime another sample requires analysis the method can be interrupted by
clicking Insert Sample. BlueNotes asks for a Sample Identifier and vial position.
Once the current sample has been analysed the Model 860 Autosampler will
move to the new inserted sample vial position, aspirate and analyse the sample
before returning to continue from where it left off.
5.3
Reports
When all the samples are complete, a report is generated automatically. Any
sample results higher than the Max Concentration specified in the Calibration
Procedure will be labelled as over-range. If Spot Checks were selected and
Automatic Correction requested; original and corrected results will be reported;
see example below.
410 91 008
Issue 2
22nd October 2008
ECN 543
25
410 BlueNotesTM Software
6
File Archives
6.1
Calibration Results
From the BlueNotes Start Page, select Calibration Results using the mouse
pointer and click to reveal the Calibration Results page with all the stored
calibration files listed – an example is shown below.
You now have a choice: Show Results or Close (to return to Start Page): select a
calibration file using the mouse pointer and click. All the calibration result files
associated with the chosen procedure will appear in date and time order.
Click on the required file to view the calibration graph or select one of the other
options shown: Back, Delete Results or Close.
410 91 008
Issue 2
22nd October 2008
ECN 543
26
410 BlueNotesTM Software
6.2
Analysis Results
From the BlueNotes Start Page, select Analysis Results using the mouse pointer
and click to reveal the Analysis Results page with all the stored analysis files
listed – an example is shown below.
You now have a choice: click on the required file to highlight it and then show
results, or Close (to return to Start Page). If you choose “show results” a screen
like the one shown below appears; highlight the required file by clicking on it and
then choose one of the option buttons.
If you click on Preview
Report a small preview
pane will appear which you
can expand and/or print as
required: an example is
shown.
410 91 008
Issue 2
22nd October 2008
ECN 543
27
410 BlueNotesTM Software
7 Appendix A: Warranty
Sherwood Scientific Limited
Product Warranty Statement
_________________________________________________________________________________________
Warranty Term: 12 Months
Sherwood Scientific Ltd (Sherwood) warrants, subject to the conditions itemised within
this document, through either Sherwood personnel or personnel of its authorised
distributors, to repair or replace free of all charges, including labour, any part of this
product which fails within the warranty time specified above, appertaining to this
particular product. Such failure must have occurred because of a defect in material or
workmanship and not have occurred as a result of operation of the product other than in
accordance with procedures described in the instructions furnished with this product.
Conditions and specific exceptions that apply to the above statement are as follows:
1.
End-user warranty time commences on the date of the delivery of product to
end-user premises.
2.
Free of all charges’ statement applies only in areas recognised by Sherwood as
being serviced either directly by its own personnel, or indirectly through
personnel of an authorised distributor. Products purchased outside these areas
requiring service during the warranty period will incur charges relative to the
travel/transit costs involved. However, products purchased in such areas will be
serviced during the warranty period free of all charges providing they are
returned, carriage paid, to either Sherwood or by pre-arrangement to an
authorised Sherwood distributor.
3.
All maintenance (other than operator maintenance as described in the
instructions), repairs or modifications have been made by Sherwood or
Sherwood authorised personnel.
4.
This product has where applicable been operated using Sherwood specified
supplies and reagents.
5.
Sherwood reserves the right to make any changes in the design or construction
of future products of this type at any time, without incurring any obligation to
make any changes whatsoever to this particular product.
6.
Reagents, supplies, consumables, accessories and user maintenance items are
not included in this warranty.
7.
Repairs or replacement of any part failing due to abnormal conditions including
the following, are excluded from this warranty:
a. Flood, lightning, earthquake, tornado, hurricane, or any other natural or
man-made disaster.
b. Fire, bombing, armed conflict, malicious mischief or sprinkler damage.
c. Physical abuse, misuse, sabotage or electrical surge.
d. Damage incurred in moving the product to another location.
8.
User agrees to permit Sherwood personnel or personnel of its authorised
distributor to make changes in the product which do not affect results obtained,
but do improve product reliability.
410 91 008
Issue 2
22nd October 2008
ECN 543
28
410 BlueNotesTM Software
Product Warranty Statement (continued)
Representations and warranties purporting to be on behalf of Sherwood made by any
person, including distributors and representatives of Sherwood, which are inconsistent or
in conflict with the terms of this warranty (including but not limited to the limitations of the
liability of Sherwood as set forth above), shall not be binding upon Sherwood unless
reduced to writing and approved by an officer of Sherwood Scientific Ltd.
Except for the obligations specifically set forth in this warranty statement, in no event
shall Sherwood be liable for any direct, indirect, special, incidental, or consequential
damages, whether based on contract, tort or any other legal theory and whether advised
of the possibility of such damages.
Neither Sherwood nor any of its third party suppliers makes any other warranty of any
kind, whether expressed or implied, with respect to Sherwood Products.
Sherwood Scientific Ltd.
1 The Paddocks,
Cherry Hinton Road,
Cambridge,
CB1 8DH,
England
410 91 008
Issue 2
22nd October 2008
ECN 543
29