1
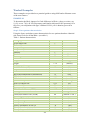
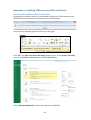
UKPDS Outcomes Model User Manual © 2005-2015 Isis Innovation Ltd Version 2.0 11 May 2015 Produced by the University of Oxford Diabetes Trials Unit (DTU) and Health Economics Research Centre (HERC) www.dtu.ox.ac.uk/outcomesmodel Contents Conditions of use and copyright ...................................................................................................... 1 Licensing the software .................................................................................................................... 1 Background ........................................................................................................................................ 2 Getting Started ....................................................................................................................................... 3 Windows Platform ......................................................................................................................... 3 Macintosh Platform ....................................................................................................................... 3 Microsoft Excel issues .................................................................................................................. 4 UKPDS Outcomes Model© Version 2.0 (OM2) interface ...................................................... 5 Controller Application Interface ................................................................................................. 5 Status panels ................................................................................................................................. 6 Buttons ............................................................................................................................................ 6 Processing Workbooks and reading the results ...................................................................... 7 Optimising the number of processes to use ............................................................................. 7 Optimising the number of processes on a Macintosh platform ................................... 7 Microsoft Windows ................................................................................................................. 10 Description of the Workbooks used by the model .................................................................. 14 The Input Workbook ......................................................................................................................... 14 About Worksheet .......................................................................................................................... 14 Inputs Worksheet .......................................................................................................................... 14 Risk Factor Worksheets .............................................................................................................. 16 Smoking Status Worksheet ................................................................................................... 18 HDL Worksheet ........................................................................................................................ 18 LDL Worksheet ........................................................................................................................ 18 Systolic BP Worksheet ........................................................................................................... 18 HbA1c Worksheet ..................................................................................................................... 18 PVD Worksheet ........................................................................................................................ 18 AF Worksheet ........................................................................................................................... 18 Weight Worksheet ................................................................................................................... 18 Albuminuria Worksheet ......................................................................................................... 19 Heart rate Worksheet .............................................................................................................. 19 WBC Worksheet ....................................................................................................................... 19 Haemoglobin Worksheet ....................................................................................................... 19 eGFR Worksheet ...................................................................................................................... 19 Model parameters Worksheet ................................................................................................... 19 Subject rows ............................................................................................................................... 19 Number of loops ........................................................................................................................ 19 i Number of bootstraps .............................................................................................................. 21 Start at bootstrap ...................................................................................................................... 22 Number of years simulated ................................................................................................... 22 Number of processes ............................................................................................................... 22 Discount rates ........................................................................................................................... 22 Therapy costs ............................................................................................................................. 22 Use these costs/utilities until age ........................................................................................ 22 Initial Utility value ................................................................................................................... 23 Cost in absence of complications ........................................................................................ 23 Utility Decrements ................................................................................................................... 23 Complication costs ................................................................................................................... 23 Currency Conversion Value ................................................................................................. 24 Reset Costs button .................................................................................................................... 24 Reset Utilities button ............................................................................................................... 24 Populate annual risk factor worksheet button ................................................................ 24 Verify Model Data button ...................................................................................................... 24 Inputs Check Worksheet (Figure 13) ...................................................................................... 24 Errors ................................................................................................................................................. 26 The Output Workbook ..................................................................................................................... 26 Outputs Worksheet ....................................................................................................................... 26 Bootstraps Worksheet .................................................................................................................. 28 Event Worksheets ......................................................................................................................... 29 KMPlotSheet Worksheet ............................................................................................................ 30 KM Plot Worksheets .................................................................................................................... 31 Worked Examples .............................................................................................................................. 32 EXAMPLE #1 ................................................................................................................................. 32 Step 1: Enter patient characteristics ................................................................................... 32 Step 2: Risk factor time paths .............................................................................................. 33 Step 3: Set up simulation ....................................................................................................... 33 Step 4: Run the simulation .................................................................................................... 33 EXAMPLE #2 ................................................................................................................................. 34 Step 1: Enter patient characteristics ................................................................................... 34 Step 2: HbA1c time path ........................................................................................................ 34 Step 3: Run model .................................................................................................................... 34 EXAMPLE #3 ................................................................................................................................. 35 Step 1 ............................................................................................................................................ 35 Appendix 1 : Enabling VBA macros in Microsoft Excel .................................................... 36 ii Microsoft office 2010 and 2013 for Windows ................................................................ 36 Microsoft Office 2011 for Macintosh .................................................................................. 37 References ........................................................................................................................................... 38 iii Conditions of use and copyright Software for the UKPDS Outcomes Model Copyright © 2005-2015 Isis Innovation Ltd is available to third parties under license from Isis Innovation Ltd, the technology transfer company of the University of Oxford, subject to the following copyright and conditions. No charge is made to academic organisations but commercial organisations must pay an appropriate fee. In either case it is a requirement to acknowledge the use of the UKPDS Outcomes Model© in any publications that make use of it, and to provide ISIS Innovation Ltd with the reference for each publication. The University is a charitable foundation devoted to education and research, and in order to protect its assets for the benefit of those objects, the University must make it clear that no condition is made or to be implied, nor is any warranty given or to be implied, as to the accuracy of this Tool, or that it will be suitable for any particular purpose or for use under any specific conditions. Furthermore, the University disclaims all responsibility for the use which is made of the Tool. However, nothing in this statement will operate to exclude or restrict any liability which the University may have for death or personal injury resulting from negligence. It is a further condition that the software obtained from this site is not distributed further without the same conditions and copyright statements being imposed. Those seeking to incorporate any part of the UKPDS Outcomes Model© into other software projects must seek the permission of the copyright holders before distribution or publication of their software. Licensing the software To obtain a copy of the UKPDS Outcomes Model© software and a license to use it, please contact: Dr James Groves Project Manager Isis Innovation Ewert House, Ewert Place Summertown Oxford. OX2 7SG United Kingdom Fax: +44 (0)1865 614425 Tel: +44 (0)1865 280831 Email: [email protected] For all queries concerning the UKPDS Outcomes Model© and its appropriate use please read this manual and the web site FAQ (www.dtu.ox.ac.uk/outcomesmodel). If your question concerning the use of the software remains unanswered, email [email protected]. Please note that general questions regarding diabetes simulation modelling, e.g. whether particular assumptions made by the user are appropriate, cannot be accepted. For purely technical enquiries concerning software installation, email [email protected]. 1 Background The UKPDS Outcomes Model© is a computerised simulation tool designed to estimate Life Expectancy, Quality Adjusted Life Expectancy and the cumulative costs of complications in people with type 2 diabetes mellitus (T2DM). It uses the peerreviewed equations and algorithms published in the UK Prospective Diabetes Study (UKPDS) paper 82,1 which should be read prior to using this software. Caution should be applied if model results are extrapolated to populations that differ significantly from that included in the UKPDS, or that include ethnic groups other than White Caucasian, Afro-Caribbean or Asian-Indian. The model was developed using data from patients with newly-diagnosed type 2 diabetes who participated in the UKPDS.2 Version 1 of the UKPDS Outcomes Model© (OM1) incorporated equations for forecasting the occurrence of seven diabetes-related complications (ischaemic heart disease, chronic heart failure, first amputation, blindness in one eye, renal failure, first stroke, first myocardial infarction) and death. These were estimated using data from 3642 UKPDS patients with complete information on risk factors and outcomes.3 Version 2 of the UKPDS Outcomes Model© (OM2) uses data from all 5,102 UKPDS patients who entered the trial and the 4,031 survivors who entered the 10 year post-trial monitoring period. The equations in OM2 are based on median 17.6 years of follow-up with 89,760 patient-years of data, providing double the number of events available when OM1 was developed to give greater precision and a larger number of significant covariates. These data were used to derive parametric proportional hazards models predicting absolute risk of diabetes complications and death.1 The additional follow-up data allowed the seven original event equations to be reestimated and to be supplemented with equations for 4 more complications, i.e. diabetic ulcer, second amputation, second stroke and second myocardial infarction, as well as the development of four new equations for all-cause mortality.1 Internal validation of model predictions of cumulative incidence of all events and death was carried out and a contemporary patient-level dataset was used to compare 10-year predictions from OM1 and OM2. OM2 is internally valid over 25 years, and predicts event rates for complications which are lower than those from OM1. OM1 incorporated risk factor trajectory equations that forecasted changes over time in smoking status, total cholesterol, HDL-cholesterol, systolic blood pressure and HbA1c. Updated equations have been estimated for these five risk factors, as well as trajectory equations for 8 more risk factors, i.e. peripheral vascular disease, atrial fibrillation, weight, albuminuria, heart rate, white blood cell count, haemoglobin and eGFR. However, these updated equations will not be incorporated into OM2 until they have been validated and fully published; until then, users may paste in their own data, or use one of the built in methods for populating the values: that is, hold the initial values constant for the simulation period, or populate using linear progression or a specified value for each group (see Risk Factor Worksheets section below for full details). The main outputs for the UKPDS Outcomes Model© are estimates of Life Expectancy, Quality Adjusted Life Expectancy, costs of therapies and costs of complications, all with 95% confidence intervals and with discounting applied if requested. Quality Adjusted Life Expectancy values can also be listed for each year simulated for each subject. The model also outputs cumulative event rates by simulated year, and Kaplan-Meier (KM) event-free survival. 2 Getting Started OM2 is provided as a downloadable package from the DTU Secure web server. Once your license has been issued you will be provided with a time-limited username and password (see Licensing the software on page 1) in order to access the package. If you wish, both the Macintosh and Windows packages can be downloaded. Keep the downloaded packages in a safe place should you need to re-install the software in the future, e.g. for a new computer or operating system upgrade. Windows Platform OM2 has been validated on the following combinations: • • • • Windows 7 (64bit) and Microsoft Excel 2013 (64bit) Windows 7 (64bit) and Microsoft Excel 2010 (64bit) Windows 7 (32bit) and Microsoft Excel 2013 (32bit) Windows 8.1 (32bit) and Microsoft Excel 2013 (32bit) On windows the software is provided as an Installer application (UKPDS Outcomes Model Windows setup.exe). Running this application will take you step by step through the installation process. Once completed the Outcomes Model inputs workbook can be accessed from the UKPDS Outcomes Model group on the Start menu, named UKPDS Outcomes Model v2.0 (Excel). Once opened, the workbook can be saved to any location and used as many times as required. The OM2 Controller Application which runs the model can be accessed from the start menu, or the desktop icon if you choose to install one during installation. Macintosh Platform OM2 has been validated on the following combinations: • • Mac OS 10.9 Mavericks and Microsoft Excel 2011 Mac OS 10.10 Yosemite and Microsoft Excel 2011 On Macintosh open UKPDS Outcomes Model.dmg by double clicking the file to open the following window: 3 Install the OM2 Controller Application by dragging the Outcomes Model icon to the Applications folder. The Outcomes Model Input workbook (UKPDS Outcomes Model v2.0.xlsm) file may be copied and or saved to any location and used as many times as required. Microsoft Excel issues Certain parts of OM2 make use of VBA macros. If macros are disabled then certain OM2 functions will not operate, including: • Reset Costs • Reset Utilities • Populate annual risk factor sheets • Verify model data See Appendix 1 for instructions on enabling macros in Excel. OM2 Disk Space Requirements To process workbooks, the OM2 Controller Application needs sufficient disk space to be available on the drive that contains the users profile folder. This space is required in the temporary folder OM2 locates there, and the amount required depends upon the options selected, e.g. the number of patients, loops and bootstraps selected will make a difference. As an example, processing a dataset with 100,000 patients for 10,000 loops and zero bootstraps would require approximately 10GB of temporary workspace. It is suggested that you ensure a sizeable amount of space is always available on the drive that contains the users profile folder. 4 UKPDS Outcomes Model© Version 2.0 (OM2) interface OM1 used Excel Workbooks to hold the data and parameters for the model. It was also the mechanism by which the model calculations were performed, using the Run Model button on the Model Parameters worksheet. This had the advantage of being fairly simple, but limited the software to use only one CPU core. This in turn limited the speed of operation and thus lengthened the time required to complete simulations. OM2 has changed part of this process. The model still stores its data and parameters within an Excel Workbook, but once these are populated and ready to run they are now saved and run via a Controller Application. The Controller Application enables the model to make full use of all computer cores in parallel in order to accelerate its calculations. It also permits multiple model files to be put in a queue to run sequentially unattended. OM2 uses .xlsm files (similar to .xlsx files) rather than the .xls files used by OM1, increasing the number of patients that may be entered into a single Workbook from 65,545 to 1,048,576. The number of patient groups allowed in OM2 has been increased from 2 to 3. OM2 fully supports Mac OS X and Windows for all aspects of the model. Controller Application Interface Below are pictures of the Controller Application interface on Macintosh and Windows computer platforms: Figure 1: Macintosh Controller Application interface 5 Figure 2: Windows Controller Application interface In each case the upper area of the Controller Application interface displays the Workbook job queue, listing the Excel Workbooks that the Controller Application will process. You may add new Workbooks to the queue either by dropping them on the window or on the OM2 application icon, or by selecting them via the File Open menu. Workbooks are queued in the order they are added. The lower part of the window displays the status panels and buttons that control the OM2 application: Status panels Workbook status: This shows the status of the currently selected Workbook. Select a different Workbook from the list to show its status. Progress: Shows the current activity of the Controller Application as a whole. This panel always shows the currently active task being performed by the Controller Application, irrespective of which Workbook is selected in the list. Queue: Shows the current state of the job queue, i.e. Running or Stopped. Buttons Start: Starts the job queue. When running, the Controller Application will process each Workbook job sequentially until it completes them all. Stop: Stops the job queue. When stopped the Controller Application will continue to work on the currently running Workbook but when it is has been completed will not start the next one. 6 Clear: Allows jobs to be cleared from the list. It will ask if you wish to clear all jobs or just the completed ones. This button is only displayed when the queue is stopped and no job is active. Delete: Allows the selected Workbook to be removed from the queue. Only displayed when the currently selected Workbook is waiting to be processed. Abort: Allows the Workbook currently being processed to be aborted, abandoning any data produced so far. Only displayed when the currently selected Workbook is running. Processing Workbooks and reading the results Once one or more Workbook jobs are added to the queue you can start processing by clicking the Start button. This causes the Controller Application to process each job sequentially until all are complete, at which point the queue stops. The results for each job are saved as a .xlsx file in the same folder as the input file, with “Outputs” appended to the filename. For example, if the input file is called “My Outcomes Workbook.xlsm” then the output file will be called “My Outcomes Workbook Outputs.xlsx”. It is important to realise that Workbooks are only read at the time they are processed. This means that if you change a Workbook after adding it to the queue then those changes will still affect the resultant output file. Additional jobs can be added to the queue at any time, even when the queue is running and processing data. Equally, jobs waiting to be processed can be removed from the queue before they are started. Optimising the number of processes to use Diabetes simulation models are complex and can take a long time to run, because each patient must be simulated multiple times and because the parameter values used to determine the transition probabilities must be varied to account for uncertainty. Simulations run times may take days, and sometimes weeks. Most modern computers have multiple processors, i.e. CPUs or cores, enabling simulation run times to be greatly reduced by using more than one processor. This software release of OM2 has the ability to use up to 10 CPUs. Additional CPUs can be enabled by changing the “Number of processes to use” setting on the Model Parameters worksheet to any value from 1 to 10. It is important to select the correct number of CPUs for the machine running the model. The following guide will allow you to select the best option for your machine. Once decided, it should be the same for all models that you run on that machine. If you change your computer the number of processes should be re-optimised. The optimisation process depends upon the type of computer you are using. Below is a guide for Microsoft Windows and another for Apple Macintosh. Optimising the number of processes on a Macintosh platform On a Mac OS X machine use the Activity Monitor application provided with the operating system, which is located in the Utilities folder, as follows: 7 -‐ Open Finder by clicking on its icon in the Dock. -‐ Select Applications on the left hand panel of the Finder window. -‐ Double click on the Utilities folder -‐ Locate the Activity Monitor application and double click to open it Once started you should see a window similar to this: Figure 3: Activity Monitor on a Macintosh computer The exact window seen may differ if you are using an older version of Mac OS. To begin optimisation, ensure that the ‘CPU’ tab is selected at the top of the window and click on the ‘% CPU’ column heading in the main list. If the % CPU direction arrow points upwards, click it again so that it points downwards. You will now see a list of all the applications and processes that are running on your machine. The ‘% CPU’ column shows how much of your CPU resource each application or process is using, with the highest values at the top. To find the best value for the number of processes you will need to do some experimentation. Take the supplied demonstration workbook and open it in the UKPDS Outcomes Model© Controller Application. Press the Start button while watching the results in Activity Monitor. You will see a ‘runoutcomes’ item in the process name column for every process specified on the Model Parameters page. For example, if you chose 8 processes there will be 8 rows with a Process Name of runoutcomes. Take note of the number in the ‘% CPU’ column next to each process. Ideally these should be as close as possible to 100%. Lower values mean that too many processes are running and they are slowing each other down. Take note also of the total utilisation value, which is provided in the bottom panel and is labelled ‘user’. Once again this value should be as close to 100% as possible. Lower values mean that too 8 few processes are running. Once you have noted these numbers, press the Abort button in the Controller Application to stop it working. The example shown in Figure 3 shows 2 processes called ‘runoutcomes’, each running at 99% of CPU. This is good, as it means that the processes are not fighting with each other for computer time. The overall utilization (User value), however, is only 26.15%. This is not so good as it indicates that more than 70% of the machine is idle, when it could be being used to perform your model calculations. Taken together, these values indicate that a larger number of processes can be used on this machine. Figure 4 illustrates for the same machine running 10 processes and shows 10 rows called runoutcomes. Figure 4: Activity Monitor on a Macintosh computer with 10 processes Here the overall utilization (User value) is 96.34%, which is pretty good, as we want it to be as close to 100% as possible. This means that there are enough processes to saturate the machine. The problem, however, is that each runoutcomes process is only working at 75% capacity, indicating that the processes are fighting against each other for CPU use. Taken together these metrics show that we need to reduce the number of processes. The further away from 100% the individual values are, the more we need to reduce the number of processes. 9 Figure 5 shows the same machine running 8 processes. Figure 5: Activity Monitor on a Macintosh computer with 8 processes This time overall utilization (User value) is 95.25%, and each process is about 92.4%. With all of these values close to 100%, the number of processes has been optimised to get the fastest model performance for this machine. One word of warning though, whilst driving the machine this hard will not cause problems for the machine it will mean that you cannot do anything else with it at the same time. If you wish to use the machine for other purposes while OM2 is running, you can lower the number of processes to prevent the model software from swamping other applications. It’s also worth pointing out that working the machine this hard for an extended period of time could lead to it getting very hot. This isn’t good for the hardware so the computer will start to do things to protect itself. For example it will run its fans at full speed, in an attempt to get the heat out of the computer. In extreme cases the CPU will actually slow itself down in order to run more coolly. If you are working with a very large dataset it could be worth reducing the number of processes in order to allow the computer to operate at a lower temperature. Microsoft Windows On a Microsoft Windows machine use the Task Manager provided with the operating system. It can be started as follows: -‐ Right click on the Task Bar, typically at the bottom of the screen. -‐ Select ‘Start Task Manager’ from the popup menu. 10 Once started you should see a window similar to this: (the window may differ if you are using older versions of Windows.) Figure 6: Activity Monitor on a Windows computer Ensure that the ‘Processes’ tab is selected at the top of the window and click on the ‘CPU’ column heading in the main list. If the CPU arrow points upwards, click it again so that it points downwards. Once done you are now seeing a list of all the applications and processes that are running on your machine. You will now see a list of all the applications and processes that are running on your machine. The ‘% CPU’ column shows how much of your CPU resource each application or process is using, with the highest values at the top. To find the best value for the number of processes you will need to do some experimentation. Take the supplied demonstration workbook and open it in the UKPDS Outcomes Model© Controller Application. Press the Start button while watching the results in the Task Manager. You will see a ‘runoutcomes.exe’ item in the process name column for every process specified on the Model Parameters page. For example if you chose 8 processes there will be 8 rows whose image name is runoutcomes.exe. The ideal value for the percentage depends upon the number of processes running. The figure is 100/processes. For 8 processes the ideal value would be 100/8, i.e. 12.5. For 2 processes it would be 100/2 (50%), and for 4 processes it would be 100/4 (25%). Take note of the number in the ‘CPU’ column next to each process. Ideally these should be as close to 100%/number of processes as possible. Lower values mean that too many processes are running and they are slowing each other down. Take note also of the total utilisation value, which is provided in the bottom panel and is labelled ‘CPU Usage’. Once again this value should be as close to 100% as possible. Lower 11 values mean that too few processes are running. Once you have noted these numbers, press the Abort button in the Controller Application to stop it working. The example shown in Figure 6 shows 2 processes called ‘runoutcomes.exe’ with an overall utilization (CPU Usage value) of only 49%. This is not good as it indicates that more than 50% of the machine is idle, when it could be being used to perform model calculations. You can also see that each process is running at 25% of CPU. Taken together these values indicate that a larger number of processes can be used on this machine. Figure 7 illustrates the same machine running 10 processes and shows 10 rows called runoutcomes.exe. Figure 7: Activity Monitor on a Windows computer with 10 processes Here the overall utilization (CPU Usage value) is 100%, which is excellent as we want it to be as close to 100% as possible. This means that there are enough processes to saturate the machine. Looking at the figures for each runoutcomes.exe process we can see that they vary from 8% and 13%, indicating that the processes are fighting against each other for CPU use. Taken together these metrics show that we need to reduce the number of processes. Figure 8 shows the same machine running 4 processes. 12 Figure 8: Activity Monitor on a Windows computer with 4 processes This time total utilization is 100%, and each process is showing 25%. The optimal value for each process is 100/number of processes, so 25% (100/4) is perfect. With all values close to ideal, the number of processes has been optimised to get the fastest model performance for this machine. One word of warning though, whilst driving the machine this hard will not cause problems for the machine it will mean that you cannot do anything else with it at the same time. If you wish to use the machine for other purposes while OM2 is running, you can lower the number of processes to prevent the model software from swamping other applications. It’s also worth pointing out that working the machine this hard for an extended period of time could lead to it getting very hot. This isn’t good for the hardware so the computer will start to do things to protect itself. For example it will run its fans at full speed, in an attempt to get the heat out of the computer. In extreme cases the CPU will actually slow itself down in order to run more coolly. If you are working with a very large dataset it could be worth reducing the number of processes in order to allow the computer to operate at a lower temperature. 13 Description of the Workbooks used by the model The UKPDS Outcomes Model© software is run as described above using the Controller Application Interface, but the main data input and output is conducted via Microsoft Excel™ workbooks. This provides users with a straightforward method for entering or importing details of populations to be simulated, viewing results, and printing or exporting them easily to other software packages. The Input Workbook contains a series of worksheets that hold the various model inputs and the parameters used when running the calculations. It provides methods for populating missing data and for verifying data prior to submission to the Controller Application. The Controller Application produces an Output Workbook for each Input Workbook processed. The data from the Input Workbook is reproduced along with the various model outputs. The Output Workbook, produced as a .xlsx file, is placed in the same folder as the Input Workbook with “Outputs” appended to its filename. For example, if the Input Workbook is called ‘My Outcomes Data.xlsm’ then the Output Workbook will be called ‘My Outcomes Data Outputs.xlsm’. A more detailed description of the worksheets found in each type of workbook and their uses is given below. N.B. It is essential that: • Worksheets contained within the workbooks are not rearranged in any way. • Columns within the worksheets are not reordered. The Input Workbook The Input Workbook is a .xlsm file. This file type is required to allow the embedded macros to function and to still maintain the maximum number of available rows. Do not save the workbook in any other format (including .xls format), as it could result in data loss, prevent the macros from working correctly and prevent it from being recognised by the Controller Application. All values in the Inputs Workbook must be provided prior to running the model. Methods are provided in the Risk Factor worksheets on how to populate the values on these worksheets in a variety of ways. This feature replaces the equations built in to the OM1 software that internally predicted missing values. Moving this functionality into the Inputs Workbook enables improved control of the values used and provides greater clarity with respect to the values used by the model in a given year. The Input Workbook has the following worksheets: About Worksheet This contains a brief description of UKPDS Outcomes Model© Version 2. Inputs Worksheet This Inputs Worksheet is used to enter patient baseline characteristics, risk factor values and history of previous events, with a single row for each subject. A subject ID 14 can be specified in column A. The following changes have been made in OM2, compared with OM1: • • • • • • Age has been changed from age at diagnosis to Age now Smoking status is now specified as yes/no. Total cholesterol has been replaced with LDL-cholesterol, alongside the preexisting HDL-cholesterol. Albuminuria, Heart rate, WBC, Haemoglobin and eGFR have been added. Ulcer has been added to the pre-existing events section. Values at Diagnosis are no longer required. All values in the Inputs Worksheet are mandatory, with the exception of Years since prior event. A blank cell in these columns indicates that the event has never taken place, a 0 forces the event to occur in the first year of simulation, and a 1 (or any other value) indicates that the event took place prior to the start of simulation. True time since a prior event occurred may be entered, but the model only discriminates between no event, event in the first year of simulation, and event prior to the start of simulation. The Discounting start year parameter is used to set the offset year for discounting in the first year of simulation on a per subject basis, e.g. entering 10 instructs the model to apply a discounting year of 10 in the year 1 outputs from the simulation. A Subject ID is required but it is not necessary for it to be unique. Figure 9: Inputs Worksheet 15 Figure 9: Inputs Worksheet (contd.) Risk Factor Worksheets There are 13 risk factor worksheets, with yellow tabs: smoking status, HDLcholesterol, LDL-cholesterol, systolic blood pressure, HbA1c, peripheral vascular disease, atrial fibrillation, weight, albuminuria, heart rate, white blood cell count, haemoglobin and eGFR. Each of these worksheets allows the user to specify values for each risk factor on a year-by-year basis. Users may paste in their own data or use one of the built in methods for populating the values. In either case a value must be provided for each year being simulated. For continuous risk factors (HDL-cholesterol, LDL-cholesterol, systolic blood pressure, HbA1c, weight, heart rate, white blood cell count, haemoglobin and eGFR), two methods for populating the worksheet are provided: 1) Copy the value from the Inputs worksheet into every year, effectively holding the initial values constant for the simulation period. 16 2) Populate using linear regression (y=mx+c), where y is the result for a given year and x is the value from the prior year, or the initial value from the inputs worksheet for the first year. Values for m and c can be specified by group) Figure 10: Typical continuous risk factor worksheet For binary risk factors (smoking status, peripheral vascular disease, atrial fibrillation, albuminuria), two methods of populating the worksheet are provided: 1) Copy the value from the Inputs worksheet into every year, effectively holding the initial values constant for the simulation period. 2) Populate each year with a specified value for each group. Figure 11: Typical binary risk factor worksheet Users should specify on each worksheet whether they wish their selected method to overwrite all cells on that worksheet, including those where values are already present, or to preserve current values on the worksheet and only populate empty cells. Once all 13 worksheets are configured they can be populated by visiting the Model Parameters worksheet, selecting the subjects and number of years to operate on and then clicking the ‘Populate annual risk factor worksheets’ button. 17 The subject ID column in each Risk Factor worksheet is required to match that provided on the Inputs Worksheet for the same row number. Smoking Status Worksheet This worksheet is used to enter the smoking status by subject for each of the years to be simulated: Y=current tobacco smoker, N=non-smoker or ex-smoker. HDL Worksheet Use this worksheet to enter HDL-cholesterol values (mmol/l) by subject for each year to be simulated. Ideally these should be from a CDC (Centre for Disease Control) aligned assay. LDL Worksheet Use this worksheet to enter LDL-cholesterol values (mmol/l) by subject for each year to be simulated. Ideally these should be from a CDC aligned assay. This is a new worksheet in OM2. Systolic BP Worksheet Use this worksheet to enter systolic blood pressure values (mmHg) by subject for each year to be simulated. HbA1c Worksheet Use this worksheet to enter HbA1c values (%) by subject for each of the years to be simulated. Ideally these should be from a DCCT (Diabetes Control and Complications Trial) or NGSP (National Glycohemoglobin Standardization Programme) aligned assay. PVD Worksheet Use this worksheet to enter peripheral vascular disease status by subject for each year to be simulated: Y = present, N = not present. AF Worksheet Use this worksheet to enter atrial fibrillation status by subject for each year to be simulated: Y = present, N = not present. Weight Worksheet Use this worksheet to enter body weight values (kg) by subject for each year to be simulated. If only the BMI (body mass index) is available, then entering that in the Weight Worksheet and setting the Height to 1 is acceptable. This is a new worksheet in OM2. 18 Albuminuria Worksheet Use this worksheet to enter albuminuria status by subject for each year to be simulated: Y = micro or macroalbuminuria, N = None. This is a new worksheet in OM2. Heart rate Worksheet Use this worksheet to enter heart rate values (bpm) by subject for each year to be simulated. This is a new worksheet in OM2. WBC Worksheet Use this worksheet to enter white blood cell count values (x109 per litre) by subject for each year to be simulated. This is a new worksheet in OM2. Haemoglobin Worksheet Use this worksheet to enter haemoglobin values (g/dl) by subject for each year to be simulated. This is a new worksheet in OM2. eGFR Worksheet Use this worksheet to enter eGFR values (ml/min/1.73m2) by subject for each year to be simulated. This is a new worksheet in OM2. Model parameters Worksheet Use this worksheet (Figure 12) to configure a set of model parameter values. These include: Subject rows Specifies the first and last subject row to be included in the simulation. (The available rows and number of subjects selected is displayed alongside the entries). This is a change from OM1 which always starts with the first subject. Number of loops Sets the number of internal loops (Monte-Carlo trials) per subject to reduce first order uncertainty (Monte Carlo Error - MCE). OM1 and OM2 are micro-simulation models that use Monte Carlo methods to simulate identical patients one at a time through the model several times while recording the outcome(s) of each loop (Monte-Carlo trial), 𝑥𝑖 . The per-patient outcome(s) are calculated by dividing the total simulated number of events (e.g. myocardial infarction) by the total number of n loops, 𝑋𝑛 . Due to the random nature of Monte Carlo, the predicted outcome(s) for each subject varies with each internal loop. This random noise is called MCE and will be reduced considerably if a sufficient number of loops (Monte-Carlo trials) are performed. 19 The MCE for a given outcome is estimated as the standard deviation of the outcome across the number on Monte-Carlo trials, 𝑆𝐷𝑛 , divided by the squared root of number of trials, 1 𝑆𝐷𝑛 = 𝑛−1 𝑛 (𝑥𝑖 − 𝑋𝑛 ) 𝑖=1 𝑀𝐶𝐸𝑛 = For i=1,...,n loops/trials 𝑆𝐷𝑛 𝑛 Performing more loops (n) produces more stable predicted outcomes for each subject, i.e. reduces MCE, but takes longer. The relative error for each outcome can also be estimated by dividing the MCE by the predicted mean. A rule of thumb is to achieve a relative error <1-5% of the statistic of interest for each outcome (e.g. mean life expectancy, standard deviation of life expectancy, etc.). Past experimentation suggests 5,000 or more loops are required to obtain stable estimates at patient level, but when looking at aggregate outcomes for a cohort a minimum of 1,000 loops may be appropriate. The user should be aware that the optimal number of inner loops depends on: 1) frequency/size of the simulated event of interest (e.g. life expectancy, stroke rates, costs, etc.); 2) whether accurate estimates are wanted at patient or cohort level and; 3) whether the focus is on estimating differences between groups or obtaining accurate estimates of the outcome(s) at group level. For example, to obtain precise estimates of the difference in life expectancy between two groups, the number of loops required is inversely related with the expected size of the difference. Hence, users should experiment with different numbers of loops to test stability, i.e. that the results of interest do not vary significantly between simulations. 20 Figure12: Model Parameters Worksheet Number of bootstraps Sets the number of bootstraps to address second order uncertainty and thus to estimate confidence intervals around Life Expectancy, Quality Adjusted Life Expectancy, therapy and complication costs. The OM2 software contains 5,000 full sets of model equation parameters derived from bootstrap samples of the UKPDS trial population, which were generated by sampling with replacement from the original data set. This is an increase from the 999 bootstraps provided in OM1. When the desired number of bootstraps has been chosen, each bootstrap run will use a different set of model equation parameters from those available. Larger numbers internal loops and bootstraps will give more precise confidence intervals, and users should experiment to assess the number required in their particular simulations to obtain stable confidence intervals. A very important first step is to minimise MCE by finding the optimal number of inner loops and then test the number of bootstraps. If the number of bootstraps is set to 0 then no confidence intervals will be generated and the model will run with the equations as published. A value of 1 for the Number of bootstraps will be rejected as calculation of confidence intervals requires at least two bootstraps. 21 Start at bootstrap Sets which of the 5000 bootstrap parameters sets supplied in OM2 should be used first. Parameter sets are used sequentially, with wrap round to the first set if necessary. Number of years simulated Sets the maximum possible number of years to be simulated per subject. The time taken to run the model can be reduced by not specifying more years to be simulated than necessary. The current version of OM2 is limited to a maximum of 70 years, an increase from the 40-year limit in OM1. No minimum age is specified for patients, but users should bear in mind that UKPDs participants, although recruited with newonset type 2 diabetes over the age range 25-65 inclusive, had a median age of 53 years. Number of processes Sets the maximum number of processes that will be used to process the dataset. Each process takes a subset of the data and works on it separately. Performing model calculations in parallel can significantly reduce the time taken to run the model. A different random number seed can be selected for each process. Further details and optimisation advice are given above in the Controller Application Interface section above. Discount rates Sets the annual discount rate to be applied to estimates of Life Expectancy, Quality Adjusted Life Expectancy and therapy and complication costs. Two different discount rates can be applied for one simulation, e.g. a discount rate of 3% can be specified for the first 10 years and then 1.5% for all subsequent years. If discounting is not required enter “0” for the discount rate. Separate discount rates can be applied for costs and life expectancy. Therapy costs Sets the therapy costs to be applied to each group, the number of years from the start of simulation in which they apply, whether they change post-complication and, if so, which events trigger the post-complication therapy costs and the number of years they apply following the complication(s). This is a new feature in OM2. Use these costs/utilities until age Defines the age limits for each of up to five age blocks. Scroll to the right to see the additional blocks. The cost/utility values within the block are used up until the subject reaches a simulated age above this value. Separate costs and utilities are provided for each gender within each block. If you do not wish to use a given block then clearing the age limit for that block will cause it to be ignored. For example, to use a single set of costs and utility values for subjects independent of age set the age limit of the first block to 200 and clear the 22 value for the other blocks. OM1 only supported one block of costs and they were not split by gender. Initial Utility value This sets the initial quality of life value at the start of the simulation from which decrements are subtracted when calculating QALYs. Initial utility levels can be set for each age block, but not at the individual patient level. The value of Age now for the subject is used to select which of the blocks apply for that subject. The default value of 0.807 is derived from UKPDS patients without complications and published in 2014.4 Cost in absence of complications Sets the annual cost incurred by a subject in the absence of any of the complications simulated in OM2. The value applied for a given year of simulation is based upon their age in that year. Age- and gender-specific default values are provided, based on updated estimates derived from UKPDS patients and published in 2015.5 Utility Decrements Sets utility decrements associated with IHD, MI, heart failure, stroke, amputation, blindness, renal failure and ulcer by age in the year of simulation. Default values are provided, based on updated estimates derived from UKPDS patients and published in 2014.4 The defaults provided for renal failure and for ulcer are taken from a meta-analysis of quality of life studies,6 and are not UKPDS-based. They have simply been provided for convenience and it should not be inferred that these are the “best” estimates available. They are shown in the worksheet in italics. Users may select their own age- and gender-specific values for the initial and subsequent utility decrement associated with each of these events. Complication costs Sets the complication costs associated with IHD, MI, heart failure, stroke, amputation, blindness, renal failure and ulcer. These include costs incurred in the year of the complication, and costs incurred in subsequent years. Age- and gender-specific default values are provided, based on updated estimates derived from UKPDS patients and published in 2015.5 The defaults provided for costs associated with renal failure and ulcer are taken from the NHS Blood and Transplant programme7 and a recent UK report on the costs of ulcer and amputation8 respectively, and are not UKPDS-based. The renal failure default cost of £19,190 per year in the year of event and in subsequent years assumes that 45% of patients are transplanted and 55% are on dialysis, that 24% of those on dialysis are on peritoneal and 76% on haemodialysis, and that costs are £17,500 per patient per year for a patient on peritoneal dialysis, £35,000 per patient per year for a patient on hospital haemodialysis, and £5000 per year following transplantation.7 The costs of an ulcer, of £6599 in the year of the event only, assume community costs of £4992, in-patient costs of £3215, 50% of patients admitted as in-patients and all patients receiving community care.8 These have simply been provided for convenience and it should not be inferred that these are the “best” estimates available. They are shown in the 23 worksheet in italics. Users may select their own values for the initial and subsequent complication costs associated with each of these events. Currency Conversion Value The exchange rate value applied to the default costs when the Reset costs button is used. This is a new feature in OM2. Reset Costs button Click this button to revert to default Costs as supplied with this version of OM2. The values provided are multiplied by the Currency Conversion Value. Reset Utilities button Click this button to revert to the default utility decrements as supplied with this version of OM2. Populate annual risk factor worksheet button Used to populate the 13 Risk Factor worksheets (smoking status, HDL-cholesterol, LDL-cholesterol, systolic blood pressure, HbA1c, peripheral vascular disease, atrial fibrillation, weight, albuminuria, heart rate, white blood cell count, haemoglobin and eGFR) using the methods selected on the individual worksheet. Note that this must be done when there are blank cells in any of the risk factor worksheets before attempting to run the model or errors will occur. Values are calculated for the subjects selected in the Subject Rows parameters described above and for the Number of years specified. Data outside of this range will remain unchanged. For more details of the methods available for each worksheet see Risk Factor section above. This is a new feature in OM2. Verify Model Data button Checks the Input Worksheets for errors. Checks include: missing data, out of range values, or invalid values for the Inputs worksheet, all Risk Factor worksheets and the model parameters worksheet. Any anomalies are marked in red. Issues are summarised on the Errors worksheet. This is equivalent to the Pre-flight check option in OM1. Clicking on button also updates the Inputs Check worksheet (see below). Inputs Check Worksheet (Figure 13) This worksheet provides the means and standard deviation (SD) or counts by column for Inputs Worksheet data, by group and for all patients. It also provides the counts (binary data) or mean and SD (continuous data) for all Risk Factor worksheets, by group, and for all patients, and by year of simulation. These data are updated whenever the Verify Model Data button is clicked. 24 Figure 13: Inputs check worksheet 25 Errors Any errors that are found by the Verify Model Data button are displayed in the Errors worksheet. The top section summarises issues with the Model Parameters worksheet and a row for each subject summarises any issues found on the Inputs or Risk Factor worksheets. This is a new feature in OM2. The Output Workbook The Output Workbook reproduces the worksheets found in the Input Workbook (apart from the Errors worksheet), and adds additional worksheets to provide the outputs from the model. The Estimated risk factors worksheets found in version 1 of the model have been removed from this version, as the data used by the model is fully visible within the Risk Factor worksheets. The following additional worksheets are provided: Outputs Worksheet This worksheet (Figure 14) tabulates Life Expectancy, Quality Adjusted Life Expectancy, cumulative therapy costs, cumulative complication costs, and cumulative total costs together with their respective 95% confidence intervals, for each subject specified. The worksheet also includes Expected utility, therapy costs, complication costs, total costs by simulated year. Overall values for the population are provided, as well as summary data for each group, and the group differences (1 vs. 2, 1 vs. 3, 2 vs. 3). Monte Carlo error (MCE) (see ‘Number of loops’) is also calculated for the overall population, for each group and for their differences, but not for the individual subject data. Figure 14: Outputs worksheet 26 27 Bootstraps Worksheet This worksheet (Figure 15) tabulates estimated mean Life expectancy, Total qualityadjusted life expectancy (QALE), Therapy cost, Cost of complications, Total cost by bootstrap replication. The number of results reported depends on the number of bootstrap replications requested with each result showing the mean value for that bootstrap averaged across the total number of loops (Monte Carlo trials) requested. Overall values are provided together summary data for each group, and the group differences (1 vs. 2, 1 vs. 3, 2 vs. 3). 28 Figure 15: the Bootstraps worksheet (All) Figure 15: the Bootstraps worksheet (Group 1) Event Worksheets A worksheet is generated for each of the following events: • • • • • • • IHD (Ischaemic Heart Disease) MI (Myocardial Infarction) Heart failure Stroke Amputation Blindness Renal failure 29 • • • • Ulcer All Death CVD Death Other Death These worksheets tabulate Event rate and Long-term history rate together with their respective 95% confidence intervals, for each subject specified and for each simulated year. Overall values for the population are provided, as well as summary data for each group, and the group differences (1 vs. 2, 1 vs. 3, 2 vs. 3). The per-subject values are calculated by dividing the total simulated number of events by the total number of loops (Monte Carlo trials) (see ‘Number of loops’). Note that a subject may have events such as a myocardial infarction in a particular year as well as a death: this indicates the event was fatal. Figure 16; the Risk Factor worksheet KMPlotSheet Worksheet This worksheet (Figure 17) derives the Kaplan-Meier estimates by year of simulation for each type of event into a single worksheet for plotting purposes. 30 Figure 17: the KMPlotSheet, including year 0 KM Plot Worksheets These worksheets (Figure 18) provide Kaplan-Meier survival plots by year of simulation for each event. They are generated for each of the events simulated by the model. (See Event Worksheets above). Figure 18: KM Plot, including year 0 31 Worked Examples These examples are provided as a practical guide to using OM2 and to illustrate some of the new features. EXAMPLE #1 To determine the likely impact of a fixed difference in HbA1c values over time, say 11.0% versus 7.0%, on Life Expectancy and Quality Adjusted Life Expectancy for a fifty-five year old patient with type 2 diabetes of five year’s duration, proceed as follows: Step 1: Enter patient characteristics Using the Inputs worksheet, enter characteristics for two patients that have identical risk-factor levels for all but HbA1c (see table 1) Table 1: Patient characteristics Demographic characteristics ID for subject one ID for subject two Group for subject one Group for subject two Ethnicity Gender Current age Duration of T2DM Weight Height Risk factor values Atrial fibrillation (AF) Peripheral vascular disease (PVD) Current smoker Micro/macroalbuminuria (albuminuria) HDL cholesterol LDL cholesterol Systolic blood pressure HbA1c for subject one HbA1c for subject two Heart rate White blood cell count (WBC) Haemoglobin Glomerular filtration rate (eGFR) Pre-existing events History of ischemic heart disease History of congestive heart failure History of amputation History of blindness in one eye History of stroke History of myocardial infarction (kg) (meters) N N N N 1.22 2.59 133.6 11.0 7.5 81 6.85 14.10 80 (No) (No) (No) (No) (mmol/l) (mmol/l) (mmHg) (%) (%) (bpm) (x 10-6 ml) (g/dl) (ml/min/1.73m2) N N N N N N 32 Value 1 2 1 2 1 M 55 5 91 1.74 Male Years (No) (No) (No) (No) (No) (No) History of ulcer Discounting start year (both patients) N 0 (No) Step 2: Risk factor time paths For simplicity, assume that all risk factors remain constant through the entire simulation. Hence, choose method ‘1’ to populate the sheet (1=‘Match initial values’) in all risk factor worksheets: • • • • • • • • • • • • • Smoking status HDL LDL Systolic BP HbA1c PVD AF Weight Albuminuria Heart rate WBC Haemoglobin eGFR Step 3: Set up simulation Go to the Model Parameters worksheet. To obtaining point estimates in an initial simulation we will deal only with first order uncertainty. Set the “Number of subjects” to 2 by choosing the last row to be ‘18’, the “Number of loops” to 10,000 to reduce Monte Carlo error, the “Number of years simulated” to 70, the ‘Number of processes to use’ to 1, and the initial and subsequent QALE/life expectancy and total costs “discount rate” to 0. At this stage we will not estimate confidence intervals so set the “Number of bootstraps” to 0. Set up ‘Therapy costs prior to complication’ and ‘Therapy cost post complication’ to £500 for groups 1 and 2 and the number of years to apply to 70. This ensures that patient one and two will face the same therapy costs during the entire simulation period. Now, assume that the costs and utilities associated with diabetes-related complications remain constant through the whole simulation period. To do this, set the age limit of the first age group to 200 (cell B24) and clear the value for the other groups. Once all the above is done, click on ‘Populate annual risk factor sheets’ and then ‘Verify model data’. Step 4: Run the simulation If no errors were identified use the Inputs Check worksheet to confirm the values for all Risk Factors by group and by year of simulation. If all is well save the Excel file and close it. Now, open the OM2 Controller Application Interface, select ‘File’ and then ‘Open’ your file. Select start and wait until is finished. Now open the resulting Excel file (will have the same name plus Outputs at the end). The Life Expectancy for subject one should be approximately 22.7 years (16.2 QALYs) and for subject two, with the lower HbA1c, somewhat greater at approximately 24.0 years (17.9 QALYs). The total costs should be £36,577 for 33 subject one and £36,024 for subject two. The difference in life expectancy between patient one and two should be -1.3 years and the difference in total costs should be £553. Estimates may differ slightly between simulations as the Outcomes model may have used a different set of random numbers. It is also possible to examine cumulative events rates over the years specified in the simulation. For example, the MI worksheet contains the expected incidence and KM event-free survival myocardial infarction for both groups. The expected cumulative incidence of events can be estimated by summing the event rates at each year. These plateau at around 0.30 for patient one and 0.23 for patient two around 40th year of the simulation as almost all patients are dead and therefore cannot have an MI. EXAMPLE #2 We may also want to undertake a simulation to estimate the cost-effectiveness of a hypothetical new therapy for HbA1c compared to standard care. The following assumptions are made: • • • The target population of the new therapy is fully represented using a single male individual with an initial HbA1c value of 7.5% and characteristics listed in Table 1; New treatment costs £500 per year and is effective at decreasing HbA1c to 6.5% and keeping it constant through a patient’s lifetime; Standard care for HbA1c costs £100 per year but allows HbA1c to increase by 1% every year. To undertake this type of simulation proceed as follows: Step 1: Enter patient characteristics Using the Inputs worksheet, change the two patients set out in Example #1 to have HbA1c levels of 7.5%. Group 1 will receive the new therapy whereas Group 2 will receive standard care. Step 2: HbA1c time path Go to the HbA1c worksheet. Change Method to ‘2’ (linear regression with slope m and constant c) and Replace existing to ‘N’. Now, change the slope coefficient m to be 1.00 for Group 1 (‘new therapy’ group) and 1.01 for group 2 (i.e. HbA1c value will increase by 1% every year in the standard care group). For the first subject, enter 6.5 for year 1 and copy this value across the row to year 70. For the second subject, clear all HbA1c values in that worksheet. Step 3: Run model Go to the Model Parameters worksheet, change the discount rate for both QALE and costs to be 3.5% for 70 years to allow a more realistic economic evaluation. Now, set ‘Therapy costs prior to complication’ and ‘Therapy cost post complication’ to £500 for group 1 and £100 for group 2 and the ‘number of years to apply’ to 70. Click on ‘Populate annual risk factor sheets’ and then ‘Verify model data’. Use Inputs Checks to make sure the HbA1c time path in both groups is correctly modelled, save the Excel file and close it. Now, open the Controller Application Interface, select ‘File’ and then ‘Open’ the saved file. Select start and wait until is finished. Now, open the resulting Excel file (will have the same name plus Outputs at the end). 34 Look at the Outputs worksheet. Group 1’s (quality adjusted) life Expectancy is higher, at around 15.2 years and 11.6 QALYs, relative to Group 2, at around 15.0 years and 11.3 QALYs. Total costs are also higher for Group 1 (£22,326) compared to Group 2 (£16,632). Hence, the new therapy is more effective but more costly than standard care. The incremental QALYs of the new therapy (Group 1) relative to standard care (Group 2) are 0.26 QALYs. The incremental costs of the new therapy relative to standard care are £5,694. The incremental cost-effectiveness ratio of the new therapy relative to standard care is then estimated at £21,877 per QALY gained. EXAMPLE #3 To obtain confidence intervals for Life Expectancy, Quality of Life Expectancy and costs for Example #2 proceed as follows: Step 1 Go to the Model Parameters. Keep the “Number of loops” at 10,000 and change the “Number of bootstraps” to 1,000. Save the Excel file and run the model using Controller Application Interface. The simulation will take a little longer to run (approximately 20 minutes on PC with a Pentium IV processor). Go to the Outputs worksheet. The Life Expectancy, QALE and costs will now have 95% confidence intervals around them. Go to the Bootstraps worksheet. The 1,000 bootstraps for life expectancy, QALE and costs are made available by group. These can be used to plot pairs of incremental costs and QALE in the cost-effectiveness plane and estimate cost-effectiveness acceptability curves. 35 Appendix 1 : Enabling VBA macros in Microsoft Excel Microsoft office 2010 and 2013 for Windows Opening the workbook in these versions and clicking any of the buttons on the Model Parameters worksheet will open the following dialog: and a security warning appears at the top of the page: Click File. The Microsoft Office Backstage view appears. In the Security Warning area, on the Enable Content button, click the down-arrow. Select Advanced Options to learn more about the publisher. 36 The following Security Options dialog will appear Check the ‘Always trust macros from this publisher’ box Click OK. You will now be able to run the model. When the model is opened again, this dialog will not appear. Microsoft Office 2011 for Macintosh Each time you open an Excel file that contains macros the following dialog will show: Click the Enable Macros button to enable the features. 37 References 1. Hayes AJ, Leal J, Gray AM, et al. UKPDS Outcomes Model 2: a new version of a model to simulate lifetime health outcomes of patients with type 2 diabetes mellitus using data from the 30 year United Kingdom Prospective Diabetes Study: UKPDS 82. Diabetologia 2013;56(9):1925-‐33. 2. UKPDS Group. UK Prospective Diabetes Study VIII: study design, progress and performance. Diabetologia 1991;34:877-‐90. 3. Clarke P, Gray A, Briggs A, et al. A model to estimate the lifetime health outcomes of patients with Type 2 diabetes: the United Kingdom Prospective Diabetes Study (UKPDS) Outcomes Model (UKPDS 68). Diabetologia 2004;47:1747-‐59. 4. Alva M, Gray A, Mihaylova B, et al. The Effect of Diabetes Complications on Health-‐Related Quality of Life: The Importance of Longitudinal Data to Address Patient Heterogeneity. Health Economics 2014;23(4):487-‐500. 5. Alva ML, Gray A, Mihaylova B, et al. The impact of diabetes-‐related complications on healthcare costs: new results from the UKPDS (UKPDS 84). Diabet Med 2015;32(4):459-‐66. 6. Lung TW, Hayes AJ, Hayen A, et al. A meta-‐analysis of health state valuations for people with diabetes: explaining the variation across methods and implications for economic evaluation. Quality of Life Research 2011;20(10):1669-‐78. 7. Transplant NBa. Factsheet 7: Cost-‐effectiveness of kidney transplantation:. London, UK., 2012. 8. Kerr M. Foot Care for People with Diabetes: The Economic Case for Change.: NHS Diabetes, 2012. 38