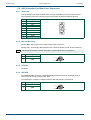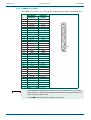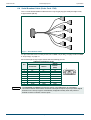
1
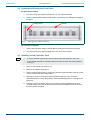
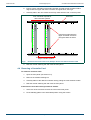
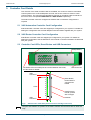
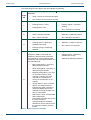
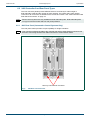
User Manual
2460 Controller
Automation and Router Control
snellgroup.com
2460 Controller
www.snellgroup.com
Contents
Contents
1. Information and Notices . . . . . . . . . . . . . . . . . . . . . . . . . . . . . . . . . . . . . . . . . . . . . . . . . 3
1.1 Copyright and Disclaimer . . . . . . . . . . . . . . . . . . . . . . . . . . . . . . . . . . . . . . . . . . . . . . 3
1.2 Contact Details . . . . . . . . . . . . . . . . . . . . . . . . . . . . . . . . . . . . . . . . . . . . . . . . . . . . . . 3
2. Safety Notices. . . . . . . . . . . . . . . . . . . . . . . . . . . . . . . . . . . . . . . . . . . . . . . . . . . . . . . . . . 4
2.1 Lithium Batteries . . . . . . . . . . . . . . . . . . . . . . . . . . . . . . . . . . . . . . . . . . . . . . . . . . . . . 4
Issue 1 Rev 2
3. Introduction. . . . . . . . . . . . . . . . . . . . . . . . . . . . . . . . . . . . . . . . . . . . . . . . . . . . . . . . . . . .
3.1 Overview . . . . . . . . . . . . . . . . . . . . . . . . . . . . . . . . . . . . . . . . . . . . . . . . . . . . . . . . . . .
3.1.1 2460 Controller Card . . . . . . . . . . . . . . . . . . . . . . . . . . . . . . . . . . . . . . . . . . .
3.1.2 IQ3HB 3U Enclosure . . . . . . . . . . . . . . . . . . . . . . . . . . . . . . . . . . . . . . . . . . .
5
5
5
6
4. Controller Card Installation and Removal . . . . . . . . . . . . . . . . . . . . . . . . . . . . . . . . . . .
4.1 Overview . . . . . . . . . . . . . . . . . . . . . . . . . . . . . . . . . . . . . . . . . . . . . . . . . . . . . . . . . . .
4.2 Opening and Closing the Front Panel . . . . . . . . . . . . . . . . . . . . . . . . . . . . . . . . . . . . .
4.3 Installing a New Controller Card . . . . . . . . . . . . . . . . . . . . . . . . . . . . . . . . . . . . . . . . .
4.4 Removing a Controller Card . . . . . . . . . . . . . . . . . . . . . . . . . . . . . . . . . . . . . . . . . . . .
7
7
8
8
9
5. Controller Card Details . . . . . . . . . . . . . . . . . . . . . . . . . . . . . . . . . . . . . . . . . . . . . . . . .
5.1 2460 Automation Controller Card Configuration . . . . . . . . . . . . . . . . . . . . . . . . . . . .
5.2 2460 Router Controller Card Configuration. . . . . . . . . . . . . . . . . . . . . . . . . . . . . . . .
5.3 Controller Card LEDs, Reset Button and USB Connectors. . . . . . . . . . . . . . . . . . . .
5.3.1 Reset Button . . . . . . . . . . . . . . . . . . . . . . . . . . . . . . . . . . . . . . . . . . . . . . . .
5.3.2 USB Connectors . . . . . . . . . . . . . . . . . . . . . . . . . . . . . . . . . . . . . . . . . . . . .
10
10
10
10
12
12
6. Specification . . . . . . . . . . . . . . . . . . . . . . . . . . . . . . . . . . . . . . . . . . . . . . . . . . . . . . . . . .
6.1 Specifications . . . . . . . . . . . . . . . . . . . . . . . . . . . . . . . . . . . . . . . . . . . . . . . . . . . . . .
6.2 2460 Controller Card Rear Panel Types . . . . . . . . . . . . . . . . . . . . . . . . . . . . . . . . . .
6.2.1 1493 Rear Panel (Automation Control Systems Only). . . . . . . . . . . . . . . . .
6.2.2 1494 Rear Panel (Automation and Router Control Systems) . . . . . . . . . . .
6.3 2460 Controller Card Rear Panel Connectors. . . . . . . . . . . . . . . . . . . . . . . . . . . . . .
6.3.1 Timecode . . . . . . . . . . . . . . . . . . . . . . . . . . . . . . . . . . . . . . . . . . . . . . . . . . .
6.3.2 Ref and Ref Loop . . . . . . . . . . . . . . . . . . . . . . . . . . . . . . . . . . . . . . . . . . . . .
6.3.3 VITC/Ref . . . . . . . . . . . . . . . . . . . . . . . . . . . . . . . . . . . . . . . . . . . . . . . . . . .
6.3.4 SDI/SCR. . . . . . . . . . . . . . . . . . . . . . . . . . . . . . . . . . . . . . . . . . . . . . . . . . . .
6.3.5 GPIO . . . . . . . . . . . . . . . . . . . . . . . . . . . . . . . . . . . . . . . . . . . . . . . . . . . . . .
6.3.6 Ethernet (Master) & Ethernet (Slave) Connectors . . . . . . . . . . . . . . . . . . . .
6.3.7 USB (Master) & USB (Slave) Connectors . . . . . . . . . . . . . . . . . . . . . . . . . .
6.3.8 COMM 1-8 (37 Way) . . . . . . . . . . . . . . . . . . . . . . . . . . . . . . . . . . . . . . . . . .
6.3.9 COMM 9-16 (37 Way) . . . . . . . . . . . . . . . . . . . . . . . . . . . . . . . . . . . . . . . . .
6.4 Serial Breakout Cable (Order Code 1748) . . . . . . . . . . . . . . . . . . . . . . . . . . . . . . . .
13
13
14
14
15
16
16
16
16
16
17
17
17
18
19
20
Page 2
© 2014 Snell Limited
2460 Controller
www.snellgroup.com
Information and Notices
1. Information and Notices
1.1 Copyright and Disclaimer
Copyright protection claimed includes all forms and matters of copyrightable material and
information now allowed by statutory or judicial law or hereinafter granted, including without
limitation, material generated from the software programs which are displayed on the screen
such as icons, screen display looks etc.
Information in this manual and software are subject to change without notice and does not
represent a commitment on the part of Snell Limited. The software described in this manual is
furnished under a license agreement and can not be reproduced or copied in any manner
without prior agreement with Snell Limited, or their authorized agents.
Reproduction or disassembly of embedded computer programs or algorithms prohibited.
No part of this publication can be transmitted or reproduced in any form or by any means,
electronic or mechanical, including photocopy, recording or any information storage and
retrieval system, without permission being granted, in writing, by the publishers or their
authorized agents.
Snell operates a policy of continuous improvement and development. Snell reserves the right
to make changes and improvements to any of the products described in this document
without prior notice.
1.2 Contact Details
Customer Support
For details of our Regional Customer Support Offices please visit the Snell web site and
navigate to Support/Customer Support Contacts.
http://www.snellgroup.com/support/customer-support/
Customers with a support contract should call their personalized number, which can be found
in their contract, and be ready to provide their contract number and details.
Issue 1 Rev 2
Page 3
© 2014 Snell Limited
2460 Controller
www.snellgroup.com
Safety Notices
2. Safety Notices
2.1 Lithium Batteries
CAUTION
This equipment contains a lithium battery
There is a danger of explosion if this is replaced incorrectly
Replace only with the same or equivalent type.
Dispose of used batteries according to the manufacturers instructions.
Batteries should only be replaced by trained service technicians
The 2460 Controller card(s) contain a Lithium battery to provide non-volatile memory.
Note:
Issue 1 Rev 2
•
Used batteries should be disposed of in accordance with the manufacturers
instruction and any specific local legislation regarding the recycling of waste
batteries and accumulators
•
Ensure that the same make and model of battery is used if replacement is required
and observe the correct polarity (a manufacturer recommended UL recognized
equivalent can be used if the original type is not available)
Page 4
© 2014 Snell Limited
2460 Controller
www.snellgroup.com
Introduction
3. Introduction
3.1 Overview
Two versions of the 2460 controller card are available; one version is used for Automation
control systems such as Snell Morpheus and ICE, the second version is used for router
control systems. The cards can be mixed in the IQ 3U enclosure as required. The card types
are identified by printing on the plastic extractor handle on the front of each card
(labelled MOR-2460 and IQRCTL2460 respectively).
The 2460 controller is a PC card where all the time critical commands for the system’s
broadcast devices are stored and executed. Each card can control any combination of serial,
IP, and GPI controlled devices. A maximum of 16 serial connections and up to 16 GPI
connections are available from each controller card. As the system is modular, command
execution and latency are easily controlled by adding additional cards or 3U enclosures.
The 2460 controller cards can be used in a dual-redundant configuration where a backup
card automatically takes over from a failed main card. In a dual-redundant system, pulling out
a live card has no effect on the system as its backup will seamlessly take over.
Note:
Router control systems are only available as dual-redundant pairs. Dual-redundant pairs
occupy two enclosure slots and four rear panel positions.
3.1.1 2460 Controller Card
The 2460 cards store and execute all of the time critical commands for the system’s
broadcast devices. The configuration of the devices that each card controls is stored in
persistent memory on the controller card.
A 2460 controller card, or a number of cards (working individually, or as dual-redundant
paired cards) are fitted in a standard Snell IQH3B 3U enclosure. This is a 19 inch wide 3U
high unit, which accommodates 2460 controller cards.
Reset Button
Status LEDs and USB ports are located between the PCBs,
see section 5.3 for details
Fig 1.
Backup Battery
Connector
2460 Controller Card
The main features of the 2460 controller cards are:
Issue 1 Rev 2
•
2460 controller cards and rear panels are hot-swappable
•
Each controller card can control up to 16 devices
•
RS232, RS485/422, TCP/IP
•
Timecode input
•
Reference input
•
GPIO
Page 5
© 2014 Snell Limited
2460 Controller
www.snellgroup.com
Introduction
3.1.2 IQ3HB 3U Enclosure
Each IQ enclosure can accommodate up to six 2460 controller cards in various combinations
of single controller and dual-redundant pairs of controllers. Each 2460 controller uses two
slots of the 16 slots available in an IQ enclosure. Rear panels are available for single
controllers and dual-redundant pairs, and occupy three and four rear panels positions
respectively. See Table 2 on page 13 for 2460 controller card combinations in a single
enclosure.
Note:
Router control systems are only available as dual-redundant pairs. Dual-redundant pairs
occupy two enclosure slots and four rear panel positions.
Fig 2.
IQH3B 3U Enclosure
For more information on the IQ3HB enclosure see the IQH3B/IQH3BQ IQ Modular
Enclosure Installation and User Manual which can be found here:
http://www.snellgroup.com/products/modular-infrastructure/frames-control/frames/
The main features of the IQH3B 3U enclosure are:
Issue 1 Rev 2
•
Hot-swappable redundant power supplies with PSU status reporting through GPIs on
the Gateway control card rear panel
•
Dual-redundant in-service removable cooling fan unit
•
Optional SNMP monitoring of PSU and fan status via the Ethernet connector on the
rear panel of the Gateway control card
•
Variable fan speed dependant on load and ambient temperature
•
Full CE and UL compliance
Page 6
© 2014 Snell Limited
2460 Controller
www.snellgroup.com
Controller Card Installation and Removal
4. Controller Card Installation and Removal
4.1 Overview
The controller cards fit into connector panels on the rear of the 3U enclosure. There are two
types of connector panel depending on whether a single controller card or a pair of
dual-redundant controller cards are fitted.
Note:
The 2460 controller cards and rear panels are hot-swappable and so can be fitted or
removed with the IQ3HB enclosure powered on.
•
1493 - single controller rear panel (three rear panel positions)
•
1494 - dual-redundant controller rear panel (four rear panel positions)
1493 - Single Controller
Rear Panel
Fig 3.
Issue 1 Rev 2
1494 - Dual-Redundant Controller
Rear Panel
Example 1493 and 1494 Rear Panels
Page 7
© 2014 Snell Limited
2460 Controller
www.snellgroup.com
Controller Card Installation and Removal
4.2 Opening and Closing the Front Panel
To open the front panel:
1.
Turn the locking screw approximately half a turn to release the panel.
2.
Pull the panel forward and downward using the handle that runs along the top edge of
the panel.
Locking Screw
Fig 4.
Handle
Opening/Closing the Front Panel
To close the front panel:
1.
Pull the panel upward using the handle that runs along the top edge of the panel.
2.
Turn the locking screw approximately half a turn to secure the panel.
4.3 Installing a New Controller Card
Note:
Issue 1 Rev 2
•
A single controller requires two slots and three rear panel positions, see Fig 5.
•
A pair of dual-redundant controllers require four slots and four rear panel positions,
see Fig 5.
1.
Open the front panel (see section 4.2).
2.
Remove the module retaining bar.
3.
Choose a pair of empty slots (4 consecutive slots are required if fitting a pair of control
cards in a dual-redundant configuration).
4.
Remove the screws securing the blanking plates at the rear of the enclosure
associated with the chosen slot position. Store the blanking plates in a safe place for
future use.
5.
Ensuring correct orientation, fit the rear connecting panel (supplied with the new
controller cards) to the rear of the enclosure in the vacant aperture and secure with
the fixing screws provided.
Page 8
© 2014 Snell Limited
2460 Controller
www.snellgroup.com
Controller Card Installation and Removal
6.
Ensure correct orientation of the 2460 controller and that the left controller PCB is
aligned with the upper and lower enclosure card guide slots, see Fig 5.
7.
Carefully slide in the new module until it fully mates with the rear connector panel.
Four card slots required for
dual controller systems
Enclosure
MOR-2460
MOR-2460
Left PCB engages with the
upper and lower enclosure
card guide slots as shown
Three card slots required for a
single controller system
Fig 5.
8.
Enclosure Viewed from the Front, Example Shows Two 2460 Controllers Fitted
Refit the module retaining bar and close the front panel.
4.4 Removing a Controller Card
To remove a controller card:
1.
Open the front panel (see section 4.2).
2.
Remove the module retaining bar.
3.
Carefully slide out the desired controller card by pulling the card extractor handle.
4.
Refit the module retaining bar and close the front panel.
If the slots are to be left vacant, proceed as follows:
Issue 1 Rev 2
1.
At the rear of the enclosure remove the now unused rear panel.
2.
Fit the blanking plates in the associated position using the screws.
Page 9
© 2014 Snell Limited
2460 Controller
www.snellgroup.com
Controller Card Details
5. Controller Card Details
Two versions of the 2460 controller card are available; one version is used for Automation
control systems such as Snell Morpheus and ICE, the second version is used for router
control systems. The card types are identified by printing on the plastic extractor handle on
the front of each card (labelled MOR-2460 and IQRCTL2460 respectively).
The 2460 controller cards are configured in software and no hardware configuration is
required.
5.1 2460 Automation Controller Card Configuration
2460 Automation controller cards are shipped pre-configured for your system. For details on
editing the configuration see the Snell Morpheus documentation supplied with your system.
5.2 2460 Router Controller Card Configuration
2460 Router controller cards are shipped pre-configured for your system. For details on
editing the configuration see the Workbench user manual on the documentation CD delivered
with your system.
5.3 Controller Card LEDs, Reset Button and USB Connectors
Reset Button
Backup Battery
The Status LEDs and USB ports are located between the PCBs,
see the below for details
Power OK
LEDs
1
2
3
4
5
6
7
8
9
USB
Connector
Fig 6.
Note:
Issue 1 Rev 2
MOR-2460
USB
Connector
Data Connector
Reset Button,
located behind
card extractor
handle
Card Extractor
Handle, printed
with card type
Heatsink
2460 Controller Card LEDs (Viewed from the Front Edge of the Card)
Jumpers and Headers are present on the 2460 controller card and these are for Snell Use
Only.
Page 10
© 2014 Snell Limited
2460 Controller
www.snellgroup.com
Controller Card Details
The LEDs along the front edge of the card indicate the following:
LED
Routing
Automation
Power OK
Power
OK
•
Green = Power is connected and okay
•
Off = Power not connected or not okay
Card Health Monitor
Active/Idle
1
•
Flashing Green = Active
•
Flashing Blue = Idle
Off = Controller not working
Green = Master Controller
•
Solid Blue = Valid Ref present
•
Blue = Slave Controller
•
Off = Valid Ref not present
LTC Present
•
Flashing Green = Watchdog
enabled and running
•
Flashing Orange = Watchdog
disabled
3
Serial Link Between Controllers
Displays the status of the serial link
between the active and idle controllers.
The serial link is used to replicate data
between the active and idle controllers in a
dual-redundant pair.
•
Blue pulsing Green = Link okay,
data is being transferred.
•
Green pulsing Blue = Link okay, no
data is being transferred.
•
Magenta pulsing Blue = Link error,
no connection with the other
controller. Indicates; the other
controller is not present/not
running or the serial link is not
working.
•
Orange Pulses = Error, received
data for unconfigured device
Indicates; the other controller is
configured differently from the
controller receiving the data or it
has no configuration.
•
Red Pulses = Error, received data
with invalid format.
Check both controllers are running
the same version of
CentraController.rtb software.
Workbench can be used to check
the controller software versions
loaded.
4
Issue 1 Rev 2
•
•
Watchdog Status
Table 1.
Flashing Yellow = Controller
working
Reference Present
Master/Slave
2
•
•
Solid Blue = Valid LTC present
•
Off = Valid LTC not present
Watchdog Status
•
Flashing Green = Watchdog
enabled and running
•
Solid Red= Watchdog disabled
2460 Controller Card LEDs
Page 11
© 2014 Snell Limited
2460 Controller
www.snellgroup.com
Controller Card Details
LED
Routing
Automation
5
Not used
Not used
6
Not used
Not used
7
Not used
Not used
Active/Idle
8
Not used
9
Table 1.
•
Solid Green = Active
•
Solid Blue = Idle
Not used
Not used
2460 Controller Card LEDs
5.3.1 Reset Button
The reset button resets the controller card and will also failover control to the second
controller in a dual-redundant controller system.
Single controllers:
Pressing the reset on a single controller will cause the 2460 controller to reboot.
Important:
All communication with the 2460 controller will be lost during the reset. Because of this no
switching outputs or status messages will be available during the reset.
Dual-redundant controller pair:
Pressing the reset button on the active controller of a dual-redundant pair of controllers will
reset the active controller and cause control to failover to the other controller in the pair.
Important:
IQRCTL2460 only:
If the Idle controller in the pair has recently been fitted in the enclosure the active controller
may still be synchronizing its configuration to the idle controller over the network.
Do not fail-over to the idle controller until data synchronization is complete.
In practice the amount of time the controller takes to synchronize will depend on a number
of factors such as; system size, system complexity, network conditions, the number of
changes made from the default configuration, etc.
To be sure synchronization is complete check the Workbench Generic Online editor, see
the Workbench user manual for details on using the Generic Online Editor:
Navigate to:
Controller | ConfigurationItems | ReplicatedPeer |
ReplicationComplete = True
Where:
•
Synchronization complete, safe to failover = True
•
Synchronization not complete, do not failover = False
Alternatively:
if you have no access to Workbench you should wait a minimum of 10 minutes from
inserting a controller before failing over to it.
5.3.2 USB Connectors
The USB connectors on the front edge of the controller card can be used if USB peripherals
such as a mouse or keyboard need to be attached to the controller.
Issue 1 Rev 2
Page 12
© 2014 Snell Limited
2460 Controller
www.snellgroup.com
Specification
6. Specification
6.1 Specifications
For a full list of the specifications for the IQ3HB 3U enclosure see the IQH3B/IQH3BQ IQ
Modular Enclosure Installation and User Manual which can be found here:
http://www.snellgroup.com/products/modular-infrastructure/frames-control/frames/
Specifications
Temperature Range:
0 to 40°C operating, -20 to +85°C storage.
A temperature and load sensitive cooling fan is fitted
Humidity Range:
10 to 85% (non condensing)
Power Rating Load Units (LU)
26 LU per 2460 Controller
IQH3B enclosure; 165 LU Max.
IQ3HB 3U Enclosure Capacity:
3 x dual-redundant pairs of controllers
or
2 x dual-redundant pairs of controllers + 2 single
controllers
or
1 x dual-redundant pairs of controllers + 4 single
controllers
or 5 single controllers
Table 2.
Issue 1 Rev 2
Specifications - Mechanical
Page 13
© 2014 Snell Limited
2460 Controller
www.snellgroup.com
Specification
6.2 2460 Controller Card Rear Panel Types
The rear connector panels provide different levels of connectivity for either single or
dual-redundant cards and the number of ports required. The panels share many similar
connectors. All connectors are detailed in the Connectors section. See “2460 Controller Card
Rear Panel Connectors” on page 16.
Note:
Router control systems are only available as dual-redundant pairs. Dual-redundant pairs
occupy two enclosure slots and four rear panel positions.
6.2.1 1493 Rear Panel (Automation Control Systems Only)
This rear panel variant provides 16-port capability for single controllers.
Note:
Only connect one Ethernet cable to the controller rear panel, either Ethernet connector can
be used. Connecting two Ethernet cables will result in communication failure.
PS
Use only one Ethernet Connector
Fig 7.
Issue 1 Rev 2
1493 Rear Connector Panel
Page 14
© 2014 Snell Limited
2460 Controller
www.snellgroup.com
Specification
6.2.2 1494 Rear Panel (Automation and Router Control Systems)
This rear panel variant provides 16-port capability and dual-redundancy.
Note:
Only connect one Ethernet cable to each controller, either of the controller Ethernet
connectors can be used. Connecting two Ethernet cables to a controller will result in
communication failure for that controller.
Use only one Slave Ethernet
Connector
Fig 8.
Issue 1 Rev 2
Use only one Master Ethernet
Connector
1494 Rear Connector Panel
Page 15
© 2014 Snell Limited
2460 Controller
www.snellgroup.com
Specification
6.3 2460 Controller Card Rear Panel Connectors
6.3.1 Timecode
LTC signal input and balanced AES reference input available on the Timecode connector.
The Timecode connector is a 9-way D-type socket (DE-9F) with the following pinouts:
Pin
1
2
3
4
5
6
7
8
9
Fig 9.
Signal
LTC In +
AES In +
N/C
N/C
N/C
LTC In AES In N/C
GND
1
9
Timecode Connector
6.3.2 Ref and Ref Loop
Passive BNC video reference input and loop through connectors.
Analog video, auto sensing B+B (625 line PAL or 525 line NTSC) or HD Tri-level reference.
Note:
No internal termination, 75 Ohm termination required at the end of a signal run.
Pin
1
Signal
Video Reference
2
GND
1
2
Fig 10. Ref Connector
6.3.3 VITC/Ref
Not Used.
6.3.4 SDI/SCR
The SDI/SCR BNC connector outputs debugging information that can be displayed on a
screen that can accept a 720p50 SDI input.
The SDI/Screen connector is a BNC connector with the following connections:
Pin
1
Signal
SDI Monitor
2
GND
1
2
Fig 11. SDI/SCR Connector
Issue 1 Rev 2
Page 16
© 2014 Snell Limited
2460 Controller
www.snellgroup.com
Specification
6.3.5 GPIO
The GPIO connector is a 25-way D-type socket (DB-25F) with the following pinouts:
Pin
1
2
3
4
5
6
7
8
9
10
11
12
13
Signal
GPI_0
GPI_1
GPI_2
GPI_3
GPI_4
GPI_5
GPI_6
GPI_7
GPI_8
GPI_9
GPI_10
GPI_11
GPI_12
Pin
14
15
16
17
18
19
20
21
22
23
24
25
Signal
GPI_13
GPI_14
GPI_15
N/C
5V (0.5A max.)
N/C
GND
GND
GND
GND
GND
GND
1
25
Fig 12. GPIO Connector
6.3.5.1
GPIO Outputs
As Outputs, the GPIOs are arranged in two banks of eight outputs; the first eight GPIOs in
bank 1, and the second eight GPIOs in bank 2. Each bank of eight outputs is capable of
sinking a maximum of 1.0A. Each output is capable of sinking up to a maximum of 500mA.
Two of the eight outputs could sink the maximum of 0.5A. alternatively all outputs could sink
125mA and still be within the maximum limits.
Outputs can switch up to 50V.
6.3.5.2
GPIO Inputs
As Inputs the switch of the external equipment must be able to sink a minimum of 5mA with a
maximum voltage of 5V.
6.3.6 Ethernet (Master) & Ethernet (Slave) Connectors
The Ethernet connectors are standard RJ-45 sockets with standard pinouts:
Note:
Only connect one Ethernet cable to each controller, either of the controller Ethernet
connectors can be used. Connecting two Ethernet cables to a controller will result in
communication failure for that controller.
6.3.7 USB (Master) & USB (Slave) Connectors
USB 1 and USB 2 are standard Type A USB sockets with standard pinouts.
Issue 1 Rev 2
Page 17
© 2014 Snell Limited
2460 Controller
www.snellgroup.com
Specification
6.3.8 COMM 1-8 (37 Way)
The COMM 1-8 connector is a 37-way D-type socket (DC-37F) with the following pinouts:
Pin
1
2
3
4
5
6
7
8
9
10
11
12
13
14
15
16
17
18
19
20
21
22
23
24
25
26
27
28
29
30
31
32
33
34
35
36
37
2460 Port Functioning as an:
RS232
RS485/422
RS485/422
Device
Controller
Device
(DCE)
Rx 1+
Tx 1+
Rx 1Tx 1Tx 1
Rx 2+
Tx 2+
Rx 2Tx 2Tx 2
Rx 3+
Tx 3+
Rx 3Tx 3TX 3
Rx 4+
Tx 4+
Rx 4Tx 4TX 4
Rx 5+
Tx 5+
Rx 5Tx 5N/A
Rx 6+
Tx 6+
Rx 6Tx 6N/A
Rx 7+
Tx 7+
Rx 7Tx 7N/A
Rx 8+
Tx 8+
Rx 8Tx 8N/A
GND
GND
GND
GND
GND
GND
GND
GND
GND
Tx 1+
Rx 1+
Rx 1
Tx 1Rx 1Tx 2+
Rx 2+
Rx 2
Tx 2Rx 2Tx 3+
Rx 3+
RX 3
Tx 3Rx 3Tx 4+
Rx 4+
RX 4
Tx 4Rx 4Tx 5+
Rx 5+
N/A
Tx 5Rx 5Tx 6+
Rx 6+
N/A
Tx 6Rx 6Tx 7+
Rx 7+
N/A
Tx 7Rx 7Tx 8+
Rx 8+
N/A
Tx 8Rx 8GND
GND
GND
GND
GND
GND
1
37
Fig 13. COMM 1-8 (37 Way) Connector
Important:
Issue 1 Rev 2
•
The Controller and Device columns are shown in the table above for information.
Signal direction is automatically swapped internally when the ports are defined as
either controller or device ports.
•
Only RS232 ports 1 to 4 are available on the COMM 1-8 connector.
Page 18
© 2014 Snell Limited
2460 Controller
www.snellgroup.com
Specification
6.3.9 COMM 9-16 (37 Way)
The COMM 9-16 connector is a 37-way D-type socket (DC-37F) with the following pinouts:
Pin
1
2
3
4
5
6
7
8
9
10
11
12
13
14
15
16
17
18
19
20
21
22
23
24
25
26
27
28
29
30
31
32
33
34
35
36
37
2460 Port Functioning as an:
RS485/422
RS485/422
Controller
Device
Rx 9+
Tx 9+
Rx 9Tx 9Rx 10+
Tx 10+
Rx 10Tx 10Rx 11+
Tx 11+
Rx 11Tx 11Rx 12+
Tx 12+
Rx 12Tx 12Rx 13+
Tx 13+
Rx 13Tx 13Rx 14+
Tx 14+
Rx 14Tx 14Rx 15+
Tx 15+
Rx 15Tx 15Rx 16+
Tx 16+
Rx 16Tx 16GND
GND
GND
GND
GND
GND
Tx 9+
Rx 9+
Tx 9Rx 9Tx 10+
Rx 10+
Tx 10Rx 10Tx 11+
Rx 11+
Tx 11Rx 11Tx 12+
Rx 12+
Tx 12Rx 12Tx 13+
Rx 13+
Tx 13Rx 13Tx 14+
Rx 14+
Tx 14Rx 14Tx 15+
Rx 15+
Tx 15Rx 15Tx 16+
Rx 16+
Tx 16Rx 16GND
GND
GND
GND
1
37
Fig 14. COMM 1-8 (37 Way) Connector
Important:
Issue 1 Rev 2
•
The Controller and Device columns are shown in the table above for information.
Signal direction is automatically swapped internally when the ports are defined as
either controller or device ports.
•
The COMM 9-16 connector has no RS232 functionality.
Page 19
© 2014 Snell Limited
2460 Controller
www.snellgroup.com
Specification
6.4 Serial Breakout Cable (Order Code 1748)
The 1.5 metre Serial Breakout Cable has a 37-way D-type plug (DC-37M) and eight 9-way
D-type sockets (DE-9F).
Fig 15. Serial Breakout Cable
For pin connections to the 37-way socket, see “COMM 1-8 (37 Way)” on page 18 and “COMM
9-16 (37 Way)” on page 19.
Each of the eight 9-way D-type sockets has the following pinouts:
Pin
1
2
3
4
5
6
7
8
9
Important:
Issue 1 Rev 2
2460 Port Functioning as an:
RS232
RS485/422
RS485/422
Device
Controller
Device
(DCE)
N/C
N/C
N/C
RX TX TX
TX +
RX +
RX
GND
GND
GND
GND
GND
GND
GND
GND
GND
RX +
TX +
N/C
TX RX N/C
GND
GND
GND
1
9
The Controller and Device columns are shown in the table above for information;
connection between Snell routers and Snell control panels require a pin to pin cable. Signal
direction on the 9-way D-type is automatically swapped internally when the ports are
defined as either controller or device ports.
Page 20
© 2014 Snell Limited