1
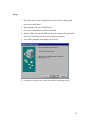
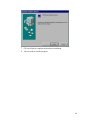
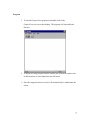
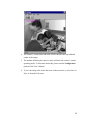
Wireless Security Camera
User’s Manual
12/14/2001
Table of Contents
Page
Introduction
3
Requirements
4
Setup
5
Program
7
Configuration
9
Troubleshooting
10
2
Introduction
Congratulations on your new Wireless Security Camera. This camera is designed
to provide cheap and reliable security for your home or office. This manual will help you
become familiar with your security camera and also show you how to setup and install
your camera. Thank you again for purchasing a Wireless Security Camera.
3
Requirements
•
Personal Computer running Windows 98 Second Edition, Windows 2000 or
newer with USB.
•
Power outlet near camera location.
•
USB Cable (not included).
4
Setup
1. Place the camera in the viewing location of your choice and plug the
power into a wall outlet.
2. Insert Program CD into CD-ROM drive.
3. Go to your CD-ROM drive and run install.bat.
4. Plug the USB cable into the USB port on your computer. Plug the other
end of the USB cable into the wireless transceiver module.
5. You will be prompted on installing a new device.
6. Continue to click on Next> until you reach the following screen.
5
7. Click on Finish to complete the hardware installation.
8. You are ready to run the program.
6
Program
1. To start the CameraView program just double-click on the
CameraView.exe icon on the desktop. The program will start and looks
like this.
2. To begin receiving pictures from the camera just click on the camera icon
on the menu bar or select Open from the File menu.
3. Once the image has been received it will automatically be loaded onto the
screen.
7
4. The camera’s current status and mode will be shown in the top left-hand
corner of the image.
5. The number following the camera’s status will show the camera’s current
operating mode. To learn more about this, please read the Configuration
portion of the User’s Manual.
6. To save the image click on the disk icon on the menu bar, or select Save or
Save As from the File menu.
8
Configuration
The camera has a few features that can be configured via the CameraView
program. To operating modes can be selected from the Options>Modes menu.
Mode 0:
This is the normal and default mode for the camera. In this mode the
camera will continuously send updated images to the computer every 2 seconds.
Mode 1:
This is an alternate operating mode in which the camera will only send an
updated image when the motion sensor detects motion in front of the camera.
9
Troubleshooting
Motion detector is not detecting motion.
1. Make sure the detector is plugged in and has 9-12 volts.
2. Does the LED turn on in the detector when there is movement?
3. Yes, problem fixed. No, send it back in.
Computer is not receiving picture.
1. Move camera closer to the computer.
2. Did this fix the problem?
3. If yes then camera was out of range.
4. If no then unplug USB and reattach.
Picture is upside down.
1. Turn the camera so that the motion sensor is above the camera.
Image is too dark.
1. This camera requires 1 Lux of light to operate.
Image is too bright.
1. Turn down lights in the room or move camera away from light source.
10