1
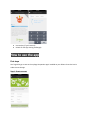
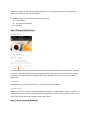
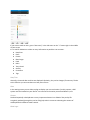
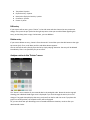
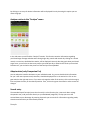
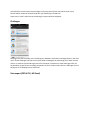
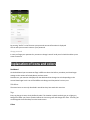
mySugr Companion 2.0
User’s manual 003
29th of April 2013
Introduction
What is mySugr Companion?
To whom is mySugr addressed and what is our goal?
On what devices can mySugr Companion be used?
Installation instructions for iOS devices
Push notifications
Uninstall
Updates
How much does mySugr Companion cost?
What to do when my Pro account is about to expire?
How to use the app
First steps
Step 1: Create account
Step 2: Therapy and app settings
Therapy settings
Sound effects
Use photo gallery
Step 3 : Get to know your dashboard
Step 4: Make new entries
Make an entry
Date/Time
Place
Pictures
Blood sugar
Food
Bolus
Temp Basal
Physical activity
Comments
Tags
Collecting points
Point allocation system:
Edit entry
Delete entry
Analyze entries in the “Entries” menu
Analyze entries in the “Analyze” menu
Adapt entries (only Companion Pro)
Search entry
Example
Challenges
Data export (PDF & CSV, MS Excel)
Profile
Change password
Explanation of icons and colors
Dashboard
Side Menu
Tags
Colors
Warnings
mySugr Companion cannot be used everywhere!
Restricted use
mySugr Companion does not replace a doctor’s visit
Error management/ Support
Data safety
Information about the developer
Introduction
What is mySugr Companion?
mySugr Companion is a charming, sometimes loud-mouth diabetes manager. The app for diabetics
allows you to record information regarding your blood sugar or other diabetes-related information
digitally on your iPhone. So, you have your diabetes-related data always at hand.
You can record not only your blood sugar level but also a lot of other information, such as the quantity
of insulin administered, physical activity, the amount of carbohydrates and different situations, like the
mood you’re in or the type of meal you had. You can even upload photos of your meals.
Diabetes can make your every-day life complicated and put a lot of obstacles in your path. mySugr helps
you to make your demanding every-day therapy easier and helps you in handling diabetes in general.
The app offers an overview of your average blood sugar and shows the blood glucose curve graphically.
This allows you to analyze the results of your therapy and adapt it to your needs. The search function
enables you to find inserted data quickly and to get an overview of how your blood sugar level
reacted to different situations, activities or meals. This way, you can use the obtained results in similar
situations and, therefore, optimize your therapy.
The mySugr app is an acknowledged medical device. It is certified and has the CE marking (Medical
Devices Directive 93/42/EEC). This device cannot be combined with other devices. Of course, you have
to keep using your blood sugar meter, insulin pump, pens etc. This app is to use independently from all
the other devices.
To whom is mySugr addressed and what is our goal?
The mySugr Companion was tailor-made for diabetics type 1 who
● are older than 18 years
● are skilled in handling digital technology
● own an iPhone 3GS, 4, 4S or 5
● have a valid contract with an operator
● have got an active account in the Apple App Store and know how to download apps
● own a credit card or are able to use another payment method accepted in the Apple App Store
mySugr Companion wants to make your therapy easier and optimize the whole therapy process for all
its users. But this is only possible if you deal actively and intensively with your diabetes-related data. In
order to keep the users motivated and the therapy interesting, we have added some fun elements to
our app.
Furthermore, you will get feedback for each entry you make. It is important to enter as much data as
possible and to be honest with yourself. Only this way you can take advantage from your data. Entering
false data does not help you.
mySugr wants to make the demanding diabetes therapy process less annoying, but easier and more fun.
mySugr Companion allows you to:
● sketch down data in no time
● search data in an efficient way
● efficient tools for analyzing your data
● clearly represented graphs
● a very useful photo upload function
● entertaining challenges
● clearly structured PDF reports
● motivating feedback
● data synchronization on multiple devices
● certified medical device
On what devices can mySugr Companion be used?
mySugr can be used on iPhone 3GS, 4, 4S and iPhone 5. iOS 5.0 or higher is required.
Installation instructions for iOS devices
After you have found the mySugr Companion app in the Apple App Store, click on the icon in order to
visualize all the details. Then press the “Free” button, then “Install”.
The downloading process will start right after the App Store authentication.
The grey app icon will appear on your iPhone, the downloading process bar will be visualized. After the
process is completed, the bar disappears and you can see the now colorful app icon.
Push notifications
After you have installed the mySugr companion app, you will be asked if you want to receive push
notifications. Such notifications do not contain messages as “You won a challenge”.
Uninstall
If you no longer wish to use mySugr Companion, you can easily uninstall the application from your
iPhone. Press the icon until it begins to move and in the left corner appears a tiny cross which allows
you to remove the app from your iPhone. If you click on the cross, you will be asked if you really wish to
remove mySugr Companion. You can confirm by choosing “Delete” or “Cancel”.
Updates
The mySugr Companion app is not updated within regular time frames but every time we develop a new
groundbreaking function. If there is a new version available, you will be informed by your Apple App
Store.
A number in a little red circle shows the updates available on your iPhone. This figure indicates the
number of updates available for the apps on your iPhone. Amongst the updates choose mySugr. You will
be informed about what the update will offer you. In order to install the new version of mySugr press
the update button on the right of the mySugr icon. During the app installation a progress bar will be
displayed that indicates the duration of the downloading process. When the progress bar disappears,
the updating process is completed. Updates can be installed at all times.
How much does mySugr Companion cost?
There are two different versions available for the mySugr Companion app:
The Companion Basic app contains all the functions you need for your every-day battle against diabetes.
For this version you don’t pay a cent.
The keywords of the Companion Pro app are flexibility and unlimited options. You can make even more
use of all the app functions and really kick your monster’s hiney.
You gain access to the Pro version by paying or by winning challenges.
For further information about the mySugr Companion Pro price table visit our web site
www.mysugr.com.
What to do when my Pro account is about to expire?
Keep cool. When your Pro account is about to expire, we simple downgrade you to Companion Basic.
There are various possibilities to regain your Pro status. Select “Pro” or “Basic” in the side menu. The
number of days left will be displayed. By pressing the “Extend” button you will obtain information about
all the advantages you will have from an upgrade.
If you wish to create a Pro account, you can choose from a variety of packages.
Other options:
●
●
Use voucher (if you have one)
Unlock for free (by winning challenges)
How to use the app
First steps
You’re good to go as soon as the mySugr Companion app is installed on your iPhone. Press the icon in
order to start the app.
Step 1: Create account
You have to register in order to use mySugr Companion. This is necessary, if you want to export your
data at a later point of time (see data export).
Three informations are necessary for creating your account:
● E-mail address
● Your name and surname
● Password
Step 2: Therapy and app settings
Therapy settings
It is important to enter your personal therapy data after you have created your account. Press “Settings”
in the side menu (you will get there by pressing the symbol in the left top corner of the screen or simply
by swiping). Enter your basic therapy data (such as pens, bread units etc.) and your individual blood
sugar levels.
Sound effects
Decide whether or not you want to hear e.g. the sound your monster makes.
Use photo gallery
Decide if you want to save the pictures you take on your iPhone. The photo gallery can be very useful. If
you decide to have a meal you have already had before, you don’t have to take yet another picture, you
simply return to the one that is already saved on your iPhone.
Step 3 : Get to know your dashboard
Before you get started get to know your dashboard and the home screen.
In the left top corner you’ll find a magnifier that enables you to search data. Right next to it there is the
plus button. Press it in order to make a new entry.
Right below those symbols a progress bar is displayed that indicates the amount of points you have
gained so far. You gain points for every entry you made. It is your goal to gain at least 50 points per day.
So, the progress bar shows you how intensively you deal with your diabetes.
Below the bar you’ll find the blood glucose curve. It displays the increasing and decreasing of your blood
sugar levels over the last 24 hours. Furthermore, blood sugar deviation, the bolus administered, the
food you have eaten and the average blood sugar are displayed.
Below the graph you see various symbols. They inform you about
● Blood sugar average – last 7 days
● Blood sugar deviation - last 7 days
● Physical activity - last 7 days
● Daily amount of bolus administered
● Food eaten on the current day
● Hypos and hypers - last 7 days
Furthermore, there are displayed:
● The challenge Button
● The upgrade Button
● The Preview of the picture you have taken last
● Aaaaaand your Diabetes monster
Step 4: Make new entries
Make an entry
If you want to make an entry, press “New entry” in the side menu or the “+” button right in the middle
of your screen.
It is crucial for diabetics to collect as many information as possible. You can enter:
● Date/time
● Place
● Picture
● Blood sugar
● Food
● Bolus
● Temp. basal
● Activity
● Comments
● Tags
Date/Time
Generally, the actual date and time are displayed. Obviously, they can be changed, if necessary. Thanks
to this function you can enter data at a later point of time.
Place
In the settings menu you can allow mySugr to display your current location. For this purpose, a GPS
system must be installed on your iPhone. You can enter the location yourself and delete it, too.
Pictures
Food and especially carbohydrates are very important elements in a diabetics’ day-to-day life.
A regularly updated photo gallery can be of big help when it comes to estimating the amount of
carbohydrates the different meals contain.
Blood sugar
Goes without saying. That’s where you enter your blood sugar date. No cheating!
Food
You can enter here the amount of exchanges or carbohydrates you would like to eat. By using the free
text button you can add a precise description to your meals.
Bolus
You can enter here the amount of insulin being injected or pumped.
Temp Basal
The amount of insulin your body needs depends on various circumstances. If you modify your basal rate,
please enter it here.
Physical activity
Exercise is always good. Enter here the duration and intensity. Above the free-text field, you can
describe in greater detail the type of activity, such as running, babysitting, hooking leaves, etc.
Comments
If you want to enter information that might help you later while analyzing your data, enter it here.
Tags
You can choose from a variety of situations, such as the mood you’re in, the meal you’re having or what
you’re up to. At a later point of time, the situations you choose from daily will form contexts that are
very important while analyzing your data (see “Analyse entries” and “Search data”).
If you have made all entries, please confirm by pressing the hook button at the right top corner for
recording your data. You can cancel the process by clicking the X-button at the top left corner. You are
the one to decide on the amount of information you want to enter.
Collecting points
You get points for each entry. It doesn‘t really matter if the entry is good news or bad. Each situation
and every single detail are worthy of getting points. Your goal is to collect 50 points per day. By reaching
this goal regularly you create a solid basis for a well-controlled therapy.
Point allocation system:
●
●
●
●
●
●
●
Tag: 1 point
Blood sugar: 2 points
Food: 2 points
Picture of food: 3 points
Description of food: 3 points
Place: 2 points
Bolus: 2 points
●
●
●
●
●
Temp Basal: 3 points
Physical activity: 3 points
Description of physical activity: 3 points
Comments: 3 points
Picture: 3 points
Edit entry
If you want to edit an entry, press “Entries” in the side menu and then choose the one you want to
change. Then press the pen symbol at the right top corner. Now you can edit all data regarding this
entry, such as date, place or tags. Furthermore, you can add data.
Delete entry
If you want to delete an entry, choose it from the entries’ list and then press the edit button at the right
top corner (pen). Then, scroll down until the red delete button appears.
You can remove the entry directly from the list by simply swiping. Attention: the entry will be deleted
immediately. There is no possibility for you to cancel.
Analyze entries in the “Entries” menu
The “Entries” menu contains all your entered data in chronological order. Above the entries a graph
showing your individual blood sugar curve is displayed. If you scroll through the entries, the curve
changes. The graph always displays the entry you chose from the list and vice versa. If you place the
graph in a certain position, the respective entry will be displayed.
So, you can check how your blood sugar curve reacted to different situations, meals or after you
administered a bolus.
By clicking on an entry all relative information will be displayed. Even by choosing this option you can
move the graph.
Analyze entries in the “Analyze” menu
In the side menu you will find the “Analyze” function. This function contains information regarding
your blood sugar average and aberration during single days, weeks and months. By clicking on a certain
month, an overview, subdivided into weeks, will be displayed. Not only does the graph show your blood
sugar curve, you can also see how many entries you made per day or what kind of meals you have had.
Furthermore, you can look at the pictures of the food you have uploaded.
Adapt entries (only Companion Pro)
You can adapt the interface elements to your individual needs. So, you can decide which information
for you is the most important and, therefore, should be displayed first in the entries list. Click on the
gear-wheel at the right top corner. If you want to change the order of the entries, click on the three grey
lines and place the entry on the desired position. Then, click on the green check box in order to save the
changes.
Search entry
The extended search function (more than 3 entries) is a Pro function (see „How much does mySugr
Companion cost“) and you find it directly on your dashboard (magnifier). It helps you to use the
entered data to your advantage. By entering keywords you can search for information regarding meals,
situations and activities you have already entered.
Example
You would like to know how many exchanges the yummy plate of pasta you had last time at your
favorite Italian restaurant contained and how your blood sugar reacted to it?
Simply enter “pasta” and all entries containing this keyword will be displayed.
Challenges
Challenges are tasks that help you to challenge your Diabetes. You find the challenge button in the main
menu. These challenges help you to meet your health-related goals by motivating you to work out a bit
more or to measure your blood sugar level more frequently. Furthermore, these challenges offer you
the possibility to gain access to mySugr Companion Pro for a certain amount of time. Challenges you are
taking part in are displayed in the side menu.
Data export (PDF & CSV, MS Excel)
In the side menu you find the report button. This function enables you to download your data in various
file formats (press the file format button).
Clearly structured PDF come in handy for your next doctor’s visit (mySugr Companion Pro offers you the
possibility to decide on the period of the time the report should regard).
By developing this function we wanted to make it easier for you and your doc to analyze your data. Print
the document before you go to see your doc or send him the file directly via e-mail. You can upload the
report also onto Dropbox and Evernote.
Additionally, this function enables you to obtain all your data as a CSV-file via e-mail. You can open the
document with Microsoft Excel, Apple Number or Google Docs and edit on them. Thanks to CSV you can
create a back-up copy or edit the data on other devices.
MS Excel is perfect for editing the data on your computer.
Profile
By pressing “Profile” in the file menu your personal account information is displayed.
You can edit your monster’s name or your password.
Change password
In case you forgot your password or you want to change it we will send you a link which enables you to
create a new one.
Explanation of icons and colors
Dashboard
On the dashboard you see numerous flags in different colors that inform you about your blood sugar
average or the amount of carbohydrates you have eaten.
Furthermore, your monster is displayed on the dashboard that changes its color depending on the
current blood sugar level. You will find different challenge and Companion Pro icons, too.
Side Menu
The menu items are not only described in words but they have each their own icon.
Tags
Every tag has got its own, clearly defined symbol. The situation symbols are dark-grey on a light-grey
background. After you press a situation button the icon turn green and change their form. That way you
can distinguish the chosen days from the inactive ones.
Colors
The color of the blood sugar flags depends on the blood sugar level.
●
●
●
Red:
Green:
Orange:
blood sugar level not in target area
blood sugar level in target area
your blood sugar level is not horrifying, but it could be better
Warnings
mySugr Companion cannot be used everywhere!
Generally, you can use mySugr Companion in all areas where it is allowed and possible to use a
smartphone. Thus, its use is not restricted to geographical areas. Obviously, this allows your Diabetes
to travel with you everywhere, so that you can enter data regardless of your current location. Anyway,
there are some exceptions. You are not to use the app in places where using a mobile phone is
prohibited, such as hospitals, airplanes, when driving a car and in all other places where you are not
allowed to use a smartphone.
Restricted use
mySugr Companion should not be used by persons who due to lacking intellectual capacity or technical
skills are not able to deal with their diabetes therapy on their own or by persons for whom it is difficult
to use a smartphone.
mySugr Companion does not replace a doctor’s visit
mySugr Companion is a certified medical device whose purpose is to help you with your diabetes
therapy. Anyway, under no circumstances does the app replace the doctor’s visits or regularly executed
measurements of your long-term blood sugar (Hba1c). Furthermore, mySugr users have to continue to
keep their blood sugar under control. mySugr does not provide insulin injections, either. The app cannot
be synchronized with blood sugar meters.
Error management/ Support
If you want to ask questions about the device or if there occur errors while using the app, contact us
via e-mail [email protected] or call at this number 0699 11109779; if you call from outside Austria:
0043 699 11109779.
Data safety
We protect your data. This is very important to us.
mySugr is a certified medical device. Therefore, it meets the highest safety and reliability standards.
Your medical data will be saved on European servers of Amazon only.
Information about the developer
mySugr GmbH
Siebenbrunnengasse 44
A-1050 Wien
Phone: +43 699 11109779
E-Mail: [email protected]
CEO: Frank Westermann
Corporate registry file number: FN 376086 v
Court of jurisdiction: Handelsgericht Wien
VAT number: ATU67061939
Manual version 0.0.3 (English), 29th of April 2013