1
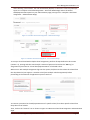
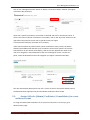
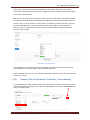
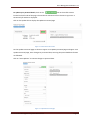
User Management Manual v1.1 Department of Education User Accounts Management System User’s Manual Version 1.1 Steps on how to use UAMS v.1.1 to manage user accounts in the Unified Information System User Management Manual v1.1 Revision History Date 6/24/2014 Version Description Author 1.0 Initial UAMS Version 1.0 User Manual R.Cruz 1.1 Updated UAMS Manual E. Ignacio Table of Acronyms LIS UAMS UIS Learner Information System User Accounts Management System Unified Information System User Accounts Management System Manual v1.1 Page ii User Management Manual v1.1 Table of Contents 1. Getting Started............................................................................................................................................ 4 2. Manage Accounts –Division Level............................................................................................................... 5 2.1. Manage My Account ........................................................................................................................... 5 2.2. Add new personnel record ................................................................................................................. 2 2.3. Create New account............................................................................................................................ 4 2.4. View and Search Users........................................................................................................................ 4 2.5. Edit/change personnel profile, reset password and lock account of other users .............................. 5 2.6. Set up an Administrator account ........................................................................................................ 7 2.7. Assign/remove School Head account.................................................................................................. 8 2.8. Assign ALS role (Admin/ Facilitator/Consolidator) to an existing account ....................................... 10 2.9. Assign ALS role (Admin/ Facilitator/ Consolidator) to a user with no account ................................ 11 2.10. 3. Remove ALS role (Admin/ Facilitator/ Consolidator).................................................................... 12 Manage Accounts – School Level .............................................................................................................. 13 3.1. Manage My Account ......................................................................................................................... 13 3.2. Add new school personnel record .................................................................................................... 13 3.3. View & search users .......................................................................................................................... 14 3.4. Edit/change personnel profile, reset password and lock account of other users............................. 16 3.5. Set up an Administrator account ...................................................................................................... 17 3.6. Assign/remove School Head account................................................................................................ 18 LIS version 2.0 Users Manual v1.3 Page iii User Management Manual v1.1 1. Getting Started To access the User Account Management System, type “http://lis.deped.gov.ph/uis/login”1 at the address or location bar of a web browser, then press Enter. This will connect you to the UIS login page. Enter your username and password, then click the “Sign In” button. A successful login will direct the user to the main page that provides access to the following: My Accounts allows the updating of a logged-in user’s own personal record, username and password. Administration provides the facility for personnel with “Administrator” role to manage the user accounts of personnel in the office or school that his/her level of authorization is allowed. For example, a division administrator will be able to create, access and update the account of system users in his/her division. Whereas a school head and a designated school administrator will be able to create, access and update the account of system users in his/her school only. Account context displays the active office/school selected among those that the user is currently engaged with. Current role/s per office/school is also displayed when active. 1 In the interim, the UAMS shall be lodged in the LIS environment, hence accessed using the url lis.deped.gov.ph. User Accounts Management System Manual v1.1 Page 1 User Management Manual v1.1 2. Manage Accounts –Division Level 2.1. Manage My Account Click on My Account in the main page of the User Accounts Management System to update your own account and personal record. Figure 2.1-1 My Account page To change your current or default password, click on the Password link under Security (see Figure 2.1-2 My Account password change) located at right side of the page. Type in the correct Old Password and the new password under the New Password and Repeat Password input boxes. Click “Change Password” to commit the password change. A successful change of password is confirmed by the message “Password changed”. Figure 2.1-2 My Account password change To change your current or default username, click on the Username link under Security then type in the new username and click “Update Username”. A successful username update is confirmed by the message “Username updated”. Figure 2.1-3 My Account username change User Accounts Management System Manual v1.1 Page 1 User Management Manual v1.1 To update your personal details, click on the View Detailed link under the Profile located at the left side of the page (see Figure 2.1-1 My Account Page). The Personal Details page is displayed (see Figure 2.1-4 My Account - update personal profile page ). Click on “Update” to display personal data and update relevant fields ensuring that prescribed data formats are followed. Click on “Save Updates” to commit changes to personal data. Figure 2.1-4 My Account - update personal profile page 2.2. Add new personnel record Before a user is allowed access to any of the application systems, his/her personnel record must be retrieved first and then associated with his/her user account. To add a new personnel record, click on Administration tab in the Main page. Then click on the Manage Personnel link page (see Figure 2.2-1 Personnel Lookup page). User Accounts Management System Manual v1.1 to display the Personnel Lookup Page 2 User Management Manual v1.1 Figure 2.2-1 Add New Personnel Record - Personnel Lookup page First, do a specific search by personnel’s username or tin number to determine if a record already exists in the database. If you are not aware of the user’s username or tin number, click on “By Name” link on the right side of the page to search user by his/her name. If the search was done by name and the system returned too many results, the admin should input middle name and birth year to make the search more specific. If the record exists, select the specific personnel record in the search result displayed, update personnel data and click Save Updates. If the record does not exist, a message shall be displayed; “Record not found”. Click on the “No, this is correct.” link if you are sure that what you have entered is correct (see Figure 2.2-2 Add New Personnel Record - Create New Record). A verification message shall appear to ensure that you have key in the correct data. Click on the “New Record” link to enter new personal data then click Create button to finalize record creation. Figure 2.2-2 Add New Personnel Record - Create New Record page User Accounts Management System Manual v1.1 Page 3 User Management Manual v1.1 2.3. Create New account After adding a new record for personnel, the admin should assign a username under the “Create Account” panel (see Figure 2.2-2 Create New Account) to be used for login. The username given by the admin shall be the user’s default password for the system. The personnel can change his login details by updating his account under the “Security” panel (see Figure 2.1-3 My Account username change). Figure 2.3-1 Create New Account 2.4. View and Search Users To search and view profile of specific personnel in the division, district and school, go to the Administration page. Select the office/location from the division drop-down list located at the left side of the Personnel panel. To search for a specific username or tin number in the division, Click on the “Manage Personnel” link, a new window shall be displayed for Personnel Lookup page where you can enter specific username or tin number of your personnel (see Figure 2.4-1 Personnel Lookup page). Figure 2.4-1 Personnel Lookup page To search a user by personal name in the division, Click on the “Manage Personnel” link, a new window shall be displayed for Personnel Lookup page. Click on the “By name” link on the right side of the panel to search a user by his/her specific name (see Figure 2.4-1 Personnel Lookup page). If the search was done by name and the system returned too many results, the admin should input middle name and birth year to make the search more specific. User Accounts Management System Manual v1.1 Page 4 User Management Manual v1.1 To list all users and/or search a specific user in a school or district, first select the office/location from the division drop-down list located at the left side of the Personnel panel. The system displays a link to the list of users of specified district or school. Display User Profile From the list of users displayed (see Figure 2.4-2 List of users’ page), click on the icon opposite the name of the personnel whose profile you want to view. Figure 2.4-2 List of users page 2.5. Edit/change personnel profile, reset password and lock account of other users Go to Administration page and retrieve the specific personnel record and/or user account to be updated. Refer to section 2.4 on searching and viewing users. Click the Update button to edit personal data. On the same page, you may reset the password or lock the account on the “Account Maintenance” panel to prevent the user from accessing the school’s record – this is in cases where the personnel is transferred to or is separated from the school. On the “Access List” panel, admin can add role by clicking on the “Add role” drop-down list located at the right side of the section. The admin can remove the user’s current role too by clicking on “x” button (see Figure 2.5-1 View and update personal data and user account). User Accounts Management System Manual v1.1 Page 5 User Management Manual v1.1 Figure 2.5-1 View and update personal data and user account After clicking the Update button, the Update Personnel page is displayed as in Figure 2.5-2 Update personnel page. Update data on this page then click Save Updates button to commit changes made to the personnel record. i When a personnel and a user account had already been created in the system, the personnel him/herself can update his/her personal data and change username and password by accessing the My Account facility (refer to 2.1). Figure 2.5-2 Update personnel page User Accounts Management System Manual v1.1 Page 6 User Management Manual v1.1 2.6. Set up an Administrator account An Administrator account is set up at the division level to manage user accounts of division personnel, district personnel and school heads. To set up an administrator account, go to the Administration page. Select the district or school to add the account, then enter specific school ID or school name (see Figure 2.6-1 Select District and School). Click the link at the bottom of the personnel’s panel to display the list of users of specified district or school. Figure 2.6-1 Select District and School Click on the icon opposite the name of the personnel whose profile you want to add the administrator account (see Figure 2.6-2 Add Admin Account). A new window shall appear displaying Personnel detail page. Figure 2.6-2 Add Admin Account User Accounts Management System Manual v1.1 Page 7 User Management Manual v1.1 On the Access List panel, select “Division or School System admin” on the “Add role” dropdown to assign administrator role to the user (see Figure 2.6-3 Add System Admin Role). Figure 2.6-3 Add System Admin role 2.7. Assign/remove School Head account In assigning a “school head” role to personnel, his/her personnel record must first be created in the system. Refer to Section 2.2 for adding new personnel. Note that the role for “school head” is exclusive, thus it can only be assigned once for every school. To assign personnel the “school head” role, go to the Administration page and select the school of assignment. Select user from the list of personnel of that school and view his/her details by clicking the icon opposite. Refer to Figure 2.6-1 Select District and School and Figure 2.6-2 Select user’s account to add role. On the Access List panel, select “School Head/Representative” to assign role to the user. Refer to Figure 2.7-1 Set school head Figure 2.7-1 Set school head User Accounts Management System Manual v1.1 Page 8 User Management Manual v1.1 After selecting “school head”, the role automatically displays on the user’s access list panel (see Figure 2.7-3 Confirm school head assignment – Personnel Detail Page) and on the School Head/Representative panel on your administration page (see Figure 2.7-2 Confirm school head assignment – Administration Page). Figure 2.7-2 Confirm school head assignment – Administration Page Figure 2.7-3 Confirm school head assignment – Personnel Detail Page To set up a school head with multiple school assignment, perform all steps defined in this section (section 2.7), starting with the search and/or creation of personnel record to the “Set-ting” or assignment of personnel as “school head/representative” of selected school. When a user with multiple assignment logs into the system, he/she must first select the school from the drop-down list (see Figure 2.7-4 Select school from multiple school assignments) before proceeding to the selection of application system to work on. Figure 2.7-4 Select school from multiple school assignments To remove a personnel as a head/representative of a specific school, first select specific school from drop-down list of schools. Then, click on the “remove” icon as shown in Figure 2.7-5Remove school head assignment- Administration Page. User Accounts Management System Manual v1.1 Page 9 User Management Manual v1.1 Figure 2.7-5 Remove school head assignment – Administration Page A successful removal of school head assignment will display “Non-assigned” in the School Head/representative section of the page. Alternatively, School Head/representative role can also be removed from the “Access List” panel when you view the Personnel details page as shown in Figure 2.7-6. Figure 2.7-6 Remove school head assignment – Personnel Details Page 2.8. Assign ALS role (Admin/ Facilitator/ Consolidator) to an existing account An ALS Administrator account is set up at the division level by the Division System Admin. On the other hand, “ALS Facilitator” and “ALS Consolidator” account is being created/assigned by the ALS-Admin. To assign role as “ALS-Admin/ALS Facilitator/ALS Consolidator”, go to Administration page. Select from “ALS” from the District/Office dropdown list (see Figure 2.8-1 Select ALS office) Figure 2.8-1 Select ALS office User Accounts Management System Manual v1.1 Page 10 User Management Manual v1.1 Click on the “Manage Personnel” button to display “Personnel Lookup” window. (see Figure 2.8-2 Select ALS personnel). Figure 2.8-2 Search Personnel Input user's specific username or tin number in the field and click on the Search button. If you are not aware of his/her username or tin number, click on the “By name” button on the right side of the panel to search user by specific name (see Figure 2.4-1 Personnel Lookup by username or tin number). If the search was done by name and the system returned too many results, the admin should input middle name and birth year to make the search more specific. Click on the search button. On the search result display, click on the icon opposite the name of the user to be assigned to. Personal details of the user shall appear. On the “Access List” panel, select the desired ALS role to be assigned. (see Figure 2.8-3 Select ALS Role). Figure 2.8-3 Search ALS Role The role automatically displayed on the user’s access list and on the System Admin panel in the Administration page after the personal details window has been closed. 2.9. Assign ALS role (Admin/ Facilitator/ Consolidator) to a user with no account To assign ALS Admin/ALS Facilitator role to a personnel that has no record yet, go to administration page. User Accounts Management System Manual v1.1 Page 11 User Management Manual v1.1 Select “ALS” from the District/Office dropdown list (see Figure 2.8-1 Select ALS office) Click on the “Manage Personnel” button to display “Personnel Lookup” window. (see Figure 2.8-2 Select ALS personnel). Click on the “By name” button and enter name of the user to be added. Click Search button. A verification message shall be displayed informing that the record was not found. Click on the “No, this is correct!” button to confirm that you have key in the correct data. A pop up message shall appear with the name you have entered (see Figure 2.8-3 Create New Record). Click on “New Record” to enter new personal data then click Create button to finalize record creation. Figure 2.8-3 Create New Record After adding a new record for personnel, the admin should assign a username under the “Create Account” panel (see Figure 2.8-3 Create New Record). After creating the account, you can add ALS-Admin/ALS Facilitator role to the user under the “Access List “ panel. 2.10. Remove ALS role (Admin/ Facilitator/ Consolidator) Go to administration page, select ALS from the dropdown list located at the left side part of the Personnel panel (see Figure 2.10-1 Removing ALS Admin role). Click on the Remove icon under the Admin panel. Figure 2.10-1 Removing ALS admin role User Accounts Management System Manual v1.1 Page 12 User Management Manual v1.1 3. Manage Accounts – School Level 3.1. Manage My Account Upon successful login, the Account Main page is displayed. Click My Accounts to update your own account details and personal record. Figure 3.1-1 User Accounts Main page To change your current or default password, click on the Password link in the Security section, (see Figure 3.1-2 My account password change) located at right side of the page. Type in the correct Old Password and the new password under the New Password and Repeat Password input boxes. Click “Change Password” to commit the password change. A successful change of password is Figure 3.1-2 My account password change confirmed by the message “Password changed”. To change your current or default username, click on the Username link under Security then type in the new username and click “Update Username”. A successful username update is confirmed by the message “Username updated”. Figure 3.1-3 Update username User Accounts Management System Manual v1.1 Page 11 User Management Manual v1.1 To update your personal details, click on the link in the Profile section located at the left side of the page. The window on Personnel Info as shown in Figure 3.1-4 Personnel info window is displayed. Click on the Update link to display the Update Personnel page Figure 3.1-4 Personnel info window On the Update Personnel page as shown in Figure 2.4-2 Update personnel page and Figure 3.1-5 Update Personnel page, enter changes to personnel data, ensuring that prescribed data formats are followed. Click on “Save Updates” to commit changes to personal data. Figure 3.1-5 Update Personnel page User Accounts Management System Manual v1.1 Page 12 User Management Manual v1.1 3.2. Add new school personnel record Before school personnel i.e. teacher or class adviser user is allowed access to any of the application systems, his/her personnel record must first be created and then associated with his/her user account. The creation of a new personnel record can only be done by accessing the UAMS using a school head or an administrator account. To add a new personnel record, go to Administration in the User Accounts Main page. Then click on the Manage Personnel link Figure 3.2-1 Administration page - Add New Personnel The Search and Create personnel page is discussed in sections 2.2 and 2.3. First, do a search through the Personnel Lookup page by typing in the username or the tin number of the user to determine if a record already exists in the database. If you are not aware of the user’s username or tin number, click on “By Name” button on the right side of the page to search user by his/her name. If the search was done by name and the system returned too many results, the admin should input middle name and birth year to make the search more specific. If the record exists, select the specific personnel record in the search result displayed, update personnel data and click Save Updates. If the record does not exist, a verification message shall be displayed to ensure that you have key in the correct data. Click on “No, this is correct.” if you are sure that what you have entered is valid (see Figure 2.2-2 Create New Record). Click on “New Record” to enter new personal data then click Create button to finalize record creation. User Accounts Management System Manual v1.1 Page 13 User Management Manual v1.1 After the new personnel record is created, the user account is also created with the username as the default password. For example, in Figure 3.2-2, the default password for the username is also simon.luke Figure 3.2-2 Create New Account Advise this new user to log into the system to update his/her account details including the default password. 3.3. View & search users To search, view and edit the user profile of personnel in the school, go to the Administration page. Select the office/location from the division drop-down list located at the left side of the Personnel panel. To search for a specific username or personnel name in the division, enter data in the search box in the Personnel Lookup page by clicking “Manage Personnel” link on your administrator page. (Figure 3.3-1 List and search personnel page). To list all users and/or search a specific user in a school, click on the link List all Personnel in…. (see Figure 3.3-1 List and search personnel page). Figure 3.3-1 List and search personnel page User Accounts Management System Manual v1.1 Page 14 User Management Manual v1.1 Display User Profile From the list of users resulting from a straight listing of personnel (see Figure 3.3-2 View profile) , click on the icon opposite the name of the personnel whose profile you want to view. Figure 3.3-2 View profile The profile of the user selected is displayed in a window as shown in Figure 3.3-3 View and update personnel info page. Click the Update button to edit personal data. On the same page, you may reset the password or lock the account to prevent this user from accessing the school’s record – this is in cases where the personnel is transferred to or is separated from the school. On the Access List Panel, admin can assign role to his/her personnel. Figure 3.3-3 View and update personnel info page User Accounts Management System Manual v1.1 Page 15 User Management Manual v1.1 3.4. Edit/change personnel profile, reset password and lock account of other users Go to Administration page and retrieve the specific personnel record and/or user account to be updated. Refer to section 3.3 on searching and viewing school users. Click the Update button to edit personal data. Figure 3.4-1 View and update personnel page On the same page, you may reset the password or lock the account to prevent this user from accessing the school’s record, particularly in cases where the personnel is transferred to or is separated from the school. After clicking the Update button, the Update Personnel page is displayed as in Figure 3.4-2 Update school personnel page. Update data on this page then click Save Updates button to commit changes made to the personnel record. i When a personnel and a user account had already been created in the system, the personnel him/herself can update his/her personal data and change username and password by accessing the My Account facility (refer to 3.1). Figure 3.4-2 Update school personnel page User Accounts Management System Manual v1.1 Page 16 User Management Manual v1.1 To remove a personnel record from the list of school personnel, click on the Remove icon. Figure 3.4-3 Remove a school personnel from school's list of personnel 3.5. Set up an Administrator account An Administrator account is set up at the school level to assist the school head in managing user accounts of school personnel. To set up a school administrator account, go to the Administration page. Select the district where you wish to add the role. Identify school to add the account with by entering specific school ID or school name (see Figure 3.5-1 Select District and School). Click the link at the bottom of the personnel’s panel to display the list of users of specified district or school. Figure 3.5-1 Select District and School Click on the icon opposite the name of the personnel whose profile you want to add the administrator account (see Figure 3.5-2 Add Admin Account). A new window shall appear for the Personnel details page . User Accounts Management System Manual v1.1 Page 17 User Management Manual v1.1 Figure 3.5-2 Add Admin Account On the Access List panel, select “School System admin” on the “Add role” dropdown to assign administrator role to the user (see Figure 3.5-3 Add School System Admin Role). Figure 3.5-3 Add School System Admin role 3.6. Assign/remove School Head account In assigning a “school head” role to personnel, his/her personnel record must first be created in the system. Refer to Section 3.2 for adding new personnel. To assign personnel the “school head” role, go to the Administration page and select the school of assignment. Select user from the list of personnel of that school and view his/her details by clicking the icon opposite. Refer to Figure 2.6-1 Select District and School and Figure 2.6-2 Select Add Admin Account. On the Access List panel, select “School Head/Representative” to assign role to the user. Refer to Figure 3.6-1 Set school head User Accounts Management System Manual v1.1 Page 18 User Management Manual v1.1 Figure 3.6-1 Set school head After selecting “school head”, the role automatically displays on the user’s access list panel refer to Figure 3.6-2 and on the School Head/Representative panel on your administration page refer to figure 3.6-3. Figure 3.6-2 Confirm school head assignment –Administrator Page Figure 3.6-3 Confirm school head assignment – Personnel Details Page To set up a school head with multiple school assignment, perform all steps defined in this section (section 2.7), starting with the search and/or creation of personnel record to the “Setting” or assignment of personnel as “school head/representative” of selected school. When a user with multiple assignment logs into the system, he/she must first select the school from the drop-down list (see Figure 3.6-4 Select school from multiple school assignments) before proceeding to the selection of application system to work on. User Accounts Management System Manual v1.1 Page 19 User Management Manual v1.1 Figure 3.6-4 Select school from multiple school assignments To remove a personnel as a head/representative of a specific school, first select specific school from drop-down list of schools. Then, click on the “remove” icon as shown in Figure 3.6-5 Remove school head assignment. Figure 3.6-5 Remove school head assignment A successful removal of school head assignment will display “Non-assigned” in the School Head/representative section of the page. Alternatively, School Head/representative role can also be removed from the “Access List” panel when viewed in the Personnel details page (Refer Figure 3.6-6). Figure 3.6-6 Remove school head assignment – Personnel Details Page User Accounts Management System Manual v1.1 Page 20