1
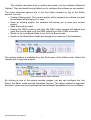
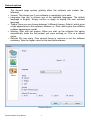
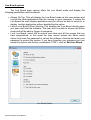
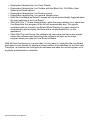
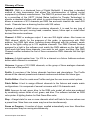
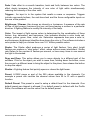
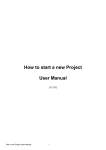
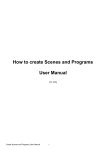
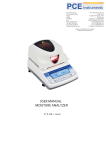
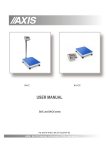
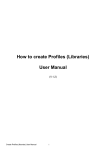
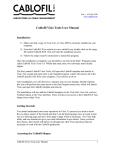
How to use the Advanced Options
User Manual
(V.1.2)
Advanced Option User Manual
1
Summary:
P. 3
P. 5
P. 7
P. 9
General Options
Live Board Options
Hardware Device options
Glossary of Terms
Index of Picture:
P. 3
P. 3
P. 4
P. 5
P. 8
Main advanced Options
Open the Advanced Option Window
General Options
Live Board Options
Device Options
Advanced Option User Manual
2
This chapter describes how to quickly and easily use the software Advanced
Options. They are benefit and will allow you to configure the software as you wished.
The main advanced options are in the tool ribbon located on top of the Editor
window. You can:
• Create a New project. The current project will be replaced by a blank one and
the software will prompt you to save.
• Open an existing project; the software will prompt you to save your current
project.
• Save the current project.
• Display the DMX Levels in real time; the DMX output window will appear and
gives the current state of all the DMX outputs from the 4 DMX universes.
• Switch to the Live Board Mode to run the Live Board mode.
• Switch to the Stand Alone mode and program the memory of the hardware<
Main advanced Options
The options window is available from the Tools menu of the Editor mode. Select the
Options link to open the window.
Open the Advanced Option Window
By clicking on one of the options window images, you are can configure the Live
Board, the Editor mode and the Hardware Devices. The option window is important
because it gives you more professional and advanced possibilities for your software.
Advanced Option User Manual
3
General options
•
•
•
•
•
The General page options globally affect the software and contain the
following:
Version; This shows you if your software is completely up to date.
Language; Use this to choose one of the available languages. The default
language is English. Simply confirm or apply to display the new selected
language.
Theme; Here you can choose between 3 different themes; Default, which gives
a light appearance to the software; Medium; or Dark, which gives the software
a darker appearance overall.
Starting: Start with last project; When you start up the software this option
automatically loads the last project you were working on. This is a default
option.
Refresh 2D view every; Give several timing to improve or not the software
rendering. Take the higher value for the best performances.
General Options
Advanced Option User Manual
4
Live Board options
The Live Board page options affect the Live Board mode and display the
following possibilities and commands:
• Always On Top; This will display the Live Board mode as the main screen and
over all the other applications that are running on your computer. It makes the
Live Board the main display application and you will not be able to switch to or
display another application without deselecting the option.
• Launch Live Board When Starting; This displays the Live Board directly when
you open and load the software. The user won't be able to access the Editor
mode and will be able to trigger its programs.
• Lock Live Board; select this to secure your show and all the scenes that you
have programmed. In this mode the user cannot access the Editor mode
unless he knows the password to unlock the software. Activate and enter your
password to protect the system. If you have forgotten your password you can
cancel this option with the key combination CTRL + click on Exit Live Board.
Live Board Options
Advanced Option User Manual
5
• Display/don't display the Live Color Palette.
• Display/don't display the Live Toolbar with the Black Out, Full White, Next
Scene and Pause options.
• Display/don't display the Live Dimmer cursor.
• Display/don't display the Live general Speed cursor.
• Start the Live Board as Default, scenes will not be automatically triggered when
the user switches to the Live Board.
• Start With The 1st Scene Automatically; when the user switches to or opens the
Live Board the first program of the list will automatically play. This option,
combined with the Launch Live Board When Starting is a great solution to
automatically start and play the show with a simple double click on the
application.
• Start With The Last Scene; the software will remember the last scene played
before the software was closed and the software will start up the same
program when you open the Live Board software.
With all these functions you can see that it is very easy to customize the Live Board
and make is user friendly by setting a limited number of possibilities for the final user.
Therefore an installer can configure the software and pass the control system on to
anybody, professional or otherwise.
Advanced Option User Manual
6
Hardware Device options
The Device Page options are reserved for the connected electronic board
connected to your computer and they allow these:
The Device Page options are reserved for the electronic board connected to
your computer and they allow the following:
• Display the List of the interfaces connected to the different USB ports of your
computer. They are ordered by serial number order from the lowest serial to
the highest serial number. The list contains the name, the DMX configuration of
the device and the DMX universe affectation.
• Firmware version of the selected device; you have the option of automatically
updating the Firmware with the software. This process takes a few minutes and
you must never disconnect your device during the updating process or it will be
destroyed.
• Speed; this is for choosing the speed of the DMX. 4 values are available to
configure the DMX signal parameters which will affect the speed of the DMX
signal. Click Apply to confirm the speed and observe the result on the pilot LED
of the interface. Speed functions are important if any of your fixtures are
incompatible; lowering the speed may solve the problem but in our experience,
the problem usually stems from a cable, a connection or a fixture.
• Configure the XLR of the Device; you can choose the communication mode by
selecting In or Out (depending on if the interface allows it or not) and connect
the DMX universe to the selected output. For example with 2 XLR and 2 Output
you can set the same universe on the 2 XLR and use your hardware like a
DMX Splitter. Click on the Apply button to confirm the new configuration.
Advanced Option User Manual
7
Device Options
This manual is the last step in learning everything about the software. From now on
you will be able to configure your software as you see fit and also be able to pass the
control of it on to another user.
Advanced Option User Manual
8
Glossary of Terms
DMX512: DMX is a shortened form of Digital MultipleX. It describes a standard
method of data transmission that allows the interconnection of lighting control
equipment by different manufacturers. The DMX512 protocol was developed in 1986
by a committee of the USITT (United States Institute for Theater Technology) to
provide a standard interface with which to control dimmers from lighting consoles. It
allows a maximum of 512 channels per DMX line and each channel can reach 255
levels. Channels have a dimming function with 255 values.
Fixture: A predefined DMX device containing channels. It is used for any type of
lighting device like spot, moving head, scanners, lasers, follow spot or visual effect
devices like smoke machines.
Channel: A DMX or analogue output. It can use 255 digital values. Also known as
DMX channel, which, for the purposes of this guide, is synonymous with DMX
address. Any DMX light show, including shows designed with the software, sends
data to the lights using up to 512 separate channels. The DMX Channel Number
assigned to a light in the software must match the DMX address on the light itself.
Since each light uses three channels, (one each for red, green, and blue,) the DMX
Channel number indicates the first of three consecutive DMX channels that the light
receives.
Address: A digital number from 1 to 512 for a channel or a fixture. Address numbers
define which channel is concerned.
Universe: A group of 512 DMX channels, or the group of three analogue channels
on the rear of the product.
Profile: A overview of the fixture channels functions and descriptions. The Profile
shows all the channel presets and channel numbers and defines the fixture type.
Profile Editor: A tool to create new Profiles and give the user more control options.
Patch Editor: A tool to assign different channels to the fixtures and create matrix
configurations. It is composed of several universes with 512 channels each.
RGB: Acronym for red, green, blue. In the RGB color model, all colors are produced
by combining various levels of red, green, and blue. The software includes an RGB
color picker. A lighting feature for Red Green Blue color.
Step : A target state for one or more channels which will fade to the new values over
a preset time. More than one scene may be active simultaneously.
Scene or Program : A number of steps, recalled automatically over time. More than
one sequence may be running simultaneously.
Advanced Option User Manual
9
Fade: Fade effect is a smooth transition, back and forth, between two colors. The
effect slowly increases the intensity of one color of light while simultaneously
reducing the intensity of the other color.
Triggers : An input in to the system that recalls a scene or sequence. Triggers
include user-mode buttons, the real-time-clock and the three configurable inputs on
the rear of the product.
Brightness / Dimmer: Also known as intensity or luminance. A measure of the rate
of flow of light energy (luminous flux) per unit area leaving a surface in a particular
direction. A lighting feature to modify the intensity of the lamp.
Color: The impact of light source colors is determined by the combination of three
factors: hue, saturation, and luminance. Hue indicates whether a color looks red,
orange, yellow, green, blue, violet, etc. Saturation represents how pure a color is,
and luminance (brightness) identifies how strong the color is. The software includes a
color picker to help you choose from over 16.7 million possible colors.
Strobe: The Strobe effect produces a series of light flashes. Very short, bright
flashes can produce a “stop action” effect, where actions seem intermittent. Strobe
rate Refers to the number of flashes per second, or how many times in one second
the light is illuminated.
Drag and Drop: This action allows you to move objects to a different part of the
software. Click on the object you wish to move then, holding down the button, move
the mouse to a different area to bring the object to this place, then release the button
to drop the object.
Shutter: A lighting feature that quickly opens or closes the light beam.
Preset: A DMX range or part of the 255 values available in the channels. For
example a preset can inscribe the channel values from 20 to 51 with a specific
function.
Default Preset: This preset is used to setup a default level for the channels. One
default preset per channel is allowed. If no default preset is defined with the Profile
Editor, the software will use the value 0 as its default preset.
Advanced Option User Manual
10