1
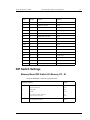
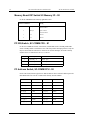
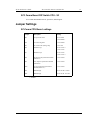
Gasboy CFN Series Site Controller III Technician’s Guide Version 3.0 Part Number C35922 Gasboy International, Inc. a Tokheim subsidiary Gasboy CFN Series Site Controller III Technician’s Guide Version 3.0 April 10, 2000 Gasboy International, Inc. Lansdale, Pennsylvania Gasboy International, Inc., P. O. Box 309 Lansdale, PA 19446 Copyright 1997-2000 by Gasboy International, Inc. A subsidiary of Tokheim Corporation, Inc. All rights reserved. Printed in the United States of America. The information in this document is confidential and proprietary. No further disclosure thereof shall be made without permission from Gasboy International, Inc. Gasboy International, Inc. believes that the information in this document is accurate and reliable. However, we assume no responsibility for its use, nor for any infringements of patents or other rights of third parties resulting from its use. We reserve the right to make changes at any time without notice. REVISION RECORD OF THIS DOCUMENT Part No. Date Published SC III Release Levels C35922 May 1997 Version 3.0 C35922 August 28, 1997 Version 3.0 C35922 April 10, 2000 Version 3.0 i Site Controller III Related Publications Site Controller III - version 3.0 Part No. Title C35920 SC III Manager’s Manual, version 3.0 C09226 SC III Configuration Manual, version 3.0 C35921 SC III Pocket Reference, version 3.0 C09204 Check Point Reference Manual C35745 Profit Point Clerk’s Manual - version 2.1 C35746 Profit Point Reference Manual - version 2.1 C09215 Point of Sale and Shift Change, version 003 Pump Interface C09146 Pump Interface Manual C01745 Current Loop Interface Unit Manual Card Encoding and Miscellaneous C09136 CFN Series Clubcard Format C01687 CFN Series Card Encoding Manual Remote Communications C09141 PC/SiteControl User’s Manual Technical Publications C01759 CFN Diagnostic Manual C35922 Technician’s Manual ii SC III Technician’s Guide Table of Contents iii Table of Contents Overview . . . . . . . . . . . . . . . . . . . . . . . . . . . . . . . . . . . . . . . . . . . . . . . . . . . . . . . . . . . . . . 1 Provided Equipment . . . . . . . . . . . . . . . . . . . . . . . . . . . . . . . . . . . . . . . . . . . . . . . . . . 1 Optional Equipment - depending on setup . . . . . . . . . . . . . . . . . . . . . . . . . . . . . . . . . 2 Cable and Wiring . . . . . . . . . . . . . . . . . . . . . . . . . . . . . . . . . . . . . . . . . . . . . . . . . . . . . . . . 2 Site Controller Board Installation . . . . . . . . . . . . . . . . . . . . . . . . . . . . . . . . . . . . . . . . . . . 3 Screen Saver . . . . . . . . . . . . . . . . . . . . . . . . . . . . . . . . . . . . . . . . . . . . . . . . . . . . . . . . 3 Installing the SCIII software . . . . . . . . . . . . . . . . . . . . . . . . . . . . . . . . . . . . . . . . . . . . . . . 4 Printer setup (optional) . . . . . . . . . . . . . . . . . . . . . . . . . . . . . . . . . . . . . . . . . . . . . . . . . . . 5 Netscape Navigator Browser . . . . . . . . . . . . . . . . . . . . . . . . . . . . . . . . . . . . . . . . . . . . . . . 6 Installation . . . . . . . . . . . . . . . . . . . . . . . . . . . . . . . . . . . . . . . . . . . . . . . . . . . . . . . . . . 6 On-line Documentation setup . . . . . . . . . . . . . . . . . . . . . . . . . . . . . . . . . . . . . . . . . . . 6 New SCIII configuration menus . . . . . . . . . . . . . . . . . . . . . . . . . . . . . . . . . . . . . . . . . 6 Creating the desktop icon for SCIII . . . . . . . . . . . . . . . . . . . . . . . . . . . . . . . . . . . . . . . . . . 7 Creating the Profit Point desktop icon . . . . . . . . . . . . . . . . . . . . . . . . . . . . . . . . . . . . . . . . 8 Creating the SC3 Help desktop icon . . . . . . . . . . . . . . . . . . . . . . . . . . . . . . . . . . . . . . . . 10 Starting the Icon editor provided with OS/2 . . . . . . . . . . . . . . . . . . . . . . . . . . . . . . . . . . 10 Front panel components . . . . . . . . . . . . . . . . . . . . . . . . . . . . . . . . . . . . . . . . . . . . . . . . . . 11 Serial/Parallel Ports . . . . . . . . . . . . . . . . . . . . . . . . . . . . . . . . . . . . . . . . . . . . . . . . . . . . . 11 DIP Switch Settings . . . . . . . . . . . . . . . . . . . . . . . . . . . . . . . . . . . . . . . . . . . . . . . . . . . . . 12 Memory Board DIP Switch SC-Memory I/O - S1 . . . . . . . . . . . . . . . . . . . . . . . . . . 12 Memory Board DIP Switch SC-Memory I/O - S2 . . . . . . . . . . . . . . . . . . . . . . . . . . 13 PC IRQ Switch, SC-COMM CPU - S1 . . . . . . . . . . . . . . . . . . . . . . . . . . . . . . . . . . . 13 PC Address Switch, SC-COMM CPU - S2 . . . . . . . . . . . . . . . . . . . . . . . . . . . . . . . . 13 SC3 Comm Board DIP Switch CPU - S3 . . . . . . . . . . . . . . . . . . . . . . . . . . . . . . . . . 14 Jumper Settings . . . . . . . . . . . . . . . . . . . . . . . . . . . . . . . . . . . . . . . . . . . . . . . . . . . . . . . . 14 SC-Comm CPU Board settings . . . . . . . . . . . . . . . . . . . . . . . . . . . . . . . . . . . . . . . . 14 SC-Comm Memory I/O board settings . . . . . . . . . . . . . . . . . . . . . . . . . . . . . . . . . . . 15 Gasboy CFN Series iv Gasboy CFN Series Table of Contents SC III Technician’s Guide SC III Technician’s Guide SCIII and OS/2 1 SCIII and OS/2 Overview This guide steps through the installation of the Site Controller III boards, installing the OS/2 and Site Controller software, creating desktop icons, and other information necessary to install a Site Controller III. Provided Equipment Site Controller III board assembly PC - which consists of: • • • • • keyboard mouse case (PC tower) power cable diskettes Monitor - one of the following: • • • 9” B/W monitor - part number C09502 14” B/W monitor - part number C09503 14” color monitor - part number C09504 Monitor cable Manuals Gasboy CFN Series 2 SCIII and OS/2 SC III Technician’s Guide Optional Equipment - depending on setup Modem cable Modem Parallel printer Serial printer Printer cables Wayne SCIII cable Tokheim cable POS Distribution box with cables Customer display Pin Pad Cash Drawer UPC scanner Cable and Wiring The following drawing illustrates the SCIII cable layout: • Port 1, Local RS232 - use cable number C05994, SCIII terminal cable assembly. • Port 2, Ribbon Cable to RS232 - use ribbon cable number C05554 (not currently used). • Port 3, RS232 - use cable number C05996 - two 67/98 box or C07119 - single 67/ 98 box, SCIII to Tokheim cable assembly. • Port 4, RS232 use cable number C05995, SCIII modem cable assembly. • Port 5, RS232 use cable number C06006, SCIII Wayne cable assembly. • Port 6 is extra and can be used as either a modem or Wayne. Note: Ports 1, 4, 5 and 6 are interchangeable. Loops 1, 2, and 3 - use cable number C05670, cable assembly 4 position 1:1 HS/Line - 8ft. phone cable. Gasboy CFN Series SC III Technician’s Guide SCIII and OS/2 3 Site Controller Board Installation 1. Identify and set all switches. Refer to a later chapter in this manual for reference. 2. If PC is powered up, turn off and unplug the PC. 3. Remove the PC tower cover. The SCIII boards require two full length, ISA side by side slots in the PC tower. Locate two side by side slots and remove the slot covers if they are still attached. 4. Slide the boards gently into the ISA slots of the PC motherboard. Make sure that the front of the boards rest on the brackets of the tower and the back bracket aligns with the screw hole. 5. Screw the board bracket onto PC and replace cover. 6. Turn on the PC, booting from the OS/2 install diskette or CD. 7. Follow the instructions on the screen. If you are installing from diskettes, you will be using several to install the OS/2 operating system. Under most install circumstances take the default options that appear. 8. Choose easy install. If you are re-installing from a disk crash then you must choose Advanced Installation. If you need assistance with the advanced install, contact your IBM representative. For Advanced Installation only: When prompted, select these two options; 1. Do not format the partition 2. FAT file system - for Windows compatibility After several diskettes you will boot from the OS/2 screen. Follow the instructions. System Configuration Take the defaults listed for the system configuration except for: • Primary Display - select VGA from the options listed. • Do not install TCP/IP. • Do not install a printer driver unless you have separate OS/2 and log printers. Note: You cannot have the log printer assigned to the same port as an OS/2 printer driver. When the setup is completed, click OK. Another screen will give you the option of learning about OS/2. Click Quit to bypass this option or Ok if you want to learn more. Screen Saver VGA monitors do not need screen savers but if you want to enable the screen saver that comes with OS/2 use the following steps from the desktop - not a window: 1. Place the arrow (cursor) someplace on the screen that doesn’t cover an icon. 2. Press the right mouse button. A small window will open. 3. From the options, select Properties. 4. In Auto Lockup (lower left), set the delay that you want. Gasboy CFN Series 4 SCIII and OS/2 SC III Technician’s Guide 5. Click on Plus sign (upper right), on page 3. Enable Screen Saver mode. You do not need a password for screen saver mode. 6. Close the window by clicking in the left corner. Installing the SCIII software The OS/2 operating system is slightly different from a Microsoft Windows display. 1. From the menu bar at the top of the screen, select the Command options icon on the rightside. From Options select OS/2 window. 2. Place SCIII disk number 1 into the A: drive. 3. At the prompt enter: [C:\] a:\install 4. Enter the IRQ number which is either 10, 11, 12, or 15. The default is 12. The IRQ number must match the SCIII board setting and must not be used by anything else (ex. ports, hard drive, mouse, etc.). 5. Enter the PC address switch. The default is 1001. You will be prompted to enter each switch individually, pressing the return key after each entry. After you have entered all 4 you will be prompted to check your entry. If correct, press Y. If not, press N and you will return to enter the switch sequence again. 6. Do you want to save the configuration? Enter a Y to save the configuration and reboot the site. If you enter No (N) you will not save this configuration information. 7. Do you want to add the SCIII software files to your hard disk? Enter a Y to add the files that you want installed on the hard disk. Enter an N if you do not want to install any SCIII files. If you enter No, then only the configuration will be saved. This is useful when you are updating a site that is currently running and needs only to change the IRQ or the PC Address, leaving the rest of the SCIII software intact. A warning message will appear about the site shutting down. Follow the instructions on the screen. The instructions will vary depending on if you selected to save the configuration or if you are saving the SCIII files to your disk. Once you configure the site and it reboots, you will not have to enter this information again. Any subsequent installation will buypass the configuration and go directly to the SC3 software. 8. A popup box, labeled Install.cmd, will open asking if you want to close the session without saving your data. Click Yes. 9. Another popup box will open telling you to hit CTRL-ALT-DEL to reboot. Follow the instructions. Remove the floppy from the A: drive. 10. To continue installing the SCIII software, insert the disk labeled number one in the A: drive and at the prompt enter: [C:\] a:\install You will proceed to the software installation. 11. Select the package(s) to install from the menu that appears. They are: 1 - Site III software 4 - Internal Profit Point Gasboy CFN Series SC III Technician’s Guide SCIII and OS/2 2 - Report Package 3 - HTML on-line documentation 5 Q - Quit. Select the package by entering the numbers with a space between them as in this example: 1234 Do not use a comma or omit the spacebar between the numbers. Then press return. You will be given the chance to correct or make any changes. The installation process takes several diskettes. You will notice that you will be prompted to replace some BIN files that don’t exist if this is a new installation. Type the letter A in uppercase, you will not be prompted again. Replace the diskettes as requested at the prompt. If you should need to stop the installation process press CTRL C. You will return to the C:\ prompt. You will need to start the install process from the beginning when you return. It is not recommended that you stop the installation process. When you insert diskette number 3 and press return, the window will change to a DOS window to install the Profit Point software. When it has completed the installation the window will return to OS/2. Note: If the internal Profit Point has problems, check if the following exist in the config.sys file. If they do, comment them out from the file by placing REM in front of the line. REM device=c:\tcpip.bin\vdostcp.vdd REM device=c:\tcpip\bin\vdostcp.sys REM run=c:\tcpip\bin\VDOSCTL.EXE Printer setup (optional) 1. Double click on the OS/2 system icon to open. 2. Select System Setup from the displayed icons and double click on the icon. 3. In the System Setup window. Select the Install/Remove icon. In the Install/ Remove window, select the Selective Install icon. The System Configuration menu appears. 4. Click on the printer icon, located in the lower right corner. A window will open displaying a list of printers on the left and port options on the right. 5. Select LPT1 by clicking in the radio button next to the words LPT1. 6. Then, select your printer from the listed options by clicking once on the words to highlight. 7. Click OK to return to the System Configuration menu. 8. In the System Configuration menu, click NEXT until the OS/2 install window opens. 9. In the OS/2 install window, click the Install button. A small Source Directory window will appear to select what drive to install the software from. The default, if you have been installing from a CD, is D:\OS2 image Gasboy CFN Series 6 SCIII and OS/2 SC III Technician’s Guide (If you were installing from diskettes, the window will display A:) 10. Click install to install the printer software for your printer. Once installed, close any remaining open windows. You may have to reboot your PC for the changes to take effect. Netscape Navigator Browser Installation Instructions on installation and how to use the browser come with the purchased software. Install Netscape according to the instructions given with your purchased copy. Once Netscape Navigator is installed, open the browser by double clicking on the Netscape icon on the desktop. See the Netscape documentation on how to use the browser. On-line Documentation setup The installation of the SCIII software will automatically install the correct path to the on-line documentation. The setup described here is for reference only. The Index.htm is the main page to access all of the documentation. It is also known as the Home page through out the documentation. At any time when using the documents, click on the word Home or Home Page and you will return to this page (Index.htm) to select another document. Home page or Home is a term used on the Internet for the base or beginning page. To open a document, click on the name of the manual you wish to review. Finding the Home page 1. Open Netscape Navigator. It may complain about not being able to establish a connection. Ignore this error message by clicking OK, the browser will open anyway. Once you set the startup page to point to a local file (as instructed below) this will go away. 2. From the Menu bar at the top of the page select File-Open file. A window will open. Find your on-line documentation folder on the C: drive. This should be located in the path C:\SC3\HTML. When you locate your on-line folder, open it and select the file called Index.htm. 3. When the path is displayed in the File name box, press OK. 4. The program will display the document Index.htm. This is the beginning of the on-line documentation. Set up Netscape Navigator to open this page every time you start the browser: Gasboy CFN Series 1. From the Menu bar, select Options-General Preferences. 2. From the Appearance selection - middle of the page - Enter the path to Index.htm in the box “Browser Starts With:” It will be C:\SC3\HTML\index.htm or similar. 3. Click OK. Now the browser will display Index.htm as the start page every time you open the browser. 4. To Quit, from the Menu bar select File-Exit. SC III Technician’s Guide SCIII and OS/2 7 Once the browser is set to open the Index. htm on the local disk (C:\) it will no longer produce an error message on startup. New SCIII configuration menus As of this writing, the Graphical User Interface will not be shipping with release 3.0x. As currently set up only 90% of the site information could be entered and that was only at startup. The complete interface will ship with a later release and will allow 100% of the SCIII to be configured at setup and at any other time for configuration changes. You will not have to use the R* window. Gasboy CFN Series 8 Icons SC III Technician’s Guide Icons Creating the desktop icon for SCIII This function is automatically done at the installation process if you use the install program. If for some reason that you need to create an icon, use the following steps. Gasboy CFN Series 1. Open the OS2 system folder by clicking on the icon using the LEFT mouse button. 2. Double-click on the Command Prompts icon. 3. Click once on the OS/2 window icon using the RIGHT mouse button. 4. Click once on the arrow to the right of Create Another using the LEFT mouse button and select New Program. 5. At the top of the appearing window, enter SC3 in the Name box. SC III Technician’s Guide Icons 9 6. From the options listed, select Desktop by clicking once on the name with the left mouse button. 7. Click the Create button at the lower left of the screen. 8. Another window will automatically open. In the Program tab, enter the path: C:\SC3\SC3.exe If the path is correct and the icon is in the same directory as the .exe file, then the program will automatically find the icon and display it on the desktop when the windows are closed. If the icon is not found, you will need to locate the file on the release diskettes. Place in the SC3 directory and follow these instructions again. Creating the Profit Point desktop icon This function is automatically done at the installation process if you use the install program. If for some reason that you need to create an icon, use the following steps. 1. Click once on the CFN icon on the desktop using the RIGHT mouse button. 2. Click once on the arrow to the right of Create Another using the LEFT mouse button and select New Program. 3. At the top of the appearing window, enter Profit Point in the Name box. 4. Click the Create button at the lower left of the screen. 5. Another window will open. In the Program tab a. b. c. 4. Enter the path = C:\bin\menu.bat Set the parameter = 1 Working directory = C:\pos In the Session tab a. b. c. d. Choose DOS Full Screen, then click on the DOS Properties button. Select OK for all DOS Settings. Highlight DOS_HIGH. In the Value box, set to On. Highlight DOS_AUTOEXEC. In the Value box, type C:\bin\OS2exec.bat. Highlight DPMI_DOS_API. In the Value box select Enabled. Gasboy CFN Series 10 Icons e. f. 7. SC III Technician’s Guide Highlight DOS DEVICE. In the Value box DELETE any text listed. Highlight DOS files. In the Value box set the number of sessions that can be opened. The default is 20. The setting in the installation program is 50. In the Icon tab, find the PP icon by clicking the Find button. In the appearing window type the name of the icon file (pp.ico) in the Name box and in the Start folder enter C:\SC3. When the icon is displayed, click OK. If the icon is not found, you will need to locate the file on the release diskettes. Place in the SC3 directory and follow these instructions again. 8. Click Save and close the windows. Creating the SC3 Help desktop icon This function is automatically done at the installation process if you use the install program. If for some reason that you need to create an icon, use the following steps. Gasboy CFN Series 1. Click once on the CFN icon on the desktop using the RIGHT mouse button. 2. Click once on the arrow to the right of Create Another using the LEFT mouse button and select New Program. 3. At the top of the appearing window, enter SC3 On-line in the Name box. 4. Click the Create button at the lower left of the screen. 5. In the Icon tab, find the Help icon by clicking the Find button. In the appearing window type the name of the icon file (help.ico) in the Name box and in the Start folder enter C:\SC3. When the icon is displayed, click OK. If the icon is not found, you will need to locate the file on the release diskettes. SC III Technician’s Guide Icons 11 Place in the SC3 directory and follow these instructions again. 6. Click Save and close the windows. Starting the Icon editor provided with OS/2 In a OS/2 session, at the prompt type iconedit This will start the icon editor program to create or change existing icons. Gasboy CFN Series 12 Site Controller III Ports and Switches SC III Technician’s Guide Site Controller III Ports and Switches For your general information, the ports and switches are listed in this manual. You can find this same information in Appendix A of the SCIII Manager’s Manual. Front panel components • • • • Power Switch - controls the power to the Site Controller III PC system PC reset Switch - resets the PC but leaves the SC Comm operations running PC Power Indicator - indicates that power is being supplied to the controller Hard Disk Status Indicator - lights when the disk is being accessed Serial/Parallel Ports The RS232 ports on the SC can be used for any function that needs a RS232 port. The ports on the PC are more limited. Com1-4 can be used for login, log printers, and command output may be directed to them. LPT1-2 can only be used as log printers or command output. The SCIII has one more RS422 channel available than the SCII. This has been assigned to be another island loop. Broadcast messages will be sent to both of these channels. The POS loop is the only loop that Profit Points can be connected to. The following is a list of ports and their assignments: Gasboy CFN Series SC III Technician’s Guide Site Controller III Ports and Switches Name Channel Location Function CON 0 PC CRT/Keyboard Local port login SC1 1 COMM CPU top DIN RS232 SC2 2 COMM CPU 26 pin ribbon RS232 all cont. lines SC3 3 COMM MEM DB-9 Tokheim pumps SC4 4 COMM MEM bottom DIN RS232 SC5 5 COMM MEM middle DIN RS232 SC6 6 COMM MEM top DIN RS232 COM1 7 PC RS232 COM2 8 PC RS232 COM3 9 PC RS232 COM4 10 PC RS232 LPT1 11 PC Parallel output LPT2 12 PC Parallel output LOOP1 N/A COMM CPU bottom handset Island loop LOOP2 N/A COMM CPU middle handset Island loop LOOP3 N/A COMM CPU top handset POS loop 13 DIP Switch Settings Memory Board DIP Switch SC-Memory I/O - S1 On the SC MEMORY I/O board top left DIP switch: Position & Definition Setting 1 Boot to monitor after reset Boot to OS after reset open closed 2 Debug mode Normal open closed 3 Don’t’ talk to PC while in monitor Monitor I/O goes to PC also open closed 4 Monitor I/O goes to SC port 1 No monitor I/O to SC port 1 open closed Gasboy CFN Series 14 Site Controller III Ports and Switches SC III Technician’s Guide Memory Board DIP Switch SC-Memory I/O - S2 On the SC MEMORY I/O board top right DIP switch: Position & Definition Setting 1 Battery 1 open=disabled closed=enabled 2 Battery 2 open=enabled closed=disabled 3 N/A unused 4 N/A unused PC IRQ Switch, SC-COMM CPU - S1 On the SC-COMM CPU board in the bottom, middle DIP switch is the IRQ enable DIP switch. The IRQ enable switch chooses one of the four possible interrupt priorities. Only one may be selected and no other device on the PC can use that interrupt. SC3.EXE currently assumes level 15. Other choices are 12, 11, and 10. 1 Closed IRQ - 15 Default - closed 2 Closed IRQ - 12 Default - open 3 Closed IRQ - 11 Default - open 4 Closed IRQ - 10 Default - open PC Address Switch, SC-COMM CPU - S2 On the CPU board, bottom right, the PC address DIP sets where in the PC address space the Dual RAM will occur. The SC-Comm board currently assumes D0000. Gasboy CFN Series Switch Address Switch Address cl cl cl cl C0000 op cl cl cl D6000 cl cl cl op C3000 op cl cl op D9000 cl cl op cl C6000 op cl op cl DC000 cl cl op op C7000 op cl op op DF000 cl op cl cl CC000 op op cl cl E0000 cl op cl op CF000 op op cl op E3000 cl op op cl D0000* op op op cl E6000 cl op op op D3000 op op op op E9000 SC III Technician’s Guide Site Controller III Ports and Switches 15 SC3 Comm Board DIP Switch CPU - S3 SC3 Comm Board DIP Switch S3, position 4, default signon. Jumper Settings SC-Comm CPU Board settings Jumper Description Setting K3 AC power fail sense 2-3 to enable 1-2 to disable * K4 AC watch dog timer 1-2 to enable * K5 SC-Comm CPU (testing only) 1-2 to reset K6 RS-485 loop 1, 2-3 for 4 wire * 1-2 for 2 wire K7 RS-485 loop 2, 2-3 for 4 wire 1-2 for 2 wire * K8 Rx Clock from synchronous modem (DB-25-15) 1-2 to connect K9 ETC output to synchronous modem (DB-25-24) 1-2 to connect K10 Tx clock input from synchronous modem (DB-25-17) 1-2 to connect K11 EPROM type 2-3 for 27128 or 27256 K12 EPROM type 2-3 for 27128 or 27256 * = default Gasboy CFN Series 16 Site Controller III Ports and Switches SC III Technician’s Guide SC-Comm Memory I/O board settings Jumper Description Setting K1 Date/Time Clock Speed 1-2 for 4 wait state* 2-3 for 1 wait state K2 Enable A19 to RAM 2-3 for 128Kx8* 1-2 for 512Kx8 K3 RAM size 2-3 for 128Kx8* 1-2 for 512Kx8 K5 Tokheim Reset Output Channel 2 Do not Install, not supported 1-2 for reset * = default Gasboy CFN Series