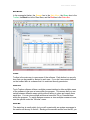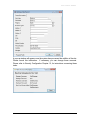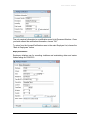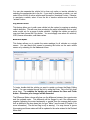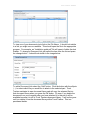
1
Truck Tracker ® Software T A B L E O F C O N T E N T S Table Of Contents ........................................................................................... 1 Chapter 1 ......................................................................................................... 5 RUNNING TRUCK TRACKER SOFTWARE........................................................................................ 5 Getting Started ......................................................................................................................................... 5 Login Screen ............................................................................................................................................ 6 SQL Server Name ..................................................................................................................................... 7 Advanced Connection Options ................................................................................................................. 8 Connection Failed Error Message ........................................................................................................... 9 Trial Mode...............................................................................................................................................10 Main Window ..........................................................................................................................................11 Toolbar ....................................................................................................................................................11 Client Area ..............................................................................................................................................11 Status Bar ................................................................................................................................................11 Main Menu ..............................................................................................................................................12 View Wizard ............................................................................................................................................13 Searching and Sorting .............................................................................................................................14 Query Wizard ..........................................................................................................................................15 Chapter 2 ....................................................................................................... 16 COMPANY INFORMATION & SETTINGS .........................................................................................16 License Activation Screen .......................................................................................................................16 Company Information .............................................................................................................................17 Global Settings ........................................................................................................................................21 TT Service Settings ..................................................................................................................................23 Site Contact Information .........................................................................................................................24 Service Settings .......................................................................................................................................24 Work Order / Invoice ..............................................................................................................................26 Vehicle Settings .......................................................................................................................................27 Parts Inventory Settings ..........................................................................................................................28 Configure Barcode Printer .....................................................................................................................31 Employee Settings ...................................................................................................................................32 Email Reminders Settings .......................................................................................................................32 Document Link Settings...........................................................................................................................33 Automatic Updates ..................................................................................................................................34 Listbox Settings .......................................................................................................................................35 Drop Down Lists .....................................................................................................................................36 Chapter 3 ....................................................................................................... 38 VENDORS LIST ........................................................................................................................................38 Managing Vendors ..................................................................................................................................38 Adding a Vendor .....................................................................................................................................38 Changing Vendor Information ................................................................................................................39 Deactivating a Vendor ............................................................................................................................39 Deleting a Vendor ...................................................................................................................................39 Chapter 4 ....................................................................................................... 40 CUSTOMER LIST ....................................................................................................................................40 Managing Customers ..............................................................................................................................40 Adding a Customer ..................................................................................................................................40 Truck Tracker ® Software Changing a Customer .............................................................................................................................41 Deactivating a Customer.........................................................................................................................41 Deleting a Customer ...............................................................................................................................41 Chapter 5 ....................................................................................................... 42 EMPLOYEE LIST .....................................................................................................................................42 Defining Employees ................................................................................................................................42 Optional Employee Module.....................................................................................................................43 Employee Documents ..............................................................................................................................44 Employee Physicals .................................................................................................................................45 Employee Licenses and Certifications ....................................................................................................45 Employee Violations................................................................................................................................46 Employee Training ..................................................................................................................................47 Chapter 6 ....................................................................................................... 48 SERVICE CODE LIST .............................................................................................................................48 Defining Service Codes ...........................................................................................................................48 Service Code Links ..................................................................................................................................50 Part Assembly .........................................................................................................................................51 Chapter 7 ....................................................................................................... 53 VEHICLE LIST .........................................................................................................................................53 Defining Vehicles ....................................................................................................................................53 Vehicle Information: ...............................................................................................................................54 License Plate Information: ......................................................................................................................54 Miscellaneous Information: ....................................................................................................................55 Meter Information: ..................................................................................................................................56 Specifications: .........................................................................................................................................56 Vehicle Weights: .....................................................................................................................................56 Vehicle Assets ..........................................................................................................................................56 User-Defined Fields: ...............................................................................................................................57 Copy Vehicle Function ............................................................................................................................58 Batch Meter Update ................................................................................................................................58 Clear Reminders .....................................................................................................................................59 Vehicle Documents ..................................................................................................................................59 Chapter 8 ....................................................................................................... 61 PREVENTIVE MAINTENANCE (PM) SCHEDULE ...........................................................................61 Defining PM Schedules ...........................................................................................................................61 PM Schedule Groups...............................................................................................................................62 Adding Services to a Vehicle ...................................................................................................................63 Chapter 9 ....................................................................................................... 65 WORK ORDERS .......................................................................................................................................65 Managing Work Orders ..........................................................................................................................65 Adding PMs Due .....................................................................................................................................68 Adding Reported Problems .....................................................................................................................68 Adding Services to a Work Order ...........................................................................................................69 Work Order Parts Assembly ....................................................................................................................70 Adding Parts to a Work Order ................................................................................................................70 Work Order Documents ..........................................................................................................................73 Chapter 10 ..................................................................................................... 75 PARTS INVENTORY MANAGEMENT ................................................................................................75 Defining Parts .........................................................................................................................................76 Add a part ...............................................................................................................................................76 Printing Barcodes ...................................................................................................................................79 Parts Cross Reference .............................................................................................................................80 2 Truck Tracker ® Software Parts Check-In ........................................................................................................................................81 Adjustments .............................................................................................................................................83 Transfers (Multiple Sites Only) ...............................................................................................................85 Core Tracking .........................................................................................................................................87 Physical Inventory...................................................................................................................................88 Part Check Out (Usage) ..........................................................................................................................91 Average Costing ......................................................................................................................................92 Vehicle Parts Reference ..........................................................................................................................94 Parts Documents .....................................................................................................................................95 Purchase Orders .....................................................................................................................................96 Adding a PO ............................................................................................................................................96 Creating a PO for Vendor Reorder Amount ...........................................................................................97 Checking In an Entire PO .......................................................................................................................97 Chapter 11 ..................................................................................................... 98 SECURITY CONFIGURATION .............................................................................................................98 Users Setup .............................................................................................................................................99 Active Directory Integration .................................................................................................................100 Groups Setup .........................................................................................................................................100 Security Permissions .............................................................................................................................101 Chapter 12 ................................................................................................... 107 REMINDERS ...........................................................................................................................................107 Preventive Maintenance Reminders ......................................................................................................107 Vehicle Module Reminders ...................................................................................................................107 Employee Module Reminders ................................................................................................................108 Reorder Parts Reminder .......................................................................................................................108 Reminder Icons .....................................................................................................................................108 Email Reminders ...................................................................................................................................108 Chapter 13 ................................................................................................... 112 VEHICLE MAINTENANCE HISTORY ..............................................................................................112 Fuel .......................................................................................................................................................112 Daily Logs .............................................................................................................................................113 Reported Problems ................................................................................................................................114 Licensing and Permits ...........................................................................................................................115 Tires ......................................................................................................................................................116 Expenses ................................................................................................................................................117 Chapter 14 ................................................................................................... 119 FUEL INTERFACE MODULE..............................................................................................................119 Setup and Configuration .......................................................................................................................119 Importing Fuel History .........................................................................................................................121 Chapter 15 ................................................................................................... 123 QUICKBOOKS INTERFACE MODULE.............................................................................................123 Setup and Configuration .......................................................................................................................123 Preparing to Export the First Invoice ...................................................................................................124 Exported Data .......................................................................................................................................127 Tax Information.....................................................................................................................................128 Common Error Messages ......................................................................................................................130 Chapter 16 ................................................................................................... 132 DOCUMENT ATTACHMENTS ............................................................................................................132 Setting up a Document Library .............................................................................................................132 Viewing the Documents Library ............................................................................................................132 Attaching a Document ...........................................................................................................................133 3 Truck Tracker ® Software Chapter 17 ................................................................................................... 134 REPORTING ...........................................................................................................................................134 Performing Custom Queries in Reports ................................................................................................135 Chapter 18 ................................................................................................... 139 DATABASE BACKUP AND RESTORE ..............................................................................................139 Full Backup ...........................................................................................................................................139 External Backup ....................................................................................................................................139 Full Restore ...........................................................................................................................................140 Automatic Backup Service.....................................................................................................................141 Chapter 19 ................................................................................................... 142 IMPORTING, EXPORTING, AND EMAILING DATA .....................................................................142 Importing Data ......................................................................................................................................142 Numeric and Currency Codes ...............................................................................................................143 Scientific Notation Format Codes .........................................................................................................144 Date Format Codes ...............................................................................................................................145 Time Format Codes ...............................................................................................................................146 Pattern Codes ........................................................................................................................................146 String Codes ..........................................................................................................................................147 Exporting Data ......................................................................................................................................147 Import / Export Jobs..............................................................................................................................148 Exporting and Emailing Data using the “Send To” Button ..................................................................148 Reading Data directly from SQL Server ...............................................................................................150 User Manual Last Updated: 4/14/2014 Copyright © 2008-2013 FleetSoft, LLC. All Rights Reserved. 4 Truck Tracker ® Software C H A P T E R 1 Running Truck Tracker Software Getting Started When getting started with Truck Tracker software, it is recommended that you begin by entering your data into the system in the following order, as much as possible: 1. Company/Site information 2. Vendor information 3. Customer information 4. Employee information 5. Service code information (and PM Groups) 6. Vehicle information 7. Preventive Maintenance Schedule information 8. Parts Inventory information 9. Work Orders (Services and Parts) 10. Other Modular Vehicle Data You can enter any area of the software after logging in to the system by clicking an icon on the toolbar or selecting an area from the “Lists” main menu. Areas of the software can be disabled or hidden according to the user account and group security settings. You can learn more about user and group accounts under the Security Configuration section. Within a given area, the software is laid out in a way that displays a list of your information pertaining to that area of the software. For example, choosing the “Vehicles” area will bring up a list of the vehicle records that you have put in the system. You can separate this list by choosing a tab at the top of the list. For example, there are tabs that read “All” “Inactive” and “Active.” 5 Truck Tracker ® Software Choosing the “Active” tab will display only the active vehicles in the list, and choosing the “Inactive” tab will display only the inactive vehicles in the list. Choosing the “All” tab will display all vehicles in the system, whether active or not. Within a given area, you can add, change, or delete items within a list. Most lists will have options available as buttons for you to “Add”, “Change”, or “Delete” items. Certain lists may allow you “Deactivate” items when they are no longer in use, yet related information is preventing it from being deleted. When you are adding or changing a record within a list, certain types of information are also grouped together by tabs. For example, when adding a vehicle, there will be a separate tab for meter information from the general vehicle information. Most records will also have a “notes” tab for you to put any notes concerning the item that you wish. When an item has notes recorded, a special icon will be displayed next to the item’s record in the list. Login Screen You can begin using Truck Tracker Software by double-clicking the icon on your desktop or in the start menu. To connect to the system, you must specify the username, password and server name. 6 Truck Tracker ® Software Truck Tracker software includes its own list of user accounts and passwords, separate from any other Windows, Active Directory, or SQL Server accounts that you might have. This list will determine what areas of the program can be accessed and what operations can be performed in those areas. The software contains two example user accounts: Manager (password is pass) Mechanic (has no password). By default, the Manager account has access to change all data including the site settings and security options for other accounts. The default Mechanic account cannot remove data, change site settings, or access security options. The “Username” and “SQL Server” fields are stored each time the program is closed, but the Password field must be entered at each login attempt. User accounts can have an empty password, and Active Directory-enabled user accounts do not require a password (single sign-on). SQL Server Name Enter the full SQL Server name where the Truck Tracker database was installed. Include only one backslash and no spaces. The format of this field is: ComputerName\SQLName (i.e. SERVER34\TRUCKTRACKER) IPAddress\SQLName (i.e. 192.168.20.111\MYSQLSERVER) IPAddress,Port\SQLName (i.e. 192.168.20.111,3456\SQLEXPRESS) For standalone systems, or while accessing the database from the SQL Server machine, the computer name can be abbreviated with a single dot (period). The default SQL Server name is .\TRUCKTRACKER. 7 Truck Tracker ® Software Pressing the drop down arrow will query the network for SQL Servers that are broadcasting via SQL Browser service and display them in the list. This function requires SQL Server Native Client driver on the computer running the program. Advanced Connection Options If you choose Network Server installation type to manually administer your own SQL Server, clients can connect to the TruckTracker database with custom credentials if required. 8 Truck Tracker ® Software Enter the SQL Login account name and password or choose Windows Authentication. If you choose “Save Login”, you will not need to enter your custom credentials again, and the password will be encrypted in a text file in the user’s profile storage. All custom SQL Login accounts using the program must have VIEW SERVER STATE permission, as well as the proper mapping to a Database User or Application Role with INSERT, UPDATE, DELETE, and EXECUTE permissions on the TruckTracker database. To restore or upgrade a database the Login account must be a member of the SYSADMIN server role, or have CREATE DATABASE and ALTER LOGIN permissions. The Encryption option will encrypt all traffic before sending to the SQL Server. The connection will attempt to use a self-signed server certificate (“trusted”) or another certificate that you manually installed (“trusted”) on both the server and your system. Connection Failed Error Message 08001-SQL Server Network Interfaces: Error Location Server/Instance Specified. If you installed the Standalone System (single user) option and you are connecting for the first time, then the SQL Server Express software or other prerequisites might not have installed properly. Check the installation guide for system requirements and installation troubleshooting information. If you are having trouble connecting to the database over a network, first make sure the network connection is working, and then verify the SQL Server name and IP Address again. Next, verify the TCP/IP protocol using the SQL Configuration Manager. If you still cannot connect, there is most likely a firewall blocking the SQL port, which is actually one of the most common network problems. Start by temporarily disabling the Windows Firewall and try to connect again. SQL Server uses port 1433 by default. If multiple SQL Servers are running on the machine where TruckTracker database is installed, SQL Browser service must be started for named instances to be used. Try restarting all SQL services and connect again. 9 Truck Tracker ® Software 28000-Login Failed for ‘TruckTrackerUser’. If you did not enter custom SQL credentials, the program will use the default TruckTrackerUser Login account. It could be the case that the SQL Server name is valid, but it’s not the correct SQL Server where TruckTracker database is installed, so you would just need to find the correct SQL Server name to login. It could also be the case that the database was moved or restored from another computer and now the mappings between the login accounts and database users are broken. To fix this situation automatically, you can run the installation program again and choose “Repair”. If you entered custom credentials and you receive a login failed message, then either the account doesn’t exist, password is incorrect, or the account is disabled. You will need to fix this manually using SQL admin. Trial Mode Truck Tracker software requires a valid license activation code to use the full unlocked version. Until you activate a full license, the software runs in “Trial Mode”. This allows new users the ability to try out each area of the software in a limited way before purchasing the full program. The first time you login to the program using an unlicensed database, you will see the Trial Version warning. In addition to the record limits, Trial Mode also restrictions certain features of the software, such as the ability to Restore a database and run the import and export functions under the File main menu. You can still export the trial version data directly from the lists and reports. 10 Truck Tracker ® Software Main Window In the screenshot below, the Orange box is the Main Menu, the Green box is the Toolbar, the Black box is the Client Area, and the Red box is the Status Bar. Toolbar Toolbar is the main way to open areas of the software. Each button is a security door that can be granted or denied to each user. If you don’t see certain buttons on the toolbar there is a chance that it is restricted security permission. Client Area Truck Tracker software utilizes a multiple screen interface to allow multiple areas of the software to be open at once within the program. This means that you can switch between different areas quickly without having to close and reopen them each time. You can view multiple windows at once and Tile or Cascade them within the program. To switch between screens or view multiple screens at once, use the options under the “Window” menu. Status Bar The status bar is mostly static, but you will occasionally see system messages in the section all the way to the left. Starting at the second section from the left, you 11 Truck Tracker ® Software will see your registered Company Name, the Site that you are currently logged into, the User you are currently logged in as, and finally your system date and time. Main Menu File Switch Site – For multiple sites users only, change the site currently logged into Settings – Change global, site and local machine settings Printer Setup – Change the printer options for Truck Tracker reports Barcode Printer Setup – Change the printer options for barcode printing User Security – Change user and group security settings Backup – Create a full database backup file Restore – Restore a full database backup file Database Tools – Some pre-canned database tools and server functions Export – Export data tables to Excel or CSV files Import – Import data from CSV files into tables Restart – Close down and restart the software Exit – Close down the software Edit Cut – Cut selected text to clipboard Copy – Copy selected text to clipboard Paste – Paste from clipboard Lists Depending on the software version and user security settings, this menu will include links to all areas of the software, similar to the toolbar. This menu also provides access to the drop down lists, document links, email reminders setup as well as the batch meters update and month-end meters functions. Reports Depending on the software version and user security settings, this list will include links to all reports in the software. Window Tile – if multiple windows are open, arrange them to fit the visible screen area Cascade – if multiple windows are open, make all same size across screen Help User Manual – opens the user manual Check for Updates – check the internet or file server for software updates Chat Room – a simple chat client with other Truck Tracker users on your network Register Item – opens the registration screen to activate your software license About – shows version, copyright and license information 12 Truck Tracker ® Software View Wizard The View Wizard allows you to use an intuitive wizard-driven interface to quickly create and save an unlimited number of custom list box formats. List box format refers to the visible columns and the order they are shown in. To move a column on the fly, click in the field (not the header) and drag it to another location. To modify the current format, reset to default format, or view of list of saved formats, right-click anywhere on the list box. “Modify View” allows you to change the current view on the fly, but changes will not be saved unless you press the Save button as select a defined view. “Reset View” will reset the list box format back to the default. Choosing “View” will open the list of previously saved views. Press “New” to add a new view, “Copy” to make a copy of the selected view, “Modify” to modify the selected view, and “Rename” to change the saved name of the view. 13 Truck Tracker ® Software Drag and drop the available fields or highlight the field and press “Add”. To hide a field, place it back in the available fields list, or highlight the field and press “Remove”. You can change the column heading by pressing “Advanced” and entering the new heading. Lastly, define security on this View by pressing “Access”. Unassigned means that all users will be able to modify this view. Owner mean that only the current user (and full access users) can modify this view. Application means only full access users can modify this view. Set visibility as Public to allow all other users to select this view but not modify it, Private to keep it hidden from all users. When the screen is closed, the formatting of the list will be saved in an INI setting file in the windows user’s roaming storage folder so that it will always be restored to the previous state. Searching and Sorting For all lists in the software, you can sort any column in ascending or descending by clicking on the column heading. To sort on multiple columns at once, hold down the CTRL key while clicking additional sort columns. Clicking a column header also resets the locator field and sets the column as the active field for searching using the Find button. Once you click a column header, you can type what you are looking for in that column and press ENTER or TAB key, or press the Find button to locate the closest match. For example, once you’ve sorted on the “Primary Bin” column, you can type in the first few characters of a bin number and click the “Find” button (or press the TAB or ENTER keys) to find the parts that match the entered text. 14 Truck Tracker ® Software Query Wizard The Query Wizard allows you to use an intuitive wizard-driven interface to quickly create and save an unlimited number of custom list box filters. Filtering refers to the limiting of the records shown in the list box based on specific criteria. Each list box will have a drop down list at the top of the list for quick access to filtering features. From the drop down list choose “All Records” to clear the current filter, “Custom Query” to create a new query on-the-fly, or choose one of the existing queries that has been saved already. To access a list of previously saved queries, right-click anywhere on the list and choose “Query”. If a query is already activated you will also see the “Reset Query” option in the right-click menu for clearing the active filter. 15 Truck Tracker ® Software C H A P T E R 2 Company Information & Settings When you begin using the software, the first task is to setup your company information and the default settings for your company. If you have multiple work sites, you will also need to setup defaults for each individual site. In order to perform this configuration, you will need to logon with Full Access user security privilege. License Activation Screen This registration screen will allow you, if you have purchased them, to activate additional software modules, as well as add users and sites. If you have already registered your software but have now purchased additional users, sites or modules, you can update your registration with a new activation code by either selecting “Register Item” from the help menu, or from within the global configuration window, as described in the next section. Fill in the appropriate information, and enter in the activation code supplied to you. Once you have enter an appropriate activation code, you will see a window reporting a successful activation, and you will need to exit the program and login again for the changes to take effect. If you need assistance in activating your software or require a new activation code, please contact your FleetSoft representative by phone or email. 16 Truck Tracker ® Software Company Information Once you have registered the software, you should perform an initial configuration setup. From the “File” menu, choose “Settings”. This will bring up the Configuration window. Your company name is setup in your software licensing and registration information. If you wish to update your registration information, choose the “Registration” button. This will open the registration window shown earlier in this chapter. 17 Truck Tracker ® Software By default, the software comes configured for only one work site. If you have purchased multiple sites, you can organize them by groups. For example, the two default groups are Region & Business Type. To configure your site group variables, choose “View Groups.” If you wish to change the Group Types, choose the “Configure Group Types” button. This will open a window allowing you to rename your group types. Once you have defined your group types you can add, delete or change group codes for each group. 18 Truck Tracker ® Software After you have completed setting up your group types, you can then setup your sites. From the Groups List window, choose “close” and then choose “View Sites.” This will bring up a window displaying the sites you have defined for your company. If you need, you can modify a site by selecting it from the list and choosing the “Change” button. You can add your additional sites by choosing the “Insert” button. If you made a mistake and need to delete the site, choose the “Delete” button. You can only delete a site if there are no records associated with it. When adding or modifying a site record, you will need to supply a unique site code and site name, as well as choose the appropriate codes for the group types setup earlier (such as “Region” and “Business Type”). 19 Truck Tracker ® Software A pop-up window will appear once the system has processed the addition of the site. Please record this information. If necessary, you can change these accounts. Please refer to Security Configuration Chapter 12, for instructions concerning these tasks. 20 Truck Tracker ® Software Global Settings The “Global Settings” item on the left allows you to define further settings that will be applied to every site in the software. The Backup Location tells the Automatic Backup feature where to save the nightly backups. This can be anywhere on the server or on the network as long as the Truck Tracker Service and the Truck Tracker SQL service are ran under users with permission to read, write and perform directory listing on that location. You may need to consult your IT department for where this location should be. You must define the Global Cost Method (Professional version only) for checking in and checking out Parts Inventory. Using Average cost will charge out the part at the average cost of all received/adjusted parts on hand. Using Actual cost will charge out the part at the actual cost of the received/adjusted part. When the system is set to Actual cost, the default behavior is to check out inventory in First In First Out (FIFO) order, based on the received date. You may also choose a specific on hand part regardless of the received date. Truck Tracker allows you to customize global reminder settings. The following items will be applied to all sites: 1. Days to Remind Before PM Due 2. Meter 1 Value to Remind Before PM Due 3. Meter 2 Value to Remind Before PM Due 21 Truck Tracker ® Software 4. Days to Remind Before License/Tag Expire 5. Days to Remind Before Employee Items Expire 6. Meter 1 Value to Remind Before Tire Life Expires There are two currency conversion buttons available that will help you convert between currencies when entering part costs. The entire company must operate from one base currency. This currency will be assumed when entering and displaying monetary values throughout the software. You can enter the base currency label and two other currency labels along with the exchange rates used to convert each of the currencies back to the base currency. Once you have finished setting up your sites and global settings, choose “OK.” At this point, you can begin using other areas of the software, or apply settings for your site. 22 Truck Tracker ® Software TT Service Settings The “TT Service Settings” item allows you to configure and enable or disable features related to the Truck Tracker Service agent. This is a separate program that is running on the server. Enable Automatic Backups – Leaving this checked enables Truck Tracker to perform an automatic backup of your data once a day at time you specify. Days to Run Backup – Select the days you want the backup to run. Leaving a day unchecked means the backup will not run on that day. Time of Day to Run Backup – Specifies the time of day the backup will occur. It is recommended to have this set to at least one hour after the Email Reminders are scheduled. Number of Days to Retain Backups – Any backups older than the number of days set here will be deleted. Set this to zero to retain all backups. Enable Email Reminders – Enable this setting to for the daily email reminders service to run. See Reminders, Chapter 13, for instructions on defining e-mail reminders. Time of Day to Send Email – This specifies the time of day that Truck Tracker will attempt send an e-mail for reminders in the system. 23 Truck Tracker ® Software Site Contact Information To configure settings specific to your site, select “Program Setup” in the File menu and choose the “Current Site Configuration” tab. You will notice the different site settings broken up into different tabs. The “Site Info” item includes information about the current site. Service Settings The “Service Record Settings” allow you to set default values and behaviors for adding service records to a Vehicle or Work Order. 24 Truck Tracker ® Software Default Hourly Wage/Cost: value to fill hourly wage field if none is specified for the given mechanic. Default Actual Hours: value to pre-fill actual hours when adding service. Default Hourly Rate: value to fill hourly invoice rate if none is specified for the given customer. Populate Actual Hours and Notes from Service Code: pre-fill service code defaults. 25 Truck Tracker ® Software Work Order / Invoice Employee Type for WO – Only employees of this type will be selectable on a WO. Last Work Order # -- The system auto assigns work order #’s in sequence. You can modify this value so that the next Work Order you create will begin at the specified number plus 1. Default Parts Markup % -- The default percentage of markup to apply when printing an invoice. This can be overridden by part (in professional version) or on the WO, and only gets calculated on the invoice (charging a customer) and is not figured into your costs (total cost report or WO reports). Use Adjusted Standard Hours when Invoicing Services – By default the invoice includes the actual mechanic hours. Check this checkbox if you would like to use the (adjusted) standard service code hours instead. Hide Hours and Rate column on the Invoice Report – By default the invoice includes columns for Hours and Rate. Check this checkbox if you would like to hide these columns and only show the Total Cost column for each service. Show Current Vehicle Meters On Work Order – Leaving this checked will display the current vehicle meters when adding or changing a Work Order. Misc. Service Fee – Enable this setting to always include a percentage of the total service cost as an additional fee on the work order and invoice. Enter the default percentage required. 26 Truck Tracker ® Software Misc. Parts Fee – Enable this setting to always include a percentage of the total parts cost as an additional fee on the work order and invoice. Enter the default percentage required. Tax 1 Name, Percent – name and percent of Tax 1 to be calculated on the invoice and whether or not it is applied to Parts or Service (or both). Tax 2 Name, Percent – name and percent of Tax 2 to be calculated on the invoice and whether or not it is applied to Parts or Service (or both). Tax 2 on Tax 1 - you can also choose to apply the Tax 2 rate on the Tax 1 total (tax on tax). Vehicle Settings User Defined Fields – Here you can define up to 10 custom field labels for you vehicle list. Show Only Current Site’s Vehicles – If you have multiple sites registered, you can toggle this checkbox to either show all company vehicles or show only the current site’s vehicles. Show Other Sites’ Reminders for Vehicle in List – If you are viewing Vehicles from all sites, you can toggle this checkbox to show all reminders for these vehicles from other sites as well. 27 Truck Tracker ® Software Round Total Costs To Nearest – Sets how Truck Tracker rounds the total fuel costs in the system. Pre-Fill Price Per Gallon – When a new fuel entry is made, this value will be put in the Price per Gallon field by default. Default Meter Types – Sets the default meter types when adding new vehicles. Press “Reset to Default” button to set all Vehicles to the selected Meter 1 and Meter 2 types. Parts Inventory Settings Default UOM -- Select the default unit of measure for new part records from the drop down list. Formula Trend Divisor – This value represents the divisor for the inventory reorder formula. See Parts Inventory, Chapter 11, for more information. Last PO Ref # - the system auto assigns purchase order reference numbers in sequence. You can modify this value so that the next Purchase Order you create will begin at the specified reference number plus 1. 28 Truck Tracker ® Software PO Prefix – the purchase order has a PO # field that you can manually change. The PO Prefix field will automatically populate the beginning of this field. PO Suffix – The PO Suffix field will automatically populate the end of the PO # field. PO Tax (%) – The default tax rate to apply when creating a Purchase Order. Include PO Tax in Part Cost – use this option to include the amount of sales tax paid with the actual price of the on-hand inventory. The system will determine the amount of tax for each individual part and add it to the unit price of the received item. Remember Last Vendor and Invoice # on Part Check-In – this option will pre-fill the last entered Vendor and Invoice # fields when adding a part check-in. Automatically Close PO when all parts are Received – When this option is enabled, during the part check-in process, if the part was received from a purchase order, the system will automatically reduce the quantity on order field and close the PO when it has no more quantity on order. Show Navistar Parts Information Links – applies to Navistar parts, if you have a subscription to Navistar’s online parts and service tools, when this option is enabled you will see an additional button on the parts forms, vehicle form and parts and service sections of a works order. The button will link the current information to a pre-determined Navistar website with parts and service information. User Defined Fields – you can define up to 5 custom field names in the parts list. Update Formula Trend routine will update the formula trend for all parts in the system. The formula trend for a part is updated each time that part is used. If the part is not used for a long time, this value can become stale. Use this utility to manually initiate a recalculation of all part formula trends. Use Decimals in (Suggested Quantity) Formula Trend – when this option is enabled, the reorder formula will keep the decimal portion of the suggested reorder quantity (formula trend). When this option is disabled, the formula trend calculation will be truncated to the nearest whole number. 29 Truck Tracker ® Software Show Barcodes Message on Check In – when this option is enabled you can choose to print barcodes for all checked-in parts. Show Price on Barcodes – This option will print the price on the barcode label so it is visible. Show Date on Barcodes – This option will print the current date on the barcode label so it is visible. Legacy Barcode Support – This option if for backwards compatibility only. If you need/want to continue using barcode labels that were printed out from a Diamond Connection Solutions system or a version of Truck Tracker prior to 6.2.0.6, then select this option. With this option enabled, all barcodes are printed with a pound sign (#) in front of the part number, and the barcode scanner should not be programmed to include any extra leading or trailing characters. With this option disabled, barcodes are printed as the part number only. Barcode Scanner Prefix Character – This option allows you to scan any barcode from any manufacturer. On windows with the barcode image in the top right corner, the ‘prefix character’ tells the window to process the following characters as a barcode scan – until the Enter character is reached. This allows for more convenient scanning features such as auto incrementing count and auto-add for multiple parts at once. The chosen character will not be allowed when adding or changing a part 30 Truck Tracker ® Software number. You must program the barcode scanner to include the ASCII character as the prefix of each scan. This can be done using the barcode’s user manual. Lookup the word PREFIX and follow the instructions to set the leading ASCII character to the character chosen in this setting. Configure Barcode Printer Use Windows Printer (USB Cable) – Select this option to choose an installed windows printer driver and select the installed printer driver for your label printer. The label size is 3 inches wide by 2 inches tall. Use Windows Printer (USB Cable) – Select this option if you are using a serial cable connected to a COM port, and choose the port number. The first time printing to this label printer through a COM port, you must initialize the barcode printer first by pressing the “Initialize Barcode Labels” button and waiting for a response from the printer. You can test communications by printing a configuration label or resetting the printer from this screen. (Left picture is printed from the COM port using Zebra EPL2. Right picture is printed by using the windows printer driver. Both are Code 128 barcodes sized at 3x2 inches, and contain basically the same information.) 31 Truck Tracker ® Software Employee Settings User Defined Fields – Here you can define up to 5 custom field labels for you employee list. Email Reminders Settings The “Email Reminders” item allows you to configure Truck Tracker to connect to an SMTP server and use it to send out reminder emails. The system requires the use of an existing e-mail address to function. You can connect to any SMTP server such as Gmail, Yahoo, AOL, or connect to an Exchange server. If you are not using your own mail server you might need to check your outgoing SMTP mail limit. 32 Truck Tracker ® Software Hostname / IP Address – this is the name of the SMTP server (or IP Address) you are connecting to. Port Number – this is the port number on the server you are connecting to. Server Requires SSL – enable this if your SMTP server uses SSL encryption. Server is Microsoft Exchange – enable this setting will allow you to specify the windows domain name required for authentication. User Name – the account user name for connecting to the SMTP server, often this is the same as the email address. If no authentication is required, leave blank. Password – password required for connecting to the SMTP server. This setting is encrypted before storing in the database. If no authentication is required, leave blank. Windows Domain Name – required to authenticate with Exchange server. You can optionally leave this field blank and include the domain name in the username. Email “From” Field – the address that the email will be sent from. Often this is the same as the user name. Default Resend Days – the number of days to wait before resending an active reminder. For example, if set to 1, active reminders will appear in the email every day. If set to 7, active reminders will appear in the email once every week. Test Email Settings – This button can be used to test whether or not the e-mail account you have specified for the E-mail Reminder settings works. Please note that this is not the exactly the same as when Truck Tracker send e-mail alerts. The Truck Tracker service uses the same credentials but may be located on a different server. If you successfully send a test e-mail and you still aren’t getting e-mail alerts please make sure the computer with the Truck Tracker service isn’t being blocked from connecting to the SMTP server you are trying to connect to. Document Link Settings 33 Truck Tracker ® Software Storage Directory – this location needs to have read and write access for all users attaching or viewing documents to Truck Tracker. If you have a standalone installation you can specify any directory on your computer. If you have a network installation this location will need to be accessible to all users. Each site has its own Document Storage setting. Because each site may have different physical locations it’s important to note that Documents may not be accessible to all users. If this is the case you will receive an error when you try to open the file. Automatic Updates Check for Updates on Startup – allows the program to check for updates when the application is launched, before logging into the database. Save Installation File After Download – allows the user to save the installation file at a specific location. Download Updates From – Internet URL - check a predefined internet location for the latest updates. Local Path (Network Folder) - check folder on your local network. 34 Truck Tracker ® Software Listbox Settings These settings apply to each individual computer user, not the entire site. Hide Reminder Icons in List – showing reminder icons requires an extra database query and increases the load time of the list. If the load time becomes slow with many reminders, select these options to increase the performance. Launch on Startup – choose the windows to launch automatically on startup. Scrolling Performance – for each screen, choose page-load or file-load records in the lists. We recommend page-loading lists because it provides the most consistent load times overall. Although File-loading improves scrolling performance, it can decrease the overall performance because it refreshes the entire list into memory every time. Clear All Listbox Formats – this function will reset all listbox properties back to the default, including column ordering and width. Reset All Windows Locations – this function clears the application settings files which contain the last known window sizes and locations. 35 Truck Tracker ® Software Drop Down Lists You may find it useful to do some additional configuration by creating list entries that other areas of the software will re-use. This can help streamline the data entry and enforce consistency across multiple users. For example, when you add a vehicle to the system, you can tell the system what color the vehicle is by selecting a color from a list of configured colors. To add or modify entries to lists of known types, select the “Lists” menu, and then select “Drop Down Lists.” Or you can simply add the value on the fly while you enter data into that field. The categories of lists are: Year – vehicle years Make – vehicle makes Model – vehicle models Color – vehicle colors Style – vehicle styles Class – vehicle classes Classification1, 2, 3 – part/service classification 1, 2, 3. Optionally enter a description. Group – vehicle groups Fuel – vehicle fuel types 36 Truck Tracker ® Software Meter – vehicle meter types. Optionally enter a max daily average. Engine – vehicle engines Trans – vehicle transmissions Front Axle – vehicle front axles Rear Axle – vehicle rear axles Axle Location– vehicle axle locations WOType – work order types Delay Code – work order delay codes PMCategory – service code categories PrimaryBin – part inventory primary bin SecondaryBin – part inventory secondary bin PartCategory – part inventory category PartSubCategory – part inventory sub category Staff – types of staff members, such as Driver, Mechanic, Manager, etc. License – this is an optional component, relating to the optional module for employee licensing PhysReason – this is an optional component, relating to the optional module for employee physicals VenType – vendor type such as Parts, Fuel, Out Source, etc. Meter entries also have a special field called “other.” This field exists to hold a normal maximum daily limit that this meter type might accrue. For example, a mileage meter might have a normal maximum daily limit of 1000 miles. If a user tries to enter any information that exceeds this limit, the system will display a warning that the user has exceeded the normal daily limit. The system comes populated with default, common types for some categories. You can add types by choosing “insert,” delete types that are not helpful by choosing “delete,” or change any types by choosing “change.” If you modify a list entry that has already been used, such as changing a color from “red” to “maroon,” any vehicles that have already been entered in the system as “red” will remain in the system this way, but any new vehicles will only be able to be entered as “maroon.” 37 Truck Tracker ® Software C H A P T E R 3 Vendors List Managing Vendors Open the Vendor module by clicking the Vendors button on the toolbar, or select Vendors from the Lists menu. To view related data, highlight a vendor and press one of the areas on the right-hand side. Adding a Vendor Click the Add button, supply the required information about the vendor, and any optional information you wish. The required information when defining a vendor is a unique Vendor Code that will be used to identify the vendor in the system, and the Vendor Name. The optional information you may include for vendors: Type – the system maintains a list of known vendor types Address / Remit To information 38 Truck Tracker ® Software Contact information – websites and email addresses will be shown as hyperlinks on the listbox. You can then click the hyperlink to launch a browser or email form. Warranty information – either the time or the distance of warranty that the vendor provides. These values will pre-fill the part warranty information when the vendor is specified as the current supplier when defining new parts. Purchase Order Tax – this value will override the default PO tax when a new PO is created. Changing Vendor Information Once a vendor has been entered into the system, you can modify or update its information by selecting it in the list and choosing the “Change” button. Deactivating a Vendor Once a vendor is used in the system, it cannot be removed unless the related fleet data is removed or changed. Instead you must Deactivate it. Likewise, to reactivate a vendor, select it from the list of inactive vendors and choose the “Activate” button. Deleting a Vendor If the vendor you wish to remove has not been used and does not have any other data associated with it, highlight the vendor record and press Delete. 39 Truck Tracker ® Software C H A P T E R 4 Customer List Managing Customers Open the Customer module by clicking the Vendors button on the toolbar, or select Vendors from the Lists menu. To view related data, highlight a customer and press one of the areas on the right-hand side. Adding a Customer Click the Add button, supply the required information about the customer, and any optional information you wish The required information when defining a customer is a unique Customer Code that will be used to identify the customer in the system, and the Customer Name. The optional information you may include for customers: Address information Contact information Accounting information 40 Truck Tracker ® Software Parts markup percentage – Will be applied to all Parts when specified on WO/Invoice. It can be manually overridden on the WO/Invoice. (Hourly) Labor rate - Will be applied to all Service when specified on WO/Invoice. It can be manually overridden on the WO/Invoice. You can store any additional information about your customers in the Notes tab. Changing a Customer Once a customer has been entered into the system, you can modify or update its information by selecting it in the list and choosing the “change” button. Deactivating a Customer Once a vendor is used in the system, it cannot be removed unless the related fleet data is removed or changed. Instead you must Deactivate it. Likewise, to reactivate a vendor, select it from the list of inactive vendors and choose the “Activate” button. Deleting a Customer If the customer you wish to remove has not been used and does not have any other data associated with it, highlight the customer record and press Delete. 41 Truck Tracker ® Software C H A P T E R 5 Employee List The first step to maintaining a catalog of employees is to define your employees in the system. You must have managerial privileges to define new employees. Defining Employees Open the Employees module Add an employee Supply the required information about the employee, and any optional information you wish The required information when defining an employee is a unique employee code that will be used to identify the employee in the system, and the employee type. The system will maintain a list of known employee types that you can select from. The optional information you may include for employees: First name Last name Once an employee has been entered into the system, you can modify or update employee information by selecting an employee in the list and choosing the “change” button. 42 Truck Tracker ® Software If you wish to deactivate an employee, you can select a record from the list of active employees and choose the “deactivate” button. Likewise, to reactivate an employee, select a record from the list of inactive employees and choose the “activate” button. You can also separate the employee list to show only active or inactive employees by selecting the appropriate tab. Optional Employee Module If you have purchased the optional full-featured employee module, extensive functionality is added to managing your employees within the system. The general procedures remain the same, but the system can now record much more information, including notes, 5 user-defined fields, and document attachments. Under the Employee section of the security module, there is a setting named ‘Show Employee Sensitive Info’ that will allow you to show/hide certain fields from users of the software such as SSN, birth date, hire date and employee’s hourly wage. 43 Truck Tracker ® Software Employee Documents Truck Trackers allows you to attach documents to your employee records. To attach a document to an employee, select the employee you would like to attach a document to and press the Change button. Select the Documents tab and press the “Add” button. To view an attached document, click on the blue hyperlink in the File Name column. This will open the file in the associated program. For example, a JPG file will open in your default image viewer and a PDF will open in your default PDF reader. 44 Truck Tracker ® Software Employee Physicals Employee physicals can be entered as historical records (a log), but additional functionality is included to create reminders when another physical is due. To add an employee physical record, choose the “insert” button. To change an existing record, select it from the list and choose the “change” button. Date of Physical refers to the date that the physical was performed. Expiration Date refers to a date by which time another physical should be performed. The system uses expiration date to calculate reminders. Once you have entered or updated physical record information, choose “OK.” To return from the Physicals area to the main Employee List, choose the “Back to Employees” button. Employee Licenses and Certifications Employee licenses and certifications can be entered as historical records, but additional functionality is included to facilitate a reminder when a certification has nearly expired. To add an employee license or certification record, choose the “Add” button. To change an existing record, select it from the list and choose the “change” button. 45 Truck Tracker ® Software The only required information in a certification record is its Document Number. Once you have entered the certification information, choose “OK.” To return from the License/Certifications area to the main Employee List, choose the “Back to Employees” button. Employee Violations Employee violations are for recording violations and maintaining driver and carrier fitness ratings for CSA 2010. 46 Truck Tracker ® Software To add an employee violation record, choose the “Add” button. To change an existing record, select it from the list and choose the “change” button. Employee Training Employee training can be entered as historical records, but additional functionality is included to facilitate a reminder when training needs to be renewed. To add an employee training record, choose the “Add” button. To change an existing record, select it from the list and choose the “Change” button. Employee training must be associated with the Vehicle Group field. 47 Truck Tracker ® Software C H A P T E R 6 Service Code List Truck Tracker allows you the ability to maintain a list of service codes in your fleet. Service codes are used to define PM schedules that will trigger an entry on the reminders screen. Service codes are also used to define services performed on work orders and reported problems. Defining Service Codes Service codes are global across all sites. If you add a service code at any site, it will be available for all sites. You must have user permissions to define new service codes. Open the service codes module Add a service code Supply the required information about the service, and any optional information. 48 Truck Tracker ® Software The required information when defining a service code is a unique service code number that will be used to identify the service code in the system, and a description of the service. The optional information for each service code is: Classification 1, 2, 3 – user-configurable fields to classify and query a service code in a VMRS-style coding. These values will be copied into the service form when this service code is added to a work order. Category – user-configurable field for grouping and querying service codes. Standard Hours – this value can be automatically filled into the actual and adjusted standard time fields on the service form when this service code is added to a work order. A site setting is provided to enable or disable the automatic fill. Standard Hourly Rate – this value can be automatically filled into the (Customer) Rate field on the service form when this service code is added to a work order. Tax Exempt – this value will pre-fill the tax exempt field on the service form, exempting the line item from the total invoice tax. Notes – the notes field can contain up to 8000 chars. For example, this field could contain a checklist or a procedure for this service. These notes can be automatically filled into the service form when this service code is added to a work order. A site setting is provided to enable or disable the automatic fill. 49 Truck Tracker ® Software Preventive Maintenance (PM) service code information – If the PM checkbox is selected, the service code will be available to add to your PM Schedule. Then, you can optionally enter additional information about the service code’s schedule. One-Time Schedule – if this option is selected, then any PM with this service code will be deleted after the service is performed, instead of being rescheduled. Interval Days – days between scheduling the service Interval Meter 1 and 2 – meter 1 and 2 intervals between scheduling the service Once a service code has been entered into the system, you can modify or update its information by selecting it in the list and choosing the “Change” button. You can also separate the service code list to show only active or inactive service codes by selecting the appropriate tab in the list. If you wish to deactivate a service code, you can select it from the list of active service codes and choose the “Deactivate” button. Likewise, to reactivate a service code, select it from the list of inactive service codes and choose the “Activate” button. Service Code Links Sometimes you might perform a service on a vehicle that implicitly includes other services. For example, you might perform service “A” every 1000 miles and service “B” every 3000 miles, and service “A” is implicitly performed in service “B”. If you have a PM reminder for each, you might want the service “A” reminder to be automatically rescheduled or reset each time service “B” is performed, without adding both service codes to a work order. To accomplish this you could add service “A” to the Service Code Link tab of service “B”. 50 Truck Tracker ® Software You can add any number of links to a service code and create a tree-like structure of linked service codes, but you cannot add a link that would create a cycle in the rescheduling process. All PM reminders will cascade down the links and be automatically updated. For example, if you have three service codes, “A”, “B” and “C”. You could add service “A” to the Service Code Links tab of service “B”, and add service “B” to the Service Code Links tab of service “C”. After these links are added you cannot add service “C” to either service “A” or “B” because it would cause a cycle (it wouldn’t make much sense to do this anyway). If you have a PM reminder for each of these services, when you perform service “C”, the PM service “B” and PM service “A” will automatically be rescheduled. Part Assembly If you have service codes that always include certain parts, you can associate those parts with the service code by adding them to the Part Assembly list. When you add a service code to the service form on a work order, you will have the option to automatically check-out individual parts or all parts at once as well as print out the part assembly list of for that work order. For more information about how Part Assembly applies to a work order, see Work Orders, Chapter 10. To maintain the part assembly lists, select the specific service code from the list and press “Change”. On the service code form select the Part Assembly tab. 51 Truck Tracker ® Software On the Part Assembly form, you can Add, Change or Delete records like other areas of the software. Choose the part #, the quantity, and whether or not it’s a non-inventory part. Optionally you can associate the part with a specific vehicle year, make, model, or engine. If you specify a year, make, model, or engine the part will only apply to work orders for vehicles with a matching year, make, model, or engine. If you leave any of the fields blank, the part will apply to all vehicles with that year, make, model, or engine. 52 Truck Tracker ® Software C H A P T E R 7 Vehicle List Vehicles are held globally, meaning that if you add a vehicle at one site, all other sites will be able to see this vehicle record. You can designate a primary site for a vehicle, but service work performed on the vehicle at any site can be recorded in Truck Tracker, and viewed at any site, depending on the site settings. Defining Vehicles Open the vehicles module Add a vehicle The required information when defining a vehicle is a unique vehicle number that will be used to identify the vehicle in the system, the year the vehicle was manufactured, the make and model of the vehicle, and the primary site where the vehicle resides. 53 Truck Tracker ® Software Vehicle Information: Meter 1 – the current meter 1 reading for the vehicle Meter 2 – the current meter 1 reading for the vehicle VIN – vehicle identification number Fuel type – user-configurable in drop down lists Color – user-configurable in drop down lists Style – user-configurable in drop down lists Veh Group – user-configurable in drop down lists. employee training. Also for GPS map group. Class – user-configurable in drop down lists License Plate Information: Plate type – user-configurable in drop down lists Plate number – license plate number Expiration – license plate or sticker expiration date Sticker number – license plate sticker number 54 Vehicle group for Truck Tracker ® Software Miscellaneous Information: Location/Yard – this field can help group your vehicles into separate locations. Primary Customer – you can select a primary customer from your customer list (this will pre-fill the customer section on a work order). Primary Driver – you can select a primary driver from your employee list (this will pre-fill the driver on a daily log and fuel entry). PM Group – when you include a vehicle in a PM Group, the vehicle’s PM schedules will automatically be added and removed when service codes are added or removed in the PM Group. Fuel Key 1, 2 – these fields are used for importing fuel records in the fuel interface module. This unique key should match the data coming from your fuel system. Require Meter 1 on Work Order –this option will require a meter entry on work orders for this vehicle. Enable Parts Warranty Reminder –this option enables warranty reminders when checking out parts to this vehicle. 55 Truck Tracker ® Software Meter Information: Current Meter 1, 2 – the current meter reading for the vehicle; this is the same data as the Meter 1 field on the Vehicle information screen. Meter 1, 2 types – user-configurable meter labels, e.g. miles, hours, and kiloms. Meter 1, 2 totals – the sum of any replaced meters and the current meter reading, minus the beginning meter reading. Last Fuel Meter 1, 2 – this value is stored as the last entered meter value for fuel entries. This will be used to fill the previous meter field on new fuel entries. Beginning Meter 1, 2 – this field is used as the lowest or first reading used on the current meter. If you choose the “Replace Meter 1” button, you can replace a meter that was physically replaced in the vehicle, or that has rolled over. A module will pop up at the bottom of the screen, where you can supply the end reading of the old meter, and the starting value of the new meter. When you are finished, you can choose the “complete” button. Your preventive maintenance schedule can automatically be updated to reflect the new current meter. Specifications: Enter a description for Engine, Trans, Front Axle, and Rear Axle Vehicle Weights: Licensed For –weight that vehicle is licensed for Axle Information –table to record axle weight information for as many axles as needed. Vehicle Assets You can record information about assets, items or components you have stored on or want to associate with the vehicle. 56 Truck Tracker ® Software User-Defined Fields: Vehicle records allow for up to 10 user-defined fields to be used for whatever purpose you wish. By default, these fields come labeled as User 1 through User 10. To change these labels, go to the “File” menu, and choose “Program Setup,” and go to the Site Configuration tab and then the Vehicle User Fields tab. Whatever label you set for these fields will replace the label of the user-defined fields. The labels apply to all list headings, custom query descriptions, export headings and the vehicle information report. Once a vehicle has been entered into the system, you can modify or update its information by selecting it in the list and choosing the “change” button. 57 Truck Tracker ® Software You can also separate the vehicle list to show only active or inactive vehicles by selecting the appropriate tab in the list. If you wish to deactivate a vehicle, you can select it from the list of active vehicles and choose the “deactivate” button. Likewise, to reactivate a vehicle, select it from the list of inactive vehicles and choose the “activate” button. Copy Vehicle Function This feature allows you to add a new vehicle into the system by copying an existing vehicle definition. This will save time re-entering the same information such as year, make, model, etc. for a group of similar vehicles. Highlight the vehicle you want to copy and then choose the Copy button. You must supply new values for vehicle #, VIN #, license information, and meter values. Batch Meter Update This feature allows you to update the meter readings for all vehicles on a single screen. You can launch this screen by pressing the button on the main vehicle screen or by selecting it in the Lists main menu. To begin, double-click the vehicle you want to update or choose the Begin Editing button. You can navigate through the list by using the Enter, Tab or the Up/ down arrow keys. To complete the update you must choose the Save and Finish button. Otherwise your changes will be discarded. The Difference Meter column will show you the difference between the current meter and the updated meter. This difference will be flagged in red if the difference is negative (adjusting the meter backwards) or greater than the average daily meter limit as defined in the drop down lists for type “Meter” (see the end of Chapter 3 for more information). The red text flag is only a warning. You may choose to ignore this warning and those meters will still be updated to the value entered in the Revised Meter field. 58 Truck Tracker ® Software Clear Reminders This function allows you to clear reminders for tire life, licensing and permits, and reported problems for all vehicles at once. Since PM reminders are based on the last service performed date, they cannot be cleared, only rescheduled again based on the current date and meter values for the vehicle. To clear a specific reminder put a check in the box next to the reminder icon shown in the list. Double click on the box to toggle the check mark. When you’re finished selecting the items you want to clear, press the Clear Selected Reminders button. Depending on your service code PM intervals and global reminder settings, some PM items may not get removed from the reminders list. Vehicle Documents Truck Trackers allows you to attach documents to your vehicle records. You can store a profile picture of the vehicle, reviews, contracts and anything else that you might want to associate with a vehicle. To attach a document to a vehicle click the Vehicles icon on the toolbar. Then select the vehicle you would like to attach to the document. Press the Change button after that. On the window that pops up you should see a Documents tab. The picture below is an example of what you should see if you have Documents already associated with the vehicle you selected. To view one of your documents just click on the File Name. It should look similar to a link you might see on a website. This should open the file in the appropriate program. For example, an Accident 001.jpg file will open in Windows Picture and Fax Viewer. To change a Document Link just select the item from the list and press the change button. It should look similar to the image below: 59 Truck Tracker ® Software To add a Document Link select the Add button. Click the button with the ellipsis (…) to select which file you would like to attach to the selected vehicle. Truck Tracker maintains its own document library and will copy the selected file into that document library when you press the OK button. So even if you delete the document from your computer after you have attached it to this vehicle it will be available because it is still in Truck Trackers document library. It will not be gone until you delete it from the document library within Truck Tracker. This is a permanent delete. 60 Truck Tracker ® Software C H A P T E R 8 Preventive Maintenance (PM) Schedule Truck Tracker allows you the ability to maintain a preventive maintenance schedule. This schedule will maintain a list of services to be performed on your vehicles, and the interval in which they are due to be performed. The PM schedule can calculate events based on meter readings, date, or whichever comes due first. If you have setup PM Service codes, these records will already include default meter or date intervals by which the PM schedule can calculate maintenance events. The first step to managing your PM schedule is to gather all of the required information for your fleet. Separate your vehicles into groups that will have the same PMs established. You can define all of the PMs for one vehicle in each group and then copy the entire schedule from that vehicle to each other vehicle in the group. Truck Tracker allows you to attach documents to your vehicle records. You can store a profile picture of the vehicle Defining PM Schedules Open the PM Schedule module by clicking its button on the toolbar, select it from the Lists menu. 61 or Truck Tracker ® Software To add a PM Schedule, click “Add”. The required information when scheduling a PM is the vehicle the event pertains to, and the service code that the schedule pertains to. You must have vehicles and service codes defined in their respective lists in order to create a PM schedule. For each PM schedule, select the appropriate vehicle and service code from the list. The optional information you may include for PM schedules: Last performed date – enter the date this service was last performed Last meter 1 – enter the meter 1 value this service was last performed at Last meter 2 – enter the meter 2 value this service was last performed at Notes – enter optional notes about the PM Once a PM Schedule has been entered into the system, you can modify or update its information by selecting it in the list and choosing the “Change” button. The required information – vehicle and service code information – cannot be modified once an event has been created. Also, you cannot modify the “Next Scheduled” values since these values will automatically be calculated according to the PM Service code settings. You can view all schedules when first opening the PM Schedule module. If you wish to separate PM schedules by vehicle, you can choose a specific vehicle from the list. You can return to the default view of PM schedules for all vehicles by choosing the “View All” button. PM schedules will be updated to reflect completed work orders. You can delete PM schedules by selecting it in the list and choosing the “Delete” button. You can also copy PM schedules from one vehicle to another, facilitating the quick creation of a PM schedule. Once you have all of your PMs entered for one vehicle, you can copy these PM schedules to another vehicle by selecting this vehicle in the top right “Vehicle Code” field and then choose the “Copy From” button. The system will then prompt you to select the source vehicle, and copy over all PM schedules from that source vehicle to the currently selected vehicle. PM Schedule Groups To define a service code grouping, click the PM Schedule Group button. The top list is the PM group names, and the bottom list is the service codes contained in the selected group. 62 Truck Tracker ® Software First, add a group name by clicking “Add” button under the top list, then type in the name and any additional notes and press enter. Now in the bottom list, add or delete service codes you want to include in this PM group. I If there are Vehicles associated to a PM Group, service codes added or deleted will be added or deleted to the corresponding vehicles PM schedules. When adding or removing a Vehicle from a PM group, the PM schedules will automatically be added or removed as well. Adding Services to a Vehicle To add a Service record directly to a Vehicle, click the Services icon on the toolbar, and then click the Add button. Or if you are on the Vehicles screen, highlight a Vehicle record, click the Services/Parts button and then click the Add button. 63 Truck Tracker ® Software Enter the required Vehicle and Service Codes if not already pre-filled. Enter meter readings and service date, as well as the mechanic or vendor performing the service and actual hours of labor. Some of this information will already be pre-filled based on the current user and site settings. If the specified vehicle has a PM Schedule defined for this service code then it will be rescheduled according to the service date and meter 1 and meter 2 fields. The stopwatch function is a very simple timer to keep a running total time. When you finish, the time will be added to the actual hours field. The smallest unit of time that can be represented is .01 hours or 36 seconds. To change information about a service, highlight the record and press Change. To remove a service record, highlight the record and press Delete. If the service record is associated with a closed work order, you cannot change or remove the service. 64 Truck Tracker ® Software C H A P T E R 9 Work Orders Work Orders allow you to update your vehicle meters and track extensive details about: Services performed such as date and time, description, mechanic hours, cost per hour, classification and notes. Parts usage such as part number, quantity, cost, warranty, classifications, and notes. Invoice information such as customer, labor rate, parts markup and taxes. Other information such as outside vendor, type of work, delay code, estimated hours and PO reference number. Managing Work Orders Open the Work Order List The work order window has a tabbed list. Work orders are organized in the system by status “Open”, “Completed” or “Closed”. The normal progression for a work order is to go from open to completed, and from completed to closed. Completed status 65 Truck Tracker ® Software represents that the work order has been performed, but not yet reviewed. Completed work orders appear in the “ready to close” list. Closed status represents that the work order has been reviewed. Under the user security settings you can restrict users from closing and reopening work orders or viewing certain tabs if needed. You can also restrict a user from viewing sensitive employee information, such as mechanic’s wage. Work order lists are linked on other screens such as the Vehicle list and Customer list. For example, you can open the Vehicle list, choose a vehicle and then press the Work Orders button for a list of work orders for only the selected vehicle. Or you could open the Customer list, choose a customer and then press the Work Orders button for a list of work orders for only the selected customer. Open the Vehicle List , select a vehicle and choose 66 Truck Tracker ® Software To add a Work Order from any of the work order lists, press the “Add” button. If a vehicle has not been assigned yet, choose the vehicle that this work order is for and enter the required meter readings. When the work order is first created it will be assigned the next work order number in sequence according the site setting for last work order number. Work order numbers must be unique, but you can alter the last work order number site setting if you want to advance this to a higher number. The meter reading requirement can be disabled on a per vehicle basis under the vehicle details. By default the vehicle’s current meter fields are not shown on the work order, but this can be enabled in the site settings. If the work was performed in house, choose a mechanic. If the work was out sourced, choose a vendor. Or just choose “Other”. The opened date will default to the date that the work order is added, but you can override this if needed. Pressing the “Cancel” button while adding a new work order will discard the work order and any services and parts associated with it. If parts were taken out of inventory and placed on the work order they will be returned to inventory with the same quantity, price and received date. Pressing the Cancel button while changing an existing work order will not discard any past services or parts added to the work order, it will only discard the recent changes made to the work order itself. 67 Truck Tracker ® Software When you add parts and service, any outstanding changes made to the work order are automatically saved before parts and service are added. You can resize the work order form by clicking on and dragging the window border. Adding PMs Due If you choose the “PMs Due” button, a view only pop-up window will display pending preventive maintenance event warnings for the vehicle. Choose “Add to Work Order” to add the service record to the work order. At this point, the PM will be rescheduled according to the work order’s meter 1 value, meter 2 and opened date and time. Adding Reported Problems If you choose the “Reported Problems” button, a view only pop-up window will display incomplete reported problems warnings for the vehicle. Choose “Add to Work Order” to add the service record to the work order. At this point, reported problem status is changed to Completed. 68 Truck Tracker ® Software Adding Services to a Work Order To add specific service codes to the work order, choose “Add” under the Services tab on the lower left hand side of the work order. The only required field on the service form is the service code field. The Mechanic field will be filled from the main mechanic of the work order, but you can override this and choose a different mechanic. Once a service code is selected, the description is automatically filled in along with specified classification. If you choose to insert a service code for the work order, you will need to supply the following information. The number of labor hours – pre-filled based on site setting The hourly wage – pre-filled based on Employee module The invoice labor rate – The invoice labor rate is determined as follows: A manually entered labor rate will always be used if it is entered. Otherwise, if a Customer has a labor rate associated with it, that labor rate will be used. If the Customer selected doesn’t have a labor rate associated with it, then the systems default labor rate will be applied even if it is 0. 69 Truck Tracker ® Software At any time, a manually entered labor rate will override any automatically calculated labor rate. Please note that these calculations are performed at the time a service is added to the work order. Thus, for example, if you associate a work order with a customer after you add service to a work order, these services may not necessarily be marked up by the correct percentage, possibly using the default percentage for the site rather than for the customer. A best practice would be to first populate the customer field on a work order before adding services. Service Date – by default the service date will equal the WO Issued date, but you can override it here. Optional: classification Optional: notes Employee – this will default to the employee selected on the main work order record screen, but can be overridden. If you have the employee module, the employee’s hourly wage will be filled. Work Order Parts Assembly The part assembly tab shows all associated part assemblies for service codes added to the Work Order. You can check out a selected part assembly or all at once. You can also print a list of all part assemblies for the Work Order. Adding Parts to a Work Order You may add parts from inventory when recording service. If you are using the Professional version, this will remove parts from inventory in a First In First Out order (FIFO), or you can select a specific inventory record. In the Standard version you can itemize a parts list on the work order, but they are recorded as non- inventory and do not have warranty information associated with them. 70 Truck Tracker ® Software When checking out a part, the markup percentage is determined as follows: A manually entered markup percentage will always be used if it is entered. Otherwise, a markup percentage associated with a particular part will be used (if this value exists). Otherwise, if a customer is associated with the work order before adding parts, a markup percentage associated with this customer will be used (if this value exists). (NOTE: If the vehicle being serviced has a default customer associated with it, this customer is the default customer on the work order. Therefore, the markup percentage associated with this customer (if this value exists) will be used unless another customer is manually selected.) Otherwise, the default markup percentage for the site will be used, even if it is 0. At any time, a manually entered markup percentage will override any automatically calculated markup percentage value. Please note that these calculations are performed at the time a part is added to the work order. Thus, for example, if you associate a work order with a customer after you add parts to a work order, these parts may not necessarily be marked up by the correct percentage, possibly using the default percentage for the site rather than for the customer. A best practice would be to first populate the customer field on a work order before adding parts. If you insert a part to a work order that uses a core, you must credit a dirty core back into inventory before you can complete this work order. The value of this dirty core will then be subtracted from the final cost of the work order. The system will notify 71 Truck Tracker ® Software you if you have used any parts that require a core credit. If so, you can choose the “credit core value” button that will appear to credit the core into the system. Work Order Information (Optional): Meter 2 – will optionally update the vehicle meter 2 value. Additional work order information can be added by choosing the “other information” tab. Person requesting work order Estimated downtime Hour estimate Reference number – Vendor Invoice Number PO Reference number – Your company Purchase Order Number for work to be performed by outside vendor or Customer’s Purchase Order Number for work you are invoicing to customer. Reason Work order type Delay code – the system maintains a list of all known delay codes 72 Truck Tracker ® Software Customer code – this refers to a customer defined in the customer list. At this point, you can insert a new customer to your customer list if you wish. Tax information – override customer tax info Work Order Notes - this will be populated on the Work Order report. Invoice Notes – this will be populated on the Invoice report. Once you have completed the initial creation of a work order, it will appear in the work order list. You can modify or update work order information by opening the work orders module, selecting the appropriate work order in the list, and choosing the “change” button. To change a work order’s status, select it from a list and choose “change.” Then, choose the appropriate status button. If you choose “closed,” the system will automatically supply the date and time the work order is closed with the current date and time, but you can override this information by typing it in by hand. To remove a work order, select it from the list and choose “delete”. Deleting a work order will remove it from the system and lower the total cost of the vehicle if costs were recorded. Any services and parts tracked on the work order will be removed and parts returned to inventory (if they were from inventory). Work orders can be printed as a work order or as an invoice. When printed as an invoice, the services will be calculated according to the labor rate hierarchy, the parts costs are calculated according to the markup or retail hierarchy and the tax settings can be customized and applied. The Bill To portion of the printed invoice will be filled with the specified Customer on the Other Information tab. Work Order Documents Truck Tracker allows you to attach documents to your work order records. You can store a profile picture of the repair order, installation guides and anything else you may need to associate with a work order. To attach a document to a work order click the Work Order icon on the toolbar. Then select the work order you would like to attach a document to. Press the Change button after that. On the window that pops up you should see a Documents tab. The picture below is an example of what you should see if you have Documents already associated with the work order you selected. 73 Truck Tracker ® Software To view one of your documents just click on the File Name. It should look similar to a link you might see on a website. This should open the file in the appropriate program. For example, an “Installation guide.pdf” file will open in Adobe Acrobat Reader. To change a Document Link just select the item from the list and press the change button. It should look similar to the image below: To add a Document Link select the “Add” button. Click the button with the ellipsis (…) to select which file you would like to attach to the selected part. Truck Tracker maintains its own document library and will copy the selected file into that document library when you press the OK button. So even if you delete the document from your computer after you have attached it to this part it will be available because it is still in Truck Trackers document library. It will not be gone until you delete it from the document library within Truck Tracker. This is a permanent delete. 74 Truck Tracker ® Software C H A P T E R 1 0 Parts Inventory Management The software is designed to help maintain and optimize your physical inventory. This includes defining parts and tracking their flow in and out of inventory. It is best to fill out as much information as possible when defining parts, such as the cost, bin numbers, warranty period and classifications. For companies with multiple sites, the inventories will be completely separate and can only be used while logged into that site. If multiple sites have the same part number defined, then they can transfer inventory between the sites. Parts Global – Quick list of common part definitions available to all sites. Sites – Separate inventory and service locations. Parts – Part definitions to use for this site’s inventory. Parts On-Hand Inventory – Currently stocked inventory. Parts Check-In (Receipts) – Historical record of parts checked-in to inventory. Parts Check-Out (Usage) – Historical record of parts checked-out to vehicles or work orders. On Hand/Adjustments – Historical record of adjustments to on hand inventory. Site Transfers – Historical record of parts moved between sites. Physical Inventory – Batch adjust full or partial inventory quantity. Cross Reference – Related parts for warranty flagging. Purchase Orders – Historical record of vendor purchases. Part Purchases (Purchase Order Details) – Line items of parts to be purchased or returned. 75 Truck Tracker ® Software Defining Parts The first step to maintaining an inventory of parts is to define your parts in the system. You must have managerial privileges to define new parts. Open the parts module Add a part Supply the required information about the part, and any optional information you wish. 76 Truck Tracker ® Software The required information when defining a part is a unique part number that will be used to identify the part in the system, a description of the part, and a default supplier. This supplier will have already been set up in the vendors section of the database. You may choose a different vendor than the default when entering parts into inventory if you order the same type of parts from more than one supplier. When using average costing, it is recommended that you DO NOT enter parts with a cost of $0.00 as this can cause confusion with your costing calculations now and in the future. While checking in parts, if you have a barcode scanner and a part with a bar code label on it, you can optionally scan the bar code and it will automatically create a new part number from the decoded bar code label. However, any additional optional information will still need to be entered manually if necessary. After you have defined a part, you can later make changes by selecting that part in the list and choosing the “change” button. The optional information for each part you define includes: Issued unit of measure – This field will use the default unit of measure as earlier defined in your company defaults. Markup percentage – percentage a part will be marked up by default when a part is included on a work order invoice. 77 Truck Tracker ® Software Retail Price – fixed price for invoice. Tax Exempt – excludes tax on the invoice for this part (pre-fills). Core Tracking – True or false checkbox, designates whether the part requires core tracking. If this is checked, you can supply a maximum core value. The part value listed for a part with core tracking will be the sum of the value of the part that contains a core and the value of a clean core. When you add a part that requires core tracking, the system will automatically create a second part signifying the dirty core. You can then modify information concerning this dirty core separately from the part itself. In the list, the dirty core will be designated with the same part number, with the suffix “Cr” added – e.g. Part number 101144 will have a dirty core part number 101144Cr. Primary & Secondary Bin – Warehouse bin locations where part is stored. Category - this is a good field to use for using custom query on reports. Subcategory – this is a good field to use for using custom query on reports. Default Service Code – default service code to pre-fill parts usage with. Warranty information – The warranty provider, as well as the terms (time and/or distance) of the warranty. This information must exist at the time of check-out in order for the warranty reminder message to show properly. Classification – supports classification coding formats occurring with three sets of three characters, such as 100-200-300, VMRS-style codes. Used for warranty detection when preformed twice on same vehicle. Reorder point information – Choose a restock option for this part. The restock option allows you to choose between the formula trend, min/ max option, or no reordering for a part. Restock Option - Formula trend – the formula tracks parts over a 90-day period to determine the average demand (default is 15 days demand, or 24 turns per year). The trend quantity is calculated by adding: 20% of parts usage from past 61-90 days 30% of parts usage from past 31-60 days 50% of parts usage from past 0-30 days And then divides that sum by the formula trend divisor (the default tend divisor is 2). 78 Truck Tracker ® Software This standard trend quantity will certainly reduce if not eliminate stock-outs on regularly carried inventory and in most instances greatly reduce your inventory investment. You can modify the trend divisor from File->Settings->Parts Inventory section. If the trend divisor is set to 1, the result is a 30 day demand, or 12 turns per year. If the divisor is 0.5, the result is a 60 day demand, or 6 turns per year. If the divisor is changed to 3, the result is a 10 day demand. When the Formula option is chosen, the system will use the Min/Max reordering for the first 90 days while the system builds the standard trend quantity. After the first 90 days the formula trend will be used. Restock Option - Min/Max - minimum reorder point, maximum reorder quantity Maximum – maximum number of parts to be held in inventory. Minimum – minimum number of parts to be held in inventory. When the minimum number is reached, the system will indicate in the reorder reports for you to order enough parts to reach the maximum number. Restock Option – Do Not Order – this part will not be included on the suggested reorder report. With a setting of Min/Max, the maximum value must be greater than or equal to the minimum value. By default, these values are set at a minimum of one, a maximum of two. You can separate your parts as either active or inactive from the main list of parts that appears when you first click on the parts button. To deactivate a part, select it from the list at the active tab, and then click the “Deactivate” button. Likewise, to reactivate a part, select it from the list at the inactive tab, and click the “Activate” tab. If you wish to remove a part record that does not have any other fleet data associated with it, highlight the record and press the Delete button. Printing Barcodes First make sure to configure your barcode printer or choose the windows printer you would like to use under the site settings. To print a bar code(s) for a part already in the system, select it in the list and then choose the “Print Barcode” button. This will print the bar code for the selected part on your label printer. You can even print bar codes for all of your parts at once by using the All Bar Code Labels report. This report is located under the Reports main menu on the Inventory sub-menu. 79 Truck Tracker ® Software By default, the report will print only one label for every part in your inventory. By selecting the All Parts on Hand option the report will print a label for every part on hand. That means if you have 300 items on hand the report will print 300 labels. You can use the custom query wizard to selectively print barcodes as needed. Parts Cross Reference Sometimes you will have multiple parts from different vendors or manufacturers that are actually the same part, but they have different part numbers. You can reference these alternate part numbers by adding a Cross Reference to one of the parts. By cross referencing two parts, you can easily lookup alternate part numbers, as well as receive warranty warnings when a matching cross-referenced part is put on the vehicle within the warranty period. 80 Truck Tracker ® Software Parts Check-In Once you have defined your parts, you can check them in and out of inventory. Open the parts module Open the parts check-in module Add Parts to Check-in queue (either manually or select from open PO) Complete and Print Once you are in the parts check-in module, you can check in parts either by scanning their barcodes, or manually selecting and entering them. If you scan a barcode, the system will automatically open a new check-in record. 81 Truck Tracker ® Software Once you scan a barcode, you must select the vendor that supplied the part. The default vendor defined for the part is supplied automatically, or you can select a different vendor from the list. You must also supply an actual cost for the part. The default cost is supplied from the bar code, but you can adjust it manually. You can increment the quantity of a particular part being checked in by scanning that part’s bar code again, or by manually modifying the quantity field. You have the option of supplying a receipt reference number, such as a receipt number from the vendor. If you Check-In a part that does not exist, it will be created automatically. Although you can define new parts in the system on the fly as you check them in, this is not recommended. When you are finished checking in a particular part, you can complete the part checkin process by choosing the “OK” button. Or, if you scan a different part’s bar code, the previous part check-in process will be completed in the system. If you are receiving inventory from an existing open purchase order, press “Add PO Details” button. 82 Truck Tracker ® Software Double click on parts to be received. When the parts are selected, press “Add to Check-In Queue” button. Each part that you check in will then be listed in the New Check In List. This list also displays the total number of part numbers checked in. You can review and modify this information by selecting the part in this list and choosing the “Change” button. If you no longer wish to check-in a part in the list, you can remove it by selecting that part and choosing the “Remove” button. Once you have all of the check-in information correct, choose “Complete Check In and Print.” Once you have completed check in, the system will ask you whether you wish to print bar codes for all parts checked in. If you choose yes, the system will open a print preview window and you can print bar codes on your label printer. Adjustments The adjustment module is an in-depth inventory list, allowing you to manually adjust on hand inventory information. There are two ways to make adjustments. To simply adjust the on hand quantity of a part, select the part from the list and choose the “Adjust Quantity” button. This will bring up the simple adjustment window where you can add or remove from the on hand quantity and include a comment. 83 Truck Tracker ® Software To adjust the vendor code, on hand quantities, or price, choose the “Adjustment” button. The adjustments module will display a list of parts that you currently have in inventory. If you received identical parts from different vendors, there will be a separate record for each part with respect to vendor. For example, if you receive part number 1000 from Vendor A, and another part number 1000 from Vendor B, your parts inventory list will show two part number 1000’s in inventory, but in the adjustment module you will see separate entries for each part number 1000. You can adjust inventory records by selecting them and choosing “Change”. If there are no inventory records for a part, you can add an inventory record by choosing “Add.” You can also delete an inventory record by choosing “Delete.” If you choose 84 Truck Tracker ® Software to delete an inventory record, any quantities associated in that record will be subtracted from inventory. If you add an inventory record, you will need to supply a vendor, quantity, an actual cost per item, and comments. When you have completed an adjustment, you can select another part to adjust if you’d like, or choose “back to parts” to return to the main parts inventory window, or choose “close” to exit the parts inventory area. Transfers (Multiple Sites Only) If you have multiple sites, you can request a parts transfer from another site to your own. After you have requested a transfer, a manager at the requested site will need to approve the transfer and arrange for parts shipment. Once you have received the parts you can complete the transfer in the system, and all inventory quantities will have been adjusted appropriately. To request a transfer, from the Parts Inventory window, select “Transfer.” The incoming transfers requested tab shows any part transfers that your site has already made. You may edit an existing request by selecting it in the list and choosing “edit,” or you can make a new request by choosing “request.” Then, you need to select the part number that you wish transferred by typing in the part number, or by pressing the ellipse button and choosing it from the list. Once you have chosen a part number, inventory quantities from other sites will be shown down in the list. Next, choose a site from which to request the transfer. You can only choose a site that currently has the part in inventory. Finally, choose the quantity you are requesting, and add any optional comments you see fit. 85 Truck Tracker ® Software Once you have made a transfer request, it will appear in the outgoing transfers requested list (tab) at the site from which you requested parts. If another site has requested a transfer from your site, on the outgoing transfers requested tab you can select it from the list and first choose “approve” to signify that the request is approved. Then, once you are ready to process the request, choose the “check out transfer” button. This will remove the quantity of items from your inventory in the system, and the system will prompt you to arrange for shipping of the items. If you’d 86 Truck Tracker ® Software like, you can select a transfer from this list and choose the “print packing list” button to generate a packing list to include with shipment. Once a transfer request has been approved and checked out at the sending site, it will appear in the incoming transfers requested list at the requesting site with status “in transit.” When the parts arrive at your site, you can complete the transfer request by choosing the “check in transfer” button. At this point, the items will be added to your inventory. A history of all completed transfers involving your site can be viewed on the “completed transfers” tab. Core Tracking In Truck Tracker Software, cores are represented by two part numbers: o (1) the part itself, which includes the clean core value o (2) the dirty core, which has a (123Cr). In Truck Tracker, when the core tracking option is selected: o The dirty core is automatically created with the same number as the part itself, followed by “Cr” at end of part number (123Cr). And with the same quantity as the part itself. o When the user first enters a price for the part (before indicating that a core exists), that price is the cost of the part itself without the value of the clean core. Once core tracking is selected for that part and the maximum value of the dirty core is entered, a notification will be made to the user that the user needs to manually update the cost of the part. That updated cost of the part should then include the value of the part plus the value of the clean core that is part of that part. NOTE: Because the value of the clean core is included within the value of the part itself, any reporting that includes that part will show the full cost of the part (including the cost of the core). o When a part that is set up for core tracking is charged out to a work order, a red dot appears to advise that a credit should be entered for the dirty core. When the dirty core is added to the work order, the user has the ability to change the value of that dirty core from the full value established to any value, including zero. A dirty core credit must be entered before the work order can be closed. 87 Truck Tracker ® Software o Dirty cores cannot be added to purchase orders (i.e., to reflect in the records the credit that the customer will receive for returning a core). The parts Adjustment feature must be used to remove the dirty core from inventory when that core is returned to the vendor. Markups: o Any markup for the part will be charged against both the part and the (clean) core. o When a dirty core is credited to a work order, that same markup will be automatically added to the dirty core, so that if the maximum value of the dirty core is entered, this will clear out the total cost of the clean core. Physical Inventory With this feature, each site can perform a complete physical inventory with count sheets and detailed reports. To launch the physical inventory module, choose the “Physical Inventory” button on the parts window or select it from the Lists main menu. 88 Truck Tracker ® Software The physical inventory functionality works in 3 steps. Step 1: Print Count Sheet(s) – this will print the count sheets and create a temporary inventory work file for recording the counted quantities. You can perform a physical inventory on a subset of parts by using the Custom Query option before you print the count sheets. After printing the count sheets, step 2 and 3 will be enabled and the Print Count Sheet button will be disabled. You cannot print the count sheets again until you complete Step 3 or start over by selecting the Clear button. Selecting the Clear button will erase all of the counted quantities that have been entered thus far. Step 2: Enter Count – this window will update the inventory work file with the counted quantities from the printed count sheets in step 1. You can edit the quantity on hand by double-clicking the record or by selecting the Begin Editing button. Use the Enter, Tab or Up and Down arrow keys to navigate the list. You can go back and re-enter or update the counted quantities in this screen. Values with a “0” entered in the Quantity on Hand will have their quantities set to 0 in stage 3. If you leave a “_” in the Quantity on Hand field then the quantity will remain unchanged in stage 3. 89 Truck Tracker ® Software Parts not Counted Report – this report will show all of the parts on the count sheets that have not had an entry in the Enter Count window. Part Variance Report – this report will show a list of all parts in the work file with a comparison of the counted quantities to the current on hand quantities. The unit cost is the cost of a single part on hand (actual or average - determined by the costing method specified in the site configuration). The counted cost is the unit cost multiplied by the counted quantity. The variance cost is the current on hand cost (the cost of the parts currently in inventory) minus the counted cost (the cost of the parts counted). This is a useful value that represents the total dollar amount that your physical inventory is off by. All buttons in step 2 (enter counts and both reports) can be run or re-run as many times as you wish in any order before moving on to step 3. Step 3: Post Counts to Inventory – this is the final step and will update the on hand records for only the parts with entries in the Enter Count screen. It will ignore any parts that have not been counted (parts with a “_”). Adjustment records are created for all modifications to the on hand records so that you will have a history of the postings. When the inventory is updated, you will get a summary report of the physical inventory update. 90 Truck Tracker ® Software Part Check Out (Usage) Parts can be checked out by using a work order. They can also be checked directly out of inventory from the parts inventory window, but a vehicle selection is still required . From the Parts list window, choose the “Part Check Out” button to begin checking out parts. 91 Truck Tracker ® Software From here you must select a vehicle for which the part is being checked out. Once you’ve selected a vehicle, you can begin checking out parts by scanning their bar code labels or manually selecting them. Once you choose “OK” or scan a second bar code label in succession the first part will be checked out, and the system will remember the vehicle for which you are checking out parts. When you select a part manually, by default the selected quantity will be checked out sequentially in First in First out (FIFO) order. You can check out a specific inventory part by highlighting the part and the specific on hand inventory record. If the quantity chosen is greater than the selected on hand record, the system will remove the remaining quantity in FIFO order. Average Costing Average cost method is used when the “Costing Method” site setting is set to Average. Average cost is recalculated when a part is received (Check-In), credited into the system (Check-Out Credit Item), or manually adjusted into or out of the system (Adjustments). To see all transactions that affect the average cost for a part you can: 1. Open the Parts Inventory Screen. a. Press the Parts button on the toolbar. 92 Truck Tracker ® Software b. c. d. e. Highlight a Part record. Press the “Check-In” button and look at the costs for that part. Press the “Adjustments” button and look at the costs. Press the “Check-Out” button for items that were marked as “Credit Items” which have a negative total cost. 2. Run the “Parts Transaction Log” report. a. Go to Reports->Inventory->Parts Transaction Log. b. Enter a date range or leave blank for all. c. Enter a custom query if you wish for specific parts. d. Press Go and wait for the report to generate. Sometimes you can find a transaction that has an incorrect cost for some reason, and this could be altering the average cost. Or maybe the whole transaction is invalid. In this case you would want to Change or Delete the On Hand records (creates an Adjustment) to get rid of the invalid data, and the average cost will be reflected. Be aware that if you checked-out parts after the invalid transaction occurred, it might not have the correct cost, and it won’t be changed automatically. If the part was used with the wrong average cost on a work order that is now closed, you might not be able to reopen it and change the cost. If the work order is open, you can Delete the incorrect part check-out records, fix the cost, and then add the parts usage back again. See the process below. To alter the average cost for a part you can: 1. Change or Delete the On Hand record, which automatically creates an Adjustment. 2. Delete a Check-in record, which automatically deletes the corresponding On Hand record if it hasn’t been used yet. If it has been used already then you need to Delete that Usage record first to put it back into the On Hand table. Once the part is back in the On Hand table you can now perform either option 1 or 2. For example, if you somehow received or adjusted quantity 2 at $0 and quantity 2 at $100, then it will check-out at average cost of $50 per part. If you then adjusted the cost of the 2 parts from $0 to $100, or if you removed the quantity of 2 parts at $0, then it will check-out at average cost of $100 per part again. Hopefully you can now understand how the average cost is managed. Behind the scenes it’s actually more complicated than it sounds because the system allows the same part with different quantities at difference prices, and the average cost spreads it all out equally in the end. You just have to be careful about adjustments because if you are half way through the stock of a particular item, it hasn’t been fully spread out yet, and an adjustment will wipe away the rest. If you think there is a problem creating the adjustments or receipts, which is actually creating the problem with the average cost, then we need to focus on why that is happening and not the calculation itself. We need to reproduce the erroneous 93 Truck Tracker ® Software adjustment or receipts in a test environment so we can isolate the issue. In this case it might also help to have a copy of the customer database backup file. Vehicle Parts Reference The Vehicle Parts Reference module allows you to track parts used on similar vehicles, according to their year, make and model (or make & model only). To use this module, first enter the vehicles module, and then select the vehicle you would like to associate a part with. Then, choose the “Vehicle Parts Reference” button. A list of any parts already associated with this vehicle’s year, make and model will appear in the list. If you switch to the “Make and Model Only” tab, then parts associated with all similar makes and models will appear in the list. This list will be built up automatically as you use parts on vehicles. You can also Add, Change and Delete records as needed. To associate a part with a vehicle by year, make and model, choose the “add” button and select the part from your parts list. This part will then show up for any other vehicle of the same year, make, and model that you select from the vehicles list if you choose “vehicle parts reference.” Similarly, any parts that you add to the “make and model only” list will appear for any other vehicles of the same make and model. There may be overlap between parts on the two lists for a particular vehicle. 94 Truck Tracker ® Software Parts Documents Truck Trackers allows you to attach documents to your part records. You can store a profile picture of the part, installation guides and anything else you may need to associate with a part. To attach a document to a part click the Parts icon on the toolbar. Then select the part you would like to attach a document to. Press the Change button after that. On the window that pops up you should see a Documents tab. The picture below is an example of what you should see if you have Documents already associated with the parts you selected. To view one of your documents just click on the File Name. It should look similar to a link you might see on a website. This should open the file in the appropriate program. For example, an “Installation guide.pdf” file will open in Adobe Acrobat Reader. To change a Document Link just select the item from the list and press the change button. It should look similar to the image below: 95 Truck Tracker ® Software To add a Document Link select the “Add” button. Click the button with the ellipsis (…) to select which file you would like to attach to the selected part. Truck Tracker maintains its own document library and will copy the selected file into that document library when you press the OK button. So even if you delete the document from your computer after you have attached it to this part it will be available because it is still in Truck Tracker’s document library. It will continue to exist until you delete it from the document library within Truck Tracker. This is a permanent delete. Purchase Orders Truck Tracker has a purchase order module that provides additional functionality and interfaces with the parts inventory module of the software. If you have purchased the Professional version, you will be able to track parts purchases more closely with purchase order records as well as automatically generate a purchase order based on the current inventory needs. Additionally, special reports pertaining to the information kept in this module are also available. Adding a PO To get to the PO System Module, first enter the Parts module. Then, choose the “Purchase Orders” button. 96 Truck Tracker ® Software To create a PO, choose the “Add” button. The system defaults to the current date and time, but you can override these if appropriate. You must also select a vendor from which you are making a purchase. Next, choose the part you wish to order by choosing the “Add” button, and choose a quantity to order. You can order multiple parts on one PO. The sales tax may also be included on the purchase order. Indicate by a check mark in the “Sales Tax” box and enter the percentage of sales tax charge. This amount will be applied to the entire purchase order and if indicated on the part line item entry, will also be included in the part cost when checked into inventory. Supply any other relevant information that you have. If you wish to print a PO, you can select it and choose the “Print PO” button. Creating a PO for Vendor Reorder Amount Use the “Add PO For Vendor Reorder” button to automatically generate and review a purchase order for a selected vendor. This PO will be automatically created to order any parts for which the selected vendor is the supplier and the current inventory has fallen below the reorder level. Checking In an Entire PO If you wish to receive all of the parts from a purchase order into your inventory quickly, you can choose that PO record from the list and press the “Check-In Entire PO” button. This function will create receipts and on hand records for the quantity remaining on order of each line item, then it will close the purchase order. 97 Truck Tracker ® Software C H A P T E R 1 1 Security Configuration Truck Tracker allows you the ability to create unique login accounts, and maintain unique security permissions for individual users or groups of users. This includes defining users in the system, creating groups, and setting permissions. In order to perform this configuration, you will need to logon with Full Access User privileges. To begin managing security, choose the Security icon on the toolbar, or select Security under the File menu. The system comes with two automatically created user accounts: manager and mechanic. You may change the default accounts or create new user accounts and then give them unique permissions. User accounts are unique across all sites: you cannot have a “Mechanic” user for more than one site. Each user will be linked to a specific site, or have the option to select a site at login. After you login, the system will recognize what site the user is setup to use and displays the appropriate site data. 98 Truck Tracker ® Software Users Setup To add a new user account, choose the security button. Next, choose “configure individual users.” Finally, choose “Insert”. A username is determined by the user’s first and last name in conjunction. For example, for a user named Anthony Anderson, this would be the username that Anthony would supply to login to Truck Tracker. If you only supply information in the last name field, this will be the username. 99 Truck Tracker ® Software You also need to supply a password for the username. Passwords are not case sensitive, and are not masked from view. You also need to select what site the user is at. You can grant the user two additional levels of security. The “Allow Full Access” setting will give the user the ability to change global company settings such as PM reminder intervals and can also configure security for vehicles and service codes. The “Allow Site Selection” (multi-site installations only) setting will give the user the ability to select which site to log into after the logon information is verified. If you wish to prevent this login from becoming active, or restrict it later, use the “locked out” checkbox. When selected, this box prevents the account from accessing the system. To join a user to a group, choose the “Insert” button near the groups list. To remove a user from a group, choose the “Delete” button near the groups list. To specify security permissions, choose the appropriate area from the top list, and the appropriate permission from the bottom list. It is recommended that you define security for groups and then join users to these groups, rather define security for each user. However, if you wish to use the “Deny” flag for any particular action for a specific user, this will override any permissions allowed for a group. For more information on specific security permissions, see the Appendix. Active Directory Integration To use single sign-on with windows active directory, select the “Active Directory User” option. Enter the domain account name in the Last Name field and enter the LDAP path to the domain. When a user is logged into active directory then they do not need to enter a password to login to the software. You must be currently logged into the domain with permissions to connect and browse the list of accounts. To browse a list of active directory entries, enter the path (i.e. LDAP://dc=yourdomain,dc=com), and press the Query AD button. You can bulk import active directory accounts as Users or Employee records (they are separate entities in the program). Simply highlight the records you want to import and press the “Import as Users” or “Import as Employees” button. Groups Setup To simplify managing uniquely defined permission sets, you can create a group for users with similar security permissions, define the permissions for this group, and then add users to the group to effectively give them the appropriate permissions. 100 Truck Tracker ® Software To create a group, choose the “Configure Groups of Users” button within the security module. Next, choose “Add”. Supply a name for the group, and define the group’s site. You can also join user accounts to the group by inserting them into the list of members. Finally, define what permissions you would like users in this group to have, and grant them these permissions. Security Permissions Users can perform functions or gain access within the software if they have been granted the permission. Users can be granted this permission either directly, to their 101 Truck Tracker ® Software user account, or they can receive it through membership in any groups that have this permission. However, any time a user is explicitly denied a function or access, deny settings override any permissions. The end result is that even if a user belongs to a group with permission to an area, but is explicitly denied this permission, the user will not be able to work in this area of the software. Similarly, if a user belongs to a group that is denied permission, the user will not be able to work in this area of the software even if the user is granted permission on the user’s individual account. If a user is neither granted nor denied permission to a function through either the user’s individual account or group memberships, the user will not have access to that function of the software. Security permissions are organized by logical groups, called “Areas:”. Some areas are related to optional modules, and are only available if these modules are purchased and activated. Each security area contains permissions, called “Doors:”. In order to deny permission to modules that have multiple points of entry, you must deny each “Door”. For example, to deny permission to Work Orders, you would need to deny the “Work Order button” in both the Vehicles and the Toolbar areas. Here is a list of all of the Areas and Doors available: Customers o o o o o Document Attachments o o o o Add/Change/Delete Customers Inactivate Customer Logs Button Vehicles Button WO/Invoices Button Add/Change/Delete Document View Employee Documents View Part Documents View Vehicle Documents Drop Menu o o o o o o o Backup Database – ability to create a backup file of the database (accessed under the File menu) Batch Meter Update From Lists Menu – allows access to launch function from the Lists menu (requires permission to access Lists menu) Change Drop Down Lists – add / modify drop down list entries (for example “Fuel Type” and “Meter Type”) Custom Query Wizard – ability to add / modify / execute custom queries on reports Database Tools – check database integrity, rebuild keys, recomputed statistics and change the database Read-Only account password. ExportDdata – ability to export data tables (accessed under the File menu) Global Company Configuration – configure sites, groups for sites, inventory cost method, reminder settings, and currency conversion settings. (Requires Site Setup permission to have access) 102 Truck Tracker ® Software E-mail Configuration o Employee Certifications o Add/Change/Delete Expense Records Fuel o Add/Change/Delete Employee Clear Warnings Employee Certifications button Employee Licenses Button Employee Physicals Button Employee Training Button Inactivate Employee View Sensitive Employee Information Expenses o Add/Change/Delete Employee Training Employees o o o o o o o o Add/Change/Delete Employee Training Employee Violations o Add/Change/Delete Employee Physicals Employee Training o Add/Change/Delete Employee Certification Employee Physicals o Add/Change/Delete E-mail Configuration Add/Change/Delete Fuel Record Parts Inventory o o o o o o o o o o o o o o Add/Change/Delete Part Record Adjust Quantity Button (Simple) Adjustments (Advanced) Change Parts Usage Button Check Out Non-Inventory Parts Delete Check-In Receipt Button Delete Part Checkout Inactivate Part Record Multi-Site Part Transfers Part Check-In Part Check-Out Part Cross Reference Button Physical Inventory Button PO System Button 103 Truck Tracker ® Software Parts Transfer o o o o o o Purchase Orders o o o o o Add/Change/Delete/Close Purchase Orders Re-Open Closed Purchase Order View All Purchase Orders View Closed Purchase Orders View Completed Purchase Orders PM Schedule o Approve/Change a Transfer Request Force Completion of Transfer Request Part Check In from Transfer Request Part Check Out from Transfer Request Request Parts from Another Site Void a Transfer Request Add/Change/Delete PM Schedule Reported Problems o Add/Change/Delete Reported Problem Service codes o o o o o Service Repair o o Add/Change/Delete Service Codes Inactivate Service Code PM Group Button View Standard Hourly Rate View Standard Hours Add/Change/Delete a Service Show Adjusted Standard Hours Toolbar o o o o o o o o o o o Customer Button Expenses Button Fuel Button – allows access to Fuel screen from the mail toolbar (should be used in conjunction with Fuel button in Vehicles area) Help Button Fuel Interface Button Licensing and Permits Button Parts Check In Button Parts Inventory Button PM Schedule Button – PM schedule button Reminder Button – access to the Reminders screen Reported Problems Button 104 Truck Tracker ® Software o o o o o o o o o Vehicle Licensing / Tags o o o o o o o o o Add/Change/Delete Vehicles Batch Meter Update Button – perform batch meter updates from the Vehicles screen Change Old Meter Fields Clear Warnings Expenses Button Fuel Button – allow access if optional module is activated, should be used in conjunction with Fuel button in Toolbar area Inactivate Vehicle Reported Problems Button – allow access if optional module is activated Service/Parts Button Vehicle Licensing/Tags Button – allow access if optional module is activated Vehicle Logs Button – allow access if optional module is activated, should be used in conjunction with Log button in Toolbar area Vehicle Parts Reference Button – allow access if optional module is activated Vehicle Tires Button – allow access if optional module is activated Work Order Button – should be used in conjunction with Work Order button in Toolbar area Vendors o o Add/Change/Delete Tire Records Vehicles o o o o o o Add/Change/Delete Vehicle Parts Reference Vehicle Tires o Add/Change/Delete Vehicle Logs Vehicle Parts Reference o Add/Change/Delete Vehicle Licensing /Tags Vehicle Logs o Security Button – access to view / modify the user and group security settings Service Code Button – access to the Service Codes screen Service Screen Button Staff Button – access to the Employees screen Tires Button Vehicle Button – access to the Vehicles screen Vehicle Log Button – allows access to Logs screen from the mail toolbar (should be used in conjunction with Daily Log button in Vehicles area) Vendor Button – access to the Vendors screen Work Order List Button – access to the Work Orders screen (should be used in conjunction with the Work Orders button in the Vehicles area) Add/Change/Delete Vendor Inactivate Vendor Work Orders/Invoice 105 Truck Tracker ® Software o o o o o o o o o o o Add/Change/Delete Work Orders Change Actual Hours in WO Service Close work order Credit Parts on Work Order - makes “Credit Item” checkbox available for Parts Used Credit Service on Work Order – makes “Credit Item” checkbox available for Services Override Default Invoice Information Reopen Closed Work Orders Record Work from Outside Sources View All/Closed/Completed Work Orders View The Invoice Labor Rate For WO Service Void Work Orders 106 Truck Tracker ® Software C H A P T E R 1 2 Reminders Truck Tracker allows you the ability to easily view reminders for Preventive Maintenance, Tire Life, Reported Problems, Licensing and Permits, Employee Physicals, Employee Licenses, Employee Violations, Employee Training, and Parts Reorder that will soon be due. To see this list, choose the Reminders button. Preventive Maintenance Reminders The default view is to show PM events coming due for all vehicles, according to the global reminder settings. You can separate this to show only PM events for one vehicle by selecting it in the Vehicle field. Alternately, you can return to the entire list by choosing the “View All” button. Items shown in red are past due or coming due within the global time period. The reminders list is view only. Vehicle Module Reminders There are additional reminders for optional modules such as Incomplete Reported Problems, Vehicle Licensing and Permits about to expire, Tires that are coming close to their expected life, and Employee Physicals, Licenses, Violations and Training are about to expire. 107 Truck Tracker ® Software The Reported Problems reminders will trigger if the problem has not yet been completed. The Vehicle Licensing and Permits reminders will trigger if the expiration date is greater than or equal to today’s date minus the global time period. The Tire Life reminder will trigger if the Tire’s “Put in Service Meter 1” plus the current vehicle meter is greater than or equal to today’s date minus the global time period. Employee Module Reminders The Employee Physicals, Licenses, Violations, and Training reminders will trigger if the expiration date is greater than or equal to today’s date minus the global time period. Reorder Parts Reminder The Reorder Parts reminder follows the same logic as the reorder report. Depending on the reorder type, when the system sees that the part needs to be ordered, it will show a reminder. Reminder Icons Truck Tracker now puts icons in certain lists to highlight the fact that a vehicle, employee, or part has a reminder associated with it. The following are examples of what reminder icons might look like: These additional reminder icons require additional queries and can slow down load time. If performance becomes an issue you can try turning off these icons under the local settings. Email Reminders With the E-mail Reminders feature Truck Tracker can be configured to send an e-mail alert when a new reminder is detected. Currently E-mail Reminders can be set up for each alert in the software. If an alert shows up in the Reminders screen it can potentially generate an e-mail alert. 108 Truck Tracker ® Software To define a new E-mail Reminder select the Lists menu and then choose E-mail Reminders. Here you will see a list of all your e-mail reminders for the site you are currently logged into. To view another sites E-mail Reminders you will need to log in to that site. To create a new E-mail Reminder click the “Add “button in the lower right of the screen. Enter the required Config Name field and the Recipients email addresses. You can manually enter any valid e-mail address or select it from the lists of existing email address already entered into the software. Separate each e-mail address with a semi-colon so the system can identify separate e-mail addresses. There are Included Alerts and there are Excluded Alerts. The Excluded Alerts subtract from the Included Alerts. For example, to email alerts for all the reported problems for this site, add an included alert for Reported Problems and specify All Vehicles. 109 Truck Tracker ® Software However, if I wanted Jon to receive all alerts for reported problems except for vehicles that are in the vehicle group Sales then I would add an included alert for Reported Problems and specify All Vehicles. After that I would add an excluded alert for Reported Problems and select Group Of Vehicles. Then specify which group to exclude from. In this case that would be Sales. Truck Tracker will exclude all vehicles with a group of type Sales while including everything else. You can choose any combination of available alerts to be included or excluded. If you want someone to receive all alerts for just their vehicle, then just select Specific Vehicle and enter the vehicle code for the vehicle. At this point you may have noticed that there is a disabled Employee tab when you are creating a new alert. The reason is that some alerts are employee based and others are vehicle based. PM Reminders, Reported Problems, Licensing and Permits and Tires are vehicle based so you can select from Specific Vehicle, Group Of Vehicles or All Vehicles. Physicals, Certifications/Licenses, Violations and Training are employee based so you can select from Specific Employee, Employee Type, or All Employees. Depending on which Reminder Type you select Truck Tracker will enable/disable the appropriate tab. Finally, when you are creating a new alert to be included there is an option to specify Resend Days. This tells Truck Tracker how long to wait before sending an e-mail notification after it has initially sent a notification of a reminder. In the example above, Truck Tracker will wait seven days before resending the e-mail alert. If the reported problem has been taken care of in that seven day time frame then it will no longer show up in the Reminders window. If it no longer shows up in the Reminders window, then Truck Tracker will not re-send an email for that reported problem even though the seven days are up. Truck Tracker will only re-send the e-mail reminder for the reported problem in the Resend Days time has elapsed and it is still in the Reminders window. Truck Tracker is designed to attempt to send e-mails throughout the day or only once a day. If the emails aren’t being received then open the Email Error Log located at the lower right of the E-mail Reminder screen. It is designed to give you insight into some of the reasons why e-mails may not be getting through. If Truck Tracker has a problem connecting to the e-mail server or has been given a bad e-mail address it will show up in here. If the e-mails are still not being sent contact your network administrator and have them check the server’s application log for messages from the event source “Truck Tracker Service.” If necessary have them contact Truck Tracker Support. 110 Truck Tracker ® Software Truck Tracker allows you plenty of flexibility in configuring when and how often email alerts are sent. You can set it to occur once a day by selecting an e-mail start time and the setting the “Time To Wait Between Each E-mail Reminder” to “24 Hours”. You can also set it to occur every 5 minutes to get a closer to real time alerts. If that is the case then the E-mail Start Time still needs to be set but it doesn’t really matter when you set it. If you have a large number of e-mail configurations you may want to set the wait time to more than 5 minutes. If you have multiple sites the system will process all sites every 15 minutes in the example below: NOTE: When changing any Service settings it may take up to six hours to take effect. 111 Truck Tracker ® Software C H A P T E R 1 3 Vehicle Maintenance History Fuel The Fuel module allows you to track fuel purchases. These purchase records also allow you to update vehicle mileage, current to the last time you purchased fuel. (For directions on interface with other fuel systems using the Fuel Interface Module see Chapter 15) To use the Fuel module, choose the “Fuel” icon from the toolbar or open the vehicle list and choose the Fuel button. To add a fuel purchase record, choose “Add.” (You can modify fuel purchase records by choosing “Change” and delete them by choosing “Delete.” When entering a fuel purchase record enter the vehicle and the fuel vendor. The system will default to the current date and time, but you can override these with accurate dates and times for the purchase. You also must supply the new current vehicle meter 1 value. You can override the previous meter value if it is inaccurate 112 Truck Tracker ® Software for fuel /MPG calculations by checking the override box. The previous meter value is filled in from the last fuel meter fields in the vehicle record form. If you enter in a meter value that is higher than the actual meter value, the system will update the actual meter. If you enter in a meter value that is lower than the actual meter value of the vehicle, the system will not update the actual vehicle meter. If you enter meter value in error that is higher than the current meter on the vehicle you can update the current meter and the previous fuel meter values in the vehicle record form. Supply fuel pricing information, and/or oil information and tax information if appropriate. Daily Logs The Daily Logs module allows you to track daily vehicle mileage and employee drive time, as well as certain FMCSA required fields and IFTA reporting fields. The Logs module also allows you to update vehicle mileage, current to the end of the trip. Reports are also available concerning daily logs. To use the Daily Logs module, choose the “Logs” icon from the toolbar or open the vehicle list and choose the “Daily Logs” button. To add a new daily log record, choose “Add.” (You can modify log records by choosing “Change” and delete them by choosing “Delete.” If you delete a log record, any updates to vehicle mileage remain with that vehicle record.) When entering a log record, choose first the vehicle, and the date of the trip. The system will default to the current date but you can override these with the accurate date of the trip. You can also supply the starting value and current vehicle meter 1 & meter 2 values. These meter values are not automatically populated. If you 113 Truck Tracker ® Software enter in a meter value lower than the actual meter value of the vehicle, the system will accept these records so that you can enter historical records, but will not update the vehicle with the lower meter value. You also have the option recording the following information based on the FMCSA “Hours of Service” Regulations. 1. Hours/Remarks – driver records time and location when driving status changes. 2. Shipments – driver records order numbers, freight and weight of shipments. 3. State Mileage – driver records total miles per state and amount of fuel purchased in that state. 4. Customer Information – record any customer and expense info of the trip. Reported Problems The Reported Problems module allows you to track problems observed for a vehicle, and alert service persons to these problems when they perform work orders. To use the Reported Problems module, it can be accessed either by the Vehicle list or by selecting the “Problems” icon in the toolbar. If accessing by Vehicle list, select the vehicle for which you wish to report a problem. Next choose “Reported Problems.” To report a problem for this vehicle, choose “Add.” The date and time of the report will automatically default to the current date & time, but you can override these if 114 Truck Tracker ® Software appropriate. You must supply a service code relating to the problem, as well as the person reporting the problem. You can also supply meter information at the time of the problem, and any other information about the problem. If a problem has been corrected, you can check this box to designate it as corrected, and it will then show up in the list on the “completed” tab. The same procedure is followed if accessed by clicking on the “Problems” icon in toolbar. However, the vehicle code will need to be entered first when adding the record. If an open reported problem exists for a vehicle, any work order for that vehicle will have a “reported problems” button that will pop-up a list of all open reported problems for that vehicle. When a service code is added to the work order that designates work has been done to fix that problem, the reported problem is automatically moved to “completed” status. Licensing and Permits The Licensing & Permits module allows you to track vehicle licenses and sticker permits, to ensure that you are aware when these items need to be renewed, etc. In order to record a license or vehicle permit, first enter the vehicle module. Next, select the vehicle with a license or permit, and then choose the “Licensing and Permits” button. Finally, choose “Add” to insert a record of a license plate or vehicle permit. 115 Truck Tracker ® Software The only required information for a license / permit record is the application date, or date the item was applied on the vehicle. If you supply an expiration date, the Reminders module will show reminders for items expiring within the time span indicated in your Global Settings. Tires The Tires module allows you to track tire information for each vehicle. In order to record tire information for a vehicle, first enter the vehicle module. Next, select the vehicle for which you want to add tire information, and choose the “Tires” button. Choose “Add” to create a record for a tire. 116 Truck Tracker ® Software Each record requires a tire number. Optionally, you can add any other tire information that is available, including warranty information and cost information. You can receive Tire Life reminders when the tire is reaching the expected life. Tire Life reminders will be triggered as follows: If the sum of the “Put In Service Meter 1” and the “Expected Life” values is greater than or equal to the Vehicle’s current meter 1 value minus the global reminder setting for tire life value, then a reminder is shown. Expenses Truck Tracker allows you to associate various types of expenses with each vehicle. The types of expenses you can add are Fuel, Parts, Service, Licensing, Insurance, Depreciation and Other. To open a list of all expense records, click on the Expenses icon on the toolbar or select it from the Lists menu. To create a new expense click on the Add button and fill out the expense information. You can also add a new expense from the Vehicle Screen as well. Just click on the Expense button to view all expenses for a selected vehicle record. If you enter in a current meter value that is greater than the actual value of the vehicle meter, then the vehicle meter will be updated. If it is lower than the actual value then the vehicle meter will not be updated. 117 Truck Tracker ® Software If you enter in a total meter value while adding an expense record, then it will always get added to the actual vehicle meter value. If you change an expense record later and alter the total meter value, the system will not update the actual vehicle meter value. 118 Truck Tracker ® Software C H A P T E R 1 4 Fuel Interface Module TT Software allows you the ability to import data from external fuel systems such as Gasboy, FuelMaster Plus, Fuelman, Wright Express, Computrol, and PetroVend through the purchase of a separate fuel interface module. The module will allow you to import, review, adjust, and then merge your fuel system data into your Truck Tracker database. Setup and Configuration To run the Fuel Interface module you must first specify the Interface Type configuration in the site settings. Select which system you’re using, and then type the path of the folder (not the data file itself) where your fuel data is located. Alternatively, you can browse to this folder by clicking the ellipse button and navigating to the folder. 119 Truck Tracker ® Software Gasboy (Gasboy for Windows software required) Gasboy for Windows software generates the rawtrans.dat file for 3rd party software interfacing. See Gasboy manual for details on how to generate this transaction file. Default Price per Gallon: rawtrans.dat file does not record price per gallon in transaction data. You can specify the default price per gallon in the configuration options or update individual records before the final import. Position of vehicle ID in transaction file. Vehicle ID is usually located at position 121 of the Gasboy rawtrans.dat transaction file. If not, you can modify this setting. Length of vehicle ID in transaction file. The field length is usually 8. If not you can change this setting. Use Fixed Length Vehicle IDs (with leading zeros). If your vehicle number scheme is such that each is the same length with leading zeros (i.e. 0001, 0002, 0003, 0004, etc.) then check this box and enter the fixed length of your TT vehicle ID field. This is required because the transaction file uses zeros instead of spaces, so by default all leading zeros are ignored. Odometer field has decimal place. Check this box if your transaction file records odometer reading with a decimal place. Default is off. Fuelman Imported as a .CSV file. First record contains column names. No advanced settings required. FuelMaster Plus The only option you need to setup for FuelMaster Plus is whether or not your Truck Tracker vehicle #’s are fixed length with leading zeros (i.e. 0001, 0002, 0003, 0004, etc.). If so the check the proper checkbox and specify the fixed length in ‘Vehicle ID Length’. Wright Express Imported as a .TXT file. First record contains column names. No advanced settings required. PetroVend (Phoenix) The only option you need to setup for Phoenix is whether or not your Truck Tracker vehicle #’s are fixed length with leading zeros (i.e. 0001, 0002, 0003, 0004, etc.). If so the check the proper checkbox and specify the fixed length in ‘Vehicle ID Length’. 120 Truck Tracker ® Software Importing Fuel History To begin importing fuel system data, open the module and select “Process Temp Fuel Data”. This will open a dialogue window in which you can select the particular fuel data file you will import. (By default, the system will ask you to choose a file from the folder you indicated when you configured the Fuel Interface Module, but you can choose a file in another folder location if appropriate.) The process will import all of the transactions from that file into a temporary table where you can review and modify the data before the final import into your Truck Tracker fuel database. This process will verify a number of things, such as the vehicle codes exist, the transactions are in chronological order and the last meter reading is within the daily range. Note: If you want to import multiple files at once, you may select “Process Temp Fuel Data” multiple times. Each time you perform the process, it will merge the data from the file into the temporary table. This also means that you can process the same file twice, so be sure to use care selecting the appropriate files. Once the processing is complete, the records will be divided into three separate tabs to help visualize which transactions have errors and which do not. From here you can delete transactions or change them to remove errors. 121 Truck Tracker ® Software You can delete any errant records by selecting a record in the list and choosing “Delete.” If you wish to clear all of the records in the temporary file, choose “Delete All” (along the lower left corner). This will undo all of your work, at which point you will need to start over. If you choose “Close” (without completing) the list will close but the temporary table will remain intact, holding all of the information and changes you have made. Once you have finished reviewing and modifying the fuel records, choose “Complete Fuel Import”. This will import the temporary fuel table into your live Truck Tracker database. The system will not import records flagged with errors. These records will remain in the temporary table, and you must fix and then import them or manually remove them. Otherwise these records will simply remain in the temporary file. Records flagged with warnings will be imported, but records with errors will not. 122 Truck Tracker ® Software C H A P T E R 1 5 QuickBooks Interface Module To use the QuickBooks Interface Module, you will first need to register the module. (You can register this module when you register the main application, or later on if you’re purchasing it separately.) To register the module, choose “Register Item” from the Help menu. Once you have registered the module, you can begin using it to export your work orders directly to QuickBooks as Invoices. Setup and Configuration Before you can begin exporting data, you must first configure the location of your QuickBooks company file. Indicate this information by going to the File menu and choosing Settings. Select the QuickBooks Interface section. Select which QuickBooks company file you’re using, and then type the path of the folder (including the data file itself) where your QuickBooks company file is located. Alternatively, you can browse to this file by clicking the ellipse button and navigating to the file. 123 Truck Tracker ® Software Note: By default QuickBooks installs itself into the C:\Program Files\Intuit folder in a directory named for the current version of QuickBooks installed. The second setting “Overwrite QuickBooks Customer Details” determines whether or not QuickBooks customer information will be exported and overwritten when an invoice is exported. With this option checked, any changes made to the customer record will be carried over to QuickBooks whenever it is exported as part of an invoice. Preparing to Export the First Invoice 1. Install QuickBooks Foundation Class library (QBFC4_0Installer.exe). This will be found on the installation disc in the ModuleSetup folder, From the Windows start menu, click RUN and then browse the install CD, double click the “ModuleSetup” directory, and then double click the QBFC4_0Installer.exe file. The following example is if Drive E was your CD-Rom. Or it can be downloaded and installing it directly from Intuit software at: http://developer.intuit.com/uploadedFiles/QuickBooks_SDK/QBSDK/Down load/QBFC4_0Installer.exe 2. Open QuickBooks with the same company file selected in the Site Configuration above. 3. The QuickBooks integration requires specific accounts and items to exist in QuickBooks before an invoice can be exported. In the event these objects do not exist, the QuickBooks Integration module will attempt to create these objects automatically. If these objects already exist, then the QuickBooks integration module will validate that the objects are configured properly and display an error message for any that fail this test. These objects are defined as follows: Accounts: Sales Name: Sales Type: Income Description: Sales Services Name: Services Type: Income 124 Truck Tracker ® Software Description: Services Sales Tax Codes: Tax Sales Tax Code: Tax Description: Taxable Sales Taxable: Yes Non Sales Tax Code: Non Description: Non-Taxable Sales Taxable: No Vendors: [Tax1Name] Vendor Name: [Tax1Name] Type: Tax agency [Tax2Name] Vendor Name: [Tax2Name] Type: Tax agency Note: [Tax1Name] and [Tax2Name] will be the actual name of the taxes as set in Truck Tracker. They will not include the brackets. For Example: If Tax1Name was ‘State IL’, then that is the name of the Tax agency that will be created. Items: Part Type: Non-inventory Part Item Name: Part Price: 0.00 Tax Code: Tax Account: Sales Info Type: Non-inventory Part Item Name: Info Price: 0.00 Tax Code: Non Account: Sales Service Type: Service Item Name: Service Price: 0.00 Tax Code: Non Account: Services Part Subtotal Type: Subtotal Item Name: Part Subtotal Description: Part Subtotal Service Subtotal 125 Truck Tracker ® Software Type: Subtotal Item Name: Service Subtotal Description: Service Subtotal 4. To begin exporting the first invoice, bring up the Work Order list screen by clicking on the “WO List” button. Then press the “QuickBooks Export” button to bring up the batch export screen. Along the top are two tabs (Non-Exported and Exported) that specifically relate to the QuickBooks integration. Note: Before an invoice can be exported into QuickBooks, it must be in the “Closed” state to appear in the Non-Exported browse. Also, each record must have an associated Customer, as this is required by QuickBooks. Once the record has been exported, it will move from the Non-Exported tab into the Exported tab. 5. Select the Invoices (Work Orders) that you want to export by double clicking the empty box, or press “Check All”. Then click the “Export to QuickBooks” button. At this time the QuickBooks interface will attempt to connect to the QuickBooks company file. A screen similar to the one that follows will appear: 126 Truck Tracker ® Software QuickBooks now wants you to confirm that Truck Tracker is allowed to access your company file. You determine the level of access for Truck Tracker by selecting a choice from the “Do you want to allow this application to read and modify this company file. Once selected, these settings can later be modified in QuickBooks by going to the Edit->Preferences menu and selecting the “Integrated Applications” section. At this time, the program will then attempt to import the Truck Tracker invoice. In the event a change needs to be made to the work order, it can be re-opened, changed, and re-closed before clicking the “Re-Export to QuickBooks” button. You can review or modify any record by double clicking on it, or by selecting it and choosing “Change.” Exported Data Data exported from Truck Tracker will start from the Invoice and include all aspects shared by QuickBooks. This will include the Customer Information, Tax information, Services, and Parts. 127 Truck Tracker ® Software Customer Information: Company Name, First Name, Last Name, Bill To address, Contact, Phone, Fax, Cell (Alt.Phone) email, Credit Terms, Sales Tax information, and Credit Limit. The connection between Truck Tracker and QuickBooks is the Customer Code and the Customer Name. This is the field that will be compared for customer exports. If the “Overwrite QuickBooks Customer” setting is checked, then all of the above information will be automatically overwritten each and every time an invoice with the associated customer is exported. If this setting is not checked, then a customer record will only be created if it does not exist, but no modification will ever be done. Invoice Information: Invoice Date, PO Number, Credit Terms, Work Order Number, Vehicle Information, Service Line Items, Parts Line Items, Tax information. Vendor Information: Depending on the tax configuration of your organization, several different types of taxing information may appear in QuickBooks. Tax1 and Tax2 will both be exported as needed and created as Tax Agencies in QuickBooks. If a combination of Tax1 and Tax2 items appears, a third Tax item referred to as Tax1 & Tax2 may appear. This is a tax group that contains both Tax1 and Tax2. (See below for more information regarding Truck Tracker and QuickBooks tax information) These vendors will be created automatically. Account Information: QuickBooks will generate two accounts, Part and Service. These accounts will be used to represent Parts sales, and Service Sales. Should these Account names not exist, they will be created automatically. Tax Information In TT software tax information is handled based on the user preferences selected from the work order. These check boxes determine which taxes are applied to Parts and Services. 128 Truck Tracker ® Software As a result of the way QuickBooks handles Taxes, taxes will be handled either as individual line items, or as a group tax that envelops all invoice line items. Individual line items will either be taxed or non-taxed based on the user preferences. Finally, the Tax2 on Tax1 tax is unable to be supported in QuickBooks, and is thus not reflected in QuickBooks. In QuickBooks, customers can be assigned default tax values. But, unfortunately they do not offer as large an ability to select what is going to be taxed and what is not. As a result of this behavior, whenever possible, a customers’ default tax code will be linked to the appropriate tax agency. In the event that QuickBooks cannot handle the tax selection for a particular customer, then a Vendor with no tax agency and a 0% tax rate will be assigned with a generic nickname to assist the user in the event they wish to manually insert line items/work orders in QuickBooks. 129 Truck Tracker ® Software Common Error Messages Error: Class not registered QBFC not installed or registered. Install QBFC4, if you still get the error then there was a problem registering the qbfc4.dll COM server. Seems to happen in Windows Vista/7 because of permission issues on this folder: “C:\ProgramData\Intuit\QBSDK\log”, or when QB is already installed on the machine. You can set the permissions on that folder and install again. Or you can manually register the COM class by running a command prompt (as Administrator) and typing this command: C:\Windows\System32\Regsvr32.exe “C:\Program Files\Common Files\Intuit\QuickBooks\qbfc4.dll” Error: This application’s certificate is expired. If you want to allow the application to log into QuickBooks automatically, log into QuickBooks and try again. Then click Allow Always when you are notified that the certificate has expired. This error happens whenever the QuickBooks interface attempts to export to a company file but has not been granted permission to access the file. To resolve this, launch QuickBooks and make sure you are viewing the company file that you want to use. At this point, when you export it will prompt you for the type of access you wish to allow. Error: Access denied. This application does not have permission to access this QuickBooks company data file. If access is required, the QuickBooks administrator can grant permission through the Integrated Application preferences. Another error caused by the setting restriction. This is the message that will appear if QuickBooks is not running, but permissions are denied in the company file. Like before, go to Edit->Preferences and Find Integrated Applications, and alter the Truck Tracker listed under Company Preferences. 130 Truck Tracker ® Software Error: Access denied by the user. This error happens when a user has selected NO to allowing access to the company file. To correct this problem, open QuickBooks and go to Edit>Preferences and Find Integrated Applications, and alter the application name listed under Company Preferences. 131 Truck Tracker ® Software C H A P T E R 1 6 Document Attachments The system allows you to attach documents to Vehicles and Work Orders, Employees and Violations, as well as Parts Inventory. It stores these documents in a folder defined by you. Once this feature is setup and documents attached, users will be able to view and edit these documents from their computer. Setting up a Document Library There is a separate document library for each site. The document library must be a folder on your computer or network that allows read and write permissions. If a user does not have permission to write to this folder, they will not be able to use the document links feature. NOTE: If the site you are logged into is at another location some of the Document Links may not be available for viewing. This depends on where Truck Tracker is configured to store its Document Library. Viewing the Documents Library You can view all your documents by going to the Lists menu and selecting the Document Links menu item. You can see all of the documents for the site you are currently logged into. The documents are seperated into 3 tabs for Vehicles, Employees, and Parts documents. To open a document simply click on the blue hyperlink. Your system must be able to recognize the file type in order to open it. For example, if you try to open a PDF file and you don’t have Adobe Reader installed, you might not be able to view that document. 132 Truck Tracker ® Software Document attachments are also viewable within the record that they are linked with. To view attachments for a specific employee, vehicle, or part record, open the record by selecting it from its main list and press the Change button. Within the form you will see a Documents tab with a list of documents related to this record where you can Add, Change or Delete document attachments. Attaching a Document To attach a document from the full documents list, first select the tab you want to use and then press the Add button. Supply the required vehicle, employee, or part record and choose the file that you want to attach. Optionally enter a description, category and work order reference. Documents can also be attached directly to a record by opening (Changing) the record selecting the Documents tab. 133 Truck Tracker ® Software C H A P T E R 1 7 Reporting Truck Tracker allows you the ability to easily generate reports so that you can print relevant business information for administration and management. The system comes with many predefined reports. You can also create custom queries for reports, and optionally save these custom queries for repeated use. Reports are available from the “Reports” drop down list. You must have appropriate security permissions to generate reports. There is an additional level of security for the ability to generate appropriate reports for all sites. Certain reports require you to enter a date range for which you are reporting. Type in these dates by hand, or choose from a pop-up calendar. The system will default with a start date of the first day of the month and end with the current date. Detailed reports require you to enter which record (vehicle record, for example) you wish to see detailed information. Choose the record from a pop-up list of records. All reports can be exported from the Print Preview window to either a PDF file or an HTML file. Select the File Menu, choose “Save As”, select the format you want to Export, and specify the location and file name to save as. 134 Truck Tracker ® Software Performing Custom Queries in Reports To perform a custom query report, choose the “Query” tab. By default, the report will include only the current site’s data. In multi-site installations to include the data from all sites, click the “All Sites” check box. Any saved queries will appear in a drop down list. If you regularly run a custom query, you can save it to easily use it again at a future time. To run a new custom query, choose the “Custom Query…” choice in the drop down list. Depending on which report you choose, all available fields for that type of record that you might want to query against are available for query. For example, an inventory report will let you choose any fields in inventory records. 135 Truck Tracker ® Software Once you’ve selected which field you wish to filter by, select how you wish to query this field. Then select how you wish to filter by this field. 136 Truck Tracker ® Software Enter any additional logic to your query to expand or further limit your filter. For example, you might want to add another condition to your query to get a more limited result set, like finding all vehicles at a certain location that are also in a specific group. To add a filter that can further limit the size of the result set, press the AND button. Then create another condition. If you want to add a condition to your query that can expand your result set to include more records, press the OR button. For example you might want to get a result set for all vehicles that are at one location OR another. In this case you need to create 2 conditions with an OR in between. If your query is more complicated than 2 conditions, then you might need to group some of the conditions together. For example, if you wanted to find all vehicles at a certain location that is also in one of two specific groups, then you would want to group all of the OR conditions together. Press the GROUP button and move the OR conditions into the group. Depending on the query you are trying to accomplish you might need to group some conditions together. Once you are done, choose, “finish” and the report will be generated. To allow you to save a custom query for repeat use, the system will prompt you to save a custom query. If you choose “yes,” then you name this query appropriately. 137 Truck Tracker ® Software This query will appear in the drop down list in this report section. The saved query name will also be displayed in the report heading for reference to what type of custom data this report contains. It is recommended that you save all custom queries with a descriptive name. The query description will appear on each page, under the report heading. 138 Truck Tracker ® Software C H A P T E R 1 8 Database Backup and Restore Truck Tracker allows you the ability to perform database functions such as reindexing, backups and restoration from within the program. It is recommended that you perform a backup after you install and register the software. You should also make a backup on a daily basis. If you are running low on disk space you should move your backup files to another storage location. Full Backup To perform a backup, choose the File menu and then choose Backup. To start the backup process, choose Start. This will create a new full database backup file marked with the current system date and time. The backup folder can be changed under the Global Settings section. The SQL Server service will create the backup file at this location as long as it has permissions. The SQL Server service is creating the backup file, so the location is relative to the server, and the user account permissions from this service are assumed (the default account is Network Service). External Backup In most cases it is sufficient to have your external backup software simply copy the SQL Server backup folder and let the TT software create the backup files. If you want to manually perform a SQL backup operation yourself you need to supply a server login with database backup permissions. The SQL Server login account is named “TruckTrackerRead”, and the default password is “TruckTr@ck3rR3@d”. The database is named “TruckTracker” (no space). This password can be changed from the File menu, Database Tools section. It’s recommended that you change the password for security. 139 Truck Tracker ® Software Full Restore To restore the database to a previous full backup, choose the File menu and then choose Restore. Choose a file from the backup log table, or select “Restore from Alternate Location” checkbox to manually locate and restore a backup file. Important! When restoring from an alternate location, the restore path is relative to the SQL Server machine, and the user account that the SQL Server Service is running as must have permissions to read from that folder. If you experience any problems with a backup or restore operation please contact your system administrator. 140 Truck Tracker ® Software Automatic Backup Service TT Software comes with the ability to schedule daily automatic backups. backups will be processed and saved according to the Global Settings. The Choose the days of the week and time of day to create a full backup. The Number of Days to Retain Backups determines how long Truck Tracker will wait before purging old backups. If you set it to zero it will not delete old backups. 141 Truck Tracker ® Software C H A P T E R 1 9 Importing, Exporting, and Emailing Data Importing Data Before importing data into the system you should create a new database backup file and make sure no other users are entering data in the system. The reason is because if you want to remove the imported data and start over, you must remove each imported record one by one. It is much easier to simply restore the database to a point just before the import process. The data must be in a comma separated text file (*.csv). Strings should be quoted if the data contains any commas. Multiple site import is not supported. The import will associate the records with the site that the user is currently logged on to. Vehicles, vendors, employees and parts lists must be imported separately for each site. Service codes are global to the entire company and can be imported once for all sites. It helps to have the field names in the first row when mapping the target fields. If the field names are included in the first row of the import file, you can press the “Auto” button to attempt to automatically map the fields according to the field name. Otherwise the field will be referenced by field number. Click on the “Next” button to preview the records in the imported file. 142 Truck Tracker ® Software Choose the field from your import file on the left and then choose the target field on the right that you want to assign to. Press the “Assign” button to assign the field from the import file to the target database field. Press the “Unassign” button to un-assign the field. To specify the data type and format of the imported field, select the field and press the “Picture” button. Now enter @N12.2 for numeric and decimal fields, and @S30 for alphanumeric data. For date and time fields, enter the correct format according to your requirements from the data format codes below. Data Format Codes (also known as picture tokens) define the way a field displays when a file is imported into or exported out of Truck Tracker software. There are six types of Data Format Codes: Numeric and Currency, Scientific Notation, Date, Time, Picture Patterns, and String. Both the import and the export screens have a Picture button where Data Format Codes can be defined. Below are examples of different Data Format Codes: Numeric and Currency Codes @N All numeric and currency codes begin with @N. Here are some examples: Numeric Result Format @N9 4,550,000 Nine digits, group with commas (default) @N_9B 4550000 Nine digits, no grouping, leading blanks if zero @N09 004550000 Nine digits, leading zero @N*9 ***45,000 Nine digits, asterisk fill, group with commas @N9_ 4 550 000 Nine digits, group with spaces @N9. 4.550.000 Nine digits, group with periods Decimal Result Format @N9.2 4,550.75 Two decimal places, period decimal separator @N_9.2B 4550.75 Two decimal places, period decimal separator, no grouping, blank if zero @N_9'2 4550,75 Two decimal places, comma decimal separator @N9.'2 4.550,75 Comma decimal separator, group with periods @N9_'2 4 550,75 Comma decimal separator, group with spaces, Signed Result Format 143 Truck Tracker ® Software @N-9.2B -2,347.25 Leading minus sign, blank if zero @N9.2- 2,347.25- Trailing minus sign @N(10.2) (2,347.25) Enclosed in parens when negative Dollar Currency Result Format @N$9.2B $2,347.25 Leading dollar sign, blank if zero @N$10.2- $2,347.25- Leading dollar sign, trailing minus when negative @N$(11.2) $(2,347.25) Leading dollar sign, in parens when negative Int'l Currency Result Format @N12_'2~ F~ 1 5430,50 F France @N~L. ~12' L. 1.430.050 Italy @N~£~12.2 £1,240.50 United Kingdom @N~kr~12'2 kr1.430,50 Norway @N~DM~12'2 DM1.430,50 Germany @N12_'2~ mk~ 1 430,50 mk Finland @N12'2~ kr~ 1.430,50 kr Sweden Scientific Notation Format Codes @E All scientific notation codes begin with @E. Here are some examples: Code Value Result @E9.0 1,967,865 .20e+007 @E12.1 1,967,865 1.9679e+006 @E12.1B 0 @E12.1 -1,967,865 -1.9679e+006 @E12.1 .000000032 3.2000e-008 @E12_.4 1,967,865 1 967.865e+003 144 Truck Tracker ® Software Date Format Codes @D All date codes begin with @D. Here are some examples: Code Format Result @D1 mm/dd/yy 10/31/59 @D1>40 mm/dd/yy 10/31/59 !This defaults to 1959 @D01 mm/dd/yy 01/01/95 @D2 mm/dd/yyyy 10/31/1959 @D3 mmm dd, yyyy OCT 31,1959 @D4 mmmmmmmmm dd, yyyy October 31, 1959 @D5 dd/mm/yy 31/10/59 @D6 dd/mm/yyyy 31/10/1959 @D7 dd mmm yy 31 OCT 59 @D8 dd mmm yyyy 31 OCT 1959 @D9 yy/mm/dd 59/10/31 @D10 yyyy/mm/dd 1959/10/31 @D11 yymmdd 591031 @D12 yyyymmdd 19591031 @D13 mm/yy 10/59 @D14 mm/yyyy 10/1959 @D15 yy/mm 59/10 @D16 yyyy/mm 1959/10 @D17 Windows Control Panel setting for Short Date @D18 Windows Control Panel setting for Long Date Alternate separators @D1. mm.dd.yy Period separator @D2- mm-dd-yyyy Dash separator 145 Truck Tracker ® Software @D5_ dd mm yy Underscore produces space separator @D6' dd,mm,yyyy Grave accent produces comma separator Time Format Codes @T All time codes begin with @T. Here are some examples: Code Format Result @T1 hh:mm 17:30 @T2 hhmm 1730 @T3 hh:mmXM 5:30PM @T03 hh:mmXM 05:30PM @T4 hh:mm:ss 17:30:00 @T5 hhmmss 173000 @T6 hh:mm:ssXM 5:30:00PM @T7 Windows Control Panel setting for Short Time @T8 Windows Control Panel setting for Long Time Alternate separators @T1. hh.mm Period separator @T1- hh-mm Dash separator @T3_ hh mmXM Underscore produces space separator @T4' hh,mm,ss Grave accent produces comma separator Pattern Codes @P All pattern codes begin with the @P delimiter and end with the P delimiter. The case of the delimiters must be the same. Here are some examples: Code Value Result @P###-##-####P 215846377 215-84-6377 @P<#/##/##P 103159 10/31/59 146 Truck Tracker ® Software @P(###)###-####P 3057854555 (305)785-4555 @P###/###-####P 7854555 000/785-4555 @p<#:##PMp 530 5:30PM @P<#' <#"P 506 5' 6" @P<#lb. <#oz.P 902 9lb. 2oz. @P4##A-#P 112 411A-2 @PA##.C#P 312.45 A31.C2 String Codes @S All string codes begin with @S. Here is an example: Code Value Result @S20 xxxxxxxxxxxxxxxxxxx xxxxxxxxxxx !A 20 character string field Exporting Data Choose the fields on the left that you want to include in the export file. Press and hold the CTRL key to select multiple fields or the SHIFT key to select a range of fields and press the “Add” button. To remove a field from export fields, select the field and press remove. You can shift the order of the fields by pressing the “Shift Up” and “Shift Down” buttons. 147 Truck Tracker ® Software It is usually best to select “Include header record with field names” so that the first record of the export file has a header record with the field names. To change the format of the exported data, highlight the field and press “Picture” button. Then enter the correct picture token. Import / Export Jobs Once you have an import or export process ready to run, you can save the settings as a template by pressing the “Jobs” button, then clicking “Add”, entering the Job Name and finally pressing Ok to save. You can modify or remove this template at any time. To quickly apply a saved Job to your process, press the “Jobs” button, highlight the template you want to use, and press “Select”. This will apply the settings and save you from reconfiguring the entire process. Exporting and Emailing Data using the “Send To” Button When you press the “Send To” button (on the bottom left side under each list), you can choose to export that list in a number of ways. 148 Truck Tracker ® Software Choose “Printer” to print the list directly to one of your printers as a report. Choose “File” to export the list to the chosen Document Format. Choosing “Email” will export the list to the chosen Document Format and automatically attach it to an email. You must supply an email address to continue sending the list to an email attachment. If you have already configured your email settings you can press the “Send” button and it will be sent automatically. If you need to configure these settings check the box “Configure Email Settings”. Below is a screenshot of the Send Email Options window. If you are using Microsoft Outlook and it’s currently running on your desktop then select “Use MS Outlook” option in the bottom left corner. Otherwise you need to enter your SMTP server address, port number, username, password, and optional security settings. You can have this pre-fill on all workstations to the same SMTP server settings by enabling the setting “Pre-Fill Local SMTP settings” under File->Settings->Email Settings. 149 Truck Tracker ® Software Specify a “From” field for the email. Usually this needs to match the email address from which the mail will actually be sent. “Email To” will be pre-filled from the previous screen; you can add more addresses separated by commas or a semi-colons. Subject will be pre-filled based on the list you are sending. The attachments list will be set to the temporary export file generated for this email. You can add attachments here if you like by pressing the ellipse button (…). You can also change the email text before it is sent. Reading Data directly from SQL Server Truck Tracker includes an SQL Server Login account with read-only and backup permissions on the database. The SQL Server login account is named “TruckTrackerRead”, and the default password is “TruckTr@ck3rR3@d”. The database is named “TruckTracker” (no space). This password can be changed from the File menu, Database Tools section. It’s recommended that you change the password for security. 150