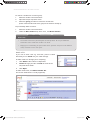
1
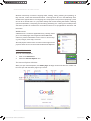
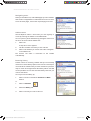
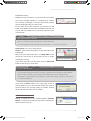
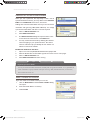
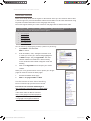
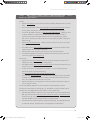
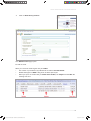
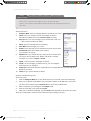
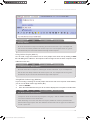
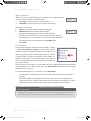
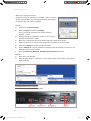
NCTE PROFESSIONAL DEVELOPMENT
GETTING STARTED
MODULE
Getting Started Module 2 the Internet and Email.indd 1
2 THE INTERNET & EMAIL
15/03/2012 14:14:11
Getting Started Module 2 the Internet and Email.indd 2
15/03/2012 14:14:32
Module 2
The Internet and Email
Getting Started Module 2 the Internet and Email.indd 3
15/03/2012 14:14:32
Getting Started Module 2 the Internet and Email.indd 4
15/03/2012 14:14:33
Published by
The National Centre for Technology in Education
National Centre for Technology in Education (NCTE)
Dublin City University
Glasnevin
Dublin 9
Tel: +353 1 700 8200
Email: [email protected]
Web: www.ncte.ie / www.scoilnet.ie
Copyright © National Centre for Technology in Education 2012
Permission granted to reproduce for educational use providing the source is acknowledged.
Copying for any other purposes prohibited without the prior permission of the publisher.
Please note:
•
Screenshots used in this manual may appear different to those on computer
screens used by participants. Variations in versions of the software and differing
operating systems may be in use.
•
The World Wide Web is constantly evolving and content and URLs (Universal
Resource Locators – website addresses) change over time. It is possible that the
content located at some of the URLs listed throughout the manual may change
over time.
Throughout this module, reference may be made to software titles and suppliers of Internet
services. These references are made purely to illustrate or expound course content. Any such
reference does not imply any endorsement by the NCTE of a product or company. The reader
should be aware that typically there are many products and companies providing similar
services in areas related to ICT. Participants should be as informed as possible before making
decisions on purchases of ICT products or services. Please refer to www.ncte.ie for details of
purchasing frameworks available to schools.
Getting Started Module 2 the Internet and Email.indd 5
15/03/2012 14:14:33
GETTING STARTED MODULE 2 THE INTERNET AND EMAIL
INTRODUCTION
This is a 7.5 hour course, designed by the NCTE, and aimed at equipping primary and post
primary teachers with little or no experience of ICT with the basic skills required to effectively use
ICT as a teaching and learning tool.
The basic principles covered in this course can be applied to any area of the primary or post
primary curriculum.
Time is allocated in each module to discussion on how the skills learnt can be used to enhance
teaching and learning, with particular reference to:
•
Literacy
•
Numeracy
•
Special Educational Needs
Traditionally we have thought about literacy as the skills of reading and writing; but today our
understanding of literacy encompasses much more than that. Literacy includes the capacity to read,
understand and critically appreciate various forms of communication including spoken language,
print, broadcast media, and digital media.
(DES 2010 – Better Literacy and Numeracy for Children and Young People)
COURSE OVERVIEW
The course consists of three modules.
Module 1
- Creating and editing a document; using files and folders
Module 2 – The Internet & Email
Module 3
– Digital Presentations
Appendix
- Connecting a Digital Projector to a Laptop
This is the second module of the above course. This module may also be delivered as a standalone
course.
1
Getting Started Module 2 the Internet and Email.indd P1
15/03/2012 14:14:33
GETTING STARTED MODULE 2 THE INTERNET AND EMAIL
NCTE
The NCTE provides a wide range of supports to schools in the area of ICT integration. When you
have completed this course, take some time to explore the NCTE website (www.ncte.ie), especially
the videos contained in the Good Practice section, to see how some teachers are integrating ICT
in their own classrooms.
Please note that this NCTE course manual contains some additional content which your course
tutor may not have time to cover as part of the 3 module course. It is intended that course tutors
will prioritise the basic skills required for you to use ICT as a teaching and learning tool. The
manual should provide you with a step-by-step guide to enable you to reinforce these skills when
you are back in the classroom, as well as providing you with additional content and information
which may be of use to you in the future
2
Getting Started Module 2 the Internet and Email.indd P2
15/03/2012 14:14:33
Getting Started Module 2 the Internet and Email.indd P3
15/03/2012 14:14:33
MODULE 2
THE INTERNET AND EMAIL
SUGGESTED DURATION OF MODULE
2.5 hours
OBJECTIVES
This module will enable the participant to:
•
Browse the Internet and use the Toolbars, Favourites and Links in a web browser to locate
educational resources.
•
Search effectively using appropriate key words for classroom resources and relevant
educational material.
•
Create, send and organise email messages.
•
Share and exchange information using e-mail in the classroom.
•
Recognise how communications software will help integrate ICT in teaching and learning
across the curriculum and can achieve the objectives of all four areas of the ICT Framework.
•
Apply best practice in relation to Copyright, Creative Commons, data protection and the
citing and acknowledgment of ownership of images, text, videos and music sourced online.
•
Consider how to apply Internet Safety best practice when using the Internet in teaching and
learning.
Getting Started Module 2 the Internet and Email.indd P4
15/03/2012 14:14:33
GETTING STARTED MODULE 2 THE INTERNET AND EMAIL
WHY USE THE INTERNET IN THE CLASSROOM?
The Internet has become an everyday tool. Our students have never known a world without it
and so the technology is invisible to them since it has always been there for them. As teachers
our challenge is to maximise the educational benefits of the technology and educate them by
employing the tools and technologies that they have grown up with. The rich resources of the
Internet can help bring about inter-disciplinary and collaborative learning. As well as the need to
engage our students by using the new tools in our classroom we need to help students navigate
safely through the information found on the Internet.
The Internet enables students to:
•
Research, access and retrieve information.
Access dynamic, multimedia interactive resources which encourage student motivation
and engagement.
•
Access a vast amount of resources that are otherwise not available in any one
geographical location.
•
Develop skills related to critical thinking, problem solving, and group work.
•
Publish their work to a real audience worldwide.
•
Experience places individually, in small groups, or as a whole class that would not be
otherwise accessible and become more globally aware.
•
Communicate and collaborate with peers and experts, from other parts of the country or
other countries, in real time.
•
Share information with parents and other students using a school website.
•
Access school related resources outside of school hours.
•
Develop an independence and autonomy that is important for students to achieve in their
learning process
The Internet enables the teacher to:
•
Research, access and retrieve information.
•
Access information instantly and present it to students.
•
Present information to the students using a variety of teaching methodologies to appeal to
the different learning styles of the students.
•
Provide educational opportunities for students based on their abilities and interests.
•
Communicate class activities to the parents and the world.
•
Share expertise with peers and overcome the isolation of a classroom.
•
Find a wealth of resource materials, both educational and administrative.
•
Avail of online continuing professional development
5
Getting Started Module 2 the Internet and Email.indd P5
15/03/2012 14:14:33
GETTING STARTED MODULE 2 THE INTERNET AND EMAIL
“Our students will leave school as capable independent learners, able to use ICT confidently,
creatively and productively, able to communicate effectively, able to work collaboratively, and to
critically evaluate, manage and use information.”
NCCA ICT Vision
Using the Internet and email for learning and teaching will enable the teacher to put the NCCA
ICT Framework into effect to help students become capable independent learners. The ICT
Framework provides a guide to teachers for embedding ICT in curriculum and assessment
across curriculum subjects. Using the Internet and email with students will enable teachers to
support students in all four Areas of the ICT Framework:
Area C - Exploring the potential of ICT to create, communicate, and collaborate to organise
and produce information.
Area F - Understanding and applying knowledge of the functions of ICT including safe practice,
maintenance and ergonomics.
Area S - Developing a critical appreciation of the role of ICT in society and habits which reflect
ethical and responsible use of ICT.
Area T - Using ICT for thinking and learning including managing enquiry, assessing
information, solving problems, and expressing ideas across a range of curriculum areas.
It is important to note that Area T for Level 2 states that a 3rd class primary student should be
enabled “to research, access and retrieve information” using the Internet.
THE INTERNET AND LITERACY SKILLS
For the student the Internet provides a powerful resource for learning as well as an efficient
means of communication. To fully avail of its vast resources students need to be information and
media literate. They need to learn the skills of effective searching, information handling and the
importance of critically evaluating the materials they find. They need to understand the issues
of plagiarism and copyright, particularly in relation to copying schoolwork or downloading music
and videos.
The Internet provides access to subject learning across a vast range of learning areas. Teachers can
help students develop search strategies, and the ability to compare, evaluate and use information
ethically and responsibly. Students can develop their editing skills and learn to write for an
audience. Writing for a real audience for a class wiki, blog or website, as opposed to writing in
their copybook, can develop writing and multi-media authoring skills. It can also encouraging
peer review and provide a real context and purpose for learning.
6
Getting Started Module 2 the Internet and Email.indd P6
15/03/2012 14:14:34
GETTING STARTED MODULE 2 THE INTERNET AND EMAIL
Students will actively use all four language skills; reading, writing, listening and speaking, as
they research, create and communicate online. Learning seems to occur most effectively when
students have opportunities to use language for real purposes. The process of preparing a piece
of work to be shared online is a purposeful activity that involves finding information, reflecting
upon that information, interpreting it and creating something new. Sharing the created product
with others provides an audience for the student and acts as a springboard for discussion and
interaction.
Web Browsers
A Web browser is a software application that, primarily, allows
you to view Web pages and navigate the World Wide Web.
A browser presents information on the screen in various ways.
e.g. text, images, movie clips, sound etc.
The most popular web browsers are shown in the image. For the
purposes of this course we will use Microsoft Internet Explore 8.
INTERNET EXPLORER
To launch Internet Explorer
1.
Click on the Start Button
2.
Select the Internet Explorer icon
The Internet Explorer Window
When you open Internet Explorer, the Home page will begin to load. The browser window can
be set to open with the Home page of your choice.
7
Getting Started Module 2 the Internet and Email.indd P7
15/03/2012 14:14:34
GETTING STARTED MODULE 2 THE INTERNET AND EMAIL
To open a new website
If you know the address of the website you may enter it.
1.
Click in the Address Bar and select the address there
2.
Type www.scoilnet.ie to open the Scoilnet Website
3.
Press Enter or Click on the Go button to the right of the address bar.
If you do not know the address of the website you may use a Search Engine e.g. Google as
described later.
USING THE BROWSER
While browsing the World Wide Web, the Back and Forward buttons allow
you to retrace your steps by moving back to a page visited earlier and then
move forward to pages visited again. They will not remember pages if you shut
down and restart the browser.
The Stop button stops your browser loading a page. Useful, if you accidentally
click on a link before finishing reading a page, or, if a page is taking a long time
to open.
The Refresh button reloads a page. It may happen that the browser stops loading
a page before all the images have appeared. Clicking Refresh will reload the
page along with the missing images.
The Home button is a Link back to the Web page that always opens when you
launch your Internet browser. Normally it is the home page of your Internet
Service Provider (ISP), but this can be changed to any page (including one on your
own computer).
The Search button opens a tool for searching the Web. Searching is dealt with in
more detail later.
The Favorites button opens a folder where links to Web pages you want to visit
frequently are stored. Favorites are dealt with in greater detail later.
The History button opens a folder that stores links to Web pages you have visited.
The History folder is dealt with in greater detail later.
The Print Button sends the current page to your printer. This is useful for printing
short Web pages quickly. Note: A web page does not mean a single A4 page. A
web page could be several pages long.
8
Getting Started Module 2 the Internet and Email.indd P8
15/03/2012 14:14:34
GETTING STARTED MODULE 2 THE INTERNET AND EMAIL
Help
The Help button can be of great assistance if you are having difficulties with any
aspect on using Internet Explorer.
You may also access help by
•
Clicking on the help button on the right side of the
browser toolbar or by
•
Pressing the F1 key on the keyboard
All schools in the Schools Broadband Network, managed by the NCTE, have access to safe filtered
education appropriate Internet content in school.
In addition Scoilnet, www.scoilnet.ie with over 12,000 Irish curriculum classroom-ready resources
and its online reference tools such as Britannica Online, provides safe, reliable and accurate
information and learning and teaching resources. ImageBank, www.imagebank.ie a photo sharing
library created by the NCTE, provides moderated images and photos for homework, project and
classroom use.
When in school using the school’s network, students will be protected from harmful and
inappropriate content. However, we all know that students can access the Internet at anytime in
anyplace. They do not always access it in school or under the supervision of a teacher. So while
a school provides some protection against inappropriate content the best protection one can give
a student is to teach them to be “Internet literate” and to be aware of being safe online.
See www.webwise.ie for Internet Safety advice and lesson plans.
Activity
Tips
Links
Tutor Demo
Open your web browser and type in the following website address: www.ncte.ie
Click on Training
Find out what is Whole School Training.
What is the minimum number of teachers required for a Whole School Training event?
What is the cost of organising a Whole School Training event?
Activity
Tips
Links
Tutor Demo
Open www.ncte.ie/Broadband/Filtering to learn about the six broadband filtering levels. Which
level has your school selected?
The majority of schools are on Level 3 but some schools have moved to Level 4 in order to access
YouTube in school. Discuss with other participants the advantages and disadvantages for your
school in allowing a video sharing site like YouTube to be available in classrooms.
Did you know there is a YouTube Safety Mode?
Read the Webwise article for teachers at www.webwise.ie
9
Getting Started Module 2 the Internet and Email.indd P9
15/03/2012 14:14:35
GETTING STARTED MODULE 2 THE INTERNET AND EMAIL
Activity
Tips
Links
Tutor Demo
Open http://lexipedia.com and enter a word or term you used recently in class that was new to
your students. Can you see how a site like this would appeal to students?
Take a moment to consider ways in which you could use the Internet to support literacy and
numeracy in your classroom.
Hyperlinks
Web Pages are linked to other pages within a website, and to other websites. To navigate to
another web page or website link, you need to click the required option. These links are called
Hyperlinks.
A Hyperlink can be a piece of text, usually underlined, e.g. www.ncte.ie, a picture or a graphic,
which links one web page to another. These links are to be found in all Web pages. When clicked,
a link will automatically retrieve the linked page and open it. When you move the mouse over a
link, the cursor will change from an arrow to a hand.
Changes to
Activity
Tips
Links
Tutor Demo
Using a new website with students
It’s wise to always fully preview a site by clicking on all of its links before using it with students.
This way you can vet its content for age appropriateness and check that it is advertisement free.
Using the Back button
It is easy to ‘get lost’ in a website by continually clicking on links which lead you
further into the site or off on to other sites. At any point you can re-trace your
steps by clicking the Back button on the toolbar. Using the Back button brings
you back along the path you travelled, one step at a time.
You will sometimes find that the Back button is greyed out. When this occurs, it indicates that
you clicked on a link, which opened into a new window or a new tab. To continue your journey
backwards, you must close that new window or tab. You may have opened several new windows.
When you get back to and close the first window you opened, the Back button will again become
greyed out.
10
Getting Started Module 2 the Internet and Email.indd P10
15/03/2012 14:14:35
GETTING STARTED MODULE 2 THE INTERNET AND EMAIL
Navigating menu
When you click this arrow, a list of Web pages you have visited in
that session is dropped down underneath the arrow. To return
to one of these pages, click on the required page in the list.
Address menu
Internet Explorer makes a list of sites you visit regularly or
access by entering the address in the Address Bar.
You can open any of the listed sites by placing the mouse over
the arrow at the end of the address bar:
1.
Click once.
A drop down menu appears.
2.
Use the scroll bar if necessary to see a full list.
3.
Click on the address you wish to visit and it will appear
in the address bar.
The browser will make a connection to the website
automatically.
Browsing history
Another means of accessing websites that you have already
visited is to use the History option in the browser. This keeps a
record of all the websites that you have visited in the past few
days or weeks. The length of time the History will be recorded
can be specified. You can also clear the History whenever you
wish to start afresh.
You may access the History by:
1.
Click on the arrow beside the Forward and Back
buttons
or
1.
Click on Favorites
2.
Select the History tab
3.
Click on the site you wish to return to.
11
Getting Started Module 2 the Internet and Email.indd P11
15/03/2012 14:14:35
GETTING STARTED MODULE 2 THE INTERNET AND EMAIL
Tabbed Browsing
Tabbed browsing is a feature in newer browsers that enables
you to open multiple websites in a single browser window.
You can open web pages in new tabs, and switch between
them by clicking the tabs you want to view.
To view other sites at the same time, just click the new tab
button in the toolbar and then type the address of the site you
want to visit in the address bar. Your home page stays open
in the first tab.
Activity
Tips
Links
Tutor Demo
Opening Scoilnet in a new tab
Click on a new tab and type www.scoilnet.ie into the address bar.
On the homepage under the heading Using Scoilnet click on “10 ways to use Scoilnet”.
Closing tabs is as easy as opening them.
Click the close button that appears on the right side of the
selected tab.
When you have several tabs open, use Quick Tabs to find
the site you want to view or to close sites you are no longer
interested in viewing.
If you have more than one tab open, click the Close Tab
button on the tab you want to close.
Activity
Tips
Links
Tutor Demo
An up-to-date browser
It’s a good idea to keep your browser up to date. Updates are free and offer you best protection
against viruses or software bugs. Indeed you will find that older versions of browsers are
increasingly not supported by the manufacturer e.g. Microsoft no longer supports or recommends
use of Internet Explorer 6.
If you click the Close button in the upper-right corner of
Internet Explorer 8, you will be asked whether you want to
close the tab you are currently viewing, or all tabs. Closing
all tab will close the entire browser window.
THE FAVORITES FOLDER
Placing a website link in the Internet Explorer Favorites
Folder is a useful way to help you keep track of websites you
like and wish to return to.
12
Getting Started Module 2 the Internet and Email.indd P12
15/03/2012 14:14:36
GETTING STARTED MODULE 2 THE INTERNET AND EMAIL
ADDING SITES TO THE FAVORITE FOLDER
When you visit a particular site frequently or find a site of
special educational interest, you may add it to the Favorites
folder and “bookmark” it for future, fast access.
Adding sites to the Favorites folder means you do not need to
remember and type long URLs (Web addresses). You simply
open the Favorites folder and click on the site required.
1.
Click on Add to Favorites icon.
2.
Select Add to Favorites.
3.
The Add a Favorites dialog box opens and the name
of the favourite will be shown in the Name box.
4.
You may rename the favourite by deleting the selected
name and typing in your preferred name. The chosen
name is a label to help you identify the site. It does not
alter the name of the website.
Bookmark ‘Scoilnet for Teachers’
1.
Open www.ncte.ie/upload/ScoilnetForTeachers/player.html
2.
Click the Next button at the bottom right of the screen to view a few pages.
3.
Click on Add to Favorites icon.
4.
Select Add to Favorites for later viewing.
Activity
Tips
Links
Tutor Demo
Organising Favorites Folder
In time your Favorites Folder will become unwieldy with a huge list of websites. It is a good idea to
create sub-folders to group websites into topic areas e.g. SEN, Scoilnet Resources , ICT Courses,
Lesson Ideas for easier use.
MAKE A FOLDER IN FAVORITES
If you wish make a new folder to file your new site:
1.
Click on New Folder and the Create a Folder dialog
box opens.
2.
Enter the Folder Name i.e. Literacy.
3.
Select Create
13
Getting Started Module 2 the Internet and Email.indd P13
15/03/2012 14:14:36
GETTING STARTED MODULE 2 THE INTERNET AND EMAIL
Activity
Tips
Links
Tutor Demo
Creating Sub-Folders in Favorite Folder
Type the following URLs into the address bar and click the Enter key or the Go button.
1.
www.scoilnet.ie
2.
www.imagebank.ie
3.
www.webwise.ie
4.
www.hist.ie
5.
www.german.ie
6.
www.french.ie
Add each site to your Favourites Folder having first created a sub-folder named NCTE Sites.
Opening the Favorites Folder
In time you will create a filing system of sub-folders inside the
Favorites Folder. To open a folder:
1.
Click on the Favorites icon to open the Favorites menu.
2.
Click on the folder you wish to open.
Alternatively you can click on Favorites on the Menubar of
the browser.
14
Getting Started Module 2 the Internet and Email.indd P14
15/03/2012 14:14:36
GETTING STARTED MODULE 2 THE INTERNET AND EMAIL
SEARCHING THE WEB
These are a variety of the search engines on the Internet where you can search for links to sites.
A search engine is a piece of information software that enables users to search the Internet using
keywords and other information such as language and country.
The search engines match your search criteria to web pages that are listed in their index.
Activity
Tips
Links
Tutor Demo
Search Engines
Here are some of the most popular search engines:
•
www.google.ie
•
www.bing.com
•
www.yahoo.com
•
www.altavista.com
•
www.askkids.com
You can search by simply typing a name, a place or a phrase eg.:
1.
Type Dublin in the blank field.
Click on search.
2.
A list of websites, “hits”, will appear with the word
or words you used in your search being highlighted
in Bold font style. They are hyperlinks. The most
relevant matches are listed first. A brief summary
of the contents of the website will appear under the
heading
3.
Click on the hyperlink and it will open your chosen
website.
When you use a general search word or phrase you will get
pages of results. To access the other pages:
1.
Scroll to the bottom of the page
2.
Click on the page number or Next
Use the Internet to learn about Searching
There are sites to help you learn how to search.
See How to use and teach with Google at
http://livebinders.com/play/play_or_edit?id=3803
or
watch some videos on How to search at
https://sites.google.com/site/mrpbps01/.
Google’s own search tips can be found at
www.google.com/support/websearch .
15
Getting Started Module 2 the Internet and Email.indd P15
15/03/2012 14:14:36
GETTING STARTED MODULE 2 THE INTERNET AND EMAIL
Activity
Tips
Links
Tutor Demo
Information overload for students with special educational needs
Information overload created by millions of search results can be quite daunting for anyone, but in
particular students with special educational needs. Some may also find it difficult to navigate their
way through millions of search returns. Show students how to open a result page in a second tab
by right clicking on an individual page link among the millions returned by Google. The original
search page remains opened, and when the website in the new tab has been explored by the
students they can click back to the search results page to explore other websites.
Activity
Tips
Links
Tutor Demo
Google Search Tip
Placing a phrase e.g.“ Primary Schools in Dublin” inside inverted commas will narrow a search in
Google. This can be a helpful tip for students, especially for students who have attention difficulty
and who get frustrated with large amounts of data handling. It can also be helpful to students with
literacy or co-ordination difficulties.
Other searching tips using Google
If you want to be more specific and cut down search time, you can add other keywords or search
words to specify areas or time periods within which to search. As you get used to searching you
will learn how to improve the accuracy of searches, both in terms of keywords to use, time spent
and relevance of the websites found.
•
Using more than one keyword makes the search more specific.
•
Use logical expressions such as AND, OR and NOT. They help to narrow down the search
e.g. Primary AND School will look for pages with both words
Activity
Tips
Links
Tutor Demo
Managing Search Results
Even when you have refined your search you may have a huge number of results pages to read
through so when you find a site that is useful add it immediately to your Favorites Folder by
bookmarking the web address. This way you will not have to remember the site or have to run the
search again in a few days!
For more flexibility you could create a free social bookmarking account and save your useful finds
online so that you can access it on any of your computers or you can share it with your students.
Take a look at the NCTE’s social bookmarking favourites www.delicious.com/ncte and bookmark
any sites you find useful.
When using Google you may use:
•
Search Pages from Ireland, over Time, Sorted by Relevance
•
The Advanced Search option. This allows you to be much more specific in your search
and ensure that there are fewer results and that they are more relevant to your needs
16
Getting Started Module 2 the Internet and Email.indd P16
15/03/2012 14:14:38
GETTING STARTED MODULE 2 THE INTERNET AND EMAIL
You have options on top of the page to search for:
•
Web pages
•
News
•
Book
•
Maps
•
Images
Activity
Tips
Links
Tutor Demo
Using the internet to find literacy resources
•
Use the URLs below to find and save resources for any subject area you teach that you can
use to help develop the literacy or numeracy skills of your students:
1.
www.google.ie
2.
www.irishtimes.com
3.
www.mathszone.co.uk > KS1 /KS2 tab on top of the page
4.
www.literactive.com
5.
www.readwritethink.org.
SEARCHING FOR IMAGES
You can of course click on the Google Image link and enter your keyword into the Image search
box. Millions of images will be returned in an instant, not all will be appropriate for your uses but
more than likely all images will be copyright protected.
1.
Open Google
2.
Click on Images
3.
Enter rabbits in the Image Search box.
4.
Click on any of the 5 million images you like
5.
Click on its file name e.g rabbit.jpg
6.
Note its copyright details.
17
Getting Started Module 2 the Internet and Email.indd P17
15/03/2012 14:14:38
GETTING STARTED MODULE 2 THE INTERNET AND EMAIL
Copyright
It can be difficult to find images that are appropriate, copyright free and freely available for
educational use in schools. As a rule, you and your students must assume an image is copyright
protected. To comply with copyright law, permission must be sought to use an image and the
copyright holder must be credited. Where a copyright holder grants use for educational noncommercial use you and your students must still acknowledge copyright and cite your source.
You should consult your school’s ICT Acceptable Use Policy in regard to copyright and publishing
and teach students their responsibilities in complying with copyright law.
Teaching students that the images and art work they find online are protected by copyright or
trademark and must always be credited and cited is a key digital literacy skill.
NCCA’s ICT Framework and Copyright
Area S of the NCCA ICT Framework outlines how all students from Junior Infants to Junior
Certificate should be “enabled to demonstrate an awareness of, and comply with, responsible
and ethical use of ICT”.
NCCA ICT Framework www.action.ncca.ie/en/ict-framework/opportunities
There are three levels of learning development in the ICT Framework and each level has its
demonstrations of learning in Area S:
Level 1 (Junior Infants to Second Class) will be able to demonstrate their learning in
regard to ownership and copyright when they:
• Develop a concept of ownership of personal work (e.g. understanding why they should
not copy or change work created by others).
• Realise that Internet sites and CD programmes have a creator or author.
Level 2 (Third Class to Sixth Class) will be able to demonstrate their learning in regard to
responsible use of the digital media when they:
• Acknowledge the use of others’ ideas, work and sources in creating personal, class
and group projects (e.g. identifying and recording the name of the author of
information or images copied from the Internet).
• Recognise the reason for copyright laws and apply them appropriately (e.g. in relation
to text, images, audio from Internet sites and other sources).
Level 3 (First Year to Third Year Junior Cert) will be able to demonstrate their learning in
regard to ethical and responsible ICT use when they:
• Demonstrate an awareness of and comply with national and international copyright
laws and fair use guidelines and creative commons in relation to using
copyrighted materials for educational purposes.
• Acknowledge the use of others' ideas and work in creating personal and class projects
by maintaining a bibliography of resources used and acquire permission of use where
required.
18
Getting Started Module 2 the Internet and Email.indd P18
15/03/2012 14:14:38
GETTING STARTED MODULE 2 THE INTERNET AND EMAIL
SAFER IMAGE SEARCHING
If you ask your students to use the classroom computers to search for images for their projects or
classwork you will need to take proactive action to ensure that only age appropriate images are
accessed or viewed by the students.
The danger for children in terms of open image search is the immediacy of images. Children
can be confronted unwittingly with unwanted or offensive images. They accept media content at
face value and may be frightened by media images, whether real or fictional. NCTE developed
ImageBank, a photo library website for safer image searching in schools. Students and teachers
can search for and share photos for educational use. All are free to use once copyright is
acknowledged.
1.
Open www.imagebank.ie
2.
Search for a photo.
3.
Before you click Save Image to download the photo click on the magnifier icon under
the picture to view the Image Details.
4.
Note the copyright holder’s name.
You will find other image sharing websites in the Useful Links area at the end of the manual.
Another option a teacher can use is apply Google SafeSearch even on the teaching computer so
that no inappropriate images of a sexual or violent nature might appear on the digital projector
screen during class.
There are three options related to Google SafeSearch filtering:
•
Strict filtering filters sexually explicit video and images from Google Search result pages,
as well as results that might link to explicit content.
•
Moderate filtering excludes sexually explicit video and images from Google Search
result pages, but does not filter results that might link to explicit content. This is the default
SafeSearch setting.
•
No filtering turns off SafeSearch filtering completely.
Activity
Tips
Links
Tutor Demo
SafeSearch in Google
Learn about Google SafeSeach at www.google.com/support/websearch > Customize your
experience > Search Preferences > SafeSearch Filtering.
Apply SafeSearch and then:
•
Search using Google Image search for images of your local area or for images in your
subject area.
•
Create a folder in Favorites with a suitable name e.g. History Images or CSPE Images etc.
and save the image search results into your sub-folder.
•
Search for three websites to support a topic you are currently teaching that you can use in
your classroom.
19
Getting Started Module 2 the Internet and Email.indd P19
15/03/2012 14:14:38
GETTING STARTED MODULE 2 THE INTERNET AND EMAIL
Encyclopaedia Britannica through Scoilnet
NCTE has made Encyclopaedia Britannica available through Scoilnet in schools. See www.scoilnet.
ie/britannica.shtm Thousands of images, video clips, graphs, diagrams, animations, maps, atlases
are contained in each version of Britannica Online.
•
Open Briticanna
•
Search in any topic that you teach for a Word File, a video clip or a podcast.
•
Open each item to view or to listen to it.
Britannica supplies a Cite Media button with each image to provide ready -made citation details.
Once the source and copyright is acknowledged you and your students may add images and
graphic elements to your word documents, slideshows or worksheets.
Activity
Tips
Links
Tutor Demo
Using Britannica’s Cite Media button
Open Scoilnet, click on Britannica.
Select the Britannica version most appropriate to your students.
Search for a famous person by entering their name in the search box.
Click on any photo or image of the person that is returned by your search.
When the image opens click the Cite Media button at the top right of the screen.
Note the Citation Details which can be quickly copied by you and your students and pasted into a
Bibliography page or Acknowledgements slide. .
Free Home Access for Teachers to Britannica Online
Remember as a teacher you may also use Britannica Online at home once you have registered
for a free Scoilnet Teachers Account. See https://admin.scoilnet.ie/registration/to register.
DOWNLOADING FILES
To download a file from the Internet means to transfer information from a remote computer to
your own computer. There are a number of ways files can be downloaded.
Downloading a single file e.g. Word file
Right click the word file and select "Save Target As" to download.
The Save in dialogue box will open and you can select where you want to download to and can
change the name also at this point.
Click Save and the Download box will open. Click Open if you wish to view the file.
Downloading Images
•
On the Scoilnet Homepage Right click on the Britannica, Access in your school image
and select Save Image As.
•
This opens the Save Picture window. Select a folder in the Save in: box and rename the file.
20
Getting Started Module 2 the Internet and Email.indd P20
15/03/2012 14:14:39
GETTING STARTED MODULE 2 THE INTERNET AND EMAIL
Downloading a Video
Enter the search term ‘free video downloaders’ into Google to see a range of web tools that will
help you download videos from the Internet. You will need a downloader that can work with the
file format of the video you wish to download.
As well as downloading a video one can now Share the link to the video or Embed a video on
the school website or class blog.
Share a Video Link
•
Open www.ncte.ie and in the Good Practice section, go to the Videos page
•
Click Play on any video you would like to Share.
•
Click on the Share button on the right-hand side when it becomes visible.
•
Click the Copy URL button and paste the video link into an email to send to others.
To embed a video you follow the same steps as above but click the Embed button to Copy the
code. If you have a class blog you can paste the code in HTML view into the blog editor.
Downloading an Audio file
While most audio files are now podcasted online there are still occasions to download audio files.
Project Gutenburg provides copyright and free audio books that one can download.
•
Go to www.gutenberg.org/browse/categories/1
•
Click on any title.
•
Click on the blue download arrow in the ‘Download this eBook’ window.
•
When the File Download dialogue box opens select Save.
Unlike elsewhere online Project Gutenberg actively encourages distribution and reusing of its
copyright free books. While it ensures that it shares only copyright free books it also takes care to
explain copyright and the term ‘free’.
From Project Gutenberg,
“The word free in the English language does not distinguish between free of charge and freedom.
Free of charge means that you don't have to pay for the book you received. Freedom denotes that
you may do as you like with the book you received.
This distinction is immaterial if you just want to read a book privately, but it becomes of utmost
importance if you want to work with the book:
You are a teacher and want to use the book in class.
You wrote a thesis about the book and want to distribute the book along with your thesis.
You have a literary web site and want to distribute the book to your audience.
You are a writer and want to adapt the book for the stage.
If the book you got is just free of charge, you may do none of the above things. You may not even
make a copy of the book and give it to your best friend. But if the book you got is free as in freedom
you may do anything you like with that book. Clearly free as in freedom beats free of charge.
Fortunately almost all Project Gutenberg ebooks are free of charge and free as in freedom.”
Source: www.gutenberg.org/wiki/Gutenberg:No_Cost_or_Freedom
21
Getting Started Module 2 the Internet and Email.indd P21
15/03/2012 14:14:39
GETTING STARTED MODULE 2 THE INTERNET AND EMAIL
Automatic download by a Web browser
You might want to download updates for software on your computer, new versions of printer
drivers for example, special add-ons for packages like Microsoft Word, games, anti-virus software
updates and virus definitions etc. Large compressed files like these, once you give the command
to download, will sometimes decompress and install themselves automatically. These files present
you with options, e.g. where the program will be installed, which you must decide.
Downloading Zip Files
Keeping files sizes to a minimum on the Internet is of vital importance and you will find many large
files available on the Internet are compressed. Zipping files is one method of reducing their size.
Compressed files need special software to decompress them once downloaded. The downloaded
file then needs to be opened and normally instructions are provided on how to proceed.
A Zipped or compressed file has been reduced to its smallest size using specialized software. To
expand or Unzip the file after download you will need a version of the same or similar software.
The current standard for Zipping and Unzipping files is WinZip but there are free programmes
available online. We will work with a trial version here.
•
Go to www.winzip.com
•
Click the Download Winzip button on the WinZip
home page.
•
Click the Download Winzip Now button.
•
You must now decide what will happen to the file. Either
a)
Run the program from its current location
b)
Save this program to disk
•
The first option means the computer will download
and then open and install the file. This means you have
no control over where the file ends up. It is better to go
with the second option; it gives you much more control
over the operation.
•
Select Save this program to disk and click OK.
•
Next you will be asked where to save it; we will save it in
a Web Documents folder on the desktop.
22
Getting Started Module 2 the Internet and Email.indd P22
15/03/2012 14:14:39
GETTING STARTED MODULE 2 THE INTERNET AND EMAIL
•
Once the computer knows where to save the file, it will
begin the download.
•
The File Download window tells you the name of the
file being saved, the Estimated time left
and where the file will Download to.
•
Once the download is complete another window
appears giving you three options.
•
Run will open the downloaded file. It may begin to
install itself, asking a series of questions. Generally it is
best to accept the suggestions made by the software (i.e.
the default settings).
•
Open Folder will open the folder in which the file
is stored while Close will close the Download complete
dialogue box.
Activity
Tips
Links
Tutor Demo
With a partner, complete each of the Internet Skills in the checklist below.
Internet Skills Checklist
Skills
Tick when
done
Open/Close the Browser
Type in a URL/Address
Navigate the Web using links
Navigate the Web using the Back & Forward buttons
Add a Web page to the Favorites Folder
Print a Web page using the Print button (if a printer is available)
Access the History Folder and use it to access two previously visited
Web pages.
Clear the History folder.
Access and add two sites to the Favorites folder.
Organise the Favorites Folder.
Open, play and save Web pages, images and sound files to a folder.
Find specific information using a Search Engine/Web Directory
Download a PDF file, a PowerPoint or Excel file from the Web and
save to your computer.
23
Getting Started Module 2 the Internet and Email.indd P23
15/03/2012 14:14:39
GETTING STARTED MODULE 2 THE INTERNET AND EMAIL
Activity
Tips
Links
Tutor Demo
Literacy
Activities to support Literacy
Primary
•
Explore www.scoilnet.ie to find resources related to literacy development for your class
level
•
Go to the Jenny Eather website http://writingfun.com/writingfun2010.html and look
at some of the activities here. How would you use these in your classroom?
•
Look at the The Week in Pictures on www.rte.ie/news/galleries.html . Working in pairs
or groups children can create stories to accompany these images or create a
summary of the news of the week. Children can use word processing to present
their news or can deliver it orally to the class using the digital projector to display the
relevant image.
•
Explore www.readwritethink.org – identify a resource which you could use to support
literacy in your classroom.
•
Go to BBC Learning http://www.bbc.co.uk/learning/ and search for activities which
support literacy. Save one to your Favourites.
•
Add any of the useful resources you have found to your Favourites folder
•
For Interactive Whiteboard resources selected for their relevance to the Irish school
curriculum, explore www.cbiproject.net
Post Primary
•
Explore the Scoilnet www.scoilnet.ie Resource Finder for activities that support your
subject area. Save one activity to your subject folder.
•
Go to BBC Learning http://www.bbc.co.uk/learning/ and search for activities for your
classroom. Save one to your favourites.
•
Purdue University has a “Writing Lab” for Grades 7 - 12 (our secondary school)
with lots of advice on good quality writing.
See http://owl.english.purdue.edu/owl/resource/677/01/
•
Go to YouTube www.youtube.com and search there using Robert Frost and The Road
not Taken as search terms. Examine a number of the video presentations and save
two in your subject favourites for later use in class.
•
Explore www.french.ie or www.german.ie, listen to podcasts, bookmark any that you
can use with your classes.
The Junior Certificate English curriculum requires that students develop a critical
consciousness with respect to all language use. The following exercise could be used to
examine the use of English across many websites in most subject areas.
•
Ask Third Year students to research a major international news story using RTE news,
BBC news and Fox News www.rte.ie/news, www.bbc.co.uk/news, www.foxnews.com.
Students compare and contrast the language used in the three reports and speculate
why RTE, the BBC and Fox reported the story in a particular way.
•
A similar exercise could be organises using El Pais (Spanish), Der Spiegel (German)
or le Monde (French). www.elpais.com, www.spiegel.de, www.lemonde.fr
24
Getting Started Module 2 the Internet and Email.indd P24
15/03/2012 14:14:40
GETTING STARTED MODULE 2 THE INTERNET AND EMAIL
Activity
Tips
Links
Tutor Demo
Literacy
Using the Internet for Numeracy Development
Numeracy is fundamental for life and to all subject areas – in the exercises below search
for educational sites that will engage your students in an online activity. Find interactive
activities that you could use in class using your digital projector.
Try to find activities that involve giving the mouse and the wireless-keyboard to a student or
group of students and let them demonstrate a mathematical concept using the interactive
activity. If you have an interactive whiteboard, the students can use the pen or touch
features of the screen to interact.
Save the activities in your favourites.
•
Search in Scoilnet ‘Resource Finder’ for suitable Maths or related materials
appropriate to your students’ level, primary or post primary.
•
Go to www.cbiproject.net and search for suitable resources to support numeracy
development.
•
Maths teachers can save the Project Maths and the GeoGebra websites to their
favourites www.projectmaths.ie/, www.geogebra.org/cms
•
In Project Maths enter NCCA and Project Maths into the web browser search box.
Explore the LINKS to useful websites.
•
Explore www.ncca.ie/en/Curriculum_and_Assessment/Post-Primary_Education/
Project_Maths/Links/PM_Links.html. In RESOURCES see the multimedia presentations
on geometry and trigonometry.
•
Science teachers can go to YouTube www.youtube.com and search there using junior
certificate, cabinteely community school, physics, or leaving certificate as search
terms. Choose one video and save it to you favourites.
The Internet and Assessment
The Internet gives you access to millions of lesson plans and assessment interactive, quizzes and
rubrics.
•
Open Resource Finder in Scoilnet and search under any topic you teach for quizzes or
games to assess learning. Bookmark your findings.
•
Open http://edorigami.wikispaces.com, go to Rubrics - Bloom's Digital Taxonomy and
select rubrics that you can use in your teaching.
•
There are free online rubric makers, see http://rubistar.4teachers.org and assessment
tools for teachers http://educate.intel.com/en/AssessingProjects/index.htm
25
Getting Started Module 2 the Internet and Email.indd P25
15/03/2012 14:14:40
GETTING STARTED MODULE 2 THE INTERNET AND EMAIL
Activity
Tips
Links
Tutor Demo
SEN
The Internet and special educational needs
The Internet is a particularly useful tool to support students with special educational needs.
With lots of images, interactivity and colour, it can be a very motivational teaching and
learning tool.
It is important to select websites with these students in mind however and ensure they are
accessible, easy to navigate and well laid out.
If you would like to learn more about web accessibility log on to
http://www.w3.org/WAI/eval/Overview.html
Activity
Tips
Links
Tutor Demo
Discussion Activity
With a particular student with special educational needs in mind, describe how you could
use the Internet in your classroom, in order to support this student’s learning.
Discuss how you will use the Internet in your classroom to support literacy or numeracy.
Share any ideas for classroom activities that you have with the other teachers on this
course.
26
Getting Started Module 2 the Internet and Email.indd P26
15/03/2012 14:14:40
GETTING STARTED MODULE 2 THE INTERNET AND EMAIL
Activity
Tips
Links
Tutor Demo
Subscribe to Scoilnet Newsletter www.scoilnet.ie, see the ready-made Theme Pages for
primary and post primary, open the Irish Schools are Blogging page to see how schools are
using the Internet. On the Homepage under ‘Popular areas’ click on Tools for Teachers. View
some of the Star School websites.
Resources for Teachers
www.etwinning .org
www.teachnet.ie
Internet Safety
www.webwise.ie
www.ncte.ie/InternetSafety
www.ncte.ie/Broadband/ContentFiltering
Free Online WebTools
Google Documents
http://docs.google.com
Microsoft Office Live www.officelive.com/en-GB/
Copyright
Video explaining copyright using Disney clips.
www.cartoonbrew.com/disney/a-fairy-use-tale.html
Fun copyright interactive www.cyberbee.com/cb_copyright.swf
Copyright for Kids www.copyrightkids.org
Citing Sources
Simple layouts from 6 years onwards http://kathyschrock.net/research/works2.htm
Avoid Plagiarism http://kathyschrock.net/research/plagiarism.htm
Fair Use Guidelines for Teachers
http://www.halldavidson.net/chartshort.html
Curriculum and Assessment
www.ncca.ie (have a look at the online curriculum planning tool)
www.action.ncca.ie
Safer Passwords
Remember to keep your passwords safe and secure. Try to choose strong passwords
that will not be easily guessed, a mix of capitals and lower case alphanumerics
is best. Always close your browser if you are going to leave your computer
unattended. If asked by Internet Explorer or any other browser if you would like the
browser to remember a password you have just entered only agree if using your
personal computer, never do so on a public or shared computer.
27
Getting Started Module 2 the Internet and Email.indd P27
15/03/2012 14:14:40
GETTING STARTED MODULE 2 THE INTERNET AND EMAIL
INTRODUCTION TO EMAIL
Why use email in the classroom?
•
Email helps to develop literacy and communication skills as students share ideas and
information and interact with others.
•
Communicating with peers is an integral part of the learning process. Email provides a
great opportunity for students to interact with each other, and to collaborate on projects.
Students are motivated by the social experience of exchanging emails with e-pals and
classroom peers.
•
Email encourages and motivates students to write for a real audience of their peers
instead of merely composing for the teacher.
•
Unlike worksheets and drills, writing to peers with email creates authentic learning
experiences, providing deeper learning and encouraging higher-order thinking skills.
•
Email facilitates collaboration between students and between teachers and is an
effective communication tool between home and school. Homework may
be assigned and completed projects transferred between home and school using email.
•
By using mailing lists, teachers have access to colleagues with similar interests outside of
their own school. This allows them access to shared information.
•
Students and teachers may exchange images, sound files or video using attachments.
•
Students can request information and receive responses quickly using email.
•
Email is a ‘greener’ form of communication as it reduces the amount of paper used.
Activity
Tips
Links
Tutor Demo
Email and literacy
Open www.ncte.ie, go to the Good Practice section and click on Videos and watch the
Email to Teddy video.
Can you think of some ways in which using email may support the development of literacy
in your classroom?
Share your ideas with the other participants.
WHAT IS EMAIL?
Email is electronic mail sent using the Internet. It is free, fast, global and easy to use.
When sending a letter, using traditional mail, sometimes referred to as ‘Snail Mail’ to distinguish
it from email, you have to know the address to send it to.
To send an email you must also know the recipient’s email address. The ‘snail mail’ postman can
sometimes deliver a letter even though the address is inaccurate or incomplete but with email
you must have the complete address and type it correctly, including all the punctuation. The email
message will not be delivered if the address is not correct.
28
Getting Started Module 2 the Internet and Email.indd P28
15/03/2012 14:14:40
GETTING STARTED MODULE 2 THE INTERNET AND EMAIL
An email address
If you have an Internet account, you will have an email address, a username and a password.
The address is made up of a user name and the name of the Internet service provider.
[email protected]
•
The username is in front of the @ symbol
•
The service provider is after the '@' symbol
(gmail.com in the case above.)
•
Do not be tempted to correct spelling mistakes in somebody’s address.
•
Spaces never form part of an email address.
The @ symbol
Hold down the Shift key and press the @ key.
What is Gmail?
Gmail is a free, search-based webmail service. Gmail makes it
easy to locate messages. Gmail includes over 7 GB of storage
space and it’s free.
To Sign up for a Gmail Account
To create a Gmail address:
1.
go to http://mail.google.com/mail/signup
or
Click on Sign in on the Google search page
www.google.ie
2.
Select Create an account now
3.
Complete the form with your account details
29
Getting Started Module 2 the Internet and Email.indd P29
15/03/2012 14:14:40
GETTING STARTED MODULE 2 THE INTERNET AND EMAIL
4.
Click on Show me my account
Your Gmail account page opens.
To read an email
When you receive an email it goes into your Inbox.
•
The number in parentheses (3) indicates the number of unread emails.
•
Emails that appear in Bold writing have not been opened yet.
•
When you open an email it tells you name of the sender, the subject and the time the
message was sent.
30
Getting Started Module 2 the Internet and Email.indd P30
15/03/2012 14:14:41
GETTING STARTED MODULE 2 THE INTERNET AND EMAIL
Activity
Tips
Links
Tutor Demo
Open an email
Click once on any email in your Inbox sent to you by the Gmail Team.
Open it, read it and then click the Back to Inbox link above the opened email to return to
your Inbox.
Gmail Overview
1.
Compose Mail: Click on Compose Mail to write and send an email
2.
Inbox shows your emails you have received (the number in
parentheses indicates how many unread emails you have).
3.
Starred shows you only messages you've marked with a star (use
stars to mean whatever you'd like).
4.
Chats: lists your archived Chat conversations.
5.
Sent Mail shows messages you've sent.
6.
Drafts houses messages you've started and saved to work on later.
7.
Customized labels show labels you've created
(e.g. 'Coupons' or 'Travel')
8.
All Mail shows you almost all of your mail; you'll see content from
your Inbox, Starred, Chats, Sent, Drafts, and all your archived
messages; you won't see Spam or Trash.
9.
Spam is where suspicious messages are stored.
10.
Trash is where messages you delete end up; you can empty the
trash whenever you feel like it.
11.
Contacts lists the email addresses of people you've corresponded with; you can add more
details as you see fit.
12.
Tasks lets you enter and track to-do lists.
Sending and Receiving mail
To send an email
1.
Click the Compose Mail link on any Gmail screen (it's on the left, under the Gmail logo).
2.
Enter your recipient's email address. You can type the address in the 'To:' field. Later when
you have some contacts in your Contacts list you can find the address there.
3.
Enter a subject for your message in the 'Subject:' field.
4.
Write your message in the large blank field.
5.
When you’ve finished composing, click the Send button (located just above the 'To:' field).
You'll see a confirmation at the top of the window that your message was sent.
31
Getting Started Module 2 the Internet and Email.indd P31
15/03/2012 14:14:41
GETTING STARTED MODULE 2 THE INTERNET AND EMAIL
Activity
Tips
Links
Tutor Demo
Message Subjects
All emails should have a subject line indicating the content of the email. Try to use subject lines
that are clear and directly related to the content of your mail. Your recipient will see at a glance
the relevance of your mail and this should encourage a faster response.
Using Carbon Copies (Add Cc)
You can send a copy of an email to one or more people at the same time by clicking on Add
Cc and adding their addresses. All recipients of the message will see the other recipients’ email
addresses in this case.
Activity
Tips
Links
Tutor Demo
Your Data Protection Responsibilities
All emails should have a subject line indicating the content of the email. Try to use subject lines
that are clear and directly related to the content of your mail. Your recipient will see at a glance
the relevance of your mail and this should encourage a faster response.
Using Blind Carbon Copy (Add Bcc)
If you're sending a message to several people and want to hide each recipient's email address,
you can use the blind carbon copy feature (Bcc).
1.
Click on Add Bcc.
2.
Enter the email addresses that you do not want to display to the recipients in the Bcc field
Activity
Tips
Links
Tutor Demo
Your Data Protection Responsibilities
Compose an email and send to three participants in the group. Add one address to the To: field,
one to the Cc field and one to the Bcc field.
When forwarding an e-mail to more than one recipient, address the e-mail to yourself and Bcc:
(Blind Carbon Copy) everyone else. The addresses entered as Bcc will not appear on the delivered
e-mails. Try this now.
32
Getting Started Module 2 the Internet and Email.indd P32
15/03/2012 14:14:42
GETTING STARTED MODULE 2 THE INTERNET AND EMAIL
Reply to an email
When you receive an email message you can reply to the message rather than
having to enter the address and subject again.
1.
Click Reply to reply only to the message sender, or
2.
Reply All to reply to everyone who received the message.
To forward a message
1.
Open the email and select the message to forward.
2.
Click Forward from the bottom of the message.
3.
Enter the email address(es) to which the email should be
forwarded, and add any notes in the message field. If the message
has attachments, you can choose not to forward them by deselecting
the checkbox next to the filename below the Subject field.
4.
Click Send
Conversations
Gmail groups all replies with their original message, creating
a single conversation or thread. In other email systems,
responses appear as separate messages in your inbox so you
may have to go through all your mail to follow the conversation.
In Gmail, replies to replies (and replies to those replies) are
displayed in one place, in chronological order. This makes it
easier to understand the context of a message and to follow the
conversation thread.
When you open one message in a conversation, all of your related messages will be stacked on
top of each other, like a deck of cards. This is the Conversation View. The newest message is
always the one you see first.
To see all the messages in a conversation, just click Expand all.
•
A conversation will break off into a new thread if the subject line of the conversation is
changed.
•
When participating in an ongoing e-mail "conversation," don't start a completely new
e-mail each time you respond. Either continue the conversation or if creating a new mail
Include some content from the last email to provide context for the conversation.
Activity
Tips
Links
Tutor Demo
Discussion Activity
Consider how email could be used in your classroom to enhance the learning experience for students
with special educational needs. Share any ideas you have with the other teachers on this course.
33
Getting Started Module 2 the Internet and Email.indd P33
15/03/2012 14:14:42
GETTING STARTED MODULE 2 THE INTERNET AND EMAIL
Contacts
1.
Click Contacts along the left side of any page.
2.
Click the New Contact button in the top-left corner of
the Contact Manager.
Enter your contact's information in the appropriate fields. Any
information you add will save automatically.
You can enter additional contact info by clicking the Add dropdown menu. You may also add an image of the contact if you
wish.
Email addresses are automatically added to your Contacts
list each time you use the Reply, Reply to all, or Forward
functions to send messages to addresses not previously stored in
your Contacts list. If these addresses don't appear immediately,
try waiting a few minutes or signing out of your account and
signing back in.
Each time you mark a message as 'Not Spam,' your Contacts
list is automatically updated so that future messages from that
sender are received in your inbox.
Activity
Tips
Links
Tutor Demo
Using Email
•
Compose an email and send it to other participants in the group.
•
Attach a picture to an email and send it to yourself. Open the attachment.
•
Created new contacts by adding some of your friends’ email addresses.
Editing Contacts
To edit or delete a contact, open your Contacts list by clicking Contacts on the side of any page,
and following the instructions below.
To edit a contact:
1.
Find and click the name of the contact in the Contacts list.
2.
Make any changes you would like to make. The changes will save automatically.
To add a contact to a contact group:
1.
Select the contact in the Contacts list.
2.
Open the Groups drop-down menu.
3.
Select the group you'd like to add the contact to, or select
Create new to create a new group.
34
Getting Started Module 2 the Internet and Email.indd P34
15/03/2012 14:14:42
GETTING STARTED MODULE 2 THE INTERNET AND EMAIL
To remove a contact from a contact group:
1.
Select the contact in the Contacts list.
2.
Open the Groups drop-down menu.
3.
Select the group you'd like to remove the contact from
(boxes will be checked next to the groups that contact is already in).
To permanently delete a contact:
1.
Select the contact in the Contacts list.
2.
Under the More actions drop-down menu, click Delete Contact.
Activity
Tips
Links
Tutor Demo
Email safely
•
The content of emails may be intercepted and read by others. Do not put confidential
information such as credit card numbers in an email.
•
Replying to or unsubscribing to spam confirms to the ‘spammer’ that your e-mail address is
active, and results in even more spam.
Attach a file
If you wish to send a file e.g. music file, picture or Word
document you can attach it to your email message.
To attach a file to a message you're composing:
1.
Click Attach a file under the subject field.
2.
Browse through your files and click the name of the
file you'd like to attach.
3.
Click Open.
To attach another file, click Attach another file.
The icon for attachments is usually a paperclip.
35
Getting Started Module 2 the Internet and Email.indd P35
15/03/2012 14:14:42
GETTING STARTED MODULE 2 THE INTERNET AND EMAIL
Activity
Tips
Links
Tutor Demo
Attachment Tips
When sending an attachment, always include a personal message in the body of the e-mail, so
the recipient will know that it is safe to open. Opening an attachment in your own mail from an
unrecognised source can be dangerous as attachments are frequently used to spread viruses.
To view an attachment in its original format
1.
Open the message containing an attachment.
2.
Click Download at the bottom of the message.
3.
Choose to Open or Save the file.
Opening the file displays the attachment in a new window.
Note: It may not be possible to open certain attachments
if you do not have the corresponding program installed on
your computer e.g.
•
To open the attachment Ceisteanna.pptx you need
PowerPoint or PowerPoint viewer
installed on your computer.
•
File002.pdf must be opened with Adobe Acrobat
Reader. This is a free download.
•
Picture1.jpg may be opened by any image viewing
program.
Activity
Tips
Links
Tutor Demo
Email etiquette
•
Always include a subject line in all e-mails. Choose a subject that will be meaningful to you
and the recipient(s).
•
Be sure to double-check the address that your e-mail is going to. After you click on Send you
cannot retrieve or stop it going to the recipient.
•
UPPER CASE WORDS LOOK LIKE SHOUTING. AVOID USING UPPER CASE WORDS.
•
Avoid using fancy fonts, unusual colours and unique formatting. Use the default settings.
Using Email Projects in School
Email is a very good medium for project-based activities. It makes interaction between schools
possible and helps students’ communication skills. Most of the work is carried out offline and
students share their research and findings through email. The teacher should select partner
schools to suit the educational goals of the project. Be definite about the aims of the project and
make sure others are aware of them.
36
Getting Started Module 2 the Internet and Email.indd P36
15/03/2012 14:14:42
GETTING STARTED MODULE 2 THE INTERNET AND EMAIL
Some basic suggestions if you wish to start or participate in an e-mail project.
•
The teacher is the project leader and sets up contact.
•
Set deadlines. When doing so, remember that projects with a long life are not very
appealing to students.
•
Avoid allowing a project to ‘fizzle out’.
•
Choose simple, straightforward projects to begin with. For example, you might
collaborate with one other school on a ‘question and answer’ style project.
Activity
Tips
Links
Tutor Demo
Email Projects
There are many websites that offer educational exchange opportunities. Examine some of
the email project links and explore the possibility of participating in an online project with
your class.
•
eTwinning:
www.etwinning.net
•
ePals:
www.epals.com
•
eLanguages:
www.elanguages.org
•
Global Gateway:
www.globalgateway.org.uk
•
Global Schoohouse: www.globalschoolnet.org
Successful collaborative international email projects have a number of features in common:
•
Teachers are clear as to the requirements and expected outcomes for the project.
•
Projects have the full support of the school.
•
Projects are co-ordinated by one person.
•
There is a close match of abilities within partner groups in age and linguistic ability.
•
Participants recognise cultural differences between countries, different holiday dates,
school working days and levels of email access.
•
Project partners are found by using educational portals on the Internet and through
contact meetings.
Activity
Tips
Links
Tutor Demo
Using email to support numeracy
•
A simple exercise to get you started using email with your class is to set up a “helpdesk” where students email you with any difficulties in maths or science.
•
Set up a class email address – keep it as simple as possible using Gmail – students
email you with their difficulty. You address this difficulty in the next class without
highlighting the student’s name and encouraging others to do the same.
37
Getting Started Module 2 the Internet and Email.indd P37
15/03/2012 14:14:43
GETTING STARTED MODULE 2 THE INTERNET AND EMAIL
Activity
Tips
Links
Tutor Demo
Using email to support literacy
•
If your students have a school email address you could organise a project where
the students email each other a piece of work with an attachment
e.g. a photo, to a paired student from the same class. You the teacher (also
using your school email address) are cc’d each piece of work. You will need to set
learning objectives e.g. email letter writing, ideas about content etc so that you can
assess them.
•
eTwinning is a good way to approach languages.. Exchanging emails between
students in different schools e.g. between France and Ireland is best managed
by teachers in each school who know each other and their classes well. eTwinning
has an advantage, in that it is on a closed platform, and the teachers
involved in the project have control of the interactions that take place between the
schools.
Activity
Tips
Links
Tutor Demo
Discussion Activity
How will you use email to support literacy or numeracy in your classroom?
Share your ideas with other teachers on this course.
38
Getting Started Module 2 the Internet and Email.indd P38
15/03/2012 14:14:43
GETTING STARTED MODULE 2 THE INTERNET AND EMAIL
NOTES
39
Getting Started Module 2 the Internet and Email.indd P39
15/03/2012 14:14:43
APPENDIX 1
USING A DIGITAL PROJECTOR WITH A LAPTOP
OBJECTIVES
This document aims to enable the participant to:
•
Use a digital projector in the classroom.
•
Attach a laptop to a digital projector or interactive whiteboard.
•
Troubleshoot problems connecting a laptop to a digital projector or interactive whiteboard.
Getting Started Module 2 the Internet and Email.indd P40
15/03/2012 14:14:43
GETTING STARTED MODULE 2
DIGITAL PROJECTORS
WHY USE A DIGITAL PROJECTOR IN THE CLASSROOM
The digital projector is highly effective as a means of instruction or demonstration in classrooms,
computer rooms, staff training, or parents’ groups. Its many uses include:
•
Presenting student work to the whole class.
•
Projecting images in conjunction with wireless mouse/keyboard, wireless slate, a visualiser
or an interactive whiteboard.
•
Displaying and browsing Web sites in a controlled and collaborative manner.
•
Demonstrating or using educational software in a whole class context.
•
Presenting video to student/parent audiences in conjunction with a TV, video or Internet
source.
•
Facilitating whole class teaching by display resources and materials to the class.
•
Providing multimedia content for students with special needs who can particularly benefit
from material being presented visually as it can aid in both information processing and
retention.
•
Enhancing professional development with staff groups via large screen projection.
•
Facilitating video conferencing via large screen group participation.
•
Focusing and engaging the students in the content being displayed.
Activity
Tips
Links
Tutor Demo
Watch the NCTE video Connecting a Fixed Digital Projector to a Laptop at www.ncte.ie/
GoodPractice/Videos. A video Connecting a Portable Digital Projector to a Laptop is also
available. Both videos have sub-titled versions.
For more information on digital projectors see the NCTE Advice Sheet at
www.ncte.ie/ICTAdviceSupport/AdviceSheets/
41
Getting Started Module 2 the Internet and Email.indd P41
15/03/2012 14:14:43
GETTING STARTED MODULE 2
APPENDIX
CONNECTING A DIGITAL PROJECTOR TO A LAPTOP
Note: An interactive whiteboard is connected in a similar
manner.
Step 1: Connecting the VGA cable to the laptop
Ensure that the laptop and digital projector are off before
commencing.
The VGA cable, pictured here, has 15 pins.
1.
Locate the VGA connector / port, on the back of your
laptop.
2.
Insert the VGA cable into the VGA Connection on the
laptop as in the image below.
Note: The wider part of the connection is at the top.
3.
Do not exert too much force or you may bend the pins on the connection.
4.
Hand-tighten the screws on each side of the connector. A poor connection can result in an
intermittent or distorted picture.
Step 2: Digital Projector VGA connector / port
If your digital projector is already mounted on the ceiling, wall or to an interactive whiteboard
you can ignore this step.
If the VGA cable is not already connected to the digital projector then:
1.
Locate the VGA connector/port on the back of the Digital Projector.
2.
Insert the VGA cable into the computer input e.g. Input 1
42
Getting Started Module 2 the Internet and Email.indd P42
15/03/2012 14:14:43
GETTING STARTED MODULE 2
Step 3: Establishing a connection
Once the VGA cable is in place you can turn on the digital projector and then the laptop.
1.
Turn on the projector.
2.
Turn on the laptop.
If you do not have the image of your laptop screen on the digital projector screen when the
laptop has booted up then you will need to press the following key combination to activate a
connection. You will need to press and hold down the Fn (Function) key while pressing and
holding down the appropriate CRT/LCD function key.
Typically, it is a combination of the Fn key and one of the function keys (F1 through F12) on your
keyboard. Depending on your laptop model either, the letters CRT/LCD or an illustration of a
monitor and a laptop, will be on the appropriate function key. Moving between two screens like
this is known as “to toggle”.
Some examples of key combinations:
DELL
Fn & F8
IBM
Fn &F7
Toshiba Fn +F5
Consult your laptop’s documentation for specific information regarding your laptop.
43
Getting Started Module 2 the Internet and Email.indd P43
15/03/2012 14:14:44
GETTING STARTED MODULE 2
3.
Press and hold the Fn key.
4.
Press the CRT/LCD function key.
APPENDIX
• Release both keys. (This may make your laptop display go black. You can get your
laptop screen back by pressing those keys again.)
• Most laptops have three possible display combinations:
o
laptop screen only
o
laptop screen and projector
o
projector only
You cycle through these by pressing the Fn and the CRT/LCD
until you get to the desired
display combination.
Activity
Tips
Links
Tutor Demo
Function Key Combinations
The function key combinations vary by computer manufacturer. Some models have a monitor icon
on the key. You may have to consult your user manual or the Internet for the combination on a
particular make and model of laptop.
www.aitech.com/support/newlapt.html may be of assistance.
THE REMOTE CONTROL
Most digital projectors come equipped with a remote control.
Many of the same functions on the control panel of the digital
projector are also on the remote control.
The most commonly used features on the remote are:
•
Inputs: Choose the same input that your VGA cable is
plugged into in the back of the projector. Input 1 and 2
are usually for connecting to the computer.
•
Volume Control lets you adjust the volume on the digital
projector. VGA cables transmit video only.
•
Standby button when pressed once puts the digital
projector into standby mode. Press the standby button
again if you wish to turn off the projector.
Note: This is the correct way to turn off the projector. The fan
continues to run for some time after turning off the projector in
this way. The fan continues to run to cool down the bulb. Do not
unplug the projector until the fan has stopped.
•
Menu allows access to various controls on the projector.
Most projectors have an ‘eco mode’ and a ‘bright mode’.
Running a projector in ‘eco mode’ reduces the brightness
slightly but it reduces the fan noise and increases the
bulb life.
44
Getting Started Module 2 the Internet and Email.indd P44
15/03/2012 14:14:45
GETTING STARTED MODULE 2
Manually Configure Display
Sometimes it may be necessary to manually configure multiple
displays. This will often vary from laptop to laptop, depending on
the graphics chip and software installed.
Method 1
a)
Navigate to the Control Panel.
b)
Click on Display, and then on Settings.
On this screen you should see two numbered boxes,
labelled 1 and 2.
d)
Clicking "Identify" should flash a number on the screen to
indicate which monitor is which.
e)
Below this is a slider that sets the resolution and colour depth of the output.
f)
Click the monitor (1 or 2) then make changes to the resolution and colour depth.
g)
Click on the Apply button after changes are made.
h)
On the Settings tab, click the monitor icon that represents the monitor you want to use in
addition to your primary monitor.
i)
Select the Extend my Windows desktop onto this monitor check box.
Method 2
a)
Right click on the Desktop.
b)
Select Graphics Options > Output To > (see example below). The options will vary from
laptop to laptop.
CONNECTIONS ON A LAPTOP
Most laptops have the following connections:
45
Getting Started Module 2 the Internet and Email.indd P45
15/03/2012 14:14:46
GETTING STARTED MODULE 2
APPENDIX
USB 2.0
Most laptops come with three to four USB 2.0 ports. They are the easiest means of connecting a
peripheral (mouse, scanner, printer, digital camera) to your laptop. USB ports can also distribute
electrical power and charge many peripherals, including mobile phones.
FireWire (IEEE 1394)
FireWire (IEEE 1394) ports are mostly used to transfer video to and from a video
camera or to connect to a hard drive.
Ethernet Port
This port allows you to connect your laptop to a wired computer
network (LAN) or Broadband high speed Internet connection
via a standard Ethernet network cable.
HDMI Connector
With an HDMI (High Definition Multimedia Interface) port you
can connect your laptop to any HD TV or Digital Projector. The
HDMI cable will carry both video and audio.
eSATA
Used for attaching an external hard drive, eSATA (external
serial ATA) ports are found on a number of business and
multimedia laptops. Portable hard drives are most commonly
used in the eSATA drive but it may also be used as a USB port.
USB Flash Drives
A flash drive may be also called a pen drive, thumb drive, or
memory stick. It is a small storage device that can be used to
transport files from one computer to another.
Flash drives are popular because they can hold a considerable
amount of digital content and are fast, reliable, and portable.
Insert the drive into any USB port on the computer and after a
few seconds the computer will detect it.
Usually an AutoPlay dialogue window opens automatically
offering you options or various actions you may take with the
USB drive.
46
Getting Started Module 2 the Internet and Email.indd P46
15/03/2012 14:14:46
GETTING STARTED MODULE 2
The drive may also be opened by going to My Computer and
clicking on the USB drive.
Activity
Tips
Links
Tutor Demo
Troubleshooting Checklist
If there is no image from the projector:
•
Check that the VGA cable is firmly connected to the digital projector and the laptop
•
Check that the digital projector is turned on and that the bulb is lighting. You will see light
coming from the bulb even if there is no image.
•
Check that you have chosen the correct input on the digital projector. The inputs / source may
be changed by using a remote control or on the control panel.
•
Press and hold down the Function Key, Fn, and press the LCD/CRT function key. Check
for an image on the whiteboard. If no image appears repeat the process twice again.
This usually cycles you through three video output modes, which are "Video to monitor
only", "Video to both monitor and digital projector" and "Video to digital projector only".
47
Getting Started Module 2 the Internet and Email.indd P47
15/03/2012 14:14:47
Getting Started Module 2 the Internet and Email.indd P48
15/03/2012 14:14:47
GETTING STARTED MODULE 2 THE INTERNET AND EMAIL
This course is part of a range of continuing professional
development options for teachers, developed and delivered
49
by NCTE, in collaboration with educational partners.
www.ncte.ie/courses
Getting Started Module 2 the Internet and Email.indd P49
15/03/2012 14:14:47