1
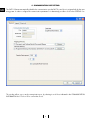
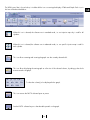
Revision 0.00 dd. november 18th, 2009 GB
USER
MANUAL
USER MANUAL
*
FASTII
INTERFACE
FASTII INTERFACE
*
Fuel/Ignition Adjustment System Tecnology
WARNINGS
GB
This manual has been prepared by SITO GRUPPO INDUSTRIALE S.p.A. for use by qualified personnel.
Obviously, the manual does not provide the complete instructions. So that it is to be understood that all those
that undertake installation and processing operations with FAST II control boxes, must have all the necessary
skill and know -how for operation on motorbikes. This is a basic pre-requisite, and without this and respect of
all the details contained in the manual any attempts to use FAST products on the bike would be rendered inappropriate and/or dangerous for use.
La SITO GRUPPO INDUSTRIALE S.p.A. is involved in a process of constant product upgrading. All the most significant alterations or modifications will be notified to all Authorized SITO dealers, and where applicable will
be included in subsequent editions of this manual.
NOTE: The drawings and specifications may be subject to alteration without prior warning.
SITO GRUPPO INDUSTRIALE S.p.A. will not accept any responsibility for any damage as the result of tampering or mishandling of the FAST II control system.
The FAST II control system has been designed and developed for motorbike competitions, use on public roads
or motorways is not permitted.
Undertake to install the FAST II control box with the engine off, and where necessary disconnect the battery.
Particular care should be taken in the fixture of the control box so as to assure a suitable
connection point.
Particular care should be taken on the position of the wiring to avoid the risk of contact with
very hot parts, and also be sure to avoid excessively tight curvature angles, and avoid any
critical passages, which may cause risk of cable friction or abrasion.
2
Should the software for the Fast interface be sold separate from the control box, the warranty conditions applied on the same will apply as indicated below:
SITO GRUPPO INDUSTRIALE S.p.A. guarantees its products in accordance with current laws. In particular, it covers any conformity defects by means of the repair or replacement of the detective parts within a suitable time limit.
Irrespective of the customer’s request for the repair or replacement of the part, SITO GRUPPO INDUSTRIALE
reserves the right to assess that the remedy requested is actually feasible and that it does not involve any excessive cost in relation to any other remedies.
Repair or replacement will be undertaken at no extra cost to the client, the right remaining of SITO GRUPPO
INDUSTRIALE S.p.A. to examine the defective product.
In order to be liable for warranty cover the customer must have a regular sales receipt and must also notify the
conformity defects within two months of the defect discovery.
The warranty terms have duration of two years from product delivery.
Any parts or products replaced under warranty will become the property of SITO GRUPPO INDUSTRIALE S.p.A.
The warranty terms of SITO GRUPPO INDUSTRIALE S.p.A. do not apply:
a) For parts used in sports competitions of any type;
b) For parts used on bikes used for hire services;
c) For parts subject to wear as the result of their normal functions (For example; rubber support elements, aluminium body)
d) In the event of the improper use or abuse of the part or the motorbike by the owner and/or operator;
e) In the event of not authorized modifications or modifications undertaken by personnel not representing SITO
GRUPPO INDUSTRIALE S.p.A.
f) In the event of parts used incorrectly or for which ineffective maintenance has been undertaken
The general warranty terms will not apply in the following cases:
a) In which the parts show defects as the result of accidents lack of maintenance or overloads
b) Use of the bikes, on which such parts are mounted in a non-compliant manner;
c) The maintenance of the motorbikes on which these parts are mounted is not undertaken in compliance with
the instructions of the use and maintenance booklet
d) Excluded parts as indicated in paragraph 3.1 of the present guarantee
e) Parts excluded due to owner negligence of the obligations specified in paragraph 3.1 of the present warranty.
SITO GRUPPO INDUSTRIALE S.p.A. is liable for damage arising from product defects, in accordance with the
terms of the legislative decree of the Italian Republic 6.9.2005 n. 206 art. from 114 to 127, and excluding
any other kind of liability.
SITO GRUPPO INDUSTRIALE S.p.A. declines all liability in the event that inadequate maintenance jeopardizes
the normal function of the product sold.
3
GB
LIST OF CONTENTS
GB
1. INTRODUCTION . . . . . . . . . . . . . . . . . . . . . . . . . . . . . . . . . . . . . . . . . . . . . . . . .5
2. SYSTEM REQUISITES . . . . . . . . . . . . . . . . . . . . . . . . . . . . . . . . . . . . . . . . . . . . . . .6
2.1 MINIMUM REQUISITES . . . . . . . . . . . . . . . . . . . . . . . . . . . . . . . . . . . . . . .6
2.2 RECOMMENDED REQUISITES . . . . . . . . . . . . . . . . . . . . . . . . . . . . . . . . . .6
3. INSTALLATION . . . . . . . . . . . . . . . . . . . . . . . . . . . . . . . . . . . . . . . . . . . . . . . . . . .7
4. COMMUNICATION PORT SETTING . . . . . . . . . . . . . . . . . . . . . . . . . . . . . . . . . . . .8
5. MAIN SCREEN . . . . . . . . . . . . . . . . . . . . . . . . . . . . . . . . . . . . . . . . . . . . . . . . . . .9
6. MAPPING TABLE . . . . . . . . . . . . . . . . . . . . . . . . . . . . . . . . . . . . . . . . . . . . . . . . .10
7. CONTROL BAR . . . . . . . . . . . . . . . . . . . . . . . . . . . . . . . . . . . . . . . . . . . . . . . . .16
8. GRAPH AREA . . . . . . . . . . . . . . . . . . . . . . . . . . . . . . . . . . . . . . . . . . . . . . . . . . .22
9. MAP SELECTION, SETTINGS, NOTES AND EXPLORE MAPS . . . . . . . . . . . . . . . . . .26
9.1 MAP SELECTION . . . . . . . . . . . . . . . . . . . . . . . . . . . . . . . . . . . . . . . . . . .27
9.2 RUNAWAY SPEED SELECTION . . . . . . . . . . . . . . . . . . . . . . . . . . . . . . . . .27
9.3 PRIVATE MAP SELECTION . . . . . . . . . . . . . . . . . . . . . . . . . . . . . . . . . . . .27
9.4 NOTES . . . . . . . . . . . . . . . . . . . . . . . . . . . . . . . . . . . . . . . . . . . . . . . . . .28
9.5 EXPLORE MAPS . . . . . . . . . . . . . . . . . . . . . . . . . . . . . . . . . . . . . . . . . . . .29
10. GRAPH COMPARISON . . . . . . . . . . . . . . . . . . . . . . . . . . . . . . . . . . . . . . . . . . .31
11. TPS CALIBRATION . . . . . . . . . . . . . . . . . . . . . . . . . . . . . . . . . . . . . . . . . . . . . . .33
APPENDIX I : LIST OF SHORTCUTS . . . . . . . . . . . . . . . . . . . . . . . . . . . . . . . . . . . . . .34
APPENDIX 2 : GLOSSARY . . . . . . . . . . . . . . . . . . . . . . . . . . . . . . . . . . . . . . . . . . . .35
APPENDIX 3 : GENERAL WARRANTY TERMS . . . . . . . . . . . . . . . . . . . . . . . . . . . . . .36
4
1. INTRODUCTION
Dear Customer,
GB
We firstly wish to compliment you on your choice of product and we intend to provide some information that
will enable you to appreciate that you have purchased a truly unique and exclusive product.
In its over 50 years of activity the Sito Group has been involved in ongoing product improvement that has
helped to make it a leader in the field of after-market motorbike exhaust systems.
The most recent development is known as LeoVince Electronic Systems, which is a novel independent department that answers to the LeoVince Research and Development department and has been set up for the development of electronic control boxes for engine control purposes, which are for the present to be combined with its
own off-road bike exhaust systems for 4-stroke carburetor bikes.
In this second stage of the evolution of the FAST project the engineers have concentrated on injection engines
and have succeeded in developing the first product in this “family”, that is, an electronic control box to be used
on the latest scooters, complete with injection powering feature.
In this case, our control box combines with the existing one and the LeoVince Electronic Systems engineers have
fully designed and developed the product in-house, in close collaboration with the engineers responsible for the
development of special exhaust system, thereby achieving a totally effective integrated control box/exhaust system.
The control box operates in conditions that may often become difficult due to mechanical, thermal and environmental strain. Our specialized laboratories have undertaken all the necessary trials to assure a very reliable
product.
After passing the bench test, the final prototypes have been sent to highly reliable and renowned testers in order
for a series of “field” tests to be undertaken. So that after a final tuning operation the product has then been
launched ready for sale.
This product forms the second stage in a diversified project, which thanks to a planned development program
will soon permit us to offer electronic control boxes both for maxi-road bikes as well as for the latest off-road
bikes, that both feature injection powering.
Welcome to the FAST era!
FOR FURTHER DETAILS:
[email protected]
5
2. SYSTEM REQUISITES
GB
2.1 MINIMUM REQUISITES
Processor:
Pentium >_ 1 GHz
Memory:
256Mb
Operating System:
Windows XP Service Pack 2, Windows Vista, Windows Seven
Graphic resolution:
1024 x 768
Port:
USB 1.1
2.2 RECOMMENDED REQUISITES
Processor:
Pentium >_ 1 GHz
Memory:
512Mb
Operating System:
Windows XP Service Pack 2, Windows Vista, Windows Seven
Graphic resolution:
1024 x 768
Port:
USB 2.0
6
3. INSTALLATION
For the installation of the FAST interface we recommend the closure of any other applications that may be open. Insert the
FAST installation DVD included in the kit, wait for the AutoPlay setup by Windows or launch the installation by double
clicking on the SETUP icon present on the DVD, then follow the guided procedure.
A message will notify that the installation is complete. A connection accessible from the START menu will be created by
default as well as a desktop connection.
To open the interface, click twice on the desktop connection or open the program from the Windows start menu.
7
GB
4. COMMUNICATION PORT SETTING
GB
The FAST II Software automatically identifies the communication port the FAST II control box is assigned with by the operating system. In order to configure the communication parameters it is alternatively possible to click on the OPTIONS icon.
This window allows you to set the communication port, by selecting it out of those indicated in the COMMUNICATION
INFORMATION box. Click on OK to confirm the choice.
8
5. MAIN SCREEN
GB
As shown in the following diagram, the main screen display is divided as follows.
F
A
B
D
E
C
G
A)
B)
C)
D)
E)
F)
CONTROL BAR – See chapter 7. CONTROL BAR
GRAPH AREA – See chapter 8. GRAPH AREA
TABLE – See charter 6 MAPPING TABLE
SELECTION AREA – See charter 9 MAP SELECTION, SETTINGS AND NOTES
NOTE AREA– See chapter 9 MAP SELECTION, SETTINGS AND NOTES
TITLE BAR – in the TITLE BAR, if the file is contained in the Hard Disk of the Personal Computer, it will be possible to
see the route and the name of the mapping file being used, or if the mapping file has been read by the FAST II control box, it will be possible to see the wording “Maps read by the Control box”.
G) STATUS BAR – The STATUS BAR shows the functional modes of the Software, and whether it is Standard or
Advanced, together with the ADVANCE BAR for the reading and writing of the mapping files.
Using the main window, it is possible to re-scale the injection table or the area dedicated to the graph, to improve the visibility of one or the other, simply by clicking the left button of the mouse on the separation line between the table and the
graph and whilst keeping the button pressed, drag the mouse upwards in order to enlarge the space dedicated to the
table at the expense of the graph, or downwards to increase the space dedicated to the graph at the expense of the table.
9
6. MAPPING TABLE
GB
The most important part of the FAST II interface is the mapping table that appears at the centre of the video display on
opening the program.
It is used for both fuel and ignition timing adjustment. You can select the table to be displayed through the selector switch
situated at the bottom left corner of the table, as shown in the figure below.
The title bar in the table indicates the current table displayed.
In advanced mode, you can select the injection map of each cylinder as well as a spark advance map for all cylinders.
10
The injection tables consist of percentage values that represent the modification to the amount of petrol injected in relation to RPM and the percentage opening of the throttle valve (TPS).
The various maps show the modification percentage to be applied (with a positive sign to increase the amount of injected petrol and thereby enrichen the air-petrol mixture, and with a negative sign to reduce the amount of petrol injected
and thereby lean-out the air-petrol mixture) as compared to the quantity set by the original control box.
The spark advance table consists of values in degrees and is relative to RPM and throttle position(TPS).
The displayed map shows the modification in degrees relative to the map present in the original control box of the vehicle. A positive value means an increase in the spark advance degrees (advancing the timing), while a negative value corresponds to a decrease in the spark advance of the bike (retarding the timing).
The table shows, all the maps stored in the memory of the control box, according to the map selected in the side menu
under MAP SELECTOR (See Chapter 9. - MAP SELECTION, SETTINGS AND NOTES) as well as in the selector under the
same table.
It is possible to add a column or row by selecting the point at which one wishes to add the line and right-clicking on the
area of the table so that the modification drop-down menu appears. From this drop-down menu it will be necessary to
select the heading TABLE followed by INSERT LINE. A new line will then appear, with an intermediate RPM value between
the selected line and the previous and having interpolated values within it.
To eliminate one or more lines simply select the line or lines to be eliminated and right-click on the relative table area to
permit the display of the modification drop-down menu. It will be necessary to select the entry TABLE on the modification
drop-down menu and then DELETE LINE.
Intervention on the table can be enabled by selection of either an individual cell, one or more columns, or one or more
lines or an area.
By entering a value, the selected value will be applied to the entire selection; moreover, the value set by the PagUP and
PagDW keys on the keyboard may be increased or decreased by a percentage point for the injection tables or by half
a degree for the spark advance table. It is also possible to copy and paste cell blocks on the table using the right button
of the mouse and selecting the copy/paste function of the drop-down menu.
Any of the modified cells will become orange in color to show that it has been modified. The different coloring will remain
until the relative modifications made are saved on the PC or control box.
The bottom left corner of each cell shows the modification entity applied to the cell as compared to the latest saving point.
11
GB
Using the modification drop-down menu, and selecting FORMULA, mathematical calculations can be undertaken on the
selected cells.
GB
On the left part of the FORMULA function window it is possible to select the mathematical operation to be undertaken on
the selected cells. The possible options being: addition, subtraction, multiplication and division.
The right side of the window contains the field that comprises the factor to be used with the selected operation.
On pressing the APPLY key, the required operation is undertaken, using the set factor.
For example the above diagram shows that the addition operation has been selected and a factor of 2 has been set,
thereby on clicking on the APPLY button, the figure 2 will be added to the value previously assumed.
12
The map can also be copied onto a Microsoft Excel work sheet (or that of compatible programs) and vice versa. The quickest solution for the use of this function is selecting the COPY TABLE option from the modification drop-down menu.
GB
Then open a new Microsoft Excel work sheet and use the paste function.
13
Once the Excel map has been copied, the desired modifications can be made. After which, you may select the area to
be copied to the map of the FAST II interface software.
GB
If the RPM column is also selected on the Excel sheet, you will only need to use “COPY” and “PASTE RPM” function found
in the modification drop-down menu. It will no longer be necessary to worry about the selection of the correct RPM area
in the FAST software.
14
This way the FAST II software will automatically proceed to paste the values selected in Excel. The software will then copy
them according to the RPM values selected.
GB
15
7. CONTROL BAR
GB
The control bar includes the icons corresponding to the various functions available in the software. The various control
bars in the software may be reached through the items included in the menu bar. This chapter describes the various control bars available in the software, and the icons listed therein.
The main control bar is the FAST bar, including the most important software functions (e.g. Read FAST, Write FAST, etc.).
Each icon included in the FAST bar is described below:
To load a map file from the Hard Disk of the PC.
To save a map file to the Hard Disk of the PC
To read a map file from the FAST II control box
To send the map file to the FAST II control box
Provides access to he map file properties, from which one can check certain details relating to the file such
as the PRODUCT CODE, the mapping version, the Firmware version etc.
Allows writing the map and firmware to the control box in one operation. This is used to re-configure a control box to be used on a vehicle different from the starting one.
16
To export the tables of the currently displayed map file from the FAST II software to an Excel data sheet.
To enclose the currently displayed map file from the FAST II software to an e-mail message.
Through this icon, the changes applied to the map may be sent to the RAM map of the control box while
working in REAL TIME mode.
To enable or disable the changes applied to a map, while working in REAL TIME mode.
Through this icon, while working in Real-Time mode, the table scrolls through the values automatically, and
tracks the RPM and throttle position the engine is running in currently.
When this icon is selected, the maps displayed in the graph and table are related to position 1 of the map
switch.
When this icon is selected, the maps displayed in the graph and table are related to position 2 of the map
switch.
When this icon is selected, the maps displayed in the graph and table are related to position 3 of the map
switch .
17
GB
GB
This is the EDIT control bar: it includes all the icons required for modifying or editing of a map (e.g. Copy, Paste, Enter
Line, etc.). Each icon included in the MODIFY control bar is described below.
To copy the entire table currently displayed to the Clipboard, including the RPM and TPS columns.
To copy the values of the selected cells to the Clipboard.
To paste to the table the values of the cells saved to the Clipboard.
To paste to the table the values of the cells saved to the Clipboard, by automatically detecting the position of
the cells to be pasted as a function of RPM and TPS, with no need for selecting such cells manually .
To actuate the window of the FORMULA function, where the mathematical operation to be made with the currently selected cells may be chosen.
Inserts a new line between the currently selected line and the previous one. The values assumed by the new
line are obtained through interpolation of the values included in the two adjacent lines.
Removes the currently selected line.
18
The VIEW control bar is shown below; it includes all the icons concerning the display of Table and Graph. Each icon in
this bar will be described below.
When this icon is selected, the software runs in standard mode, i.e. one injection map only is used for all
cylinders.
When this icon is selected, the software runs in advanced mode, i.e. one specific injection map is used for
each cylinder.
This icon allows centering and zooming the graph onto the currently selected cells.
This icon allows displaying the entire graph as a function of the selected columns, by taking up the whole
area reserved to the graph.
To select the column(s) to be displayed in the graph.
This icon restores the FAST II software layout as preset.
Sets the FAST II software layout so that the table prevails on the graph.
19
GB
Sets the FAST II software layout so that the graph prevails on the table.
GB
To save the current layout of the FAST II software or to recover a previously saved layout.
The following TOOL control bar includes the icons concerning various functions of the FAST II software (e.g. Compare
Maps, Options, etc.); each icon in this bar will be described below.
To access the function to compare two maps.
See chapter 10. GRAPH COMPARISON.
To access the function for building a map.
To access the function for calibration of the minimum and maximum values of the throttle valve sensor (TPS).
See chapter 11. TPS CALIBRATION.
To access the window of options, where the FAST II software may be configured under several graphic and
functional respects.
To access the window for updating the firmware in the FAST II control box.
20
Another bar is always in the foreground, i.e. the RAPID ACCESS bar included in the title bar of the FAST II software main
window (at the top right of the window).
GB
Any icon may be added to the RAPID ACCESS bar by simply clicking on the icon to be added with the right button of
the mouse and selecting the item “Add to Rapid Access”. In the same way, any icon may be removed from the RAPID
ACCESS bar: click on the icon to be removed with the right button of the mouse and then select “Remove from Rapid
Access”.
The RAPID ACCESS bar includes by default the following icons, previously described: Open, Save, and Options. The only
new icon included therein is the FAST button which cannot be removed, unlike the other icons.
Press the FAST button to access a drop-down menu, including the following items: “Exit”, “FAST information”, “Guidelines” and “News”.
21
8. GRAPH AREA
GB
The graph area makes it possible to visualize the modification curves made on petrol injection and spark advance as a
function of the TPS. It is also possible to work on the maps by means of the graph area in a similar way to the MAPPING
TABLE.
To visualize the desired graph simply select one or more cells in the map table and the software will display the modification curve/s of the modification applied according to the TPS columns to which the selected cells belong.
As an option, use the column selector in the control bar, under VIEW; for further details, please refer to chapter 7, CONTROL BARS.
Therefore, on the selection of any of the cells in the TPS 25% column, the curve related to that column will be displayed;
if another cell belonging to the 50% TPS column is also added, the curve related to that second column will also be added
to the previous column in the graph area.
The graphs of the various curves always have the RPM values as the “X” axis, while the “Y” axis will always be the percentage value of the modification applied on injection or the value in degrees of the modification applied to spark
advance, function of the map which is currently displayed.
22
The graph display can be modified on both axes, by clicking with the right button of the mouse on the desired axis, holding in the button and dragging the mouse. On the “X” axis the rightward movement of the mouse corresponds to an
increase in the definition of the axis scale, while a leftward movement will result in a reduction in the same. As regards
the “Y” axis, there will be an increase in the detail of the axis display as the result of an upward movement, and a reduction in the same as the result of a downward movement (always holding in the right button of the mouse).
The graph can be translated in any direction by pressing the right button of the mouse on the internal area of the graph,
and whilst keeping the same pressed, by shifting the mouse in the direction to which the graph is to be moved.
23
GB
GB
One or more points may be selected on the table as well as on the graph; to this purpose, click the graph area using the
left button of the mouse and, whilst holding in the button, drag the mouse to create a dashed box. To select the required
points, make sure they are located within the dashed box, then release the mouse button.
The selected points will therefore change color and turn orange.
24
To modify the selected points, use the PgUP and PgDW keys, as for the mapping table, or alternatively the mouse can be
used.
By holding in the CONTROL (CTRL) key on the keyboard and moving the mouse up or down, you can shift all the selected points of the graph in the required direction simultaneously; the mouse pointer will change appearance and take the
form of a double arrow. By shifting the graph upwards, the quantity of petrol injected into the engine will be increased
(enriching the air-petrol mixture) if the currently displayed map is an injection map, or the spark advance will be increased
if the spark advance map is displayed. By shifting the graph downwards, the amount of petrol injected into the engine
will be reduced (leaning out the air-petrol mixture). Otherwise, the spark advance will be delayed in case the displayed
map is a spark advance map.
The map to be displayed may be selected through the selector switch, located at the bottom of the graph.
25
GB
9. MAP SELECTION, SETTINGS, NOTES AND EXPLORE MAPS
GB
Use the right side of the main screen to select the map to be displayed in the table and therefore in the graph area.
In this area it is also possible to select the rev limiter and private map function, it will also be possible to edit the notes
field.
You can also gain access to the EXPLORE MAPS function through the selector switch at the bottom of the side bar.
26
9.1 MAP SELECTION
The map selector makes use of a drop-down menu to permit the selection of the map to be displayed on the injection table
and in the graph out of three possible options.
9.2 REV LIMITER SELECTION
There is a special check box to select whether to enable a procedure for increasing the maximum engine rotation limit
(rev limiter), which has already been pre-set by LeoVince (check box with tick), or whether to disable the procedure and
thereby maintain the maximum rotation speed set by the original manufacturer (check box empty).
9.3 PRIVATE MAP SELECTION
By clicking on the “Protect” word, the PRIVATE MAP function is enabled, which prevents the reading of the maps resident
on the control box by other FAST II INJECTION Software users, that do not have the correct password.
On enabling this function the user will be asked to enter an alphanumeric password consisting of eight digits, and to confirm the same.
On clicking on the OK button the map will be identified as private.
27
GB
GB
To remove this protection it will be necessary to click on the wording “Remove protection” and then to digit the correct
password in the just displayed window.
On attempting to read a mapping file that has been made private from a hard-disk or FAST II control box, the user will
be requested to enter the correct password to enable the reading of the same.
The operation will be successful only on entering the correct password.
9.4 NOTES
This makes it possible to add, visualize and edit the notes present on the map relative to the bike, the exhaust system, the
type of map and its position, etc.
We recommend that you make a note of the information relating to the maps and the modifications made to the same so
as to be able to find the required maps again quickly and easily in the future.
The note section has space for writing over 300 characters.
28
9.5 EXPLORE MAPS
You can explore your own mapping database as well as the mapping file inside as you usually can with Windows
Explorer. Select the mapping file to look through its contents: the file is viewed as a directory, including three further folders corresponding to as many positions of the map switch; each position of the switch includes both the injection map(s)
and the spark advance map.
29
GB
GB
When a map is selected, the preview of the same map is displayed on the bar bottom.
Using the selector located in the centre of the side bar (red circled on the figure beside), you can select three different
preview modes: graph display, table display, and notes field display.
One part of the map previewed with the Explore Maps function, in the table display mode, may be copied to the map
currently used in the mapping table. Simply select the cells to be copied on the preview screen and, through the
Copy/Paste function and after a proper selection of the cells in the Mapping Table, the selected cells will be copied to
the current map.
Moreover, an entire map may also be copied to the Mapping Table. Select a map in the Explore Maps window with the
left button of the mouse and, holding in the left button, drag the icon of the selected map to the Mapping Table. Now,
release the left button of the mouse and the “dragged” map will be pasted to the Mapping Table.
Note: For a correct implementation of the Copy/Paste function, it is essential that the type of the destination map is the same as the starting one. Namely, both maps must be either injection or spark
advance maps.
30
10. GRAPH COMPARISON
Use this function to compare the maps of a single file or of different files.
With the Explore map function, from the left side of the window you can select the two maps to be compared.
The maps may be selected by loading them from the control box, by loading them from one or more files saved on the
Personal Computer or alternatively by a combination of the two. To select the maps, drag them by holding in the mouse
button as long as the pointer is on the holder identified by the letter A or B.
Once the maps to be compared have been selected, it is possible to compare their differences by clicking on the Compare
key.
31
GB
GB
The table will show the result of the difference between the map located in holder A and that located in the B one, subtracting map B from map A.
On selecting a column of the table, the graph area will show an overlay of the curves of the two maps relative to the TPS
value of the selected column. The curve of the map selected in position A will be blue while that relative to position B will
be orange in color.
As in the main window, you can re-scale the table of differences or the area dedicated to the graph in order to enhance
the visibility of one or the other, by simply clicking with the left button of the mouse on the separation line between the
table and the graph, and always keeping the button pressed, dragging the mouse upwards to enlarge the space dedicated to the table at the expense of the graph, or downwards to enlarge the space dedicated to the graph at the expense
of the table.
In the same way, the area dedicated to Explore Maps may be enlarged or reduced by clicking with the left button of the
mouse on the separation line between Explore Maps and the area dedicated to the table and graph and, always keeping the button pressed, dragging the mouse rightwards to enlarge the space dedicated to Explore Maps, or leftwards to
enlarge the space dedicated to the graph and the table.
To escape from the map comparison function and return to the main software display screen, simply click on the Close
key in the bottom right corner of the GRAPH COMPARISON window, or alternatively click on the “X” in the top right corner, as in any other Microsoft Windows application.
32
11. TPS CALIBRATION
For a correct functioning of the maps, we recommend you to verify that, during the operation in REAL-TIME mode, a full
opening of the throttle valve, obtained by turning the accelerator handle completely, is corresponding to 100% on the
“THROTTLE OPENING %” indicator.
Should such percentage values fail to match, a TPS CALIBRATION should be carried out using the related icon in the control bar (see Chapter 7, CONTROL BAR).
Then proceed to connect the Personal Computer to the FAST II control box and enable the TPS CALIBRATION window
by clicking on the TPS CALIBRATION icon and turn on the engine.
The calibration window shows the current TPS reading and the minimum and maximum values currently used by the control box. Open the throttle valve completely by fully twisting the throttle grip at least once. Should the acquired value not
be satisfactory, twist the throttle fully again. The values automatically acquired by the software may be edited by switching the engine off and entering the required values to the related fields.
At this stage simply click on the icon showing the FAST II control box to send the new TPS calibration values.
33
GB
APPENDIX I : LIST OF SHORTCUTS
GB
General shortcuts:
SHORTCUT
ACTION
CTRL+F12
Open file
MAIUSC+F12
Save file
ALT+F4
Exit
CTRL+C
Copy
CTRL+V
Paste
CTRL+R
Paste RPM
CTRL+5(tn)
Select all
CTRL+Y
Formula
CTRL+T
Copy table
CTRL+P
Mapping file properties
F3
Read Fast
F4
Write Fast
F1
Select Map 1
F2
Select Map 2
SHIFT+F1
Select cylinder 1 of map 1
CTRL+F1
Select cylinder 2 of map 1
SHIFT+F2
Select cylinder 1 of map 2
CTRL+F2
Select cylinder 2 of map 2
F7
Centre graph on selection
F8
Display all
F11
Change over to Standard mode
F12
Change over to Advanced mode
ALT
Activate menu
Shortcuts specific to the injection table:
SHORTCUT
ACTION
Arrow Keys
Shift amongst cells
SHIFT + Arrow Keys
Select cellse
PagUp
Scorre di una pagina in alto la tabella
PagDown
Scorre di una pagina in basso la tabella
+ (tn)
Increase by one percentage point the values
of the selected cells
- (tn)
Decrease by one percentage point the values
of the selected cells
34
APPENDICE 2: GLOSSARIO
.
.xls
File format for Microsoft Excel
E
ECU
Eletronic Control Unit, acronym indicating the electronic control box
F
FAST
Fuel/Ignition Adjustment System Tecnology
File di mappatura
File resident in the control box, containing information on the bike calibration and the two
maps that can be selected by the optional switch.
Firmware
Set of instructions and programs residing in the memory of the FAST control box, which
allows the system to function.
R
RPM
Revolution Per Minute, acronym that indicates the engine speed measurement unit, revs per minute
S
Switch
Three-position switch for the selection of the mappings stored in the control box memory, also
known as map selector.
T
TPS
Throttle Position Sensor, acronym which indicates the accelerator sensor
U
USB
Universal Serial Bus, indicates a serial communication protocol.
35
GB
APPENDIX 3: GENERAL WARANTY TERMS
GB
Warranty
SITO GRUPPO INDUSTRIALE S.p.A. guarantees its products in accordance with the terms of the current law.
In particular, it guarantees the products against conformity defects, and will either repair or replace faulty parts within an
appropriate time limit.
Irrespective of the clients request for the repair or replacement of the part, SITO GRUPPO INDUSTRIALE S.p.A. reserves
the right to evaluate whether the required remedy is actually feasible and that it is not excessively costly as compared to
the other solutions.
Repairs and replacement will be at no extra charge to the customer, although SITO GRUPPO INDUSTRIALE S.p.A. will
have the right to inspect the defective product.
In order to be able to take advantage of the warranty the customer must have a regular fiscal receipt and must notify any
conformity defects within two months of their discovery.
The warranty is valid for two years from the date of product consignment.
Those parts or products replaced under warranty will become the property of SITO GRUPPO INDUSTRIALE S.p.A.
Exemptions
The warranty provided by SITO GRUPPO INDUSTRIALE S.p.A. is not applicable for:
a. Parts used in sports competitions of any type;
b. Parts used on motorbikes used for hire services;
c. Parts subject to wear as part of their normal function (such as rubber support elements, or aluminium casing by way
of an example only)
d. Defects arising as the result of rusting or the action of atmospheric agents
e. In the event of the improper use or abuse of the part or the motorbike by its owner and/or operator;
f. In the event of non-authorized modifications or modifications made by personnel that does not represent SITO GRUPPO INDUSTRIALE S.p.A.
g. In the event of parts used incorrectly or which have not undergone normal maintenance.
Limitations
The general warranty terms will be invalidated in the following cases:
a. The parts are found to be detective as the result of accidents, carelessness or overloading
b. The irregular use of the motorbikes on which these parts are mounted;
c. The maintenance of the motorbikes on which these parts are mounted has not been undertaken in accordance with
the instructions provided in the user and maintenance booklet
d. Excluded parts as indicated in paragraph 2.0 of the present warranty
e. Parts excluded due to owner negligence in the observance of the obligations specified in paragraph 1 of the present
warranty.
Liability for damage caused by detective parts
SITO GRUPPO INDUSTRIALE S.p.A. is liable for the damage caused as the result of the defects of its products, in accordance with the terms of the Legislative Decree of the Italian Republic 6.9.2005 n. 206 Art. from 114 a 127, and excluding all other liability.
SITO GRUPPO INDUSTRIALE S.p.A. declines all liability in the event that lack of maintenance causes damage or jeopardizes the regular function of the product sold.
36
Revision 0.00 dd. november 18th, 2009 GB
37