1
Medisoft Network Professional
Medisoft Advanced
Medisoft
User Manual
March 2008
Version 14
5222 E. Baseline Road, Suite 101
Gilbert, AZ 85234
Sales
Support
EDI Support
Corporate
Fax
Web site
(800) 333-4747
(800) 334-4006
(800) 689-4550
(480) 892-5120
(480) 892-4804
www.medisoft.com
Software registration required
You must register your Medisoft program. Full instructions on how to register are part
of the installation instructions you printed out prior to installing the program.
Proof of ownership
KEEP YOUR SERIALIZED SOFTWARE, even if damaged or obsolete. It is your
proof of ownership.
Table of Contents
PREFACE...................................................................................................................I
COPYRIGHTS ............................................................................................................. I
SOFTWARE LICENSE AGREEMENT............................................................................. I
CHAPTER 1 .............................................................................................................. 1
SETTING UP THE PRACTICE ...................................................................................... 1
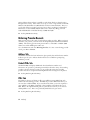
Billing Services ................................................................................................... 2
Setting up Multiple Practices .............................................................................. 2
Practice Type ...................................................................................................... 3
CHAPTER 2 .............................................................................................................. 5
MEDISOFT AT A GLANCE ......................................................................................... 5
Menu Bar ............................................................................................................ 5
File Menu ........................................................................................................ 5
Edit Menu........................................................................................................ 5
Activities Menu............................................................................................... 5
Lists Menu ...................................................................................................... 5
Reports Menu.................................................................................................. 5
Tools Menu ..................................................................................................... 6
Window Menu................................................................................................. 6
Services Menu................................................................................................. 6
Help Menu....................................................................................................... 6
Toolbar................................................................................................................ 6
Shortcut Bar ........................................................................................................ 6
CHAPTER 3 .............................................................................................................. 7
GENERAL PRACTICE SETUP...................................................................................... 7
Open Practice, New Practice .............................................................................. 7
Backup Data, View Backups, Restore Backups................................................... 7
Program Date ..................................................................................................... 7
Program Options................................................................................................. 7
General Tab..................................................................................................... 8
Backing Up Data ................................................................................. 8
Hide Inactive/Closed Items ................................................................. 8
Default Choices................................................................................... 9
Data Entry Tab ................................................................................................ 9
Payment Application Tab (Advanced and above)......................................... 11
Aging Reports Tab ........................................................................................ 12
HIPAA Tab ................................................................................................... 12
Color-Coding Tab (Advanced and above) .................................................... 14
Transactions ...................................................................................... 14
Patients .............................................................................................. 14
Billing Tab (Advanced and above)................................................................ 15
Claims Manager ................................................................................ 15
Statements ......................................................................................... 15
Billing Notes ..................................................................................... 16
Quick Formats ................................................................................... 16
Audit Tab ...................................................................................................... 17
Security Setup.................................................................................................... 18
Medisoft Standard Security ........................................................................... 18
Global Login ................................................................................................. 18
Login/Password Management ....................................................................... 19
Permissions (Advanced and above)............................................................... 19
File Maintenance .............................................................................................. 20
Rebuild Indexes............................................................................................. 20
Pack Data ...................................................................................................... 20
Purge Data..................................................................................................... 20
Recalculate Balances..................................................................................... 20
TUTORIAL PRACTICE.............................................................................................. 21
User Setup ......................................................................................................... 21
Group Setup ...................................................................................................... 22
Permissions ....................................................................................................... 22
Login/Password Management........................................................................... 23
CHAPTER 4 ............................................................................................................ 25
SETTING UP THE PRACTICE .................................................................................... 25
Procedure, Payment, and Adjustment Codes .................................................... 25
New Procedure Codes and Accounting Codes .................................................. 26
General Tab................................................................................................... 26
Amounts Tab................................................................................................. 27
Allowed Amounts Tab (Advanced and above) ............................................. 27
MultiLink Codes ................................................................................................ 27
Diagnosis Codes................................................................................................ 28
Provider Records .............................................................................................. 28
Address Tab .................................................................................................. 29
Default Pins and Default Group IDs Tabs..................................................... 30
PINs Tab........................................................................................................ 30
Eligibility Tab ............................................................................................... 30
Provider Class Records..................................................................................... 30
Insurance Carrier Records................................................................................ 30
Address Tab .................................................................................................. 30
Options Tab................................................................................................... 31
EDI/Eligibility Tab ....................................................................................... 31
Codes Tab ..................................................................................................... 32
Allowed Tab (Advanced and above)............................................................. 32
PINs Tab ....................................................................................................... 32
Insurance Class Records................................................................................... 32
Address Records................................................................................................ 32
EDI Receiver Records ....................................................................................... 33
Referring Provider Records .............................................................................. 34
Address Tab .................................................................................................. 34
Default PINs Tab .......................................................................................... 34
PINs Tab ....................................................................................................... 34
Billing Code List ............................................................................................... 35
Contact List (Advanced and above) .................................................................. 35
TUTORIAL PRACTICE ............................................................................................. 35
Opening the Practice Record ............................................................................ 35
Creating a New Procedure Code ...................................................................... 36
Editing Procedure Codes .................................................................................. 37
Creating a MultiLink Code ............................................................................... 37
Creating a New Diagnosis Code....................................................................... 38
Setting up a New Provider Record.................................................................... 38
Setting Up a New Insurance Carrier Record .................................................... 40
Creating a New Address Record ....................................................................... 41
Setting Up a Referring Provider Record........................................................... 42
CHAPTER 5 ............................................................................................................ 43
PATIENT RECORD SETUP........................................................................................ 43
Patient List ........................................................................................................ 43
Set Up............................................................................................................ 43
Setting Up the Chart Number........................................................................ 43
New Patient Setup Window ............................................................................... 44
Patient Quick Entry Overview ...................................................................... 45
Custom Patient Designer (Advanced and above).......................................... 46
Setting up a Case............................................................................................... 46
Custom Case Designer (Network Professional only).................................... 49
TUTORIAL PRACTICE ............................................................................................. 49
Entering Patient and Case Records .................................................................. 49
Setting Up a New Patient Record.................................................................. 49
Opening a New Case..................................................................................... 51
CHAPTER 6 ............................................................................................................ 57
TRANSACTION ENTRY ............................................................................................ 57
Start with a Chart Number................................................................................ 58
Entering a Charge in Transaction Entry........................................................... 59
Entering a Payment or Adjustment in Transaction Entry ................................. 60
Apply Payments or Adjustments to Charges ..................................................... 60
Unprocessed Transactions ................................................................................ 61
Patient Treatment Plans (Network Professional only)...................................... 61
Print Receipts, Create Claims ........................................................................... 61
Billing Charges (Advanced and above)............................................................. 61
Quick Ledger (Advanced and above) ................................................................ 62
Quick Balance (Advanced and above) .............................................................. 64
TUTORIAL PRACTICE.............................................................................................. 64
Transaction Entry.............................................................................................. 64
Transaction Documentation .............................................................................. 66
CHAPTER 7 ............................................................................................................ 67
CLAIM MANAGEMENT ........................................................................................... 67
The Claim Manager’s Job................................................................................. 67
Creating Claims ................................................................................................ 69
Editing Claims................................................................................................... 69
Printing Claims ................................................................................................. 70
Troubleshooting Insurance Claims................................................................ 71
Claim Form Not Centered ................................................................. 71
Reprinting Claims ............................................................................................. 71
Listing Claims ................................................................................................... 71
Changing Claim Status...................................................................................... 72
Entire Batch................................................................................................... 72
Selecting Multiple Claims ............................................................................. 72
Sending Claims to a File ................................................................................... 73
TUTORIAL PRACTICE.............................................................................................. 73
Claim Management ........................................................................................... 73
Creating Claims ................................................................................................ 73
Editing Claims................................................................................................... 74
Sending Claims.................................................................................................. 75
Changing Claim Status...................................................................................... 76
CHAPTER 8 ............................................................................................................ 79
STATEMENT MANAGEMENT (ADVANCED AND ABOVE).......................................... 79
Creating Statements .......................................................................................... 79
Editing Statements............................................................................................. 80
Converting Statements....................................................................................... 81
Printing Statements ........................................................................................... 82
Reprinting Statements ....................................................................................... 82
Listing Statements ............................................................................................. 82
Changing Statement Status................................................................................ 83
Entire Batch................................................................................................... 83
Selecting Multiple Statements....................................................................... 83
TUTORIAL PRACTICE ............................................................................................. 84
Statement Management ..................................................................................... 84
Creating Statements .......................................................................................... 84
Editing Statements............................................................................................. 85
Sending Statements ........................................................................................... 85
Troubleshooting Statement Printing ................................................................. 86
Patient Remainder Statements (Advanced and above).................................. 86
Changing Statement Status ............................................................................... 87
CHAPTER 9 ............................................................................................................ 89
DEPOSIT/PAYMENT APPLICATION (MEDISOFT ADVANCED AND ABOVE) ............... 89
EOB Payments .................................................................................................. 90
Managed Care................................................................................................... 91
Capitation Payment ....................................................................................... 91
TUTORIAL PRACTICE ............................................................................................. 92
Creating a New Deposit .................................................................................... 92
CHAPTER 10 .......................................................................................................... 95
COLLECTIONS AND REVENUE MANAGEMENT ........................................................ 95
Collection List ................................................................................................... 95
Add Collection List Items ............................................................................. 95
Patient Payment Plans ...................................................................................... 95
Collection Letters.............................................................................................. 96
Customizing Collection Letters..................................................................... 96
REVENUE ............................................................................................................... 96
Billing Cycles .................................................................................................... 96
Claim Rejection Messages ................................................................................ 97
SMALL BALANCE WRITE-OFF ................................................................................ 97
Writing off a Balance ........................................................................................ 97
TUTORIAL PRACTICE ............................................................................................. 98
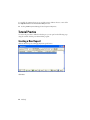
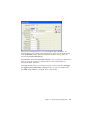
Creating Collection List Items .......................................................................... 98
Adding a Collection List Item ........................................................................... 99
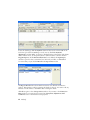
Patient Payment Plans ...................................................................................... 99
Collection Letters............................................................................................ 100
Customizing Collection Letters................................................................... 101
Writing off Small-Balances ............................................................................. 101
CHAPTER 11 ........................................................................................................ 103
ELECTRONIC SERVICES ........................................................................................ 103
Electronic Claims Processing ......................................................................... 103
Customizing Statements .................................................................................. 103
Eligibility Verification..................................................................................... 103
Eligibility Verification Setup ...................................................................... 104
Provider ........................................................................................... 104
Insurance Carriers ........................................................................... 104
Patients ............................................................................................ 104
Cases ............................................................................................... 104
Eligibility Verification Results ........................................................................ 105
CHAPTER 12 ........................................................................................................ 107
REPORTS .............................................................................................................. 107
Printing Reports .............................................................................................. 107
Available Reports ............................................................................................ 107
Day Sheets................................................................................................... 107
Analysis Reports ......................................................................................... 108
Billing/Payment Status Report (Advanced and above) ................... 108
Insurance Payment Comparison (Network Professional only)........ 108
Practice Analysis ............................................................................. 108
Insurance Analysis (Advanced and above) ..................................... 108
Referring Provider Report (Advanced and above) .......................... 108
Referral Source Report (Advanced and above) ............................... 109
Facility Report (Network Professional only)................................... 109
Unapplied Payment/Adjustment Report (Advanced and above) ..... 109
Unapplied Deposit Report (Advanced and above) .......................... 109
Co-Payment Report (Advanced and above) .................................... 109
Outstanding Co-Payment Report (Advanced and above)................ 109
Global Coverage Report.................................................................. 110
Aging Reports ............................................................................................. 110
Patient Aging................................................................................... 110
Patient Remainder Aging (Network Professional only) .................. 110
Patient Remainder Aging Detail (Network Professional only)........ 111
Patient Aging Applied Payment ...................................................... 111
Insurance Aging .............................................................................. 111
Production Reports (Network Professional only)........................................ 111
Production by Provider, Procedure, and Insurance ......................... 111
Activity Reports (Network Professional only) ............................................ 111
Daily/Monthly Activity Report ....................................................... 111
Activity Summary by Provider, Procedure, and Insurance ............. 111
Collection Reports (Advanced and above).................................................. 112
Patient Collection Report ................................................................ 112
Insurance Collection Reports .......................................................... 112
Patient Collection Letters ................................................................ 112
Collection Tracer Report ................................................................. 112
Audit Reports .............................................................................................. 113
Audit Generator............................................................................... 113
Login/Logout Report....................................................................... 113
Security Permissions Report (Advanced and above) ...................... 113
Productivity by User (Network Professional only) ......................... 113
Patient Ledger ............................................................................................. 113
Guarantor Quick Balance List (Network Professional only)....................... 114
Standard Patient Lists.................................................................................. 114
Claims Manager Reports............................................................................. 114
Custom Report List ..................................................................................... 114
Load Saved Reports ........................................................................................ 115
Add/Copy User Reports................................................................................... 115
Receive/Send Reports Through Medisoft Terminal......................................... 115
Report Procedures .......................................................................................... 115
Printing a Report ......................................................................................... 115
Exporting a Report ...................................................................................... 116
Previewing a Report.................................................................................... 116
Searching for a Specific Detail in a Report................................................. 117
CHAPTER 13 ........................................................................................................ 119
MEDISOFT REPORT DESIGNER ............................................................................. 119
Report Designer .............................................................................................. 119
Report Designer Menu Bar ............................................................................. 119
Toolbar............................................................................................................ 120
The Format Grid ............................................................................................. 120
Report Properties............................................................................................ 121
Field Properties .............................................................................................. 121
Standard Properties ..................................................................................... 121
Text Field Properties ................................................................................... 122
Data Field Properties................................................................................... 122
Calculated Field Properties ......................................................................... 124
System Data Field Properties ...................................................................... 125
Shape Field Properties................................................................................. 126
Images Field Properties............................................................................... 127
Data Fields and Expressions .......................................................................... 127
TUTORIAL PRACTICE ........................................................................................... 128
Repositioning the CMS- or HCFA-1500 form................................................. 128
How To Revise an Existing Report.................................................................. 129
How To Create a New Report ......................................................................... 130
CHAPTER 14 ........................................................................................................ 131
OFFICE HOURS ..................................................................................................... 131
Introduction..................................................................................................... 131
Starting Office Hours ...................................................................................... 131
Accessing Office Hours from Other Programs............................................ 131
Office Hours Setup .......................................................................................... 131
Setting up Provider Records........................................................................ 132
Setting up Patient Records .......................................................................... 132
Setting up Case Records.............................................................................. 132
Setting up Resource Records....................................................................... 133
Setting an Appointment ................................................................................... 133
Repeating Appointments ............................................................................. 134
Entering Breaks............................................................................................... 135
Setting Up Repeating Breaks ...................................................................... 136
Moving/Deleting Appointments....................................................................... 136
Changing Appointment Status (Office Hours Professional) ....................... 136
Moving an Appointment ............................................................................. 137
Deleting an Appointment ............................................................................ 137
Patient Recall (Office Hours Professional Integrated) ................................... 137
Multiple Booking Columns.............................................................................. 137
Program Options............................................................................................. 138
Appointment Length ................................................................................... 138
Views (Office Hours Professional) ............................................................. 139
Day View......................................................................................... 139
Week View...................................................................................... 139
Month View..................................................................................... 139
Multi View/Multiple Provider/Resource View ............................... 139
Appointment Display (Office Hours Professional) ..................................... 140
Security Setup.................................................................................................. 140
Reports in Office Hours................................................................................... 140
Appointment List......................................................................................... 141
Appointment Status (Advanced and above) ................................................ 141
Printing Superbills....................................................................................... 141
TUTORIAL PRACTICE............................................................................................ 141
Entering Resources ......................................................................................... 141
Entering Appointments.................................................................................... 141
Repeating Appointments.................................................................................. 142
Setting Breaks.................................................................................................. 143
Creating Reason Codes................................................................................... 143
Creating Templates (Office Hours Professional)............................................ 143
Creating Multi Views (Office Hours Professional) ......................................... 144
Using the Wait List (Office Hours Professional)............................................. 144
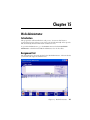
CHAPTER 15 ........................................................................................................ 145
WORK ADMINISTRATOR ...................................................................................... 145
Introduction..................................................................................................... 145
Assignment List ............................................................................................... 145
Filters.............................................................................................................. 146
Tasks ............................................................................................................... 146
Rules................................................................................................................ 147
APPENDIX A ........................................................................................................ 149
WHERE TO FIND HELP WITH MEDISOFT ............................................................... 149
Support Options .............................................................................................. 149
Using Online Help ...................................................................................... 149
Medisoft Web Site ...................................................................................... 149
Training Options ......................................................................................... 150
Local Value-Added Resellers...................................................................... 150
Technical Support ....................................................................................... 150
When You Call Support .................................................................. 150
Service Hours .................................................................................. 150
Updates and Changes .................................................................................. 151
Tips and Shortcuts on the Internet............................................................... 151
APPENDIX B ........................................................................................................ 153
NEW FEATURES IN MEDISOFT 14 ......................................................................... 153
APPENDIX C ........................................................................................................ 157
CONVERTING DATA ............................................................................................. 157
Converting from Windows Version 5.5x or Higher to Windows Version 14
.................................................................................................................... 157
Converting from Windows Version 5.4x or Lower to Windows Version 14
.................................................................................................................... 157
Multiple Practice Conversion Process......................................................... 157
Medisoft MS-DOS Users Converting to Windows ..................................... 158
What Doesn’t Convert..................................................................... 158
Converting MS-DOS to Windows .................................................. 158
Bringing Over Account Detail from Another System ................................. 160
APPENDIX D ........................................................................................................ 161
MEDISOFT TERMINAL .......................................................................................... 161
Receiving Reports from a BBS ........................................................................ 161
Program Options............................................................................................. 162
Dial Options.................................................................................................... 163
Modem Tab ................................................................................................. 164
ID and Extra Tab......................................................................................... 165
Dialing a BBS.................................................................................................. 165
Sending and Receiving Files ........................................................................... 165
Receive File................................................................................................. 167
Answering ....................................................................................................... 168
APPENDIX E ........................................................................................................ 169
ARCHIVING OVERVIEW ........................................................................................ 169
Medisoft Archive Wizard window.................................................................... 169
Setting Up Archiving Permissions................................................................... 169
To Set Up Archiving Permissions ............................................................... 170
Archiving Cases .............................................................................................. 170
To Access the Archiving Module and Archive a Case................................ 170
Restoring Archived Cases ............................................................................... 171
To Access the Archiving Module and Restore a Record............................. 172
Printing Log Reports....................................................................................... 173
To Access the Archiving Module and Print a Log Report .......................... 173
APPENDIX F......................................................................................................... 175
GLOSSARY ........................................................................................................... 175
INDEX.................................................................................................................... 183
Preface
Copyrights
Medisoft, Medisoft Advanced, Medisoft Network Professional, and Office Hours
programs and documentation Copyright © 2008 McKesson Corporation and/or one of
its subsidiaries. All Rights Reserved.
Software License Agreement
License Agreement
NDCHealth Corporation d/b/a McKesson Provider Technologies (“McKesson”) grants
to the original purchaser ("Purchaser") a nontransferable, nonexclusive license to use the
accompanying software (the “Software”) in machine-readable, object code form only,
and the associated documentation for the private use of Purchaser as set forth in the
Permitted Uses and Prohibited Uses sections below. Acceptance and use of the Software
acknowledges Purchaser's agreement to abide by the terms of this License Agreement.
Disclaimer
McKesson makes no representations or warranties with respect to the contents of the
Software and specifically disclaims any implied warranties and warranties of
merchantability or fitness for any particular purpose. McKesson reserves the right to
make changes or alterations in the Software without the obligation to notify anyone of
the changes or alterations.
Permitted Uses
Purchaser may (1) copy the Software for backup purposes to support Purchaser's use of
the Software; (2) use the Software on a single computer; and (3) if integrated with
McKesson networked software licensed by Purchaser from McKesson, Purchaser may
install this Software on each computer within one network at a single location.
Prohibited Uses
Purchaser may not (1) distribute, rent, sublicense, or otherwise make available to others
the Software, documentation, or any copies thereof; (2) modify, translate, adapt,
disassemble, or create derivative works from the Software or documentation; or (3) use
the Software or permit it to be used on more than one computer at any one time, except
Preface
i
as expressly authorized in the Permitted Uses Section above. The Software,
documentation, and all manuals accompanying the Software are copyrighted and all
rights are reserved by McKesson. No copyrighted material may be copied, photocopied,
reproduced, translated, or reduced to any electronic medium or machine-readable device
without prior written consent from McKesson.
McKesson’s Rights
Purchaser acknowledges and agrees that the Software and associated documentation are
proprietary products of McKesson and certain third parties (“Third-Party Licensors”)
protected under U.S. and international copyright law. Purchaser further acknowledges
and agrees that all right, title, and interest in and to the Software and any copies thereof,
including associated intellectual property rights, are and shall remain with McKesson
and Third-Party Licensors. The License Agreement does not convey to Purchaser any
interest in or to the Software, but only a limited right of use revocable in accordance
with the terms hereof, and Purchaser agrees to transfer to McKesson any property
interests or rights in the Software Purchaser may have or later obtain by operation of law
or otherwise which are inconsistent with the rights granted to Purchaser herein.
Trademarks
All other trademarks associated with the Software are trademarks owned by McKesson
or Third-Party Licensors. No right, license, or interest to such trademarks is granted
hereunder, and Purchaser agrees that no such right, license, or interest shall be asserted
by Purchaser with respect to such trademarks. Purchaser agrees not to take any action
which would damage the goodwill associated with any such trademarks.
Limited Warranty
McKesson warrants to Purchaser that the computer media on which the original
Software is recorded will be free of defects in materials and workmanship for a period of
thirty (30) days from the date of purchase under normal conditions of use and service.
Should the media become defective within thirty (30) days from the date of purchase, if
proof of original purchase can be verified, McKesson will replace the Software or, at its
option, McKesson may refund to Purchaser the original McKesson purchase price.
McKesson, its software suppliers, distributors, and Value-Added Resellers make no
representations, warranties, or guarantees, express or implied, including warranties of
merchantability or fitness for any use or any particular purpose with regard to the
Software and documentation. The Software and documentation are licensed to
Purchaser on an AS IS basis. Liability of McKesson will be strictly limited to the
purchase price of the Software in any case.
IN NO EVENT SHALL MCKESSON BE LIABLE FOR ANY DIRECT,
INCIDENTAL, OR CONSEQUENTIAL DAMAGES, INCLUDING, BUT NOT
ii
Medisoft
LIMITED TO, LOSS OF PROFITS, LOSS OF BENEFITS, OR LOSS OF DATA
RESULTING FROM THE USE OF THIS SOFTWARE OR ARISING OUT OF
ANY CLAIMED OR ACTUAL BREACH OF WARRANTY. Some states do not
allow the exclusion or limitation of direct, incidental, or consequential damages. If
Purchaser resides in such a state, the above limitation may not apply to Purchaser.
NO OTHER REPRESENTATIONS OR WARRANTIES CONCERNING THE
SOFTWARE OR DOCUMENTATION MAY BE GIVEN EXCEPT THOSE
CONTAINED HEREIN.
Termination of License
McKesson may terminate this License Agreement upon a breach by Purchaser of any
term hereof. Upon such termination by McKesson, Purchaser agrees to immediately
return to McKesson or destroy all copies of the Software in Purchaser’s possession.
Miscellaneous
The failure of McKesson to enforce any rights granted hereunder or to take any action
against Purchaser in the event of a breach hereunder shall not be deemed a waiver by
McKesson as to subsequent enforcement of rights or subsequent actions in the event of
future breaches. Neither this License Agreement nor any interest in this License
Agreement is assignable by Purchaser. This License Agreement represents the entire
agreement concerning the Software between Purchaser and McKesson. Should any
term of this License Agreement be declared void or unenforceable by any court of
competent jurisdiction, such declaration shall have no effect on the remaining terms
hereof. This License Agreement shall be construed and governed in accordance with the
laws of the State of Georgia, United States of America.
Preface
iii
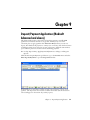
Chapter 1
Setting up the Practice
When you first open the Medisoft program after installation, you are required to create
a new data set (if this is the first time you have ever installed Medisoft) or convert
previous Medisoft or MS-DOS data.
If you have been using Medisoft Version 5.5x or 5.6x and above and have just installed
Version 14, a message displays stating that data must be converted before you can access
the program. If you have not already performed a backup on your existing data,
perform a backup now. Then click OK to perform the automatic conversion.
If you work with multiple practices, each will have to be converted.
For more conversion information, see Appendix C, page 157.
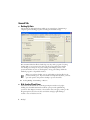
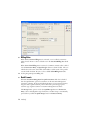
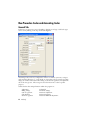
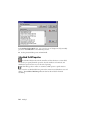
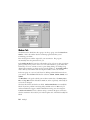
If you choose to create a new data set, the Create a New Set of Data window is
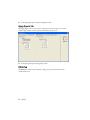
displayed. Fill in the practice name. When you click Create, the Practice Information
window is displayed, at which time you need to enter all the practice information
requested.
Chapter 1: Setting up the Practice
1
The information in report headings comes from this Practice Information window.
Billing Services
In recent years, with electronic submission becoming more important and the
complexity of insurance claims processing increasing, there has been a growing number
of billing services. Smaller office or home-based businesses now handle insurance billing
for healthcare practices.
If you are a billing service, enter your client’s information in the Practice tab. Enter
your information in the Billing Service tab. If you want to use the Medisoft program to
keep track of your own accounts receivables, a separate database can be set up with each
client listed as a patient. Separate procedure codes can be created to cover the various
services of your billing service.
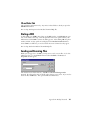
Setting up Multiple Practices
It is not necessary to install the program for each new practice. To set up multiple
practices, go to the File menu and select New Practice. When the first practice is set up
in the Medisoft program, the program assumes there is only one practice and establishes
a default directory for the data for that practice. Each time you set up an additional
data set with totally unrelated patients and procedure files, you must create a different
2
Medisoft
subdirectory. In the Create A New Set Of Data window, enter the additional practice
name and change the data path. This establishes a completely separate database for the
new practice.
Once you have set up additional practices, you can move easily from one to another by
going to the File menu, selecting Open Practice, and choosing the practice you want
from the list presented.
Practice Type
The practice Type field is a drop-down list. Click on the arrow to view the entry
options, i.e., Medical, Chiropractic, and Anesthesia. Each option controls special fields
within the program.
Medical: This is the general setting for all healthcare groups except Chiropractic and
Anesthesiology.
Chiropractic: Choosing Chiropractic activates the Level of Subluxation field in the
diagnosis section of the patient case file. When set as Medical or Anesthesia, this field is
not available.
Anesthesia: The Anesthesia choice adds a Minutes field in the Transaction Entry
window for entering charges in transaction billing functions.
Chapter 1: Setting up the Practice
3
Chapter 2
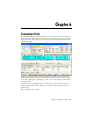
Medisoft at a Glance
Once the program is open, your can get a good look at the main program window. The
top bar on the window is the Title bar and it displays the name of the active program
and contains Minimize, Maximize, and Close buttons on the right side.
Menu Bar
Just below the Title bar is the Menu bar, which shows categories of activities available in
the program. Click on various headings, such as File, Edit, Activities, Lists, Reports,
Tools, Window, Services, and Help, and each opens a submenu with a list of all the
activity options available in that category.
File Menu
The File menu contains options for managing your database files and access to them.
Edit Menu
The functions of the Edit menu are Cut, Copy, Paste, and Delete. These deal primarily
with the handling of text.
Activities Menu
This is the center of much of the daily routine of the practice.
Lists Menu
This menu provides access to the various list windows available in the program.
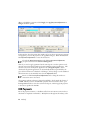
Reports Menu
Reports within Medisoft are accessible through the Reports menu. You can also access
the Custom Report List and the Report Designer through this menu.
Chapter 2: Medisoft at a Glance 5
Tools Menu
The options available in this menu help you access peripheral programs and information
to assist in the management of your practice.
Window Menu
This menu contains options that control the display of windows in the program.
Services Menu
The Services menu contains a link to OnCallData for electronic prescriptions. Call
your local Value-Added Reseller or call your Medisoft sales representative at (800) 3334747 for information concerning OnCallData.
Help Menu
The Help menu contains access to information on how to use the program, as well as
how to register.
Toolbar
Below the menu bar is the toolbar with an assortment of speed buttons (or icons) that
are shortcuts to accessing options within the program.
Select the option you want by clicking the appropriate speed button. That function of
the program opens in a full data entry window.
The toolbar can be customized to your liking. Change the order of the buttons in the
toolbar or hide them so they don’t show at all. Create a new toolbar with only the
buttons or file names that you want. In addition, you can move the toolbar to the top,
bottom, or either side of the screen or return it to its original position and layout.
F1 Look up Toolbar Customizing.
Shortcut Bar
At the bottom of the screen, above the Status bar, is a shortcut bar that describes the
available shortcut function keys available in the active window. This bar may also be
referred to as the “function help bar.”
6
Medisoft
Chapter 3
General Practice Setup
Open Practice, New Practice
To change practices or create a new practice database, go to the File menu and select the
appropriate option.
To open an existing database, go to the File menu and select Open Practice. Choose the
practice you want to open and click OK.
To create a new database, follow the same procedure as described in the Setting Up the
Practice section, page 1.
Backup Data, View Backups, Restore Backups
Information concerning backups is contained in the online Help. Go to the File menu
in your Medisoft program, select any backup-related topic, and then press F1.
F1 Look up Backup, View Backup, or Restore.
Program Date
You can change the program date for back dating a large number of transactions. This
affects all dates in the program except the Date Created setting, which always reflects the
System date.
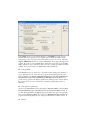
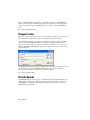
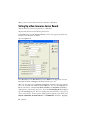
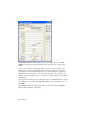
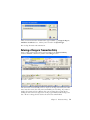
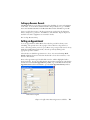
Program Options
Go to the File menu and select Program Options. There are a number of tabs within
Program Options, several available only with Medisoft Advanced and Medisoft
Network Professional. Each is described below.
Chapter 3: General Practice Setup
7
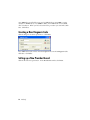
General Tab
Backing Up Data
The General tab deals with backups, which are an essential part of maintaining a
computer-generated billing program, and with general default settings.
We recommend that data files be backed up every day, with a program of rotating
backup disks so you can restore lost data to the most recent date before the files
were damaged or corrupted. If you are working with multiple practices, each
practice should have its own set of backup files. Doing your backups within the
Medisoft program is a dependable method.
When you perform a backup, you are only backing up the data files for the
practice currently open. If you work with several practice databases, you must
open each practice and perform a backup to preserve those files.
F1 Look up Backup, View Backup, or Restore.
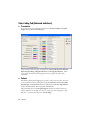
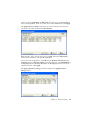
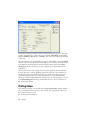
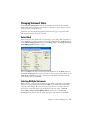
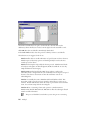
Hide Inactive/Closed Items
Accessed from the General tab on the Program Options window or by rightclicking a list, the Hide Inactive/Closed Items option provides quick filtering
options for data display for inactive or closed items. Users can apply a setting on the
Program Options tab and as needed, override this setting by right-clicking as
needed to view or hide data in a list.
8
Medisoft
The default setting for this option is not enabled; users can selectively override this
setting to enable the feature as needed or permanently change the default setting
and then also, as needed, override this setting.
Users can apply these settings to these lists:
Billing Codes
Insurance Carriers
Procedure Codes
Diagnosis Codes
Providers
Patients
Cases
Referring Providers
Security Accounts
`
When users selects the right-click menu option of Show Inactive Records to
override the setting on the Program Option window, a red X appears next to all
inactive items in the list. It is very easy for users to distinguish what codes have
been marked as inactive by noting the red “ X “ as the graphic indicator in front of
the inactive code. The right-click menu also provides an option to Hide Inactive
Records.
Note: The option that is initially displayed depends on the current setting on the
Program Options window. If the feature is enabled on the window, then the rightclick menu initially displays the Show Inactive Records option; if the feature is
disabled on the Program Options window, then the right-click menu initially
displays the Hide Inactive Records option.
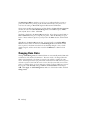
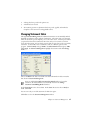
Default Choices
You have the option to show the Patient List and/or Transaction Entry windows
on startup by placing a check mark next to either or both options here. You can
indicate whether you want to show shortcuts and/or hints, or Enforce Accept
Assignment. You have the option to calculate patient remainder balances upon
opening or closing the program. You can set account alerts that appear in the
Transaction Entry, Deposit List, and Appointment windows that tell you when a
patient has a certain remainder balance, is delinquent on a payment plan, or is in
collections. In Medisoft Advanced and Medisoft Network Professional, you can
indicate whether to print a title page for every report. Network Professional
includes an option to synchronize your computer time with the time on the
network server.
F1 Look up Program Options-General Tab.
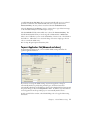
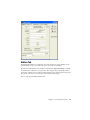
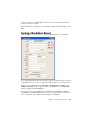
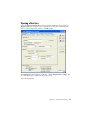
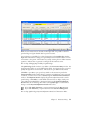
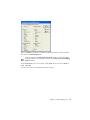
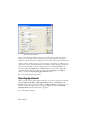
Data Entry Tab
The Data Entry tab gives you lots of options for various sections of the program.
Chapter 3: General Practice Setup
9
In the Global section, you can indicate whether to use ENTER as a toggle to move
between fields, to force payments to be applied, and to multiply unit times amount.
Using the zip code to enter city and state information can save a lot of time. When the
Suppress UB04 Fields check box is selected, UB-04 fields do not appear throughout the
program. If you do not process UB-04 claims, check the box. If you do process UB-04
claims, uncheck the box so that all the fields you need to populate the claim form will be
available. For more information on UB-04 functionality in Medisoft:
F1 Look up UB-04.
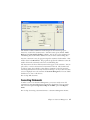
In the Patient section, you can choose to use numeric Chart numbers (the default is to
use an alphanumeric code) and/or have the program automatically hyphenate Social
Security Numbers. The Patient Quick Entry Default list and the Use Quick Entry for
New Patient/Case F8 and Use Quick Entry for Edit Patient/Case F9 check boxes
provide setting options for the Patient Quick feature, which provides a custom method
for creating records. For more information on the Patient Quick Entry feature in
Medisoft:
F1 Look up Patient Quick Entry.
Choices in the Transaction section primarily affect Transaction Entry. Selecting Force
Document Number displays a Document field in the Transaction Entry window. If
you click Force payments to be applied, the program makes you apply every payment
before exiting Transaction Entry. If you choose to Multiply units times amount, the
program automatically adjusts the cost of the procedure based on number of units. If
10
Medisoft
you click Auto Create Tax Entry, the program automatically adds tax to any selected
procedure code that has been marked taxable and create a separate line item in
Transaction Entry. Be sure you have created and selected a Default Tax Code.
Select the Suppress Co-pay Message option to suppress the co-pay collection message
on the Transaction Entry for cases that require a co-pay.
The Case Default field determines which case is selected in Transaction Entry. The
default is Last Case Used, but you can change this to Newest Case or Oldest Case.
There is also a field where you can set the default Place of Service Code. The default in
this field is 11. When there is an occasional change of location, simply type the new
code to override the default entry.
F1 Look up Program Options-Data Entry Tab.
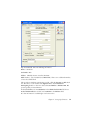
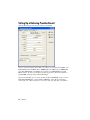
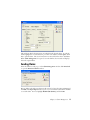
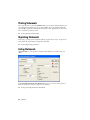
Payment Application Tab (Advanced and above)
In the Payment Application tab, you can establish default settings that affect the
payment application function.
If you choose to accept the default settings, any amount applied to a charge is
automatically marked as paid by that particular payee, the allowed amount is
automatically calculated, and the difference between the calculated allowed amount and
the practice charge is offset in the Adjustment column. In addition, any claim that has
received payment from all responsible payers is automatically marked “Done.”
In the lower half of the window, select default billing codes to be applied when using
this feature.
Chapter 3: General Practice Setup
11
F1 Look up Program Options-Payment Application Tab.
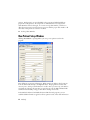
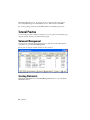
Aging Reports Tab
The Aging Reports tab lets you alter the starting date for patient aging reports and to
redefine aging columns for both patient and insurance aging reports.
F1 Look up Program Options-Aging Reports Tab.
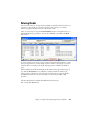
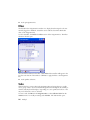
HIPAA Tab
The HIPAA tab offers features designed to help protect patient information from
unauthorized access.
12
Medisoft
The Auto Log Off check box is designed to protect your data files from unauthorized
tampering. Click the check box and then enter a number of minutes (up to 59) in the
data box. If you click this box and have not utilized the Security Setup feature in the
program, a message pops up telling you that security has to be set up before the backup
will function. Click OK to clear the message. See Security Setup for information on
setting up security for the program.
With Auto Log Off activated, any time the program remains unused for the amount of
time designated, it minimizes to a User Login window which requires reentry of the
user’s password in order to access the program again. You can also click Close Program
to turn the program off completely.
When the Warn on Unapproved Codes check box is checked, the program alerts you if
a code entered or selected is non-HIPAA compliant. This warning pops up every time
you save transactions and the program finds a code that has not been marked HIPAA
compliant.
To mark an existing code compliant, you need to edit each code entered in the program,
determine its HIPAA compliance and then click the HIPAA Approved box (in both
Procedure Code and Diagnosis Code edit windows).
Another option is to use a program such as Codes on Disk. This program imports
current CPT and/or ICD-9 codes with all HIPAA-compliant codes marked. See your
local Value-Added Reseller or contact NDCHealth directly at (800) 333-4747.
Chapter 3: General Practice Setup
13
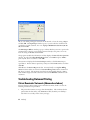
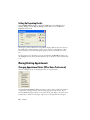
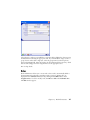
Color-Coding Tab (Advanced and above)
Transactions
If you want to use color coding for transactions in Transaction Entry and Quick
Ledger, click the Use Color Coding box.
Select colors for each of six types of transactions: Unsaved, No Payment, Partially
Paid, Overpaid Charge, Unapplied Payment, and Overapplied Payment. These
colors appear in both windows, letting you know at a glance the status of the
transaction.
Patients
This feature, called patient flagging, lets you color code patient records to alert you
to various situations when viewing the records the Patient List, Transaction Entry,
Quick Ledger, and Deposit List windows of Medisoft and the New Appointment
window in Office Hours (when integrated with Medisoft).
The patient flag colors in the Program Options window are fixed and cannot be
edited. In the box to the right of a color box, assign your own description to that
flag color. To activate the edit boxes, click Use Flags.
14
Medisoft
Patient flags are connected to patient records in the Other Information tab of the
Patient/Guarantor window as you edit or set up a new patient record.
F1 Look up Program Options-Color Coding Tab.
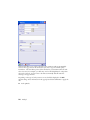
Billing Tab (Advanced and above)
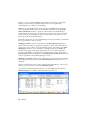
Claims Manager
These check boxes control settings for the Claims Manager feature. For more
information on using Claims Manager with Medisoft:
F1 Look up Claims Manager Overview.
The Delete transmission and claim batch information after X days check box and
field controls when the application deletes the transmission and batch related
information that appears on the Claims Manager Transmission History report.
This field defaults to 60 days.
The Delete closed claims and related claim tracking information after X days
check box and field controls when the application deletes closed claims and other
claim related information like the change log and change detail information. This
field defaults to 90 days.
Statements
Options in the Statements section deal with billing cycles. If you want to use
billing cycles when sending statements, click Use Cycle Billing. See page 96 for
more information.
F1 Look up Cycle Billing.
If you choose to use cycle billing, be sure to enter a cycle billing days interval (e.g.,
every 30 days).
Chapter 3: General Practice Setup
15
Billing Notes
When Create statement billing notes is activated, a note is added to statements
when printed. Be sure to select a default note in the Statement Billing Note Code
field.
When Create claim billing notes is activated, a Comment transaction line is added
in both Transaction Entry and Quick Ledger whenever a claim is billed. The note
includes the carrier name, date billed, claim number, and the name of the provider
associated with the claim. Be sure to select a default Claim Billing Note Code.
F1 Look up Program Options-Billing Tab.
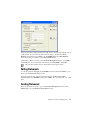
Quick Formats
If the Use Statement Management for Quick Statements check box is checked,
then the Quick Format options for Statements are the Statement Management
statements; otherwise, the list would include the Report option statement formats.
Any place that a Quick Statement prints would need to print the appropriate
statement type: regular statements or Statement Management statements
The Receipt format option is tied to the Quick Receipt button in Transaction
Entry. Select a default quick receipt format here, and that receipt is automatically
printed when you click the Quick Receipt button in Transaction Entry.
16
Medisoft
You can select a default Statement format, which gives you one-button printing of
a statement from Quick Ledger. When you click Quick Statement from either of
these windows, the default statement is automatically printed for the selected
patient record. If you do not specify a default format here, the first time you click
Quick Statement from Quick Ledger, you are required to select a format.
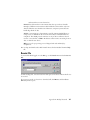
You can print a Face Sheet directly from the patient Case window. To set a default
form, click the down arrow in the Face Sheet field and select one of the options.
The selected default form prints each time you click Face Sheet in the patient Case
window.
The Quick List provides report options for selecting a default list report for the
Quick List on the Patient Quick Entry window. You can print a quick list directly
from the Patient Quick Entry window each time you click Quick List in the
Patient Quick Entry window.
F1 Look up Program Options-Billing Tab.
Audit Tab
The Audit tab lists all tables available in the database. The tables you choose here
become those tables available in the Audit Generator when preparing the Data Audit
Report. If you deselect MultiLink here, it will not be available in the Audit Generator.
F1 Look up Program Options-Audit Tab and Audit Report Generator.
Chapter 3: General Practice Setup
17
Security Setup
Medisoft Standard Security
Basic security in Medisoft is practice based with each practice having various users and
groups. Multiple practices require security setup for each database. Set up security when
nobody else is using the program. After you set up security, close and open the practice
to apply the changes.
Security in Medisoft Advanced and Medisoft Network Professional allows restricted
levels of access to those areas of the program that the security supervisor designates. The
supervisor has unlimited access and full control of security, while other users are
restricted to varying degrees. See Permissions. You can also manage password settings,
such as how frequently a user must change the password. Once at least one Level 1 user
has been entered, you can add more names, edit entries, or delete entries as necessary.
See Login/Password Management.
In Medisoft Basic, you can define a user as an Administrator, which grants the user
access to the Security Setup window and the ability to create users. If you are creating an
administrator, make sure that you select the Administrator check box. The first user
needs to be designated the Administrator.
If desired, Level One users can also set up and apply the Global Login feature. The
Global Login function provides an extra layer of security and added convenience for
users that access multiple practices and applications. For more information see Global
Login Overview.
Through the Security Setup window, you are also able to assign users to groups.
Grouping users by job function or security level can help you easily assign tasks or send
messages to a number of people at once.
F1 Look up Medisoft Standard Security.
Global Login
Topic is for Medisoft Advanced and Medisoft Network Professional only.
The Global Login features works with standard Medisoft security to provide a path that
determines what practices users can access. The feature utilizes standard security and
permissions that determine what users can access or do in individual practices but then
provides a method for users to logon once and then access all practices associated with
the global user—essentially, once the feature is set up, a single user may access multiple
practices without having to login to each dataset separately.
Users apply standard security in practices and create users within the practice. A practice
without security applied to it (no users) can be associated with any global users. If a
practice has users created in it, these users are the only users that can have a global login
18
Medisoft
associated with them. That is, if standard security exists in a practice, then these users
are the only potential global login users—in this case a standard user must exist in the
practice before a global user can be created. If a practice has no security applied, then
any global users can be associated with the practice.
Global login users are machine-specific and only users with a standard security of Level
1 can enable this feature and create users. Level 1 users can then create a global login
user and make this global login user a Global Login Administrator. Global Login
Administrators create other users, map these users to practices, change their or users
passwords, and determine whether the new users are also Global Login Administrators
or Global Login users with login expiration dates. What this means in a multiple PC
environment is that the Global Login PC machine practice is enforced. In other words if
user Smith is a Global Login user connected to Practice A on machine A, Smith cannot
login to Practice A on machine B at the same time. Smith, however, could login to
Practice A from machine B as another Global Login User if an account exists.
When setup, global login users default to the last practice accessed, but can select a
different practice if the global login user is associated with that practice.
F1 Look up Global Login Overview.
Login/Password Management
In Login/Password Management, the supervisor sets the requirements and application of
login rights and password usage. For example, you can set the length of valid passwords,
the valid time frame in which a password can be used before it has to be changed, how
long a user has to wait before reusing a password, etc.
F1 Look up Login/Password Management.
Permissions (Advanced and above)
The Permissions feature provides five levels of access to the program. The Security
Supervisor, who has unlimited access and full control of security, can assign or remove
rights for any level of security, with one exception. Level 1 access cannot be removed
from any of the three options listed in the Security window settings for the Supervisor.
Lower level access can be added, but the Supervisor must retain rights to these options.
Level 1 is for unlimited access and is designed to be used exclusively by the Supervisor or
administrator to restrict access to the program. Levels 2, 3, 4, and 5 can be user-defined
with the Supervisor deciding what fits in what level and assigning users accordingly.
Generally, the higher the level number, the less rights are assigned to it. Add or remove
check marks for level access by clicking the appropriate check box for each process
displayed with each listed window name.
Chapter 3: General Practice Setup
19
If a task is attempted by a user who does not have rights to that task, based on the
security level assigned, a warning dialog box is displayed stating that the user does not
have the authority to perform the requested task.
Once the security feature is used, the File menu contains an additional option, Log In
As Another User.
File Maintenance
The program puts you in the driver’s seat by giving you the ability to rebuild indexes,
pack data, recalculate patient balances, and purge data. The tools to perform each
procedure are contained within separate tabs.
Each of these file management functions carries the warning that it can take a
long time to process. Keep that in mind when planning your file maintenance
activities.
Rebuild Indexes
The Rebuild Indexes tab provides options to rebuild data indexes and lists the files
available for rebuilding. Clicking All Files includes them all.
Pack Data
Select the Pack Data tab to choose the data files from which you want to remove deleted
data. Here again, you can choose one particular set of files or click All Files to include
them all.
Purge Data
The decision to purge data files should be done only after careful consideration. Data
removed cannot be reinstated unless you have a previous backup disk containing the
information. You have a choice of purging appointment fields, closed cases, and claims
data files. In any case, select the cutoff date to which you want to clear data. All data in
the selected file before and including the date specified is deleted.
Recalculate Balances
On occasion, account balances or applied amounts may appear to be miscalculated.
This option recalculates the selected types of balances.
Note: An individual patient's account balance can be recalculated in the
Transaction Entry window by clicking the Account Total amount. Click OK in
the Transaction Entry window and the program begins the process.
To recalculate all account balances, click the Recalculate Balances check box. To
recalculate all unapplied amounts, click the Recalculate Unapplied Amount check box.
20
Medisoft
Click the Recalculate Patient Remainder Balances to recalculate all patient remainder
balances.
F1 Look up File Maintenance.
Tutorial Practice
To practice setting up security, you can perform the following steps using the tutorial
database provided with this program.
User Setup
1.
Go to the File menu and select Security Setup. This opens the Security Setup
window:
2.
Click New to open the User Entry window.
3.
In the Medisoft original program, we recommend that the first user be designated
the Administrator. Click the Administrator box in the middle of the window.
Then you can add more names, edit entries, or delete entries as necessary.
In Medisoft Advanced and Medisoft Network Professional, after one Level 1 person
has been entered, you can add more names, edit entries, or delete entries as
necessary.
4.
In Login Name, enter Supervisor as the login name.
5.
In Full Name, enter I M Boss as the user's full name.
6.
In Password, enter Adam812 as the password.
7.
Reenter the password in Reconfirm.
8.
If you are using Medisoft original, click the Administrator box (if this is the first
record you are setting up).
If you are using Medisoft Advanced or Medisoft Network Professional, be sure the
Access Level is 1.
9.
Skip the Expire Date field for now.
10. Open the Question tab.
11. In Select a question or type in your own, choose What is your pet’s name.
12. In Answer, type Ginger.
13. Reenter Ginger in the Reconfirm field.
14. Click Save.
Chapter 3: General Practice Setup
21
Repeat these steps for a second user only this time, the user won’t have the
Administrator box checked (Medisoft original).
15. Click Close to close the Security Setup window.
16. If a message pops up reminding you that users must relog into the program before
the changes take effect, click OK to clear this message.
Group Setup
1. Go to the File menu and select Security Setup. This opens the Security Setup
window.
2. Click the Group tab.
3. Click New to open the Security Group window.
4. In Group ID, enter DCTRS.
5. Enter Doctors in the Group Name field.
6. Enter All doctors and physicians assistants in the Description field.
7. Click Save.
8. In the Security Setup window, click the User tab.
9. Select the user information for I. M. Boss.
10. Click Edit.
11. Select the Group tab.
12. Click the check-box next to the DCTRS group.
13. Click Save.
14. Repeat these steps to create another group and to assign a user to that group.
15. Click Close to exit the Security Setup window.
Permissions
If you are using Medisoft Advanced or Medisoft Network Professional, logged in as
Supervisor, you can create/revise the rights of each level of security. Be sure you are still
in the Tutorial database when you perform the following steps. Today we’ll just change
the settings for Credit Card functions.
1.
Go to the File menu and select Permissions.
2.
Select Activities. In the Process section, give Level 2 and 3 users the rights to
Billing Charges by clicking in those boxes.
22
Medisoft
3.
Click Close.
Login/Password Management
1.
Go to the File menu and select Login/Password Management.
2.
Enter 30 in the Renewal Interval field. This way, a password must be replaced
every 30 days.
3.
In Reuse Period, enter 90 as the number of days before a password can be reused.
4.
Enter 6 as the minimum character requirement for a valid password.
5.
Enter 25 as the maximum number of characters for a valid password. .
6.
Click the Require Alphanumeric check box. You may notice that the password for
the Supervisor already complies with these settings.
7.
Enter 5 as the maximum number of failed login attempts before a user is locked out
of the program.
8.
In Account disable period, enter 5 as the length of time a user's account is on hold
when the maximum number of attempts has been exceeded.
9.
Click Save.
10. Close the program and open it again. This applies all the security changes you just
set up.
11. When you reenter the program, the User Login box appears asking you to enter
your login name and password. Enter Supervisor and Adam812.
Chapter 3: General Practice Setup
23
Chapter 4
Setting Up the Practice
Here is a recommended sequence for setup that helps you get off to a great start.
1.
2.
3.
4.
5.
6.
7.
8.
9.
Procedure codes and MultiLinks.
Diagnosis codes.
Provider records.
Insurance carrier records and their ID numbers.
Address information.
EDI receiver records.
Referring provider records.
Billing codes.
Contact List.
Procedure, Payment, and Adjustment Codes
Procedure codes are used to communicate procedure information between patient,
provider, and third-party payers. These codes can be accessed by going to the Lists
menu and selecting Procedure/Payment/Adjustment Codes, or by clicking the CPT
icon.
The Procedure/Payment/Adjustment List window shows what codes have been set up.
At the top of the window, there are two fields to help you find a procedure code:
Search for and Field. Field defaults to Type but can be changed to Code 1 or
Description. If you are not sure of the complete code, description, or type, enter the
first few letters or numbers in the Search for field. As you type, the list automatically
filters to display records that match. At the bottom of the window are choices for
setting up a new code, editing a code, or deleting a code. If the code you need is not
shown in the list, click New or press F8.
F1 Look up Procedure/Payment/Adjustment Entry.
Chapter 4: Setting Up the Practice
25
New Procedure Codes and Accounting Codes
General Tab
In this area, you can enter a new code number, description, and type. Valid code types
can be seen by clicking on the drop-down Code Type list.
Accounting Codes can be any configuration of letters or numbers you want to assign to
each accounting function, e.g., cash, checks, etc. Procedure codes are used for recording
charges for services rendered, and Accounting Codes show the payment and adjustment
side of the entry process. These categories are broken down into codes for specific
purposes.
Valid codes that have unique functions within the program are:
Adjustment
Deductible
Billing Charge
Inside Lab Charge
Cash Co-payment
Insurance Adjustment
Cash Payment
Insurance Payment
Check Co-payment
Insurance Withhold Adjustment
26
Medisoft
Check Payment
Comment
Credit Card Co-payment
Credit Card Payment
Outside Lab Charge
Procedure Charge
Product Charge
Tax
Also indicated in this window are the type of service, place of service, time to perform
the procedure, whether to allow the code to print on insurance forms, Alternate Codes
and, if applicable, whether only the patient is responsible. There is also a check box to
indicate if the code is inactive.
Modifiers help pinpoint the exact procedure performed. If needed for claim filing, add
modifiers. The HIPAA Approved field indicates whether the code is HIPAA approved.
The Revenue Code is used with the UB92 claim form. You can adjust the number of
units associated with this code in the Default Units field. If the code is used only with a
service that the practice purchased (usually from a lab), click this check box.
F1 Look up Procedure/Payment/Adjustment Entry-General Tab.
Amounts Tab
The Amounts tab is linked with Case information, Account tab, Price Code field.
Medisoft Advanced and Medisoft Network Professional allow 26 charge amounts for
each code entered in the program. The applicable charge amount is selected in the
Account tab of each patient’s Case window.
F1 Look up Procedure/Payment/Adjustment Entry-Amounts Tab.
Allowed Amounts Tab (Advanced and above)
The Allowed Amounts tab keeps track of how much each carrier pays for a particular
code. The program calculates the allowed amount based on the amount paid, any
applicable deductible, and the service classification. This amount is used in calculating
the patient portion of any transaction entered in Transaction Entry.
F1 Look up Procedure/Payment/Adjustment Entry-Allowed Amounts Tab.
MultiLink Codes
MultiLinks are groups of procedure codes combined under one access code. They are
for procedures that are normally performed at the same time, e.g., for a physical exam, a
routine set of treatments, etc.
The advantages to using MultiLinks include a reduction of time during data entry. If
you can create several transactions with the entry of a single code name or number, there
is an obvious time saving. MultiLinks also reduce omission errors. You won’t forget
codes that should be included if they are included in a MultiLink. When you use the
MultiLink code, all the codes in the group are entered.
Chapter 4: Setting Up the Practice
27
Enter the MultiLinks function by going to the Lists menu and selecting MultiLink
Codes. The list displays all available procedure codes, adjustment codes, and payment
codes. You can also set up a new MultiLink or edit or delete an existing MultiLink
code.
F1 Look up MultiLink Entry.
Diagnosis Codes
Diagnosis codes represent the reason a service is provided. In effect, the procedure code
tells what the doctor did and the diagnosis code tells what the doctor found.
As with other list functions, the diagnosis code setup is accessed by going to the Lists
menu and selecting Diagnosis Codes or by clicking the Diagnosis Code List speed
button. At this point you can review codes in the list or search for one you do not see.
Clicking New (F8)or Edit (F9)opens up a window where you can create a new code or
edit an existing one.
The Diagnosis: (new) window displays fields for the code number and description. You
also have the option of entering Alternate Code Sets. These can be used later for
entering codes for different carriers but for the same diagnosis.
F1 Look up Diagnosis Entry.
Provider Records
The Provider List is accessed by going to the Lists menu and selecting Providers or by
clicking the Provider List speed button. Specific provider information is accessed by
clicking Edit or pressing F9, and the Provider: (new) setup window is accessed by
clicking New or pressing F8.
28
Medisoft
Address Tab
Provider Code numbers are assigned to more than the doctors. Every member of the
staff should be set up as a provider and receive a provider Code number.
Provider and staff member Code numbers are utilized in Transaction Entry to identify
the author when a Patient note is generated. The only provider Code number that is
printed on a claim form or transmitted electronically is that of the physician assigned to
the patient. All others are for in-house monitoring and accounting.
F1 Look up Provider Entry-Address Tab.
Chapter 4: Setting Up the Practice
29
Default Pins and Default Group IDs Tabs
PIN and ID numbers assigned by Medicare, Medicaid, TRICARE, Blue Cross/Blue
Shield and other commercial carriers are recorded in the Default PINs and Default
Group IDs tabs.
F1 Look up Provider Entry-Default Pins Tab and Provider Entry-Default Group IDs
Tab.
PINs Tab
The PIN matrix is contained in the PINs tab. This contains all of the provider’s PINs
assigned by the various carriers. This is the same table as that contained in the
Insurance Carrier record.
F1 Look up Provider Entry-PINs Tab.
Eligibility Tab
This tab is where you set up the provider to perform eligibility verification.
F1 Look up Provider Entry-Eligibility Tab.
Provider Class Records
Use this window to enter classes or groups for providers in your practice. Grouping
providers into classes is helpful when sending claims or statements electronically. Go to
the Lists menu and select Provider. Select Class from the drop-down menu. To create
a new class of providers, click New or press F8. To edit a class, click Edit or press F9.
The Provider Class List window appears. Enter an ID, Name, Description, and
National ID (group NPI number) for the class. Provider classes are assigned to specific
providers in the Providers Entry window, Default Group IDs tab.
F1 Look up Provider Class Entry.
Insurance Carrier Records
Setting up the insurance carriers correctly is essential to getting claims paid in a timely
manner. Go to the Lists menu and select Insurance. Select Carriers from the dropdown menu or click the Insurance Carrier speed button.
Address Tab
The information contained in the Address tab is standard and includes the
Practice ID code.
F1 Look up Insurance Carrier Entry-Address Tab.
30
Medisoft
Options Tab
The Options tab provides fields for more specific information, including plan name and
type.
This is where you designate insurance classes, indicate the Procedure and Diagnosis
Code Set that are used by this carrier, select options in the various Signature on File
fields, and specify the Default Billing Method. The various Signature on File fields are
provided to determine what prints in Boxes 12, 13, 31, and 24K of the CMS- or
HCFA-1500 claim form.
F1 Look up Insurance Carrier Entry-Options Tab.
EDI/Eligibility Tab
In the EDI/Eligibility tab, be sure to enter the EDI Receiver if you are planning to
submit electronic claims. If the EDI receiver you want is not in the list, you can add it
“on the fly” by pressing F8. After you have signed up with a receiver for your electronic
claims, that receiver assigns your EDI Payor ID and EDI Sub ID numbers and any
other necessary numbers or codes.
F1 Look up Insurance Carrier Entry-EDI/Eligibility Tab.
Chapter 4: Setting Up the Practice
31
Codes Tab
In the Codes tab, you can enter default payment and adjustment codes for applying
payments from this insurance company.
F1 Look up Insurance Carrier Entry-Codes Tab
Allowed Tab (Advanced and above)
This tab contains a listing of allowed amounts paid by the selected carrier for each of the
procedure codes contained in the program. Enter these amounts by hand or let the
program gather the information from insurance payments entered in the program.
F1 Look up Insurance Carrier Entry-Allowed Tab.
PINs Tab
The PINs tab contains a listing of all PINs assigned by the selected carrier to each
provider contained in the program.
F1 Look up Insurance Carrier Entry-PINs Tab.
Insurance Class Records
Use this window to create insurance classes, such as Blue Shield or Medicare. Use these
classes to group insurance carriers for easier reporting. Go to the Lists menu and select
Insurance. Select Classes from the drop-down menu. To create a new insurance class,
click New or press F8. To edit a class, click Edit or press F9. The Insurance Class List
window appears. Enter an ID, Name, and Description for the class. Insurance classes
are assigned in the Insurance Carrier Entry window, Options tab.
F1 Look up Insurance Class Entry.
Address Records
The Address file is your address book within the computer. It keeps the names,
addresses, and phone numbers (with extensions) of important outside contacts, such as
referring physicians, attorneys, employers, referral sources, etc. The Address file should
include all important contact persons whose phone, fax, cell, and e-mail numbers the
practice needs at any time in the future.
Go to the Lists menu and select Addresses or click the Address List icon.
32
Medisoft
When you click New or press F8, the program automatically assigns an address code
based upon the Name field. The address code is not assigned until all information is
entered and saved. Use Search for and Field to look up the address code of existing
records.
The addresses maintained in the program are classified by “type” assigned to facilitate
ease of selection in a drop-down list. These types include: Attorney, Employer, Facility
(Hospital, Rest Home, etc.), Laboratory, Miscellaneous, and Referral Source. Correct
types are required to ensure the CMS- or HCFA-1500 form prints correctly.
F1 Look up Address Entry.
EDI Receiver Records
EDI receiver records are used when sending claims or statements electronically. To get
started with electronic claim or statement submission, contact your local Value-Added
Reseller or call Medisoft directly at (800) 689-4550 and request the enrollment package.
Chapter 4: Setting Up the Practice
33
Optional direct claims software is available to send claims directly to selected carriers
throughout the country. Most of these are set up on a state or regional basis and handle
Medicare, Medicaid, Blue Cross/Blue Shield, and often commercial claims. There is a
cost for each of these programs, but, in most cases, there is no charge for claims filed.
Information on other available EDI modules can be obtained by calling your local
Value-Added Reseller or Medisoft directly at (800) 689-4550.
F1 Look up EDI Receiver Entry.
Referring Provider Records
Many patient visits are the result of a referral from another provider. When a patient is
referred to your practice, you must record the Unique Physician Identification Number
(UPIN). The referring provider name prints in Box 17 of the CMS- or HCFA-1500
claim form, and the UPIN prints in Box 17a.
Go to the Lists menu and select Referring Providers. To enter a new referring provider
record, press F8 or click New.
Address Tab
The Address tab takes the basic information, plus specialty data and the license number.
It allows space for you to indicate whether this doctor is a Medicare participating
healthcare provider.
Default PINs Tab
The Default PINs tab displays UPIN and other identification numbers and
information. If a practice is performing internal lab work and/or X-rays, the attending
provider is also the referring provider. To get paid for this service, the attending
provider must also be set up in the Referring Provider file and assigned to the patient.
F1 Look up Referring Provider Entry.
PINs Tab
Depending on the type of claims you file, you could have separate PINs from each
insurance for this referring provider. The PINs tab provides a PIN matrix where you
can store these additional PINs. If you send electronic claims, you are also required to
enter qualifiers to the PINs, if applicable. These qualifier codes indicate the type of
PIN. Refer to the implementation guide for you insurance carrier if you are not sure
which qualifier to use. This is not provided by Medisoft but by your carrier.
F1 Look up Referring Provider Entry.
34
Medisoft
Billing Code List
A Billing Code is a user-defined two-character alphanumeric code. Billing Codes can be
effective in sorting and grouping patient records. Go to the Lists menu and select
Billing Codes.
The Billing Code List window lets you review and edit the codes contained in the
program and create new ones. If you want to use a code you have not previously
entered, click New or press F8 and the window for a code and description appears.
A billing code range is a filter available in most reports printed in Medisoft.
F1 Look up Billing Code Entry.
Contact List (Advanced and above)
The Contact List contains a ready reference of people with whom you have had contact
during the course of business. The Contact window has space where you can add notes
concerning your conversations to help you keep track of what was discussed and any
conclusions or information shared during the conversation. For more information on
the use of this feature, see the Help files.
F1 Look up Contact Entry.
Tutorial Practice
To review the procedures outlined in this chapter, you can perform the following steps
using the tutorial database provided with this program.
Opening the Practice Record
Going to the File menu and selecting Open Practice.
The sample data set up in this tutorial is under the practice name Medical Group
(Tutorial Data). Highlight that name and click OK. If this practice name does not
appear, click the Add Tutorial button. Then select the practice and click OK. The
practice name appears in the Title bar of the main Medisoft window.
Chapter 4: Setting Up the Practice
35
Creating a New Procedure Code
Click the Procedure Code List speed button. In the Procedure/Payment/Adjustment
List, click New.
In the General tab, enter XYZ in the Code 1 field, and then enter Test Code in the
Description field. Select Procedure charge in the Code Type field.
The Account Code is an internal code for in-house bookkeeping. It can be any
configuration of letters or numbers you want to assign to each accounting function, i.e.,
cash, checks, etc. Enter OVSP (for Office Visit-School Patient).
Leave Type of Service empty. Enter 11 as the Place of Service, and leave Time to do
Procedure empty.
Leave the Service Classification field alone. It defaults to A..
Leave the Alternate Codes fields alone.
Click the Taxable box to mark this code as needing tax charges added to it.
36
Medisoft
Click the Patient Only Responsible box.
No other fields in this window are applicable, so skip them.
Open the Amounts tab and enter 50 in field A as the amount you want charged for this
procedure.
Enter 20 in the Cost of Service/Product field and 50 in the Medicare Allowed Amount
field. Click Save
Editing Procedure Codes
You need to edit a couple of the procedure codes in the program. If the
Procedure/Payment/Adjustment List window is not already open, click the Procedure
Code List speed button. In the Search for field, enter 99214. (Be sure the Field is set
to Code 1.) Click Edit. Open the Amounts tab. In field A, enter 75. Click Save.
In the Search for field, enter 82954. Click Edit. Open the Amounts tab and enter
12.50 in the A field. Click Save. Click Close.
Creating a MultiLink Code
Go to the Lists menu and select MultiLink Codes. Click New.
In the MultiLink Code: (new) window, enter SCHOOLPHYS in the Code field.
Enter a description in the Description field, such as Physical, School. In Link Codes 1,
Chapter 4: Setting Up the Practice
37
enter 80050, the general health screen panel; in Link Codes 2, enter 81000, a routine
urinalysis; in Link Codes 3, enter 93000, an EKG; and in Link Codes 4, enter 99241,
office consultation. When you have selected all of the procedures you want linked, click
Save. Click Close.
Creating a New Diagnosis Code
Click the Diagnosis Code List speed button. Click New.
Enter TEST in the Code 1 field. In the Description field, enter Test Diagnosis Code.
Click Save. Click Close.
Setting up a New Provider Record
Click the Provider List speed button. In the Provider List window, click New.
38
Medisoft
Skip the Code field. Enter the following information:
Name: I. M. Urdoc
Credentials: MD
Address: 1 Healthy Avenue, Stressfree, IA 68888
Office number: (123) 443-2584 (123-4HEALTH). There are no additional numbers,
so leave those fields blank.
This provider is a Medicare participating provider. Click the Signature on File check
box, then select or enter 4/3/89 as the Signature Date. Click the Medicare
Participating check box. Enter Dr. Urdoc’s License Number as ZYX1111110. His
practice specialty is General Practice.
In the Default PINs tab, enter 102938475 in the SSN/Federal Tax ID field, choose
Federal Tax ID Indicator, and then enter 22222222 in the Medicare field.
No other information is available right now for Dr. Urdoc.
Chapter 4: Setting Up the Practice
39
When you have entered all the information, click Save. Click Close.
Setting Up a New Insurance Carrier Record
Click the Insurance Carrier List speed button. Click New.
Skip the Code field. Enter the following information:
In the Name field, enter A1 Insurance Partners. In the other appropriate fields, enter
PO Box 11223, Hartford, CT 01234.
Open the Options tab.
Enter Best Choice in the Plan Name field. Enter HMO in the Type field. Leave the
Procedure Code Set and Diagnosis Code Set fields alone for now.
What you select in the various Signature on File fields determines what prints in Boxes
12, 13, 31, and 24K of the CMS- or HCFA-1500 form. For now, select Signature on
File in each of them. Select Provider Name and PIN in the Print PINs on Forms by
clicking the box and selecting that option. Leave the Default Billing Method as Paper.
Open the EDI/Eligibility tab. We aren’t dealing with electronic claims, so skip the top
section of the window. In the respective default payment application code fields, select
INSPAY, APWROFF, MCWH, DEDUC, and TAKEBACK. Click Save. Highlight
40
Medisoft
A1 Insurance Partners, and click Edit. (A new insurance record must be saved before
the last two tabs are accessible.)
Open the PINs tab. For IM Urdoc, enter 1122334. When finished, click Save. Click
Close.
Creating a New Address Record
Click the Address List speed button to open the Address List window. Click New.
Leave the Code field blank this time and let the program automatically assign one based
on the Name field. The code is not assigned until all information is entered and saved.
In the name and address fields, enter Pizza Hut, 1234 Fifth Avenue, Anywhere, IA
85000, 1234567890 (this is the phone number). In Fax Phone, enter 1234567899.
Be sure the Type field reflects Employer.
The contact for this entry is Murray and in the ID field, enter Hawaiian, 3-Cheese.
The ID, Extra 1, and Extra 2 fields are used for any other information you may want to
enter to identify this entry. When finished, click Save. Click Close.
Chapter 4: Setting Up the Practice
41
Setting Up a Referring Provider Record
Click the Referring Provider List speed button. Click New.
Create a record for Frank N. Stein, MD; 1 Spooky Drive, Transylvania, IA 85004; enter
[email protected] in E-Mail address, 4800981234 in the Office phone, 4800981233
as the Fax, 6026789123 as the Home phone number, and 4805432109 as the Cell
Phone number. Dr Stein is a Medicare participating physician, his License Number is
5551212900, and his specialty is Gastroenterology.
Open the Default Pins tab. Dr. Stein’s Federal Tax ID is 23YXO444 (be sure to choose
Federal Tax ID Indicator), and his UPIN is 2X3XC12. That’s all the information
needed right now. When information is entered in both tabs, click Save. Click Close.
42
Medisoft
Chapter 5
Patient Record Setup
Patient List
Set Up
One of the most important functions in getting your practice computerized is entering
patient data. Go to the Lists menu and select Patients/Guarantors and Cases or click
the Patient List speed button. You can search for an existing patient’s record by
entering the first few letters of his or her last name in the Search for field.
If you want the Patient List window to open automatically each time you open the
program, go to Program Options and click Patient List in the Show Windows on
Startup section of the General tab.
Clicking New or pressing F8 opens an entry window to set up a new patient. Each of
the data windows during setup lets you edit, change, or delete the information
contained in window. The importance of entering correct information into the patient
data files cannot be overemphasized. From setting up the chart numbers to entering
percentage amounts for insurance claims, the effect of data entry is far reaching.
It is especially important to set up the guarantor when doing insurance billing.
F1 Look up Patient/Guarantor Entry.
Setting Up the Chart Number
Every patient or guarantor must have a chart number and be set up in the database
before transactions can be entered.
If using the program’s default automatic settings, each chart number consists of eight
alphanumeric characters. If you leave the Chart Number field blank, the program
automatically assigns a unique chart number. If you want, you can change the default
settings and have the program automatically assign numeric chart numbers. Go to
Program Options, open the Data Entry tab, and click Use numeric chart numbers in
the Patient section.
If you want to establish your own patient chart numbering system, type a number or
code as soon as you enter the new patient window. There is no need for corresponding
numbers within a family; the number sequence has little bearing on grouping of
Chapter 5: Patient Record Setup
43
patients. Each patient is set up individually in the program and individual bills are
prepared for each guarantor. It is important to understand that once assigned, the
Chart Number cannot be changed. To correct a wrong chart number, you’d have to
delete the entire patient record and create a new one with the proper chart number. All
other data in the patient record can be modified.
F1 Look up Chart Number.
New Patient Setup Window
Clicking New Patient or pressing F8 lets you set up a new patient record in the
program.
Enter all known or necessary information. When entering an address, the focus moves
from the Street fields directly to the Zip Code field. The program has a feature that
saves city, state, and zip code information in a table. Once you enter a zip code with its
associated city and state, the next time you enter the zip code, the City and State fields
are filled in automatically, saving you time when entering new records.
In the Medisoft Advanced and Medisoft Network Professional programs, you can
establish default information, applied to all new patient records. Enter that information
44
Medisoft
which is generally the same for all of your patients, and then click Set Default. To
remove your new default settings, hold down CTRL and the button name changes to
Remove Default.
When you enter a Social Security Number, the program checks through the patient
records for any duplications. If a number you enter is a duplicate, the program displays
the name and chart number of the patient first showing that Social Security Number.
Do not include spaces or hyphens as you enter dates or phone numbers. If you want the
program to automatically hyphenate Social Security Numbers, go to Program Options,
open the Data Entry tab, and click Auto format Soc. Sec. # in the Patient area. Then
enter Social Security Numbers without hyphens.
The Other Information tab contains fields for additional information relevant to the
patient record, such as the assigned provider, identification codes, and emergency
contact numbers. If you have chosen to use patient flagging (Advanced and above), the
Flag field lets you choose which flag to associate with the patient record, including
None if you want to disable the feature after assigning a flag.
F1 Look up Patient/Guarantor Entry-Other Information Tab and Program Options –
Color Coding Tab (Advanced and above).
If the patient’s employer record has been set up in the Address file, this data is available
in the Other Information tab. Clicking the arrow or magnifying glass icon to the right
of the Employer field displays a list of those employer records already stored in the
program. If the employer record you need is not available, press F8 for the new
employer setup.
F1 Look up Patient/Guarantor Entry and Patient List.
Patient Quick Entry Overview
(Available with Medisoft Advanced and Network Pro)
The Patient Quick Entry feature provides another way to create patient records. This
method involves more initial setup but offers benefits for practices that want to
streamline and customize data entry. This feature provides a customized interface for
patient entry. Using this feature allows you to set up a method for entering patient data
that reflects your work environment, which simplifies data entry and increase efficiency.
Patient and case data is easily added to existing records or you can quickly create new
records from one window without clicking multiple tabs.
This feature lets you select which fields from the Patient and Case windows are included
on a Patient Quick Entry template. Templates are the basic building block of this
Chapter 5: Patient Record Setup
45
feature. You can create and customize as many as needed and then when using the
Patient Quick Entry feature, you can select which template to build or edit a record
from. When building templates, you cannot remove required system fields, but can
create as many templates as needed to reflect your office workflow and job duties. And,
you can on an ad-hoc basis add or remove fields on a template from the Patient Quick
Entry window.
For more information and complete instructions for setting up and using this feature,
see:
F1 Look up Patient Quick Entry Overview, Using the Patient Quick Entry Feature.
Custom Patient Designer (Advanced and above)
A practice may need information that is not already gathered in the accounting package.
Medisoft lets you design a custom tab in the Patient/Guarantor window for gathering
this data. It could be eye color, hair color, emergency contact information, and so on.
Go to the Tools menu and select Design Custom Patient Data.
If there is information in the Patient/Guarantor window that you do not need or if you
want to add additional fields, go to the Tools menu and select Design Custom Patient
Data. The Custom Patient Designer window opens.
Installing this feature replaces any existing fields in the window.
Within the large blank area on the right, add whatever fields you want to gather the
extra data. Similar to the Report Designer function (see Chapter 13, page 119), you
have tools with which to define the fields, place Text or Data fields in the window in
whatever order you desire, and create shapes to frame, divide or accent the fields or
sections within the window. There is an Add New Data Field speed button that lets
you specify the type of data the fields contain (Alphanumeric, Date, or True/False) and
then establish the field names. Click a field type speed button, and then click in the
window to place the field. Each field, when created, can be adjusted as to size,
alignment, and position.
Multiple custom patient tabs can be designed in a database, and you can access them by
opening the appropriate tab in the Patient/Guarantor window.
F1 Look up Custom Patient Designer.
Setting up a Case
Transactions within the program are generally case-based. A case is a grouping of
procedures or transactions generally sharing a common treatment, facility or insurance
carrier. You can set up as many new cases as needed.
46
Medisoft
Each new case that is set up needs to contain the patient’s pertinent information. If you
click New Case or press F8 with the case list selected, only the Guarantor designation is
copied to the new case. To save time, click Copy Case to copy all the current case
information, and then revise those portions of the data that are different for the new
case.
You definitely want to open a new case if the treatment comes under a different
insurance carrier. Suppose you are treating a diabetic patient regularly and he is injured
on the job. His visits regarding the work-related injury should be kept in a Workers’
Compensation case, totally separate from the regular visits, for legal and reporting
reasons. The ideal situation is to have a case for each different malady from which the
patient suffers. Then you can pull up groupings of case visits to help you evaluate the
patient’s overall health status. By pulling a case that contains all diabetic treatments,
one for high blood pressure, one for angina, and one for cancer, you get a better picture
of the full range of health problems.
If a patient comes for a onetime treatment, you can create a transaction for that
treatment without creating an entirely new case. Just select different diagnosis
codes in Transaction Entry when creating the transaction.
Existing case numbers are found in the Patient List window through which you set up
new cases. Case numbers set by the program are sequential and not one of the numbers
is repeated within the program in a single data set.
An existing case can be edited or reviewed through the Patient List window or accessed
from any Case fields in the program by pressing F9. The patient Case window contains
tabs that display fields necessary to complete an insurance claim form.
In Medisoft Advanced and Medisoft Network Professional, you can limit the tabs that
are displayed. If a tab is not applicable to your practice or if you would prefer not to
have it visible, right-click the tabs. In the list that appears, click each tab you don’t want
displayed. That tab no longer appears in the Case window. To add tabs that are not
visible, right-click the tabs and click the tab you want displayed to remove the check
mark.
The Personal tab establishes the patient and his or her guarantor information, marital
and student status, and employment.
F1 Look up Case – Personal Tab.
The Account tab displays the provider, referral, and attorney information set up in the
Address file. It also covers billing and price codes and information on visit
authorization, including the number of visits.
F1 Look up Case – Account Tab.
The Diagnosis tab allows for entry of up to four default or permanent diagnosis codes
for this case, plus entry for allergy and EDI notes. Information in the Allergies and
Chapter 5: Patient Record Setup
47
Notes section is displayed in Transaction Entry and the New Appointment Entry
window of Office Hours when a Chart number is selected.
F1 Look up Case – Diagnosis Tab.
The Condition tab allows for entry of information pertinent to the illness, pregnancy, or
injury and tracking of symptoms. It also includes dates relative to the condition, plus
Workers’ Compensation information.
F1 Look up Case – Condition Tab.
The Miscellaneous tab contains supplemental information features like lab work
charges, whether the lab is in-house or outside, Referral and Prescription Dates, Local
Use A and Local Use B fields, case Indicator code, and prior authorization. It also
provides space for recording information concerning a primary care provider outside
your practice.
F1 Look up Case – Miscellaneous Tab
The Policy 1, 2, and 3 tabs let you connect up to three insurance carriers to the patient
record, including policy and group numbers, and Insurance Coverage Percents by
Service Classification (how much the carrier pays for certain types of procedures). The
service percentage classification is tied to each procedure code.
F1 Look up Procedure/Payment/Adjustment Entry.
A Deductible Met check box is provided in the Policy 1 tab. When the patient meets
his or her deductible obligation for the year, click this box and the status is displayed in
the patient account detail of the Transaction Entry window.
The three tabs have the same layout, except Policy 1 asks about Capitated Plan and CoPay Amount and has the Deductible Met check box; Policy 2 asks if this is a Crossover
Plan; and Policy 3 can be set up for tertiary or third-party involvement.
F1 Look up Case – Policy 1, 2, and 3 Tabs
The Medicaid and TRICARE tab includes fields for all submission numbers, reference,
and data for each carrier. It also includes branch of service information.
Within the Medicaid and Tricare tab are EPSDT and Family Planning indicators,
required submission numbers, and reference data for the case. It also includes service
information for TRICARE claims.
The Multimedia tab (Network Professional only) allows you to add bitmaps, video, or
sound to your patient records.
F1 Look up Case – Multimedia Tab and Multimedia Entry.
The Comment tab (Advanced and above) is provided for the entry of notes to be
printed on statements.
48
Medisoft
F1 Look up Case – Comment Tab.
This EDI tab is where you enter information for electronic claims specific to this case. If
applicable to the claims for this case, enter values in the fields.
F1 Look up Case – EDI Tab.
Custom Case Designer (Network Professional only)
As well as creating custom patient tabs, you can create custom case tabs in the Custom
Case Designer. Information in these tabs might be vital signs, immunization records,
etc. Go to the Tools menu and select Design Custom Case Data.
Within the large blank area, add whatever fields you want to gather for extra data.
Similar to the Report Designer function (see Chapter 13, page 119), you have tools with
which to define the fields, place Text or Data fields in the window in whatever order
you desire, and create shapes to frame, divide or accent the fields or sections within the
window. There is an Add New Data Field speed button that lets you specify the type of
data the fields contain (Alphanumeric, Date, or True/False) and establish the field
names. Click a field type speed button, and then click in the window to place the field.
Each field, when created, can be adjusted as to size, alignment, and position.
Multiple custom case tabs can be designed in a database, and you can access them by
clicking on the appropriate tab in the patient Case window.
F1 Look up Custom Case Designer and Format/Design Reports.
Tutorial Practice
To review the procedures outlined in this chapter, you can perform the following steps
using the tutorial database provided with this program.
Entering Patient and Case Records
Setting Up a New Patient Record
Click the Patient List speed button to open the Patient List window. Click New
Patient.
Chapter 5: Patient Record Setup
49
The Patient/Guarantor: (new) window opens on the Name, Address tab. Chart
Number is the first field. Skip this field and let the program create a unique chart
number.
Create a record with the following information: Name: I.B. Gone; address: 246
Outtahere Street, Pasturize, IA 55556; e-mail address: [email protected]; home
phone number: (513) 224-4668 (remember to not enter parentheses or hyphens in
phone numbers); work number: (123) 345-6789; cell phone: (513) 224-1111; fax
number: (513) 531-9766; birth date: 1/12/1975; sex: Male; Social Security Number:
012-34-5678.
Open the Other Information tab. In the Type field, be sure Patient is selected. Assign
J. D. Mallard as the provider, click Signature on File and enter the signature date of
9/15/2004.
In the Employer field, select Bean Sprout Express. Mr. Gone’s status is Full time.
When finished, click Save. Click Close.
50
Medisoft
Opening a New Case
Open the Patient/Guarantor List window by clicking the Patient List speed button.
Highlight I.B. Gone in the left section of the window. Then choose the Case radio
button at the top right of the window. Click New Case.
Enter Back pain as the description of this case. Change Marital Status to Single. All
the other information is taken from the patient record.
Open the Account tab.
Chapter 5: Patient Record Setup
51
In the Assigned Provider field, enter IMU (for I.M. Urdoc). In Referring Provider,
select Frank N. Stein.
Let’s say Mr. Gone was referred by your stellar Yellow Pages ad. In Referral Source,
select Yellow Page Ad.
You’ve already received information from Mr. Gone’s insurance carrier and you know
that treatment is authorized through October 2006. Enter 10/31/2007 in the
Treatment Authorized Through field. In Authorization Number enter 6489211, in
Authorized Number of Visits enter 12, and in the ID field, enter A.
Open the Diagnosis tab.
52
Medisoft
In Default Diagnosis 1, enter 724.2, and in Default Diagnosis 2 enter 847.2. Mr.
Gone has informed you that he is allergic to Codeine, so enter that in the Allergies and
Notes field.
Open the Condition tab.
Chapter 5: Patient Record Setup
53
The reported injury date was September 15, 2002, the Illness Indicator is Injury, and
the first consultation date was September 21, 2002. There have been no similar
symptoms. This was related to an auto accident, so select Auto in Accident Related To.
Mr. Gone lives in Iowa but was visiting people in Arizona when the accident happened,
so indicate AZ as the State. In Nature Of, select Injured during recreation. No other
fields are important for this case so leave them blank.
Open the Policy 1 tab.
54
Medisoft
In Insurance 1, select A1 Insurance Partners. Mr. Gone’s Policy Number is 9782XYZ,
and his Group Number is 98KEY. The Policy Start date is October 1, 1998 and the
End date is October 31, 2007. Click Assignment of Benefits/Accept Assignment.
Leave the default information in the rest of the fields in this tab.
Mr. Gone has a secondary insurance policy. Open the Policy 2 tab. Select Aetna as his
secondary coverage, Policy Number 00034526Z, and the Group Number is 888B.
Policy Start and End dates are October 1, 1999 and September 30, 2008, respectively.
Click Assignment of Benefits/Accept Assignment. Your carrier assigns a Claim
Number; in our case let’s use 283-8765D.
No fields in the Medicaid and Tricare or Multimedia (Advanced and above) tabs are
necessary for Mr. Gone, so skip these tabs. Click Save when finished.
Chapter 5: Patient Record Setup
55
Chapter 6
Transaction Entry
The Transaction Entry window is designed for easy transaction entry and to display as
much information with as few clicks or keystrokes as possible. Not only do you record
all patient visits and their charges, you also enter payments and adjustments that may be
added to the ledger.
Medisoft is an Open Item Accounting program, meaning that transactions entered are
marked when paid but remain on the active ledger as long as the case is active. There is
no clearing of the ledger and bringing up a total to start a new month, as with a balance
forward program.
Transaction entry is generally case-based. Transactions are entered into the patient
ledger grouped by case number. You can have a case for each transaction or for each
diagnosis type.
F1 Look up Transaction Entry.
Chapter 6: Transaction Entry
57
Start with a Chart Number
From the Activities menu select Enter Transactions or click the Transaction Entry
speed button. Within Transaction Entry, two numbers are of prime importance: the
chart number and the case number.
Enter the chart number or click the Chart field and select the chart number from the
drop-down list. You also have the option of entering the superbill number or selecting
the superbill number from the drop-down list in the Superbill field. If the patient
record has not yet been set up, press F8 to bring up the Patient/Guarantor: (new)
window. See Chapter 5 for setting up a patient record, page 43.
When you press TAB or ENTER, a case number is selected in the Case field (if one is
available). By default, the most recently opened case is opened. You can change the
default in the Program Options window, Data Entry tab, Case Default field, see page
9.
If you want to create a new case, the shortcut to bring up the Case window is F8.
Another method of selecting a specific case is to click the speed button to the right of
the Case description field to open the Select Case by Transaction Date window.
F1 Look up Select Case by Transaction Date.
A document number is automatically assigned by the program and is used for reference
and filtering purposes, whether the field is displayed in the Transaction Entry window
or not. You can replace this number with your own if you want.
If you use superbills, you can enter a superbill Serial Number in this field to help keep
track of the superbill. To use superbill numbers in Transaction Entry, open Program
Options and click both Force Document Number and Use Serialized Superbills in the
Data Entry tab.
Sometimes there is a need to provide more documentation about a transaction. This
can be done in a special Transaction Documentation window activated by pressing F5
or clicking Note in the Charges section of the Transaction Entry window.
58
Medisoft
There are various transaction documentation types available, e.g., Diagnostic Report,
Ambulance Certification, etc., and they can be viewed in the Quick Ledger.
F1 Look up Transaction Documentation.
Entering a Charge in Transaction Entry
Once you have selected patient chart and case number in the Transaction Entry
window, click New or click in any column of the Charges section.
The current date is automatically entered. If you are entering transactions from earlier
dates, insert the correct date of the entries with which you are working. If you have a
number of transactions from a different date, you can change the program date by
clicking the date in the lower right corner of the program window and selecting a new
date. Be sure to change the date back to the current date when finished.
Chapter 6: Transaction Entry
59
The Transaction Entry window displays on a tabbed panel the current insurance carriers
assigned to the patient’s case along with the aging columns. The aging columns’
appearance is dictated by setting on the Program Options tab.
Enter information in the Procedure column and any other information that is necessary
to complete this charge transaction.
To create a second charge transaction, click the down arrow key or click New.
Entering a Payment or Adjustment in Transaction
Entry
After selecting patient chart and case numbers in the Transaction Entry window, you
can enter a payment by clicking New in the Payments, Adjustments, and Comments
section of the window.
The current date is inserted in the Date field. Select the Pay/Adj Code, and then enter
Who Paid, a Description, and the Amount. If the payment is being made by check, the
check number can be entered in the Description field.
Apply Payments or Adjustments to Charges
We recommend that you apply all payments and adjustments to charges.
Failure to do so results in other parts of the program not functioning properly,
i.e., remainder billing and the delay secondary billing feature (Advanced and
above), to name only two. In addition, some report results will be incomplete
or inaccurate.
You can distribute a payment or an adjustment to a specific charge or charges by
clicking Apply. The Apply Payment to Charges or Apply Adjustment to Charges
window opens (depending on whether you are applying a charge or an adjustment) and
lets you direct that payment or adjustment to the proper charge or charges.
Besides displaying the source of the payment or adjustment and the patient’s name, the
Apply Payment to Charges or Apply Adjustment to Charges window also displays the
number of charges in this case. The upper right corner displays the unapplied amount
entered in the payment.
Once the entry is complete and verified, click Close to return to Transaction Entry.
You can then click Print Receipt (which gives the patient a Walkout Receipt before
leaving the office), click Print Claim (which prepares entries that have not yet been
submitted on an insurance claim and sends them to print), or click Close to exit the
window.
F1 Look up Apply Payment to Charges or Apply Adjustment to Charges.
60
Medisoft
Unprocessed Transactions
The Unprocessed Charges window provides an interface between an Electronic Medical
Records (EMR) service and Medisoft via Communications Manager.
This window provides controls to with edit and post financial transactions imported
from an EMR service and Medisoft.
Transactions imported into Medisoft from an EMR service through Communications
Manager are held as Unprocessed Charges until they can be processed by a Medisoft
user.
From Activities menu select Unprocessed Transaction and then select Unprocessed
EMR Charges. The Unprocessed Charges window appears with a list of transactions
that have yet to be posted.
The columns in the list correspond to information from EMR application Columns
such as billing, providers, diagnosis codes, and procedure codes should be reflected in
the same manner as found in your practice management software.
F1 Unprocessed Transactions Overview.
Patient Treatment Plans (Network Professional only)
When a patient has a choice of options for the treatment he or she can receive, a
treatment plan can be prepared which sets out the different treatments offered and the
cost of each plan.
F1 Look up Treatment Plan List.
Print Receipts, Create Claims
Once a transaction has been entered and saved, the transaction can be displayed in the
Transaction Entry window. By sliding the scroll bar at the bottom of the window, a
full summary of the transaction is revealed.
You can now print a receipt for the patient, file a claim, or close the window.
F1 Look up Create Claims.
Billing Charges (Advanced and above)
This feature lets you apply billing charges to accounts that are past due.
Before you can use this feature, you must set up at least one billing charge type of
procedure code. Do this through the Procedure/Payment/Adjustment List and
Procedure/Payment/Adjustment: (new) windows. Fill in the Code 1 and Description
Chapter 6: Transaction Entry
61
fields. Be sure to select Billing charge in the Code Type field. Add whatever other
information you want and save the code. Create as many billing charge codes as you
need.
If desired, you can use billing codes (which are used to categorize patient records) and
indicator codes in applying billing charges. Be sure these codes are set up if you want to
use them.
Go to the Activities menu and select Billing Charges. Use the range limitations to
select the records to which you want to apply the billing charges. The Charges
Creation Date is the date that appears in the ledger with the billing charges. This can
be whatever date you choose (but the transactions created still show on the current day’s
activity reports).
Fill out all the requested information, then click Start. New transactions are added to
each patient record that fits the criteria you selected.
F1 Look up Billing Charges and Procedure/Payment/Adjustment Entry.
Quick Ledger (Advanced and above)
The Quick Ledger in Medisoft gives a quick reference for transaction and other
information in the patient’s account. There are two types of Quick Ledgers in
Medisoft: the Patient Ledger and the Guarantor Ledger.
The Patient Ledger displays transaction information and account totals for individual
patients. The Patient Ledger is the default ledger in Medisoft.
The Guarantor Ledger provides the same information as the Patient Ledger but allows
you to view guarantor totals as well. In the Program Options, General tab, you can
select Guarantor Ledger as your default ledger.
To get quick and easy access to a patient’s ledger from almost anywhere in the program,
press F7 or click the Quick Ledger speed button.
62
Medisoft
While no new transactions can be made in the ledger itself, it is possible to edit and
print the ledger and gain valuable detail on patient accounts.
You can change responsibility for a selected transaction in the Quick Ledger window.
Right-click a transaction to change its responsibility between insurance carriers or from
an insurance to the patient. This feature lets you skip entering the zero-dollar insurance
payment to indicate that no payment is coming from the insurance carrier.
F1 Look up Changing Responsibility in Quick Ledger.
The Quick Ledger detail window is very similar to the Transaction Entry window. Use
the horizontal scroll bar to reveal additional data fields. A navigation bar lets you move
quickly through the list of transactions. Three buttons open additional data fields.
Click Edit or press F9 to open a panel very similar to the transaction panel in the
Transaction Entry window where charges, payments and adjustments can be reviewed
and edited, as needed. Notes can be added through the Transaction Documentation
window. Click Payment Detail to display all payments/adjustments made toward a
specific charge. Click Filter to search which transaction data to display. Real power
comes with using multiple filters. Navigation buttons in the Payment/Adjustment
Detail window are for selecting other entries in the Quick Ledger to review without
having to exit the Payment/Adjustment Detail window first.
If you click Quick Statement, you print statements from the Reports menu.
If you click Statement, you print statements from Statement Management.
F1 Look up Quick Ledger, Payment/Adjustment Detail, and Transaction Filter.
Chapter 6: Transaction Entry
63
Quick Balance (Advanced and above)
Quick Balance is a quick summary of all remainder charge totals contained within the
program for a selected guarantor record. It can be displayed at just about any time
while working in the Medisoft program by clicking the Quick Balance speed button or
pressing F11.
If the record selected is a guarantor’s record, the Quick Balance window displays each
patient for whom the guarantor is responsible and the total qualifying remainder charges
for each. If the record selected is not a guarantor’s record, a listing of all the selected
patient’s guarantors is displayed. Choose a guarantor to see the quick balance.
If you click Print in Quick Balance, you print statements from the Reports
menu.
F1 Look up Quick Balance.
Tutorial Practice
To review the procedures outlined in this chapter, you can perform the following steps
using the tutorial database provided.
Transaction Entry
To begin, go to the Activities menu and select Enter Transactions or click the
Transaction Entry speed button.
For this exercise, enter GON in the Chart field to pull up Mr. Gone’s chart. Press
ENTER. His most recent case opens and a number appears in the Document field. If
this field does not appear and you want to see it, go to Program Options, open the Data
Entry tab, and click Force Document Number. Return to the Transaction Entry
window.
To create a new transaction, click any column in the Charges section or click New.
Any information contained in the case Allergies and Notes box is popped up for your
view. Click OK to clear this message and continue.
Enter 99214 (Office visit) in the Procedure column. Press ENTER. All available
information concerning that procedure code is automatically entered in the appropriate
column. The charge shows $75 for the visit.
To create a second charge transaction, press the down arrow or click New. Now enter a
second procedure code for this visit, 82954 (Glucose Test). Note that the Amount field
shows $12.50.
Mr. Gone is making a payment of $10 on the account. Click any column in the
Payments, Adjustments, and Comments section, and then enter the procedure code for
64
Medisoft
a cash co-payment (COPAY10). In Who Paid, select Mr. Gone. In the Description
field, enter Co-payment. Notice that -10 is entered in the Amount field. Click Apply.
The Apply Payment to Charges window shows each of the charge entries that have
been made and a white column marked This Payment.
With the $10 to apply, select the charge that is $75.00, click in the This Payment
column of that transaction, and enter 10. Click Close.
You need to make an adjustment, so click New in the Payments, Adjustments, and
Comments section of Transaction Entry. Enter the adjustment code CACSYDISC, in
the Pay/Adj Code field, Courtesy Discount in the Description column, and 5 as the
adjustment amount. Click Apply.
The Apply Adjustment to Charges window is similar to the Apply Payments to
Charges window.
Chapter 6: Transaction Entry
65
Locate the $65 balance and enter 5 in the This Adjust column. Click Close to return to
the Transaction Entry window.
Transaction Documentation
You need to add a note to the first transaction. Locate that transaction in the Charges
area and click Note in that same area. (You can add a note to either a charge transaction
or a payment/adjustment transaction.)
The default Type is Transaction Note (internal use only). Enter the following in the
Documentation/Notes area of this window: Follow up with the carrier on this charge.
Press the ENTER key and then press CTRL +T to enter a date and time stamp in the
note. Click OK. Click Save Transactions. In the column to the right of the selected
transaction there is a small icon, which indicates that a note has been added. This
indicator is also displayed in the Quick Ledger window next to this transaction.
Click Close to close the Transaction Entry window.
66
Medisoft
Chapter 7
Claim Management
This chapter explains briefly how to manage claims within the Claim Management
window and includes creating, editing, printing/reprinting, and listing claims, as well as
changing claim status.
The Claim Manager’s Job
To help you better understand the function of claim management, let’s use a shipping
analogy. Whereas Cases are containers filled with claims for specific diagnoses, claim
management is the process by which the cases are checked, sorted and delivered. In
other words, claim management is the process of making sure all shipments are correct,
ready to be sent and shipped to the right companies (insurance carriers).
The Claim Manager (the person performing claim management) checks the claims,
makes sure the boxes are properly marked, and sends them on their way. She
determines whether the shipment goes by truck (paper claims) or by air (electronic
claims). When a box is returned (rejected claim), the Claim Manager makes whatever
changes are necessary (with help from the EOB or Audit/Edit Report) and ships the box
again (resubmits the claim).
Someone else sees and treats the patients. Another person enters data from the superbill
to begin the billing process. Once all the data has been entered, it must go through the
Claim Manager’s office before being sent to an insurance carrier.
The Claim Manager focuses on three principal areas, not necessarily sequential: review,
batch, and final review.
Watchdog: The Claim Manager is, first of all, the watchdog of the claims. She checks
each claim and verifies the numbers. She has the authority to edit the claim and make
needed changes. If she sees that a claim should go to a different carrier than indicated,
or if the EDI receiver information is incomplete, she corrects the record. She has access
to all three carriers, primary, secondary, and tertiary. She checks the billing date and
how the claim is to be sent, either by paper or electronically. And then she can indicate
the status of the claim. There is a place where she can add any special instructions that
need to go with the claim.
Batch ‘em up! The function of creating claims serves to group claims that are headed to
the same destination. The Claim Manager gathers and sorts by range of dates or chart
numbers. Transactions can be selected that match by primary carrier, Billing Code, case
Chapter 7: Claim Management
67
indicator, or location. Random Billing Code numbers can be selected. The Claim
Manager can also indicate a minimum dollar amount for creating the claims,
eliminating claims too small to be worth billing.
Reviewer: The Claim Manager has at her fingertips a List Only button that lets her
retrieve claims that match a certain criteria that she has determined. The List Only
Claims That Match window is a “show me” window that lets the Claim Manager
review all that is in the program. The claims that come before her can be given a final
check for accuracy and completeness. She can select specific or all carriers to review.
She can group all electronic media claims.
Besides these three focus areas, the Claim Manager also has responsibility to mark claims
that are paid and those that are rejected.
Marking paid claims: The date of submission in the Claim Management window
indicates when the claims were shipped or transmitted. Claims are marked under the
designation of “Sent” and the date is automatically inserted. The claims stay in Claim
Management marked as “Sent” until they are manually changed in the Claim edit
window as having been received and dispatched by the carrier. When a payment is
received, use the EOB to enter all payments through transaction entry. If selected in
Program Options (Payment Application tab, Mark Completed Claims Done field), the
status for paid claims is automatically changed to “Done.”
Handling rejected claims: When a paper claim is rejected for payment by the insurance
carrier, change the payment status in the Claim Management window from “Sent” to
“Rejected.”
Now put yourself in the picture. Picture yourself as the Claim Manager. The tools by
which you get the job done are found in Claim Management.
To perform any claim management functions, go to the Activities menu and select
Claim Management, or click the Claim Management speed button.
68
Medisoft
Creating Claims
It is in the creating claims operation that a claim is finally prepared for submission.
Preparation can involve a single claim or a batch. Claims are gathered by range of dates
and/or chart numbers. The selection of claims to be created can be further narrowed by
specifying detail in the Select transactions that match, Provider, and Include
transactions if the sum is greater than fields.
F1 Look up Create Claims.
Editing Claims
This function within the program is the watch dog area where you can verify and edit
the claims that are ready to be submitted for payment. It is a safety net where problems
can be solved, and information entered in a transaction can be overridden if necessary.
An override in the Claim edit window changes that claim submission, but does not
affect the default database.
As the claim comes up for final verification, it may be determined that a change needs to
be made, such as a different carrier or EDI receiver.
By highlighting a specific claim and clicking Edit or pressing F9, the Claim edit window
appears with the claim details and information concerning all assigned insurance carriers
and their pertinent data.
Chapter 7: Claim Management
69
The detail also indicates submission method assigned to the claim (paper or electronic),
as well as the claim status. Claim status options include: Hold, Ready to send, Sent,
Rejected, Challenge, Alert, Done, or Pending. The status of the claim can be changed
at this point.
Any time a claim is sent, a batch number is assigned. That number shows in the Batch
data box in the center of the window of the claim you are reviewing. If a claim needs to
be resubmitted, the batch number coincides with the number shown in the Claim
Management window and the one you use to designate those claims that need to be
resubmitted.
The Transactions tab reveals a listing of all transactions applied to the selected claim.
You can split, add, or remove qualifying transactions in this tab. The Comment tab
provides an empty box in which to place whatever comments you feel are necessary
concerning this claim and/or any transactions relating to it. If you have Medisoft
Advanced or Medisoft Network Professional, these notes are represented by a note icon
in the Claim Management window. Double-click the icon to view or edit the note.
F1 Look up Edit Claim.
Printing Claims
Once claims are created, you can print them by clicking Print/Send. Indicate whether
you are sending the claims on paper or electronically, then apply filters to select only
those claims you want to send.
F1 Look up Print/Send Claims.
70
Medisoft
Troubleshooting Insurance Claims
Claim Form Not Centered
If your insurance claims are printing just a little off center, this can be fixed by
entering the Report Designer (Reports menu, Design Custom Reports and Bills).
Open the insurance form you use for printing claims. Go to the File menu and
select Report Properties. In the Form Offset area of the window, adjust the form
as necessary from the top and/or left margins. The form is moved in increments of
one hundredth of an inch. When the form is adjusted, save the form, exit the
Report Designer, and reprint your claim.
For more detailed information, go to the Knowledge Base (www.medisoft.com/kb).
Reprinting Claims
If necessary, you can reprint claims without regard to their status. To reprint an entire
batch, the status must be changed for the batch.
F1 Look up Reprinting Claims.
Listing Claims
The Claim Management window has a claims viewing feature that lets you retrieve
claims that match a set of criteria that you define. Click List Only.
Chapter 7: Claim Management
71
In the List Only Claims that Match window, use one or more of the options to limit
the claims you want to appear in the window.
F1 Look up List Only Claims that Match.
Changing Claim Status
In the Claim Management window, all submitted claims are automatically marked Sent
with an indication of the method of submission. There may be occasions when you
need to change this status.
Entire Batch
If the status of an entire batch needs to be changed, you can change all the claims at
once. Highlight one of the claims and note the number listed in the Batch 1 column in
the Claim Management window. Click Change Status. The Change Claim
Status/Billing Method window is opened.
Choose the Batch radio button and enter the batch number from the Batch 1 column
in the Claim Management window. Then choose the appropriate radio buttons in the
Status From and Status To sections. All claims with that batch number have the status
changed when you click OK.
Selecting Multiple Claims
When only one or a few claims within the same batch or claims from multiple batches
need a status change, hold down the CTRL key and click each claim that needs the
72
Medisoft
status changed. Note that the selected claims do not need to have the same claim status
to begin with, but they are all changed to the same status. Click Edit.
In the Change Claim Status/Billing Method window, choose the Selected Claim(s)
radio button, then choose the appropriate radio buttons in the Status From and Status
To sections. If you have chosen claims with varying statuses, choose Any status type in
the Status From section. When finished, click OK.
F1 Look up Change Claim Status/Billing Method and Marking Claims.
Sending Claims to a File
The HCFA11 program takes data and puts it in an MS-DOS text file in CMS or
HCFA format. The program prints only the Group ID Number in Box 11.
Only the standard CMS or HCFA form can be used with this feature.
Now you can follow the instructions given in your third-party program to access this
claim file.
F1 Look up Sending Claims to a File.
Tutorial Practice
To review the procedures outlined in this chapter, you can perform the following steps
using the tutorial database provided with this program.
Claim Management
To perform any claim management functions, click the Claim Management speed
button to open Claim Management. Be sure you are using the tutorial database for
these exercises.
Creating Claims
Click Create Claims in the Claim Management window.
Chapter 7: Claim Management
73
Since we created two charge transactions for I.B. Gone in the Transaction Entry portion
of this tutorial, let’s create the claim for these charges. Click the first Chart Numbers
range field and type GON to set GONI0000 in the first Chart Numbers field. Repeat
this process in the second Chart Numbers field.
Click Create. When you return to the Claim Management window, change the Sort
By field to Chart Number and type GON in the Search field. A new claim has been
created for GONI0000.
The claim number may not match that shown in figures below.
Editing Claims
To edit the claim, highlight the GONI0000 claim and then click Edit or press F9 to
open the Claim editing window.
Open the Comment tab. Type the following message: Notify attorney when claim is
paid by primary carrier. Press ENTER and then press CTRL+T to enter a date/time
stamp.
The two transactions we created in Transaction Entry are now part of one claim.
Suppose you find out that they have to be sent separately (for whatever reason). Open
the Transactions tab.
74
Medisoft
This tab shows that both transactions are included in the selected claim. To split the
claim, highlight the second transaction, procedure code 82954, and click Split. Click
Yes to split the claim. The second transaction is removed from the claim. Click Save.
When Claim Management is reopened, a second claim has been created and displays
below the original claim.
Sending Claims
Once the claims are ready to go, in the Claim Management window, click Print/Send
to open the Print/Send Claims window.
We are dealing only with paper claims in this tutorial, so leave the setting at Paper and
click OK. The Open Report window opens so you can select the claim form on which
to send the claim. For now, highlight HCFA-1500 (Primary) and click OK.
Chapter 7: Claim Management
75
The Print Report Where? window pops up for you to indicate whether you want to
preview the claim before printing or just send the claim directly to the printer. For
now, leave the setting on Preview the report on the screen and click Start.
The program assembles the information and then displays the Data Selection Questions
window. In each of the Chart Number Range fields, enter GON and press TAB to
print only Mr. Gone’s claims. Click OK.
The claim is displayed in the Preview Report window. If you have preprinted CMS- or
HCFA-1500 claim forms, put a couple in your printer. Click the Print Report speed
button. Answer whatever questions you may need in the Print window, and then click
OK.
Click Close in the Preview Report window. You may briefly see an Update Billing
Status window and then are returned to Claim Management and the claim for Mr.
Gone is printed. The claim status has been automatically changed to Sent, a batch
number assigned, and the current date entered in the Bill Date 1 column for both
claims.
Changing Claim Status
Through Claim Management, all submitted claims are automatically marked Sent with
an indication of the method of submission. The status needs to be changed when the
claim is paid completely or if a claim is rejected or put on hold or pending for some
reason. Time has passed since you printed and sent the claims for I.B. Gone and you’ve
received a rejection notice from the carrier. You’ve already corrected the errors and are
ready to resend the claims. To locate Mr. Gone’s claims, we’ll use a different portion of
the program. Click List Only and type GON in the Chart Number field and press
TAB. Click Apply. In Claim Management, make note of the batch number and click
Change Status.
76
Medisoft
Choose the Batch radio button and make sure the batch number in the box matches
that shown in Claim Management.
Since we used the List Only Claims that Match window to locate the claims,
the batch number is automatically entered in the Change Claim Status/Billing
Method window.
In the Status From section, choose Sent. In the Status To section, choose Ready to
Send. Click OK.
You are now ready to send the claims for I.B. Gone again.
Chapter 7: Claim Management
77
Chapter 8
Statement Management (Advanced and
above)
This chapter explains briefly how to manage statements within the Statement
Management window and includes creating, editing, printing/reprinting, and listing
statements, as well as changing statement status.
To perform any statement management functions, go to the Activities menu and select
Statement Management or click the Statement Management speed button.
Creating Statements
Click Create Statements to gather available transactions onto a statement.
Chapter 8: Statement Management
79
You can create a single statement or an entire batch. Enter ranges of transaction dates
and/or chart numbers to control which statements are created. Also, you can further
limit the statements created by entering information in the Select transactions that
match, Include statements if the remainder total is greater than, and Statement Type
areas of the window.
F1 Look up Create Statements.
Editing Statements
Highlight a specific statement and click Edit or press F9 to edit a statement. You can
modify general statement information, the transactions that appear on the statement,
and any comments attached to the statement. When you make changes in the
Statement edit window, you modify only that statement and do not affect the defaults
for other statements.
80
Medisoft
The detail also indicates submission method assigned to the statement (paper or
electronic), as well as the statement status. Statement status options include: Hold,
Ready to send, Sent, Failed, Challenge or Done. You can also see the statement type,
initial billing date, batch number, submission count, and most current billing date.
Any time a statement is sent, the program assigns the statement a batch number. That
number shows in the Batch field. The program also updates the submission count, the
number of times the statement has been sent, and the billing date.
The Transactions tab shows all the transactions that appear on the statement. You can
split, add to, or remove transactions from statements in this tab. The Comment tab
provides an empty box in which to place whatever comments you feel are necessary
concerning this statement and/or any transactions relating to it. If you add a note here,
an icon is displayed next to the statement in Statement Management. You can doubleclick the note to view or edit the note.
F1 Look up Edit Statement.
Converting Statements
To make it easier to use Statement Management, you can now easily convert old
statements into Statement Management statements in the format’s report properties.
This is done through the Design Custom Reports and Bills option in the Reports
Menu.
F1 Look up Converting a Statement Format to a Statement Management Format.
Chapter 8: Statement Management
81
Printing Statements
Once statements are created, click Print/Send to process them. Indicate whether you
are sending the statements on paper or electronically. If you are sending statements
electronically, specify the format for the statements. Then apply filters to select only
those statements you want to send.
F1 Look up Print/Send Statements.
Reprinting Statements
If necessary, you can reprint statements without regard to their status. To reprint an
entire batch, the status must be changed for the batch.
F1 Look up Reprinting Statements.
Listing Statements
Click List Only to view only those statements that match a set of criteria that you
define.
In the List Only Statements that Match window, use one or more of the options to
limit the statements you want to appear in the window.
F1 Look up List Only Statements that Match.
82
Medisoft
Changing Statement Status
In the Statement Management window, all submitted statements are automatically
marked Sent with an indication of the method of submission. There may be occasions
when you need to change this status.
Statements sent electronically through Statements Processing get a report that marks
each statement as either accepted or rejected.
Entire Batch
If the status of an entire batch needs to be changed, you can change all the statements at
once. Highlight one of the statements and note the number listed in the Batch column
in the Statement Management window. Click Change Status. The Change Statement
Status/Billing Method window is opened.
Choose the Batch radio button and enter the batch number from the Batch column in
the Statement Management window. Then choose the appropriate radio buttons in the
Status From and Status To sections. All statements with that batch number have the
status changed when you click OK.
Selecting Multiple Statements
When only one or a few statements within the same batch or statements from multiple
batches need a status change, hold down the CTRL key and click each statement that
needs the status changed. Note that the selected statements do not need to have the
same status to begin with, but they are all changed to the same status. Click Edit.
In the Change Statement Status/Billing Method window, choose the Selected
Statement(s) radio button, then choose the appropriate radio buttons in the Status
Chapter 8: Statement Management
83
From and Status To sections. If you have chosen statements with varying statuses,
choose Any Status Type in the Status From section. When finished, click OK.
F1 Look up Change Statement Status/Billing Method and Marking Statements.
Tutorial Practice
To review the procedures outlined in this chapter, you can perform the following steps
using the tutorial database provided with this program.
Statement Management
To perform any statement management functions, click the Statement Management
speed button to open Statement Management.
Be sure you are using the tutorial database for these exercises.
Creating Statements
Click Create Statements in the Statement Management window to open the Create
Statements window.
84
Medisoft
Since we created two charge transactions for I.B. Gone in the Transaction Entry portion
of this tutorial, let’s create the statement for these charges. Click the first Chart
Numbers range field and type GON to set GONI0000 in the first Chart Numbers
field. Repeat this process in the second Chart Numbers field.
Click Create. When you return to the Statement Management window, type GON in
the Search field. A new statement has been created for GONI0000. Click OK.
The statement number may not match that shown in figures below.
Editing Statements
To edit the statement, highlight the GONI0000 statement and then click Edit or press
F9 to open the Statement editing window.
Open the Comment tab. Type the following message: Notify attorney when
statement paid. Press ENTER and then press CTRL + T to set a date/time code. Click
Save.
Sending Statements
Once the statements are ready to go, in the Statement Management window, click
Print/Send to open the Print/Send Statements window.
Chapter 8: Statement Management
85
We are only dealing with paper statements in this tutorial, so leave the setting at Paper
and click OK. The Open Report window opens so you can select the statement form
on which to send the statement. For now, highlight NEW Patient Statement (30, 60,
90) and click OK.
The Print Report Where? window pops up to indicate whether you want to preview the
statement before printing or just send the statement directly to the printer. For now,
leave the setting on Preview and click Start.
The program assembles the information and then displays the Data Selection Questions
window. In each of the Chart Number Range fields, enter GON and press TAB to
print only Mr. Gone’s statements. Click OK.
The statement is displayed in the Preview Report window. Click the Print Report
speed button. Answer whatever questions you may need in the Print window, and then
click OK.
Click Close in the Preview Report window. You may briefly see an Update Billing
Status window and then are returned to Statement Management and the statement for
Mr. Gone is printed. The statement status has been automatically changed to Sent, a
batch number assigned, and the current date entered in the Bill Date column for both
statements.
Troubleshooting Statement Printing
Patient Remainder Statements (Advanced and above)
If you are having trouble printing patient remainder statements, check to be sure the
following items have been performed:
1.
The patient has insurance coverage other than Medicare. This is indicated in the
patient Case window, Policy 1 tab, Insurance 1 field (also Policy 2 and Policy 3
tabs if there is secondary and/or tertiary coverage).
86
Medisoft
2.
A charge has been posted in the patient case.
3.
A claim has been created.
4.
An insurance payment or adjustment has been posted, applied, and marked as
Complete to the account for each applicable carrier.
Changing Statement Status
Through Statement Management, all submitted statements are automatically marked
Sent with an indication of the method of submission. The status needs to be changed
when the statement is paid completely or for some other reason. Time has passed since
you printed and sent the statements for I.B. Gone and you’ve received a correction
notice from the patient. You’ve already corrected the errors and are ready to resend the
statements. To locate Mr. Gone’s statements, we’ll use a different portion of the
program. Click List Only and type GON in the Chart Number field and press TAB.
Click Apply. In Statement Management, highlight the statement and click Change
Status.
Choose the Batch radio button and make sure the batch number in the box matches
that shown in Statement Management.
Since we used the List Only Statements that Match window to locate the
statements, the batch number is automatically entered in the Change
Statement Status/Billing Method window.
In the Status From section, choose Sent. In the Status To section, choose Ready to
Send. Click OK.
You are now ready to send the statements for I.B. Gone again.
Click Close to close the Statement Management window.
Chapter 8: Statement Management
87
88
Medisoft
Chapter 9
Deposit/Payment Application (Medisoft
Advanced and above)
This feature makes creating a deposit list and applying payments, especially EOB
payments from insurance carriers, an easy process. In many ways, it is a more
convenient place to apply payments than Transaction Entry because you enter one
deposit, then distribute the payment to as many cases as necessary, then click one button
and all the transactions are created at one time. If necessary, within the same window,
open a different patient record and continue distributing payments.
F1 Look up Deposit Entry, Apply Payment/Adjustments to Charges, and Program
Options.
Click the Enter Deposit/Payment speed button or go to the Activities menu and select
Enter Deposits/Payments to open the Deposit List window.
In this window, you can select a payment to apply, edit a payment, or create a new
payment. The deposit date does not have to be the current date (but the transactions
entered still appear on the current day’s activity reports).
Chapter 9: Deposit/Payment Application
89
When you highlight a payment and click Apply, the Apply Payment/Adjustments to
Charges window is opened.
In this window, select the patient chart number (if you’ve chosen an insurance payment)
and apply the portion of the payment to the applicable charge(s). When finished, click
Save Payments/Adjustments to create the transactions.
If you check Print Statement Now and click Save Payments/Adjustments,
you print statements from Statement Management.
Then, if you need to apply payments from the same deposit to another patient record,
select the next patient chart number and continue making payment applications. This
window is also tied to the Payment Application tab of Program Options. Unless
deactivated, all payment applications are automatically checked as paid in full by the
payer, allowed amounts are calculated on all charges, and any charges over the calculated
allowed amounts are automatically entered in the Adjustment field.
Be sure to click Save Payments/Adjustments before closing this window or
transactions cannot be created.
The payment application feature is designed specifically to closely match the format of
an EOB. When you receive an EOB with a payment from an insurance carrier, open
the Deposit List window, create the total amount deposit, and then apply the payment
to the cases as specified in the EOB.
EOB Payments
Part of the payment structure to a healthcare office from an insurance carrier involves a
check and an “Explanation of Benefits.” Widely known throughout the industry as the
90
Medisoft
EOB, it lists claims for which payment is being made and, in some cases, an explanation
of what is not being paid and why.
Not every insurance claim that is filed with a carrier is paid in full. It may be that
payment is 80 percent of the claim or it may be 50 percent. Other times a claim may be
totally or partially disallowed. The EOB explains in these cases. Normally the part that
is not paid by the carrier is picked up by a secondary carrier or charged back to the
patient.
When an EOB is received, a transaction must be entered to offset the charges. This is
done by creating a deposit in the Deposit List window. If the EOB check covers several
charges, distributing a payment to specific charges can be handled by clicking Apply.
The window lets you select the patient records and claims to be paid and designate how
much goes to each.
F1 Look up EOB Payments/Managed Care/Capitation Payments.
Managed Care
One of the important sources of patients and income in many practices has begun to be
managed care organizations. In each instance, the HMO or PPO provides a list of
patients who have selected your practice as their primary care provider. Payment is
made to your practice on a per-patient basis, regardless of whether the patient ever visits
the office. When a patient does come in for treatment, he or she pays a set co-pay
amount.
The co-pay is charged only by the primary care facility or the facility to which the
patient is referred by the primary care facility. After a patient’s visit to the doctor’s
office, a claim is filed and sent to the carrier. When the EOB is returned, there is
seldom a payment included, since payment is made under the capitation program for
managed care organizations.
F1 Look up EOB Payments/Managed Care/Capitation Payments.
Capitation Payment
The basis for capitation payments is to provide healthcare for a fixed cost, irrespective of
the amount of service required by each individual patient. This is done in connection
with the managed healthcare services such as HMOs and PPOs. There is no direct
relationship between the capitation payment received by the practice and the number of
patients covered by the plan who actually visit the practice for treatment. Capitation
payments are not posted to patient accounts but are entered in the Deposit List
window. If it is necessary to zero out a patient account, create a zero deposit for the
carrier. For each patient covered by the capitation payment who has an outstanding
balance, zero out the account by entering the remainder in the Adjustment field. When
Chapter 9: Deposit/Payment Application
91
it is applied, the payment shows as zero and the patient’s balance shows as a write off in
the Adjustment field in the Transaction Entry window.
F1 Look up EOB Payments/Managed Care/Capitation Payments.
Tutorial Practice
To review the procedures outlined in this chapter, you can perform the following steps
using the tutorial database provided with this program.
Creating a New Deposit
Click the Enter Deposits and Apply Payments speed button.
Click New.
92
Medisoft
The payer is A1 Insurance Partners, so be sure the Payor Type is Insurance. A1
Insurance Partners conveniently paid $35 by check No. 5237; enter the check number
in the Check Number field. The bank is American Southwest Savings. Enter the
amount in the Payment Amount field.
In the Insurance field, select A1 Insurance Partners. Since you already set default codes
when you set up the record for A1 Insurance Partners, the remaining fields are
automatically filled. Click Save.
In the Deposit List window, be sure this new deposit is selected, and then click Apply.
The Apply Payments/Adjustments to Charges window is opened. In the For field,
type GON and press Enter to call up I.B. Gone’s chart number.
Chapter 9: Deposit/Payment Application
93
Locate the $75 charge, click the Payment column of that record, and enter 30. In the
box below (part of the $12.50 charge record), enter 5. Click Save Payments.
Adjustments and then Close. A message is displayed letting you know that both claims
will be marked “Done” for the primary carrier. (This is based on a selection made in
Program Options.) If the Print Statement Now box is checked, the Open Report
window is opened to select a statement form. Print it if you’d like, or click Cancel.
To review what you just did, click Detail in the Deposit List window.
The Deposit Detail window shows which transactions were affected and what was
applied. This window is only for reviewing the details of a deposit. You cannot edit any
transaction in this window. Click Close after reviewing the details.
Click Close again to close the Deposit List window. If you return to the Transaction
Entry window, a new entry has been created in the Payments, Adjustments, And
Comments section—this insurance carrier payment.
94
Medisoft
Chapter 10
Collections and Revenue Management
Collection List
The collection list is a central place where you can manage accounts that are in
collections. Ticklers or collection reminders are displayed as collection list items. Go to
the Activities menu and select Collection List.
Note: Security must be activated before this feature can be used.
What appears in the collection list depends on the user login. The program displays the
collection list item for the current user, unless the user has administrative access.
Administrators can choose to view all or selected users’ collection list items.
To enter items in the collection list, click New while in the collection list. Fill in the
necessary information.
F1 Look up Collection List.
Add Collection List Items
The option to add collection items through reports is no longer an option. However,
you can add collection items with the new Add Items option in the Collection List.
This feature lets you create tickler items based on criteria you enter in the Add
Collection List Items window.
F1 Look up Add Collection List Items.
Patient Payment Plans
To help patients make consistent payments on their accounts, create payment plans.
You can create as many plans as necessary to accommodate your patients. Go to the
Lists menu and select Patient Payment Plan.
Once you create a plan, open the Patient/Guarantor window, Payment Plan tab, and
assign the plan to the patient’s record. The particulars for the plan appear in fields in
this tab.
The program records and tracks the scheduled date for the next payment and the
amount to be applied. If the patient follows the payment plan (e.g., the patient pays the
Chapter 10: Collections and Revenue Management
95
required amount by the required date), this account is not included when you process
collection letters. If the patient does not follow the payment plan, the account is
included when you process collection letters.
F1 Look up Patient Payment Plan Entry.
Collection Letters
Once you put a patient-responsible account in collections, you can create collection
letters to follow up with the patient.
To print collection letters, go to the Reports menu, select Collection Reports, and then
select Patient Collection Letters. You must print the Collection Letter Report before
you print collection letters.
In the Data Selection Question window, click the Exclude items that follow Payment
Plan check box to activate Generate Collection Letters box. Check the Generate
Collection Letters box.
F1 Look up Collection Letters and Collection Letter Report.
Customizing Collection Letters
Customize the collection letter format through the Collection Letter Wizard. Go to the
Tools menu and select Collection Letter Wizard.
The things you can customize are the name and address, contact phone number, and
sender’s name. Make your selections and click either OK or Preview.
Access the new format through the Custom Report List. New formats are named
WzCollections date (using the date on which the format was revised). If you create
several new formats in a single day, you can distinguish them by the order in which you
created them. Click Show File Names to reveal the format file names. This shows the
file names (which are mrcol[#], numbered sequentially), type and date and time last
modified.
F1 Open the Collection Letter Wizard and then look up Collection Letter Selection.
Revenue
Billing Cycles
The cycle billing feature lets you print statements every certain number of days. If you
want to print statements every 30 days, you can set up a billing cycle of that length.
First you set up the billing cycle in Program Options, Billing tab. Then you process the
96
Medisoft
statements through Statement Management. The other ways of printing statements do
not offer this feature.
F1 Look up Cycle Billing.
Claim Rejection Messages
Claim rejection messages let you enter rejection messages from an EOB and print them
on patient statements. You connect the message to a transaction in the Rejection field
when applying deposits from the insurance company. To create claim rejection
messages, go to the Lists menu and select Claim Rejection Messages.
F1 Look up Claim Rejection Message Entry.
Small Balance Write-off
This feature lets you automatically write off remainder balances of a certain amount.
The balance written off is the patient remainder balance. You can write off small
remainder balances as a batch in the Small Balance Write-off window or for one patient
at a time in the Apply Charges/Adjustments to Payments window.
F1 Look up Small Balance Write-off Overview.
Writing off a Balance
To access the Small Balance Write-off window, select Small Balance Write-off from
the Activities menu.
Chapter 10: Collections and Revenue Management
97
The window is divided into two sections. In the first section, select criteria for the type
of remainder balances you want to write-off and click apply. In the second section, a list
of the patients who meet the criteria appears in the Write-off Preview List. The default
is set to write off all records in the list. You can select individual records to write off by
clicking on the record. Multiple records can be selected by pressing the CTRL key and
clicking the record. Click Write off to write off the selected remainder balances.
When the program writes off the remainder balances it updates a number of other
features. Write-off entries are created and applied to all patient responsible charges
associated with the selected patient. The program also updates the associated Collection
List items, refreshing balances and marking zero balances as deleted. After a remainder
balance write off, statements are changed to the status of Done and a note is added to
the write-off entries.
F1 Look up Small Balance Write-off.
Tutorial Practice
To review the procedures outlined in this chapter, you can perform the following steps
using the tutorial database provided with this program.
Note: Be sure that you have activated security in your Medisoft program.
Collections and Revenue will not work unless you have applied security.
Creating Collection List Items
1.
Go to the Activities menu and select Collection List.
2.
Click New.
3.
In the Tickler tab, enter Contact Attorney.
4.
Choose the Patient radio button.
5.
In the Chart Number field, start typing Gone to call up I B Gone.
6.
Choose Mr. Gone also in the Guarantor and Responsible Party fields.
7.
Choose the person to whom you want to assign this tickler. The names you see are
those entered in the Security Setup window. If no names appear, you must set up
Security first. See Chapter 3.
8.
Choose Open as the status of the item.
9.
By default, the follow-up date is today’s date. Leave that date for now.
10. Click Save.
98
Medisoft
11. Let’s create an insurance-responsible tickler also, so you can see the difference
between the two. Click New.
12. In the Tickler tab, enter Call insurance.
13. Select Insurance.
14. In the Chart Number field, start typing Gone to call up I B Gone. Press TAB.
15. Choose Mr. Gone also in the Guarantor field.
16. Choose AI Insurance Partners in the Responsible Party field.
17. Choose the person to whom you want to assign this tickler.
18. Choose Open as the status of the item.
19. By default, the follow-up date is today’s date. Leave that date for now.
20. Click Save.
Adding a Collection List Item
1. Go to the Activities menu and select Add Collection List Item.
2.
Choose the Claims radio button.
3. Click the Primary radio button in the Carriers field.
4. Click the Rejected radio button.
5. Select Aetna for the first Insurances field and A1 Insurance Partners in the second
Insurances field.
6. Enter 2 in the Add item if submission count is great than field.
7. Assign the item to I M Boss.
8. Check the Add Billing Comment to Office Notes check box.
9.
Click Add Items.
10. Click No.
Patient Payment Plans
1.
Go to the Lists menu and select Patient Payment Plan.
2.
Click New.
3.
In the Code field, enter A.
4.
In Description enter 15/30 (signifying a plan to pay $15 dollars every 30 days).
Chapter 10: Collections and Revenue Management
99
5.
In First Payment Due, enter 5 to have payments due on the 5th of every month.
6.
In Due Every … days enter 30.
7.
Enter 15 in the Amount Due field.
8.
Click Save.
9.
Close the Patient Payment Plan List window.
10. Go to the Lists menu and select Patients/Guarantors and Cases.
11. Find IB Gone’s record, highlight it, and click Edit Patient.
12. Open the Payment Plan tab.
13. In Payment Code select plan A.
14. Click Save. Click Close.
Mr. Gone is now assigned to a payment plan. If he makes payment of the correct
amount and in the prescribed time, he will not be receiving collection letters from your
practice.
Collection Letters
1.
Go to the Reports menu and select Collection Reports, then Patient Collection
Letters.
2.
Click Start in the Print Report Where? window.
3.
In the Collection Letter Report: Data Selection Questions window, skip the
range fields and click Exclude items that follow Payment Plan.
4.
Click Generate Collection Letters. This also activates and enables the Add To
Collection Tracer field. Keep this field clicked. Then click OK.
5.
Preview the report, and then click Close (unless you really want to print it first).
6.
When asked if you want to print collection letters, click Yes.
7.
Select the Collection Letter format (or any customized format available) and click
OK.
8.
Click Start to preview the letters.
9.
Review the letters and print them.
10. When you open an account in Transaction Entry, Quick Ledger, Quick Balance,
or an Appointment window, the words “Account alert” appear near the patient’s
name to indicate that the account is in collections.
100
Medisoft
Customizing Collection Letters
1.
Go to the Tools menu and select Collection Letter Wizard.
2.
Choose the Third-Party Address radio button. The Third-Party Billing
Information section opens at the bottom of the window.
3.
In the other fields enter Happy Valley Associates, 9825 W. Baseline Road, Suite
263, Gilbert, AZ 85234, 480-111-2222.
4.
In Sender Name choose Provider.
5.
Click Preview.
6.
After previewing the sample letter, click Create. A little box appears in the middle
of the window stating that the format is being updated. Then a confirmation box
displays. Click OK. The wizard closes.
7.
A new collection letter format has been created. You will see it the next time you
create collection letters. It is called WzCollections date. For example, if today’s
date were December 3, 2004 and I customized the format today, the format would
be called “WzCollections120304.”
Note: If you create multiple customized versions of the collection letter
format, you might want to keep a list somewhere noting the date and a note
concerning what was customized.
Writing off Small-Balances
1. Go to the Activities menu and select Small Balance Write-off.
2. Leave the radio button set to All in the Patient Selection field.
3. Select CABADDEBT in the Write-off Code field.
4. Enter 1/12/06 in the Cutoff Date field.
5. Enter 150.00 in the Maximum Amount field.
6. Click Apply.
7. Select Selected Items in the Write off field.
8. Hold down CTRL and click the patient record for Sammy Catera and James
Doogan.
9. Click Write off.
10. Click Close.
Chapter 10: Collections and Revenue Management
101
Chapter 11
Electronic Services
Electronic Claims Processing
Medisoft offers the ability to file electronically. Electronic submission through
Electronic Claims Processing is a separate procedure and requires enrollment. To get
started with electronic claim submission, contact your local Value-Added Reseller or call
Medisoft directly at (800) 689-4550 and request the enrollment package.
Optional direct claims software is available to send claims directly to selected carriers
throughout the country. Most of these are set up on a state or regional basis and handle
Medicare, Medicaid, Blue Cross/Blue Shield, and often commercial claims. There is a
cost for each of these programs, but, in most cases, there is no charge for claims filed.
Information on other available EDI modules can be obtained by calling your local
Value-Added Reseller or Medisoft directly at (800) 689-4550.
Statement Processing
You can send statements electronically through Statement Processing, the clearinghouse
which is set up to process Medisoft electronic statements. Statements sent electronically
through Statement Processing get an instant response report that tells what information
was sent.
F1 Look up Sending Statements Electronically.
Customizing Statements
Statement Processing lets you choose alternate formats for both paper (Advanced and
above) and electronic statements through the Statement Wizard. Go to the Tools menu
and select Statement Wizard.
F1 Look up Statement Selection in the Statement Wizard Help file.
Eligibility Verification
The Eligibility Verification feature lets you check a patient's insurance coverage online.
This is a fee-based service for which you must enroll. Contact the Medisoft sales
Chapter 11: Electronic Services
103
department at (800) 333-4747 for information on pricing. You must have broadband
internet service to make eligibility verification inquiries.
Eligibility Verification Setup
To set up Medisoft for eligibility requests, you must enter information in the Provider,
Insurance Carrier, Patient, and Case windows. Manage your eligibility enrollment from
the Services Menu by selecting Eligibility Verification and then selecting Manage
Enrollment.
F1 Look up Eligibility Verification Overview
Provider
Fields in the Provider window must be populated for each provider whose patients
you are verifying electronically. On the Default Pins tab, enter information in the
Tax ID field. On the Eligibility tab, enter information in the Allow Eligibility
Verification and Eligibility Enrollment IDs fields.
F1 Look up Provider Entry
Insurance Carriers
The Eligibility Payer field on the EDI/Eligibility tab must be populated for each
insurance company.
F1 Look up Insurance Carrier Entry – EDI/Eligibility Tab
Patients
Fields in the Patient / Guarantor window must be populated for each patient. On
the Name, Address tab, enter information in the following fields: Last Name, First
Name, Date of Birth, Gender, and Social Security Number. On the Other
Information tab, enter information in the Assigned Provider field.
F1 Look up Patient/Guarantor Entry
Cases
Fields in the Case window must be populated for each patient. On the Policy 1,
Policy 2, and Policy 3 tabs, enter information in the following fields: Insurance,
Policy Holder, Relationship to Insured, and Policy Number. On the Account
tab, enter information in the Assigned Provider field.
F1 Look up Case Entry.
104
Medisoft
Eligibility Verification Results
The Eligibility Verification Results screen is where you perform many eligibility
verification activities. Go to the Activities menu and select Eligibility Verification.
From the speed menu, select View Results. The Eligibility Verification Results
window opens. Records only appear in the Eligibility Verification Results window after
you have made an eligibility verification inquiry. You can redo an eligibility inquiry at
any time by highlighting the inquiry and clicking Verify.
F1 Look up Eligibility Verification Results.
Chapter 11: Electronic Services
105
Chapter 12
Reports
Printing Reports
Reports are generated through the Reports menu. In Medisoft, you can view or preview
a report before printing or exporting it. For example, you could preview a Patient Aging
report before printing it to make sure that you have selected the most appropriate data
criteria. Or users could conduct a search for certain details before printing. After
previewing users can export or print the report.
F1 Look up Reports and Printing Reports.
Available Reports
Not only does the program build an accounts receivable file and handle statements,
insurance claims, and electronic billing, it also provides a variety of reports that can give
you a better understanding of the day-to-day workings of your practice.
Among the reports generated within the program are Day Sheets, Analysis Reports,
Aging Reports, Productivity Reports (Advanced and above), Activity Reports (Advanced
and above), Audit Reports (Advanced and above), Patient Ledger Report, and
Guarantor Quick Balance List (Network Professional only).
You can print a title page that shows all the filters used in preparing the report.
F1 Look up Program Options.
Day Sheets
Day Sheets are available in three reports. The Patient Day Sheet lists each patient’s
name, showing all transactions and a summary of activities for the day. The Procedure
Day Sheet breaks down by procedure code the activities of the day, summarizing
patients treated for each procedure. The Payment Day Sheet shows the payments made
on the requested day and the charges to which the payments are applied.
F1 Look up Patient Day Sheet, Procedure Day Sheet, and Payment Day Sheet.
Chapter 12: Reports
107
Analysis Reports
Billing/Payment Status Report (Advanced and above)
One of the most powerful tools in Medisoft, the Billing/Payment Status Report
provides a thumbnail sketch of the current billing and payment status of each
claim. The report shows what has been billed and not billed, what is delayed for
some reason, if the carrier is not responsible or has refused the claim, or if the claim
is paid in full. An asterisk (*) next to an amount indicates that entity has paid all it
is going to pay and the balance, if any, should go to the next responsible payer.
F1 Look up Billing/Payment Status Report.
Insurance Payment Comparison (Network Professional only)
The Insurance Payment Comparison report compares the payment records of all
carriers in the practice.
F1 Look up Insurance Payment Comparison.
Practice Analysis
This report summarizes the activity of a specified period (e.g., a month), listing
each procedure performed, the number of times it was performed, and the total
dollar amount generated by each procedure. It shows the average charge, includes
any costs involved with that procedure, and calculates the net monetary effect on
the practice’s income.
F1 Look up Practice Analysis.
Insurance Analysis (Advanced and above)
This report summarizes all claims filed by category (Primary, Secondary, and
Tertiary). Claims totals are shown for charges and insurance payments in both
dollar amount and percentage.
F1 Look up Insurance Analysis.
Referring Provider Report (Advanced and above)
It is good to keep track of the source of your patients. The Referring Provider
Report shows which patients were referred by other practices and the percentage
each referral contributes to the overall referred income of the practice, as of the date
of that report. The report also includes the UPIN of the referring provider. By
blanking out the Referring Provider range in the Data Selection Questions
window, a report can be generated showing what percentage of the entire practice
has been referred.
108
Medisoft
F1 Look up Referring Provider Report.
Referral Source Report (Advanced and above)
This is another report for tracking the source of patients who come to the practice.
For the report to work, however, all referral sources must be entered in the Address
Book. A source can be an attorney, a hospital, friends, other patients, or even the
Yellow Pages. Most new patient application forms include the inquiry “How did
you hear about us?” The Referral Source Report assembles the patient list by source
(other than provider) and shows how much revenue comes from each source,
allowing the practice to identify those sources that send profitable referrals and/or
limit those that are costly or nonproductive.
F1 Look up Referral Source Report.
Facility Report (Network Professional only)
This report tracks patients who are seen at different facilities. Like referral sources,
all the facilities records are created in the Address List window. The Facility
Report assembles the patient list by facility and shows how much revenue comes
from each facility, helping you identify which generates the most money.
F1 Look up Facility Report.
Unapplied Payment/Adjustment Report (Advanced and above)
This report shows any payment or adjustment that has an unapplied amount and
where the transaction can be found.
F1 Look up Unapplied Payment/Adjustment Report.
Unapplied Deposit Report (Advanced and above)
The Unapplied Deposit Report shows all deposits that have an unapplied amount.
F1 Look up Unapplied Deposit Report.
Co-Payment Report (Advanced and above)
The Co-Payment Report shows all patients who have co-payment transactions. It
shows the amount of the required co-payment, how much was applied, and what
was left unapplied. If a patient does not have any co-payment transactions, he or
she is not included in the report.
F1 Look up Co-Payment Report.
Outstanding Co-Payment Report (Advanced and above)
This topic is for Medisoft Advanced and Network Professional programs.
Chapter 12: Reports
109
This report shows all patients who have outstanding co-payment transactions. The
report shows the Co-payment amount expected, the actual amount paid, and the
amount due. If a patient has no outstanding co-payment transactions, he or she is
not included in the report.
F1 Look up Outstanding Co-Payment Report.
Global Coverage Report
The Global Coverage Report displays the patients who fall under global coverage
during a certain time frame. The report detail includes information on the patients,
the date the coverage expires, and the total that would have been billed if global
coverage did not apply. For more information on using and implementing the
Global Coverage feature:
F1 Look up Global Coverage Overview.
F1 Look up Global Coverage Report.
Aging Reports
Patient Aging
One of the important tools in collections is the patient aging report. This can be
printed showing the age of each unpaid transaction for patients. Default aging
criteria is based upon the number of days between the creation of the transaction or
claim and the date of the report you are generating. The columns break down the
amounts due that are 30, 60, and 90+ days old. Aging is from actual date of the
transaction, so it reflects the true age of the account. The aging criteria and
columns can be altered in Program Options. This report includes all unapplied
amounts in the totals. The Date filter has been removed as it would return invalid
values.
F1 Look up Patient Aging.
Patient Remainder Aging (Network Professional only)
This report has the same format as the Patient Aging, but there is a key difference
in how it works. A charge does not show up on Patient Remainder Aging until all
insurance responsibility has been marked complete.
F1 Look up Patient Remainder Aging Report.
110
Medisoft
Patient Remainder Aging Detail (Network Professional only)
This report has the same criteria as Patient Remainder Aging Detail; however, it
also lists each insurance company on the patient’s account and the date the
insurance payment was marked complete.
F1 Look up Patient Remainder Aging Detail.
Patient Aging Applied Payment
This report differs from the Patient Aging Report in that it contains only applied
amounts in the totals and it has a Date filter. In earlier Version 9 releases, this
report was called the Patient Aging Report but has now been renamed Patient
Aging Applied Payment Report.
F1 Look up Patient Aging Applied Payment Report.
Insurance Aging
These reports (Primary, Secondary, and Tertiary) tracks aging of claims filed with
insurance carriers.
F1 Look up Insurance Aging.
Production Reports (Network Professional only)
Production by Provider, Procedure, and Insurance
These reports give incoming revenue information for each provider, procedure, or
insurance carrier, respectively.
F1 Look up Production by... Reports.
Activity Reports (Network Professional only)
Daily/Monthly Activity Report
This report presents financial activity based on the date range selected. The report
displays the total number and the total amounts of the charges, payments, and
adjustments entered during a date range. The report also details the net effect of the
financial information entered on the Accounts Receivable balance for the
day/month.
Activity Summary by Provider, Procedure, and Insurance
Activity reports break down financial activity by day or month. The summary
reports summarize financial information entered for each provider, procedure, or
insurance carrier, respectively.
Chapter 12: Reports
111
F1 Look up Activity Reports.
Collection Reports (Advanced and above)
Patient Collection Report
The Patient Collection Report contains information based on statements marked
Sent in the Statement Management window, showing what has not been paid,
statement date, etc.
F1 Look up Patient Collection Report.
Insurance Collection Reports
The Insurance Collection Reports are identical in layout, but each reflects the
selected insurance level—primary, secondary, or tertiary. This report also shows the
claim data, what amount is outstanding, etc.
F1 Look up Insurance Collection Report.
Patient Collection Letters
The Collection Letter Report is printed in preparation of collection letters. It
contains information from the collection list and is used to help evaluate
collections. To access this report, go to the Reports menu, select Collection
Reports, and then Patient Collection Letters.
F1 Look up Collection Letter Report.
Collection Tracer Report
The Collection Tracer Report reports how many collection letters have been sent
and when. Each time collection letters are printed, the program, by default, keeps
track of each letter sent.
F1 Look up Collection Tracer Report.
112
Medisoft
Audit Reports
Audit Generator
The Audit Generator helps create a Data Audit Report that contains only the
information you want included in the report. The tables available in the Audit
Generator are governed by choices made in the Audit tab of the Program Options
window and whether a table has been edited. You choose which tables, fields,
users, and activities are included in the template. This report is intended as a
protection for the practice to keep track of changes made and, if desired, by whom.
Some PHI (personal health information) will be included in the Data Audit Report
no matter what selections are made or excluded in the Program Options window
or the Audit Generator.
Note: This report does not support printing a report title page even if the Print
Report Title Page option was set in the Program Options window.
F1 Look up Audit Generator.
Login/Logout Report
This report tracks user login/logout activity in the program.
F1 Look up Login/Logout Report.
Security Permissions Report (Advanced and above)
This report lists permissions by security level, and shows which users are assigned to
which level.
F1 Look up Security Permissions Report.
Productivity by User (Network Professional only)
This report tracks user activity in the program.
F1 Look up Productivity by User Report.
Patient Ledger
This report reflects the account status of each patient. Charges are shown until a
payment is entered to remove a specific procedure paid. You may include all patient
accounts or select a few. The patient ledger is similar to a ledger card in a manual
accounting program. Since the Medisoft program is a true Open Item Accounting
program, it can show all or part of the financial activity for a patient, including the
current balance and what procedures have not been paid. Past activity in the account
Chapter 12: Reports
113
includes a listing of all transactions, indicating those that have been paid. The report
marks those transactions that have been paid and the amounts.
F1 Look up Patient Ledger.
Guarantor Quick Balance List (Network Professional only)
This report lists the guarantor quick balances that appear in the Quick Balance feature.
These balances are the guarantor remainder balances, so if there are charges that the
insurance company has not paid on yet, then they are not reflected in this report.
F1 Look up Guarantor Quick Balance List.
Standard Patient Lists
The Patient by Diagnosis, Patient by Procedure, and Patient by Insurance Claim reports
provides users a means to sort data in meaningful chunks for analysis and reporting
purposes.
F1 Look up Patient by Diagnosis Report.
F1 Look up Patient by Procedure Report.
F1 Look up Patient by Insurance Claim Report.
Claims Manager Reports
The purpose of the Transmission History report is to give the user an idea of when
transmissions occurred between Medisoft and Claims Manager. This report will help
users troubleshoot integration issues between Claims Manager and Medisoft.
The purpose of the Process Change Results Report is to show what information was
updated in Medisoft after you made changes to claims in Claims Manager. This report
is broken down into two levels: Log and Detail.
F1 Look up Transmission History Report or Process Change Results Report.
Custom Report List
Design capabilities in the program let you generate a variety of custom reports to meet
the needs of your practice. To access the customized reports, go to the Reports menu
and select Custom Report List. When you create a customized report, it is included in
the Custom Report List.
There are numerous reports already formatted that are included in the program and can
be accessed. These include: Address List, Billing Code List, Birthday Card, Birthday
Labels, Claim List, Diagnosis Code List, EDI Receiver List, HCFA-1500 Forms,
114
Medisoft
Insurance Carrier List, Insurance Payment Tracer (Claim Mgmt), Laser HCFA-1500
forms, Patient Birthday List, Patient Face Sheet, Patient List, Patient Recall Labels,
Patient Recall List, Patient Statements, Pre-Printed Statement, Primary Claim Detail,
Primary Claim Labels, Primary Claim Summary, Procedure Code List, Provider/Staff
List, Referring Provider List, Remainder Statements, Remainder Statement
Troubleshooter Report, Sample Statement with Image, Sample Statement with Logo,
Secondary Claim Labels, Security Permissions Grid, Superbill, Tertiary Claim Labels,
Transaction List, Unbilled Transactions, and Walkout Receipts.
In Medisoft Advanced and Medisoft Network Professional, there are two
statement types: Statement and Statement Management. If you are
modifying a statement, make sure you are modifying one with the correct
type. You can only print Statement report formats from the Reports menu
and Statement Management report formats from Statement Management
F1 Look up Modifying an Existing Report.
Load Saved Reports
This option allows you to reopen reports that were prepared earlier and have been saved.
F1 Look up Load Saved Reports.
Add/Copy User Reports
This option allows you to share reports by adding reports to your database that may
have been prepared by another practice or copying reports to disk for use by another
practice or for disk storage. Go to the Tools menu and select Add/Copy User Reports.
F1 Look up Add Reports and Copy Selected Reports To.
Receive/Send Reports Through Medisoft Terminal
Within Medisoft, the Medisoft Terminal option can be used to send or receive reports
by connecting to various bulletin boards using a modem. The BBS (Bulletin Board
Service) is set up through Medisoft Terminal. See Appendix F, Medisoft Terminal,
page 175.
F1 Look up Medisoft Terminal.
Report Procedures
Printing a Report
To print a report, complete the following steps:
Chapter 12: Reports
115
1.
2.
3.
4.
On the Reports menu select the report to be run. The Data Selection
Questions window opens.
On the Data Selection Questions window enter and select appropriate criteria.
If needed, select the Print Setup button to select another printer other than the
system default.
Click the Print button.
Exporting a Report
In Medisoft, you are able to export a report into another format. For example, you
could export a Patient Aging report to an Excel spreadsheet. To export a report,
complete the following steps:
1. On the Reports menu select the report to be exported. The Data Selection
Questions window opens.
2. On the Data Selection Questions window enter and select the appropriate
criteria and click the Export button. The Export window appears.
3. On the Export window select a file format for exporting and a destination.
Click OK. The Export Options window appears.
4. On the Export Options window select an appropriate page range and enter
criteria if needed. Click the OK button. The Choose export file window
appears.
5. On the Choose export file window confirm file name and destination or make
needed changes and click the Save button. The report is exported.
Previewing a Report
In Medisoft, you can view or preview a report before printing or exporting it. For
example, you could preview a Patient Aging report before printing it to make sure that
you have selected the most appropriate data criteria. After previewing users can export or
print the report.
1.
2.
3.
4.
•
•
•
116
On the Reports menu select the report to be run. The Data Selection
Questions window opens.
On the Data Selection Questions window enter and select appropriate criteria.
Click the Preview button. The Report appears in the Report Preview window.
The Report Preview window displays the contents of the report most recently
generated from the Data Selection Questions window. Use the controls in the
Report Preview window to view or search for details. Controls include:
Print - Used to print the report on the default system printer using the user
specified criteria.
Export - Used to export reports in various file formats including MS Word,
MS Excel, or PDF.
Refresh - Used to refresh page so that the most current information is
displayed.
Medisoft
•
•
•
•
•
•
Toggle Group Tree - Used to change the display space of the window and
move to a specific element in a displayed report such as a chart number,
insurance, etc.
Zoom - Used to increase or decrease the viewing size of the report.
Navigate - Used to navigate or browse through the various pages of a multipage report and features jumping to the first or last page, moving to the
previous or next page, or specifying a particular page to view.
Stop Loading - Used to stop a report from loading.
Search Text - Used to perform a case-insensitive text search within the report
currently being viewed.
Help - Used to open the access the Help file.
Searching for a Specific Detail in a Report
Once you have generated a report, you can use the Search tool to find specific
information in the report. To search for data, complete the following steps:
1. On the Reports menu select the report to be run. The Data Selection
Questions window opens.
2. On the Data Selection Questions window enter and select appropriate criteria.
3. Click the Preview button. The Report appears in the Report Preview window.
4. On the Report Preview window click the Search Text button. The Search
window appears.
5. On the Find What field enter the appropriate search criteria and click the Find
Next button. The search executes.
Chapter 12: Reports
117
Chapter 13
Medisoft Report Designer
Report Designer
One of the most exciting features of Medisoft is the Report Designer, adding flexibility
in the creation of reports to best serve your practice or business needs. Using the Report
Designer and the existing set of reports, you can generate custom reports tailored to
meet specific needs.
Report forms in this section are categorized into several “styles.” Each style defines basic
report characteristics, i.e., List, Label, Ledger, Walkout Receipt, Insurance Form,
Statement, and Statement Management.
To create custom reports, go to the Reports menu and select Design Custom Reports
and Bills.
F1 Look up Report Designer and Format/Design Reports.
Report Designer Menu Bar
The Menu bar for the Report Designer is very similar to the Menu bar of Medisoft.
It lists File, Edit, Insert, Window, and Help menus.
The File menu is where most of the functions begin. The Edit menu features the usual
Cut, Copy, Paste, and Delete options, plus Find Field and Find Again.
The Insert menu contains a variety of the field types that can be used to create your
report. The field types are Text Field, Data Field, Calculated Field, System Data,
Shapes, and Images). The field types are also conveniently placed as speed buttons on
the right side of the toolbar, giving quick and easy access.
Chapter 13: Medisoft Report Designer
119
Toolbar
Besides the New, Open, Save, Preview, Print, and Exit speed buttons, there are Find
and Find Again buttons, as well as a Hints button that lets you toggle on or off the Help
that appears throughout the program. On the right side of the toolbar are the field type
speed buttons.
The Format Grid
For illustration purposes, go to the File menu and select New Report. Click Next.
Choose Patient and click Next. Click Create. The format grid, which is the basis for
the layout of the report (excluding insurance and statement forms), generally contains
three “bands” to help in its organization.
The Page Header band is where basic identifying information should be placed, such as
the report title, page number and date. Header information appears at the top of every
page printed.
The Transaction Detail band, or the body of a report, contains the main information of
the report and differs from page to page.
The Patient Footer band contains those fields that typically appear at the bottom of the
every report. For example, in a patient list, you might expect to see a page number, a
date, or maybe the total number of records.
F1 Look up Report Properties-Bands Tab.
120
Medisoft
Report Properties
One of the creative features of the Report Designer is the ability to break up the report
into sections or bands. Go to the File menu and select Report Properties. You can
adjust band height, set data filters and determine the overall general size and margin
settings. You can also enter the title, paper size, orientation, and position. One
important feature is Form Offset. This permits the form to be adjusted even fractions
of an inch so it fits exactly the prescribed form. You can also affect the order in which
the documents are printed by using the Sort By feature.
F1 Look up Report Properties.
Field Properties
Standard Properties
Each field type has the following options:
Alignment: Options are Left, Center, or Right, which align the box to report margins.
There is also an option to Align to Band. Used in conjunction with one of the other
alignment designations, it applies the alignment to the height of the band.
Size: You can specify in the Properties window an exact height and/or width in
increments of pixels (which are the smallest graphic unit that can be displayed on your
screen).
Matching Alignment and Size: You can match the size or alignment of any field or
group of fields to another.
Position: Specify an exact position on the page in relation to the top and left edges of
the report, again in increments of pixels.
Transparent Background: This option eliminates the white area around data in the
various fields when the report is printed, showing the data directly over any background
color.
Font: One of the variations you can introduce is changing the font. As you go through
the font list in the Font window, a sample of how a highlighted type face looks is shown
in the sample box.
Background Color: You can change the background color for each field. These colors
are printed with the report if you have a color printer.
Handles: When a field is selected, it displays black handles. The handles allow the field
to be resized, shaped and moved by dragging the handles with the mouse.
Multiple Fields: If you hold down the SHIFT key and click on any field speed button,
you can drop multiple fields by placing your pointer on the format grid and clicking.
Chapter 13: Medisoft Report Designer
121
Use the arrow key on the toolbar to release the multiple lock or click on another speed
button. You can also use the SHIFT key to select multiple fields to size or align all at
once.
Other: You have the choice to show the ruler, snap to the grid or designate the grid
size. “Snap to the grid” means the field adheres to the grid lines and does not float
when you click it.
F1 Look up Format/Design Reports.
Text Field Properties
A Text field is used to enter static text, or text that you want to print the same
way every time, such as the word “Signature” next to a blank line. A Text field does not
retrieve stored information from program database files. It prints on the form in the
position you specify, and what you type is what prints. This is contrasted with the Data
field, which pulls data from your program data files.
Insert a Text field by clicking the Text speed button on the toolbar, then clicking the
report grid. A field labeled “Text1” is displayed and each time you add a text field, the
number advances — Text2, Text3, etc.
F1 Look up Text Field Properties.
Data Field Properties
A Data field allows complete control in retrieving data from your program data
files (Case, Insured, Claim, etc.) through the use of expressions.
122
Medisoft
Click the Data Field button on the toolbar and then click on the grid to place a Data
field on the form. To set the properties of the field, double-click on the field (or rightclick and select Properties). The Data Field Properties window appears.
The Data Field Properties window lists any expressions that have already been created.
To create an expression, click New Data Field, select a field from the list and click Save
or press F3.
If you do not see the field you want, either scroll through the Fields list box or click
Find Field. The Find Field window is displayed.
Chapter 13: Medisoft Report Designer
123
In the Find Fields that Match area, type a word or two of description and you usually
get a list in Search Results to select the field you want.
F1 Look up Data Field Properties and Find Field.
Calculated Field Properties
A Calculated field works with the same files and data selections as a Data field,
but also lets you specify financial operations, how the numbers are formatted, and
whether the layout bands are reset at the time of printing.
This field type has no effect on statements, which present a special situation.
Data entered in a Calculated field can generate the transaction and calculates costs and
charges. The Calculated Field Properties window has three fields for financial
accounting.
124
Medisoft
The Calculated field permits averaging, count, maximum, minimum, and sum
functions. There are numerous options for the Format field. The Reset After Print
field can be used to reset the calculations after printing. This resets the field to zero.
F1 Look up Calculated Field Properties.
System Data Field Properties
A System Data field lets you insert data into your report that is tracked by your
computer system, such as the date or current page number. Data possibilities, such as
Total number of Records to be Printed on Report, Current date in the format set by
Windows, Current Page Number, and Report Title, among others, make System fields
an invaluable asset to creating that “finishing touch” to a report.
Chapter 13: Medisoft Report Designer
125
F1 Look up System Data Properties.
Shape Field Properties
The Shapes feature lets you add color, shapes, different background styles, and
borders with inserted text. Shapes and colors can add greatly to the appearance of
reports and creative possibilities are almost limitless. In the Shapes category, you can
choose from rectangle, circle, horizontal line, vertical line, right and left lines, and top
and bottom lines. Backgrounds can be solid, cross, diagonal cross, backward diagonal
lines, horizontal lines, forward diagonal lines, vertical lines, and clear.
126
Medisoft
Choices for border style are clear, solid, dash, dot, dash-dot, dash-dot-dot, and inside
frame. Colors can be basic or custom, and within custom you can designate hue, sat,
lum (which is set for brightness), plus basic color mixes.
F1 Look up Shape Field Properties.
Images Field Properties
The Images feature permits you to add bitmaps, sound, and videos to patient
records in the program.
Add images to your reports, such as a company logo or picture of the office building.
F1 Look up Image Properties.
Data Fields and Expressions
Of the field types available in the Report Designer, the Data field is the only type that
allows for expressions to be defined.
An expression is a formula or equation that lets you introduce variables to determine the
end result. A conditional expression is a formula or equation that contains at least one
“if” clause which must be met to get the desired result. In effect, expressions give you an
easy formatting method to get the exact data desired to display in the field.
Click New Expression. The Select Data Field window is displayed. Select a file on the
left-hand side of the window and an abundant list of fields available is displayed in the
Fields list on the right. The files from which you may choose are Case, Insured, Claim,
Custom Data, Patient, Practice, and Transaction.
F1 Look up Data Field Expressions and Conditional Expressions.
Chapter 13: Medisoft Report Designer
127
Tutorial Practice
To review the procedures outlined in this chapter, you can perform the following steps
using the tutorial database provided.
Repositioning the CMS- or HCFA-1500 form
Let’s say your paper claims are printing with text shifted too far to the right and below
the spaces provided in the pre-printed CMS- or HCFA-1500 forms.
Go to the Reports menu and select Design Custom Reports and Bills. Click the Open
speed button (the book with the arrow pointing to it) and select HCFA - 1500
(Primary). Click OK.
Go to the File menu and select Report Properties.
It’s probably better to make one adjustment at a time, so in the Form Offset section,
and change Left to .05. Click OK. You need to print the form to see if it is adjusted
enough. Click the Print speed button. The Save Report As... window is displayed.
Since you are revising a standard form, give this form a different name, until you know
it is correct. In the Report Title box, enter CMS - 1500 1.
You need to use a name that you can remember, but you can’t replace the
original form. If you use the same name as the original form, the list shows
two forms with the same name and it may be difficult to remember which is
the form you’ve revised.
128
Medisoft
The program informs you that claims and statements printed through the Report
Designer are not marked as billed. This is generally a good thing. Click OK.
In the Data Selection Questions window, select a single claim number in the Claim
Number Range so only one page prints. Click OK.
Use the Claim Number Range and not the Chart Number range because
there must be an available claim before the form prints from the Report
Designer.
Click OK in the Print window. We made a great adjustment and the right/left
adjustment is perfect.
Now repeat the process, opening the Report Properties window. This time, enter .6 in
the Top field. Click OK.
Again print the form and check to see if the alignment is OK.
Unfortunately, aligning the CMS- or HCFA-1500 form is a trial-and-error process.
You may have to make a number of adjustments to get the printing just right. When
you do get the adjustments right, save the form and close the Report Designer. Use this
revised form each time you print paper claims.
If you are short on CSM- or HCFA forms, you can print the report on plain paper.
Place the test paper on top of a pre-printed form and hold them up to the light to see if
the text is lined up properly.
How To Revise an Existing Report
You decide that you want the Zip Code included on your patient lists. In the Report
Designer, click the Open speed button. Locate Patient List and click OK.
First you need to add the column heading and you have to make a little space for it.
Move the Phone heading a little to the right by clicking and dragging the field. (This is
the heading in the blue band, not the one in the green band.)
Click the Text Field speed button in the toolbar and then click the cursor in the space
between CityLine and Phone. Double-click this new text field to open the Text
Properties window. In the Text field, enter Zip Code. Click Font and, in Font style,
click Bold. Click OK. Click OK again. To be sure the heading is aligned properly,
hold down the Shift key and click CityLine, Zip Code, and Phone. Right-click over
one of the selected fields and select Align Fields in the Speed menu.
In the Alignment window, choose Bottoms and click OK. You’re halfway there!
In order to align the Phone heading and the Phone 1 field (in the green band), rightclick Phone and select Properties. In the Text Properties window, locate and make
note of the value in the Position Left field. Click OK. Now, right-click over the Phone
Chapter 13: Medisoft Report Designer
129
1 field and enter the same value in the Position Left field of this window. Click OK.
The Phone heading and Phone 1 field are now aligned.
Next you need to enter the Zip Code field in the document–you need to insert a Data
Field in the green band. Click the Data Field speed button, and then click the green
band below the Zip Code heading.
Double-click this new field to open the Data Field Properties window. Click New
Data Field. In the Select Data Field window, the Patient file should automatically be
selected. Be sure it is. In the Fields section, scroll down until you see Zip Code. Select
Zip Code and click OK. Click OK again.
To make sure the two Zip Code fields are aligned, right-click over the heading and
make note of the value in the Left position field. Then right-click over the Zip Code
field (green band) and enter the same number in the corresponding field of this window.
To save, you must rename the form. Go to the File menu and select Save As. In the
Report Title box, enter Patient List w/Zip and click OK. Close the Report Designer.
To test your new report form, go to the Reports menu and select Patient List w/Zip.
How To Create a New Report
Choose a report style on which to base a completely new form.
Format the report by going to the File menu and selecting Report Properties. Establish
the report name, margins, size of bands and filter the source data needed to provide the
information for the report.
With the report formatted, you can begin placing fields on the grid. Make the necessary
additions and/or changes to complete your form, then save and exit Report Designer.
The new report appears in the Custom Report List.
As you become familiar with the workings of Report Designer, formatting and
designing become easier.
130
Medisoft
Chapter 14
Office Hours
Introduction
Office Hours is an appointment scheduling program that helps keep track of
appointments for your practice. It is automatically installed with Medisoft (unless you
chose not to have it included when you performed the installation).
If you purchased Office Hours Professional, the features of this program are clearly
marked throughout this chapter.
Starting Office Hours
If you are working in Medisoft, click the Appointment Book speed button or go to the
Activities menu and select Appointment Book.
Accessing Office Hours from Other Programs
You can access Office Hours at the same time as you are working in other Windowsbased programs. Open Office Hours at the beginning of each day and then minimize it.
Press ALT + TAB at the same time to activate Office Hours, perform the desired
scheduling tasks, and then minimize it to return to your previous task.
Office Hours Setup
There are several portions of the program that need to be set up before you can start
scheduling.
First, set up provider records. If you are booking appointments for lab work or therapy,
each of those technicians should have a provider number and schedule and so should
each office member whose schedule is included in the Office Hours program.
Second, create your resource records. You can include all treatment apparatuses in this
list, as well as consultation and treatment rooms, so that you do not double book a
room or equipment.
Third, establish the number of booking columns you want.
Chapter 14: Office Hours Patient Appointment Scheduler
131
Fourth, clarify program options, such as establishing appointment length, creating
whatever views you need for viewing multiple columns at once, and deciding how much
information you want displayed in your appointment blocks in the appointment grid.
Fifth, set up breaks and recurring breaks, to show lunch hour, set coffee-type breaks,
seminars, etc.
Setting up Provider Records
Office Hours must have at least one provider record set up in order to run. If no
provider record is set up, Office Hours automatically prompts you to do so. If you
want, you can let the program assign the Code for the provider or you can enter a fivecharacter code yourself.
Enter the provider’s name and pertinent information. PIN and ID numbers assigned by
governmental carriers and other commercial carriers are recorded in the Default Pins tab
of the Provider: (new) setup window, as well as the Group Number and UPIN, when
needed.
F1 Look up Provider Entry.
Setting up Patient Records
This can be done in either Medisoft or Office Hours. Click the Patient List speed
button and click New Patient or press F8 to display the Patient/Guarantor: (new)
window. You can create a chart number yourself (eight alphanumeric characters) or let
the program create one. Enter information in as many of the fields as necessary in both
tabs. When finished, click Save. Repeat this process for each patient who visits your
practice.
F1 Look up Patient Entry.
Setting up Case Records
This can be done in either Medisoft or Office Hours. Click the Patient List speed
button and then choose the Case radio button in the top-right corner of the window.
Then click New Case or press F8 to display the Case: Patient Name (new) window.
Enter information in as many of the fields as necessary. When finished, click Save.
Repeat this process for each case you want to enter.
In the Case window, you cannot press F8 or F9 to access records available
from lookup fields, such as Facility or Attorney. The F8 and F9 keys are only
available in the Case window from within Medisoft itself.
F1 Look up Case Entry.
132
Medisoft
Setting up Resource Records
The Resource List is a tool to help you manage the scheduling of rooms and equipment
in the office. To create the list, click the Resource List speed button or go to the Lists
menu and select Resource List. In the Resource List window, click New or press F8.
Create a code for the resource or let the program create one based on the description.
Enter a description (e.g., Room 1, Treadmill, etc.) and click Save. Repeat this process
until all rooms and/or equipment are contained in the list.
F1 Look up Resource Entry.
Setting an Appointment
To set an appointment in Office Hours, first select the provider for whom you are
scheduling. The provider box at the top right of the toolbar has a drop-down box
arrow. Select the provider you need, or press F8 to set up a new provider record. In any
Multi View (Office Hours Professional), select the provider by clicking in the
appropriate provider’s column.
Select the date on which the appointment is to be set. You can use the Day, Week,
Month, and Year selection arrows below the calendar to locate the correct date, or use
the Go to Date feature.
Next, in the appointment grid, double-click a time slot, which is highlighted with a
heavy line border. You can also click the New Appointment speed button; right-click in
the time slot and select New Appointments press F8; or go to the Lists menu and select
Appointment List and then click New to open the New Appointment Entry window.
Office Hours Original
Chapter 14: Office Hours Patient Appointment Scheduler
133
Office Hours Professional
Enter or select the chart number of the person for whom the appointment is being set.
If the person’s information has been entered in the program, the name and phone
number are automatically entered and the patient’s last case is reflected in the Case field.
Assign a resource. If the resource or room you need is not in the list, press F8 to create a
new resource record. The Notes field lets you include a reminder message regarding the
patient’s need or condition. Enter an appointment reason in the Reason field. If
necessary, change the Length, Date, and Time fields here. You can also change the
appointment color. If there is a need for repeat visits, click Change in the Repeat
section. See the following Repeating Appointments section.
F1 Look up New Appointment Entry.
Repeating Appointments
When a patient needs to make regular return visits, set up repeat appointments through
the New Appointment Entry or Edit Appointment window. Click Change in the
Repeat section at the bottom of the window. The Repeat Change window that opens is
the same window that appears when creating repeating breaks. See the Setting Up
Repeating Breaks section for instructions, page 136.
F1 Look up Repeat Change.
134
Medisoft
Entering Breaks
You can enter breaks into the appointment schedule as reminders that the time slots are
committed. Some breaks are a one-time occurrence, like a vacation or a seminar.
Others are regularly scheduled times for each month or week.
There are several ways to access the New Break Entry window. The quickest way is to
click the Break Entry speed button. You can also click New or press F8 in the Break
List window.
To create a break, give it a name, a date, and enter the time that the break starts. Using
the up and down arrows, enter the length of time in minutes. The display color of the
break should be contrasting to the regular daily appointment schedule (the default is
gray).
Indicate whether the break should display in all columns on the appointment grid. If
not, click the All Columns box to uncheck it, and then mark those columns to be
affected. Three radio buttons at the bottom of the window let you apply the break to
the Current provider (the one whose schedule is on the window), Some, or All
providers.
The Print Grid feature is available with Office Hours Professional.
F1 Look up New Break Entry.
Chapter 14: Office Hours Patient Appointment Scheduler
135
Setting Up Repeating Breaks
In the New Break Entry window is a field marked Repeat, with a Change button.
Clicking Change opens the Repeat Change window where you can establish the
Frequency of the break.
Choosing any of the radio buttons (except None) displays different data entry boxes in
the middle of the window that give you the repeat options for each frequency. Also, a
written summary of the selected frequency appears in the bottom middle area of the
box.
It is important to note that when you set up a break using the Monthly frequency, the
date highlighted on the main calendar affects the day or date that is entered in the break
note.
Moving/Deleting Appointments
Changing Appointment Status (Office Hours Professional)
There are multiple options for marking the status of an appointment.
The default is Unconfirmed. When any change in status occurs, edit the appointment
or right-click on the appointment and choose the appropriate radio button. If you
choose Cancelled, the appointment is removed from the grid display. Any other status
is reflected by a small icon in the upper right corner of the appointment in the grid.
136
Medisoft
Moving an Appointment
If you want to move the appointment to another day or time, click the appointment
and press CTRL + X (or go to the Edit menu and select Cut). Move the cursor to the
new day and/or time slot, and either press CTRL + V or select Paste in the Edit menu.
If you want to move the appointment to another time slot showing on the appointment
grid (whether the same provider or not), click the appointment, hold the left mouse
button down and drag the cursor to the desired time slot. Release the mouse button.
Deleting an Appointment
There are multiple ways to delete or remove an appointment: click the appointment
slot on the appointment grid and press DELETE, highlight the appointment in the
Appointment List and click Delete, or right-click on the appointment (either in the
Appointment List window or on the appointment grid) and select Delete or Delete
item, respectively. You can also edit the appointment and change the status to
Cancelled.
F1 Look up Moving/Deleting an Appointment.
Patient Recall (Office Hours Professional Integrated)
The program includes a complete patient recall system with a recall appointment list to
assist in contacting patients to schedule appointment dates and times or to make
reminder phone calls. This feature is available through both the Medisoft and Office
Hours programs.
F1 Look up Patient Recall.
Multiple Booking Columns
If you want to multi-book appointments (that is, schedule more than one patient in the
same time slot), simply right-click on the column heading in the appointment grid and
the Speed menu gives you a choice of Add Column or Delete Column. If you add a
column, the Add Column window has a horizontal scroll bar that lets you indicate the
provider for whom you are adding a column. The number of columns determines how
many appointments can be booked in one time slot for one provider. There is really no
limit as to how many columns can be set up on the appointment grid. You can also edit
the column display by selecting Edit Column in the Speed menu. Changes are made in
the Change Column window.
Chapter 14: Office Hours Patient Appointment Scheduler
137
Program Options
Appointment Length
Set the starting and ending appointment times for the practice. Enter the Starting
Time and Ending Time, breaking it down by hour and minutes. Standard
appointment Intervals can be established by scrolling with the up and down arrows.
Office Hours Original
Office Hours Professional
You can also set colors to distinguish appointments, breaks, and conflicts (Office Hours
Professional). Make decisions concerning all the other default settings in this tab.
138
Medisoft
Designate one of the reports in the Speed Report box (Office Hours Professional) and it
automatically prints when you click the Print speed button.
Views (Office Hours Professional)
One of the most important features of the Office Hours Professional program is the
variety of ways you can display appointments/breaks in the appointment grid.
At the bottom of the main Office Hours window, in the Status bar, there are four View
boxes, with different configurations of dot patterns. These give quick access to the same
functions available through the View menu on the Menu bar. These correspond to
Single Provider View, Week View, Month View, or any combination Multi View.
Day View
The Day View shows a single provider’s appointments for a selected day. If
multiple columns are set up, all columns are displayed. To display another
provider’s schedule, make a new selection in the provider box in the toolbar. This
view does not show columns for resources, but columns can be added or removed
as necessary in this view.
Week View
The Week View also shows only one provider’s schedule, but with one column for
each day of the week. If you have multiple appointments scheduled, the time slot
shows the color for scheduling conflicts. You can size the columns to see all the
appointments/breaks scheduled by placing the cursor on the right column heading
boundary line until it takes the shape of a double-sided arrow, and then drag the
boundary line right or left to increase or decrease the size of the column. Columns
can be added or removed as necessary in this view.
Month View
The Month View shows up to 31 days, with the boxes colored where appointments
have been scheduled. This is a single-provider view. The value of this view is that
you can get a good overall view of which days are free for appointments or other
scheduled items. Columns cannot be added or removed in the Month View.
Multi View/Multiple Provider/Resource View
The Multi View, or Multiple Provider/Resource View, is the most flexible. The
program provides one Multi View setup, which automatically includes all providers
and all resources, each with its own column. You can create as many Multi Views
as you need in the Multi Views tab of Program Options.
Chapter 14: Office Hours Patient Appointment Scheduler
139
The open data entry field lists all Multi Views that have been set up. This is where
you can group providers and/or resources (rooms or facilities scheduled for
appointments) in any combination desired, or modify or delete existing multiple
view setups. Click New to set up a new Multi View (select a view and click Edit to
make changes).
In the New View window, assign a name for the new view. For the first column,
indicate the type (Provider or Resource), the Code (provider number or resource
code), then the width of the column (in pixels). Set up each column you want in
the view and click Close when finished.
If you want to add a column between columns that have already been created, place
your cursor where you want the new column and click Insert.
These views can be also edited or reverted to default views through the View menu.
Appointment Display (Office Hours Professional)
In the Appointment Display tab of Program Options, you can specify up to five rows of
information to display in the grid for an appointment. Be aware that the length of the
appointment determines how much data is actually displayed on the grid. An
appointment must be at least 75 minutes long to display five rows of information.
F1 Look up Program Options.
Security Setup
If you are using Office Hours in connection with Medisoft, the security settings
established in Medisoft are applied to Office Hours as well. However, you can make
changes from within Office Hours if needed.
You can be logged in to the program on only one computer at a time. If you are logged
in on one computer and try to log in on another, a message pops up. You have to log
out of the first computer before you can log in on another computer.
F1 Look up Security Setup.
Reports in Office Hours
If you select one of the following reports in the Speed Report box in Program Options
(Options tab), that report prints automatically when you click the Print speed button
(Office Hours Professional).
140
Medisoft
Appointment List
Probably the most important report printed in Office Hours is the Appointment
Schedule, a listing of all the day’s scheduled events. Generally, printing this report is the
first order of business. Print the list and be sure you are ready to meet the day.
F1 Look up Printing the Appointment List.
Appointment Status (Advanced and above)
The Appointment Status report displays a list of appointments showing their statuses.
F1 Look up Appointment Status Report.
Printing Superbills
If you use Office Hours integrated with any version of Medisoft, you can print
superbills for the day through Office Hours. Go to the Reports menu and select Print
Superbills.
F1 Look up Printing the Superbill.
Tutorial Practice
To review the procedures outlined in this chapter, you can perform the following steps
using the tutorial database provided with this program.
Entering Resources
Go to the Lists menu and select Resource List. Click New.
Leave the Code field blank. In the Description field enter Treadmill. Click Save.
Click Close.
Entering Appointments
I.B. Gone (remember him?) calls and needs to see Dr. Urdoc today. Dr. Urdoc actually
has an opening at 11:30 am. In all views except Monthly (Advanced and above) and
Multi View (Advanced and above), select Dr. Urdoc in the provider box to the right of
Chapter 14: Office Hours Patient Appointment Scheduler
141
the Exit speed button in the toolbar. In any Multi View, be sure to locate Dr. Urdoc’s
appointment column. You see that the 11:30 time slot is open for Dr. Urdoc so
double-click it to open the New Appointment Entry window.
Office Hours Original
In the Chart field, enter GON to locate I.B. Gone’s chart number. Press ENTER. In
Resource, enter T to help locate the treadmill resource. Highlight the correct resource
and press ENTER.
In the Note field, enter the following information: Emergency physical for work.
The Case defaults to Mr. Gone’s most recently opened case. In the Reason field,
although we have not yet created reasons of our own, we can select one from the
database. Click the down arrow and select Routine Checkup.
The date and time have already been selected, so click Save. See that Mr. Gone’s name
appears in the 11:30 am slot. Also notice that it is fuchsia in color (which is the color
assigned to the Routine Checkup reason). A recap of the appointment and Mr. Gone’s
information is also displayed to the left of the Appointment Grid.
Repeating Appointments
Dr. Urdoc wants to follow up on Mr. Gone’s treadmill results and asks you to make two
more appointments, a month apart. Since 11:30 am is a good time for Mr. Gone,
double-click the existing appointment.
In the bottom left corner of the Edit Appointment window, click Change to open the
Repeat Change window. Choose Monthly. In the End on: field, click the down arrow
142
Medisoft
to show the calendar. Click the right arrow twice (for two months). Then click OK.
Click Save.
Setting Breaks
Click the Break Entry speed button. In the Name field, enter Dr. Urdoc Seminar.
The meeting is scheduled for two hours on June 21, starting at 1:00 pm. In the Date
field, enter 6/20/2003. For Time, type in 1:00 p. In Length type 120. In Resource
enter L for the Lunch room. Give it an aqua color, using the down arrow to display the
color choices. Click the All Columns box to be sure everyone participates. Under
Provider, choose All. Click Save. To double-check, click the appropriate Month and
Day buttons to locate June 21, 2003. If necessary, use the scroll bar to show the
seminar.
To return to today’s calendar, click the Go to Today speed button.
Creating Reason Codes
Go to the Lists menu and select Reasons List. Click New to open the Appointment
Reason Entry window.
Leave the Code field blank. In the Description field, enter Sports Accident.
The default appointment length is 15 minutes. Change this number to 30. In the
Default Appointment Color field, the drop-down arrow lets you select a color that fills
the appointment space on the schedule grid. Choose red for this emergency accident
response. In Default Template Color (Advanced and above), select Light Red. Click
Save.
Creating Templates (Office Hours Professional)
Go to the Lists menu and select Templates List. Click New.
In one of the six Template Reasons fields, use the drop-down arrow to enter NEW in
the Code field. In the Description field describe the template’s use as See New
Patients. Using the drop-down arrows, select Dr. Urdoc as the Provider, and the
Resource is Exam Room 2.
Click the arrow on the Date field to display the calendar and highlight the designated
date. Use the arrows on either side of the month name to change to an earlier or later
month, if necessary. Type 10:00 a in the Time field. Set the Length to 120. The
search arrow on the Color field lets you select light yellow as the color for the template
on the appointment grid.
You want to use this template every day, so click Change to display the Repeat Change
window. Choose the Weekly frequency, enter the number 1, and click the boxes for
Chapter 14: Office Hours Patient Appointment Scheduler
143
Tuesday and Thursday. Leave the End on field blank at this time. Your entry is
confirmed with the message, “Every week on Tue and Thu.”
Creating Multi Views (Office Hours Professional)
Dr. Urdoc works only with therapy patients and uses Exam Room 2 for consultations.
Let’s create a view where you can see all of these schedules at the same time.
To create a multi view, go to the File menu and select Program Options. Open the
Multi Views tab. Click New.
Name the new view Dr. Urdoc and press TAB. In the Type field, click the box and
select Provider. In the Code field, locate and highlight Dr. Urdoc’s name. Leave the
Width at its default setting. Click Insert Column.
In the next line, select the Resource type. Press TAB. Locate Exam Room 2 and
highlight it. Press TAB. Change the Width column to 50. Click Insert Column to
create a new line. Again select Resource. This time locate and select Therapy. Click
Close. Click OK.
Using the Wait List (Office Hours Professional)
Mr. Gone has seen the doctor for his injury but he needs a return visit in a week. With
the full appointment schedule, the surest way to work him in is to put him on the Wait
List. Go to the View menu and click Wait List. Click New.
Type in GONI to select the Chart number. Click Save.
To begin the search for his next appointment, highlight his record and click Find to
open the Find Open Time window.
Mr. Gone is out of school at 2 p.m. but has choir practice on Tuesday and Thursday.
He needs a 15 minute appointment so enter a Start Time of 2:30 p and an End Time
of 5:00 p. Click Monday, Wednesday, and Friday. Click Search and let it go. In a
few moments, if the program finds a match, a Confirm window pops up: “Open time
slot found. Do you want to set the appointment?” If the first time slot it presents is not
satisfactory, click Retry and let it search further. Or click Yes and schedule the
appointment.
144
Medisoft
Chapter 15
Work Administrator
Introduction
This program lets staff streamline their work process. You can use this feature to
organize tasks for users and user groups. It lets you add tasks manually and set up rules
that automatically add tasks when certain conditions are met.
To open Work Administrator, go to the Activities menu and select Launch Work
Administrator or click the Launch Work Administrator icon in the toolbar.
Assignment List
The Assignment list is the main window for the Work Administrator. This window lets
you view the tasks assigned to Medisoft users.
Chapter 15: Work Administrator
145
F1 Look up Assignment List.
Filters
The default for the Assignment List window is to display the tasks assigned to the user
currently logged in to Medisoft. Data filters can be added to determine which tasks
show on the Assignment List.
To add a data filter, click Add in the Filters section of the Assignment List. The Filter
Selections window opens.
Select the field and values for the filter. Click Add and the new filter will appear in the
text box at the bottom of the window. Click Save to apply the filter to the Assignment
List.
F1 Look up Filter Selections.
Tasks
This window lets you enter tasks in the Assignment List and assign them to a specific
user or group of users. Users can check the Assignment List throughout the workday to
view the tasks they should complete. Depending on a user’s permission level, he or she
may not be allowed to create or edit tasks.
To create a task, click New in the Assignment List or select Add New Task from the
Activities menu. To modify an existing task, click Edit. The Task window opens.
146
Medisoft
Select the user to whom you would like to assign the task by clicking the down arrow in
the User field and selecting the appropriate user. If you would like to assign a task to a
group of users, rather than a single user, select the group name from the drop-down
menu in the Group field. Enter information in the remaining fields as necessary. Click
Save and the task appears in the Assignment List of the appropriate users.
F1 Look up Tasks.
Rules
Work Administrator allows you to create rules so that a task is automatically added to
the Assignment List each time a particular scenario is created. Existing rules are
displayed in the Task Rules List accessed by clicking the List Rules button in the
Assignment List. To add or modify a rule, click New or Edit in the Task Rules List.
The Rule window appears.
Chapter 15: Work Administrator
147
This window allows you to add or edit rules so that common tasks are automatically
created. The top portion of the window lets you create a type of task and specify
instructions. The Condition portion of the window lets you determine when the task
above is created. For example, you office may need to check eligibility for each patient
who needs a referral. You can create a rule that automatically adds this task after
entering a new appointment.
Depending on the type of task you want to create, the fields displayed in the Rule
window change. Enter information in the appropriate fields and click Save to apply the
rule.
F1 Look up Rules.
148
Medisoft
Appendix A
Where to Find Help with Medisoft
Support Options
Technical help for learning and working with Medisoft is available in the following
options: (1) F1 key or Help buttons access online information while within the
program; (2) accessing the Medisoft web site; (3) training options; (4) local ValueAdded Resellers; and (5) Medisoft telephone technical support. Medisoft support is
unable to provide training on the telephone.
Using Online Help
No matter where you are in your Medisoft program, help is close at hand. If you don’t
understand what is wanted, or how data should be entered, press F1, click Help (if
available), or click the Help speed button, and data files are opened. Specific
information and examples of how data should be entered is displayed in the Help
window.
In addition, you can go to the Help menu and select Table of Contents. Highlighting
any option in the Contents list opens the related help data fields.
Regardless of which of these entry points you utilize, you open the same Help files.
Access the files in the manner most convenient to you.
Medisoft Web Site
The Knowledge Base is a searchable online database containing technical information
relevant to the use of all Medisoft and related products. If you are working in a
Medisoft program, access is made easy by going to the Help menu and selecting
Medisoft on the Web or at the following web site:
http://www.medisoft.com/kb.
When accessed, you can search for information concerning all Medisoft products or any
particular product. We try to maintain the most current technical information in the
Knowledge Base. For instructions on how to use the Knowledge Base, click Help on
the left side of the Knowledge Base page.
Appendix A: Where to Find Help
149
Training Options
There are various training options available. Contact your sales representative at (800)
333-4747 or a local Value-Added Reseller for information concerning these options.
Local Value-Added Resellers
There are local Value-Added Resellers of Medisoft in your market area who are
knowledgeable and efficient in selling, installing, troubleshooting, and supporting your
Medisoft program. You can contact a Medisoft sales representative for the name of a
qualified Value-Added Reseller in your area to give you hands-on help.
Technical Support
Call Toll-Free (800) 334-4006. Get help directly from Technical Support services!
Support is available to answer questions and assist in troubleshooting problems.
Support answers questions related to the operation of Medisoft software in a physician’s
office or a billing service. Support technicians are unable to assist with network
configuration, computer hardware problems, training on how to do medical billing, or
aligning your CMS or HCFA forms. Support does provide software assistance to any
customer, no matter where the program was purchased.
Support is unable to provide training or file repair over the telephone.
When You Call Support
You’ll get faster service if you have these items ready when you call Support:
•
Your Medisoft customer number. This is found on the upper right corner of
the invoice or packing slip that came with your Medisoft program.
•
The Serial Number and registration information for your Medisoft software.
•
A complete description of your problem or question, including the complete
text of any error messages.
•
Have a current support contract already in place or be ready with credit card
information to set one up.
•
It is usually necessary for you to be able to work on your computer while you
are talking to the technical support staff, so be sure your phone is close to the
computer.
Service Hours
Remember, Arizona doesn’t change to daylight saving time. Year around support is
available from 6:00 AM until 5:00 PM, Monday through Friday, Mountain
Standard Time.
150
Medisoft
Updates and Changes
Go to the Help menu and select Online Updates. Any free update available is
downloaded to your system.
F1 Look up Online Updates.
Tips and Shortcuts on the Internet
There’s a wealth of information on the Medisoft web page on the Internet. The web
site address is www.medisoft.com.
Appendix A: Where to Find Help
151
Appendix B
New Features in Medisoft 14
There are many new features in this version to help you to manage your practice. Some
of the highlights are listed below.
UB-04 Support
• Version 14 adds UB-04 claims support. If you need to process these types of
claims, you can easily enable UB-04 specific fields in the application on the
Program Options, Data Entry tab. Version 14 also provides UB-04 claim
processing. Once you have entered data in the UB-04 fields for a patient, you
can enter transactions and then create and print UB-04 claims. You will enter
transactions and create UB-04 claims as you would for other insurance claims.
You will also print the UB-04 claims the same except for the report format you
choose when printing. For more information on this feature:
F1
Lookup UB-04 Claims Overview
Custom Date Entry for ERA Posting
• Version 14 now supports a quick method for a entering a custom remittance
date. The Program Options window, Data Entry tab now provides a new
option that you can select so that you are prompted to enter a remittance date
after selecting a file to post. For more information on selecting this feature:
F1
Lookup Program Options, Data Entry Tab
Global Days
•
The Global Coverage feature lets you enter multiple charges for follow up
visits after a surgery. When you enter a Global Surgical Procedure for a patient
in Transaction Entry, all transactions entered during the global coverage
period will default to a zero-dollar amount and will not be included on claims.
Once the global coverage period expires, the charges default back to the
standard amount. For more information on this feature:
F1
Lookup Global Coverage Overview
Appendix B: New in This Version
153
Patient Quick Entry (Available with Medisoft Advanced and Network Pro)
• Version 14 now offers a customized interface for patient entry. Using this
feature allows you to set up a method for entering patient data that reflects
your work environment, which simplifies data entry and increase efficiency.
Patient and case data is easily added to existing records or you can quickly
create new records from one window without clicking multiple tabs. Using this
feature involves setting up templates which contain fields from the Patient and
Case windows. You can create and customize as many as needed and then
when using the Patient Quick Entry feature, you can select which template to
build or edit a record from. For more information on this feature:
F1
Lookup Patient Quick Entry Overview or Using the Patient Quick
Entry Feature
Dashboard (Available with Medisoft Advanced and Network Pro)
• Version 14 introduces the Dashboard feature. This new feature provides a
quick method to monitor key data points such as the number of appointments,
outstanding claims, etc. along with one-click access to application functions all
in one window. Once setup is complete and you have created at least one
profile (a basic grouping of data categories and selected settings), you can view
the displayed data on the Dashboard window and if needed, click links on the
window to further examine the data in greater detail. For more information on
this feature:
F1
Lookup Medisoft Dashboard Overview or Using the Dashboard
PowerTools Enhancement
•
Version 14 adds the Power Tools utility to Medisoft Utilities. PowerTools is
also enhanced and now provides a new feature to modify individual procedure
codes in a single practice.
F1
Lookup PowerTools
Data Import/Export
•
154
Version 14 adds two new utilities to Medisoft Utilities. The Export Data
utility lets you export data from a Medisoft practice. You can pick and choose
the tables and records that are exported. The utility then exports the data into
an encrypted file that can be imported into another Medisoft practice. The
Import Data Records utility lets you import data into a Medisoft practice. First
you have to create an export file using the Export Data Records utility. Then
you can import that file using the Import Data Records utility.
Medisoft
F1
Lookup Export Data Records or Import Data Records
Multi-Practice Data Conversion
• Version 14 adds the Global Convert utility to Medisoft Utilities. This new
utility lets you select and convert multiple practices in the same root directory
to the current Medisoft version at the same time.
F1
Lookup Global Convert
Scheduled File Maintenance
•
Version 14 provides a simple method for scheduling file maintenance. You can
now select a time and a interval for these features to run that best reflects your
office’s needs. For more information on this feature:
F1
Lookup Scheduling File Maintenance
Appendix B: New in This Version
155
Appendix C
Converting Data
Converting from Windows Version 5.5x or Higher to
Windows Version 14
If you have been using Medisoft Version 5.5x or higher and have just installed Version
14, an automatic conversion is performed the first time a practice data set is opened in
the new program.
Converting from Windows Version 5.4x or Lower to Windows
Version 14
If you are converting from Medisoft Windows Version 5.4x or lower to Version 14, data
must be converted before it can be accessed in the new program. Go to the File menu
and select Convert Data. Choose Convert Windows 5.x data. Follow the prompts.
Multiple Practice Conversion Process
There are two ways to convert data. First, you can open a different practice through the
File menu. The program will immediately perform a conversion. Second, you can go
to the File menu and select Convert Data.
When you convert previous data choosing Convert Data, the program searches your
physical hard drive for any MWDBLIST.ADT files. When found, the program lists all
valid data directories in the Medisoft File Conversion window.
A valid data directory is one that contains data.
Of the data sets listed in the Medisoft File Conversion window, select one at a time that
you would like to have converted.
When you are finished converting the data sets, your original data directories remain
unchanged except a CONVERT.LOG file (and possibly a DATABASE.CLI file) is
created in each data directory that is upgraded. The program creates a new directory for
each data set converted in the root data directory you specified when you installed your
latest program. The first new data directory is automatically named DATA, the second
is named DATA1, and each new data directory is named consecutively after that (e.g.,
DATA2, DATA3, etc.).
Appendix C: Converting Data
157
DO NOT RENAME THESE DATA FILES.
The program relies on this naming convention to function properly. To identify which
practice files are contained in which data directory, use the Open Practice window,
which contains the data path for the highlighted directory.
We recommend that you do not delete your old data directories until you know for
certain that the newly converted data is complete. If you need more space on your
computer, you can create a backup of the old data directories or just copy them onto
storage disks, but keep them until you are certain the new program is working
completely and properly.
Medisoft MS-DOS Users Converting to Windows
If you are a user of any Medisoft patient accounting program in the MS-DOS
environment, your data files are converted to the Windows version.
The conversion process is designed to have no effect on your original MS-DOS files.
However, before you begin installation of the new program, back up your current data
files just to be safe.
What Doesn’t Convert
Before you undertake the conversion of Medisoft MS-DOS data to the Medisoft
Windows program, you need to know that there are several types of data or formats
that do not convert, no matter which option you choose.
Any custom formatting you have done, including lists, statements, CMS or HCFA
forms, receipts, and the custom data windows, does not convert. In addition,
notes, superbills, billing notes, and custom printer setups do not convert.
Prior to conversion, you must complete all EDI batches in your MS-DOS program.
In addition, the conversion does not apply payments to charges. There is no way
for the conversion program to know how much of each check is applied to
respective changes, so it is up to you to apply payments to charges. It is highly
recommended that all payments be applied before performing a conversion of the
data.
Converting MS-DOS to Windows
Medisoft data file conversion from MS-DOS to Windows is automated with a
simple click of a button.
To start your conversion, go to the File menu (or press ALT+F) and select Convert
Data.
The Convert Medisoft Data window, by clicking Search for Data, finds all MSDOS Medisoft data files. This search may take a few minutes.
158
Medisoft
Each MS-DOS database found appears in a list and automatically marked for
conversion. If you do not want to convert all data at one time, deselect those files
you do not want to convert by clicking on the check box next to the data you don’t
want converted. Buttons marked All and None below the data field can aid in
marking the files. When you click Start Data Conversion, you have three options:
Convert All Transactions, Convert Patient Balances, and Convert No
Transactions.
The Convert No Transactions option (which is recommended) converts all MSDOS data except transaction detail and transaction histories. If selecting this
option, you need to maintain two accounting systems until all patient balances in
the earlier system are zeroed out. All new charges (and payments and adjustments
for the new charges) should be recorded in the new Medisoft program for Windows
program, and all payments and adjustments for existing transactions should be
recorded in the MS-DOS program until all accounts are balanced.
The Convert Patient Balances option (not recommended) converts all MS-DOS
data but treats transactions in a special manner. All transactions for each patient
are compiled and converted into a single balance forward sum with no transaction
detail. A BALFORWARD or CREDFORWAR transaction is created showing the
amount owing or credited to the patient. Because no detail is converted, we do not
recommend this type of conversion. It becomes very difficult to apply payments to
old transactions.
The Convert All Transactions option (not recommended) converts all MS-DOS
data and creates new cases as necessary.
Select the type of conversion you want and click OK. The Conversion Progress
window is displayed.
The Convert No Transactions option converts only these files:
Address
Appointment
Billing Code
EDI Receiver
Insurance
Patient
Provider
Procedure/Diagnosis/MultiLink
The Convert Patient Balances option converts these files:
Address
Appointment
Billing Code
EDI Receiver
Insurance
Patient
Provider
Transaction (lump sum only)
Procedure/Diagnosis/MultiLink
The Convert All Data process converts the following data files:
Address
Appointment
Patient
Provider
Appendix C: Converting Data
159
Billing Code
EDI Receiver
Insurance
Transaction
Transaction History
Procedure/Diagnosis/MultiLink
During the conversion process, the program checks billing dates on all transactions
and places them in the Claim Management list format, as discussed in Chapter 7,
page 67.
The conversion finishes on its own. If the data conversion encounters problems, a
file named CONVERT.LOG is created in the data file directory which explains any
problems.
Any problems or questions should be reported to or clarified through Technical
Support. Call (800) 334-4006.
Bringing Over Account Detail from Another System
If you are converting data from an accounting system other than Medisoft, the data is
not affected by the built-in automatic conversion. Because Medisoft is an Open Item
Accounting system, to best take advantage of this capability, it is recommended that you
recreate each transaction, with all of its detail, for every charge that is still outstanding.
The recommended course of action is as follows:
1.
Be sure each patient with an outstanding balance is set up in the Patient/
Guarantor: (new) window. That puts all the patient information into the system
for filling out the insurance claim forms.
2.
After your patient accounts are set up, enter a transaction for each outstanding
charge in Transaction Entry. The date on each transaction should be the date that
service was rendered.
You can work from the ledger of each patient and enter data, item by item, until
everything is current.
Again, it is noted that the manual reentry applies to data originating from a different
accounting program. It could also apply if you do not want to put your MS-DOS data
through the automatic conversion built into the Windows versions of Medisoft.
160
Medisoft
Appendix D
Medisoft Terminal
Receiving Reports from a BBS
Within the Medisoft program, the Medisoft Terminal feature can be used to send or
receive reports by connecting to bulletin boards using a modem.
Go to the Tools menu and select Medisoft Terminal. The Medisoft Terminal window
appears.
The window displays speed buttons or icons allowing you to dial, hang up, answer, and
send or receive files. The Menu bar at the top of the window has corresponding
functions to the speed buttons.
Dial:
CTRL + D
Answer:
CTRL + A
Receive File: CTRL + R
Hangup: CTRL + H
Send File: CTRL + S
The speed buttons are defined as follows:
Dial
Appendix D: Medisoft Terminal
161
Answer
Hang up
Send a file
Receive a file
Exit the program
The blank part of the window displays all modem activity (such as dialing).
Before using Medisoft Terminal, parameters are defined in the Dial menu or the
Program Options window of Medisoft Terminal. Go to the File menu and select
Program Options.
Check the Knowledge Base (www.medisoft.com/kb), call your local Value-Added
Reseller, or call Support at (800) 334-4006 for technical support, go to the Call menu
and select Dial.
F1 Look up Medisoft Terminal.
Program Options
Go to the File menu and select Program Options. The Program Options window
appears.
The window is divided into three groups. If you are using an in-house phone system,
you may need to enter 9 or some other number in the Dialing Prefix field. You are
always required to enter a 1 for dialing a long distance phone number. The Dialing
162
Medisoft
Suffix is used to dial any extra numbers after the telephone number, such as an
extension.
In the next group are a series of scroll boxes for defining technical information about
your modem. The Serial Port field has four selections: COM1, COM2, COM3, and
COM4. In order to determine which Communications port your modem uses, click
Find Modem and the Modem Search/Test window opens.
F1 Look up Modem Search/Check in the Medisoft Terminal help files.
The lower third of the window has two fields. Modem Initialization is normally left
blank. If you have problems connecting with your EDI receiver or BBS and your
modem manufacturer suggests a Modem Initialization String, enter the string here.
In Modem Termination, enter a character string to terminate the phone connection
after the transmission has ended if your modem requires this. This field is usually left
blank.
F1 Look up Program Options in the Medisoft Terminal Help file.
Dial Options
Go to the Call menu and select Dial to open the Dial window.
Select the EDI receiver to dial from the scroll box. After the EDI receiver is selected,
the Options button becomes activated. Click it to open the Dial Options window.
Appendix D: Medisoft Terminal
163
Modem Tab
The Modem tab is divided into three groups. In the top group, enter the Data Phone
Number. This is the number that the Terminal program dials when you are
transmitting your claims.
Enter the data phone number assigned for your transmission. The program
automatically enters the punctuation for you.
In the Dialing Prefix field, enter the prefix number, if any. If you are using an in-house
phone system, you may need to enter a 9 or some other number to get an outside line,
followed by one or two commas to create a pause during dialing. For dialing a long
distance phone number, you always need to enter the number 1. The Dialing Suffix is
used to dial any extra numbers after the telephone number, such as an extension.
In the next group are a series of scroll boxes for defining technical information about
your modem. The Serial Port field has four selections: COM1, COM2, COM3, and
COM4.
The Baud Rate is the speed at which your modem transmits data. The Parity, Data
Bits, and Stop Bits fields are defaulted to None, 8, and 1, respectively, and usually do
not need to be changed.
The lower third of the window has two fields. Modem Initialization is normally left
blank. If you have problems connecting with your EDI receiver or BBS and your
modem manufacturer suggests a Modem Initialization String, enter the string here.
In Modem Termination, enter a character string to terminate the phone connection
after the transmission has ended, if your modem requires this. This field is usually left
blank.
164
Medisoft
ID and Extra Tab
This tab displays information only. Any entries in these fields are already set up in the
EDI Receiver window.
F1 Look up Dial Options in the Medisoft Terminal Help file.
Dialing a BBS
To dial a BBS, press CTRL + D to bring up the Dial window. See Dial Options, page
163, on the features and setup. Once the parameters have been specified, select your
EDI receiver and click OK to initiate the dialing process. After clicking OK, the phone
number, ATDT, and any prefix entered displays in the Medisoft Terminal window.
Since all BBS’s are different, you need to follow the screen commands as they appear.
F1 Look up Dial in the Medisoft Terminal Help file.
Sending and Receiving Files
While you are logged on to the BBS, you may want to send or receive files. To do this
while logged on, go to the Transfer menu and select Send File. The Protocol
Properties window appears.
The window has two field selections: Send file and Use the following transfer
protocol. If you know the name of the file and its location, enter it here. If you need to
locate the file, click Browse. This opens the File to Send window.
Appendix D: Medisoft Terminal
165
The window is divided into two parts. On the left side, select the drive and/or
subdirectory where the file(s) are located. On the right, select the actual file to send.
Click OK when done and the file is immediately downloaded.
In the Send A File window, select the protocol at which you want to send the file.
The selections are, in suggested order of use:
ZModem offers the best overall combination of speed, features and error tolerance.
ZModem protocol has many options and should generally be used as the most
versatile protocol of choice.
XModem is the simplest and possibly the slowest protocol. XModem uses blocks
of 128 bytes and requires an acknowledgment (ACK) of each block. It uses only
simple checksum for data integrity.
XModem-1K transfers larger blocks (1024- bytes) and uses a 16-bit cycle
redundancy check. A larger block size can considerably increase the protocol speed
because it cuts down on the amount of times the transmitter waits for an
acknowledgment.
YModem is essentially the same as XModem with batch facilities added. This
means that a single protocol session can transfer as many files as you can care to
transmit. Another added feature allows the sender to provide the receiver with the
name, size, and time stamp with the incoming file.
YModem-G has a “streaming” feature and operates in a similar manner to
XModem-1K. But like YModem itself, YModem-G offers the advantages of batch
transfers and file information.
This protocol shouldn’t be used unless you are using an error-correcting
166
Medisoft
modem with error control turned on.
Kermit allows file transfers in environments that other protocols can’t handle.
Examples of different environments would include those that transfer only seven
data bits; links that can’t handle control characters, computer systems that can’t
handle large blocks of data.
ASCII is a convenient way of transmitting a text file. Because ASCII follows no
real protocol, it is difficult for the receiver to know when an ASCII transfer has
completed. The ASCII protocol terminates on any of three conditions: when it
receives or saves the file, a CTRL + Z character, when it times out waiting for more
data, or when the user aborts.
BPlus protocol is a proprietary protocol designed and used exclusively by
CompuServe.
F1 Look up Send A File and/or File Transfer Protocol in the Medisoft Terminal Help
file.
Receive File
To receive files while logged on to the BBS, go to the Transfer menu and select Receive
File.
As with sending a file, enter the location and the protocol of where and how the file is to
be received.
If you want to search on a location to download a file, click Browse and the Choose
Directory window opens.
Appendix D: Medisoft Terminal
167
Select the proper transfer protocol by clicking on the Transfer Protocol field. For
descriptions on what each protocol does, refer to the previous two pages.
F1 Look up Receive File in the Medisoft Terminal Help file.
Answering
When an outside source wants to connect with your computer (generally an individual),
he or she would typically let you know that a connection will be attempted at such a
time.
At the given time, when the phone rings and with Medisoft Terminal open, click the
Answer speed button, or go to the Call menu and select Answer to make the connection
through your modem.
Once the two computers are communicating, you can send or receive files. You can also
communicate by typing on your keyboard. What you type shows up on the other user’s
screen, and vice versa.
168
Medisoft
Appendix E
Archiving Overview
Accessed from the File menu – Archive, Archiving provides a simple method for
improving system performance and avoiding undue HIPAA compliance issues.
Note: Archiving functionality is available for Medisoft Network Professional.
Records can be archived instead of deleted, which increases system performance and lets
the practice still access the records if necessary. This feature provides users a method to
archive or, if necessary, restore archived records for items tied to that patient including
cases, claims, statements, and appointments.
The archiving feature allows users with the appropriate permission level to archive and
restore cases to the database. The archiving process is implemented via a series of dialog
boxes that lead users through the process of archiving data, restoring data, or printing
log or error reports on archived and restored records. Users can also print the archive
data in reports.
Note: the advantage of archiving patients' cases is that patients remain in the system
without the risk of deleting records to save space. Do not delete patients after archiving
their cases since this could create a situation in which these cases are no longer
accessible.
Medisoft Archive Wizard window
The Medisoft Archive Wizard window provides three options: the Archive Patient Case
Records radio button, the Restore Patient Case Records radio button, and the Print Log
Reports radio button. Next to the Archive Patient Case Records radio button is the
Cutoff Date for Archive Patient Case Records drop-down list, which is enabled when
the radio button is selected. The default date is one year prior to the current date.
Setting Up Archiving Permissions
Before utilizing the archiving feature, the system administrator should set up user access
and create/revise rights in the Medisoft Security Permissions window. Also, if needed,
the system administrator should set up any new users using the Security Setup window,
accessed from the File menu.
Appendix E: Archiving
169
The Medisoft Security Permissions window features two sections. The Window section
shows the available modules. The Process section shows the access level. A checkmark
under a level heading means users with that level of security have the ability to perform
that task or have access to that portion of the application. The supervisor has full rights
within this window to assign to or remove rights from any level of security.
Level 1 is for unlimited access and is designed to be used exclusively by the supervisor or
administrator to restrict access to the program. Levels 2, 3, 4, and 5 can be user-defined
– the supervisor decides the appropriate level and assigns users accordingly.
In most cases, archiving will only be assigned for level 1, or supervisor level.
To Set Up Archiving Permissions
1.
On the File menu select Permissions. The Medisoft Security Permissions
window opens.
2.
In the Window section select Archive Wizard and in the Process section click
the appropriate checkbox corresponding to the desired access level.
3.
Click the Reset Defaults button and click the Close button.
Archiving Cases
The archiving process is implemented via a series of dialog boxes that lead users through
the process of archiving data, restoring data, or viewing/printing/exporting log or error
reports on archived and restored records.
To Access the Archiving Module and Archive a Case
170
1.
On the File menu select the Archive command. The Warning window
appears.
2.
Option: if needed, click Back up Data Now (recommended) and follow the
steps for data backup.
3.
Click Continue w/o Backup. In some instances, the Confirm window
appears. This window notes the total number of open cases (greater than ten)
with a zero account balance.
4.
Option: on the Confirm window click No to skip reviewing the open cases.
The Medisoft Archive Wizard window appears. Skip Step Five and proceed
to Step Six.
Medisoft
5.
Option: on the Confirm window click Yes to review the open cases. The
Patient Case Search window appears. As needed in the Case Closed column,
select any cases to close or click Select All to select all the cases. Click Save.
The Medisoft Archive Wizard window appears.
6.
Choose the Archive Patient Case Records radio button and on the Cutoff
Date for Archive Patient Case Records drop-down list next to the radio
button, select an appropriate cutoff date.
7.
Click Next. The Select Patient Cases to Archive window appears, which
displays a list of all the patients who qualify for archiving based on the
specified criteria.
Note: A guarantor’s chart will only be included in this window if all patients
associated with this guarantor and their cases have had no transactions since
the cutoff date for all cases and have a zero balance.
8.
As needed in the Selected column, deselect any records not to be included in
the archive or click Unselect All to deselect all the records displayed and then
select any appropriate records.
Note: If a patient who is a guarantor is selected, then all patients associated
with the chart are also selected. If one of the patients associated with a
guarantor’s chart is deselected, then the guarantor’s chart is also deselected.
9.
Click Next. The Warning window appears.
10. On the Warning window click the Yes button. The Archiving Data window
appears, and as patient records are archived, a dual progress bar displays the
progress of the archiving process. When the archiving process completes, the
Confirm window appears.
11. Option: click No on the Confirm window to exit the Medisoft Archive
Wizard without printing the log report or click Yes to view the log report.
The Print Report Where window appears. As needed, select printing or
exporting options on the Print Selection panel and click Start.
Restoring Archived Cases
The archiving process is implemented via a series of dialog boxes that lead users through
the process of archiving patient data, restoring patient data, or printing log or error
reports on archived and restored records. Users can also print the archive data in
reports.
Appendix E: Archiving
171
To Access the Archiving Module and Restore a Record
1.
On the File menu select Archive. The Warning window appears.
2.
Option: if needed, click Back up Data Now (recommended) and follow the
steps for data backup.
3.
Click Continue w/o Backup. In some instances, the Confirm window
appears. This window notes the total number of open cases (greater than ten)
with a zero account balance.
4.
Option: on the Confirm window click No to skip reviewing the open cases.
The Medisoft Archive Wizard window appears. Skip Step Five and proceed to
Step Six.
5.
Option: on the Confirm window click Yes to review the open cases. The
Patient Case Search window appears. As needed in the Case Closed column,
select any cases to close or click Select All to select all the cases. Click Save.
The Medisoft Archive Wizard window appears.
6.
Choose Restore Patient Case Records.
7.
Click Next. The Select Patient Cases to Restore window appears, which
displays a list of all the patients who qualify for restoring based on the specified
criteria.
8.
As needed in the Selected column, check the records to restore or click Select
All to select all the records displayed.
Note: If you select a chart that is associated with an archived guarantor, then
the guarantor’s record is also selected. If you deselect a guarantor who has
associated archived patients selected, they will be unselected.
9.
Click Next. The Warning window appears.
10. On the Warning window click Yes. The Restoring Data window appears and
as patient records are archived, a dual progress bar displays the progress of the
restoring process. When the restoring process completes, the Confirm window
appears.
11. Option: click No on the Confirm window to exit the Medisoft Archive
Wizard without printing the log report or click Yes to view the log report.
The Print Report Where window appears. As needed, select printing or
exporting options on the Print Selection panel and click Start.
172
Medisoft
Printing Log Reports
The archiving process is implemented via a series of dialog boxes that lead users through
the process of archiving patient data, restoring patient data, or printing log or error
reports on archived and restored records. Users can also view or export log reports.
Use the Print Log Reports option to view, print, or export archiving log report batch
files.
To Access the Archiving Module and Print a Log Report
1.
On the File menu select Archive. The Warning window appears.
2.
Click Continue w/o Backup. In some instances, the Confirm window
appears. This window notes the total number of open cases (greater than ten)
with a zero account balance.
3.
Option: on the Confirm window click No to skip reviewing the open cases.
The Medisoft Archive Wizard window appears. Skip Step Four and proceed
to Step Five.
4.
Option: on the Confirm window click Yes to review the open cases. The
Patient Case Search window appears. As needed in the Case Closed column,
select any cases to close or click Select All to select all the cases. Click Save.
The Medisoft Archive Wizard window appears.
5.
Choose Print Log Report.
6.
Click Next. The Select Archive Batches to Report window appears, which
displays a list of all batch reports.
7.
As needed in the Selected column, check the batch log report records to
archive or click Select All to select all the batch log report records displayed.
8.
Click Next. The Print Report Where window appears. As needed, select
viewing/preview, printing, or exporting options on the Print Selection panel
and click Start.
Appendix E: Archiving
173
Appendix F
Glossary
Many of the words in this list may be familiar, but a common understanding of their
meanings is helpful.
Abort — To discontinue or stop the current function or process.
Accelerator key (hot key) — A shortcut key on the keyboard that can be pressed to
perform a specific action. Usually the ALT key in combination with another key,
but can also be a combination of the CTRL or SHIFT keys with another key. The
underlined letter on menu items and field labels indicates an accelerator key that is
available. Function keys are also considered accelerator keys. See Function keys.
Activate — To bring an application or document window to the foreground. If you are
working in more than one application or more than one document with the active
program, the active window is the window in which you are working.
Alphanumeric — Consisting of both letters and numbers and often other characters
(such as a question mark).
Application menu — The main menu of the program; it is displayed in a horizontal
format. Sometimes called operations menu or the Menu bar.
Backup — Act of saving some or all of the data on a backup disk. Backups are
extremely important in the event of data loss, data damage or computer failure.
Making regular and complete data backup copies can save countless hours of data
reentry.
Bit map — Graphic image that fills appointment spaces illustrating and indicating
breaks in scheduling. See also Pixel.
Boolean — A switching function that has two options, such as True/False or Yes/No.
Capitation — The payment made to doctors from managed healthcare services for
those patients who select this primary care provider, regardless of whether they visit
that provider or not.
Case — A grouping of claims usually with at least one thing in common, i.e., the same
carrier, the same diagnosis, etc.
Appendix F: Glossary 175
Case-based — A method of accounting that helps keep track of transactions of a
common nature; transactions tied to a case.
Chart number — An eight-character control number to a patient’s information.
Check box — A square box with associated text that represents a choice. When a user
selects a choice, a check mark appears in the box to indicate that the choice is in
effect.
Choose — To execute and complete a command. Some commands are executed when
you select the menu command; others execute when you choose OK in a window
or dialog box.
Clearinghouse — A company set up to process Medisoft insurance claims transmitted
electronically, distributing those claims to various carriers.
Click — To place the mouse pointer at the desired location and then quickly press and
release the left mouse button once.
Close button — The button in the top right-hand corner of an active window which,
when clicked, ends an activity and removes that window from the display. Closing
a program window clears the immediate screen in which you are working. See also
Exit.
Close — The button in many windows that closes the active window but not the
program.
CMS — Centers for Medicare and Medicaid Services (formerly known as the Health
Care Financing Administration – HCFA).
Combo Box control — A combination edit control and list box control with a down
arrow button control. The button control displays a drop-down list box so a
selection can be made.
Conditional expression — An expression applied to Data fields in Report Designer that
contains at least one “if” clause.
Control — A component of the user interface that allows the user to select choices or
types of information, i.e., check box, entry field, radio button, etc.
Cursor — A movable object (such as the flashing underline or block) on your screen
that indicates the position where keyboard input appears.
Cyclical billing — A method of equalizing cash flow by spreading billing processes
through the month.
176
Medisoft
Date format (MMDDYY or MMDDCCYY [for Medicare forms]) — The format used
to enter dates in Medisoft programs. The date is entered without punctuation,
using two digits each for month, day and year.
Default — A preset value in a field.
Diagnosis code — One of the ICD-9 codes used to identify a patient’s condition.
Dialog box — A moveable window containing controls that a user uses to provide
information required to process a user request.
Double-click — To place the mouse pointer at the desired location and then quickly
press and release the left mouse button twice.
Drag — To place the mouse pointer on an item and, holding down the left mouse
button, move the pointer to the desired location and release the mouse button to
set the item in the new place.
Drop-down menu — A menu that emerges in a downward direction from a point or
line at or near the top of the window. The series of menu levels displayed underneath the main menu are drop-down menus.
Edit control — The most common type of control for entering text.
EOB Report — “Explanation of Benefits” report provided by the insurance carrier at
the time a check is sent for payment of submitted claims.
Exit — An action that ends the active application and removes all windows associated
with it. Usually press on the program Title bar. Many data screens also have Exit
or Cancel buttons, as well as a Close button (see Close button).
Expression — A formula or equation that lets you introduce variables into Data fields
in Report Designer.
Field — The space allowed in the window for entering data, usually labeled by a field
name, e.g., Code Name.
Filter — A procedure that reads data from the keyboard, modifies the data, and displays
it on the window; that is, you set parameters through the keyboard, the program
searches the database for data that fits your parameters, and displays the result on
the window.
Focus — The control or area of a window where user interaction is possible, where the
data entry or action can occur or is occurring at a set point in time. A button that
has the focus usually has a broken line box on the button. An edit control indicates
that it has the focus by the blink caret (vertical cursor).
Appendix F: Glossary 177
Folder — A container in which documents, program files, and other files are stored in
the computer or on disk. Also referred to as a directory.
Format code — A character assigned to a data entry field that can be used in designing a
report.
Function keys — Keys usually identified by the letter “F” followed by a number from 1
to 12 which provide shortcuts to accessing various parts of the program. Each key
can have assigned functions in different software.
Graying — A visual cue that a choice is not available at that time; a menu item or
control is displayed in a gray color instead of black.
Guarantor — A person who accepts responsibility for the payment of the patient’s debt.
HCFA — See CMS.
Highlight — Contrasting color or reverse video (light letters on dark background)
indicating selection of a menu option or field in a window.
Hint — Brief summary of function displayed in a small yellow balloon when the mouse
cursor is placed on an icon in the toolbar or on a field in a window. Hints are also
displayed in text form in the Status bar at the bottom of the application window.
Also known as a ToolTip.
Hotspot — A point of reference in a window that provides additional information
concerning the picture, word, or group of words on which the cursor is resting. To
signify that a hotspot is present, the cursor becomes a hand. Click anywhere you
see a hand. Text that is linked to a hotspot is displayed in green and underlined in
one of two specific ways: Solid double underlining moves you to another topic or
activates a particular macro; dotted underlining displays a brief definition.
Icon — See Speed button.
List box — A control that presents its data in a list format from which a user can make a
choice. Normally a vertical roll bar appears on the right side of the list. Also
known as a scroll box.
List window — A window unique to Medisoft programs which presents each record of
the given data file in a list format. This window is also called the browser window,
indicating that the data can easily be viewed and browsed through.
Managed care — Healthcare organizations that offer patients treatment to contracting
providers and facilities for payment of a set co-pay amount. Services and co-pay
amounts vary with the plan under which the patient registers.
Maximize — To expand the active window to fill the entire screen. The Maximize
button is the middle of three buttons in the upper right corner of the Title bar.
178
Medisoft
Minimize — To reduce the program to a button on the Task bar. The Minimize
button is the first of three buttons in the upper right corner of the Title bar.
Operation — A function in the program which may be selected from a menu.
Operations menu — The main list of options in a program. Also referred to as the
application menu or Menu bar.
Pixel — Short for “picture element.” The smallest graphic unit that can be displayed on
your screen. All the images displayed on a computer screen are composed of pixels.
See also Bit map.
Procedure code — A CPT code established by the American Medical Association
consisting of up to ten characters which identify a service provided to a patient. A
charge is assigned to each procedure and is included with the code data. Procedure
codes are also used to record payments or adjustments to patient accounts.
Provider — Usually a doctor, but may also be an assistant or nurse who renders services.
Radio button — A circle with text beside it. Radio buttons are combined to show a
user a fixed set of choices from which only one choice can be selected. The circle is
partially filled when a choice is made.
Record pointer — The pointer on the left side of list windows that indicates the record
selected.
Right-click — To position the mouse pointer in the desired location and then click the
right mouse button. This action displays the Speed menu. o
Select — To highlight or mark a section of text, menu name, command, dialog box
option or graphical object with the keyboard or with mouse actions.
Shortcut — A quicker, more direct method of doing something than the ordinary
procedure; usually keystrokes as opposed to using the mouse.
Speed button — An image or picture displayed on a window on which the user can
click to select a particular function or software application. Also known as an icon.
Speed menu — The menu that displays when the right mouse button is pressed. This
menu normally duplicates functions that can be initiated in other ways.
Statement — A summary of a financial account showing the balance due.
Status bar — The gray bar across the bottom of an applications window which displays
data and information pertaining to the field in which a user is working.
Submenu — A menu related to and reached from a main menu.
Suboption — An option on a submenu.
Appendix F: Glossary 179
Superbill — Checklist of procedures and diagnoses used to indicate the procedures that
are performed during an office visit. Once completed by the doctor, it becomes the
basis for transaction entry. Also known as a Routing slip.
System menu — A drop-down list that displays when the System menu icon is selected
(the upper left square in a window). Usually contains items such as Restore, Move,
Minimize, Maximize, Close, Switch To.
Task bar — The bar at the bottom of the screen that contains the Start button, as well
as minimized buttons of any active program. In the Medisoft program, it also
contains written hints concerning buttons and windows.
Tertiary — Of third rank, value or importance. In the Medisoft program, the patient’s
tertiary (third) insurance carrier can be an attorney, employer, or anyone else that
needs a copy of insurance claims.
Title bar — The area at the top of each window that contains the window title and
System menu icon. When appropriate, it also contains the Minimize, Maximize,
and Close buttons.
Toggle — To switch between two options, such as showing hints or not showing hints.
Toolbar — The bar just below the Menu bar that usually contains speed buttons to
perform specific functions in the program.
Transaction — Recording of both charge procedures and accounting procedures to
depict accounting activities.
Validation — A process used to detect input data in order to determine whether they
are inaccurate, incomplete or reasonable. The object (or set of functions) that
actually performs the validation of the data is called the validator.
Walkout Receipt — A receipt issued to the patient at the time of payment specifying
the procedures and related accounting codes for which he/she was treated.
Window — An area on your computer monitor screen surrounded by a box which
contains information for temporary use. Windows may be used to display
information or to enter data. They may include search information, help text,
notes, etc.
Windows Operating System — A graphical user interface developed by Microsoft
Corporation wherein action is controlled by movement with a mouse or by clicking on
icons.
180
Medisoft
Appendix F: Glossary 181
Index
A
Abort
Accelerator keys
Alt + Tab
Ctrl
Shift
Accelerator Keys
Ctrl + V
Ctrl + X
Activate
Activities menu
Activity reports
Daily Activity
Summary by Provider
Activity Summary
by Provider
Add records
On the fly
Add/Copy User Reports
Address File
Type
Attorney
Employer
Facility
Provider
Address Record
Type
Address records
Type
Laboratory
Miscellaneous
Adjustment codes
Adjustments
175
175
131
175
122
137
137
175
5
111
111
111
31
115
33
33
33
33
33
32
33
33
26
Apply to charges
60
Aging reports
Insurance
111
Patient
110
Patient Remainder
110
Patient Remainder Detail
111
Aging Reports
110
Alphanumeric
175
Analysis reports
108
Billing/Payment Status
108
Facility
109
Insurance
108
Insurance Payment Comparison108
Practice
108
Referral Source
109
Referring Provider
108
Unapplied Deposit
109, 110
Unapplied Payment/Adjustment
109
Applications Menu
175
Appointment
Finding time slot
134
Repeating
134
Setting
133
Audit reports
Data Audit
113
Productivity by User
113
Auto log off
13
B
Backup
8, 175
Options
8
BBS (Bulletin Board Service)
115
Billing
Index
183
Cyclical
176
Billing charge codes
26
Billing charges
61
Billing codes
35
Billing Cycles
96
Billing services
2
Billing/Payment Status report
108
Bit map
175, 179
Boolean
175
Browser window
178
Buttons
All
159
Apply
65, 90, 91
Apply Payment to Charges 60, 65
Browse
165, 167
Cancel
177
Change
134, 136
Change Status
72, 83
Close
60, 65, 66, 176
Close (Exit)
176, 177
Close Exit
5
Copy Case
47
Create
74, 85
Create Claims
60, 73
Create Statements
84
Delete
137
Edit 28, 41, 63, 69, 73, 74, 83, 85
Exit
177
Exit
177
Filter
63
Find Field
123
Find Modem
163
List Only
68, 71
Maximize
5, 178
Minimize
5, 179
Navigation
63
New 25, 28, 33, 34, 35, 36, 37, 38,
40, 41, 42, 43, 59, 60, 64, 65,
133
New Case
47, 51
New Data Field
123
New Expression
127
New Patient
44, 49
184
Medisoft
None
159
Note
58
OK 35, 64, 72, 73, 75, 76, 83, 84,
86, 159, 165, 166
Options
163
Payment Detail
63
Print Receipt
60
Print/Send
70, 75, 82, 85
Radio
179
Remove Default
45
Save 1, 38, 40, 41, 42, 50, 123, 132
Save Payments/Adjustments
90
Set Default
45
Speed
179
Add New Data Field
46, 49
Address List
32, 41
Claim Management
68
Diagnosis Code List
38
Diagnosis List
28
Enter Deposit/Payment
89
Insurance Carrier List
30, 40
Patient List
49, 51
Procedure Code List
36
Provider
38
Provider List
28
Quick Balance
64
Quick Ledger
62
Referring Provider List
42
Statement Management
79
Transaction Entry
58, 64
Start
62, 76, 86
Start Data Conversion
159
C
Calculated field
Cancel
Capitation
Capitated plan
Payment
Case
Account
Capitated plan
Condition
124
177
175
48
91
175
47
48
48
Co-Pay Amount
48
Crossover Plan
48
Diagnosis
47
Medicaid
48
Miscellaneous
48
Multimedia
48
New
47
Number
58
Opening
47
Personal
47
Policy 1, 2, 3
48
Select by transaction date
58
TRICARE
48
Workers' Compensation
48
Case setup
46
Case-based
57, 176
Cash Co-payment
26
Cash Payment
26
Centers for Medicare and Medicaid
Services
176
Changing claim status
72
Changing statement status
83
Chart number
Automatic
43
Chart Number
176
Check box
176
Check co-payment
26
Check Payment
27
Choose
176
Claim management
67
Changing claim status
72
Creating
69
Editing
69
List claims that match
71
Printing claims
70
Reprinting claims
71
Claim Management
Batch number
70
Creating
Ranges
69
EDI receiver
69
Manager's job
67
Marking claims
Multiple claims in same batch 72
Claim Rejection Messages
97
Clearinghouse
176
Click
176
CMS
176
CMS-1500 form
34
Codes
6
Adjustment
26
Alternate
28
Billing
35
Billing charge
26
Cash co-payment
26
Cash payment
26
Check co-payment
26
Check payment
27
Comment
27
Credit card co-payment
27
Credit card payment
27
Deductible
26
Diagnosis
28
Setup
28
Format
178
Inside lab charge
26
Insurance payment
26
MultiLink
27
Outside lab charge
27
Procedure
25, 107
Procedure charge
27
Product charge
27
Tax
27
Withhold adjustments
26
Collection List
95
Add Collection List Items
95
Collection reports
Insurance
112
Patient
112
Color coding
Patients
14
Transactions
13
Combobox control
176
Comment codes
27
Conditional expression
127, 176
Contact list records
35
Index
185
Control
176
Check box
176
Combobox
176
Field
177
List box
178
Scroll box
178
Conversion
158
All transactions
159
Data files affected
159
Bringing detail from another
system
160
Data
CONVERT.LOG
160
EDI batches
158
What doesn't convert
158
Medisoft MS-DOS to Windows158
MS-DOS
158
MS-DOS data to Windows data158
No transactions
159
Data files affected
159
Patient balances forward
159
Data files affected
159
Windows data to upgraded
Windows data
157
Co-Pay Amount
48
Copyrights
i
Creating claims
69
Credit card co-payment
27
Credit card payment
27
Crossover claims
48
Cursor
176
Custom Case Designer
49
Custom Patient Designer
46
Custom Report List
114
Customizing statements
103
Cyclical billing
176
D
Daily Activity Report
111
Data Audit report
113
Data conversion
MS-DOS converting to Windows
158
186
Medisoft
Windows converting to upgraded
Windows
157
Data field
122
Date format
MMDDCCYY
177
MMDDYY
177
Day Sheets
107
Patient Day Sheet
107
Payment Day Sheet
107
Procedure Day Sheet
107
Deductible codes
26
Default
177
Default choices
9
Account alert setting
9
Auto create tax entry
11
Calculate disallowed amount
11
Calculate patient remainder
balances
9
Define aging columns
12
Enforce accept assignment
9
Enter to move between fields
10
Force payments to be applied 10
Mark completed claims Done 11
Mark paid charges complete
11
Multiply units times amount
10
Place of Service code
11
Show hints
9
Show shortcuts
9
Show Windows on setup
9
Starting date
12
Use numeric chart numbers
10
Use Zip Code
10
Default directory
2
Deposit/payment application
89
Diagnosis codes
28, 177
Setup
28
Dialog box
177
Directories
Default
2
Document number
58
Double-click
177
Drag
177
Drop-down menu
177
F8 25, 33, 35, 43, 45, 47, 58, 133,
134
F9
28, 47, 63, 74, 85
E
EDI
Receivers
33
Sending claims to file
HCFA11
73
EDI receiver
69
EDI receiver records
33
Edit control
177
Electronic Claims Processing
103
Eligibility Verification 30, 103, 104
Results
105
Setup
104
Employer
Setup
45
New
45
EOB
Explanation of Benefits
90
Report
177
Transaction adjustment
91
Exit
177
Expression
177
Conditional
127, 176
F
Facility report
Field
File maintenance
Pack data
Purge data
Appointment fields
Claims data files
Closed cases
Rebuild indexes
Recalculate balances
Filter
Focus
Folder
Form offset
Format code
Format grid
Function keys
F11
109
177
20
20
20
20
20
20
20
177
177
178
121
178
120
175, 178
64
G
Graying
Guarantor
Guarantor Ledger
Guarantor Quick Balance List
178
178
62
114
H
HCFA
178
HCFA-1500 form
34
Header band
120
Help
Where to Find it
Local Value-Added Resellers
150
Support options
149
Technical Support
150
Tips and shortcuts on the
Internet
151
Training Seminars
150
Updates and changes
151
Help menu
6
Highlight
178
Hint
178
HIPAA Compliance
12
HIPPA Disclaimer
iii
HMO
91
Hotspot
178
I
Icons
ID numbers
Images field
Indicator codes
Inside lab charge
Inside lab charge codes
Insurance Aging report
Insurance Analysis
Insurance carrier records
Insurance carriers
6, 178
30
127
48
26
26
111
108
30
Index
187
Setup
Tertiary
Insurance Collection report
Insurance payment code
Insurance Payment Comparison
Internet
Medisoft web page
Tips and shortcuts
30
180
112
26
108
151
151
K
Keys
Accelerator
175
Ctrl + V
137
Ctrl + X
137
Alt
131
Ctrl
72, 83, 175
Delete
137
Enter
10
F11
64
F8
25, 33, 35, 43, 45, 47, 58
F9
28, 47, 63, 74, 85
Function
175, 178
F8
133, 134
Shift
122
L
List box
List only
Claims that match
List window
Listing statements
Lists menu
Load saved reports
178
71
178
82
5
115
M
Managed care
91, 178
Capitation payment
91
HMO
91
PPO
91
Primary care provider
91
Marking claims
Multiple claims in same batch 72
Marking statements
188
Medisoft
Multiple statements in same batch
83
Maximize
178
Medicaid
48
Medisoft
Copyrights
i
Web page
151
Medisoft MS-DOS converting to
Windows
158
Medisoft Report Designer
119
Calculated field properties
124
Data field properties
122
Data fields and expressions
127
Format grid
120
Images field properties
127
Report properties
121
Shape field properties
126
Standard field properties
121
System Data field properties 125
Text field properties
122
Toolbar
120
Medisoft Terminal
115
Answer
161
Answering
168
BBS
115, 165
Dial options
163
Dialing a BBS
165
Program options
162
Protocols
166
Receive file
161, 167
Receiving reports
161
Sending files
165
Speed buttons
161
Transfer protocols
166
Menu bar
5, 175
Activities menu
5
Edit menu
Copy
5
Cut
5
Delete
5
Paste
5
File menu
Security Setup
5
Help menu
Lists menu
Reports menu
Tools menu
Window menu
Minimize
MMDDCCYY
MMDDYY
Modal
MS-DOS
Conversion
MultiLink codes
Multiple practices
Default directory
6
5
5
6
6
179
177
177
179
158
158
27
2
N
New practice
Numbers
Punctuation
3
45
O
Office Hours
Accelerator keys
Alt + Tab
Keys
Alt
Tab
Main window
Open Item Accounting
Operations menu
Outside lab charge
131
131
131
131
113, 160
179
27
P
Pack data
Patient
Setup
Guarantor
Head of household
New
Patient Aging report
Patient Collection report
Patient Day Sheets
Patient Ledger
20
44
44
43
110
112
107
62
Patient Ledger Report
57, 113
Patient records
43
Patient Remainder Aging Detail
report
111
Patient Remainder Aging report 110
Patient treatment plans
61
Payment Day Sheets
107
Payments
Apply to charges
60
Pending changes
151
Pixel
175, 179
PPO
91
Practice
Setup
Address records
32
Billing codes
35
Cases
46
Contact list records
35
Diagnosis codes
28
EDI receiver records
33
Insurance carrier records
30
MultiLink codes
27
Multiple practices
2
New
3
Patient records
43
Procedure codes
25
Procedure Codes
25
Provider records
28
Referring provider records
34
Security
18
Type
3
Practice Analysis
108
Summarizes activity
108
Primary care provider
91
Printing claims
70
Printing statements
82
Prior authorization
48
Procedure charge code
27
Procedure codes
25, 107, 179
Procedure Day Sheets
107
Product charge
27
Production by Insurance report 111
Production by Procedure report 111
Index
189
Production by Provider report
111
Production reports
Production by Insurance
111
Production by Procedure
111
Production by Provider
111
Productivity by User report
113
Program options
138
Aging reports
12
Backup options
8
Color coding
13, 15
Data entry
9
Default choices
9
HIPAA
12
Program Options
Appointment display
139
Auto log off
13
Default choices
Account alert setting
9
Auto create tax entry
11
Calculate disallowed amount 11
Calculate patient remainder
balances
9
Define aging columns
12
Enforce accept assignment
9
Force payments to be applied 10
Mark completed claims Done 11
Mark paid charges complete 11
Multiply units times amount 10
Place of Service code
11
Show hints
9
Show shortcuts
9
Show Windows on setup
9
Starting date
12
Use Enter to move between
fields
10
Use numeric chart numbers 10
Use Zip Code
10
Views
Day
139
Warn on unapproved codes
13
Protocols
166
Provider
179
ID numbers
30
190
Medisoft
Number
Records
Punctuation
Numbers
Purge data
Appointment fields
Claims data files
Closed cases
29
28
45
20
20
20
20
Q
Quick Balance
Quick Ledger
Changing responsibility
Guarantor Ledger
No additions
Patient Ledger
Payment detail
Transaction Documentation
64
62
63
62
63
62
63
63
R
Radio button
Ranges
Chart Number
Date
Rebuild indexes
Recalculate balances
Referral Source report
Referring provider records
Referring Provider report
Report Designer
Bands
Header band
Create a report
Format
Place fields
Expressions
Conditional
Font selection
Menu bar
Edit menu
File menu
Help menu
Insert menu
179
69
69
20
20
109
34
108
119
120
120
130
130
127
121
119
119
119
119
119
Window menu
119
Report properties
Adjust band height
121
Form offset
121
Paper settings
121
Set data filters
121
Set size and margins
121
Title
121
Speed button
Exit
120
Find
120
Find again
120
Hints
120
New
120
Open
120
Preview
120
Print
120
Save
120
Standard field properties
Alignment
121
Background color
121
Font
121
Handles
121
Matching alignment and size 121
Multiple fields
121
Other
122
Position
121
Size
121
Transparent background
121
Styles
119
Insurance form
119
Label
119
Ledger
119
List
119
Statement
119
Walkout Receipt
119
Toolbar
Exit
120
Find
120
Find Again
120
Hints
120
New
120
Open
120
Preview
120
Print
120
Save
120
Report printing
Insurance claims
Claim not centered
71
Patient Remainder Statements 86
Report styles
Insurance form
119
Label
119
Ledger
119
List
119
Statement
119
Walkout Receipt
119
Reports
107, 140
Activity
Daily Activity
111
Summary by Provider
111
Activity Summary by Provider 111
Add/Copy User Reports
115
Aging
Insurance
111
Patient
110
Patient Remainder
110
Patient Remainder Detail
111
Analysis
Billing/Payment Status
108
Facility
109
Insurance
108
Insurance Payment Comparison
108
Practice
108
Referral Source
109
Referring Provider
108
Unapplied Deposit
109, 110
Unapplied Payment/Adjustment
109
Appointment List
141
Appointment Status
141
Audit
113
Data Audit
113
Productivity by User
113
Billing/Payment Status
108
Index
191
Collection
Insurance
112
Patient
112
Custom List
114
Daily Activity report
111
Data Audit
113
Day Sheets
107
Facility
109
Guarantor Quick Balance List 114
Insurance Aging
111
Insurance Analysis
108
Insurance Collection
112
Insurance Payment Comparison108
Load saved
115
Patient Aging
110
Transaction age
110
Patient Collection
112
Patient Day Sheets
107
Patient Ledger
113
Account status
113
Procedure
113
Patient Remainder Aging
110
Patient Remainder Aging Detail
111
Payment Day Sheets
107
Practice analysis
108
Practice Analysis
Summarizes activity
108
Procedure Day Sheets
107
Production
by Insurance
111
by Procedure
111
by Provider
111
Production by Insurance
111
Production by Procedure
111
Production by Provider
111
Productivity by User
113
Receive/Send thru Medisoft
Terminal
115
Referral Source
109
Referring Provider
108
Title pages
107
Unapplied Deposit
109, 110
192
Medisoft
Unapplied Payment/Adjustment
109
Reports menu
5
Reprinting claims
71
Reprinting statements
82
Revenue Features
96
Right-click
179
S
Scroll box
178
Security setup
5, 18
Select
179
Select case by transaction date
58
Service classifications
36
Setting up
Breaks
135
Repeating
136
Patient records
132
Provider records
132
Repeating breaks
136
Resource records
133
Security
140
Shapes field
126
Shortcut
179
Small Balance Write-off
97
Software License Agreement
i
Speed button
6, 119
Claim Management
68
Diagnosis List
28
Insurance Carrier List
30
Provider List
28
Quick Balance
64
Quick Ledger
62
Statement Management
79
Transaction Entry
58
Speed menu
179
Statement management
79
Changing status
83
Creating
79
Editing
80
Listing
82
Marking statements
Multiple statements in same
batch
Printing
Reprinting
Statement Management
Batch number
Converting Statements
Statement Processing
Statements
Status bar
Submenu
Suboption
Superbills
Support options
Medisoft web site
Online help
System Data field
System menu
83
82
82
81
81
103
179
179
179
179
180
149
149
125
180
T
Task bar
Tax charge
Tax charges
Terminal
Medisoft
Answer
BBS
Dial options
Program options
Protocols
Receive file
Receiving reports
Send file
Speed buttons
Transfer protocols
Terminology
Abort
Accelerator key
Ctrl
Activate
Alphanumeric
Applications menu
Backup
180
27
36
161, 168
165
163
162
166
161, 167
161
165
161, 165
166
175
175
175
175
175
175
175
Bit map
Boolean
Capitation
Case
Case-based
Chart Number
Check box
Choose
Clearinghouse
Click
Close
Close button
Combobox control
Conditional expression
Control
Cursor
Cyclical billing
Date format
Default
Diagnosis codes
Dialog box
Double-click
Drag
Drop-down menu
Main Menu
Edit control
EOB report
Exit
Expression
Field
Filter
Focus
Folder
Format code
Function keys
Graying
Guarantor
HCFA
Highlight
Hint
Hotspot
Icon
List box
175
175
175
175
176
176
176
176
176
176
176
176
176
176
176
176
176
177
177
177
177
177
177
177
177
177
177
177
177
177
177
177
178
178
178
178
178
178
178
178
178
178
178
Index
193
List window
178
Browser
178
Managed care
178
Maximize
178
Minimize
179
Modal
179
Operations menu
179
Pixel
179
Procedure code
179
Provider
179
Radio button
179
Right-click
179
Select
179
Shortcut
179
Speed button
179
Speed menu
179
Statement
179
Status bar
179
Submenu
179
Suboption
179
Superbill
180
System menu
180
Task bar
180
Tertiary
180
Title bar
180
Toggle
180
Toolbar
180
Transaction
180
Validation
180
Walkout Receipt
180
Window
180
Windows Operating System 180
Tertiary
Insurance carrier
180
Text field
122
Tips and shortcuts
151
Title bar
5, 180
Title pages
107
Toggle
180
Toolbar
6, 180
Tools menu
6
Tooltip
178
Training seminars
150
194
Medisoft
Transaction
110, 180
Transaction entry
Adjustment
Apply to charges
60
Case-based
57
Document number
58
Documentation
58
New
Apply payment or adjustment 60
Charge transaction
59
Entering transactions
57
Payment or adjustment
transaction
60
Patient Ledger
57
Patient notes
29
Provider number
29
Payment
Apply to charges
60
Select case by date
58
Transfer protocols
166
TRICARE
48
U
Unapplied Deposit report
109, 110
Unapplied Payment/Adjustment
report
109
UPIN
34
V
Validation
Validator
180
180
W
Walkout Receipt
60, 180
Warn on unapproved codes
13
Window
180
Window menu
6
Windows converting to upgraded
Windows
157
Windows Operating System
180
Withhold adjustments
26
Work Administrator
145
Assignment List
145
Filters
Rules
146
147
Tasks
Workers' Compensation
146
47, 48
Index
195