1
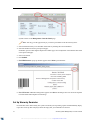
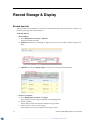
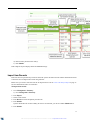
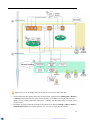
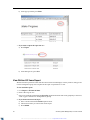
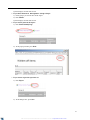
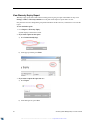
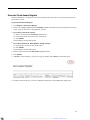
eInventory(Asset Management) V1.0
User's Guide
XML to PDF by RenderX XEP XSL-FO Formatter, visit us at http://www.renderx.com/
Contents
Introduction.....................................................................................................................3
Introducing eInventory (Asset Management)................................................................................................3
Additional Help..............................................................................................................................................4
Manual Organization and Usage..................................................................................................................4
Getting Started................................................................................................................5
Assign Inventory Administrator (By eClass Administrator)...........................................................................5
Add Item Categories and Sub-Categories....................................................................................................5
Import Item Categories and Sub-Categories................................................................................................6
Add Locations and Sub-Locations................................................................................................................7
Import Locations and Sub-Locations............................................................................................................8
Add Resource Management Groups and Group Members..........................................................................8
Import Resource Management Groups........................................................................................................9
Add Funding Source.....................................................................................................................................9
Import Funding Sources.............................................................................................................................10
Add Write-Off Reasons...............................................................................................................................10
Set Up Barcode Format..............................................................................................................................10
Generate Barcode Labels...........................................................................................................................11
Set Up Warranty Reminder.........................................................................................................................12
Create CSV File for Import.........................................................................................................................13
Launching the System................................................................................................................................13
Record Storage & Display............................................................................................14
Browse Item List.........................................................................................................................................14
View Item Information.................................................................................................................................15
Add Item Records.......................................................................................................................................15
Import Item Records...................................................................................................................................17
Update Item Status & Location...................................................................................................................18
Generate Barcode Labels...........................................................................................................................20
Stocktake & Variance Handling...................................................................................22
Stocktake & Variance Handling Overview...................................................................................................22
Define Stocktake Period..............................................................................................................................24
Perform Stocktake.......................................................................................................................................25
Handle Stocktake Variance.........................................................................................................................29
Request Write-Off.......................................................................................................................................32
Approve/Reject Write-Off Requests............................................................................................................34
Reports..........................................................................................................................36
View Item Status Report.............................................................................................................................36
View Stocktake Report................................................................................................................................37
View Stocktake Progress Report................................................................................................................39
View Written-Off Items Report....................................................................................................................40
View Warranty Expiry Report......................................................................................................................42
Generate Fixed Assets Register.................................................................................................................43
Glossary........................................................................................................................44
ii
eInventory(Asset Management) V1.0 User's Guide
XML to PDF by RenderX XEP XSL-FO Formatter, visit us at http://www.renderx.com/
Introduction
Introducing eInventory (Asset Management)
eClass eInventory (Asset Management) system is a web-based asset management system. It helps schools to
manage fixed assets like computers, software, table and desks, as well as other items that are purchased and own
by the school.
The main features of the system include:
• Record storage and display
• Store and manage asset item information and maintenance status.
• Display item information in flat list or by categories.
• Attach photos to item records for easy identification.
• Barcode sub-system
• Generate barcode labels with customizable information in printable HTML format.
• Manual/auto-assign barcodes to asset items.
• Support stocktake via barcode scanner.
• Stocktake workflow support
• List asset items for stocktake in self-definable stocktake period.
• Manually item check and barcode scan item check supported for individually-purchased items.
• Manual item check supported for bulk-purchased items.
• Missing, misplaced and surplus items for a location will be listed up for furthering handling (bulk-purchased
items only):
• Move misplaced items to original location or reassign them to the current location
• Request to write-off missing items
• Add surplus to the location as new asset item
• Item write-off management
• Lower privileged users can request for item write-off from higher privileged users.
• Approve item write-off requests
• Reports generation
• Stocktake report to show found and missing items
• Stocktake progress report to show locations where stocktake is not completed
• Item status report to show maintenance status of asset items
• Generate Fixed Assets Register in format suggested by EDB
You can learn more about each of these features from this user manual.
3
XML to PDF by RenderX XEP XSL-FO Formatter, visit us at http://www.renderx.com/
Additional Help
If you cannot find the information you want from this manual, you can
• Log on to eClass Community (http://support.broadlearning.com/) and browse to the forum;
• Go to eClass Community's Customer Support page(http://support.broadlearning.com/contact/) and submit
your enquiry;
Manual Organization and Usage
This is a topic-based manual for eInventory (Asset Management). The manual is divided into individual topics,
allowing users to understand each topic on its own. Each topic has related tasks, with concepts that provide more
in-depth explanations if needed. For easy reference, topics are grouped together by their contents, but not
necessarily by their system function categories.
4
eInventory(Asset Management) V1.0 User's Guide
XML to PDF by RenderX XEP XSL-FO Formatter, visit us at http://www.renderx.com/
Getting Started
Assign Inventory Administrator (By eClass Administrator)
Inventory administrator is the user with the highest access right. As basic settings for initializing the system can
only be performed by inventory administrator, the eClass administrator has to assign an inventory administrator
first.
Asset items in eClass eInventory (Asset Management) are managed by three types of users, namely resources
group member, resource management group leader, and the inventory administrator.
Only users who are assigned as one of these three types of user can sign in the system. While resources group
member and resource management group leader can be created and assigned system initialization, inventory
administrator has to be assigned beforehand.
To assign inventory administrator:
1. Login the administration console (http://[eclasssite]/admin).
2. Go to Settings > Function Settings > eInventory Settings.
3. Select a user from the user list on the right hand, and click Add to.
4. Press Save.
The assignment completes. The user who are assigned can sign in the system and perform basic settings.
Add Item Categories and Sub-Categories
Asset items are grouped into categories and sub-categories. For example, a flute can be grouped under Musical
Instruments > Woodwind Instrument. You can define these categories and sub-categories manually.
To add item categories and sub-categories:
1. Add an item category:
a) Go to Settings > Category.
b) Press New.
c) Fill in all the fields and choose a photo to represent the category.
Note: For Category Code, enter one that is not yet used. For Display Order, smaller numbers
will be displayed on top.
d) Optional: Choose Customize, and press Browse to upload your own photo.
e) Press Submit.
Operation completes. System displays Record Added message.
f) Repeat Step 1b to 1e to add more categories.
2. Add item sub-categories:
5
XML to PDF by RenderX XEP XSL-FO Formatter, visit us at http://www.renderx.com/
Important: Asset item are associated with an item sub-category directly. Item categories are just
used to organize the sub-categories. Therefore, you must create sub-categories for each of the categories.
a) Press the Category Name of any category.
b) Press New.
c) Fill in all the fields and choose a photo to represent the category.
Note: For Category Code, enter one that is not yet used.
d) Optional: Check one or more of the following options.
Licence
Check this box if items under this sub-categories comes with a license key (like a software
package).
Warranty
Check this box if items under this sub-categories are supposed to have warranty period.
Serial Number
Check this box if items under this sub-categories comes with a serial number (like a microwave
oven).
Note: This options affects what information you can provide for Single Items on page 44. When
the above options are checked, you will be able to enter relevant information for the asset items.
For example, if Serial Number is checked and you add a software item into the system, you will
be asked for the serial number of that software.
e) Press Submit.
The system displays the Record Added message and the newly added sub-category.
f) Repeat Step 2b to 2e to add more sub-categories.
Import Item Categories and Sub-Categories
Asset items are grouped into categories and sub-categories. For example, a flute can be grouped under Musical
Instruments > Woodwinds. You can import these categories and sub-categories via CSV.
Before start, you need to create the CSV file for import. Please refer to Create CSV File for Import on page 13
for more information on how to create CSV.
To import item categories and sub-categories:
1. Import item categories:
a) Go to Settings > Category.
b) Press Import.
c) Press Browse to locate and upload your CSV file.
d) Press Submit.
6
eInventory(Asset Management) V1.0 User's Guide
XML to PDF by RenderX XEP XSL-FO Formatter, visit us at http://www.renderx.com/
System checks the CSV for data validity. If no errors are detected, you will see another Submit button.
e) Press Submit.
Operation completes. System displays Record Added message.
2. Import item sub-categories:
Important: Asset item are associated with an item sub-category directly. Item categories are just
used to organize the sub-categories. Therefore, you must create sub-categories for each of the categories.
a)
b)
c)
d)
Press the category name of any category.
Press Import.
Press Browse to locate and upload your CSV file.
Press Submit.
System checks the CSV for data validity. If no errors are detected, you will see another Submit button.
e) Press Submit.
Operation completes. System displays Record Added message.
Add Locations and Sub-Locations
Asset items are placed in various locations of the school. Each location can be broken down further into
sub-locations. The system will associate every asset item record with a sub-location. For example, a piano can
be associated with 2nd Floor > Hall. You can import locations and sub-locations via CSV.
To add locations and sub-locations:
1. Add an item category:
a) Go to Settings > Location.
b) Press New.
c) Fill in all the fields and choose a photo to represent the category.
Note: For Display Order, smaller numbers will be displayed on top.
d) Press Submit.
Operation completes. System displays Record Added message.
e) Repeat Step 1b to 1d to add more locations.
2. Add item sub-locations:
a) Press the Location Name of any location.
b) Press New.
7
XML to PDF by RenderX XEP XSL-FO Formatter, visit us at http://www.renderx.com/
c) Fill in all the fields.
Note: For Sub-location Code, enter one that is not yet used. For Display Order, smaller numbers
will be displayed on top.
d) Press Submit.
The system displays the Record Added message and the newly added sub-category.
e) Repeat Step 2b to 2d to add more sub-locations.
Import Locations and Sub-Locations
Asset items are placed in various locations of the school. Each location can be broken down further into
sub-locations. The system will associate every asset item record with a sub-location. For example, a piano can
be associated with 2nd Floor > Hall. You can import locations and sub-locations via CSV.
Before start, you need to create the CSV file for import. Please refer to Create CSV File for Import on page 13
for more information on how to create CSV.
To import locations and sub-locations:
1. Import locations:
a) Go to Settings > Location.
b) Press Import.
c) Press Browse to locate and upload your CSV file.
d) Press Submit.
System checks the CSV for data validity. If no errors are detected, you will see another Submit button.
e) Press Submit.
Operation completes. System displays Record Added message.
2. Import sub-locations:
a) Press the Location Name of any location.
b) Press Import.
c) Press Browse to locate and upload your CSV file.
d) Press Submit.
System checks the CSV for data validity. If no errors are detected, you will see another Submit button.
e) Press Submit.
Operation completes. System displays Record Added message.
Add Resource Management Groups and Group Members
Asset items are managed by resource management groups. Each group can have one or more group
leader(s)/member(s). You can define resources management group manually.
To add resource management groups and add members:
1. Add resource management groups:
a) Go to Settings > Resource Management Group.
b) Press New.
c) Fill in all the fields.
8
eInventory(Asset Management) V1.0 User's Guide
XML to PDF by RenderX XEP XSL-FO Formatter, visit us at http://www.renderx.com/
Note: For Group Code, enter one that is not yet used. For Display Order, smaller numbers will
be displayed on top.
d) From the Import Members From drop down menu, select a eClass IP user group.
Teacher and staff members from this group can be imported in Step 2 as resource management group
members.
e) Press Submit.
Operation completes. System displays Record Added message.
2. Add members:
a) Press the Resource Management Group Name of any group.
b) Press New.
c) Select a user from the Select User(s) drop down menu.
d) Select a role from the Role drop down menu.
• Leader: A resource management group leader has higher privilege than her group members. Besides
doing Stocktake on page 44 , she can approve/reject write-off requests while her members cannot.
• Member: Resource management group members can only perform stocktake.
e) Press Submit.
Operation completes. System displays Record Added message.
Import Resource Management Groups
Asset items are managed by resource management groups. Each group can have one or more group
leader(s)/member(s). You can import resources management group via CSV.
Before start, you need to create the CSV file for import. Please refer to Create CSV File for Import on page 13
for more information on how to create CSV.
To import resource management group:
1.
2.
3.
4.
Go to Settings > Resource Management Group.
Press Import.
Press Browse to locate and upload your CSV file.
Press Submit.
System checks the CSV for data validity. If no errors are detected, you will see another Submit button.
5. Press Submit.
Task completes. System displays Record Added message.
Add Funding Source
Asset items can have been purchased using money from different sources. This source of funding can be stored
with other item information. You can define funding sources manually.
To add funding source:
1. Go to Settings > Funding Source.
2. Press New.
9
XML to PDF by RenderX XEP XSL-FO Formatter, visit us at http://www.renderx.com/
3. Fill in all the fields.
Note: For Funding Code, enter one that is not yet used. For Display Order, smaller numbers will
be displayed on top. For Funding Type, choose either School or Government.
4. Press Submit.
Task completes. System displays Record Added message.
Import Funding Sources
Asset items can have been purchased using money from different sources. This source of funding can be stored
with other item information. You can import funding sources using CSV file.
Before start, you need to create the CSV file for import. Please refer to Create CSV File for Import on page 13
for more information on how to create CSV.
To import funding sources:
1.
2.
3.
4.
Go to Settings > Funding Source.
Press Import.
Press Browse to locate and upload your CSV file.
Press Submit.
System checks the CSV for data validity. If no errors are detected, you will see another Submit button.
5. Press Submit.
Task completes. System displays Record Added message.
Add Write-Off Reasons
Items will have to be written-off towards the end of their life cycles. You can define write-off reasons appropriate
for your school manually.
To add write-off reasons:
1. Go to Settings > Write-off Reason.
2. Press New.
3. Fill in all the fields.
Note: For Display Order, smaller numbers will be displayed on top.
4. Press Submit.
Task completes. System displays Record Added message.
Set Up Barcode Format
Except for bulk items, asset items can bear barcodes optionally. You can define the format and length of barcode.
10
eInventory(Asset Management) V1.0 User's Guide
XML to PDF by RenderX XEP XSL-FO Formatter, visit us at http://www.renderx.com/
To set up barcode format:
1. Go to Settings > Others.
2. Under Barcode Format, enter the barcode length (e.g. 10 digits) and the format.
Use numbers only
Use both numbers
and characters
3. Press Submit.
Task completes. System displays Record Added message.
Generate Barcode Labels
Barcode labels can be applied to asset items. Then, barcode scanners can be used during stocktake. Barcode
labels can be generated in HTML format. If you want more control on the label layout, you can export label data
in CSV format. You can then use mail merge function in Microsoft Word to create labels from a layout template
and the exported CSV data source.
In order to be able to display and print barcodes, you have to go to Management > Barcode Labels to download
and install the barcode font. Please consult your system administrator on how to install fonts. You can also
download the word template from the same page.
To generate barcode labels:
1. Go to Management > Inventory.
2. Check the items for which you want to print labels and press Export.
11
XML to PDF by RenderX XEP XSL-FO Formatter, visit us at http://www.renderx.com/
System switches to the Management > Barcode Labels page.
Note: You may go to this page directly if you want to print labels for all the inventory items.
3. Select information item(s) to be included on the labels by checking the relevant checkbox.
4. Select the number of labels to print per each page.
Sometimes, part of a label might be displaced to another page. You can adjust this value until the entire label
can be print on the page.
5. Select a file format.
6. Press Submit.
7. For HTML format: A pop-up windows appears. Press Print to print the label.
8. For CSV format: A Windows dialogue box appears. Press Save at the dialogue box. You can use the exported
CSV file and the label template for mail merge.
Set Up Warranty Reminder
For items that comes with warranty, the system can remind you of upcoming expiries with the Warranty Expiry
report. You can set up how many days before the expiry date you would like to be noticed.
12
eInventory(Asset Management) V1.0 User's Guide
XML to PDF by RenderX XEP XSL-FO Formatter, visit us at http://www.renderx.com/
To set up warranty reminder:
1. Go to Settings > Others.
2. Under Warranty Expiry Reminder, enter the number of days in advance you want to be reminded
3. Press Submit.
Task completes. System displays Record Added message.
Create CSV File for Import
The system provides CSV templates for data import. You can download these templates from the system, open
it with Excel, and replace the sample data with your own data.
To create CSV file for import:
1. Press the [Click here to download sample] link at relevant pages of the system.
Before is an example from the asset item category import page (Settings > Category).
2. Press Save at the Windows dialogue box and save the sample file at your preferred location.
3. Open the sample CSV with Excel.
4. Replace sample data with your own data. For columns where codes are to be entered, you can press the [Click
here to check Code Name] link to check for codes currently being used.
5. Save the CSV file when done.
Launching the System
Only users who are assigned as one of these three types of user can sign in the system.
To assign inventory administrator:
1. Login eClass IP 2.0. (http://[eclasssite]/).
2. For primary schools: Go to Campus Zone > Admin Centre > eInventory (Asset Management).
3. For secondary schools: Go to eAdmin > eInventory (Asset Management).
The full asset item list is displayed by default.
13
XML to PDF by RenderX XEP XSL-FO Formatter, visit us at http://www.renderx.com/
Record Storage & Display
Browse Item List
The system stores all information of asset items in a centralized list. You can browse this list as a full list or to
browse by item categories and sub-categories.
To browse item list:
•
Browse full list:
a) Go to Management > Inventory > Full List.
System lists all the asset items.
b) Optional: When the list is too lengthy to display in one screen, you can filter out items using the view
filters.
c) Optional: You can press Display Image to view photos associated with with the items.
•
14
Browse by categories:
a) Go to Management > Inventory > Category.
System displays all item categories with their corresponding photos.
b) Choose a category.
System displays all the sub-categories under the category chosen.
c) Click the category name of a sub-category.
System displays all asset items under the sub-category chosen.
eInventory(Asset Management) V1.0 User's Guide
XML to PDF by RenderX XEP XSL-FO Formatter, visit us at http://www.renderx.com/
View Item Information
The system supplies a full list of asset items records. You can access detailed information of each asset item via
this list. You will be able to to view the item's inventory and purchase information. In additional, the status
history of the item, like when has it been repaired or damaged.
You can view item information for both Single Items on page 44 and Bulk Item on page 44.
To view item information:
1. Go to Management > Inventory.
System displays the full item list by default.
2. Click an item name.
For single items, you will see the Item Detail tab (showing inventory information) and the History tab
(showing item status change). For bulk items, you will see two more tabs:
For single items, you will see the Item Detail tab (showing inventory information) and the History tab (showing
item status change). For bulk items, you will see two more tabs:
• Location and Resources Management Group: Shows the number of items in different location and their
responsible Resource Management Group on page 44.
• Invoice: Shows how many items were purchased for each invoice, together with information like supplier(s)
and purchase date(s).
Add Item Records
Each asset item is represented by an item record in the system. Each item records contains information related
to the item. Depending on the item type, you can store information like item names, descriptions, purchase details
and related attachments.
Asset items are classified into Single Items on page 44 and Bulk Item on page 44. The ways to add single item
record and bulk item record are very much the same. However, you have to pay special attention when
To add item records:
1.
2.
3.
4.
5.
Go to Management > Inventory.
Click New.
Select an item type.
Select an item sub-category.
If Bulk Items is chosen in Step 3:
a) Choose New Item from the Purchase Details drop down menu if this is the first time you create a record.
Choose Existing Item if you are updating item information or quantity for an already existed item.
Important:
The Existing Item option assumes that the resource management group and funding source of the
newly added items remain unchanged if the items are added to the same location as the original
items.
For example, there are originally 10 footballs at location X. You now add five to the same location.
The resource management group and funding source of that five football can only be the same as
15
XML to PDF by RenderX XEP XSL-FO Formatter, visit us at http://www.renderx.com/
the original 10. If these five balls are assigned to location Y, then both can be changed even if these
five balls are sharing the same item code as the original footballs.
System then displays the item detail page.
b) If Existing Item is chosen at Step a, choose the item to update from the Existing Item dropdown
menu. Then press Next.
c) Fill in the necessary item details. Fields with asterisks are mandatory.
If you are updating an existing item, you will not be able to modify the Item Name and item
Description fields.
d) Press Next.
e) Assign item code, location, resource management group and funding source. You
can press Generate Item Code to have the system generate a unique item code for the item.
There may be cases where you cannot modify item code, resource management group and
funding source, as described at Step a.
Important: The fields Total Purchase Amount and Unit Price need special attention.
When you are creating bulk item records: Under normal situations, total purchase amount (total
purchase price) should be equal to unit price x quantity bought. However, when discount is involved,
the total purchase amount can be smaller than the sum of the unit price. For example, three flutes,
each sold at HK$3000, should cost HK$9000 totally. However, with a 10% discount, the total
purchase amount will become HK$8100.
When you are creating identical single item records: You should enter the same total purchase
amount for all the item records. For example, three $300 lamps are purchased with one invoice.
You should create a single item record, with $300 filled into the Unit Price field and $900 into
the Total Purchase Amount field. Then, enter 3 in the Quantity field.
f) Press Submit.
6. If Single Items is chosen in Step 3:
a) Fill in the necessary item details. Fields with asterisks are mandatory.
b) Press Next.
c) Enter inventory details for the item(s).
16
eInventory(Asset Management) V1.0 User's Guide
XML to PDF by RenderX XEP XSL-FO Formatter, visit us at http://www.renderx.com/
d) Enter inventory details for the item(s).
e) Press Submit.
Task completes. System displays Record Added message.
Import Item Records
Each asset item is represented by an item record in the system. Each item records contains information related
to the item. You can import item records using CSV file.
Before start, you need to create the CSV file for import. Please refer to Create CSV File for Import on page 13
for more information on how to create CSV.
To import item records:
1. Go to Management > Inventory.
a) Go to Management > Inventory.
2.
3.
4.
5.
Press Import.
Select a CSV format.
Press Browse to locate and upload your CSV file.
Press Submit.
System checks the CSV for data validity. If no errors are detected, you will see another Submit button.
6. Press Submit.
17
XML to PDF by RenderX XEP XSL-FO Formatter, visit us at http://www.renderx.com/
Task completes. System displays Record Added message.
Update Item Status & Location
Item status indicate whether an item is usable or not. You can change item status at any time. Changing the
location of items can also be performed in similar way.
To update item status & location:
•
Update bulk item status:
a) Go to Management > Inventory.
b) Select the bulk item you want to update and press Update Status.
c) Choose the location at which the item you want to update is placed.
All locations with the selected item will be listed.
d) Enter the number of items which are normal, damaged or currently being repaired.
• Normal - The item can be used.
• Damaged - The item is damaged and cannot be used
• Repairing - The item is damaged and is under repair at the moment.
e) Optional: Enter remarks.
f) Press Submit.
•
18
Task completes. System displays Record Updated message.
Update single item status:
a) Go to Management > Inventory.
b) Select the single item you want to update and press Update Status.
eInventory(Asset Management) V1.0 User's Guide
XML to PDF by RenderX XEP XSL-FO Formatter, visit us at http://www.renderx.com/
c) Choose a status from the New Status drop down menu.
• Normal - The item can be used.
• Damaged - The item is damaged and cannot be used
• Repairing - The item is damaged and is under repair at the moment.
d) Optional: Enter remarks.
e) Press Submit.
•
Task completes. System displays Record Updated message.
Update bulk item location:
a) Go to Management > Inventory.
b) Select the bulk item you want to update and press Update Status.
c) Go to the Update Item Location tab.
d) Choose the original location of the item.
All locations with the selected item will be listed.
e) Choose a location from the New Location drop down menu.
The drop down menu for selecting sub-location appears.
f) Select a sub-location.
g) Enter the quantity of items to relocate.
h) Press Submit.
•
Task completes. System displays Record Updated message.
Update single item location:
a) Go to Management > Inventory.
b) Select the single item you want to update and press Update Status.
c) Go to the Update Item Location tab.
d) Choose a location from the New Location drop down menu.
The drop down menu for selecting sub-location appears.
e) Select a sub-location.
f) Press Submit.
Task completes. System displays Record Updated message.
19
XML to PDF by RenderX XEP XSL-FO Formatter, visit us at http://www.renderx.com/
Generate Barcode Labels
Barcode labels can be applied to asset items. Then, barcode scanners can be used during stocktake. Barcode
labels can be generated in HTML format. If you want more control on the label layout, you can export label data
in CSV format. You can then use mail merge function in Microsoft Word to create labels from a layout template
and the exported CSV data source.
In order to be able to display and print barcodes, you have to go to Management > Barcode Labels to download
and install the barcode font. Please consult your system administrator on how to install fonts. You can also
download the word template from the same page.
To generate barcode labels:
1. Go to Management > Inventory.
2. Check the items for which you want to print labels and press Export.
System switches to the Management > Barcode Labels page.
Note: You may go to this page directly if you want to print labels for all the inventory items.
3. Select information item(s) to be included on the labels by checking the relevant checkbox.
4. Select the number of labels to print per each page.
Sometimes, part of a label might be displaced to another page. You can adjust this value until the entire label
can be print on the page.
5. Select a file format.
6. Press Submit.
20
eInventory(Asset Management) V1.0 User's Guide
XML to PDF by RenderX XEP XSL-FO Formatter, visit us at http://www.renderx.com/
7. For HTML format: A pop-up windows appears. Press Print to print the label.
8. For CSV format: A Windows dialogue box appears. Press Save at the dialogue box. You can use the exported
CSV file and the label template for mail merge.
21
XML to PDF by RenderX XEP XSL-FO Formatter, visit us at http://www.renderx.com/
Stocktake & Variance Handling
Stocktake & Variance Handling Overview
Stocktake on page 44 and variance handling are collaborative processes that are tightly related:
Table 1:
Action
Performed By
Users visit responsible locations to check for item quantity during
the stocktake period.
Stocktakers (Resource management group members/leaders,
eInventory administrator)
The system compares actual item quantity of each location with the System
quantity listed in the item list
Users handle quantity variances identified above by:
Variance Managers
• Either ignoring surplus items or update item quantity information • In the case of Single Items on page 44, the resource management
(i.e. Add surplus items to the complete item list)
group (RMG) leader(s) will become variance managers if her/their
group is assigned as the RMG of the item
• Request writing-off missing items
• In the case of ,
• Either the resource management group (RMG) leaders can become
variance managers if her/their group is assigned as the variance
handling group (VHG) of the item
• Or the school can create a special RMG to perform the role of
variance manager.
You can do so by assigning all members as group leaders.
Whenever you create/import bulk items, assign this group as
the VHG. Then, this group will be responsible for handling all
bulk item quantity variances.
Tip: You can name this special group with descriptive
names like "Bulk Item Variance Handling Group".
• eInventory administrator can also perform variance handling
Users issue write-off requests for items which are no longer usable Resource management group members/leaders
Below is a flowchart that describes the two processes in details.
22
eInventory(Asset Management) V1.0 User's Guide
XML to PDF by RenderX XEP XSL-FO Formatter, visit us at http://www.renderx.com/
Tip: Please refer to the HTML version of this manual for the full-resolution flowchart.
1. All item information, like quantity and location, are stored in the complete item list (Management > Inventory
> Full List). Information in the list will be used as reference for stocktake. For example, when an actual
quantity of 20 is found for bulk item X at Room 101, comparing with the listed quantity of 18, there will be
a surplus of two.
2. Stocktake is performed within the stocktake period, which can be defined in Settings > Others > Others >
Stocktake Period. When the stocktake period is over, users can no longer perform stocktake.
23
XML to PDF by RenderX XEP XSL-FO Formatter, visit us at http://www.renderx.com/
3. The stocktaker is responsible for stocktake. She can either enter the barcode of found items manually or via
a barcode scanner, as in the case of single items, or enter the number of items observed into the system, as
in the case of bulk items. Stocktakers have to record stocktake result into the system. The system will compare
for and record any variances for further handling.
4. For single items, possible stocktake results are:
• Items are found in their listed locations. These are referred to as listed items.
• Items are found but no item information can be retrieved from the complete item list. These are usually
items that are not owned by the school.
• Items that should be found at certain locations are not found. They are missing items.
• Items are found in locations different from their listed location. For example, Item D, which should be
placed at location B, is found at location A. This kind of items is referred to as unlisted items.
5. For bulk items, possible stocktake results are:
• No variance is found between the observed quantity and the listed quantity for a location. Variance handling
is not necessary.
• Negative variance is found. In other words, the quantity of items observed is smaller than the listed quantity.
Variance handling is needed in this case.
• Positive variance is found. In other words, the quantity of items observed is greater than the listed quantity.
Variance handling is needed in this case.
6. When the stocktake period is over, the Management > Stocktake menu will be disabled. Variance handling
can then be started.
7. Variance handling is performed by variance managers who come from either the item's resource management
group or a specialist variance handling group (See table above for details).
8. The possible ways of handling variance are:
• Surplus single/bulk items - Re-assign the items to their current location or ignore them. After location
re-assignment, you can assign a variance handler to be responsible for moving the item. A variance handler
will receive notice on what items are to be moved. She can move the items herself or assign a variance
mover to physically re-allocate the items concerned. Assignment of variance mover is not part of the system
functions.
• Missing single/bulk items - Request write off the items so that the quantity of items in the complete item
list can be reconciled with the actual found quantity. When an item's write-off request is approved by the
eInventory administrator, the item record will be removed from the item list. So, when there is a -3 variance
and all three items are successfully written-off, the listed quantity of that item will be adjusted to the actual
quantity found.
Important: You must write-off ALL missing items.
Define Stocktake Period
Stocktake have to be carried out within certain period. Before the period starts, no stocktake options (Management
> Stocktake, Report > Stocktake, Report > Stocktake Progress) will be available from the system menu.
To define stocktake period:
1. Go to Settings > Others.
2. Enter the period start date and end date into the From and To field respectively.
3. Press Submit.
24
eInventory(Asset Management) V1.0 User's Guide
XML to PDF by RenderX XEP XSL-FO Formatter, visit us at http://www.renderx.com/
Task completes. System displays Record Updated message.
Perform Stocktake
Stocktake is the process of checking up asset item quantity and their status. The process is carried out on a
by-location basis.
Stocktake can only be performed in the Define Stocktake Period on page 24.
The stocktaker visits the location that she is responsible and enter the items she find into the system either
manually or via barcode scanner. The system will show missing, dislocated and surplus items for further handling.
To perform stocktake:
1. Go to Management > Stocktake.
2. Select a sub-location from the Location drop down menu.
As items are associated with sub-locations, you are actually selecting a sub-location in this step.
The Stocktake List showing all the registered single and bulk items appears.
3. Mark your stocktake result onto the stocktake list.
The list is divided into two sections. The upper sections lists all the single items that should appear in the
location. You can enter the barcode of items found manually or use a barcode scanner to do so. For bulk
items, you can enter the quantity found or the quantity to be kept. Any differences between found quantity
(including request-to-write-off quantity) and expected quantity (known as variance) can be handled later.
25
XML to PDF by RenderX XEP XSL-FO Formatter, visit us at http://www.renderx.com/
Let's see a few examples.
26
eInventory(Asset Management) V1.0 User's Guide
XML to PDF by RenderX XEP XSL-FO Formatter, visit us at http://www.renderx.com/
•
Figure 1: In this example, two single items out of the expect three are found. For bulk items,
the quantity found is exactly the same as expected.
•
Figure 2: In this example, four single items out of the expect three are found. Hence, there
is one unlisted item. For bulk items, the quantity found is two less than the expected
quantity. Therefore, the
27
XML to PDF by RenderX XEP XSL-FO Formatter, visit us at http://www.renderx.com/
•
Figure 3: In this example, 12 bulk items are found, three more than the expected quantity.
•
Figure 4: In this example, only 11 bulk items are found but only eight are to be kept. Hence,
there is a +2 variance (11 found - nine expected).
4. Press Next to confirm stocktake result.
5. Optional: Fill in stocktake remarks and select reasons for single items requesting write-off. You can also
press Browse to locate and attach supporting document (like photo of the item) for the write-off request.
6. Optionally fill in stocktake remarks for bulk items. You MUST select a reason for all write-off requests.
28
eInventory(Asset Management) V1.0 User's Guide
XML to PDF by RenderX XEP XSL-FO Formatter, visit us at http://www.renderx.com/
Task completes. System displays Record Added message.
Handle Stocktake Variance
After stocktake is completed, missing/surplus items will be recorded by the system as variances. You can
manually adjust variances.
The system lists all items with variances found. If an item has different variances across different locations, each
variance will be displayed as a single record. For example, you may see three variance records (+3, +1, -2) for
the bulk item Football. This means there are a surplus of three and one at location A and B, and two missing
balls at location C.
After selecting an item to handle, the system will display four values with reference to which you re-assign items
to different locations.
These values are:
Total Available Quantity
The number of items that can be re-assigned to the locations displayed.
It is calculated as:
Expected Quantity + (Surplus Item Quantity Missing Item Quantity)
Total Assigned Quantity
Total Remaining Quantity
Total Write-Off Quantity (When there are
missing items)
The number of items that has been re-assigned to the locations displayed.
The number of available items that has NOT been re-assigned to any location.
The number of items needs to be written-off.
Note: This quantity must be equal to the number of missing items.
Total Ignore Quantity (When there are surplus
The number of surplus items that are not assigned to any location.
items)
You can re-assign quantities for the selected item following the rules below:
29
XML to PDF by RenderX XEP XSL-FO Formatter, visit us at http://www.renderx.com/
Variance
Likely Reason
Rule for Quantity Re-Assignment
If the sum of all variances across all locations The items are simply dislocated
equals zero (e.g. +5 football in PE Room and
-5 in Storeroom)
Total Available Quantity must be equal to
the Total Assigned Quantity.
If the sum of all positive variances is larger There are excess items. These items will be
than that of all negative variances
displayed as Total Ignored Quantity
Total Available Quantity must be larger or
equal to the Total Assigned Quantity
If the sum of all negative variances is larger There are items missed.
Total Available Quantity must be equal to
than that of all positive variances
the Total Assigned Quantity.
Important: These items must be
written-off. You can assign these item
to be written-off from one location or
multiple locations.
To handle stock variance:
1. Go to Management > Stocktake Variance Handling.
System displays stocktake variances by locations.
2. Press the Item Name of a single or bulk item.
3. System displays the selected item's variance records together with user interface elements for handling the
variances. Choose one of the steps below that suits your situation.
4. For single item with negative variance:
a) Choose Request write-off and press Submit.
b) Select a Write-off Reason from the dropdown menu of the same name.
c) You can optionally press Browse to upload supporting documents, like photos showing the item's condition.
30
eInventory(Asset Management) V1.0 User's Guide
XML to PDF by RenderX XEP XSL-FO Formatter, visit us at http://www.renderx.com/
d) Press Submit.
Operation completes. System displays Record Updated message.
5. For single item with positive variance: You can either move the item to its original location or to re-assign
it to its current location.
•
To move the item to its original location:
1. Choose Move to original location.
2. Choose a variance handler who are members of the item's resource management group from the
Handler dropdown menu.
3. Press Submit.
•
To re-assign the item to its current location:
1. Choose Reassign to new location.
2. Choose a location and sub-location from the drop down menus to the right of To:.
3. Choose a variance handler who are members of the item's resource management group from the
Handler dropdown menu.
4. Press Submit.
6. For bulk item:
a) Enter a new number under New Quantity for each of the listed locations.
31
XML to PDF by RenderX XEP XSL-FO Formatter, visit us at http://www.renderx.com/
Figure 5: In this example, the variances are handled so that surplus items are removed
(green) and miss items are replenished (red).
b) Press Calculate to update the item quantity statistics. Make sure the quantities calculated match the rules
outlined above.
c) Assign variance handlers from the Handler dropdown menu.
Request Write-Off
There are situations when items are no longer part of the inventory but their historical information are still useful.
All system users can request item write-off. All requests will be approved by the eInventory administrator in
order to be effective.
To request write-off:
•
32
Bulk item:
a) Go to Management > Inventory.
b) Select the bulk item you want to write-off and press Update Status.
eInventory(Asset Management) V1.0 User's Guide
XML to PDF by RenderX XEP XSL-FO Formatter, visit us at http://www.renderx.com/
c) Go to the Request Write-off tab.
d) Choose the location at which the item you want to write-off is placed.
All locations with the selected item will be listed.
e) Enter the number of items to request for write-off.
f) Select a write-off reason and optionally press Browse to upload supporting documents (e.g. Photo of the
item).
You can press the + button to attach more.
g) Press Submit.
•
Task completes. System displays Record Updated message.
Single item:
a) Go to Management > Inventory.
b) Select the bulk item you want to write-off and press Update Status.
33
XML to PDF by RenderX XEP XSL-FO Formatter, visit us at http://www.renderx.com/
c) Go to the Request Write-off tab.
d) Select a write-off reason and optionally press Browse to upload supporting documents (e.g. Photo of the
item).
You can press the + button to attach more.
e) Press Submit.
Task completes. System displays Record Updated message.
Approve/Reject Write-Off Requests
Write-off requests have to be approved by eInventory administrator before the items are actually written-off and
removed from the complete item list.
You have to be the eInventory administrator in order to be able to do approval/rejection. You can approve
requests made by yourself.
To approve/reject write-off requests:
1. Go to Management > Write-Off Approval.
2. Select a record to approve/reject.
3. Press the Approve/Reject button.
34
eInventory(Asset Management) V1.0 User's Guide
XML to PDF by RenderX XEP XSL-FO Formatter, visit us at http://www.renderx.com/
4. At the dialogue box, press OK.
Task completes. System displays Record Updated message. Processed records, no matter they are approved
or rejected, will be removed from the record list.
35
XML to PDF by RenderX XEP XSL-FO Formatter, visit us at http://www.renderx.com/
Reports
View Item Status Report
Item status report shows item conditions (normal, damaged, repairing) by location, item type and resource
management group. You can print out the report or export data as csv file.
To view item status report:
1. Go to Reports > Item Status.
2. Select a record display method from the Group By dropdown menu. Records can be grouped by location,
item type or resource management group.
3. If you choose Location at Step 2:
a) Select a location from the Location dropdown menu.
b) Check sub-locations you want to show on the report.
c) Press Submit.
System displays relevant item records.
4. If you choose Item Type at Step 2:
a) Press Submit.
System displays relevant item records.
5. If you choose Resource Management Group at Step 2:
a) Check groups you want to show on the report.
b) Press Submit.
System displays relevant item records.
6. If you want to print out the report:
a) Press Printer-friendly Page.
b) At the pop-up window, press Print.
36
eInventory(Asset Management) V1.0 User's Guide
XML to PDF by RenderX XEP XSL-FO Formatter, visit us at http://www.renderx.com/
7. If you want to export the report into csv:
a) Press Export.
b) At the dialogue box, press Save.
View Stocktake Report
Stocktake status report shows date/time and responsible user of the last stocktake by location, item type and
resource management group. You can print out the report or export data as csv file.
To view stocktake report:
1. Go to Reports > Stocktake.
2. Enter a data range to view.
3. Select a record display method from the Group By dropdown menu. Records can be grouped by location,
item type or resource management group.
4. If you choose Location at Step 2:
a) Select a location from the Location dropdown menu.
b) Check sub-locations you want to show on the report.
c) Press Submit.
System displays relevant item records.
5. If you choose Item Type at Step 2:
a) Press Submit.
System displays relevant item records.
37
XML to PDF by RenderX XEP XSL-FO Formatter, visit us at http://www.renderx.com/
6. If you choose Resource Management Group at Step 2:
a) Check groups you want to show on the report.
b) Press Submit.
System displays relevant item records.
7. If you want to print out the report:
a) Press Printer-friendly Page.
b) At the pop-up window, press Print.
8. If you want to export the report into csv:
a) Press Export.
38
eInventory(Asset Management) V1.0 User's Guide
XML to PDF by RenderX XEP XSL-FO Formatter, visit us at http://www.renderx.com/
b) At the dialogue box, press Save.
View Stocktake Progress Report
Stocktake progress report shows stocktake progress by locations or resource management groups. It is useful
when you want to find out which resource management groups have/have not performed stocktake, or which
locations have/have not been stocktaken. You can print out the report or export data as csv file.
To view stocktake report:
1. Go to Reports > Stocktake Progress.
2. Enter a data range to view.
3. Select a record display method from the Group By dropdown menu. Records can be grouped by location or
resource management group.
4. If you choose Location at Step 2:
a) Select a location from the Location dropdown menu.
b) Check sub-locations you want to show on the report.
c) Press Submit.
System displays relevant item records.
5. If you choose Resource Management Group at Step 2:
a) Check groups you want to show on the report.
b) Press Submit.
System displays relevant item records.
6. If you want to print out the report:
a) Press Printer-friendly Page.
39
XML to PDF by RenderX XEP XSL-FO Formatter, visit us at http://www.renderx.com/
b) At the pop-up window, press Print.
7. If you want to export the report into csv:
a) Press Export.
b) At the dialogue box, press Save.
View Written-Off Items Report
Written-off items report shows what items have been written off and displays result by location, item type and
resource management group. You can print out the report or export data as csv file.
To view stocktake report:
1. Go to Reports > Written-off Items.
2. Enter a data range to view.
3. Select a record display method from the Group By dropdown menu. Records can be grouped by location,
item type or resource management group.
4. If you choose Location at Step 2:
a) Select a location from the Location dropdown menu.
b) Check sub-locations you want to show on the report.
c) Press Submit.
40
eInventory(Asset Management) V1.0 User's Guide
XML to PDF by RenderX XEP XSL-FO Formatter, visit us at http://www.renderx.com/
System displays relevant item records.
5. If you choose Resource Management Group at Step 2:
a) Check groups you want to show on the report.
b) Press Submit.
System displays relevant item records.
6. If you want to print out the report:
a) Press Printer-friendly Page.
b) At the pop-up window, press Print.
7. If you want to export the report into csv:
a) Press Export.
b) At the dialogue box, press Save.
41
XML to PDF by RenderX XEP XSL-FO Formatter, visit us at http://www.renderx.com/
View Warranty Expiry Report
Warranty expiry report shows items whose warranty period is going to expire in the number of days set in
Settings > Others > Warranty reminder. You can print out the report or export data as csv file.
Only the item's resource management group leaders/members and the eInventory administrator can view this
report.
To view stocktake report:
1. Go to Reports > Warranty Expiry.
System displays relevant item records.
2. If you want to print out the report:
a) Press Printer-friendly Page.
b) At the pop-up window, press Print.
3. If you want to export the report into csv:
a) Press Export.
b) At the dialogue box, press Save.
42
eInventory(Asset Management) V1.0 User's Guide
XML to PDF by RenderX XEP XSL-FO Formatter, visit us at http://www.renderx.com/
Generate Fixed Assets Register
Fixed Assets Register is a summary of all asset items possessed by the school. You can print out the report or
export data as csv file.
To generate Fixed Assets Register:
1. Go to Reports > Fixed Assets Register.
2. Select a record display method from the Group By dropdown menu. Records can be grouped by location,
item type or resource management group.
3. If you choose Location at Step 2:
a) Select a location from the Location dropdown menu.
b) Check sub-locations you want to show on the report.
c) Press Submit.
System displays relevant item records.
4. If you choose Resource Management Group at Step 2:
a) Check groups you want to show on the report.
b) Press Submit.
System displays relevant item records.
5. Select a report format from the File Format dropdown menu.
6. Press Submit.
7. If HTML is selected at Step 5, you will see a pop-up window. Press Print to print out the report.
8. If CSV is selected at Step 5, you will see a Windows dialogue box. Press Save at the dialogue box.
43
XML to PDF by RenderX XEP XSL-FO Formatter, visit us at http://www.renderx.com/
Glossary
Single Items
Single items refers to asset item which are usually of higher unit price and small in volume. For example, a piano is a
single item. Information like licence, warranty period and serial number can only be associated with single item. Any
quantity variance identified during stocktake (e.g. an extra headset is found in Room 101) is to be handled by the
eInventory administrator. See also Bulk Item on page 44.
Bulk Item
Bulk items refers to asset item which are usually of lower unit price and large in volume. For example, desks are typical
bulk items. As each bulk item record in eInventory (Asset Management) represent a quantity of items (e.g. 100 desks),
information like licence, warranty period and serial number cannot be associated with bulk item records. Any quantity
variance identified during stocktake (e.g. a surplus of 10 desks is found in the Hall) is to be handled by the eInventory
administrator and the variance manager. See also Single Items on page 44.
Resource Management Group
Resource management group is a group of users that can perform stocktake, as well as to view/edit asset item records.
Resource management can be formed on location or other basis that the school considers appropriate. For example, a
group can be formed for the Geography room and another can be formed to be responsible for all musical instruments.
Each group can have one or more group leader(s), who can approve item write-off requests while members are not
allowed to do so. (See also Stocktake on page 44)
Stocktake
Stocktake is the process of checking how many items are present at each school location and their status. The process
is carried out on a by-location basis within the stocktake period defined by the eInventory administrator. The stocktaker
(resource management group member) visits the location that she is responsible and enter the items she find into the
system either manually or via barcode scanner. The system will show missing, dislocated and surplus items for further
handling. See Stocktake & Variance Handling Overview for a complete overview.
44
eInventory(Asset Management) V1.0 User's Guide
XML to PDF by RenderX XEP XSL-FO Formatter, visit us at http://www.renderx.com/