1
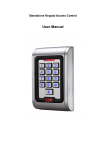
Preface
Honorable customers,
Thanks for choosing products of this company. T5, with world cutting edge
technologies—fingerprint recognition, computer communication, as well as
microelectronics, is considered to be combination of three technologies: electronics,
optics and computer communication. It is no doubt that it has become the first choice
of standalone time & attendance for enterprises with its strong function and veracity.
Please read this user manual carefully to have an initial understanding of functions
and basic knowledge of installation, debugging, maintenance, application and
management to better use this product.
Utilizing the state-of-the-art biometric tech, this product will bring unprecedented
reliability, convenience and benefits to the top management of enterprise in HR.
1
Contents
1
2
3
4
Product Introduction ..........................................................................................2
1.1
Introduction..............................................................................................2
1.2
Parameters..............................................................................................3
1.3
Size .........................................................................................................3
Operation Guide ................................................................................................5
2.1
Interface Introduction...............................................................................5
2.2
Upper Electricity ......................................................................................5
2.3
Set Manager’s Fingerprint .......................................................................5
2.4
Register User’s Fingerprint......................................................................6
2.5
Delete user ..............................................................................................7
2.6
Reset.......................................................................................................8
2.7
Illustration for pressing fingerprint ...........................................................8
2.8
Usage Notice...........................................................................................8
System Installation .......................................................................................... 11
3.1
Running Environment............................................................................ 11
3.2
System Installation ................................................................................ 11
3.3
Uninstall the software ............................................................................14
Communication ...............................................................................................16
4.1
Login the System...................................................................................16
4.2
T5 Management ....................................................................................17
4.2.1
Add Unit ......................................................................................17
4.2.2
Modify Unit ..................................................................................19
4.2.3
Delete Unit ..................................................................................19
4.2.4
Synchronize Time........................................................................20
4.2.5
T5 Parameter ..............................................................................20
4.2.6
Initialize Unit................................................................................21
4.2.7
Download New Records..............................................................21
4.2.8
Download All Records .................................................................21
4.2.9
Clear record ................................................................................22
4.2.10
Backup Staffers .........................................................................22
I
4.2.11
4.3
4.4
4.5
4.6
5
Resume Staffers ........................................................................23
Staffers Management ............................................................................24
4.3.1
Add Staffer ..................................................................................24
4.3.2
Modify Staffer ..............................................................................27
4.3.3
Delete Staffer ..............................................................................28
4.3.4
Transfer Department ...................................................................28
4.3.5
Copy Privilege .............................................................................28
4.3.6
Download FP...............................................................................29
4.3.7
Upload Staffer & FP.....................................................................30
4.3.8
Delete Staffer from Unit ...............................................................31
4.3.9
Check Staff..................................................................................31
4.3.10
Department Management..........................................................32
4.3.11
Right-hand Button......................................................................33
Record Management.............................................................................33
4.4.1
Search Record ............................................................................33
4.4.2
Export record...............................................................................34
System Settings ....................................................................................35
4.5.1
Basic parameter setting...............................................................35
4.5.2
Timing downloading record .........................................................35
4.5.3
Management PW setting .............................................................36
4.5.4
Database linking setting ..............................................................37
4.5.5
Exit system..................................................................................38
Software Interface Setting .....................................................................38
4.6.1
Interface Skin Color.....................................................................38
4.6.2
Language ....................................................................................38
4.6.3
Setting Quick Access Button .......................................................39
FAQ .................................................................................................................41
5.1
Fingerprint has been enrolled but gets failure in identification...............41
5.2
The machine can't be connected with PC .............................................41
5.3
No records found though identification have passed.............................41
5.4
The FP scanner is off and staffer can’t identify. .....................................41
5.5
T5 beeps automatically when no one punches in/out............................42
II
6
Appendix .........................................................................................................44
6.1
Access control system is established by T5 and SC021 .......................44
III
Chapter1
Introduction
The main theme of this chapter is the advantage
of T5, as well as function introduction.
1
1
Product Introduction
1.1
Introduction
T5 Fingerprint Reader (Abbreviation: T5) is an innovative fingerprint card
access reader which fully integrates fingerprint technology. The very compact design
makes it suitable for installation on door frame.
T5 can be used stand alone, or as professional fingerprint access control
machine online through USB or RS485. Control access permission by verifying user
fingerprint. Enable control lock, as well as offer user transaction records.
T5 Fingerprint Reader
Function:
y
Small in size and compact in design. Can be easily installed on doorframe;
y
Anviz optical fingerprint reader. Scratch-proof, unbreakable and durable.
Well accept all kinds of fingerprints;
y
Steady 2007 version algorithm platform for T&A and access control, high
performance and reliability;
y
Identification method: Fingerprint;
y
Communicate with computer via RS232 and RS485;
y
Standard Wiegand26 output to connect with standard access controller and
2
Anviz encrypted;
y
1.2
1.3
Wiegand output to connect with Anviz simple access controller SC021;
Parameters
Item
Parameter
Processor
32-bit high speed DSP
Power supply
DC12V, 150mA
User capacity
512
Record capacity
32000
Scan Area
22mm × 18mm
Resolution
500DPI
Identification Method
gather twice fingerprint
Identification Time
≤ 1s
FRR / FAR
0.001% / 0.00001%
Output
Wiegand26, ANVIZ Wiegand
Communication
USB, RS485
Working Temperature
-10℃ ~ 60℃
Casing Material
ABS project plastics
Size
3
Chapter2
Operation Guide
This chapter is mainly about the hardware
operation, contains how to set the administrator, how
to add/delete users etc.
4
2
Operation Guide
2.1
Interface Introduction
Interface:
LED Indicator
Three different colors (Blue,
red and green) to show
FP sensor
Place finger on sensor
Bottom:
USB port
Reset
Screw fix hole
2.2
Upper Electricity
We can use the DC 12V power to link T5.
Under initialization state: After upper electricity, blue LED flashes and FP sensor
light with ’di-di-di-’ 3 beeps prompt.
Under nu-initialization state: After upper electricity, blue lights flashing once
every 3 seconds, the FP sensor lights and after 5 seconds it will enter into sleeping
state.
2.3
Set Manager’s Fingerprint
The manager fingerprint contains Add-Admin fingerprint and Delete-Admin t
fingerprint. Under the state of original, the first fingerprint regards as the Add-Admin
fingerprint, and the second fingerprint regards as Delete-Admin fingerprint.
Blue lights flashing, the FP sensor is off under the original state.
Firstly, press the finger on the FP sensor window, the LED indicator and FP
sensor are off after one beep, then remove finger. Blue lights flashing quickly and the
FP sensor lights.
5
Then press the finger again and remove finger after one beep, green lights
flashing with 4 short beeps (‘di-di-di-di-’). That is the Add-Admin fingerprint registers
successfully.
And then red lights flashing, press author finger on the FP sensor window twice,
when green lights flashing and follow ‘di-di-di-di-’ 4 short beeps. That is the Delete
–Admin fingerprint registers successfully.
Press delete finger
Press add finger
Original state,
4 short beeps,
Blue
green LED light,
green LED light,
set successfully.
set successfully.
flashing.
lights
Red LED light
4 short beeps,
After add/delete manage registration completed, blue LED flashed 3s at once,
the sensor entered into the sleep state after 5s.
2.4
Register User’s Fingerprint
Firstly press the Add-Admin fingerprint, blue LED flashes quickly and follow
‘di-di-di’ three beeps, T5 enter into registration state. In time we can register the user
finger.
Press the finger that needed to enroll on the FP sensor window and then
remove finger after one beep, press finger again and remove finger after one beep,
green LED light and follow ‘di-di-di-di-’4 short beeps, the finger has been increased
successfully. We can add user finger continually, or wait 5s to exit the registration
state.
6
Registered continually
LED is off after ‘di-’
LED is off after ‘di-’
beep, remove finger
beep, remove finger
Exits register
state after 5s.
Blue LED flash,
Blue LED flash
4 short beeps,
register state
quickly, press
green LED flash.
finger again.
Add successfully.
Note: If the finger has been registered, red LED flash twice and follow ‘di-di-’ 2
beeps.
2.5
Delete user
Firstly press the Delete Admin finger on sensor window, red LED flash quickly
and follow ‘di-di-di’ three beeps, T5 enter into delete state. In time we can delete the
user finger.
Press the finger that needed to delete on sensor and remove finger after ‘di-’
beep, press finger again and remove finger after ‘di-’ beep, green LED light and
follow ‘di-di-di-di-’4 short beeps, the finger has been deleted successfully. We can
delete user finger continually, or wait 5s to exit the delete state.
Deleted continually
LED and FP sensor
LED and FP sensor
are off, remove finger.
are off, remove finger.
Exits
delete
state after 5s
Red LED flash,
Red LED flashes quickly,
4
delete state
FP sensor lights, press
green
short
finger again.
Delete successfully.
LED
beeps,
flash.
Note: If the finger has not exited in T5, red LED flashing twice and two long
beeps beep.
7
2.6
Reset
Reset is actually to restart T5.
When doing reset operation, you only need to press the reset button
underneath the T5, which will not delete the data in T5.
Note: Reset is not initial or to delete staffer info in T5.
2.7
Illustration for pressing fingerprint
Correct method:
Wrong method:
Valid
Left
Right
Defluxion
Down
1. Please register the thumb or index finger if possible.
2.Place finger flatly and the center of the finger is on the center of scanner
window and press a little hard on scanner so it can scan as large finger area as
possible to extract enough minutia.
3. Keep the angle and direction of finger the same each time placing on
scanner.
4. Touch the forehead to increase oily level of the finger, if the fingerprint is too
dry.
2.8
Usage Notice
1、Don’t scratch the surface of the optical fingerprint sensor with the keen-edged
things such as small knife or pen.
8
2、Humidity, dust and direct light can affect the T5’s performance.
3、Please don’t clean the surface of the optical fingerprint sensor with the
organic impregnate such as alcohol or gasoline.
Recommended solution:
Use one-sided adhesive tape to paste on the sensor and then remove the tape.
9
Chapter3
I n s ta l l a t i o n
This chapter mainly discusses the installation and
un-installation of software as well as the hardware
and operation system requirement.
10
3
System Installation
First we should install background management software on the computer. Please
refer to the following steps.
3.1
Running Environment
Hardware environment:
PentiumⅡ266 and above; PentiumⅢ500 and above is recommended
128 Memory and above; Minimum 100M hardware space
COM Port
CD-ROM (CD-ROM needed in installation)
VGA support 800*600 resolution and above
Operating system:
Microsoft Windows 2000
Microsoft Windows XP (recommended)
Microsoft Windows Vista
3.2
System Installation
Insert the CD to the pc’s CDROM. Following window pops up:
Click [[Next] to continue installation (see the picture below):
11
Select the target directory to install the program and the default is “C:\T5”. Click
[Next] to continue installation (see the picture below):
Click [Back] and installation will return to the previous screen and re-select target
directory; Click [Next] and the installation will start as the following picture shows:
The installation will be done after seconds (see the picture below):
Choose the driver installation program, click [Finish] to begin install the driver.
12
Click [Next] to continue installation:
Choose ‘I access the terms of the license agreement’, and click ‘Next’ to
continue installation:
The installation will be done after seconds:
13
Click [Finish] to close the installation program and an icon
will be added to
the desktop. Double click it and the T&A management system will be started. In
addition, “T5 Management System” has been added to “All Programs”. Please see
the picture below:
The shortcut of “Finger Reader” is included in “All Programs”.
3.3
Uninstall the software
Click “Uninstall T5 Management System” in the above picture, click [Next] and
the program will be uninstalled automatically.
Please note: All the files and data will be deleted after uninstalling the program
so please make sure before operation!
14
Chapter4
Communication
The chapter is mainly regarding the link method
and the communication between the machine and pc.
15
4
Communication
The communication between software and device should be realized firstly
through connecting PC and devices via USB or COM.
4.1
Login the System
Double click
or click 【Start】--【All programs】--【T5 management system】
to open software. The default login password is empty; the following window will pop
up:
Pic4.1
Main Interface
If the time attendance software’s login password is not empty, you should enter
the password firstly.
Enter the password and click the button 【OK】 to login.
Notice: If you enter the wrong password 3 times, the software will automatically
close.
16
Click the button 【OK】. And then try to enter the correct password.
4.2
T5 Management
4.2.1
Add Unit
Click the button 【Add Unit】. Following windows pops up:
No.: This number can be set as you like.
Unit S/N: Serial number is used to identify every time attendance terminal (this
number is on back label as “Serial No”);
Unit Name: You can set it to distinguish devices.
Communication method: USB and RS485:
USB: please connect pc and device using USB cable and make sure the driver
is installed.
RS485: The default is Com1. Please choose the correct com number in the list.
Click the button 【OK】to save the information.
There will display an icon for the new added device terminal
. Put the
mouse on icon, which will show the detailed info of the device:
Machine Number: 1
Machine Name: Front Door
Serial Number: 1
Communication Method: USB
Connection State: Normal
Notice: Click right button of mouse on the device icon to show:
17
Pic4.2 Right click Terminal menu
【Select all】: select all terminals;
【Reverse selection】: reverse to select all;
【Align top】: The list of device icon on the top;
【Align left】: The list of device icon on the left:
【Terminal info】: We can check the staffer , FP, records number and firmware
version etc:
Click 【Retrieve】to get the new information of device. Click 【Cancel】 to exit.
If fail, system will prompt:
This operation information displays in the main interface as follows:
[2008-12-18 10:34:31] 1[Front Door] Failed to read the records amount from the
machine.
【Enter enrollment mode】:This function enables T5 to register user fingerprint
directly. The main interface will show as following:
[2008-12-18 10:35:21] 1[Front Door] Enter enrollment mode successfully!
18
【Enter deletion mode】:This function enables T5 to delete user fingerprint
directly. The main interface will show as following:
[2008-12-18 10:39:18] 1[Front Door] Enter deletion mode successfully!
【Delete Manager Fingerprint】:Delete the manager fingerprint in the terminal
machine.
After delete completed, T5 will make ‘dididi-dididi’ six beeps, blue LED indicator
flash and FP sensor light. The machine is in original state.
The main interface will show as following:
Delete manager fingerprint successfully!
4.2.2
Modify Unit
Choose the terminal (tick □ showing √ )and then click 【Modify Unit】, the
following window will pop up:
Modify the information and then click the button 【OK】to save the modification.
Click the button 【Cancel】 to cancel the modification.
If the “No” is already exist in the software, following message box pops up:
Click the button 【OK】 to set the Unit information again.
4.2.3
Delete Unit
Choose the T&A unit (tick □ showing √ )and then click the button 【Delete
Unit】. Following message box pops up:
19
Click the button 【OK】to delete or click the button 【Cancel】to cancel.
4.2.4
Synchronize Time
Synchronize the T5’s time with the computer time. Click the button【Synchronize
time】
. Following message box pops up:
Click the button 【OK】to confirm or click the button 【Cancel】to cancel.
Some operation information displays in the main interface as follows:
[2008-12-18 14:56:02]1[Front Door] Synchronization successful!
4.2.5
T5 Parameter
Click the button 【Terminal Parameter】to open the 【T5 Terminal Advanced
Parameter】 window:
Wiegand Mode: Standard wiegand and Anviz wiegand. It is set as standard
wiegand as default.
【Management card】: Sets the admin card number for terminal machine. Add
card and delete card should be existent at the same time. If one card is lacking, the
setting is not effective.
Click the button 【OK】 to save the settings.
Note: If the terminal machine is T5, the setting of admin card can not be used;
If the terminal machine is T5-ID, the setting of admin card can be used;
The main interface will show like following:
[2008-12-18 15:03:36]Set Advanced Parameter...
[2008-12-18 15:03:37] 1[Front Door] Advanced Parameter Setting Successful!
20
4.2.6
Initialize Unit
The machine system will resume to factory settings. All data will be cleaned up.
Attention should be taken for this operation!
Click the button 【Initialize Unit】. Following message box pops up:
Click the button 【OK】to confirm or click the button 【Cancel】to cancel.
Some operation information displays in the main interface as follows:
[2008-12-18 15:23:36]Initializing...
[2008-12-18 15:23:39]1[Front Door] Initialization Successful!
4.2.7
Download New Records
Download the records from the T5 to the computer.
Click the button【Download new records】. Following message box pops up:
Click the button 【OK】to confirm or click the button 【Cancel】to cancel.
Some operation information displays in the main interface as follows:
[2008-12-18 15:25:26]1[Front Door] Reading attendance records...
[2008-12-18 15:25:29]1[Front Door] Read the records completed, Records: 4,
Read successful: 4
4.2.8
Download All Records
Download all records from the T5 to the computer.
Click the button【Download all records】. Following message box pops up:
21
Click the button 【OK】to confirm or click the button 【Cancel】to cancel.
Some operation information displays in the main interface as follows:
[2008-12-18 15:26:26]1[Front Door] Reading attendance records...
[2008-12-18 15:26:29]1[Front Door] Read the records completed, Records:
60, Read successful: 60
4.2.9
Clear record
Clear all records from the T5 to the computer.
Click the button【Clear record】. Following message box pops up:
Click the button 【OK】to confirm or click the button 【Cancel】to cancel.
Some operation information displays in the main interface as follows:
[2008-12-18 15:27:26]Clearing time attendance records...
[2008-12-18 15:27:29]1[Front Door] Clear time attendance records successfully!
4.2.10
Backup Staffers
Download the staffer information and staffers’ fingerprint templates from the T5
to the computer. You can edit the staffer information in the database Att2003.mdb.
The user information is saved in the table “UserInfo” of the database. And the
fingerprint templates information is saved in the folder “Template “in the installation
directory.
Click the button 【Backup Staffer】. Following message box pops up:
Click the button 【OK】to confirm or click the button 【Cancel】to cancel.
After backup staffer info completed, it starts to backup fingerprints. When
backup completed, the whole backup process is finished. The main interface is
following:
22
[2008-12-18 15:27:26]Backupping staffers...
[2008-12-18 15:27:29]Backup staffers: 1[Head Office]
[2008-12-18 15:27:26]1[Front Door] Backup staffer information completed,
Records: 5, Read successful: 5
[2008-12-18 15:27:29] Backupping staffers...
[2008-12-18 15:27:26]1[Front Door] Backup staffer and fingerprints completed!
Notice: During backup the staffer info, you can click 【Stop】button to end this
operation. Following message box pops up:
Click the button 【OK】to confirm or click the button 【Cancel】to cancel.
The operation will show in main interface like following:
[2008-12-18 15:28:26]Exit current operation
4.2.11
Resume Staffers
Upload the staffer information and staffer’s templates from the computer to the
T5.
Click the button【Resume staffers】. Following message box pops up:
Click the button 【OK】to confirm or click the button 【Cancel】to cancel.
Some operation information displays as follows:
[2008-12-18 15:29:26]Get back staffers...
[2008-12-18 15:29:29] Get back staffers: 1[Front Door]
[2008-12-18 15:29:56]1[Front Door] Get back staffer completed!
Notice: Before resume operation, each staffer should be set terminal authority. If
the staffer doesn’t not added to device terminal, the following message will prompt,
23
[2008-12-18 15:30:26]Get back staffers...
[2008-12-18 15:30:26] Get back staffers: 1[Front Door]
1[Front Door] No such ID existed, recovery failed!
4.3
Staffers Management
Staffers management mainly includes these functions: staffer management in
database of local PC、staffer communication management between PC and unit、
staffer info tracking.
Staffer management interface is as following,
4.3.1
Add Staffer
Click 【Add staffer】button, open 【Add/modify staffer info 】window which
includes 3 page info: Basic info、relevant info、fingerprint registration. The interface
is as following:
24
Pic4.3 Add Staffer
The Window Contains three pages information: Basic info、Relevant info、
Fingerprint registration。
【Basic info】:
Input staffer info, authorized terminals and access permissions etc. in Pic4.3
【Basic info】.
Add picture for staffers: Add pictures in local pc or online capture pictures.
1st way: Click 【
】button, choose staffer’s picture stored in PC and open
【Edit picture】 window, and click【view】button, it will pop-up 【Open】 window,
choose staffer’s picture in its directory. Use the mouse to choose the area needed
cut. Then click 【Cut down】button and the picture is as following. After cutting the
picture completed, click 【Save】 button to save picture and exit to 【Add/modify
staffer info 】window. Then this staffer’s picture will show at the right-up corner as
following:
25
2nd way: You can install camera to take pictures and edit then save. Make sure
there is camera equipment installed in your PC.
Click 【
】 button, open 【Pictures shooting】 window, and adjust the image
then click 【take pictures】button. The picture will show below:
Then please use mouse to choose the cut down area and click 【view】 button
to cut the picture. The way is same as 1st way.
Click 【
】 button to clear the staffer picture.
Authorize to terminal:
Choose the terminal the staffer belongs to in 【Terminals not authorized】, click
【
】(add single) or 【
】(add all) button and add it to 【Terminals
authorized】list.
For example: There are three terminal in company (1[Head office], 2[Developer
Department], 3[Product Department]), the staffer 8001 belongs to developer
department, we can add his to the terminal of 1and 3. So the staffer 8001 can
execute identity verify and access in two machine.
26
Delete terminal:
Choose useless terminal in 【Terminals authorized】 list for staffer, then click
【
】or【
】 button to delete the terminal.
【Relevant info】:
Click 【Relevant info】 page in pic4.3, input information in these items.
【Fingerprint registration】:
Connect FP sensor reader to register FP.
Click 【Fingerprint registration】page, if there is prompt ‘Fingerprint sensor
reader not connected’ ,you must check the link of FP sensor with pc.
When the prompt info becomes to ‘Connect to fingerprint sensor reader
successfully’, you can start to register FP. We can click 【Enroll】button that matches
along with the first or second FP.
Put the finger on FP sensor, click the 【Enroll】 button at back of 【□ First
Fingerprint】 or 【□ Second Fingerprint】 to register FP.
After register completely, the ‘□’ has pitched on ‘;’. It means the FP has
already existence:
Notice: Each staffer can register 2 FP.
After edit the info completed, click 【save(S)】 button to save staff info. If you
need cancel the staffer info added, click 【Cancel(C)】 button.
Notice: Maybe all info can’t input in actual operation, but the number of staffer is
must be input. Other info can not input.
4.3.2
Modify Staffer
Modify staffer is to modify the database staffer info in local PC.
27
Choose the staffer info from staffer info list and click 【Modify staffer】button or
double click this staffer info, open 【add/modify staff info 】window to modify. For
detail, please refer to 4.4.1【Add staffer】.
4.3.3
Delete Staffer
Delete staffer is to delete database staffer info in local PC.
Choose staffer from staff info list (you can choose some or one through 【Shift】
or 【Ctrl】 key), click 【Delete staffer】and the following window pop-up:
Click 【OK】to confirm and start to delete staffer info. Click 【Cancel】 to exit.
4.3.4
Transfer Department
When staffers are transferred, there is necessary to transfer them between
different departments. Transfer department enable realize this function.
Choose staffer info who need to transfer department in staffer info list (you can
choose some or one through 【Shift】 or 【Ctrl】 key), click 【transfer department】
to open 【Staffer transfer】window as following,
Choose the department which staffer transfer to, click 【OK】 button to save
transfer info. Click 【Cancel】 button to exit.
4.3.5
Copy Privilege
Copy privilege is to copy staffers’ T&A method and access permission.
28
Choose staffer info who need to set T&A method and access permission in
staffer info list (you can choose some or one through 【Shift】 or 【Ctrl】 key), click
【Copy privilege】to open
【Copy privilege】window as following,
Pic4.4 Copy Privilege
Input the staffer ID who will be copied and click 【OK】, system will pop-up
confirm info:
Click 【OK】button and it will start coping privilege; Click 【Cancel】button to exit.
After copying completed, system will prompt as following:
If you don’t understand the staffer’ privilege, you can click 【
】 to open
【Function and Privilege setting】 window for check the info of staffer.
Notice: After confirming, click 【Cancel】to close window and click 【OK】in
【Copy Function and Privilege】.
4.3.6
Download FP
Download FP is to download staffers’ FP stored in attendance terminal to PC
which will not download staffer info. Please make sure staffer info has existed before
29
downloading FP.
Choose staffer info who need to download FP in staffer info list (you can choose
some or one through 【Shift】 or 【Ctrl】 key), click 【download FP】and system
will prompt if the operation will continue or not, as following:
Click 【OK】 button and start download the staffers’ FP info from terminal. Click
【Cancel】 to exit.
Downloading process is as following:
[2008-12-18 16:16:56] Download fingerprint …
[2008-12-18 16:16:56] Download fingerprint: 1[Front Door]
[2008-12-18 16:16:57] 1[Front Door] Download fingerprint completely!
4.3.7
Upload Staffer & FP
Upload staffer & FP is to upload staffer info stored in PC to terminal.
Choose staffer info who need to upload FP in staffer info list (you can choose
some or one through 【Shift】 or 【Ctrl】 key), click 【download FP】and system
will prompt if the operation will continue or not, as following:
Click 【OK】button to upload staffers’ info and FP from PC; Click 【Cancel】
button to exit.
Uploading process is as following:
[2008-12-18 14:16:56] Upload staffers and fingerprints: 1[Front Door] …
[2008-12-18 14:17:14]1[Front Door] Upload staffers and fingerprints completely!
Notice: The function of ‘upload staffer & FP’ is the same as ‘resume staffer’
which both store staffer info to terminal. The difference is upload staffer & FP enable
30
user choose staffers who need to be uploaded, but ‘resume staffer’ is to upload all
the staffers stored in database to terminals.
4.3.8
Delete Staffer from Unit
‘Delete staffer from unit’ is meaning delete staffer info from unit through software.
Choose staffer info need be deleted in staffer info list (you can choose some or one
through 【Shift】 or 【Ctrl】 key), click 【delete staffer from unit】and system will
prompt as following:
Click【OK】 button to confirm and start delete the staffer info; Click 【Cancel】
button to cancel this operation.
After deletion successfully, the terminal device ID the staff belong to will be
deleted from 【unit 】as following:
The main interface shows like following:
[2008-12-18 14:21:25] Delete the staffer from the device...
[2008-12-18 14:21:25] Delete the staffer from the device: 1[Front Door]
[2008-12-18 14:21:34]1[Front Door] Delete the staffer from the device completely!
4.3.9
Check Staff
Input the info of the staffer like ID, name, unit location which are no necessary to
fill up. Click 【Check staff】 button and correct staffer info will show in the list
31
Click 【Check staff】button, the results are corresponding staff info:
4.3.10
Department Management
Click right button of mouse upon department icon 【
.】 Pop-up the
menu:
Add department
Choose Add dept in the menu, which will pop-up the following window:
Input department name. Click 【OK】button to save. Click 【Cancel】 to exit.。
Modify department
Choose Edit dept in the menu, which will pop-up the following window:
Input department name. Click 【OK】button to save. Click 【Cancel】 to exit.。
Delete department
Choose Delete dept in the menu, which will pop-up the following window:
Input department name. Click 【OK】button to save. Click 【Cancel】 to exit。
32
4.3.11
Right-hand Button
Select All: Select all records that are in the record list.
Cancel Selection: Cancel select the record.
Click options one by one in the menu and the following modules will pop up
respectively:【Transfer Department】,【Copy Privilege】,【Add Staffer】, 【Modify
Staffer】and 【Delete Staffer】.
4.4
Record Management
It is mainly to search, export records. It can use for backup record:
4.4.1
Search Record
Search record is to search the downloaded attendance records in the time
range.
Firstly set the date. Click the box after 【Begin date】 and 【End date】, there
will pop-up calendar info as following:
33
】 choose the month or year needed to be set.
Click 【
Then click 【Search Record】button, the record of mach condition will show in record
list:
4.4.2
Export record
Export record is to backup the data stored in the database of PC to other space,
so that if the current database is abnormal, it can be used to resume data:
Export format: It has 3 formats optional: text file (.txt), CSV file (.csv), Excel files
(.xls).
Export field: users can choose important fields or all to export.
Time format: 4 formats optional.
yyyy-mm-dd hh:mm:ss
yyyy-m-d hh:mm:ss
yy-mm-dd hh:mm:ss
yyyymmddhhmmss
Staffer No. length: set staffer No. length, the length of txt file is 4 digits, and the
length of Excel file is 6digits.
Space symbol: space symbol to separate fields
Space symbol length:
space symbol bit
After setting completed, click 【Export record】button, open ‘Save as’ window,
choose save file directory, input file name as following:
Click 【OK】button to confirm finishing export records.
34
4.5
Click
4.5.1
System Settings
button, pop-up the following menu:
Basic parameter setting
Click 【Basic parameter setting】 item, pop-up 【Basic parameter setting】
window as following:
Com port communication: delay time (1-5) sec. default 2s.
Communication Failed, automatically exit current operation: Exit software
automatically after time-out.
Choose parameter bases on practical situation, click 【OK】button to save the
setting of parameter; Click 【Cancel】button to cancel the setting.
4.5.2
Timing downloading record
Click 【Timing downloading record】item, pop-up 【Timing downloading record】
window as following:
Firstly tick Run timing downloading record item, then set timing downloading
35
function. Or else, this function is limited.
Click 【
】button to adjust time, and 【add】 button to add the set times to
【Timing downloading record】input box.
Notice: the input box does not allow input by hand.
Click 【OK】button to confirm running timing downloading record function and
system will prompt:
Click 【Cancel】button to cancel the timing downloading settings.
If no set time, click 【OK】 button, system will prompt:
Click 【OK】button and set the timing downloading time again.
4.5.3
Management PW setting
Click 【Management PW setting】 item, open 【Modify management password】
window as following,
Old password: default password is empty. If user has modified password,
please input this password which is used to log on system. If it’s wrong, system will
prompt,
Click 【OK】and input old password again.
New Pwd: the password user wants to set
36
Confirm Pwd: input new password again to confirm. if confirm Pwd is different
from new one, system will prompt:
Click 【OK】 button to input confirm password again.
After modifying completed, click 【OK】 button to save new password and
system will prompt:
Click 【Cancel】 button to exit.
4.5.4
Database linking setting
Click 【Database linking setting】 item, pop-up 【Data link properties】 window
as following:
Click 【
】button beside 【1. Select or enter a database name:】to choose the
linking database directory.
Choose database name, click 【Open】 button to confirm database linking and
exit to【Data link properties】interface. If database set ID and password, input ID and
password in 【2. Enter information to log on to the database】. After completed, click
【Test connection】to test the connection correctness of the database and
system
37
prompts:
Click 【OK】 button to 【Data link properties】interface. Click 【OK】 button
and system prompts:
Click 【OK】 button to exit.
4.5.5
Exit system
Click 【Exit system】 item, pop-up confirm info:
Click 【OK】button to exit management software system. Click 【Cancel】 button
to cancel this operation.
4.6
Software Interface Setting
4.6.1
Interface Skin Color
Choose
button in title menu which enable change software interface
color. The style is Windows XP system style as following:
Black
4.6.2
Silver
Language
38
Choose
button in title menu which enable convert between
English and Chinese interface. The following is Chinese interface:
4.6.3
Setting Quick Access Button
Add more functions to the titled language toolbar in order to quick access. For
example: [Synchronize Time].
Click right button on 【Synchronize Time】, pop-up the following window:
Click 【Add to quick access toolbar】and it will display in titled language toolbar:
Delete quick access button: When you need to delete the quick access button,
click on the button, pop-up the menu. Click it and the quick access button will
disappear:
Click the menu and we can delete the quick access button.
The Setting of other button is same as 【Synchronize Time】.
39
Chapter5
FAQ
Frequently asked questions and answers
e.g.: the FP has been enrolled but gets failure in
identification;
No records found though identification have
passed;
.......
40
5
FAQ
5.1
Fingerprint has been enrolled but gets failure in identification.
Reason
1 、 The fingerprint was not
Solution
Enroll the finger again.
captured properly
2、The fingerprint is too dry or too
1、Touch the forehead to increase
wet with oil or cosmetics.
oily level of the finger;
2、Clean fingers with towel
3、The fingerprint has peeling or
Enroll other fingers with better
callus
quality
4 、 Latent fingerprint on the
Clean sensor surface ( adhesive
surface of sensor
tapes recommended)
5.2
The machine can't be connected with PC
Reason
Solution
1、Cable not plugged firmly or
Plug the cable firmly or change
cable hardware problem
another cable
2 、 Not able to connect COM
Enter the right COM No
(wrong COM No)
5.3
No records found though identification have passed
Reason
1、Unit power break for a long
Solution
Synchronize the time
time(time turn to zero as default)
2、Minority staff fingerprint false
Change another finger and enroll
accepted
again
3、The records has not download.
Downloading records in time.
4 、 Records has been full in
Delete records in time.
machine.
5.4
The FP scanner is off and staffer can’t identify.
Reason
1、Unit in sleeping status
Solution
Press the finger to active.
41
2. T5 is communication or has
line’s obstruction.
1. Cut the connection between T5
and pc.
2. Excludes the line’s obstruction.
3、Fingerprint scanner abnormal.
Restart
unit
or
change
the
fingerprint module
5.5
T5 beeps automatically when no one punches in/out
Reason
Solution
1、Direct sun light or too bright
Avoid direct sun light or other bright
light
light
2 、 Latent fingerprint on the
Clean sensor surface ( adhesive
surface of sensor
tapes recommended)
Please note: Should you have any other problems, please kindly email us the
log files in zip or rar (The log files are in Log directory in the installation directory of
the software)!
42
Chapter6
Appendix
This chapter is mainly about T5 &SC021 access
control system.
.
43
6
Appendix
6.1
Access control system is established by T5 and SC021
Installation: Make the cable connection according to the following connection
diagram:
Authorization:
1. Power off the SC021.
2. Keep pressing the exit button. (Please do not stop pressing the exit
button until the step5.) And power on the SC021
3. Please try to send the Anviz Wiegand signal to the SC021 by swiping the
registered card on the reader or placing the registered fingerprint on the
reader's scanner window after hearing 11 short beeps from the SC021.
4. The SC021 will generate a long beep and its green led will flash if the
SC021 receives the Anviz Wiegand signal successfully.
5. Stop pressing the exit button. And then power off and power on the
SC021.
6. That's all.
Notice:
1). One SC021 can connect two T5.
2). The T5 reader's GND and the SC021's GND must be same.
3). The reader's Wiegand output must be set as encrypted Wiegand( Anviz
44
Wiegand).
4). You only need make the authorization operation one time.
5). The current from the power supply must be higher than SC021 current (0.5)
+ reader1 current + reader2 current + electrical lock current.
45