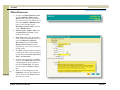
1
AKAIMS AKAIMS User Manual v2.0 (Alaska Automated Information Management System) Division of Behavioral Health DHSS / Behavioral Health Page 1 AKAIMS User Manual v2.0 Table of Contents Minimal Data Set ......................................................................................................... 5 Navigation Guidelines ................................................................................................ 6 Introduction ................................................................................................................................ 6 Menus.......................................................................................................................................... 7 Toolbar Icons and Hyperlinks ................................................................................................... 8 Navigation Buttons .................................................................................................................... 9 Table Actions ............................................................................................................................ 10 Controls..................................................................................................................................... 11 Messaging ................................................................................................................................. 12 Insert, View & Search .............................................................................................................. 13 Search........................................................................................................................................ 14 Conventions .............................................................................................................................. 15 Accessing AKAIMS..................................................................................................... 16 Change facility.......................................................................................................................... 20 Home Page ................................................................................................................... 21 Announcements ........................................................................................................................ 21 Schedule .................................................................................................................................... 22 Client Profile & Related screens ............................................................................ 24 Client Search ............................................................................................................................ 25 Client List ................................................................................................................................. 27 Add Client ................................................................................................................................. 29 Alternate Names ...................................................................................................................... 32 Additional Information ............................................................................................................ 34 Add Collateral Contacts........................................................................................................... 37 Other Numbers......................................................................................................................... 39 History ...................................................................................................................................... 41 Non-Episode Contact................................................................................................................ 42 Client Intake ............................................................................................................... 46 Client Status Review................................................................................................. 50 Alaska Screening Tool (AST)................................................................................... 54 Mental Health Screening......................................................................................................... 58 Traumatic Brain Injury Screening.......................................................................................... 60 Screening Outcomes................................................................................................................. 62 DHSS / Behavioral Health Page 2 AKAIMS User Manual v2.0 Client Admission ........................................................................................................ 64 Financial Info and Household Composition ........................................................................... 68 Youth Admission ...................................................................................................................... 71 Substance Abuse ...................................................................................................................... 74 Legal History ............................................................................................................................ 78 Assessment Scores (ASI, ASAM)............................................................................................. 80 ASAM – PPC2R ........................................................................................................................ 82 Client Diagnosis ....................................................................................................................... 83 Program Enrollment ................................................................................................................ 86 Treatment Team....................................................................................................................... 89 Client Wait List........................................................................................................... 92 Notes ............................................................................................................................. 94 Miscellaneous ........................................................................................................................... 96 Encounters ................................................................................................................................ 98 Profile.................................................................................................................................... 98 Encounter Note ..................................................................................................................101 Services...............................................................................................................................103 Discharge ................................................................................................................... 105 Profile ......................................................................................................................................106 Legal........................................................................................................................................108 Status ......................................................................................................................................110 Diagnosis.................................................................................................................................112 Treatment Summary..............................................................................................................117 Consent....................................................................................................................... 119 Referrals..................................................................................................................... 125 Agency Disclosure Agreement .............................................................................. 130 Appendix A – Job Function Roles and Attributes. ........................................... 134 Appendix B – Encounters Service Code Descriptions..................................... 136 Appendix C – FAQs .................................................................................................. 139 Module: Client Profile ............................................................................................................139 Module: Client Search............................................................................................................139 Module: Emergency Services .................................................................................................141 Module: Intake........................................................................................................................142 Module: Program Enrollment................................................................................................142 Module: Encounters – Why....................................................................................................143 Module: Consent, Referrals, and Disclosures.......................................................................144 Module: General .....................................................................................................................146 DHSS / Behavioral Health Page 3 AKAIMS User Manual v2.0 Module: Security.....................................................................................................................146 Module: Agency ......................................................................................................................147 Module: Staff ..........................................................................................................................147 Module: Client List.................................................................................................................147 Module: Admission .................................................................................................................148 Module: Reports......................................................................................................................149 Module: Notes - Encounter - Service Code Descriptions .....................................................149 DHSS / Behavioral Health Page 4 AKAIMS User Manual v2.0 Minimal Data Set Client Profile Additional Information Screen Client Intake Episode List Screen Intake Case Information Screen Client Status Review Identifying Info Screen Status Review/Follow up – General Questions Alaska Screening Tool (AST) Substance Abuse Screening Mental Health Screening Traumatic Brain Injury Screening Screening Outcomes Client Wait list Client Admission Admission Profile Screen Financial Info / Household Composition Screen Youth Admission Screen Substance Abuse Screen Legal History Screen ASAM – PPC2R Screen Client Diagnosis List Add Client Diagnosis Level Screen Program Enrollment List Program Enrollment Screen Notes - Encounters Treatment Encounter List Encounter Screen DHSS / Behavioral Health Discharge Client Discharge - Profile Screen ASAM Criteria Client Discharge - Legal Status Screen Client Discharge - Status Changes Since Admission screen Client Diagnosis At Discharge Client Discharge – Substance Abuse Screen Client Discharge - Treatment Summary Screen Disclosure Agency – Relationships - Disclosure Consent Client Consent List Client Disclosure Agreement Referral Client Referral List Client Referral Screen Page 5 AKAIMS User Manual v2.0 Navigation Guidelines Introduction AKAIMS (Alaska Automated Information Management System) is an internet based data collection and reporting system sponsored and hosted by the State of Alaska. AKAIMS allows behavioral health providers of substance use and mental health treatment services to record information related to agency and client management. AKAIMS facilitates easy online compliance of State and Federal data reporting requirements. It is grouped into Modules by major areas of information or clinical process. Each module has a set of screens, screens have fields and fields have values. The set of modules are organized in two broad categories as follows: Agency Management 9 9 9 9 Client management 9 9 9 9 9 9 9 9 9 9 9 9 9 9 9 9 DHSS / Behavioral Health Organizational details and management (state agency; provider agency) Facility, programs, services management Staff management Administrative reports Profile Non-episode contact Intake Wait list Treatment team Screening Assessment Admission Notes - Encounter Treatment plan Treatment review Outcomes (GPRA & status review) Discharge Consent Referrals Clinical reports Page 6 AKAIMS User Manual v2.0 Menus The AKAIMS main menu appears in the far left column of the screen. First level menu items are left-most aligned, and may include Home Page, Agency, Client List, Reports and My Settings. However, depending on the user’s access level, some or all may be visible. There are over 200 screens in AKAIMS. For ease of navigation, they are organized by function. Therefore, the client List will have a complement of screens which relate to the management of clients. These screens are accessed and organized through a second level sub-menu. Once the user has selected a high level function using the First level menu, such as Client List, the menu expands to display the second level sub-menu. The sub-menus allow the user to navigate to specific screens without having to use next and back keys. If a menu item has a sub-menu, you will see a small triangle to the right of the label. The triangle points down when the sub-menu is displayed (menu expands) and points to the right when the sub-menu is not displayed. When you place your cursor over a menu item, it is outlined with a dotted box. Use a single, left-click of your mouse to select the menu item and display the associated screen. When selected, the menu item will be outlined with a box. DHSS / Behavioral Health Page 7 AKAIMS User Manual v2.0 Toolbar Icons and Hyperlinks AKAIMS Toolbar: This is the uppermost portion of the screen, and contains the: AKAIMS icon, User Identity and Context, Print and Help Icons, and logout hyperlink. AKAIMS Icon: This icon is displayed near the upper left of the screen to assure the user that they are in the AKAIMS database. User identity, Agency / Facility, and active client information are immediately to the right of the icon. Print View Icon: The Print View Icon allows you to print the current screen. Print Report Icon: Allows you to print a formal document, often with signature lines. This is not available on all screens. Help Icon: This icon will take the user to the AKAIMS Support website were help information, including FAQs, and training documents that may be downloaded can be found. The support site also contains contact information for reporting system bugs or asking technical questions and other help needs. Logout: Use Logout rather than closing the browser window with the red X to ensure that you will not be locked out upon trying to start a new session. You will be asked if you are certain you wish to end the session. Click Yes. DHSS / Behavioral Health Page 8 AKAIMS User Manual v2.0 Navigation Buttons Cancel: Cancel returns the user to the previous screen or mode without storing the data entered on the screen. Save: The Save button is used in two ways. First, it allows the user to commit data to the database after completing the required fields, without having to complete the entire form. Save may also be used to add multiple records to a list without having to leave the screen. Examples of this function are found on screens such as Alternate Name, Address and Phone. Finish: The Finish button saves any unsaved data, and returns the user to the first screen of a module or the Activity List. Previous: Takes the user to the previous screen in a series of screens which compose a dataset. Next: Takes the user to the Next screen in a series of screens which compose a dataset and automatically saves the data entered on the current screen. DHSS / Behavioral Health Page 9 AKAIMS User Manual v2.0 Table Actions Review: This hyperlink allows the user to either review record details or edit them, depending on their permissions and case status. Delete: The Delete hyperlink allows users to delete records without requiring them to go to the detailed view. To reduce inadvertent deletes of important data, this feature is only used in tables where most of the critical record information is displayed in the table. In addition, a warning screen asks the user if they want to delete the record, or return to the table. DHSS / Behavioral Health Page 10 AKAIMS User Manual v2.0 Controls Textbox: Text boxes are designed to allow the user to enter data in manually. Some text fields have specific formats which must be used: DOB/Date: mm/dd/yy SSN: nnn-nn-nnnn Phone Number: nnn-nnn-nnnn Scrolling textbox: Scrolling text boxes are used to capture notes and descriptions. A scrolling text box allows the user to enter at least 500 characters. Some have no character limits. An example of a scrolling text box is often a Comment field. Drop-down box: A drop-down box is used when only one entry may be selected from a list of values. Mover Box: A mover box is used when more than one entry may be selected from a list of values. Some may scroll. Select an option from the left hand box and move it to the Selected box on the right by clicking on the arrow that points right. Mover Box with Radio Buttons: The user selects an option with a single left click. Before selecting the mover arrow, they must select an option, using the radio buttons located between the boxes. DHSS / Behavioral Health Page 11 AKAIMS User Manual v2.0 Messaging Messages: AKAIMS displays messages and warnings at the top of the screen, just below the toolbar, when required. Information Messages: Information messages direct the user to complete the appropriate steps to continue most tasks in AKAIMS. In most cases with information messages, you will not lose data, and you may proceed if you choose to ignore the message. An example would be “Please select a Facility.” You could ignore the message, but you could only perform functions which did not require a context to be established. Some of the messages in black are informative only. An example of this is on the Home Page that will tell you how many people are on the wait list. Error: A red circle with an X indicates the failure to provide required data. This means that the record cannot be saved. Warnings may be used for incorrect formats. In addition to the error message, the field in error is colored pink. The user may type directly over the colored box to correct the data so that it may be saved to the database. DHSS / Behavioral Health Page 12 AKAIMS Insert, View & Search General: There are three modes in AKAIMS: Insert, View and Search. Each mode allows the user to perform a predetermined set of functions. User Manual v2.0 Note: The view mode is also used in some cases where the user is adding data to a table on the same screen. Examples of this include the addition of phone numbers, addresses, and alternate names. In these cases, the Add links are used to move the user from view to insert mode. Insert: In most cases, when you first enter a screen, you will be in insert mode. This mode allows you to make entries into most fields in the screen, and save them to the database. When you select a screen from a menu, click next, or use a hyperlink to navigate to a screen, you are usually in this mode. View: Sometimes AKAIMS will not allow the user to modify any information in the screen. This is usually done to protect data integrity. When you enter a screen in this mode, all fields will be read-only, and grayed out. An example of this is the Announcement screen. Search: Some list screens will allow the user to perform searches based on criteria. When in Search mode, you will usually see a Clear and a Go button, rather than Save, Cancel, Finish. The Client List is an example of this feature. DHSS / Behavioral Health Page 13 AKAIMS User Manual v2.0 Search Exact Match: This type of search is to find records which match the search criteria exactly. Therefore, if you type First Name = Jane, you will only get clients who have the first name of Jane. You may constrain the search results by adding other parameters such as First Name, DOB, and Facility to reduce the number of erroneous results. Wild Card: Wild card searches are very useful in cases where you do not have the exact value or spelling of a parameter. It allows you to search with just three characters. To use the wildcard search, place an asterisk after, before, or on both sides of the known characters of the parameter. Click the Go button. The search will return all values with a string of characters which match the characters provided by you. D*- will return any string starting with D or d. *s- will return anything ending in s. Range Expression: This search allows you to search a range of values when given two specific values. 01/01/2000: 12/31/2000 – returns any record with a date in the year 2000. DHSS / Behavioral Health Page 14 AKAIMS User Manual v2.0 Conventions Required Fields: Required fields will be indicated by a yellow background. Incomplete Required Fields: Incomplete required fields will generate a warning or error, and will be indicated by pink background. You will not be able to move forward to the next screen until you have completed all dark yellow screens and those that have been turned to pink. Reporting: If a field is not required for data integrity, but is required to support reporting requirements for the State or Agency, the background is light yellow. You can move to the next screen without completing light yellow fields. DHSS / Behavioral Health Page 15 AKAIMS User Manual v2.0 Accessing AKAIMS Introduction AKAIMS is a web-based management information system and is accessed via a web browser. To utilize your web browser and access AKAIMS you will need to have a reliable Internet connection. AKAIMS requires the Internet Explorer 6.0 browser. To navigate to AKAIMS, backspace over the address in the address line, and type the following URL in the Address Line of your browser, and hit the enter key or click the “Go” button on the right-hand side of the screen if available. http://akaims.org/ After your screen refreshes you will be shown a security alert. AKAIMS is located on a secure site, to access this site, click the yes button. DHSS / Behavioral Health Page 16 AKAIMS User Manual v2.0 Warning Message Box: After clicking the Yes button in the Security Alert Box, you will be warned that you must be authorized to use the site. Click Go if you are authorized. If you have a User ID and a Password you are authorized to enter. DHSS / Behavioral Health Page 17 AKAIMS After clicking the Go button in the previous screen a new browser window will open. Here you will be required to provide your user ID and password. Simply type your user ID in the user ID field and your password in the password field. Your administrator would have registered you as an authorized user and the system would have sent you an email with your system generated password and user name information as well as a pin number. Save this email for future use. If you have not received your User ID, contact your AKAIMS Administrator. When complete, click the Go button to proceed. User Manual v2.0 Note: The first time you enter your assigned Password and PIN you are asked to change them. Be sure to make the new Password and PIN at least 6 characters long, including both letters and numbers. Do not use proper names or old PIN or passwords from another system. For security reasons, you will periodically be prompted to change your Password and PIN. To manage the security of your identity, a password has been assigned to you. As you type it in, you will see small dots for each character. This is to prohibit someone from seeing your password and using it to pose as you to access the system. DHSS / Behavioral Health Page 18 AKAIMS User Manual v2.0 After clicking the Go button next to the password, you will be asked for your PIN. To manage the security of your identity, a Personal Identification Number (PIN) has been assigned to you. It will be lengthy and will not appear to follow any convention. This is to prohibit someone from being able to guess your PIN, and access the system as you. After entering your PIN, click the Go button. DHSS / Behavioral Health Page 19 AKAIMS User Manual v2.0 Change facility Introduction AKAIMS requires each user to have access to a Facility for their session. Most users will be associated with one Agency, but some users may be associated with multiple Facilities. The facility you select defines the boundaries within which you can work within this session. All facilities under your agency are listed in the New Facility list and you are asked to pick one for this specific session. Only the facilities that you are authorized to access will show up in this list. Everything you do (with the exception of client search) with a client record would be within the limits of this facility that you select. Note: The agency you are attempting to access must have already had at least one facility registered. You will have been granted access to one or more facilities by your agency administrator when you were granted access rights to the system. If you do not see the correct facility listed in the dropdown list, contact you agency administrator for assistance. Note: You may use Cancel and go to the menu on the left. However, you will not be able to access any client records until you have picked a facility. 1. Click the downward facing arrow for the drop-down box next to New Facility to select the Facility for the session. 2. Click the Go button. You will enter the AKAIMS Home screen. DHSS / Behavioral Health Page 20 AKAIMS User Manual v2.0 Home Page Introduction Once you have successfully logged on to the system, you will be taken to the homepage. From this page, all interactions with the system begin. Here you will notice any system generated messages and announcements. You are able to interact with your organization’s schedule; viewing, adding, editing, and deleting scheduled events and appointments. Announcements 1. Click the Review link to access the Announcements screen. If authorized, you will have the ability to edit announcements. If you are not, you may view the details of the Announcement. DHSS / Behavioral Health Page 21 AKAIMS Schedule Users may enter their schedule information in AKAIMS, including posting reminders for themselves. Another person with the authority to access staff schedules may set appointments with clients or create other appropriate events in staff schedules. User Manual v2.0 Note: The announcements section allows AKAIMS authorized users to broadcast information to the AKAIMS community. Your agency’s System Administrator can only send information to their assigned agency. The State IT staff can send information to all AKAIMS users. 1. Click the Edit Schedule link to access the Schedule screen. Double click in the time slot for which you want to enter an event. This will open the Schedule Edit screen. If your event will last more than the length of one time slot, click and drag to highlight the number of slots needed for your event. DHSS / Behavioral Health Page 22 AKAIMS User Manual v2.0 2. The Staff field is a read-only system provided field. When you move a staff name into the Selected Staff Member box, the screen will bring up the other staff member’s calendar information as well as yours. This allows you to check availability for scheduling purposes. (You will need the appropriate access permissions to do this.) DHSS / Behavioral Health Page 23 AKAIMS Client Profile & Related screens Path: Client List → Client Profile User Manual v2.0 Note: Before adding a client to AKAIMS, you should first check to see if they have already been added to the system by another user. Scan the list for their name or variants of their name. For instance, a client named “Robert” may have earlier represented himself as “Bob”. Prerequisite: You must have; 9 Logged into the system. 9 Selected a facility. Introduction The Client Profile is the first screen of several in a series that contains clientspecific information in the system. It is used to collect and display general and demographic information about a client. When the Client Profile is saved, AKAIMS generates a unique client identifier for your client. All of the client's records created in AKAIMS are associated with the unique client identifier. Because AKAIMS is a client-driven system, you must first either create or select an existing client before you can perform any client-related activities. You can search for clients by entering a variety of search criteria on the Client Search screen, which is displayed when you click Client List from the left menu. DHSS / Behavioral Health Page 24 AKAIMS User Manual v2.0 Client Search Path: Client List Prerequisite: You must have; 9 Logged into the system. 9 Selected a facility. Introduction To begin working with clients you must perform a search to avoid creation of duplicate clients. If the client does not already exist, a new client profile needs to be created. By entering specific search criteria, you can also use this screen to generate lists of clients matching specific criteria, such as gender, facility, etc. 1. Click Client List from the left menu. Your screen will refresh to display the Client Search/Client List screen. 2. Clicking the Go button without entering search criteria will return a listing of all clients for your agency. DHSS / Behavioral Health Page 25 AKAIMS User Manual v2.0 3. Type any known information in any search field to narrow your results to a smaller, more refined list of clients. o Exact Match: This type of search is to find records which match the search criteria exactly. o Wild Card: Wild Card searches are very useful in cases where you do not have the exact value or spelling of a parameter. It allows you to search with two or more characters. To use the wildcard search, place an asterisk after, before, or on both sides of the known characters of the parameter. The search will return all values with a string of characters which match the characters you entered. D*- will return anything starting with D or d. *s- will return anything ending in s. o Date range: This search allows you to specify a date range. For instance, 01/01/2000:12/31/2000 returns any record with a date in the calendar year 2000. DHSS / Behavioral Health Page 26 AKAIMS User Manual v2.0 Client List Path: Client List Prerequisite: You must have; 9 Logged into the system. 9 Selected a facility. 9 Searched for a client record. Introduction The search method you used will result in a list of clients who have met the search criteria. These will be displayed in the Client List section of the screen. 1. Notice that in the Client List section of the screen, there are two links under the Actions column. To view and effect changes to a client’s profile and related screens, click Profile. To view and effect changes to a client’s activities, click Activity List. DHSS / Behavioral Health Page 27 AKAIMS User Manual v2.0 2. If you click the Profile link, your screen will refresh and resemble the following graphic. 3. You may now begin actively working with this client’s record. 4. Depending on your needs, clicking the indicated buttons produces the following results. o Cancel: Brings you back to the Client Search/Client List screen, populated with the results of your previous search. o Save: Saves the Client Profile screen contents. This is used if any profile items have been altered. In this case, Save will change the Last Updated By and the Last Updated Date fields. o Finish: Brings you back to the Client Search/Client List screen, populated with the results of your previous search. o Next: Saves the screen contents and takes you to the Alternate Names screen. DHSS / Behavioral Health Note: By default, all agency facilities are included in the initial search. Note: Ensure All Clients is selected in the Case Status Field to ensure both active and closed records are checked. Note: You can also export the entire client list by clicking on the export hyperlink. The list will be exported to Excel; if you do not have Excel, the system will prompt you to open it in another available document type. Page 28 AKAIMS User Manual v2.0 Add Client Path: Client List → Client Profile Prerequisite: You must have; 9 Logged into the system. 9 Selected a facility. 9 Searched for a client record. Note: If you enter an inaccurate SS# you may go back and correct it without creating a new client or losing any information on the client. The AKAIMS Client ID requires that you have the correct last 4 digits of the SS# in order to avoid possibly linking the information to someone else. Introduction If your search results indicate that the client you’re working with has not previously been entered, you can add a new client record. 1. New clients can be added via the Client Search / Client List screen. To do this, click the Add Client link. This will open the Client Profile screen with blank fields you will complete for the new client. All highlighted yellow are fields required as part of the minimal data set. DHSS / Behavioral Health Page 29 AKAIMS 2. First Name: Enter the client’s first name. 3. Last Name: Enter the client’s last name. User Manual v2.0 Note: If you enter an inaccurate SS# you may go back and correct it without creating a new client or losing any information on the client. The AKAIMS Client ID requires that you have the correct last 4 digits of the SS# in order to avoid possibly linking the information to someone else. 4. Gender: If you enter “Female”, Maiden Name becomes a required yellow field (see Maiden Name below). 5. DOB (Date of Birth): MM/DD/YYYY or MM/DD/YY. 6. SSN (Social Security Number): The system automatically adds hyphens. If you enter an inaccurate SSN, you may go back and correct it without creating a new client or losing any information on the client. If the SSN is not provided or is unknown, users should enter 99999-9999. 7. Medicaid #: Enter the actual Medicaid number. If it is unknown or there is none, enter “N/A”. 8. Maiden Name: Enter the client’s or the mother’s maiden name. If the maiden name is unknown, enter “None”. DHSS / Behavioral Health Page 30 AKAIMS User Manual v2.0 9. Depending on your needs, clicking the indicated buttons produces the following results: o Cancel: Brings you back to the Client Search/Client List screen, populated with the results of your previous search. o Save: Saves the Client Profile screen contents and populates the following gray fields: • AKAIMS Client ID • Record Created By • Last Updated By • Created Date • Last Updated Date o Finish: Brings you back to the Client Search/Client List screen, populated with the results of your previous search. o Next: Saves the screen contents and takes you to the Alternate Names screen. DHSS / Behavioral Health Page 31 AKAIMS User Manual v2.0 Alternate Names Path: Client List → Client Profile → Alternate Names Prerequisite: You must have; 9 Logged into the system. 9 Selected a facility. 9 Searched and retrieved an existing client record or created and saved a client profile if none existed. Introduction Enter any other names the client uses. These names may be collected from the client, their driver’s license, Social Security Card, or other form of ID. Collect as many names as you can to ensure they are not entered in the system as a new client. In a later Client Search these could assist in locating the correct client profile, avoiding the possibility of creating duplicate clients. 1. Click the Add Alternate Name link. This will refresh the Alternate Names screen and the First Name field becomes yellow. DHSS / Behavioral Health Page 32 AKAIMS User Manual v2.0 2. Enter the client’s alternate name information; First Name, Middle Name, and/or Last Name. 3. If you wish to add multiple Alternate Names, Click the Save button to store the name in the Alternate Name table at the top of the screen. You must click the Add Alternate Name link after each entry to insert additional names. Note: If at some point you need to review or delete an entry in the Alternate Names table, click either the Review or the Delete link in the table. Note: It is best practice to get a copy of the person’s license for verification of address, spelling of name, etc. 4. Depending on your needs, clicking the indicated buttons produces the following results: o o o o o Cancel: Brings you back to the Alternate Names screen. The fields are populated with their original contents. Save: Refreshes the Alternate Names screen with your changes, which are then displayed in the appropriate columns. Finish: Saves the Alternate Names screen contents and populates the appropriate columns with the information provided. You are then returned to the Client Search/Client List screen. Previous: Takes you back to the Client Profile screen. Next: Brings you to the Additional Information screen. DHSS / Behavioral Health Page 33 AKAIMS User Manual v2.0 Additional Information Path: Client List → Client Profile → Additional Information Prerequisite: You must have; 9 Logged into the system. 9 Selected a facility. 9 Searched and retrieved an existing client record or created and saved a client profile if none existed. Note: Many of the fields on this screen are federally required. Ethnicity is also federally defined. The client’s Community of Origin is from where they came to seek services at your agency, not place of birth. You may need to come back to fill in Special Needs after an assessment has been done on the client. Be sure to fill in all of the color highlighted fields. Introduction This screen is used to capture the client’s federally-mandated race and ethnicity information, as well as any special needs. Additionally, English Fluency, Education, and Veteran Status are required fields. 1. Select the appropriate entry(s) from the Races box then click the mover button pointing right. The selected item(s) should now appear in the Selected Races box. If you notice that an item was selected in error, simply select that item from the Selected Races box and click the left mover button. The item will be removed from the list of Selected Races and returned to the Races box. DHSS / Behavioral Health Page 34 AKAIMS User Manual v2.0 2. Select the appropriate entry from the Ethnicity drop-down list. 3. Select the appropriate entry(s) from the Special Needs box then click the mover button pointing right. Your selected items should now appear in the Selected Special Needs box. If you notice that an item is selected in error, simply select that item from the Selected Special Needs box and click the left mover button. The item will be removed from the list of Selected Special Needs and returned to the Special Needs box. 4. Select the appropriate entry from the English Fluency drop-down list. 5. Select the appropriate entry from the Primary Language drop-down list. 6. Choose Yes, No, or leave blank for the Interpreter Needed field. 7. Select the appropriate entry from the Education drop-down list. 8. Select the appropriate entry from the Veteran status drop-down list. 9. Select the appropriate entry from the Citizenship drop-down list. DHSS / Behavioral Health Page 35 AKAIMS User Manual v2.0 10. Depending on your needs, clicking the indicated buttons produces the following results: o o o o o Cancel: Brings you back to the Client Profile screen with no changes being made to the Additional Information screen. Save: Saves the Additional Information screen contents. Finish: Brings you back to the Client Profile screen. Note that the gray Last Updated By and Last Updated Date fields are changed. Previous: Brings you back to the Alternate Names screen. Next: Saves the screen contents and takes you to the Contact Information screen. DHSS / Behavioral Health Page 36 AKAIMS Add Collateral Contacts Path: Client List → Client Profile → Collateral Contacts User Manual v2.0 Note: The Treatment Team screen and Other Numbers Screen contain an “Add Contact” hyperlink that will bring you back to this screen, thus allowing you to add additional collateral contacts. You may add the client here to get their name on the Tx Team. Prerequisite: You must have; 9 Logged into the system. 9 Selected a facility. 9 Searched and retrieved an existing client record or created and saved a client profile if none existed. Introduction This screen is where you can document the details about all people associated with the client who are outside the agency. 1. Click the Add Contact link. 2. Fill in all dark yellow fields. If you have selected Other in the Relation field, use Notes to indicate what that relationship is. DHSS / Behavioral Health Page 37 AKAIMS User Manual v2.0 3. The Can Contact field asks the client if the provider can contact this person for any reason. If you need a signed consent to be able to contact this person, complete the consent in the consent module and then select Yes on this screen for the Consent On File field. Be sure to ALWAYS verify that there is an active consent before releasing any information on a client. Note: Be sure to enter at least one phone number for the contact, AKAIMS will not let you save the screen contents until you do so. 4. Depending on your needs, clicking the indicated buttons produces the following results: o o o o o Cancel: Brings you back to the Collateral Contacts screen. Save: Refreshes the Collateral Contacts screen with your changes displayed in the appropriate columns. Finish: Saves the Collateral Contacts screen contents and populates the appropriate columns with the information provided. You are then returned to the Client List screen. Previous: Takes you back to the Contact Info screen. Next: Saves the screen contents and takes you to the Other Numbers screen. DHSS / Behavioral Health Page 38 AKAIMS User Manual v2.0 Other Numbers Path: Client List → Client Profile → Other Numbers Prerequisite: You must have; 9 Logged into the system. 9 Selected a facility. 9 Searched for and retrieved an existing client record or created and saved a client profile if none existed. Introduction On this screen use the Number Type and Number to document client legal numbers. Select the number type from the drop down list and enter the appropriate number. The following types of numbers can be entered: 1. Court Case 2. OBISIS Number (Dept of Corrections—the title of this should be changed soon) 3. Juvenile Court Number 4. Click the Add Other Number link. 5. Enter other information as needed. 6. Click on Add Other Number link for each new entry. You can save multiple numbers for a client. DHSS / Behavioral Health Page 39 AKAIMS User Manual v2.0 7. Depending on your needs, clicking the indicated buttons produces the following results: o o o o Cancel: Brings you back to the Other Numbers screen. Save: Refreshes the Other Numbers screen with your changes displayed in the appropriate columns. Finish: Saves the Other Numbers screen contents and populates the appropriate columns with the information provided. You are then returned to the Client Profile screen. Previous: Takes you back to the Collateral Contacts screen. DHSS / Behavioral Health Page 40 AKAIMS User Manual v2.0 History Path: Client List → Client Profile → History Prerequisite: You must have; 9 Logged into the system. 9 Selected a facility. 9 Searched and retrieved an existing client record or created and saved a client profile if none existed. Introduction The History screen displays a list of all users and any screens they have accessed in the system. It also tracks any changes that have been made to the client’s electronic chart. If you make a change to the client chart— like a change of address on the Address screen, you may delete the old address there, but the old address will still show in the History along with the creation of the new one. DHSS / Behavioral Health Page 41 AKAIMS User Manual v2.0 Non-Episode Contact Path: Client List → Client Profile → NonEpisode Contact Prerequisite: You must have; 9 Logged into the system. 9 Selected a facility. 9 Searched and retrieved an existing client record or created and saved a client profile if none existed. Introduction A Non-Episode Contact allows you to document the details about contacts with the client when the client is not actively enrolled in treatment. Use the tab key to move from field to field. Using this screen generates data for the quarterly state reports. 1. To document a Non-Episode Contact, choose this option from the sub-menu then click the Add New Non-Episode Contact Record link. DHSS / Behavioral Health Page 42 AKAIMS User Manual v2.0 2. Contact Date: This field is auto populated with today’s date. 3. Time (hh:mm): Enter the time for the contact this note will represent. You must enter the time in the format that is asked for on the screen, any deviation from this format will be rejected and you will not be able to save or finish. 4. Contacted By: This Drop-Down List (DDLB) is populated with the names of the staff associated with the agency that is logged into. 5. Referral: Select an appropriate entry from the DDLB; Formal, Informal, or None. 6. Referring Agency: Enter the referring agency if any. 7. Referred By – First Name: Enter the first name of the person who made the referral if any. 8. Referred By – Last Name: Enter the last name of the person making the referral if any. 9. Referred By – Phone: Enter the phone number f the person making the referral if any. 10. Problem Description: Enter information that would best describe the problem(s) the client is experiencing. 11. Comments: Enter appropriate information. DHSS / Behavioral Health Page 43 AKAIMS User Manual v2.0 12. Contact Reason: Select an appropriate entry from the DDLB; Crisis, Other, Seeking Admission, Seeking Info, Education of referral. 13. If Other, Specify: If Other is selected in the Contact Reason field this field will become active, otherwise it is grayed out. If editable enter appropriate text for this field. 14. Location: Select an appropriate entry from the DDLB. 15. Contact Type: Select an appropriate entry from the DDLB. 16. Duration (hrs): Enter the number of hours for the contact, this field will not accept fractions of hours; whole numbers only. 17. Severity Rating: Select an appropriate entry from the DDLB. 18. Created Date: this field auto populates with the current date and time. 19. Follow-Up Steps: Select an appropriate entry from the list box and move the item(s) to the FollowUp Steps Selected box by clicking the mover button pointing to the right. DHSS / Behavioral Health Page 44 AKAIMS User Manual v2.0 20. Follow-Up Steps Selected: This box will list those items that were selected from the Follow-Up Steps box. To remove items; select them and click the mover arrow pointing left. 21. Depending on your needs, clicking the indicated buttons produces the following results: o o o Cancel: Brings you back to the Non-Episode List screen. Save: Refreshes the NonEpisode Contact Notes screen. Finish: Saves the NonEpisode Contact Notes screen contents. You are then returned to the NonEpisode List screen, the list contents are updated with the information provided. DHSS / Behavioral Health Page 45 AKAIMS User Manual v2.0 Client Intake Path: Client List → Select or Create Client → Activity List → Episode List Prerequisite: You must have; 9 Logged into the system. 9 Selected a facility. 9 Searched and retrieved an existing client record or created and saved a client profile if none existed. Introduction There are several fields that are required to meet reporting requirements. A new client will not have had a previous Intake completed, while a previously served client may have one. Intake is the beginning of a new treatment episode. Using the AKAIMS Client ID, all records associated with this course of treatment are logged to produce a history of care. 1. Select Episode List from the navigation menu on the left of the screen. This will take you to the Episode List screen for the new client. 2. Click the Start New Episode link. DHSS / Behavioral Health Page 46 AKAIMS User Manual v2.0 3. When your screen refreshes you will be taken to the Intake screen. Some fields will be pre-populated: Intake Facility, Intake Staff, Case Status, and Intake Date. These fields can be changed to suit the user’s needs. Check the information in the top portion of the screen, and edit if appropriate. Select or enter appropriate information. Initial Contact will usually be by Appointment unless a client has an extended Phone conversation with a counselor. 4. Intake Facility: The Intake Facility field is pre-populated based on the facility that you were logged into when you added the new client profile. The drop-down list box will include only those facilities that have been set up for your agency. 5. Intake Staff: Pre-populated and defaults to the name of the Agency Staff currently logged into the system. The drop-down list box will include only those staff who have been set up in your agency. 6. Case Status: Defaults to open active when starting a new episode. 7. Initial Contact: Select the appropriate entry from the dropdown list. 8. Village: Select the appropriate entry from the drop-down list. Village refers to where the client DHSS / Behavioral Health Page 47 AKAIMS User Manual v2.0 lives. 9. Intake Date: Defaults to today’s date.This field is editable; you have the ability to change the dates to the date when the actual intake occurred. 10. Source of Referral: Select the appropriate entry from the dropdown list. 11. Pregnant: Only required if Female was selected in the Gender field on the Client Profile screen. 12. Due Date: Only required if the Pregnant field selection is Yes in the Client Intake screen. 13. Injection Drug User: Select the appropriate choice from the dropdown list, Yes, No, or No Response. Choose yes if the client has injected drugs in the past six (6) months 14. Presenting Problems Primary: Select the appropriate choice from the drop-down list. 15. Presenting Problems Secondary: Select the appropriate choice from the drop-down list. 16. Presenting Problems Tertiary: Select the appropriate choice from the drop-down list. 17. Presenting Problem (In Client’s Own Words): Complete the free form text box. DHSS / Behavioral Health Page 48 AKAIMS User Manual v2.0 18. Special Initiative: Select the Special Initiative(s) if any apply, from the left-hand list, and then click the mover button pointing right. Multiple selections can be made at the same time by holding down the control key and selecting these items. 19. Depending on your needs, clicking the indicated buttons produces the following results: o o o o Cancel: Will take you back to the Episode List screen if the client had not been previously admitted. If the client had been previously admitted, you will be taken back to the Client Activity List screen. Save: Saves the Intake Case Information screen contents. Finish: Saves the Intake Case Information screen and you will be taken back to the Client Activity List screen. When you click Finish, you have opened a case for the client. Next: Saves the screen contents and takes you to the AK Status Review List screen. DHSS / Behavioral Health Page 49 AKAIMS User Manual v2.0 Client Status Review Path: Client List → Select or Create Client → Activity List → Outcomes → CSR Prerequisite: You must have; 9 Logged into the system. 9 Selected a facility. 9 Searched and retrieved an existing client record or created and saved a client profile if none existed. 9 Completed a client intake. Introduction The CSR measures the level of client function in several different life domain areas. Questions 9 and 11 both deal with the client’s financial domain. One is for youth and the other is for adults. One or the other will be displayed as a dark yellow, required field depending on the age of the client. As the responses are recorded you will see the generation of a score. Some questions intentionally have no score, e.g. #16 asking if the client has children under 18. The client will lose 10 points if custody of the children has been lost. The client will regain those points if they have regained custody and stayed in compliance with custody requirements. DHSS / Behavioral Health Page 50 AKAIMS 1. From the Activity List, select Outcomes, and then select AK Status Review, which will take you to the AK Status Review List screen. If you have completed any reviews previously you will see them listed here. 2. Click the Add New AK Status Review Record link to create a new review. You will be placed in the Identifying Info screen, the first of four related screens. DHSS / Behavioral Health User Manual v2.0 Note: If you accidentally select the wrong client, do NOT click the close button at the top right corner. The close button (red X) will close your browser and lock you out of the session. Use the menu at the far left to return to Client List. Note: As a Condition the Grant Award, all agencies receiving grants from the Division of Behavioral Health are required to complete a Client Status Review (CSR) on every client at intake, every 3 months for children, 6 months for adults, and at discharge. Page 51 AKAIMS 3. Type of Review: Select the appropriate choice from the dropdown list. User Manual v2.0 Note: You can click the PDF Version link to download a paper copy of the form. 4. Method of Administering: Select the appropriate choice from the drop-down list. 5. Administered By: This field defaults to display the name of the staff currently using AKAIMS. If necessary, a different name can be selected from the drop-down list. 6. Date Administered: The default setting for this field is today’s date. 7. Continue to enter the responses on the subsequent screens until you have entered all the required fields. DHSS / Behavioral Health Page 52 AKAIMS User Manual v2.0 8. Depending on your needs, clicking the indicated buttons produces the following results: o o o o Cancel: Will take you back to the Client Activity List screen. Save: Saves the AK Status Review screen contents. Finish: Will save the AK Status Review screen and you will be taken back to the Client Activity List screen. Previous: Returns you to the General Questions screens. DHSS / Behavioral Health Page 53 AKAIMS User Manual v2.0 Alaska Screening Tool (AST) Alaska co-occurring screener Path: Client List → Select or Create Client → Activity List → AK Screening Tool Prerequisite: You must have; 9 Logged into the system. 9 Selected a facility. 9 Searched and retrieved an existing client record or created and saved a client profile if none existed. 9 Completed a client intake episode. Introduction You have completed the client’s Profile and Intake screens (and perhaps the Client Status Review—located under Outcomes on the menu). Go to Activity List and select Screening from the menu. DHSS / Behavioral Health Page 54 AKAIMS User Manual v2.0 Note: Instructions on how to complete the Screening Tool can be downloaded as a PDF file by clicking on the Instructions menu item under Screening. Note: A paper version of the screening tool can be downloaded as a PDF by clicking on the Paper Version menu item under Screening. DHSS / Behavioral Health Page 55 AKAIMS User Manual v2.0 Substance Abuse Screening 1. Identify the Screener: You will be placed in the Substance Abuse screen. Your name will appear at the top. If another staff member has administered the screening on paper and you are entering in the data, select the name of the administrator in the Administered By field. If necessary, change the date to the day it was administered. 2. Yes / No / No Response Questions: Ask the questions of the client, and record their Yes, No, or No Response answers. When you have recorded their responses, click the Next button. DHSS / Behavioral Health Page 56 AKAIMS User Manual v2.0 3. Depending on your needs, clicking the indicated buttons produces the following results: o o o o Cancel: Will take you back to the client’s Client Activity List screen. Save: Saves the Substance Abuse Screening screen contents. Finish: Will save the Substance Abuse Screening screen contents and you will be taken back to the Client Activity List screen. Next: Saves the screen contents and takes you to the Mental Health Screening for… screen. DHSS / Behavioral Health Page 57 AKAIMS User Manual v2.0 Mental Health Screening 1. Identify the Screener: You will be placed in the Mental Health screen. Your name will appear at the top. If another staff member administered the screening on paper and you are entering in the data, select the name of the administrator in the Administered By field. If necessary, change the date to the day it was administered. 2. Yes / No / No Response Questions: Ask the questions of the client, and record their Yes, No, or No Response answers. When you have recorded their responses, click Next to complete the remaining mental health screening questions. DHSS / Behavioral Health Page 58 AKAIMS User Manual v2.0 3. Depending on your needs, clicking the indicated buttons produces the following results: o o o o o Cancel: Will take you back to the client’s Client Activity List screen. Save: Saves the Substance Abuse Screening screen contents. Finish: Will save the Substance Abuse Screening screen contents and you will be taken back to the Client Activity List screen. Previous: You may use the previous button to amend or review responses in previous sections. Next: Saves the screen contents and takes you to the Traumatic Brain Injury Screening for… screen. DHSS / Behavioral Health Page 59 AKAIMS User Manual v2.0 Traumatic Brain Injury Screening 1. Identify the Screener: You will be placed in the Traumatic Brain Injury screen. Your name will appear at the top. If another staff member administered the screening on paper and you are entering in the data, select the name of the administrator for the Administered By field. If necessary, change the date to the day it was administered. 2. Read-only fields: You will notice that many fields are grayed-out upon entering this screen. That is because some questions are not relevant unless the client has answered Yes to having a severe blow to the head, a concussion, or treatment for a head injury. If the client answered Yes, the fields will become write-enabled for you to record more information related to the injury. If they answer No, they will remain grayed-out. DHSS / Behavioral Health Page 60 AKAIMS User Manual v2.0 3. Depending on your needs, clicking the indicated buttons produces the following results: o o o o o Cancel: Will take you back to the client’s Client Activity List screen. Save: Saves the Traumatic Brain Injury Screening screen contents. Finish: Will save the Traumatic Brain Injury Screening screen contents and you will be taken back to the Client Activity List screen. Previous: You may use the previous button to amend or review responses in previous sections. Next: Saves the screen contents and takes you to the Screening Outcomes screen. DHSS / Behavioral Health Page 61 AKAIMS User Manual v2.0 Screening Outcomes 1. Identify the Screener: You will be placed in the Screening Outcomes screen. Your name will appear at the top. If another staff member administered the screening on paper and you are entering in the data, select the name of the administrator for the Administered By field. If necessary, change the date to the day it was administered. 2. Problem Area Questions: Outcomes of Yes / No / Blank will be automatically populated based on previous responses provided in the screeners. 3. Follow-up Details: You must provide Follow-up Details for all Yes responses. Also, if during the course of reviewing the Alaska Screening Tool with the client you and the client decide to change some of the responses on the screen, indicate what was changed and why in the Follow-Up Details text box. This is for your clinical use. DHSS / Behavioral Health Page 62 AKAIMS User Manual v2.0 4. Depending on your needs, clicking the indicated buttons produces the following results: o o o o Cancel: Will take you back to the client’s Client Activity List screen. Save: Saves the Screening Outcomes screen contents. Finish: Will save the Screening Outcomes screen contents and you will be taken back to the Client Activity List screen. Previous: You may use the previous button to amend or review responses in previous sections. DHSS / Behavioral Health Page 63 AKAIMS User Manual v2.0 Client Admission Path: Client List → Select or Create Client → Activity List → Admission Read-Only Fields: At the top of the screen in the tan box you will see the Client Name, Referral Source, Gender, DOB, County of Residence, Race, Ethnicity and Age. Most of this data was entered via the Client Profile. To edit inaccuracies, return to Client Profile. Prerequisite: You must have; 9 Logged into the system. 9 Selected a facility. 9 Searched and retrieved an existing client record or created and saved a client profile if none existed. 9 Completed a client intake episode. Introduction One of the objectives in the admission process is to document the entry conditions for the client. The first three questions refer to whether the client is determined to have a substance abuse (SA), mental health (MH) or traumatic brain injury (TBI) problem. The adjacent question documents the Basis for this Determination. These items are pre-populated from the completed Screening module. You can override the Basis for Decision if in your Assessment you found evidence contrary to that found in the Screener. DHSS / Behavioral Health Page 64 AKAIMS 1. Select Admission in the Activity List sub-menu. You will be placed in the Admission Profile, the first of 9 admission screens. 2. Treated Here For: This field specifies what problem area will be addressed at the current facility, again, based on your Assessment. Your selection in this field will determine what information you need to complete in the rest of the Admission module. If SA or MH/SA is selected, then the ASAM Level of Care will be required at Admission and Discharge. User Manual v2.0 Note: If you accidentally select the wrong client, do NOT click the close button at the top right corner. The close button (red X) will close your browser and lock you out of the session. Use the menu at the far left to return to Client List. Note: If SA or MH/SA is selected, then the ASAM Level of Care will be required at Admission and Discharge. Type: Select 3. Admission the appropriate entry from the dropdown list. This field is used in reporting to indicate the number of referrals versus new admissions or re-admissions. Be certain to check for previous episodes and alternate names before determining if this client is being re-admitted or not to this facility. 4. Admissions Staff: The Admission Staff field is pre-populated based on the user’s name that entered the client record. In some circumstances, the admission record may be entered into AKAIMS by someone other than the admitting counselor. This field may be changed by selecting another staff member from the drop-down list. DHSS / Behavioral Health Page 65 AKAIMS 5. Admission Date: The Admission Date field is pre-populated based on the current date. In some circumstances, the admission record may be entered into AKAIMS on a different day. This default value may be overridden so that the correct date may be recorded. 6. Screening/Admission for Concerned Person: Choose Yes or No from the drop-down list. This field is where you record whether the client is the person with a substance use problem, or whether the client is the significant other, parent, child or other close type of relationship to the person with the substance use problem. This is a federally required field that collects information about what they refer to as “Codependent/Collateral”. User Manual v2.0 Note: The questions at the bottom of the screen are used to collect the number of times the client has been treated in various settings. An episode is defined as having an admission and a discharge, and is therefore for closed cases only. When you enter the # of Prior admissions, this is the number of prior admissions at your agency. Note: All required fields are highlighted in yellow color. The status of the module in the Activity List will remain In Progress until all required fields are filled. You cannot enter services until the Intake and Admission Modules are completed. 7. Number of prior SA TX Admissions: enter a number in this field. 8. Number of non-TX SA Related Hospitalizations in the Past six Months: entering number in this field. 9. Number of Prior MH TX Admissions: enter a number in this field. 10. Number of prior MH Hospitalizations: enter a number in this field. DHSS / Behavioral Health Page 66 AKAIMS User Manual v2.0 11. Clients Reported Health Status: choose one item from the drop-down list. 12. Pharmacotherapy Planned: choose yes or no from the drop-down list. 13. On Psychotropic: choose yester now from the drop-down list. 14. Depending on your needs, clicking the indicated buttons produces the following results: o o o o Cancel: Will take you back to the client Activity List screen. Save: Saves the Admission screen contents. Finish: Saves the Admission screen contents and takes back to the client’s Activity List screen, a new entry will have been made in the Client Activity List for Admission. Next: Saves the screen contents and takes you to the Financial Info and Household Composition screen. DHSS / Behavioral Health Page 67 AKAIMS User Manual v2.0 Financial Info and Household Composition Path: Client List → Activity List → Admission → Financial/Household Prerequisite: You must have; 9 Logged into the system. 9 Selected a facility. 9 Searched and retrieved an existing client record or created and saved a client profile if none existed. 9 Completed a client intake episode. Introduction This section captures some basic federally required information about the client’s financial situation. More detailed questions about their living circumstance may be captured in the assessment phase. 1. Employment Status: Select the appropriate entry from the dropdown list. 2. Primary Income Source: Select the appropriate entry from the dropdown list. 3. Expected Payment Source: Select the appropriate entry from the dropdown list. DHSS / Behavioral Health Page 68 AKAIMS User Manual v2.0 4. Insurance Type: Select the appropriate entry from the dropdown list. 5. Occupation: Select the appropriate entry from the drop-down list. 6. Annual Household Income: Select the appropriate entry from the dropdown list. 7. The information for income from SSI/SSDI is input under the Other Income Sources which allows you to pick multiple options. 8. Household Composition: This field provides information about who if anyone lives with the client. Select the appropriate entry from the dropdown list. 9. Marital Status: Select the appropriate entry from the dropdown list. 10. Living Arrangement: Living Arrangement is about where the client lives and not with whom they live. Select the appropriate entry from the drop-down list. 11. Number of People Living With Client: Enter a numeric value. 12. Number of Children in Residential Setting: Refers to children living in a residential treatment setting with a parent who is the client. Enter a numeric value. DHSS / Behavioral Health Page 69 AKAIMS User Manual v2.0 13. Number of Children in the Household: Enter a numeric value. 14. Number of Children in a Residential Setting Receiving Services: Refers to children living in a residential treatment setting with a parent who is the client and the child is receiving services. Enter a numeric value. 15. Depending on your needs, clicking the indicated buttons produces the following results: o o o o o Cancel: Will take you back to the client Activity List screen. Save: Saves the Financial Info and Household Composition screen contents. Finish: Saves the screen contents and takes you back to the client Activity List screen. Previous: Will take you back to the Substance Abuse screen. Next: Saves the screen contents and takes you to the Youth Admission screen. DHSS / Behavioral Health Page 70 AKAIMS Youth Admission Path: Client List → Activity List → User Manual v2.0 Note: Use the Add School Contact hyperlink to add the details of the School Contact in the Client Profile. Admission → Youth Prerequisite: You must have; 9 Logged into the system. 9 Selected a facility. 9 Searched and retrieved an existing client record or created and saved a client profile if none existed. 9 Completed a client intake episode. Introduction This section is only required if the client is under 18 years old. 1. Client is a Student: Choose Yes or No from the Drop Down List (DDL). 2. Client is a Gang Member: Choose Yes or No from the DDLB. 3. Guardian Name: Select the appropriate entry from the dropdown list. 4. Guardian Type: Select the appropriate entry from the dropdown list. 5. School Name: Enter appropriate text. DHSS / Behavioral Health Page 71 AKAIMS User Manual v2.0 6. School Contact: Select the appropriate entry from the dropdown list. If the contact name you are looking for is not on the list, click the Add School Contacts link and provide the appropriate information. 7. Attending Grade: Enter the grade the student is currently attending. 8. Current GPA: Enter the students current GPA if known. 9. Days Suspended in Last 30 Days: Enter the number of days the student has been suspended in the last 30 days, if any. 10. Days Absent in Last 30 Days: Enter the number of days the student has been absent in the last 30 days, if any. 11. The POSIT is a youth dual assessment tool. You can use paper version of the POSIT scale and then manually enter any POSIT scores here. Use the scores from the last administration of the test. DHSS / Behavioral Health Page 72 AKAIMS User Manual v2.0 12. Depending on your needs, clicking the indicated buttons produces the following results: o o o o o Cancel: Will take you back to the client Activity List screen. Save: Saves the Youth Admission screen contents. Finish: Saves the screen contents and takes you back to the client Activity List screen. Previous: Will take you back to the Financial Info and Household Composition screen. Next: Saves the screen contents and takes you to the Substance Abuse screen. DHSS / Behavioral Health Page 73 AKAIMS Substance Abuse Path: Client List → Activity List → Admission → Substance Abuse Prerequisite: You must have; 9 Logged into the system. 9 Selected a facility. 9 Searched and retrieved an existing client record or created and saved a client profile if none existed. 9 Completed a client intake episode. User Manual v2.0 Note: You cannot have a Secondary substance without a Primary. Note: This screen is only required if SA or MH/SA was selected in the Treating Here For field in the Admission Profile screen. Note: This screen is NOT required if MH was selected in the Treating Here For field in the Admission Profile screen. Introduction This section should be completed for all substance use clients. This screen is limited to clinicians and counselors whose access allows them to enter data. Once you select a primary substance, you must complete the associated Severity, Frequency and Method sections. 1. Primary Substance: Select the appropriate entry from the dropdown list. 2. Primary Severity: Select the appropriate entry from the dropdown list. 3. Primary Frequency: Select the appropriate entry from the dropdown list. DHSS / Behavioral Health Page 74 AKAIMS User Manual v2.0 4. Primary Method: Select the appropriate entry from the dropdown list. 5. Secondary Substance: Choose the appropriate entry for the drop-down list. 6. Secondary Severity: Select the appropriate entry from the dropdown list. 7. Secondary Frequency: Select the appropriate entry from the dropdown list. 8. Secondary Method: Select the appropriate entry from the dropdown list. 9. Tertiary Substance: Select the appropriate entry from the dropdown list. 10. Tertiary Severity: Select the appropriate entry from the dropdown list. 11. Tertiary Frequency: Select the appropriate entry from the dropdown list. 12. Tertiary Method: Select the appropriate entry from the dropdown list. 13. At what age did the client FIRST use of substances indicated: You must also complete this field if a substance has been indicated in the upper section of this form. DHSS / Behavioral Health Page 75 AKAIMS User Manual v2.0 14. # of DAYS since the LAST use of the substance listed above: You must also complete this field if a substance has been indicated in the upper section of this form. 15. # of Days Abstinent in Last 30 Days: This section captures the client’s current problems related to substance use. It is recommended that you provide detailed comments if the client has experienced problems in the past 30 days. 16. # of Days in Support Group in Last 30 Days: Enter a numeric value. 17. # of Days Attended AA/NA/Similar Meetings in Last 30 Days: Enter a numeric value. 18. Does Client Currently Use Tobacco: Select the appropriate entry from the drop-down list. 19. Other Addictions: You may use the mover box to document additional addictions. DHSS / Behavioral Health Page 76 AKAIMS User Manual v2.0 20. Depending on your needs, clicking the indicated buttons produces the following results: o o o o o Cancel: Will take you back to the client Activity List screen. Save: Saves the Substance Abuse screen contents. Finish: Saves the screen contents and takes you back to the client Activity List screen. Previous: Will take you back to the Youth Admission screen. Next: Saves the screen contents and takes you to the Legal History screen. DHSS / Behavioral Health Page 77 AKAIMS User Manual v2.0 Legal History Path: Client List → Activity List → Admission → Legal Prerequisite: You must have; 9 Logged into the system. 9 Selected a facility. 9 Searched and retrieved an existing client record or created and saved a client profile if none existed. 9 Completed a client intake episode. 1. Select the appropriate values from the Legal Status box and click the right pointing arrow. This will place your selection in the Selected Legal Status box. To remove a selection from the Selected Legal Status box highlight the selection and click the left pointing arrow. 2. Remaining text boxes: Indicate the number of incidences as appropriate to the question by typing in a number in the appropriate text box. DHSS / Behavioral Health Page 78 AKAIMS User Manual v2.0 3. Depending on your needs, clicking the indicated buttons produces the following results: o o o o o Cancel: Will take you back to the client Activity List screen. Save: Saves the Legal screen contents. Finish: Saves the screen contents and takes you back to the client Activity List screen. Previous: Will take you back to the Substance Abuse screen. Next: Saves the screen contents and takes you to the Assessment Scores screen. DHSS / Behavioral Health Page 79 AKAIMS Assessment Scores (ASI, ASAM) User Manual v2.0 Note: If you don’t use this screen just skip it by selecting ASAM on the menu. Path: Client List → Activity List → Admission → Assmt Scores Prerequisite: You must have; 9 Logged into the system. 9 Selected a facility. 9 Searched and retrieved an existing client record or created and saved a client profile if none existed. 9 Completed a client intake episode. 9 The client must have been admitted Introduction You may manually enter the latest ASI scores in the table. If the ASI was administered through AKAIMS, you may use the Upload Latest Assessment Score link to auto-populate the scores. You may clear the scores using the Clear Assessment Scores link. The Clear Assessment Scores link will not delete the scores. It will only remove them from view until you load them again. DHSS / Behavioral Health Page 80 AKAIMS User Manual v2.0 1. Depending on your needs, clicking the indicated buttons produces the following results: o Cancel: Will take you back to the client Activity List screen. o Save: Saves the Assessment Scores screen contents. o Finish: Saves the screen contents and takes you back to the client Activity List screen. o Previous: Will take you back to the Legal screen. o Next: Saves the screen contents and takes you to the ASAM screen. DHSS / Behavioral Health Page 81 AKAIMS User Manual v2.0 ASAM – PPC2R After doing the paper version of the ASAM, select the appropriate Level of Risk and Level of Care for each ASAM dimension and provide necessary comments for your selection. If the Recommended Level of Care and the Actual Level of Care do not match, provide an explanation by choosing an appropriate entry in the Clinical Override box. Note: If SA or MH/SA is selected in the Treating Here For field on the Admission Profile screen, then Level of Care is required for each of the six dimensions 1. Depending on your needs, clicking the indicated buttons produces the following results: o Cancel: Will take you back to the client Activity List screen. o Save: Saves the ASAM screen contents. o Finish: Saves the screen contents and takes you back to the client Activity List screen. o Previous: Will take you back to the Assessment Scores screen. o Next: Saves the screen contents and takes you to the Diagnosis screen. DHSS / Behavioral Health Page 82 AKAIMS User Manual v2.0 Client Diagnosis Path: Client List → Activity List → Admission → Diagnosis Prerequisite: You must have; 9 Logged into the system. 9 Selected a facility. 9 Searched and retrieved an existing client record or created and saved a client profile if none existed. 9 Completed a client intake episode. Introduction By selecting the diagnosis at the bottom of the screen, you may populate the upper table. Select the Axis in the Select Diagnosis Level. The Select / Edit Diagnosis box will appear where you can select the specific diagnosis for that Axis. You may have multiple AXIS I, II, II and IV, but only one AXIS V. 1. Click the Add New Diagnosis Level link. DHSS / Behavioral Health Page 83 AKAIMS User Manual v2.0 2. Select Diagnosis Level: Select the appropriate entry from the dropdown list. This will make additional fields available to further define the client diagnosis. DHSS / Behavioral Health Page 84 AKAIMS User Manual v2.0 3. Select /Edit Diagnosis: Select the appropriate entry from the dropdown list. 4. Priority: Select the appropriate entry from the drop-down list. 5. Specifier: Enter any additional information you want to link to the diagnosis. 6. You may use the Review and Delete links to edit and delete the entries. 7. Depending on your needs, clicking the indicated buttons produces the following results: o Cancel: The Cancel button will refresh the Diagnosis screen, making no changes. o Save: Click the Save button to add more diagnoses. This will add the current diagnosis to the table at the top of the screen. o Finish: Clicking the Finish button will take you back to the Admission Profile screen. o Previous: Clicking the Previous button will take you to the ASAM screen. o Next: Clicking the Next button will take you to the Program Enrollment screen. DHSS / Behavioral Health Page 85 AKAIMS User Manual v2.0 Program Enrollment Path: Client List → Activity List → Admission → Program Enroll Prerequisite: You must have; 9 Logged into the system. 9 Selected a facility. 9 Searched and retrieved an existing client record or created and saved a client profile if none existed. 9 Completed a client intake episode. Introduction This module allows you to record the client’s enrollment in and transition through multiple programs within a facility. The client may be enrolled in more than one program at once. By default the program enrollment section is blank and the program specific fields are grayed out. 1. Click the Add Enrollment link to enroll the client in a new program. You may also use the Review link to change previously entered enrollment information. When your screen refreshes you will see that some fields become required. DHSS / Behavioral Health Page 86 AKAIMS User Manual v2.0 2. Select the appropriate facility which will then populate the appropriate Programs under Program Name. 3. Program Name: Select the appropriate entry from the dropdown list. 4. Currently Enrolled: Choose Yes or No. 5. Start Date: the default setting for this field is today’s date, you may alter this by deleting the current date and entering a new one. 6. Program Staff: Select the appropriate entry from the dropdown list. 7. Notes: Enter appropriate notes pertaining to this client’s enrollment for this program. 8. Click the Save button to save this information and remain on the same screen. The enrolled program will be listed in the program enrollment table in the top section of the screen. This enrollment can now be reviewed and edited or deleted. 9. To create additional program enrollments for this client click the Add Enrollment link and provide the required information. DHSS / Behavioral Health Page 87 AKAIMS User Manual v2.0 10. When a client has completed a program, or for some other reason is no longer in a program, you must “dis-enroll” the client. You do this by clicking on Review and then changing the Yes in Current Enrolled field to No. This will open the Tx Completed, End Date and Reason for Termination fields. Complete these fields and save. You will now see the End Date in the list at the top of the screen. 11. Depending on your needs, clicking the indicated buttons produces the following results: o Cancel: Will clear the entered data. o Save: Will save the data you just entered in the table at the top. o Finish: Will save the Program Enrollment information and you will be returned to the client’s Admission Profile screen. o Previous: Returns you to the Diagnosis screen. o Next: Saves the screen contents and takes you to the Treatment Team screen. DHSS / Behavioral Health Page 88 AKAIMS User Manual v2.0 Treatment Team Path: Client List → Activity List → Admission → Treatment Team Note: if you entered this information in the Admissions module it will pre-populate here. Prerequisite: You must have; 9 Logged into the system. 9 Selected a facility. 9 Searched and retrieved an existing client record or created and saved a client profile if none existed. 9 Completed a client intake episode. Introduction This screen allows you to record all the members of the treatment team. The treatment team may be composed of staff and non-staff persons. 1. When you enter this screen, the lower half is grayed-out. Click on the link for Add Team Member to add one treatment team member at a time. DHSS / Behavioral Health Page 89 AKAIMS 2. Staff Name: Select the appropriate entry from the drop-down list. 3. Non Staff Name: Select the appropriate entry from the dropdown list. 4. Click on the link for Add Contacts which will take you to the Collateral Contacts screen. You can add the details there, save, and then come back here to add the person to the team. User Manual v2.0 Note: The drop-down list for non-staff member comes from the contact list setup in the Client Profile. If you do not see the name of the person you are trying to add to the team, you need to first add that person to Collateral Contacts. Note: You can select either a Staff Name or a Non Staff Name for the Treatment Team, not both. 5. Role/Relation: Select the appropriate entry from the dropdown list. 6. Review Member: Indicates whether the team member is a member of the Treatment Plan review team. Choose “Yes” or “No”. 7. Select Yes or No for the Primary Care Staff field to indicate if the person you are adding to the team is the client’s primary staff member. There is only one Primary Care Staff. 8. Select Yes or No for the Deny Access to Client Records. If you select yes this member of the treatment team will not be able to view the client’s record. When complete click the Save button and see the person’s name added to the Team Member Name list. 9. Use the Add Team Member link to add additional members. DHSS / Behavioral Health Page 90 AKAIMS User Manual v2.0 10. Start Date. Defaults to today’s date. The date the record was created. This field is editable; you have the ability to change the dates to the date when the actual intake 11. End Date: Enter an End Date for the Treatment Team or Group, format the date mm/dd/yy or mm/dd/yyyy. Note: The current version of AKAIMS does not automatically include the client on the Tx Team. To add the client, go to Collateral Contacts and add the client to the drop down. Then you may add the client to the list. To create a Group you must have Access authority to enter the Agency module. If you have this authority, you may go to the Agency module and click on Create Group. The process there is the same as on this screen except that you create a Group Name. 12. To add a group of people to a client’s treatment team at one time, click the Assign Group link. The groups are created in the Agency module. 13. Click the desired group from the Available Groups list and click the right pointing arrow to select the group. Then click the Assign button, this will add all of the individuals from the group to the Treatment Team. 12. Depending on your needs, clicking the indicated buttons produces the following results: o Finish: Will save the TX Team information and you will be returned to the client’s Activity List screen. DHSS / Behavioral Health Page 91 AKAIMS User Manual v2.0 Client Wait List Path: Client List → Select or Create Client → Activity List → Wait List Prerequisite: You must have; 9 Logged into the system. 9 Selected a facility. 9 Searched and retrieved an existing client record or created and saved a client profile if none existed. 9 Completed a client intake episode. Introduction This module allows you to document the placement of a client on a waiting list for a specific program. 1. To access this module, go the Activity List menu and then click the Wait List menu item. 2. This will bring you to the Wait List, which shows all previously wait listed entries for this client. Click the Put client on Waiting for Another Program link. DHSS / Behavioral Health Page 92 AKAIMS User Manual v2.0 3. When your screen refreshes you will be take to the Client Wait List screen. 4. Select Program, choose from the available listed programs. 5. Wait Start Date, defaults to today’s date, change if necessary. 6. Added to Wait List By, choose from the available listed Staff names. 7. Receiving Interim Services, choose Yes or No. DHSS / Behavioral Health Page 93 AKAIMS User Manual v2.0 Notes Path: Client List → Select or Create Client → Activity List → Notes → Encounters Prerequisite: You must have; 9 Logged into the system. 9 Selected a facility. 9 Searched and retrieved an existing client record or created and saved a client profile if none existed. 9 Completed a client intake episode. 9 Client must have been admitted. 9 Client must be enrolled in a program. Introduction This module allows you to document a variety of notes, each of which serves different purposes. 1. To access this module, go the Activity List menu and then click the Notes menu item. 2. This will bring you to the Notes List which shows all previously entered Miscellaneous and Billable Notes. To review an existing Note click on Review in the Actions column. DHSS / Behavioral Health Page 94 AKAIMS User Manual v2.0 3. To print notes that have previously been entered click the Print Notes link. This will bring up a screen to enter Note Date. This allows you to print notes by date. If you leave the note date blank all notes will be included. Click Go. This will bring up a Note List. To Print this list click Export. This will export the notes into Excel to be printed. DHSS / Behavioral Health Page 95 AKAIMS User Manual v2.0 Miscellaneous 1. To add a new Miscellaneous Note click the Add New Misc. Notes Record link. This will bring you to the screen to enter the details. If you select the Add New Billable Note link you will be taken to the Encounter Note Profile screen to start a Billable Note. 2. Author Name, Author Title, and Created Date and Time, all prefilled by the system. 3. Note Type: Select the appropriate entry from the drop-down list. If you select the Missing / Injured / Deceased option, the field Was Report Sent to State becomes available for you to select the option of Yes or No. 4. The Date will pre-populate with the current date. This can be changed as needed. Enter the Start Time, End Time, and Duration. 5. To set an alert related to this Note click the blue Mark Alert link. This will highlight the client’s name in red on the Client List. To remove the alert click the Remove Alert link. 6. Write a one line Summary in the Summary text box. This summary will be shown in the Notes List on the previous screen. DHSS / Behavioral Health Page 96 AKAIMS User Manual v2.0 7. Write the detailed note in the text box for Notes. There is unlimited space to type in this box. 8. Depending on your needs, clicking the indicated buttons produces the following results: o Cancel: Will return you to the Notes List screen with no new addition to the list. o Save: Will save the data you just entered. Your screen will refresh and all fields will be grayed out. o Finish: Will save the Miscellaneous Note and you will be returned to the client’s Notes List screen. DHSS / Behavioral Health Note: Once a Miscellaneous Note is entered and saved, it cannot be edited, it can only be reviewed for details. This is not a billable note. Page 97 AKAIMS User Manual v2.0 Encounters Profile 1. To add a new Treatment Encounter Note click the Add New Treatment Encounter Record link. This will refresh your screen where you can enter the encounter details. This is where you would document the details of the services that are actually delivered. DHSS / Behavioral Health Page 98 AKAIMS User Manual v2.0 2. Select Note Type from the dropdown box. 3. Choose Yes or No for the Billable field. 4. Select the specific service being delivered in the drop down box for Service Code/Description. (see Appendix B for an expanded list) 5. Select the appropriate Program Name from the drop-down list (DDL). Select the appropriate Service Location from the dropdown list (DDL). 6. Choose Yes, No, or leave blank for the Emergency field. 7. TX Start Date is the date that treatment started. Use the format mm/dd/yyyy or mm/dd/yy. 8. TX Start Time is the time the treatment began. 9. TX End Time is the time in which the treatment finished. 10. Use the Duration field to document the length of time the treatment has taken or will take. Use the adjacent field to denote the unit in which the Duration field is measured. 11. IDC 9 Diagnosis for This Treatment: Choose from the dropdown list for the Primary, Secondary, and Tertiary fields. DHSS / Behavioral Health Page 99 AKAIMS User Manual v2.0 12. Rendering Staff information comes pre-filled based on your login. It can be changed if the person who delivered the service was different from the person documenting it here. 13. Supervising Staff: Select an appropriate item from the drop down box. 14. Select an appropriate item from the drop down box for Referring Physician. 15. Depending on your needs, clicking the indicated buttons produces the following results: o Cancel: Will take you back to the client’s Treatment Encounter List. o Save: Saves the Encounter Profile screen contents. o Finish: Will save the Encounter Profile screen and you will be taken back to the client’s Treatment Encounter List screen. o Next: Saves the screen contents of the Encounter Profile screen and takes you to the Encounter Note screen. DHSS / Behavioral Health Page 100 AKAIMS User Manual v2.0 Encounter Note 1. On this screen you can select the Goals and Objectives from the treatment plan that was addressed in this session. If you are not currently using the Treatment Plan in AKAIMS, you must be sure to include in your narrative a discussion of all the objectives and interventions you covered in your session, along with other necessary narrative elements. 2. To add a Goal or Objective click the Add Goals or Add Objectives link. You can select the relevant goals or objectives by clicking the box to the left of the appropriate goal or objective. Write a detailed Narrative in the text box provided. The Narrative box will contain some prompts about appropriate note content depending on which of the note types you selected on the top of the previous screen. DHSS / Behavioral Health Page 101 AKAIMS User Manual v2.0 3. Depending on your needs, clicking the indicated buttons produces the following results: o Cancel: Will take you back to the client’s Treatment Encounter List. o Save: Saves the Encounter Notes screen contents. o Finish: Will save the Encounter Notes screen and you will be taken back to the client’s Treatment Encounter List screen. The goals or objectives you selected will be listed under the Associated Goals or Associated Objectives. o Next: Saves the screen contents of the Encounter Notes screen and takes you to the Services screen. DHSS / Behavioral Health Page 102 AKAIMS User Manual v2.0 Services 1. The next screen will be the Services screen. This screen allows you to document ancillary services and medications rendered to the client during the period covered by the dates you entered on the previous screen. 2. Ancillary Services Rendered: Select the applicable ancillary services in this box. You may hold the Ctrl key down to make multiple selections at the same time. When you select the item, its background will turn dark. After selecting all the appropriate services click the right pointing arrow for the Ancillary Services to move to the Ancillary Services Rendered box. To unselect a service click on it in the Ancillary Services Rendered box and click the left pointing arrow. 3. Medications: Select the Medications as applicable in the left hand box. Then select the Frequency from the drop-down box in the middle. After that click the right pointing arrow for the Medications to move to the Medications Rendered box on the right. To unselect a Medication click on it in the Medications Rendered box and click the left pointing arrow. DHSS / Behavioral Health Page 103 AKAIMS User Manual v2.0 4. Depending on your needs, clicking the indicated buttons produces the following results: o Cancel: Will take you back to the client’s Treatment Encounter List. o Save: Saves the Ancillary Services screen contents. o Finish: Will save the Ancillary Services screen and you will be taken back to the client’s Treatment Encounter List screen. o Previous: Saves the screen contents and takes you to the Encounter Notes screen. DHSS / Behavioral Health Page 104 AKAIMS User Manual v2.0 Discharge Path: Client List → Select or Create Client → Activity List → Discharge Prerequisite: You must have; 9 Logged into the system. 9 Selected a facility. 9 Searched and retrieved an existing client record or created and saved a client profile if none existed. 9 Completed a client intake episode. Note: The client cannot be discharged until the state reporting requirements have been met. Note: You cannot discharge a client who is still enrolled in a program. Note: If SA or MH/SA is selected in the Treating Here For field on the Admission Profile screen, then Level of Care is required for each of the six dimensions. Introduction Once the Client Profile, Intake and Admission are completed you are free to discharge the client. When you attempt to access the Discharge menu item the system will check to see if the client is currently enrolled in any Programs. If you have not dis-enrolled the client from all programs, you will automatically be routed back to the Enrollment screen where you must take the steps to end a client’s enrollment(s). Once all enrollments are ended, return to the Discharge screen. You will be placed in the Discharge Profile screen, the first of 6 Discharge screens. DHSS / Behavioral Health Page 105 AKAIMS User Manual v2.0 Profile 1. The system will populate the Discharge Date with the current date. You may override this date by manually typing in another date. 2. Discharge Staff: Select an appropriate item from the drop down box. 3. Reason: Select an appropriate item from the drop down box. 4. Disposition: Select an appropriate item from the drop down box. 5. Date of Last Contact: Enter an appropriate date for this field. 6. Discharge Referral: Select an appropriate item from the drop down box. 7. ASAM Criteria: For each dimension, the level of care and level of risk determined at Intake will be in read-only format. On this screen, provide the Level of Care and Level of Risk determination at Discharge for each dimension. DHSS / Behavioral Health Page 106 AKAIMS User Manual v2.0 8. Depending on your needs, clicking the indicated buttons produces the following results: o Cancel: Will take you back to the Client Activity List screen. o Save: Saves the Discharge Profile information. o Finish: Will save the Discharge Profile screen and you will be taken back to the Client Activity List screen. o Next: Saves the screen contents and takes you to the Legal screen. DHSS / Behavioral Health Page 107 AKAIMS User Manual v2.0 Legal 1. This screen allows the user to enter discharge information regarding the client’s previous and current legal status. 2. Legal Status: Select the appropriate items from the Legal Status mover box and click the right pointing arrow. This will place your selection(s) in the Selected Legal Status box. 3. To remove a selection from the Selected Legal Status box highlight the selection and click the left pointing arrow. 4. # of Arrests in Past 30 Days: Enter an appropriate number. DHSS / Behavioral Health Page 108 AKAIMS User Manual v2.0 5. Depending on your needs, clicking the indicated buttons produces the following results: o Cancel: Will take you back to the Client Activity List screen. o Save: Saves the Discharge Legal information. o Finish: Will save the Discharge Legal screen and you will be taken back to the Client Activity List screen. o Previous: Saves the screen contents and takes you to the Discharge Profile screen. o Next: Saves the screen contents and takes you to the Status screen. DHSS / Behavioral Health Page 109 AKAIMS User Manual v2.0 Status This screen allows the user to compare admission and discharge information for various domains of information. 1. The Status At Admission is prepopulated from the admission module. Complete all the information for the Status At Discharge by selecting the appropriate response(s) from the drop down lists. 2. Relationship Status: Select an appropriate item from the drop down box. 3. Living Arrangement: Select an appropriate item from the drop down box. 4. Employment Status: Select an appropriate item from the drop down box. 5. Occupation: Select an appropriate item from the drop down box. 6. Primary Income Source: Select an appropriate item from the drop down box. DHSS / Behavioral Health Page 110 AKAIMS User Manual v2.0 7. Depending on your needs, clicking the indicated buttons produces the following results: o Cancel: Will take you back to the Client Activity List screen. o Save: Saves the Discharge Status information. o Finish: Will save the Discharge Status screen and you will be taken back to the Client Activity List screen. o Previous: Saves the screen contents and takes you to the Legal screen. o Next: Saves the screen contents and takes you to the Diagnosis screen. DHSS / Behavioral Health Page 111 AKAIMS User Manual v2.0 Diagnosis Diagnoses entered at Admission will appear in the Diagnosis at Admission list at the top of the screen for reference purposes. 1. To enter Diagnosis at Discharge, click the Add New Diagnosis Level link. DHSS / Behavioral Health Page 112 AKAIMS User Manual v2.0 2. Select Diagnosis Level: The Select/Edit Diagnosis box will appear as dark yellow, you can select the specific diagnosis for the Axis. 3. Once you have made a selection in the Select Diagnosis Level drop-down list; the Select/Edit Diagnosis, Priority, and Specifier fields become visible. 4. Choose an appropriate item from the Select/Edit Diagnosis dropdown list. 5. Choose an appropriate item from the Priority drop-down list. 6. Type in the Specifier if any. DHSS / Behavioral Health Page 113 AKAIMS User Manual v2.0 7. Depending on your needs, clicking the indicated buttons produces the following results: o Cancel: Will take you back to the Client Activity List screen. o Save: Saves the Diagnosis screen and updates the Diagnosis At Discharge table. o Finish: Will save the Diagnosis screen and you will be taken back to the Diagnosis Profile screen. o Previous: If you have clicked the Add New Diagnosis Level link and provided any information, the system will ask you to save of cancel the changes before you can proceed. o Next: Saves the screen contents and takes you to the Substance Abuse screen. DHSS / Behavioral Health Page 114 AKAIMS User Manual v2.0 Substance Abuse This screen is used to capture the substances used by the client at time of discharge. 1. Primary: Substance will be prepopulated based on the data that was put into the Admissions module. 2. Secondary: Substance will be prepopulated based on the data that was put into the Admissions module. 3. Substances will be pre-populated from the Admission module. Edit the Severity, Frequency, and Method as needed to reflect the status at Discharge. You cannot have a secondary substance without a primary substance. 4. Discharge Parameters must be filled in as appropriate. DHSS / Behavioral Health Page 115 AKAIMS User Manual v2.0 5. Depending on your needs, clicking the indicated buttons produces the following results: o Cancel: Will take you back to the Client Activity List screen. o Save: Saves the Discharge Profile information. o Finish: Will save the Discharge Profile screen and you will be taken back to the Client Activity List screen. o Next: Saves the screen contents and takes you to the Treatment Summary screen. DHSS / Behavioral Health Page 116 AKAIMS User Manual v2.0 Treatment Summary 1. The Presenting Problem will prepopulate from the Intake module. 2. Answer the questions at the top of the screen as appropriate. Fields highlighted in light yellow are required for state reporting. 3. Complete the field on Strengths, Abilities, Needs, etc. 4. The Program Enrollment table will pre-populate if the information was entered in the Program Enrollment screen under the Admission module. 5. Services Rendered will prepopulate if the information was entered in the Encounter module. 6. Complete the Recommendations field. DHSS / Behavioral Health Page 117 AKAIMS User Manual v2.0 7. Depending on your needs, clicking the indicated buttons produces the following results: o Cancel: Will take you back to Discharge Profile. o Save: Saves the TX Summary information. o Finish: Will Discharge the client. o Previous: Saves the screen contents and takes you back to the Substance Abuse screen. 8. Client is Discharged: Click the Yes or No button to eigther close the casee or not. DHSS / Behavioral Health Page 118 AKAIMS Consent Path: Client List → Select or Create Client → Activity List → Consent User Manual v2.0 Note: This section is only applicable to AKAIMS users who are making a client referral. Prerequisite: You must have; 9 Logged into the system. 9 Selected a facility. 9 Searched and retrieved an existing client record or created and saved a client profile if none existed. 9 Completed a client intake. 9 A signed Release of Information (ROI) / consent form on file. Introduction If a client needs to be referred to another agency, the client’s written consent is required before sharing any information with outside agencies. Consents are also known as a Release of Information (ROI). In AKAIMS, you will need to setup Disclosure Agreements first for each agency with whom you intend to share client information. 1. Click Consent from the left menu. This will display the Client Consent List where you will see any existing consents. 2. To create a new consent, click the Add New Client Consent Record link. DHSS / Behavioral Health Page 119 AKAIMS User Manual v2.0 3. This will open the Client Disclosure Agreement screen. 4. The Entities with Disclosure Agreements field is populated with a list of Agencies for which an Agency Disclosure Agreement has been created. (See the Agency Disclosure section of this manual.) 5. If you select an agency from the Entities with Disclosure Agreements drop down list box (DDLB), it will populate the Disclosed To Agency field with that agency’s name. If no agency is selected in the DDLB, then the Disclosed To Agency field will contain the text Non-System Agency by default. 6. Disclosed To Agency: Populated with a list of agencies that use AKAIMS. If it becomes necessary to disclose client information with agencies that are not in the DDLB, you must select Non System Agency. DHSS / Behavioral Health Page 120 AKAIMS User Manual v2.0 7. Disclosed to Entity (Non System Agency): If Non-System Agency was selected in the Disclosed to Agency field, enter the name of the agency in this field. 8. Purpose of Disclosure: Enter the reason for disclosure. 9. Consent Date: Format MM/DD/YYYY. Defaults to today’s date. This date can be changed if necessary. 10. Has the client signed the paper agreement form: Choose Yes or No. If No is entered, then you will not be able to complete a referral for the client to another agency, and the Signed Consents DDLB on the Client Referral screen will contain no information. DHSS / Behavioral Health Page 121 AKAIMS User Manual v2.0 11. Consent Options: An expiration date must be associated with EACH body of data selected for consent. Select the option in the left hand box, click on the appropriate choice from the Consent Expires Upon options, and then click on the right pointing arrow to move the selections to the right hand box. Remember that if you hold down the ctrl key, you may select more than one option at a time. o Discharge: The consent will expire based on the date of discharge + the number of days entered. You may enter 0 here. o Date Signed: The consent will expire based on the Consent Date + the number of days entered. You may enter 0 here. o Other Event: The consent will expire based on some specified event. The user must specify the date of expiration and fill in the Description box. o Criminal Justice Condition: The consent will expire based on a criminal justice condition. The user must specify the date of expiration. DHSS / Behavioral Health Page 122 AKAIMS User Manual v2.0 12. Description: This field becomes required only if the Other Event or the Crim Just Cond radial buttons are selected when attempting to move items from the Client Information Options list box to the Disclosure Selection list box. 13. Comments: Comments may be entered in this text box. 14. Disclosure Selection: This section is populated in the following ways; if there is an existing Disclosure Agreement between agencies this field will by default contain those items selected in that agreement and begin counting the days to expire from the value of the Consent Date field. The field contents can be modified to suit the client and agency needs by selectively adding or removing items from the list. If any option was moved into the Disclosure Selection field by mistake, highlight it and then click the left arrow mover box to remove the item(s). The selection(s) will then be returned to the Client Information Options box. DHSS / Behavioral Health Page 123 AKAIMS User Manual v2.0 15. Depending on your needs, clicking the indicated buttons produces the following results: o Cancel: Will take you back to the Client Consent List screen with no new entry being listed. o Save: Saves the Client Consent screen contents. o Finish: Will save the Client Consent screen contents and you will be taken back to the client’s Client Consent List screen. DHSS / Behavioral Health Page 124 AKAIMS User Manual v2.0 Referrals Path: Client List → Select or Create Client → Activity List → Referrals Prerequisite: You must have; 9 Logged into the system. 9 Selected a facility. 9 Searched and retrieved an existing client record or created and saved a client profile if none existed. 9 Completed a client intake. 9 Verified a signed written consent from client exists. Introduction A referral is required to send information about a client to another agency. Referrals cannot occur in AKAIMS if there is no active consent on record. Once the system contains an active consent/Release of Information (ROI) then the host agency can elect to share approved client information with another agency. It is important to note that information is shared for a finite period of time and that the receiving agency is then responsible to collect and note case information that is pertinent to their treatment of the client referred. Information gathered and compiled by the receiving agency is not automatically shared back to the host agency. DHSS / Behavioral Health Page 125 AKAIMS 1. Once the client is selected, click Referrals from the left menu. The Referrals menu item can be found under the expanded Activity List menu. User Manual v2.0 Note: There are two methods of initiating a referral. There is a known problem when using the yellow underlined Create Referral Using this Client Disclosure Agreement link. Please do not use this link. In the future, this link will become fully functional and a notice will be sent to that effect. Until then, use the Referrals menu item on the left side of the screen. 2. Your screen will refresh and you will be shown any existing referrals for the client. 3. To add a referral for the client, click the yellow underlined Add New Client Referral Record link. DHSS / Behavioral Health Page 126 AKAIMS User Manual v2.0 4. This will open the Client Referral screen. 5. Referred By: o Agency: Pre-populated with the agency you are currently logged into, and read only. o Facility: Pre-populated with the facility you are currently logged into, and read only. o Staff Member: Prepopulated with the name of the user currently logged into the system, and read only. o Program: This Drop-down list box (DDLB) is populated with the programs in which the client is enrolled. o Reason: This DDLB is populated with a selection of possible reasons for which the client is being referred. o If Other: Free form text box for the reason for referral. o Comments: Free form text box that allows space for comments associated with the referral. o Referral Status: Select the appropriate entry from the drop down list. o Date of Referral: Enter the date for the referral. This DHSS / Behavioral Health Page 127 AKAIMS User Manual v2.0 field defaults to blank, allowing you to enter a date other than today. o Created Date: Date the referral record was created. This field is populated when the yellow Add New Client Referral Record link is selected on the previous screen. 6. Referred To: o Signed Consents: Populated with a list of agencies and/or NonSystem Agencies for which an Agency Disclosure Agreement has been created. When you select an agency from this list it will auto-fill the Agency field below and grayed out. If the Signed Consents DDLB is o Agency: If the Signed Consents DDLB is left blank the default entry for this field will be Non System Agency. o Facility: Populated with the Signed Consent and Agency Disclosure Agreement. o Staff Member: This dropdown list box is populated with a list of staff members that are associated with the DHSS / Behavioral Health Page 128 AKAIMS User Manual v2.0 agency to which the client is being referred. o Consents Granted: This list box is populated by the consents granted in the Agency Disclosure Agreement and/or the Client Consent Agreement and is not populated until the Referred To section of this screen is completed and the Save or Finish buttons are clicked. 7. Depending on your needs, clicking the indicated buttons produces the following results: o Cancel: Will take you back to the Client Referral screen with no new entry being listed. o Save: Saves the Client Referral screen contents and populates the Consents Granted list box. o Finish: Will save the Client Referral screen contents and populates the Consents Granted list box; you will be taken back to the client’s Client Referral List screen. Notice that the new client referral is placed in the table. DHSS / Behavioral Health Page 129 AKAIMS User Manual v2.0 Agency Disclosure Agreement Path: Agency → Relationships → Disclosure Prerequisite: You must have; 9 Logged into the system. 9 Selected a facility. Introduction Agency Disclosure Agreements are useful in that they allow for the establishment of a relationship between agencies with a view towards the future collaboration of treatment and ease the sharing of client information. These relationships once set-up can be revoked or modified to suit the users needs. 1. Click the Add Agency Disclosure Domain Record link. 2. This will open the Agency Disclosure Domain screen. DHSS / Behavioral Health Page 130 AKAIMS User Manual v2.0 3. Disclosing Agency: This drop down list box (DDLB) will populate with the name of the agency to which you are logged into. Select the name of the agency from which disclosures are to be made. 4. Receiving Agency: The Default setting for this field is Global Policy or Non System. The DDLB will contain a listing of all agencies that are using AKAIMS. Select from this list the agency to which you will be disclosing client information. 5. Receiving Entity (Non System Agency): If the receiving agency is not in the system, enter the name of that agency here. 6. Global Policy (Available to All Agencies): Choose Yes or No. the default setting for this field is Yes. 7. Always Verify Consent? Choose Yes or No. DHSS / Behavioral Health Page 131 AKAIMS User Manual v2.0 8. Consent Options: Select the item(s) to be shared from this list. 9. Consent Expires Upon: o Choose either Discharge or Date Signed. o Enter a number. This number represents the number of days that the shared information will be accessible. An example is that if Discharge radio button was selected and 30 was entered in the +Days field, the information would be available for 30 days after the client was discharged. If no number is entered here then the shared information will not be available upon the client’s discharge. o Click the Right Mover Button. This will move the Consent Options item selection into the Selected Options list box with the appropriate expiration count. DHSS / Behavioral Health Page 132 AKAIMS User Manual v2.0 10. Depending on your needs, clicking the indicated buttons produces the following results: o Cancel: Will take you back to the Agency Disclosure Domain List screen with no new entry being listed. o Save: Saves the Agency Disclosure Domain screen contents. o Finish: Will save the Agency Disclosure Domain screen contents and you will be taken back to the client’s Agency Disclosure Domain List screen. Notice that the new agency disclosure is placed in the table. DHSS / Behavioral Health Page 133 AKAIMS User Manual v2.0 Appendix A – Job Function Roles and Attributes. Job Function Roles Role Attributes Agency Administrator No Assigned Role Attributes Case ReOpen No Assigned Role Attributes Clinical (Full Access) Admission (Full Access) Admission (Read Only) Assessments (Full Access) Assessments (Read Only) Client Profile (Full Access) Client Profile (Read Only) Consent (Full Access) Consent (Read Only) Discharge (Full Access) Discharge (Read Only) Intake (Full Access) Intake (Read Only) Non-Treatment Team Access Notes (Full Access) Notes (Read Only) Outcomes (Full Access) Outcomes (Read Only) Referrals (Full Access) Referrals (Read Only) Screening (Full Access) Screening (Read Only) TxEncounter (Full Access) TxEncounter (Read-Only) TxMedications (Full Access) TxMedications (Read-Only) TxPlan (Full Access) TxPlan (Read Only) Wait List (Full Access) Wait List (Read Only) DHSS / Behavioral Health Comment When select Clinical (Full Access) Clinical (Read Only) is automatically moved to the Assigned Job Function Roles Page 134 AKAIMS Clinical (Read Only) User Manual v2.0 Code Table Administrator Admission (Read Only) Assessments (Read Only) Client Profile (Read Only) Consent (Read Only) Discharge (Read Only) Intake (Read Only) Notes (Read Only) Outcomes (Read Only) Referrals (Read Only) Screening (Read Only) TxEncounter (Read-Only) TxMedications (Read-Only) TxPlan (Read Only) Wait List (Read Only) No Assigned Role Attributes Facility Administrator No Assigned Role Attributes RSS User No Assigned Role Attributes Staff Administrator No Assigned Role Attributes State Licensing Administrator State Reporting No Assigned Role Attributes No Assigned Role Attributes WITS Administrator No Assigned Role Attributes DHSS / Behavioral Health When select WITS Administrator automatically assigned job function roles of: Agency Administrator Code table Administrator Staff Administrator Page 135 AKAIMS User Manual v2.0 Appendix B – Encounters Service Code Descriptions 80100 - Drug Screen; Multiple Drug Classes 90801 - Psychiatric diagnostic interview examination 90802 - Interactive psychiatric diagnostic interview examination using play equipment, physical devices, language interpreter, or others 90804 - Individual Psychotherapy - Insight Oriented 90805 - Psychotherapy w/Med Mgmt 20-30 min 90806 - Individual Psychotherapy 1hr 90807 - Psychotherapy w/Med Mgmt 45-50 90808 - Individual psychotherapy, insight oriented, behavior modifying and/or supportive, in an office or outpatient facility, approx. 75 to 80 minutes, face-to-face with the patient. 90810 - Individual Psychotherapy - Interactive 90846 - Family Psychotherapy w/o patient 1hr 90847 - Family psychotherapy (conjoint psychotherapy) with patient present 90849 - Multiple-Family group psychotherapy 90853 - Group psychotherapy (other than multi-family group) 90862 - Pharmacologic Management 90862HF - Medication Management (for Substance Abuse Medicaid) 90885 - Psychiatric evaluation of hospital records, other psychiatric reports, psychometric and/or projective tests, and other accumulated data for medical diagnostic purposes. 90887 - Treatment Team Advisory 90889 - Preparation of forms 90899 - Miscellaneous 96100 - Psychological Testing 99205 - Psychiatric Assessment, new patient 99245 - Office consultation for a new or established patient, which requires: a comprehensive history; a comprehensive examination; and medical decision making of high complexity. 99371 - Telephone call by a physician to patient or for consultation or medical management or for coordinating medical management with other health care professionals. 99372 - Telephone call, intermediate 99373 - Telephone call, complex or lengthy 99402 - Crisis Intervention 30min 99404 - Crisis Intervention 1hr CDABF - Family involvement training, counseling CDACM - Coping skills development assistance, individual CDADK - Substance Abuse Therapy CDAEP - Behavior modification training, social skills, individual, counseling DHSS / Behavioral Health Page 136 AKAIMS User Manual v2.0 CDAEQ - Social skills assistance group each 60 minutes CDAJC - Coping support skill, counseling CDAKQ - Social skills assistance group each 15 minutes CDBAP - Psychological testing, brief assessment, Testing, evaluation and interpretation CDBAQ - Psychological testing, comprehensive, Testing, evaluation and interpretation CDBAS - Neuropsychological testing, Testing, evaluation and interpretation H0001 - Alc and/or drug assessment H0002 - Behavioral health screening to determine eligibility for admission to treatment program H0003 - Alc and/or drug screening; laboratory analysis of specimens for presence of alcohol and/or drugs H0004 - Behavioral health counseling and therapy, per 15 min. H0005 - Alc &/or drug services; group counseling by a clinician H0006 - Alc &/or drug services; case management H0007 - Alc &/or drug services; crisis intervention (outpatient) H0008 - Alc &/or drug services; sub-acute detoxification (hospital inpatient) H0009 - Alc &/or drug services; acute detoxification (hospital inpatient) H0010 - Alc &/or drug services; sub-acute detoxification (residential addiction program inpatient) H0011 - Alc &/or drug services; acute detoxification (residential addiction program inpatient) H0012 - Alc &/or drug services; sub-acute detoxification (residential addiction program outpatient) H0013 - Alc &/or drug services; acute detoxification (residential addiction program outpatient) H0014 - Alc &/or drug services; ambulatory detoxification H0015 - Alc &/or drug intervention service (planned facilitation) H0016 - Alc &/or drug services; medical/somatic (medical intervention in ambulatory setting) H0017 - Behavioral health; residential (hospital residential treatment program), without room and board, per diem H0018 - Behavioral health; short-term residential (non hospital residential treatment program) without room and board, per diem H0019 - Behavioral health; long term residential (non-medical, non-acute care in residential tx program; stay usually > 30 days), without room and board, per diem H0020 - Alc &/or drug services; methadone administration and/or service (provision of the drug by a licensed program) H0021 - Alc &/or drug training service (for staff and personnel not employed by providers) H0022 - Alc &/or drug intervention H0023 - Behavioral health outreach service (planned approach to reach a targeted population) H0024 - Behavioral health prevention info dissemination service (1-way direct or indirect contact w/service audiences to affect knowledge/attitude) H0025 - Behavioral health prevention education service (delivery of services with target population to affect knowledge, attitude, and/or behavior) H0026 - Alc &/or drug prevention process service, community-based (delivery of services to deliver skills of impactors) H0027 - Alc &/or drug prevention environmental service (external activities for modifying systems to main stream thru policy/law) H0028 - Alc &/or drug prevention problem ID and referral service (student & employee assistance); excluding assessment DHSS / Behavioral Health Page 137 AKAIMS User Manual v2.0 H0029 - Alc &/or drug prevention alternatives service (services for populations that exclude alcohol and other drug use e.g. alcohol free social events) H0030 - Behavioral health hotline service H0031 - Mental Health assessment, by non-physician H0033 - Oral medication administration, direct observation H0047 - Alc &/or other drug abuse services, not otherwise specified H0048 - Alc &/or other drug testing: collection and handling only, specimens other than blood H2012 - Behavioral health day treatment, per hour H2034 - Alc &/or drug abuse halfway house services, per diem H2035 - Alc &/or drug treatment program per hour H2036 - Alc &/or drug treatment program, per diem H2037 - Developmental delay, prevention activities, dependent child of client, per 15 min NONE - None OTHM - Medicaid service, see progress notes. S9484 - Crisis intervention mental health services T1006 - Alc &/or substance abuse services, family/couple counseling T1007 - Alc &/or substance abuse services, treatment plan development and/or modification T1009 - Child sitting services for the children of the individual receiving alcohol and/or substance abuse T1010 - Meals for individuals receiving alc &/or sa services (when meals aren't included in the program) T1012 - Alc and/or substance abuse services, skills development T1013 - Sign language or oral interpreter for alc &/or substance abuse services T1016 - Case Management DHSS / Behavioral Health Page 138 AKAIMS User Manual v2.0 Appendix C – FAQs Module: Client Profile Issue: In the past we had a work around for when a client would not provide a SSN do we now have to go back and change all of these fake SSN to 999-99-9999? Solution: No, but once the 999-99-9999 enhancement goes live in October 2007 you need to start using it You should keep a record of the work around that your Agency used prior to October 2007 so that you can easily determine who has fake SSN entered Module: Client Search Issue: There are clients whose name appears in red font on the Client Search screen. What is causing it and how do I remove it? Solution: 1. Log into AKAIMS as usual 2. Click on Client List from the left menu 3. Click the blue oval Go button (you will now see a prompt just above the green Client Search bar informing you that "Clients whose names are in RED are clients who currently have active alert notes") 4. In the Client List screen, click on Activity List under the Actions column on the same line where you see a client's name in red 5. Click on Notes from the left menu 6. Click Review under the Actions column on the Notes List screen for each note highlighted in light yellow 7. In each case where you see Yes selected in the Alert field, click Remove Alert, if you are certain the alert is no longer needed 8. Don't forget to click the blue oval Finish button 9. When you have completed this process, that client's name should no longer be displayed in red on the Client List 10. NOTE: The gray Alert field defaults to No, unless someone deliberately clicks "Mark Alert", which then auto-populates that field with Yes and changes the wording to "Remove Alert". Clicking "Remove Alert" will result in the Alert field auto-populating with No. Issue: If an individual comes up as having already been entered into the AKAIMS by having been seen at another facility in AK but does not remember where (TBI) how do we deal with this? DHSS / Behavioral Health Page 139 AKAIMS User Manual v2.0 Solution: If the person does not remember the Agency, is there another person and/or guardian who may be able to provide the information? Is there someone else who would know? If not, in the absence of having a referral you will need to add the client to your Agency as a new client. Agency staff needs to understand that they should always check the client list before trying to create a new client in AKAIMS. If they get a warning as they complete the client profile that the SSN has already been used, they should immediately ask the client, “Have you ever received mental health and/or substance abuse services from this or any other agency in Alaska?” If the client says yes and it was at your agency, you already have the client profile and should not start a new one. If the client says yes, but it was at another agency (and they know where), you want to get the client’s written consent and work with the other agency so that they can electronically refer the client to your agency, sharing only the info that the client chose to allow. That will take a little bit of time and effort, but then you have the info that has already been collected and entered into AKAIMS and avoid creating a duplicate client. If a duplicate client has been entered into AKAIMS, it is up to the provider agency to determine which record they want to keep. Then, someone sends Rik an email providing just the unique AKAIMS client ID, specifying that it is a duplicate client ID which should be excluded for reporting purposes. DHSS / Behavioral Health Page 140 AKAIMS User Manual v2.0 Module: Emergency Services Issue: If an individual receives emergency services but never provides Client Profile info and/or completes the AK screening tool, CSR or other info……how do we deal with this in terms of AKAIMS? Solution: It is known that there is no easy way to capture non client Emergency Services within AKAIMS It is known that a workaround was communicated within the user group when Von Terry was the User Group chair The work around allowed for the creation of a fake client record of EMERGENCY CONTACT and then Emergency Services activity would be captured on the Non Episode Contact screen Enter one client with the name Emergency Contact and create dummy information in the initial Client Profile screen. Do not start an Episode, Admission or Program Enrollment. Enter contact information in the Non-Episode Contact screen UNLESS At a minimum, if you can obtain the name of the individual in an emergency you can create a record Client Profile screen: If Gender is not known you can select Unknown from the drop down list box (DDLB) If DOB is unknown you can enter a fake date of 1/1/1900 If SSN is unknown you can enter 999-99-9999 If Medicaid # is unknown you can enter N/A Races, Ethnicity, Special Needs, Education Status, and Veteran Status all have an unknown option Complete only the dark yellow fields Each DDLB has an option of unknown, no response, not applicable, not collected, OR other Once the Client Profile and Intake Information screens are completed you can proceed to Consent / Referrals. DHSS / Behavioral Health Page 141 AKAIMS User Manual v2.0 Module: Intake Issue: How do you capture more than one Source of Referral in the Intake Case Information screen? Solution: The Source of Referral DDLB will allow only one selection and should be used for the primary source of referral You can input additional information in the Inter-Agency Service area If you still require additional sources of referral to be documented you should come to consensus within your Agency on where you would document this information. Examples: Client Profile - Collateral Contact screen or to Presenting Problems (in Client’s Own Words) text box on the Intake Case Information screen. Consistency within your Agency is important. Module: Program Enrollment Issue: Client is enrolled in the wrong program. How do I move the client from one program to another program? Solution: If the Agency has more than one Facility you need to select the correct Facility from the list. Select Client List from the left hand AKAIMS menu. Conduct a Client Search and select Go. The Client List area will be populated with search results. Select the Activity List link for the Client you want to move from one program to another. Select Admission from the left hand AKAIMS menu. The AKAIMS left hand menu will then expand. Select Program Enroll. From the Program Enrollment screen you can change the current Program Name by selecting the appropriate Program Name from the drop down list box. After you select the new program name, select Save. The selected client will now be enrolled in the appropriate program DHSS / Behavioral Health Page 142 AKAIMS User Manual v2.0 Module: Encounters – Why Issue: Encounters - “Why do we have to enter encounters?” Solution: Encounters are required to identify activity as outlined in some of the quarterly report questions Demo provided Refer to the Minimal Data Set Requirements document found on the support site in the following location http://support.akaims.org/training.htm Understand that there is a need for a group notes module. The AKAIMS team is aware of this and it will be developed in the future. Issue: The Encounters screen is slow and cumbersome. Is there a way to enter a Service Code/ Description without having to use the DDLB? Solution: No, but you can select the first letter or number of the Service Code/ Description and the DDLB will populate with the first instance of the letter or number It has been discovered if you type the Service Code/ Description very quickly that it will go directly to it An issue has been logged in the AKAIMS issue db under the Change Request (enhancement) category for future discussion, prioritization, and consideration Issue: Is there an easier way to populate the Program Name on the Encounters screen? Solution: You can select the first letter of a Program Name that you know exists in the Program Name DDLB and it will populate the DDLB with a Program Name where the first instance of the letter DHSS / Behavioral Health Page 143 AKAIMS User Manual v2.0 Module: Consent, Referrals, and Disclosures Issue: What happens if the client does not consent to release information to AKAIMS / State? Solution: DBH Grantee Providers are required to complete AKAIMS minimal data set (demographics) for all Program Types that are DBH Grant and/or Medicaid funded. Issue: What constitutes a referral? Solution: Behavioral Health (SA, MH, and MH/SA) treatment. There may be times when you hear of referral to housing, referral to employment etc… This does not constitute a referral. Formal referral for Behavioral Health treatment Issue: Can you please go through that area of AKAIMS and indicate the required fields and the proper usage of this area in AKAIMS? Solution: Demo provided Can also refer to Minimal Data Set Requirements document The Referral screen will be more user friendly in the next release of AKAIMS AKAIMS Agency – Relationships – Disclosure agreement is an online form comparable to Qualified Service Organization Agreement (sample form is set forth in CSAT/SAMHSA’s TAP 24, Appendix B-5). If this is something that you currently do at your Agency this is where you have the capability to replicate in AKAIMS. It is not to serve as a replacement to a signed hard copy Qualified Service Organization Agreement. AKAIMS Consent screen is comparable to the Release of Information (ROI) (sample form is set forth in CSAT/SAMHSA’s TAP 13, page 17). This screen must be completed prior to creating a Referral. It is not to serve as a replacement to the signed hard copy ROI form. Issue: How far back do we need to go back to enter the referrals? Solution: Performance measures require that the first three quarters of data be available for FY08. That means that any referrals that have occurred on or after July 01, 2007 must be entered into AKAIMS. If you have any questions related to completing the Consent and Referral screens please contact Michael Walker. DHSS / Behavioral Health Page 144 AKAIMS User Manual v2.0 Issue: Does our Agency need to capture referrals to our Infant Learning Program? Solution: No, referrals to Behavioral Health (SA, MH, and MH/SA) treatment only There may be times when you hear of referral to housing, referral to employment etc… This does not constitute a referral Formal referral for Behavioral Health treatment Issue: Are referrals from our Crisis line or Emergency Response required? Solution: It is known that there is no easy way to capture non client Emergency Services within AKAIMS It is known that a workaround was communicated within the user group when Von Terry was the User Group chair The work around allowed for the creation of a fake client record of EMERGENCY CONTACT and then Emergency Services activity would be captured on the Non Episode Contact screen The workaround does not allow for the capturing of Referral data specific to Emergency Service activity Until functionality for Emergency Service activity is designed and developed within AKAIMS all Emergency service referrals will have to be captured manually UNLESS At a minimum, if you can obtain the name of the individual in an emergency you can create a record and then do the referral. Client Profile screen: If Gender is not known you can select Unknown from the drop down list box (DDLB) If DOB is unknown you can enter a fake date of 1/1/1900 If SSN is unknown you can enter 999-99-9999 If Medicaid # is unknown you can enter N/A Races, Ethnicity, Special Needs, Education Status, and Veteran Status all have an unknown option Intake Case Information screen: Complete only the dark yellow fields Each DDLB has an option of unknown, no response, not applicable, not collected, OR other Once the Client Profile and Intake Information screens are completed you can proceed to Consent / Referrals. DHSS / Behavioral Health Page 145 AKAIMS User Manual v2.0 Module: General Issue: What are the Hardware, Software, and Internet Requirements for AKAIMS? Solution: Software Operating System: Widows 2000 Professional or Higher Virus Software: Any providing it's is a current version with updated definitions Browser: Internet Explorer 6.0 or above you can download for free at http://www.microsoft.com/windows/ie/downloads/default.asp Adobe Acrobat Reader 5.0 or higher, for displaying and printing reports. Hardware: CPU: 266 MHz or Higher RAM: 64 MB or Higher Internet An internet connection is required, such as dial-up, broadband (cable/DSL), wireless, or LAN (T1, T3, etc.) A virus and spyware free environment A firewall solution is strongly recommended. Windows XP has a built in software firewall, and Cisco and Linksys offer several firewall solutions. Module: Security Issue: When attempting to log in to AKAIMS, the following error is displayed: Invalid Login Attempts Solution: For security purposes, the account is locked after a number of failed login attempts. Please have your agency administrator or one of the state staff unlock your account through the following steps on the staff screen: 11. Disable Account (resets the login attempts) 12. Enable Account 13. Reset Credentials (since they had trouble logging in) DHSS / Behavioral Health Page 146 AKAIMS User Manual v2.0 Module: Agency Issue: Upon logon, the user gets the error: There is no IForm child registered to process events in state 'Start' Solution: Open up the application directly from within Internet Explorer. This is caused by the ASP.Net SessionID being reused between instances of the web browser. Apparently if you reconnect to the site using the same shortcut IE assumes you want to connect to the same session, rather than creating a new one. Issue: On the Agency -> Relationships -> Collaborative screen, there isn't a button for adding a collaborative relationship. Solution: This is a training issue, in that this screen is supposed to list out the agencies that have parent-child relationships. Module: Staff Issue: After adding a staff member, the user receives the error message, "You must save or cancel your changes first". However, after saving the record again, the same message is displayed. Solution: This is a known bug with the state machine. The current solution is to completely close the browser window by clicking in the 'X' in the upper right hand corner of the screen. Module: Client List Issue: There aren't any clients on the client list Solution: When the client list is first viewed, press the "Go" button to populate the client list. If you still can't see any clients on your client list, it is because the staff member needs the appropriate roles to view the client list. Have someone with the "System Administrator" role at the agency assign one of the following permissions: * Clinical * Non-treatment team DHSS / Behavioral Health Page 147 AKAIMS User Manual v2.0 Module: Admission Issue: What are the ASAM Levels of Care? Solution: Per ASAM PPC-2R, 2001, they are: Level 0.5: Early Intervention Level I: Outpatient Level II.1: Intensive Outpatient Level II.5: Partial Hospitalization Level III.1: Low Intensity Residential (a.k.a. Halfway House) Level III.3: Medium Intensity Residential Level III.5: High Intensity Residential Level III.7: Medically Monitored Intensive Inpatient Level IV: Medically Managed Intensive Inpatient Level I-D: Ambulatory Detox Level II-D: Ambulatory Detox with Onsite Monitoring Level III.2-D: Clinically Managed Residential Detox Level III.7-D: Medically Monitored Inpatient Detox Level IV-D: Medically Managed Intensive Inpatient Detox Issue: A client enrolled in one program has completed treatment and needs to be transferred to another. Solution: This can be accomplished on the "Program Enrollment" screen. Set their enrollment status to transferred and set the end date, then add a new enrollment record for the second program. Issue: On the "Admission" -> "Substance Abuse" screen, there isn't an option for Polydrugs in the substance field. Solution: This is a field required by the federal government for the TEDS dataset. They want the top three substances to be specified, rather than having them rolled up into a single "Polydrugs" category. DHSS / Behavioral Health Page 148 AKAIMS User Manual v2.0 Module: Reports Issue: Problem printing the reports, usually occurs when visiting a remote office. Solution: This is because Adobe Acrobat Reader is required for viewing and printing PDF documents. Issue: When trying to print, the user receives the error: "Could not start print job". Solution: This is a known problem with Adobe Acrobat Reader 6.0. Please update to the latest version. This problem is described in detail on the Adobe website at: http://www.adobe.com/support/techdocs/33396.htm Module: Notes - Encounter - Service Code Descriptions Issue: I am unable to read all the items listed in the Service Code/Description drop down list box (DDLB) in the following location Activity List - Notes - Encounters - Encounter Screen? Solution: Service Code/Description; see Appendix B DHSS / Behavioral Health Page 149