1
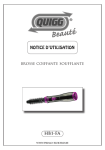
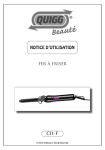
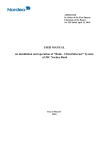
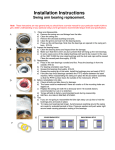
Milling Blocks
USER MANUAL
1 Product Description
BruxZir ® NOW Milling Blocks are pre-shaded, fully sintered zirconia CAD/CAM blocks used for manufacturing
single-unit dental restorations with the TS150™ chairside mill from IOS Technologies, Inc. The milling blocks are
available in multiple shades that correspond to the VITA® Classical shade system. Each block pack includes three
blocks, three milling burs and the milling strategies necessary for the TS150 to process BruxZir NOW.
The overall workflow for preparing a restoration using a BruxZir NOW milling block is shown below.
Prepare Tooth, Determine
the Shade, Take Digital
Impression
Design
the Resoration
Mill
Finish and Polish
Stain & Glaze
(Optional)
2 Technical Data Table
As measured according to ISO 6872
Table 1
Classification - Type II, Class 6
Coefficient of Thermal
Expansion (CTE) (25-500ºC)
Flexural Strength
Density
11 x 10 -6 K
>800 MPa
6.05 g/cm3
3Scanning
Follow the manufacturer’s instructions to scan the oral environment using your intraoral scanner.
When scanning is complete, press SEND to deliver the scan file to the FastDesign™ design software.
4 Designing the Restoration
This illustration shows an ideal 1.5 mm reduction for a posterior
BruxZir NOW crown with a chamfer margin. BruxZir NOW zirconia performs well with a feather-edge margin at minimal thickness; however this is not optimal conditions for the restoration.
Maintaining 1.5 mm of thickness allows you to safely adjust the
crown if necessary when checking the occlusion. While BruxZir
NOW zirconia can be milled as thin as 0.7 mm, it cannot be adjusted at this thickness without the risk of breakage.
Failure to observe the wall thickness recommendations
may result in fracture of the final restoration.
For specific instructions on the design of the restoration
please refer to the FastDesign QuickStart Guide, which
can found online at www.ios3d.com/access.
2
USER MANUAL
1.5 mm axial
reduction
1.5 mm occlusal
reduction
Chamfer margin
preferred
(Feather-edge
acceptable)
•
1.5 mm ideal reduction (0.7 minimum)
•
Chamfer or shoulder margins preferred.
Feather-edge OK
•
Buccal and lingual walls must be convergent
•
Preparation should be cut in three planes
5 Milling the Restoration
NOTE: To ensure milling success, a site inspection must be completed by your service representative before milling BruxZir NOW
Milling Blocks. Please call your TS150 service technician for help with site inspection.
Warning: Material may break loose from sprue if dropped on a hard surface.
Do not inhale dust. Do not let dust into eyes or have prolonged contact directly with the skin. Personal protective
equipment (PPE) such as gloves, masks, and lab coats are recommended in order to avoid possible contact to and
irritation of skin or eyes during processing.
NOTE: To request the SDS for this product, call Glidewell Direct at 800-303-3975.
5.1 Coolant concentration and cleaning the trough filter
The time frame for changing the coolant is dependent on mill usage, but generally it should be changed on a weekly
basis.
Warning: Ensure that the coolant trough filter is cleaned according to the TS150 QuickStart Guide before and
after any BruxZir NOW blocks are milled. Failure to do so may result in low coolant pressure and a pause in
subsequent milling procedures.
•
To remove the coolant trough, press the coolant trough release button on the side of the system and remove
trough using the trough handle.
•Grasp the filter and remove it from the top of the trough. Empty any large particles on top of the filter into a trash
receptacle. Once the large particles have been removed, the filter can be washed in warm water with a mild
detergent to remove the spindle oil. Be sure to rinse all of the detergent out of the filter before reusing it.
•Empty the trough using the rubber drain plug and then rinse the trough with distilled or reverse osmosis
water. Scoop out any remaining slurry using a large spoon or spatula.
NOTE: It helps to use a toothbrush to clean the inside crevices within the trough.
Warning: Sharp milling block particles may be present in the trough, so use care when emptying it. Using
gloves is recommended.
Coolant Trough Filter
Coolant Trough
Release Button
Rubber Drain Plug
Coolant Window
and Handle
IMPORTANT: Make sure to reinsert the plug before reinserting the trough.
3
USER MANUAL
5.2 Refilling the coolant trough
Fill the trough with 2.4 L (2.5 quarts) distilled or reverse osmosis water containing 240 mL (8 fl oz) of TS150 mill
coolant concentrate. The coolant mixture level should be near the top edge of the handle.
Fill Line
IMPORTANT: Only use distilled or reverse osmosis
water in the trough. DO NOT USE standard tap water
in the trough, as it contains minerals which will cause
scale buildup and premature failure of the seals.
IMPORTANT: Only use mill coolant concentrate
supplied by IOS Technologies. This mill coolant
concentrate was developed specifically for the TS150.
Use of other fluids may damage the machine and void
the warranty.
Please refer to your TS150 User Manual for complete
information on care and operation.
5.3 Loading the bur
NOTE: Each BruxZir NOW Milling Block must be milled with a new, red-stripe bur. A new bur is provided with every block.
The spindle contains a spring-loaded lock mechanism that prevents it from rotating while installing or removing
burs. Push this lock in and apply a wrench to the nut. To remove a used bur, rotate the nut counterclockwise to
loosen. To install a new bur, rotate the nut clockwise to tighten.
Milling Bur
Spindle Nut
Confirm that the milling
bur is completely pushed
into the collet.
Continue to press the
spring-loaded mechanism
in while tightening or
loosening the spindle nut.
Spring-Loaded Lock
Mechanism
TS150 wrench for
tightening or loosening
the spindle nut.
When installing a new bur, push the bur all the way
down to the nut, and tighten the nut firmly while
holding the spring-loaded lock. It will take about four
90° turns to completely tighten the bur.
4
USER MANUAL
After tightening the nut, make sure the spring-loaded
mechanism is all the way out and the spindle rotates
freely. You are now ready to run the program.
5.4 Loading the BruxZir NOW Milling Block
BruxZir NOW
Block
No Gap
Mandrel
Fully Seated
Retaining
Screw
osition slot on mandrel toward rear of mill so retaining
P
screw hole is visible above the retaining screw. Push it
all the way down until it is fully seated.
lightly rotate the material block side-to-side while
S
tightening the retaining screw clockwise until the
retaining screw is fully seated into the depression. The
retaining screw should be tightened firmly.
5.5 Loading the design file
A. From the TS150 start screen,
select TECHNICIAN or OPERATOR
and log in.
B. After selection, the TS150 will go
through a self-check sequence which
will verify that motion control and
other systems are working correctly.
C. To start the machining process,
select LOAD PROGRAM from the
home screen.
D. Select the case file to be milled and
OPEN.
E. If a new tool is needed the load
tool dialog will appear as soon as you
select LOADED. (See section 5.3)
F. When you select OPEN the system
will automatically open the load
material dialog. (See section 5.4)
5
USER MANUAL
5.5 Loading the design file (continued)
G. A brand-new tool is
required for each BruxZir
NOW job. The TS150 will
verify this information and
the message shown will
depend on whether the
current tool has remaining
life or not.
H. Once the user selects
LOADED, the job will
automatically start and
the UI will change to the
above screen.
I. Selecting PAUSE will
change the UI to the above
screen.
J. When a job completes,
the above dialog appears.
From this screen, the
user can either cancel or
resume the job.
NOTE: Once milled, carefully remove the restoration from the block and remove all residual dust from the restoration.
6Finishing
Step 1: Remove restoration from the block
Use fine-diamond bur at high speed.
Step 2: Smooth out the sprue
Use fine-diamond bur at high speed.
NOTE: Margin finishing and surface polishing are optional, but if performed they should be done as follows:
Step 3: Margin finishing
Use a blue wheel or blue rubber wheel to finish the
margin
6
USER MANUAL
Step 4: Surface polishing
Use diamond polishing paste (fine) and a standard
stiff-bristle brush to polish the surface.
7 Stain and Glaze
NOTE: These steps are optional and may be done as desired. BruxZir NOW Milling Blocks are individually designed to match the
body of the indicated VITA shade. Since the blocks are monochromatic (one color), staining may be performed to match specific
prescriptions or to achieve a gingival-to-incisal blend of color.
Follow the manufacturer’s directions for using stain or glaze.
NOTE: Only low-fusing glaze may be used.
8Cementation
There is no bonding required for BruxZir NOW crowns, although may be done if preferred. The dental professional
may use conventional cementation techniques to cement the restoration.
Recommended: The dental professional should use resin-reinforced glass ionomers, resin cements or self-adhesive
resin cements to cement the BruxZir NOW restorations. A zirconia primer must be placed in the crown prior to
cementation.
9Questions/Comments
For questions and/or comments or for further instructions regarding the use of the product, please contact Glidewell
Direct in the U.S. at 18651 Von Karman Ave., Irvine, CA 92612 or by calling 888-303-3975.
10
Frequently Asked Questions
1.
How many blocks and burs are in each package?
•A package of BruxZir NOW Milling Blocks includes three blocks and three burs. Please note: These are singleuse burs that are thrown away after each use.
2.
Are there special tools required for this block?
• Yes, you MUST use a brand-new BruxZir NOW bur with each block. The user cannot use any other type of
bur to mill this material.
3.
I tried to install and run a BruxZir NOW job and my mill prompted me to contact my distributor about
BruxZir NOW. What should I do now?
•Congratulations—you’re almost ready to start milling BruxZir NOW. Please contact your distributor. After a site
assessment has been performed and verified, a representative of IOS will enable your TS150 for BruxZir NOW
milling capabilities.
4.
Why does a site inspection need to take place for me to mill BruxZir NOW?
• A service technician will need to ensure your compressor can meet the required specifications, coolant is
flowing sufficiently, and mill is calibrated.
5.
Can I add porcelain onto the BruxZir NOW crown, to fix a light contact?
•Applying any type of add-on material to the crown is not recommended. BruxZir NOW is intended to be a
monolithic restoration.
6.
Zirconia is strong enough for bridges, why can’t I do bridges with BruxZir NOW?
• We have optimized BruxZir NOW for single-unit posterior crowns only.
7.
Who should I be ordering my BruxZir NOW milling blocks from?
• You should be ordering your BruxZir NOW milling blocks from your TS150 distributor.
8.
Who should I call for milling-related technical support?
• Please contact your distributor or service technician
VITA is a registered trademark of VITA Zahnfabrik.
7
USER MANUAL
MDSS
Schiffgraben 41
30175 Hannover, Germany
Designed and Manufactured
in the USA by
(A wholly owned subsidiary of Glidewell Laboratories)
2212 Dupont Dr. • Irvine, CA 92612
United States
800-GO-BENCO
800-241-3743
800-562-8176
800-766-2025
Canada
Exclusively Distributed by
800-668-5558
Exclusively Distributed by
3035010_1.0PK-229-091115
ECO# 3035009