1
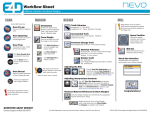
Design Center
Quick Reference
Table of Contents
Home Screen............................................... 1
Setup Screen............................................... 2
Block Selection ........................................... 3
Scanning...................................................... 4
Scanning Occlusal Data.............................. 5
Orientation................................................... 6
Margin Tab .................................................. 7
Editing Margins........................................... 8
Selection Area (for inlays and onlays)........ 8
Buccal Bite Alignment................................. 9
Design Tab................................................. 10
Mill Tab.......................................................13
How to use the mouse.............................. 14
How to use the Skyball™.......................... 14
Log on to our website www.e4d.com for these
additional resources:
●●Resources tab - log in to ECO Community*
●●Online Training Videos
●●Chairside Chats - practical "how to" presentation updated
weekly
●●Online community and forum
●●User Manual
●●Exercise Workbook
●●Quick Reference Guides
*To register for the ECO Community and access these
resources, go to www.e4d.com/eco
●●Education tab
●●Intermediate and advanced course descriptions
●●Course planner and calendar
●●Links to online registration
Online Help is available in the software by
clicking
Contact Customer Support
Caution: US Federal law restricts the E4D scanner to sale by or on
the order of a dentist.
phone: 800.537.6070
fax: 972.479.1106
email: [email protected]
Home Screen
Customer Support: 800.537.6070
Click
on any tab to save and return to the Home screen. Click
Click
on any tab to view online Help. Click Sky or E4D Studio to import a case.
Add New Patient:
1
1
2 3
1
1
to view/edit the settings for the current tab.
1 Click Add.
Select Existing Patient:
1 Select patient from the list.
2 Type patient Name.
Existing restorations appear on the right.
3 Click Enter.
2
Start New Restoration:
1 Click Start New Restoration.
Setup screen appears.
Open Existing Restoration:
1 Select the existing restoration from
the list.
2 Click Open Existing Restoration.
Setup screen appears. Select desired
tab.
1
2
Setup Screen
Select:
1 Tooth
2 Restoration Type
3 Occlusal Data Type
Multiple
Restorations:
Repeat the
steps for each
tooth.
8
2
4 Library
5 Material
6 Shade
Single Restoration
8 Click the Scan tab.
Bridge
7 Link the
restorations
to create a
bridge.
See the Blocks page
for more information.
1
3
7
4
5
6
Customer Support: 800.537.6070
Block Selection
Customer Support: 800.537.6070
The block selection chart
provides general direction on
what block or category of block is
recommended for different types
of restorations. Please understand
that the clinical situations and
parameters (preparation, occlusion,
patient compliance) are all factors in
the success of the final restoration
regardless of the material.
3
Scanning
Desktop operators may prefer to have the Live View rotated if the scanner is
facing the operator. Click Rotate
to change the Live View if needed.
Begin at the location of the circle in the diagram below.
Move in half tooth (or smaller) increments and take
overlapping scans. Use small rotations at the corners of the
diagram. As you go down the buccal and lingual sides, the
wand can be held at close to 90°.
4
1 Turn OFF bright lights; they can interfere with scanning.
2 Scan.
3 Rotate and evaluate the model using Highlight
Low Data Areas.
4 Take more scans to fill in any low data areas (dark blue/purple) on the
prep and interproximal areas.
5 Trim Model if needed.
6 If an Impression was scanned of the prep or Clone, click
Impression Mode which inverts the scans to look like
a traditional model. This is NOT used on scans of a bite
registration.
Scan Occlusal Data (See next page)
Scanning Pattern
Scanned Model
Customer Support: 800.537.6070
Scanning Occlusal Data
Customer Support: 800.537.6070
The proposal’s occlusion can be evaluated and designed using:
●● Bite registration
Scan Opposing
●● Buccal bite and opposing dentition
1 Click Scan Opposing.
●● Clone a waxup or existing anatomy before preparation
2 Starting with an occlusal view,
scan the occlusal surfaces of the
opposing dentition. Include
the same number of teeth as the preparation model. Ensure there is
good cusp tip data on both the lingual and buccal sides.
Scan Clone
1 Click Scan Clone.
2 Scan the pre-operative tooth or wax-up with the same
scanning techniques used for the prepared anterior or
posterior tooth.
3 Roll to the buccal and scan the buccal side of the opposing dentition.
Include gingival data; do not stop halfway down the tooth.
4 Use Trim Model to trim away excess data.
3 Prepare the tooth.
4 On the Scan tab, click Scan Prep.
Scan Buccal Bite
1 Click Scan Buccal Bite.
Scan Bite Registration
1 Click Scan Bite Registration.
2 Capture occlusal details (90%) of proximal dentition for
template alignment.
3 Use Trim Model to trim away excess data.
4
Click Select Bite Area and circle the opposing
dentition on the template.
2 Press the articulated model down
firmly or have the patient bite
down firmly and tell them not to
move. If the teeth shift during
scanning, the alignment may be
incorrect.
3 Scan at a 90° angle to the teeth. Scan the sides of the teeth that
were captured in the preparation and opposing models. Ensure
some gingival data is captured.
5
6
Orientation
See the User Manual for instructions on centering the preparation and using multiple orientations.
Orientation activates automatically when the Margin tab is selected for the first time.
Orientation is a critical part of the entire design process. The position of the model affects the position of the library tooth before Autogenesis™ is
applied. If the wand was positioned properly on the first scan, only small adjustments should be needed.
To adjust the model, use the LEFT mouse button.
1From the Occlusal – ensure you are looking straight down at the occlusal
plane of the teeth (not tilted to the lingual or buccal).
Good
Poor
2From the Distal – Evaluate the cusp heights of the proximals. Align the cusps and axial
walls according to the Curve of Spee.
Good
Poor
To reduce the
pink undercut indicators,
accept the Orientation,
draw the margin, then
reactivate Orientation.
When the margin is drawn,
the undercut indicators
appear only inside the
margin.
3From the Buccal - ensure
the marginal ridges of the
proximals are parallel to the
red line.
4From the Occlusal - ensure
you can visualize the margin
around the entire preparation.
If you cannot, it may influence
the fit of your restoration.
5Click Orientation to accept
the current position.
Customer Support: 800.537.6070
Margin Tab
Customer Support: 800.537.6070
Margin Aids
1Set Orientation (see previous page)
2Draw the margin using Trace, Lasso, or Paint. Trace is the most
popular selection.
Show Features highlights areas with high
contours. This often aids in finding the margin.
View ICE Preparation toggles between
model view and ICEverything view. Use only in
intraorally scanned cases with equigingival or
subgingival margin areas.
3Edit the margin using Move Margin or Add Segments.
Click Align Buccal Scans to align the
preparation, opposing, and buccal models.
Toggle Margin to show or hide the margin.
Trace
Preview Library appears after the margin
has been edited and the editing tools
deselected. Click to use the library tooth as an
aid to verify and adjust Orientation.
Crown
Click the Design tab.
Partial
1Designate a
Selection Area.
2Click Design tab.
1 Click Trace.
2 Click along the margin in small increments. The system creates
straight lines between each click; a blue dot marks the starting point.
Connect to the starting point to finish the margin.
Show Features is recommended
as an aid in finding the edge of the
margin, it is not necessary for using
the Trace tool. Draw the margin in
the middle of the green high contour
indication.
7
Editing Margins
Move Margin
1 When using Trace,
Move Margin is
activated by default.
Click to activate if necessary.
2 Position the pointer on the margin line; click and hold down the
mouse button.
3 Drag the margin into position and release the mouse button.
The system automatically redraws the margin. Repeat as needed.
Selection Area (for inlays and onlays)
8
With the Selection Area tool, you define the area where the computer
will place the restoration. This is important on partial restorations.
When the margin is drawn, a reminder appears. If a Selection Area is
not designated, Autogenesis™ will create a proposal, but it may not be
correct. A Selection Area can be defined after the proposal has been
generated, but the library needs to be reapplied.
1Click Selection Area.
2Click Add to Selection.
3Use the mouse to draw a line
around the entire tooth, down to the
gums. The selected area is highlighted.
Add Segments
1 Click Add Segments.
2 Start and end by
clicking on a good part of the
margin. Click to add a new line
across the gap. Use multiple clicks to create a curve if necessary.
4Click the Design tab.
Autogenesis applies the library tooth to the
selected area.
Customer Support: 800.537.6070
Buccal Bite Alignment
Customer Support: 800.537.6070
On Buccal/Opposing cases, the Design tab is not available until after the buccal and opposing have been aligned with the preparation model.
1Click Align Buccal Scans.
Three models appear.
2Click Grab Model.
3Click directly on a distinctive feature (such as a cusp tip,
groove, unique gingiva, etc. - examples circled in green
below) in the buccal bite and drag the model until the
pointer is directly over the same distinctive feature on the
preparation model.
The buccal bite model changes color and snaps into
place.
4Click directly on a
distinctive feature in the
opposing model and drag
the model until the pointer
is directly over the same
distinctive feature on the
buccal bite model.
The opposing model changes
color and snaps into place.
Your alignment should
resemble the following.
If you are not satisfied with
the alignment, click Reset to
start over
9
Design Tab
10
Evaluate the Library Tooth's Position
Good Position
Adjust Library Tooth
1If the Library Tooth is disproportionate
to the proximals, press and hold the
ALT key while pressing the Up or Down
Arrow key to resize the preview tooth.
2If the Library Tooth is not centered over
the preparation and/or centered within
the proximals, use the mouse to drag
the tooth into the correct position.
1st Attempt
Poor Position
Change Orientation
1 Click the Margin tab.
2 Click Preview Library and
Orientation.
3 Use the preview tooth to aid
in orienting the model. The
model moves, the preview
tooth is stationary.
4 ClickOrientationtoacceptthe
new model position.
2nd Attempt
5 Click the Design tab.
Click Apply
to generate
the proposal.
Deselect Autogenesis
and click Apply to
regenerate the proposal.
Proposal Generated
Acceptable
Distorted
Customer Support: 800.537.6070
Customer Support: 800.537.6070
Global Positioning
Adjust the overall position of the tooth
in relation to the proximals using
Incremental Tools.
Design Tab
Area of Influence - The Area of Influence appears with many of
the Freeform Change Tools and can be used to adjust the depth
and/or width of the affected area.
1Alignment (Move)
2Rotation (Rotate)
3Height (Expand)
Esthetic Adjustments
Go to Freeform Change Tools. Evaluate
the following and adjust if needed. Rubber
Tooth is recommended for these changes.
1Material Thickness
Occlusal Contacts
1To display the bite registration or opposing dentition, click
View Bite Registration once to make it appear and a
second time to make it translucent.
2Use Contact Refinement or Rubber Tooth and Slice Plane to
adjust the contacts.
2Contours
Popular goal: white/brown/black
3Marginal Ridges
Your office preference:
4Embrasures
Bite Registration _______________
Buccal Bite _______________
3Click View Bite Registration until it is deactivated.
11
12
Proximal Contacts
1Click View Contacts.
2Click Hide Model.
Popular goal: 50 microns (Aqua blue color)
Your office preference: _______________
3For large changes, use Expand under
Incremental Change Tools to increase or
decrease. For smaller changes, use Smooth if the contact is
too heavy and use Dropper if it's too light. Change the Area
of Influence to be broad and shallow.
Material Thickness
1Click View Material Thickness.
2Use Rubber Tooth to adjust the
thickness. Adjust the Area of Influence to be
smaller for pit changes and larger for axial walls.
Goals:
Axial Walls = Green
Occlusal Surface = Dark Green/Blue
3Click View Bite Registration and View Contacts
to ensure occlusal contacts are still in desired
range.
Click the Mill tab.
Customer Support: 800.537.6070
Mill Tab
Customer Support: 800.537.6070
1 Look for orange or red shading (thin material) on the proposal. Return to
the Design tab to increase the material thickness to remove these colors.
Restoration
Sprue
Yes
Sprue location good?
No
3 Select the Block size from the list. If there are no block sizes listed, try
a different sprue location or click Settings and select a different material.
Mandrel
2 To change the location of the sprue, click and
drag the placement indicator (circled in yellow)
along the circle that represents the exterior of
the restoration or click one of the arrows.
4 Click Sim and select Standard.
5 Click Gingival to view the model from below.
1
Try a Detailed
Simulation.
If blue is still visible on
the axial walls, return
to the Design tab and
increase the spacer.
Repeat the Sim.
Repeat steps until
satisfied with the Sim.
Yes
Is the blue
visible
anywhere other
than the
margin?
3
No
6 Click Send to Mill.
2
6
4
5
After the restoration is milled, remove the sprue and
clean thoroughly with toothbrush and water, ultrasonic, or
steam clean.
13
Customer Support: 800.537.6070
How to use the mouse
Select position
pointer on item
and click left
button to select
Rotate Model
press and hold
the right button,
then drag
Zoom Model rotate
the wheel button to
change the size of the
model on the screen
Move Model
up/down, left/right:
press and hold the
wheel button, then drag.
How to use the Skyball™
Left button
Skyball Cap
Right button
Skyball Base
The Skyball enables you to pan, zoom, and rotate separately or at
the same time. The base of the Skyball does not move, only the
cap (top half), moves.
Place the Skyball with the cord facing away from you. Place your
fingers on the raised areas of the cap. This helps orient you to
match the up/down/left/right of the cap to what’s on the screen.
Pan - Use side-to-side
motions to move the
model straight up and
down or left and right.
Zoom - Pull up or
push down on the cap
to zoom in and out.
Rotate - Tilt the cap
in the direction that
you want to rotate the
model.
Press the right button to re-center the model on the screen. This acts
the same as the Occlusal arrow in View Controls. This also re‑enables
the mouse for moving the model. However, once the Skyball is used, the
mouse is deactivated.
© 2013 E4D Technologies All rights reserved 10570700.R DRAFT
US $25.00
14