1
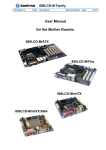
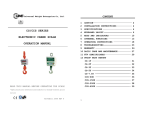
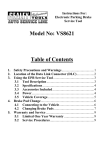
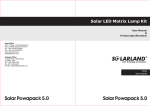
FWA-6280A User Manual
1
FWA-6280A User Manual
Copyright Notice
This document is copyrighted, 2005. All rights are reserved. The original Manufacturer
reserves the right to make improvements to the products described in this manual at any
time without notice. No part of this manual may be reproduced, copied, translated or
transmitted in any form or by any means without the prior written permission of the original
manufacturer. Information provided in this manual is intended to be accurate and reliable.
However, the original manufacturer assumes no responsibility for its use, nor for any
infringements upon the rights of third parties which may result from its use.
CE Notification
The FWA-6280, developed by Advantech Co., Ltd., has passed the CE test for environment
specifications when shielded cables are used for external wiring. We recommend the use of
shielded cables.
2nd Edition
Printed in Taiwan AUG 2005
2
FWA-6280A User Manual
Product warranty
Advantech warrants to you, the original purchaser, that each of its products will be free
from defects in materials and workmanship for two year from the date of purchase.
This warranty does not apply to any products which have been repaired or altered by
persons other than repair personnel authorized by Advantech, or which have been subject
to misuse, abuse, accident or improper installation. Advantech assumes no liability under
the terms of this warranty as a consequence of such events.
Because of Advantech’s high quality-control standards and rigorous testing, most of our
customers never need to use our repair service. If an Advantech product is defective, it will
be repaired or replaced at no charge during the warranty period. For out-of-warranty
repairs, you will be billed according to the cost of replacement materials, service time and
freight. Please consult your dealer for more details. If you think you have a defective
product, follow these steps:
1. Collect all the information about the problem encountered. For example, CPU speed,
Advantech products used, other hardware and software used, etc. Note anything abnormal
and list any on-screen messages you get when the problem occurs.
2. Call your dealer and describe the problem. Please have your manual, product, and any
helpful information readily available.
3. If your product is diagnosed as defective, obtain an RMA (return merchandise
authorization) number from your dealer. This allows us to process your return more
quickly.
4. Carefully pack the defective product, a fully-completed Repair and Replacement Order
Card and a photocopy proof of purchase date (such as your sales receipt) in a shippable
container. A product returned without proof of the purchase date is not eligible for warranty
service.
5. Write the RMA number visibly on the outside of the package and ship it prepaid to your
dealer.
3
FWA-6280A User Manual
Packing List
Before installation, ensure that the following materials have been received:
• One FWA-6280 Internet Security Platform
• One box of accessories, which includes a PS/2 Keyboard and mouse cable x 1 and Console
cable x 1
• One warranty certificate
If any of these items are missing or damaged, contact your distributor or sales
representative immediately.
Technical Support and Sales Assistance
If you have any technical questions about the FWA-3140 or any other Advantech products,
please visit our support website at:
• http://www.advantech.com.tw/support
For more information about Advantech's products and sales information, please visit:
• http://www.advantech.com
4
FWA-6280A User Manual
1 General Information
1.1 Introduction
Conceived as a powerful rackmount Internet security platform, the FWA-6280A
was specifically designed for high performance IDS/IPS, firewall, VPN gateway and
Unified Threat Management (UTM). Designed with the Intel® Xeon processor, it
provides high performance and meets the requirements of Internet security
appliances.
PCI-Express technology improves the I/O bandwidth and system total bandwidth
up to 32Gbps. The system supports two removable optional 3.5" IDE/SATA H.D.D.
and Compact Flash for OS and Internet security applications.
In addition, the FWA-6280A can support system memory up to 12 GB DDR2
memory. Both Compact Flash and memory can be accessed and replaced for
software upgrades through an easily removable cover. The H.D.D. can be
inserted/removed easily from the front panel. Designed with the Plug-and-Serve
concept in mind, the FWA-6280A offers eight 10/100/1000 Mbps LAN ports in the
front panel. For easy access, the front panel has a 9-pin RS-232 serial port, a 10/100
managed LAN port, and an LCD Module for local system management, maintenance,
and diagnostics. It is FCC and CE compliant.
1.2 Features
。 Intel Xeon. EM64T (Nocona), up to 3.2 GHz
。 Dual channel DDR-II 400 ECC registered, up to 12 GB
。 Eight 10/100/1000 Mbps LAN ports
。
Supports mini-GBIC, up to two interfaces
。 PCI-X 64/133 slots 3.3 V, up to 2 slots
。 Supports two removable 3.5” IDE/SATA HDD
。 One 10/100 Mbps managed LAN port
6
FWA-6280A User Manual
1.3 Specification
Processor
System
CPU
Max Speed
Chipset
Front Side Bus
BIOS
Memory
3.2GHz
Intel® E7520 (Lindenhurst) + 6300ESB (Hance Rapids)
800 MHz
Award 4MB Flash
Dual channel DDR II-400 ECC Registered
Capacity
Up to 12GB with 6 slots, installed in pairs
Onboard Expansion
slots
Riser card
Ethernet
processor
Technology
PCI-Express
Expansion
Intel® Xeon™ EM64T with Hyper Threading, single or dual
One PCI-E x8 connector
Support half-height cards without external access
Two PCI-X 64/133 connectors
Support full-height cards and external access, like, LAN and
SCSI
Managed LAN
One Fast Ethernet for management
Gigabit Ethernet
Eight, support fiber interface
LAN bypass
One segment for all copper ports
Controller
IDE
6300ESB
IDE interface
- Supports 3.5” H.D.D x 2 on IDE0
- Max. Data Transfer Rate 100MB/sec
SATA
Storage
- Non-hot swappable
SATA interface
- Supports 3.5” H.D.D bay x 2 on separate SATA channel
- Max. Data Transfer Rate 150MB/sec
- Supports Serial ATA, RAID 0,1
Compact Flash
Socket
USB
- Supports hot swap (SATA only)
One CF socket on IDE1
Two USB2.0
7
FWA-6280A User Manual
Peripheral
Power
Environment
Serial
One RS-232
LCD Module
Size:16x2, 5 buttons, in COM1
K/B, Mouse, LPT,
CRT
Pin headers
Watt
Support Redundant 500W
Input
90 ~ 240V AC
Operating
Non-Operating
Temperature
0 ~ 40 °C (32 ~ 104 °F)
-20 ~ 75 °C (-4 ~ 167 °F)
Humidity
5 ~ 85 % @ 40 °C (104 °F)
5 ~ 95 %
Dimensions(W x H
Physical
x D)
Weight
426 x 88 x 487.5 mm
(16.8” x 3.46” x 19.2”)
Weight 18 Kg (40lb)
8
FWA-6280A User Manual
1.4 Dimension
9
FWA-6280A User Manual
2 System Installation
2.1 Remove Top Cover
There are screws which secure the cover to the chassis. They are along
the sides, near the top. Remove them, and then slide the cover to the
rear of the chassis.
LCD Display Module
8 LAN ports
Power S/W
On/Off S/W
2 Hot-Swappable HDDs
Figure 2-1: Front view of FWA-6280
Management LAN port
RS232 Console port
USB2.0 ports
Figure 2-2: Remove Top cover
10
FWA-6280A User Manual
2.2 Install XEON Central Processor Unit
1. Locate the CPU ZIF socket on the motherboard. And pull the
Socket actuation lever to the 90-degree directly.
2. Position the CPU above the socket that its marked corner (golden
cut edge on the CPU upper corner) matches the base of the socket
lever. Insert the CPU into the socket. (Do not force the CPU into the
socket.) Then push down the socket lever to secure the CPU.
3. Position the cooling fan on top of the CPU, Screw each side of the
CPU cooling fan to fix on the retention mechanism, then installing
CPU is completed.
2.
1.
3.
3.
Figure 2-3: Installing Central Processing Unit
11
FWA-6280A User Manual
2.3 Install Memory
1. Unlock a DIMM socket by aligning the notch of the DIMM memory
module to match on the socket and insert the DIMM into the socket
until the DIMM is properly seated.
2. Press the retaining clips inward to lock the DIMM memory module.
Installing memory module is completed.
1.
1. & 2.
Figure 2-4: Installing Memory Module steps
12
FWA-6280A User Manual
2.4 Install Riser Card and PCI-X Adapter
1. Unscrew the rear side of the riser card
2. Unscrew the bracket of riser card, and pull out the riser card from M/B
3. Unscrew the I/O shield
4. Install a PCI card into the riser card, and position the screws
accordingly
5. Install the riser card into the M/B, and position the screws accordingly
1.
2.
3.
3.
5.
4.
Figure 2-5: Installing Riser Card and PCI-X Adapter steps
13
FWA-6280A User Manual
2.5 Install Hard Drive
1. Unlock a HDD tray socket by.
2. Pull out the HDD tray.
3. Place the HDD on the HDD tray, and position the screws accordingly.
4. Put back into the HDD bracket, and lock the HDD tray socket.
1.
2.
3.
4.
Figure 2-6: Installing Hard Drive steps
14
FWA-6280A User Manual
2.6 Install Compact Flash
1. Locate the compact flash socket on the motherboard.
2. Place the CF card in the compact flash socket as shown in the
picture.
1.
2.
Figure 2-7: Installing compact flash card steps
2.7 Removable Fan
1. Locate the removable fans on the rear side of system.
2. Unscrew the removable fans, and put it out from the system.
2.
1.
Figure 2-8: Installing removable fans steps
15
FWA-6280A User Manual