1
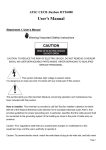
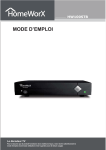
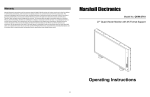
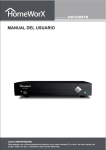
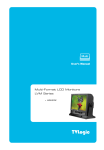
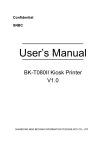
DTV Converter Box
User’s Manual
Content
Content………………………………...……………………………….……………………………………..……2
Safety warning………………...…………………………………………………………………………..………4
I . General Information ……………………………...………………………………………………….………5
1 Preface……………………………...…………………………..……………………..……………...5
2 Features………………………………………………….……………………………………………5
II . Overview Of The Equipment………………………………………………………………………….…...6
1 Front Panel…..………………..………………………..…………………..………………………...6
2 Rear Panel…..…………………………………………..……………………………………………7
3 Remote Control Unit...……………………………………………..………………………………...8
III . Cable Connections………….………………………………………………...………………………...….9
IV. Quick Installation………………..…………………………………………………………………….…….10
V . Menu Operation……………………………………….....………………..…….……………………….….11
1 Auto Search……………………………………………………………….………………………...12
2 CH Setup…..…………...………………………………………………………...…………………13
3 CC Setup……….…...………..………………….………………………………….……………...14
4 EAS Setup……………………………..…………………..…..………………………...………...15
5 Parental Control………………………………………………………………...…..……………...16
6 System Setup.…………………………………….……..…………………………….……………19
VI. Special Features…………...…………………….………….………………………..………………….….20
1 Channel List…….…………...……………….………………..………………...…..……………...20
2 Electronic Program Guide …………………...……………………………………….……………20
3 Channel information………………….……….…………….……………………….……………20
4 Sleep Setting………………………….…….……………….……………………….……………21
5 Audio Language..………………………………..…………………………………….……………21
6 Signal Strength..……………………………………..…..…………………………….……………22
7 3/4 CH output setting..……..…………………………….…………………………………………22
8 Loop though setting…………………………………………………………………………………23
APPENDIX
Trouble Shooting…………………………………………..………………………………………….24
Care And Maintenance…………………………………...…………………………………………..25
Specifications………………………………………………………...………………………………..26
2
Safety Warning
Instruction Markings:
General:
This marking appears on the rear panel of the receiver, painted prominently in contrasting color
to the background.
PART 1
This marking consists of two Graphical Symbols and warning message .The detailed
specifications are as follows:
CAUTION: To reduce the risk of electric shock, don’t remove cover (or back) .Equipment
service and maintenance should be undertaken only by trained personnel.
PART 2
This symbol indicates high voltage is present inside, It is dangerous to
make any kind of contact with any inside part of this product.
This symbol alerts you that important literature concerning operation and
maintenance has been included with this product.
3
Safety Warning
IMPORTANT SAFTY INSTRUCTIONS:
Always be careful when using your product. To reduce the risk of fire, electrical shocks, and other
injuries, keep these safety precautions in mind when installing, using, and maintaining your
machine.
Be sure to read this user’s manual before starting your operation.
Never open the cover. It is very dangerous to touch the inside of the unit due to possible
electric shock.
When you don’t use this unit for a long time, please pull the power cord from the outlet. Also
do not use a damaged power cord.
Do not touch the power with wet hand. If there is liquid flowing into the unit, pull out the power
cord immediately because it may cause fire or electric shock.
Place the unit in a well ventilated and no heat environment.
Install the unit horizontally. Unbalanced installation may cause the unit to be damaged.
When the unit is suddenly moved to a hot area from a cold area, it may cause problems. In
that case, turn off the power, and turn on after 1-2 hours.
Install the unit in a place with: good ventilation, suitable temperature, no direct sunrays, low
humidity, and low vibration influence.
Do not put heavy objects on the unit.
4
I . General Information
1 Preface
Thank you for purchasing the product .We designed it with easy-to-use on-screen menus and
closed captioning capabilities, making it one of the best products in its class. We are proud to offer
you a product that will provide convenient, dependable service and enjoyment for years to come.
Please read this user’s manual carefully to safely install, use and maintain the product at
maximum performance. Keep this user’s manual next to your product for future reference.
Note: Instructions and figures in the manual are just for your reference. If any discrepancy
exists, the goods are subject to your purchase of practical object.
2 Features
· Fully ATSC compliant.
· Loop Though or Channel 3/4 NTSC RF output.
· Electronic Program Guide (EPG).
· Support 4:3 center cut-out of 16:9 transmitted images, letterbox output of 16:9 letterbox
transmitted image, and a full or partially zoomed output of unknown transmitted image.
· Closed Captioning, Emergency Alert System (EAS) and Parental Controls (V-Chip).
· Composite Output, 3 female RCA connectors for composite video (yellow connector) & stereo left
and right audio (white and red connectors)
· Signal Quality Indicator
5
II. Overview Of The Equipment
1. Front Panel
①
②
③
1 POWER BUTTON
2 CH+ / CH-
3 IR
6
II. Overview Of The Equipment
2. Rear Panel
①
1.
②
③
④
RF OUT
Selectable Loop though or CH 3/4 NTSC RF output
2.
RF IN
Connect to terrestrial antenna.
3.
VIDEO
If your TV or monitor has Audio/Video capability , connect this jack to the AV Input jack on
your TV or monitor using an Audio/Video cable
4.
L – AUDIO - R
connects these terminals to analog audio inputs of a TV set. Or connect these terminals to
the L/R inputs of a separate audio component.
7
II. Overview Of The Equipment
3. Remote Control Unit
The Set-Top Box remote control and on-screen menu system work together to operate the Set-Top
Box as simple as possible. Understanding the remote control buttons and the menus allow you to
operate the Set-Top Box with ease.
The remote key list:
STANDBY: Press to switch between Operation and
Standby modes
MUTE:
Mutes the TV audio
0 – 9: Press to enter required numbers in the input box
or select a channel to watch
Press directly to tune particular channel.
– : Press to input a dash in a virtual channel number
CC: Press to turn CC on or of f
MENU: Press to display the Main Menu on the screen
EXIT: Press to return to the previous menu
Up/Down/Left/Right: Move cursor up/down/left/right
CH+/-: Channel + / VOL+/-: Volume + /OK: Press to execute the selected item in the menu , or
confirm the desired value in input mode
FAV: Press to display the favorite channel list for setting
8
III. Cable Connections
The following figure shows cable connections required for TV and other related electrical
equipment. If you need any assistance for specific equipment connection, please contact your
local dealer.
Antenna
RF Cable
TV 1
RCA Cable
3/4 CH / Loop though Cable
TV 2
Connections
1. Connect the antenna to RF IN connector.
2. Connect to TV by using RCA cable.
3. Connect the RF OUT for other TV if you want.
NOTES
If your antenna has separate leads for VHF/UHF signals, you will need to purchase a
combiner.
The Converter Box can receive DTV signals in the event that a local cable provider is
passing 8VSB through on their system.(8 VSB is the RF modulation format utilized to
transmit digital bits over the airwaves to the home consumer.)
When Receiving Digital Cable Signal: If your cable service signal does not comply with
the ATSC requirement, this product may not operate properly.
9
IV. Quick Installation
STEP 1: Check the cable connections
Make sure all the cables are connected correctly as figure in chapter of Cable
Connections
STEP 2: Turn on the television and switch to video mode
STEP 3: Power on
Turn on the STB by pressing the “STANDBY” switch on the front panel.
STEP 4: Search program
If there is no program stored in the Converter Box, or you want to add new program to
program list, you need to auto search program. Please refer to the next Chapter for
more details.
STEP 5: Play program
Select the desired program by using CH up/down or digital number keys under the
non-menu mode to view.
NOTE: All functions can be operated by using the keys on the RCU (Remote
Control Unit), and some of the functions can also be operated by using the
buttons on the front panel. If you experience any difficulty with the operation of
your unit, please refer to the relevant section in this manual, or call your dealer,
or customer service adviser.
10
V. Menu Operation
Press MENU key to display the main menu.
It consists of six items as following:
· Auto Search
· CH Setup
· CC Setup
· EAS Setup
· Parental Control
· System Setup
Figure 1
Use UP/DOWN keys to move up and down from
one item to another , and press OK key to
display corresponding sub-menu.
Example:
In the Main menu, use UP/DOWN keys to select
Auto Search item, and press OK key to enter
into Auto Search menu. (Figure 1 - > Figure 2)
Figure 2
Note: In any page of the menu, you can use EXIT key to return to previous menu page, or
press MENU key switch to Main Menu page and then press MENU key again to exit Main
Menu.
11
V. Menu Operation
1.
Auto Search
We suggest searching the TV program by using
the auto search function in Auto Search menu
for first use.
1> Use UP/DOWN keys to select Auto Search
item in Main menu, you will see the menu as
Figure 2.
2> Press OK key to enter into Auto Searching
window (Figure 3). System will search channels
automatically.
After searching, the searched channels will be added
to channel list and system will turn to full-screen mode
to view first searched program automatically.
Figure 3
During the searching, you can press LEFT key
to stop. When auto searching is completed or
stopped, you will see the information as Figure 4
Also, you can press EXIT key to exit auto
searching mode.
Figure 4
12
V. Menu Operation
2.
CH Setup
In Main menu, select CC Setup item and press OK
key to enter into Channel Setup menu (Figure 5).
·Skip / unskip a channel
If you want to skip a channel, you should use this
menu and do the following two steps:
1> Use UP/DOWN key to select Channel item,
then press OK key to select the channel backward
or forward that you want to skip.
Figure 5
2> Use UP/DOWN key to select the Skip item in
Channel Setup menu and press OK key to skip
current selected channel or not.
Favorite list
In the Remote control unit, you can press FAV key to set your favorite channels.
1> Press FAV key to enter into Favorite List
(Figure 6).
2> You can set maximum five favorite
channels, use UP/DOWN key to moving
up/down the highlight item, use OK to
select the particular channel.
After you set the favorite channel list and exit the
favorite list window, you can press FAV+/- key to
jump into favorite channel and change current
channel up or down set in favorite list.
Figure 6
13
V. Menu Operation
3.
CC Setup
In this section, you will get enough information
about how to set Closed Captioning
(CC608/CC708).
1> Use UP/DOWN key to select CC Setup item
in main menu ,and press OK key to enter
into CC Setup menu (Figure7).
2> Use UP/DOWN key to select a sub item, and
press OK key to change current item setting.
If you don’t want to display the CC when viewing
the program , you can set CC Display Off.
Figure 7
If you don’t want to change the CC style of
current program, you can set CC Mode to
Broadcast mode as Figure 7. When CC Mode is
Broadcast, CC Customer is grayed-out and
cannot be edited.
The default value about CC setup menu is
following:
CC Display:
On;
608CC Type: C1;
708CC Type: Service 1;
CC Mode:
Broadcast;
Figure 8
You can set CC style as you like as following:
1> Use UP/DOWN key to select CC Mode item
in CC Setup menu(Figure 8) and press OK
key to set CC Mode to Customer;
2> Use UP/DOWN key to select CC Customer
item in CC Setup menu (Figure 8), then
press OK key to enter into CC Customer sub
menu (Figure 9)
3> In CC Customer menu, you can use
UP/DOWN key to select sub item and use
OK key to change setting.
Figure 9
14
V. Menu Operation
Some important things about 608CC/708CC
1> If you set CC Display On, and the program has CC608 and CC708 at the same time, CC 708
display is higher priority than the CC608 display.
2> If you have not set the 608CC and 708CC type to proper setting, the CC will not be displayed
even the current program contains CC information.
3> You can’t change CC608 style, such as font, color, or others.
CC Option List
4.
Item
Option
Default
CC Size
Small, Standard, Large
Standard
CC Font
Font0, Font1, Font2, Font3, Font4, Font5, Font6, Font7
Font1
CC Opacity
Solid, Trnsl, and Trnsp
Solid
CC color
Black, White, Red, Green, Blue, Yellow, Magenta, and
Cyan
White
Font Edge color
Black, Gray, Red , Green , Blue , Yellow , Navy and Dark
Gray
Black
Font Edge type
None, Raised, Depressed, Outline, L.Shadow and
R.Shadow
None
Background color
Black, Gray, Dark Gray, Red, Navy, Green, Blue and
Yellow
Black
Background
opacity
Solid, Transparent
Solid
EAS Setup
The system can display EAS (Emergency Alert
System) message broadcast pursuant to
47CFR11.117 of the FCC Rules.
1>
2>
In main menu(Figure 1), use UP/DOWN
key to select EAS Setup item and press
OK key to enter into EAS Setup menu.
Use UP/DOWN key to select EAS level
and change the current setting.
There are three setting: Always, Skip low priority
and Skip low/medium priority. The default setting is Always.
Figure 10
15
V. Menu Operation
5.
Parental Control
Before entering Parental Control menu, you need
to input password in order to prohibit from the child
to change any settings on the Parental Control.
How to enter into Parental Control menu
1> In main menu(Figure 1), use UP/DOWN key
to select Parental Control item and press OK
key to enter into Parental Control password
input page(Figure 11).
2> Input the password by pressing digital number key
(default password is : 0000). If password is invalid,
input numbers are cleared and you need to input
password again; when password is valid, Parental
Figure 11
Control menu will be displayed automatically (Figure 12).
About Parental Control menu
1> Enter into Parental Control menu (Figure 12) ;
2> Use UP/DOWN key to select sub item and use
OK key to enter into sub menu or change
current item setting.
This menu you can set as following:
·V-chip Setting;
·RRT Setting;
·Block Enable;
·Unrated;
·Change Password;
Figure 12
·V-chip setting
1> Select V-chip Setting item in Parental Control
menu(Figure 12) and press OK key to enter
into V-chip setting menu(Figure 13).
2> Use UP/DOWN key to select sub item and
press OK key to enter into sub menu.
V-chip Rating includes the following rating level:
·Movie rating
·USA TV Content rating
·Canada English rating
·Canada French rating
Figure 13
16
V. Menu Operation
Example:
How to set Movie ratings;
1> Select Movie ratings item in V-chip Setting
menu(Figure 13) and press OK key to enter
into Movie ratings menu(Figure 14);
2> Press UP/DOWN key to select sub item;
3> Press OK key to set view or block, default
setting is view;
- VIEW
- BLOCK
Figure 14
Instruction:
1> Blocking one rating will affect all the higher
ratings. For example, blocking “R”, and the
above rating “NC-17” and “X” will automatically
block, no matter the previous state of these
ratings was. If a password is defined while a
TV program rating is received from the current
channel, then sound will be muted and the
following message is displayed on the center of
screen. The rating information should be
consistent with current program rating.
2> Using the same way to set USA TV Content /
Canada English / Canada French ratings.
Figure 15
·RRT setting
1> Select RRT Setting item in Parental Control
menu (Figure 12) and press OK key to enter
into RRT setting menu (Figure 16).
2> Use UP/DOWN key to select sub item and
Press OK key to enter into sub menu. (Figure
17).
3> Use OK key to set View or Block
Figure 16
17
V. Menu Operation
Note: if you select Reset item in RRT Settings
menu and press OK key, the contents of RRT
Setting menu will disappear, you must exit
RRT Setting menu and enter into it again to get
the contents.
Figure 17
·Change Password
1> Select Change Password item in Parental
Control menu (Figure 12) and press OK key to
enter into Change Password menu (Figure
18).
2> Input the new password , after that, the system
will require you to confirm the new password
as Figure 19
3> Confirmed the password, if success, you will
get the message as Figure 20
Figure 18
Figure 19
Figure 20
Note: If you want to disable parental control blocking function, you can set “Block Enable”
item to “off”, or if you want to disable this function completely, you could set “Unrated”
item to “off”.
18
V. Menu Operation
6.
System Setup
In main menu, select System Setup item and
press OK key to enter into System Setup menu
(Figure 21). Press UP/DOWN to select item and
OK key to enter into sub menu or change current
item setting.
Figure 21
1> Factory Reset: Restore system setting parameter to
default setting if you press OK key when this item is highlighted.
2> Time Setup: Enter into a menu for time setup
3> OSD Language: Set OSD language to English, Spanish or French, default is English.
4> Audio Language: Set audio language to English,
Spanish or French, default is English.
5> RF Output: Select the loop though or Ch3/4 RF output.
6> Screen: Set display screen type, default is 4:3.
7> Format: Zoom in or zoom out the picture.
About Time Setup
1> Enter to System menu;
2> Use UP/DOWN key to select Time Setup
item and press OK key to enter into Time
Setup menu(Figure 22);
3> Press UP/DOWN key to select different item
and press OK key to change setting.
Instruction:
1> The Clock item displays the current time
from programs and you can’t change it.
2> The time zone item can set to Eastern, Samoa,
Hawaii, Alaska, Pacific, Mountain, Central, Atlantic,
Newfoundland, the default is Samoa;
3> The Daylight saving switch, and default value is off.
Figure 22
19
VI. Special Features
1.
Channels List
1> Press OK key when TV is showing no menu,
the channels list will be displayed (Figure
23), you can get the information about
channel number, channel name, skip status
of all channels.
2> Press UP/DOWN key to select item and
Press OK key to switch current channel to
your selected channel.
Figure 23
2. Electronic Program Guide
1>
Press GUIDE key to open the EPG window,
it displays the first page of program
scheduler;
2> Press RIGHT key to switch the next
page in program scheduler.
3> Press LEFT key to switch the previous
page in program scheduler.
Figure 24
3.
Channel information
Press DISPLAY key to get the information of
current channel. All the information is following:
[1] Channel number: current channel number.
[2] Channel name: current channel name.
[3] Picture size: current picture
[4] System time: current time of day
information.
[5] Program name: current program name.
[6] Program time: time duration of current
program.
[7] Audio language: current language in the program
[8] CC&CS: current status of CC
[9] V-chip Info: current program V-chip information.
Figure 25
20
VI. Special Features
4.
1>
2>
Sleep Setting
Press MENU key to enter into main menu;
Select System Setup item and press OK
key to enter into System Setup menu;
Use UP/DOWN key to select Power Save
Mode item and press OK key to change
setting.
There are four setting: OFF / 2 hours / 4 hours /
8 hours, and the default are 4 hours.
3>
Note: If you pull out the power cord, the setting will be initialized to default value (4 hours).
Figure 26
5.
Audio Language
Press AUDIO key to set audio language of the
current program.
If the program contains several audio languages,
you can switch the audio language between
these languages by pressing MTS key. The
system can display the full language name of
English, Spanish, French, German, Italian,
Japanese, Chinese, Korean, but others just only
use the front three letters of language name
instead of the full name.
Figure 27
Set default audio language:
You can set the default audio language in menu:
1>
2>
Press MENU key to enter into main menu;
Select System Setup item and press OK
key to enter into System Setup menu;
3>
Use UP/DOWN key to select Audio
Language item and press OK key to
change setting.
Figure 28
21
VI. Special Features
6.
Signal Strength
Press SIGNAL key to display the signal
strength of current channel. (Figure 29)
Figure 29
7.
3/4 CH output setting
Figure 30
The system can output channel 3 or channel 4 NTSC RF signal as following:
1>
2>
Use a cable to connect “RF OUT” converter of the STB(Figure 30) and your TV can support
CATV input;
Auto search the program and change current channel to CH 3 or CH 4 directly by inputting
the channel number in your TV;
22
VI. Special Features
8.
Loop though output setting
The system can select the loop though as following:
1> Use a cable to connect “RF OUT” converter of the STB(Figure 30) and your TV can support
CATV input;
2> Auto search the program to the target channel.
3> Go to the Setup Menu and On/Off the loop though RF output.
23
Appendix
Trouble Shooting
If you have difficulty with your digital TV set-top receiver, there are several possibilities you should
investigate before calling for a service technician.
Problem
The display on the front
panel does not light up
No sound and no picture
No signal when selecting
channels
Picture only ,but no
sound
Sound only, but no
picture
Video and audio
mismatch or abnormal
sound
Picture is still or mosaic
phenomenon
Remote control unit does
not work
Possible Causes
What To Do
Power cord is not connected
Check that the power cord is
plugged into power socket
The receiver is under standby
Press POWER key on the front
panel to switch to operation mode
The signal cable is disconnected
Connect the signal cable securely
Program parameters are set
incorrectly
Set correct parameters
Audio cable is not connected
securely
Connect it securely
System in MUTE mode
Press MUTE key on the RCU to
restore volume
Volume is set to minimum
Increase the volume to suitable
level
Audio setting parameter is wrong
Please go to Audio Setting menu,
select proper audio mode and
proper audio language
Video cable is not connected
securely
Connect the video cable securely
The current channel is in radio
mode
Normal
Audio channel is not set
correctly
Select proper Audio channel
Signal is too weak
Check to make sure that the signal
cord has been connected tightly
RCU is not aimed at the sensor
on the front panel
Aim at the sensor on the front
panel
Not enough power in the battery
of the remote control
Change battery
CAUTION: If the problems are still unsolved after you’re done all of these. Do not open the STB
yourself! Please contract the dealer, and the trained personnel will help you.
24
Appendix
Care and Maintenance
With proper care, your Set-Top Box will give you many years of service. Please follow these
guidelines to get the maximum performance.
Placement
·Do not put the Set-Top Box near extremely hot, cold, humid or dusty places.
·Do not put the Set-Top Box near appliances that create magnetic fields.
Liquids
·Do not handle liquids near or on the Set-Top Box.
Cabinet
·Never open the cabinet or touch the parts inside.
·Wipe your Set-Top Box with a clean, dry cloth. Never use water, cleaning fluids, wax, or
chemicals.
·Do not put heavy objects on top of the cabinet.
Temperature
·If your Set-Top Box is suddenly moved from a cold to a warm place, unplug the power cord for at
least two hours so that moisture that may have formed inside the unit can dry completely.
25
Appendix
Specifications
General Specification
Broadcasting standard
ATSC
Power requirement
AC 100 ~ 240V, 50-60 Hz
Power consumption
20 watts / In standby:2 watts
Dimensions(W x D x H)
225 x 162 x 40 (mm)
Weight
0.76kg
RF Specification
Input Frequency
54 ~ 807 MHZ (VHF :2 ~13 / UHF : 14 ~ 69)
Channel Bandwidth
6M
Input Level
-83 ~ -5 dBm
Antenna
75-ohm external antenna terminal for VHF/UHF
Number of inputs/outputs
75-ohm VHF/UHF In/Out
Video out
2 Analog Audio Out (R/L)
26