1
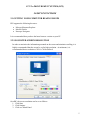
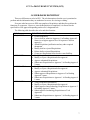
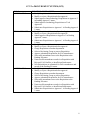
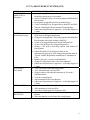
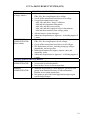
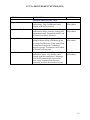
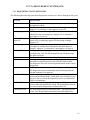
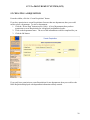
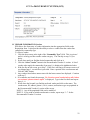
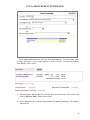
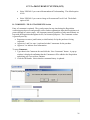
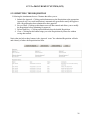
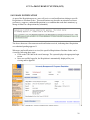
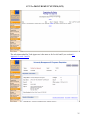
CUNY e-PROCUREMENT SYSTEM (EPS) USER MANUAL May 7, 2008 1 CUNY e-PROCUREMENT SYSTEM (EPS) TABLE OF CONTENTS 1.0 INTRODUCTION .................................................................................................................... 3 1.1 EPS SYSTEM OVERVIEW................................................................................................ 3 1.2 DOCUMENT OBJECTIVE................................................................................................. 3 1.3 DOCUMENT OUTLINE..................................................................................................... 4 2.0 SET UP FUNCTIONS.............................................................................................................. 5 2.1 GETTING YOUR COMPUTER READY FOR EPS.......................................................... 5 2.2 SUGGESTED SCREEN RESOLUTION ............................................................................ 5 2.3 HELPFUL HINTS ............................................................................................................... 6 3.0 USER ROLES DEFINITION ................................................................................................... 7 4.0 GETTING INTO EPS............................................................................................................. 11 4.1 LOGGING INTO THE SYSTEM ..................................................................................... 11 5.0 e-PROCUREMENT PROCESSING ...................................................................................... 12 5.1 e-PROCUREMENT ACCESS........................................................................................... 12 5.1.1 SIDEBAR OPTIONS ........................................................................................... 15 5.1.2 REQUISITION STATUS DEFINITION ............................................................. 19 5.2 CREATING A REQUISITION ......................................................................................... 20 5.2.1 COMPLETING THE REQUISITION FORM ..................................................... 21 5.3 SUBMITTING THE REQUISITION ................................................................................ 28 5.4 E-MAIL NOTIFICATION ................................................................................................ 29 6.0 REQUISTION APPROVAL PROCESS ................................................................................ 30 6.1 APPROVAL - LEVELS 1 and 2........................................................................................ 30 6.2 TECH APPROVAL ........................................................................................................... 34 6.3 APPROVAL - LEVEL 3.................................................................................................... 36 7.0 PURCHASE ORDER PROCESS........................................................................................... 41 7.1 GENERATING/ASSIGNING A PURCHASE ORDER ................................................... 41 7.2 CANCELLING A REQUISITION/PURCHASE ORDER ............................................... 44 7.3 BID PROCEDURE ............................................................................................................ 45 7.3.1 INVITATION TO BID ........................................................................................ 45 7.3.2 RECEIVING BIDS.............................................................................................. 51 7.3.3 AWARDING THE BID....................................................................................... 53 7.4 DRAFTING THE PURCHASE ORDER .......................................................................... 56 7.5 SUBMITTING THE PURCHASE ORDER...................................................................... 58 7.5.1 COMPLETING THE PURCHASE ORDER FORM........................................... 61 8.0 FIXED ASSETS ..................................................................................................................... 68 9.0 RECEIVING ........................................................................................................................... 70 9.1 FIRST TIME RECEIPT OF MERCHANDISE................................................................. 70 9.2 CENTRAL RECEIVING GROUP .................................................................................... 74 9.3 SUBSEQUENT RECEIPT OF MERCHANDISE............................................................. 74 9.4 COMPLETED RECEIPT OF MERCHANDISE .............................................................. 75 2 CUNY e-PROCUREMENT SYSTEM (EPS) 1.0 INTRODUCTION 1.1 EPS SYSTEM OVERVIEW The e-Procurement System (EPS) is intended to automate and standardize the Requisition/Purchase Order process within CUNY. The system supports the following: Requesting goods and/or services; approving the request; generating and assigning Purchase Order; and tracking the receipt of the goods/services. Payment procedures are currently outside the scope of the EPS system. 1.2 DOCUMENT OBJECTIVE This manual provides a user guide for user/system interactions performed by the varying levels of college personnel involved in ordering goods and services. WHAT IS COVERED Written for an “end user” audience, this user guide: a. Describes the process flow of Requisition / purchase order and defines the responsibilities of functional execution within them. b. Defines step-by-step procedures for keeping track of the status and completion of Requisition / purchase order. c. Identifies the screens accessed at each level and provides instructions for their completion and/or correction (as appropriate). WHAT IS NOT COVERED This document does not provide system level specifications. For example, it does not: a. Define detail edits or itemized program steps within the EPS system process. b. Provide database type information or record layouts for the files used within processing. c. Provide system configuration or detail technical specifications. 3 CUNY e-PROCUREMENT SYSTEM (EPS) 1.3 DOCUMENT OUTLINE The e-Procurement System (EPS) User Guide presents chapters comprised of screen displays and step-by-step completion instructions for: • Setting up the computer and defining user roles within EPS. • Functions involved in Purchase Order generation, including: ¾ Creating a Requisition. ¾ Submitting a Requisition for approval. ¾ Approving a Requisition. ¾ Submitting a Requisition for encumbrance in FAS. ¾ Assigning a Requisition to a buyer. ¾ Creating an Invitation To Bid (ITB). ¾ Generating the PO (Purchase Order, Contract, Direct Pay). ¾ Completing the PO. ¾ Submitting the PO for encumbrance in FAS. ¾ Entering merchandise received into a Receiving Report. ¾ Tracking the PO. • Administrative functions, such as maintaining information used within the system that includes Ship To Addresses, Department Profiles, Group Members, and User Profiles. 4 CUNY e-PROCUREMENT SYSTEM (EPS) 2.0 SET UP FUNCTIONS 2.1 GETTING YOUR COMPUTER READY FOR EPS EPS supports the following browsers: • • • Microsoft Internet Explorer Mozilla Firefox Netscape Navigator It is recommended that you have the latest browser version on your PC. 2.2 SUGGESTED SCREEN RESOLUTION In order to maximize the information presented on the screen and minimize scrolling, it is highly recommended that the screen be set for high resolution. At minimum, it is recommended that a resolution of 1024 x 768 be utilized. On a PC, the screen resolution can be set as follows: 1. Click Start 2. Click Settings 3. Click on Control Panel 5 CUNY e-PROCUREMENT SYSTEM (EPS) 4. Double click "Display" 5. Click the "Settings" tab 6. Move the slide control on the Screen Resolution left or right to achieve the higher resolution recommended - 1024 x 768 7. Click the "Apply” button 8. Click the "OK" button 2.3 HELPFUL HINTS Following are some suggestions for using EPS as efficiently as possible: • • • • • • • Have the latest browser version. Allow pop-up windows in your browser. Have the latest Adobe Reader installed. Do not use the browser’s forward and backward buttons to navigate EPS - always use the navigation buttons and links within EPS. Do not refresh your screen while entering data - you will lose information that you are entering. After one hour of inactivity, your session will expire and you will be logged off from the system. EPS operates within the protection of SSL (Security Socket Layer) - a security protocol that protects your system from unauthorized access. While using EPS you may be prompted with the following: “Do you want to display non secured items?” – Click “OK” to continue or “NO” to terminate the session. 6 CUNY e-PROCUREMENT SYSTEM (EPS) 3.0 USER ROLES DEFINITION There are different user roles in EPS. The role determines what the user is permitted to perform and the information they are authorized to access for viewing or editing. Everyone who has access to EPS can complete a Requisition, and therefore perform the functions of a requester. However, once the Requisition is completed, it is directed to the specified level for approval depending on the user’s designated role. The following table describes the roles and their function: ROLE REQUESTER APPROVER 1 ALTERNATE 1 APPROVER 2 FUNCTION / EDIT ACCESS • Create Requisition. • Save as draft or submit to Approver 1 in Pending Approval 1 Status (or to higher approval level if requester is also an approver). • Attach Requisition justification and any other required documents. • Modify draft or rejected Requisitions. • Delete draft or rejected Requisitions. • Create new Requisition from closed or cancelled Req. • Verify Requisition information. • Modify or reject a Requisition before approval. • Approve submitted Requisitions. • Submit new Requisitions to Approver 2 in Pending Approval 2 status. • Verify Requisition information. • Modify or reject a Requisition before approval. • Approve submitted Requisitions. • Submit approved Requisitions to Approver 2 in Pending Approval 2 status. • Submit new Requisitions to Approver 1 in Pending Approval 1 status. • Verify Requisition information. • Modify or reject a Requisition before approval. • Submit approved non-technology Requisitions to Approver 3 in Pending Approval 3 status. • Submit approved technology Requisitions to Tech Approvers. • Submit new Requisitions to Approver 3 in Pending Approval 3 status. 7 CUNY e-PROCUREMENT SYSTEM (EPS) ROLE ALTERNATE 2 TECH APPROVER APPROVER 3 ALTERNATE 3 FUNCTION / EDIT ACCESS • Verify Requisition information. • Modify or reject a Requisition before approval. • Submit approved non-technology Requisitions to Approver 3 in Pending Approval 3 status. • Submit approved technology Requisitions to Tech Approvers. • Submit new Requisitions to Approver 1 in Pending Approval 1 status. • Verify Requisition information for technology items. • Modify or reject a Requisition before approval. • Submit approved Requisitions to Approver 3 in Pending Approval 3 status. • Submit new Requisitions to Approver 1 in Pending Approval 1 status. • Verify Requisition information. • Modify or reject a Requisition before approval. • Charge Requisition to another department. • Select a Purchasing Group to process Requisition. • Approve submitted Requisitions for FAS encumbrance. • Successful encumbrance moves the Requisition to the Pending PO status. • Unsuccessful encumbrance results in a Requisition with Rejected, FAS Conflict, or Insufficient Funds status. • New Requisitions are submitted for FAS encumbrance and moved to the Pending PO status. • Verify Requisition information. • Modify or reject a Requisition before approval. • Charge Requisition to another department. • Select a Purchasing Group to process Requisition. • Approve submitted Requisitions for FAS encumbrance. • Successful encumbrance moves the Requisition to the Pending PO status. • Unsuccessful encumbrance results in a Requisition with Rejected, FAS Conflict, or Insufficient Funds status. • Submit new Requisitions to Approver 1 in Pending Approval 1 status. 8 CUNY e-PROCUREMENT SYSTEM (EPS) ROLE PURCHASING DIRECTOR (or Designee) BUYER (Purchasing Group) ACCOUNTS PAYABLE FIXED ASSETS CENTRAL RECEIVING FUNCTION / EDIT ACCESS • Assign Pending PO Req to staff member (buyer). The Requisition status moves to Assigned. • Select a Pending PO Req’s Processing Option and Method of Procurement. • Reassign an Assigned Requisition to another buyer. • Cancel a Pending PO or Assigned Req in both EPS and FAS. • Transfer a Pending PO Req to another Purchasing dept. • Submit new Requisitions to Approver 1 in Pending Approval 1 status. • Perform bidding procedure by creating an Invitation To Bid (ITB) from an Assigned Requisition. • Change an Assigned Req’s Processing Option and Method of Procurement (used when creating a draft PO). • Cancel an Assigned Requisition in both EPS and FAS. • Create a PO draft from an Assigned Requisition. • Change a PO draft’s Processing Option and Method of Procurement. • Submit PO draft to FAS (Purchase Order #s are automatically generated). EPS changes Requisition status to “Closed” and the Requisition encumbrance is liquidated in FAS. • Increase, decrease, or cancel a submitted PO. • Change PO information after it has been submitted. • Submit new Requisitions to Approver 1 in Pending Approval 1 status. • View Closed and Cancelled Requisitions. • View Submitted and Cancelled POs. • Change expense code and add comments in POs with a Submitted status. • View Receiving Reports. • Add comments in Receiving Reports. • Submit new Requisitions to Approver 1 in Pending Approval 1 status. • View fixed asset POs with a Submitted status. • Add comments to fixed asset POs. • View Receiving Reports for fixed asset POs. • View Submitted and Cancelled POs that have Receiving Reports. • Enter merchandise received into Receiving Reports. 9 CUNY e-PROCUREMENT SYSTEM (EPS) ROLE SUPER USER (College Admin.) FUNCTION / EDIT ACCESS • View and edit access to all Procurement data (Requisitions, ITBs, POs, Receiving Reports) for a college. • Can do all the transactions listed above for a college. • Can perform administrative tasks: - Add, edit, and delete “ship to” addresses - Add and edit department information - Add, edit, and delete user profiles - Add, edit, and delete approval roles for departments - Add and delete members from college groups • Add and remove system messages. • Submit new Requisitions to Approver 1 in Pending Approval 1 status. E-PROC DATA • View and edit access to all Procurement data (Requisitions, ADMINISTRATOR ITBs, POs, Receiving Reports) for all colleges. (Data Admin.) • Can do all the transactions listed above for all colleges. • EPS deployment activities, including setting up colleges, departments, and user profiles. • Maintain information for ledgers, expense codes, and commodity codes. • Submit new Requisitions to Approver 1 in Pending Approval 1 status. SYSTEM ADMINISTRATIVE ROLES: EPS SYSTEM • Edit access to all system configuration information. ADMINISTRATOR • Set up initial system information. • Does not have access to Procurement data. DOMINO • Maintains all usernames, e-mail addresses, passwords, and ADMINISTRATOR groups in the Domino Directory (NAB) and monitors Domino server related transactions. • Run agents as part of the initial application setup or upon system design changes. 10 CUNY e-PROCUREMENT SYSTEM (EPS) 4.0 GETTING INTO EPS 4.1 LOGGING INTO THE SYSTEM To access the e-Procurement System (EPS) you must sign on to the Website where EPS resides, as follows: 1. Open a desired browser and enter this URL: https://ebusiness.cuny.edu The system will display the Log in screen. 2. Enter your name in Username and your Password. 3. Hit Enter or click the Login button. 4. If you have forgotten your password, click on the “Forgot Your Password?” link and enter your username. Your new password will be emailed to you. 11 CUNY e-PROCUREMENT SYSTEM (EPS) 5.0 e-PROCUREMENT PROCESSING 5.1 e-PROCUREMENT ACCESS CHANGING YOUR PASSWORD 1. When you click “Password”, the following “Change Password” confirmation pop-up window is displayed. 2. Click the “OK” button to proceed. You will be returned to the initial Log in screen. Click the “Cancel” button if you decide not to change your password. The confirmation prompt will disappear. 12 CUNY e-PROCUREMENT SYSTEM (EPS) 3. Log in again entering your name and old password (this ensures that another person is not trying to change your password). 4. Once logged in, the system displays the “Change Password” screen. 5. Following the instructions on the screen, enter your new password in the “New Password” field, and enter it again in the “Confirm Password” field. 6. Click “Cancel” if you do not wish to change your password. The system returns to the log in screen where you must log in with your old password. 7. Click “Change Password” to apply your changes. The system displays the “Successful Password Change” screen, instructing you that you must wait at least five minutes and then log in using your new password. 13 CUNY e-PROCUREMENT SYSTEM (EPS) If after waiting at least five (5) minutes you have problems logging in with your new password, contact the EPS System Administrator. 14 CUNY e-PROCUREMENT SYSTEM (EPS) 5.1.1 SIDEBAR OPTIONS The Sidebar presents the sections and options available to the logged on user for continued processing within the e-Procurement system. The available sections and options depend on the user’s designated EPS role. The table below describes options under each section and defines which roles have access authority. OPTION Password Logout Create Requisition FAQs about Procurement About EPS: EPS Enhancements About EPS: EPS User Guide Search For Requisitions Assigned to Me Created By Me Require My Approval Require Tech Approval By Status For Purchasing Group: By Status DEFINITION Allows the user to change their password. Returns the user to the Login screen. If entered data was not saved, it is lost. Allows the user to create a Requisition. If the user can create Requisitions for more than one department, a department must be selected first before a Requisition can be created. HELP SECTION Frequently asked questions about how to buy goods and services. The file is in PDF format. A list of changes to the e-Procurement system. The file is in PDF format. This document, in PDF format. ACCESS All Roles All Roles All Roles All Roles All Roles All Roles REQUISITIONS SECTION This allows you to enter criteria for finding Requisitions and All Roles displays the search results. If you are a buyer in a Purchasing Department, this displays all Requisitions assigned to you, sorted by Dept, Date assigned, or Charged to P/T card. Displays a list of all Requisitions you have created, sorted by Department, Requisition status, Date created. Purchasing Dept Buyer If you are an approver, this displays a list of all Requisitions Pending Approval at your level, sorted by Requisition status, Department, Requisition date. If you are a technology approver, this displays a list of all Requisitions Pending Approval at your level, sorted by Department, Requisition date. Displays a list of all Requisitions filtered by Requisition Status, sorted by Department, Date created. Approvers / Alternates 1, 2, 3 Technology Approvers Displays a list of encumbered, closed, and cancelled Requisitions sorted by Requisition status, Encumbered date, Requisition number. Purchasing Dept All Roles All Roles 15 CUNY e-PROCUREMENT SYSTEM (EPS) OPTION For Purchasing Group: Pending PO Other Req Lists: By Department DEFINITION Displays a list of all Requisitions Pending PO sorted by Encumbered date, Requisition number. Other Req Lists: By Req Number Displays a list of all Requisitions sorted by Requisition number, Requester, Date created. All Roles Other Req Lists: By Vendor Displays a list of all Requisitions sorted by Vendor name, Requisition number. All Roles Closed / Cancelled After 90 Days (Archived) Requisitions that have been closed or cancelled are automatically archived after 90 days. This option allows viewing of the archived Requisitions, sorted by Requisition number. All Roles Search For ITBs By Bid Number Search For POs ACCESS Purchasing Dept Displays a list of all Requisitions filtered by Department and All Roles sorted by Requisition Status, Date created. BID INVITATIONS SECTION This allows you to enter criteria for finding Invitation To Bids (ITBs) and displays the search results. Displays a list of all ITBs, sorted by Bid number. PURCHASE ORDERS SECTION This allows you to enter criteria for finding Purchase Orders, Contracts, and Direct Pays (POs), and displays the search results. Purchasing Dept Purchasing Dept All Roles Assigned To Me If you are a buyer in a Purchasing dept, this displays all POs that have been assigned to you, sorted by Department, PO date, PO number. Purchasing Dept Buyer By Status Displays a list of all POs sorted by Status, Department, Date created. All Roles With Attached Invoice Displays a list of all POs with attached invoices, sorted by PO number. For Accounts Payable Displays a list of all encumbered and cancelled POs, sorted by PO status, PO number. Purchasing Dept, Accts Payable Dept Accounts Payable Dept Other PO Lists: By Department Displays a list of all POs filtered by Department, sorted by PO Status, PO Date. All Roles Other PO Lists: By PO Number Displays a list of all POs sorted by PO Number, Requisition number. All Roles Other PO Lists: By Vendor Displays a list of all POs sorted by Vendor name, PO number. All Roles 16 CUNY e-PROCUREMENT SYSTEM (EPS) OPTION Other PO Lists: By Encumbered Date DEFINITION Displays a list of all POs sorted by Encumbered date, PO number. ACCESS All Roles Older Than Two Fiscal Years (Archived) POs older than two fiscal years are automatically archived. This option allows viewing of the archived POs, sorted by PO number. All Roles FIXED ASSESTS SECTION Search For Fixed This allows you to enter criteria for finding POs for fixed assets, and displays the search results. Assets Fixed Asset Dept By Expense Code Displays a list of POs for fixed assets sorted by Expense code, PO number. Fixed Asset Dept By PO Number Displays a list of POs for fixed assets sorted by PO Number. Fixed Asset Dept Search For Receiving Rpts RECEIVING REPORTS SECTION This allows you to enter criteria for finding Receiving Reports, and displays the search results. All By PO Number Displays a list of all Receiving Reports sorted by PO number. All Roles Other Receiving Report Lists: Open Receiving Rpts Displays a list of Receiving Reports that are awaiting receipt of merchandise, sorted by PO number. All Roles Other Receiving Report Lists: Closed Receiving Rpts Displays a list of Receiving Reports that have received all merchandise, sorted by PO number. All Roles Older Than Two Fiscal Years (Archived) Receiving Reports older than two fiscal years are automatically archived. This option allows viewing of the archived Receiving Reports, sorted by PO number. All Roles My Profile USER PROFILE SECTION This allows you to edit your user profile information. All Roles View Messages MESSAGE BOARD SECTION Displays college specific or system wide messages. All Roles View Forum FORUM SECTION Displays college specific discussion forum entries. All Roles All Roles 17 CUNY e-PROCUREMENT SYSTEM (EPS) OPTION DEFINITION ADMINISTRATION SECTION Displays a list of all Ship To addresses for each college. Ship To addresses can be created, modified, or deleted. ACCESS Department Profiles Displays a list of all Department Profiles within each College, sorted by College and Department name. Department Profiles can be created, modified, or deleted. Super User & Data Admin. Group Members Displays usernames belonging to different groups within a college (Purchasing group, Accounts Payable group, Fixed Asset group, Central Receiving group, Technology Approver group). Usernames can be added or deleted to/from groups. Super User & Data Admin. User Profiles Displays a list of User Profiles sorted by Last Super User & Data Admin. Name/First Name. User Profiles can be created, modified, and deleted. Deleting a User Profile automatically removes the user’s entry from the Notes Directory (removing access to the e-business server). Ship to Addresses Super User & Data Admin. 18 CUNY e-PROCUREMENT SYSTEM (EPS) 5.1.2 REQUISITION STATUS DEFINITION The following describes the status that a Requisition can have as it moves through its life-cycle: STATUS DEFINITION Draft The Requisition is a work in progress. Requester is still editing the Requisition draft. The Requisition has been submitted to the first approver. Approver 1 or Alternate 1 must approve or reject it. The Requisition has been approved at the first level and has been submitted to the second approver. Approver 2 or Alternate 2 must approve or reject it. The Requisition contains technology related items and must be approved by a technology approver before going to budget (approver 3). The Requisition has been approved at the second level or by a tech approver, and has been submitted to the third approver (budget). Approver 3 or Alternate 3 must approve or reject it. The Requisition has been approved at the third level and has been encumbered in FAS. The Purchasing Director will then assign the order to a Buyer. The Requisition has been assigned to a Buyer. The Requisition has been automatically closed as the Buyer turned the Assigned Requisition into a Draft Purchase Order. The Requester can create a new Requisition based on this closed Requisition. The Requisition has been rejected at the Approver 1, 2 or 3 level. The Requester can now permanently delete the Requisition or edit and resubmit it for approval. FAS has rejected the “post up” of the approved Requisition for reasons of insufficient funds. Funds need to be allocated for it to proceed. Once resolved, the Requisition can be re-submitted to FAS for encumbrance. FAS has rejected the “post up” of the approved Requisition for reasons other than Insufficient Funds. The inconsistency must be corrected, and the Requisition re-submitted to FAS. The Requisition has been cancelled in FAS. The Requester can create a new Requisition based on this cancelled Requisition. Pending Approval 1 Pending Approval 2 Pending Tech Approval Pending Approval 3 Pending PO Assigned Closed Rejected Insufficient Funds FAS Conflict Cancelled in FAS 19 CUNY e-PROCUREMENT SYSTEM (EPS) 5.2 CREATING A REQUISITION From the sidebar, click the “Create Requisition” button. If you have permission to create Requisitions for more than one department, then you would need to select a department. To select a department: 1. Click the “Select Dept” button (next to Code). A list of departments that you have permission to create Requisitions for is displayed in alphabetical order. 2. Click on the department name. The rest of the information would be completed for you. 3. Click the OK button. If you only have permission to create Requisitions for one department, then you would see the Draft Requisition displayed with department information already entered. 20 CUNY e-PROCUREMENT SYSTEM (EPS) 5.2.1 COMPLETING THE REQUISITION FORM The Requisition Form screen is split into the 4 sections – Requester; Vendor; Item Selection, Comment, and File Attachment sections. Fields marked with (*) are required before the Requisition can be saved or submitted for approval. A. REQUESTER INFORMATION Section The top portion of the form is pre-populated with today’s date and the current fiscal year. If it is not correct, do not continue completing this Requisition and contact the EPS System Administrator / Help Desk. The Requester portion is pre-populated with information copied from your User Profile and cannot be modified on this screen. If this information is incorrect, then you must update your User Profile by clicking on the “My Profile” link from the sidebar (to the left of the Requisition). The “Ship To” and “Direct Questions To” fields are also pre-populated with information from your User Profile. However, it can be modified on this screen. NOTE: If the modification is to be permanent, you should update your User Profile. 21 CUNY e-PROCUREMENT SYSTEM (EPS) B. VENDOR INFORMATION Section EPS allows free-form entry of vendor information into the appropriate fields on the Requisition form. It also provides the ability to select a vendor from the vendor lists compiled by commodity type. To select a vendor: 1. Click the down arrow at the right of the “Commodity Type” field. This is optional and it is to help you filter out the vendor category. You can skip to step 3 if you desire. 2. Scroll down until you find the desired commodity and click on it. 3. Click the “Select Vendor” button in the Recommended Vendor #1 section. A list of vendors who supply the commodity (from step 1) is displayed in alphabetical order. 4. If the list fits on one screen, go to step 7. If the list is too long to fit on one screen or if you skipped step 1, a search box is provided. Enter a portion of the vendor name and click the “GO” button. 5. Any vendors found whose names start with the letters entered are displayed. Continue with step 7. 6. If no matches are found, the message “No Vendors were found starting with letters you entered, please search again” is displayed. Type in the first letter and repeat steps 4 – 6. 7. Scroll down the list until you find the preferred vendor and click on the name. The vendor name, ID, address, phone #, fax #, contact, and business type are populated in the Recommended Vendor #1 section of the screen. NOTE 1: Any of the populated fields can be modified. NOTE 2: If you wish to include an alternative vendor, repeat steps 3 – 7 for the Recommended Vendor #2 section. 22 CUNY e-PROCUREMENT SYSTEM (EPS) C. LINE ITEMS Section Click the “Add Item” button. The Requisition Item screen is displayed. 23 CUNY e-PROCUREMENT SYSTEM (EPS) Data must be entered for all the following fields: a. b. c. d. e. f. DESCRIPTION - Enter a general description of the product or service you are requesting. QUANTITY - Enter the desired number of the described item(s). PRICE – Enter the unit price ($$.CC). UNIT – Click on the arrow to the right of the “Unit” field to select the unit measurement associated with the price. Select the appropriate value by clicking on it. TECHNOLOGY CATEGORY – Click the arrow at the right of the “Category” field, and select the correct value for the product or service being requested - If this is a computer related item, select the appropriate technology category; otherwise select NON-TECHNOLOGY. COMMODITY INFORMATION – It allows you to select a commodity class and sub-class or you can type in the free-form. To select, click on “Select Commodity” button. You can search by Code or by Description. Click on the arrow at the right of “Search by” and select one. Select “Commodity Class” and “Commodity Sub-Class” by clicking on the arrows next to them. Once you have made your selections, it would be displayed on the screen. Under Commodity Description, select the commodity by clicking on it (displayed in blue). 24 CUNY e-PROCUREMENT SYSTEM (EPS) If you want to add more items, click on “Save and Add item”. If you are done, click on “Save and Close”. If you want to start over, click on “Reset”. If you do not want to save changes, click “Close”. • Delivery Date is the date that you want the items to be delivered. Click on the icon next to “Delivery Date” field to select a date. • Select YES/NO if you want the Requisition to be Annual/Continuous. The default option is NO. 25 CUNY e-PROCUREMENT SYSTEM (EPS) • Select YES/NO if you want a Memorandum of Understanding. The default option is NO. • Select YES/NO if you want to charge to Procurement/Travel Card. The default option is NO. D. COMMENTS / FILE ATTACHMENTS Section Entry of comments is optional. They can be entered at any time during the Requisition creation/approval process and generally reflect further explanations about the Requisition as it passes through its various stages. All comments entered (regardless of who entered them) are kept with the Requisition throughout its life, for historical purposes. The Comments section is generally used by: • Requesters to enter a justification (or clarification) of why the purchase is being requested. • Approvers 1 and 2 to enter “worth and wisdom” statements for the purchase. • Approver 3 to indicate fiscal information. To enter Comments: 1. Type them in the Comments box and click the “Save Comments” button. A pop-up window is displayed confirming that the Comments will be added to the Requisition and asking you if you wish to continue. 2. Click the OK button. Notice that the comments history is updated. 26 CUNY e-PROCUREMENT SYSTEM (EPS) To attach electronic File Attachments: 1. Click the “Browse” button. A pop-up window containing the Windows file selection box appears. 2. If the folder displayed in the ‘Look In’ box is not the correct folder, click the arrow at the left of the box, scroll to the appropriate folder and click on it. 3. Select the desired file from the list displayed by clicking on it. Notice that the file appears in the ‘File Name’ box. NOTE: Double clicking on the file name eliminates the need for the next step. 4. Click the Open button. 5. Click the “Save Attachment” button. 6. Repeat steps 1 – 5 to attach more files. Notice that you can see the list of attached files. You can delete them by checking the box next to them and clicking “Delete Files”. 27 CUNY e-PROCUREMENT SYSTEM (EPS) 5.3 SUBMITTING THE REQUISITION Following the Attachments box are 3 buttons that allow you to: 1. Submit for Approval - Clicking on this button moves the Requisition to the appropriate Approval step. An e-mail notification is automatically generated to notify the approver that a Requisition has been submitted for their approval. 2. Save as Draft - Clicking on this button saves all data entered and allows you to modify the Requisition before submitting for approval. 3. Delete Draft Req. – Clicking on this button deletes the drafted Requisition. 4. Close - Clicking on this button brings you to the Requisitions by Status list without saving data entered. Notice that just below these buttons is the Approval “route” the submitted Requisition will take and a history of where the Requisition has been. 28 CUNY e-PROCUREMENT SYSTEM (EPS) 5.4 E-MAIL NOTIFICATION As part of the Requisition process, users will receive e-mail notifications relating to specific Requisitions or Purchase Orders. These notifications may describe an action the user must perform (e.g. approve a submitted Requisition) or a condition that needs their attention (e.g. change in status for a Requisition they submitted). The above shows an e-Procurement email notification received, indicating that a Requisition was submitted pending approval 1. When an e-mail notification is received, the specified Requisition or Purchase Order can be viewed by following these steps: • Click on the URL link in the e-mail message. The system displays the appropriate login screen. • Once successfully logged in, the Requisition is automatically displayed for your viewing and/or approval. 29 CUNY e-PROCUREMENT SYSTEM (EPS) 6.0 REQUISTION APPROVAL PROCESS 6.1 APPROVAL - LEVELS 1 and 2 Approvers / Alternates at levels 1 and 2 are able to access Requisitions requiring their approval in either of the following ways: • By clicking on the URL in an e-mail notification, then logging in to the system. The Requisition requiring approval is automatically displayed. • By clicking on the links under the “Requisitions” section in the sidebar. The “Require My Approval” list will show only those Requisitions that require your approval. • The “By Status” list allows you to select Requisitions by status. ¾ Select from the drop-down by Pending Approval 1 or Pending Approval 2. ¾ Click on the Requisition number (displayed in blue). ¾ Click on the “Edit Info” button in the Requisition. 30 CUNY e-PROCUREMENT SYSTEM (EPS) 1. The completed Requisition form is displayed with two (2) buttons – “Edit Info” and “Print Preview”, in the upper right corner of the screen. Use “Print Preview” to print out a copy of the Requisition form. NOTE: If only the “Print Preview” button displays, you selected a Requisition you are not authorized to edit/approve. 31 CUNY e-PROCUREMENT SYSTEM (EPS) 2. Click on the “Edit Info” button to modify (e.g. changing data or entering comments), approve, or reject the Requisition. 3. When review/modification is concluded, click on: • Approve Requisition – to move the Requisition to the next level of Approval. (This can be verified by viewing the Requisitions by Status screen). • Reject Requisition – to send the Requisition back to the requester. If Reject Requisition is selected, a pop-up confirmation window is displayed with the question ‘Are you sure you wish to reject this Requisition?’ Click the Cancel button to bring you back to the Requisition. ¾ Click the OK button to display a pop-up window prompting you to supply a reason for rejection. Enter a reason and click OK. The Requisition form window closes, and you are returned to the Requisition selection screen you started with. Notice the Requisition is now listed under the Rejected status. NOTE: If you click Cancel, another pop-up window appears warning you that you must enter comments for a Rejection. • Save and Close – Saves the modified Requisition and returns you to the Requisition list. The Requisition is not approved. 32 CUNY e-PROCUREMENT SYSTEM (EPS) • Close – Returns you to the Requisition list without saving entered/modified data. The Requisition is not approved. NOTE: The Requisition history is updated as you go through its life-cycle. If a rejected Requisition is submitted for approval again, it will be reflected in the history. 33 CUNY e-PROCUREMENT SYSTEM (EPS) 6.2 TECH APPROVAL As with Approvers at levels 1 and 2, tech approvers are able to access Requisitions requiring their approval in either of the following ways: • By clicking on the URL in an e-mail notification, then logging in to the system. The Requisition requiring approval is automatically displayed. • By clicking on the links under the “Requisitions” section in the sidebar. The “Require Tech Approval” list will show only those Requisitions that require your approval. • In the “By Status” list, select from the drop-down by Pending Tech Approval. ¾ Click on the Requisition number (displayed in blue) ¾ Click on the “Edit Info” button in the Requisition. 34 CUNY e-PROCUREMENT SYSTEM (EPS) The selection method for Tech Approvers is the same as for Levels 1and 2 (see section 6.1 Approval - Levels 1 and 2). 35 CUNY e-PROCUREMENT SYSTEM (EPS) 6.3 APPROVAL - LEVEL 3 As with Approvers at levels 1 and 2, Approvers / Alternates at level 3 are able to access Requisitions requiring their approval in either of the following ways: • By clicking on the URL in an e-mail notification, then logging in to the system. The Requisition requiring approval is automatically displayed. • By clicking on the links under the “Requisitions” section in the sidebar. The “Require My Approval” list will show only those Requisitions that require your approval. • In the “By Status” list, select from the drop-down by Pending Approval 3, Insufficient Funds, or FAS Conflict. ¾ Click on the Requisition number (displayed in blue) ¾ Click on the “Edit Info” button in the Requisition. 36 CUNY e-PROCUREMENT SYSTEM (EPS) 37 CUNY e-PROCUREMENT SYSTEM (EPS) The process at this level is the same as for steps 1-3 in Levels 1 and 2 (see section 6.1 Approval - Levels 1 and 2), except for two (2) sections that only pertain to level 3 approvers. These are: a. Charge to Department Name: The default is the department under which the Requisition was created. If another department is to absorb the cost of this Requisition, change that department by: • Clicking on the “Select Dept” button (right side of the Dept. Code) which displays the departments associated with the Approver’s user profile. • Clicking on the correct Department Name (displayed in blue). NOTE: Charging the Requisition to another department does not change the original Requisition or the automatic e-mail notification sequence. You will also need to enter a FAS Account Code. To enter the FAS Account Code, select the Program Code and Expense Code from the dropdown boxes. 38 CUNY e-PROCUREMENT SYSTEM (EPS) When review/modification of the Requisition is concluded, click on: • Approve Requisition - This automatically submits the Requisition for FAS encumbrance. ¾ If there are sufficient funds, the Requisition will be encumbered in the Financial Accounting System (FAS) and the system will display a pop-up window confirming the encumbrance, and move the Requisition to the status of Pending PO. The Requisition form window closes, and you are returned to the Requisition selection screen you started with. Notice the Requisition is now listed under Pending PO status. ¾ If there are insufficient funds in the FAS system, the e-Procurement system displays the following message with the options to: Edit Req.: Use this option if you think the cost amount estimated is incorrect – the Requisition can be modified and be re-approved. Leave as ‘Insufficient Funds’: Use this option if you are not sure what your next steps should be. It moves the Requisition to a FAS Conflict status. Reject Req.: Use this option to send the Requisition back to Approver 2. Close: Use this option if you want to close the Requisition. • Reject Requisition – to send the Requisition back to the Approver 2. If Reject Requisition is selected, a pop-up confirmation window is displayed with the question ‘Are you sure you wish to reject this Requisition?’ Click Cancel to bring you back to the Requisition. 39 CUNY e-PROCUREMENT SYSTEM (EPS) ¾ Click OK to display a pop-up window prompting you to supply a reason for rejection. NOTE: If you click Cancel, another pop-up window appears warning you that you must enter comments for a Rejection. ¾ Click OK. The Requisition form window closes, and you are returned to the Requisition selection screen you started with. Notice the Requisition is now listed under the Rejected status. NOTE: The Requisition history is updated as you go through its life-cycle. If there are any conflicts, it will be listed under the Requisition history. 40 CUNY e-PROCUREMENT SYSTEM (EPS) 7.0 PURCHASE ORDER PROCESS 7.1 GENERATING/ASSIGNING A PURCHASE ORDER Once funds are encumbered for the Requisition, the Purchase Order process begins with the Requisition being moved to a Pending PO status. To assign a Requisition to a buyer in the Purchasing department: • Click on the links under the “Requisitions” section in the sidebar. The “Pending PO” list shows all Requisitions that are Pending PO. • In the “By Status” list, select from the drop-down by Pending PO. ¾ Click on the Requisition number (displayed in blue) ¾ Click on the “Edit Info” button in the Requisition. 41 CUNY e-PROCUREMENT SYSTEM (EPS) When the Requisition detail screen is displayed, scroll down to the ASSIGN TO section to assign it to a person in the purchasing department. The purchasing person (buyer) will be responsible for finalizing and tracking the order. • Click the down arrow associated with the Assign To field. Select a person by highlighting it. 42 CUNY e-PROCUREMENT SYSTEM (EPS) • • Select a Processing Option – Purchase Order, Contract, or Direct Pay. Once you select one, select the Procurement Method by clicking on the down arrow next to that field. To assign the Requisition, click on the “Assign Requisition” button. The Requisition status changes to ASSIGNED and is now ready to be finalized. If you click the “Save and Close” button the Requisition will be saved, but it will not be assigned. If you click the “Cancel Requisition” button, the Requisition will be cancelled (see section 7.2 Cancelling a Requisition/Purchase Order). If you click the “Close” button, you will not save any of the changes made. 43 CUNY e-PROCUREMENT SYSTEM (EPS) 7.2 CANCELLING A REQUISITION/PURCHASE ORDER • If the Requisition must be cancelled at any time prior to submission, click the “Cancel Requisition” button. The following message is displayed: • When you click the OK button, this pop-up box is displayed. A reason must be supplied for cancelling the Requisition. Click “OK” to cancel the Requisition. The Requisition status is changed to “Cancelled in FAS”. • If you do not supply a reason, the following message is displayed: 44 CUNY e-PROCUREMENT SYSTEM (EPS) 7.3 BID PROCEDURE Selecting the Procurement Method of Bid Procedure* provides the opportunity to get the best price for item(s) being purchased. It allows selected vendors to submit pricing offers and involves the following steps: • Invitation to Bid – Preparing invitations to bid detailing the expectations from selected vendors for submitting their bids. Using the Mail Merge Files to create the invitations for mailing to the selected vendors. • Receiving and recording the bids returned from the vendors. • Awarding the contract(s) and drafting the Purchase Order(s). * NOTE: If the Procurement Method is not Bid Procedure, skip to 7.4 - Drafting the Purchase Order. 7.3.1 INVITATION TO BID Invitation to Bid is the process by which you invite the selected vendors to bid for the items you want to purchase. To start the process: • Click on the links under the “Requisitions” section in the sidebar. Click on one of the “Assigned To Me” lists to display all Requisitions that have been assigned to you. • In the “By Status” list, select from the drop-down by Assigned. ¾ Click on the Requisition number (displayed in blue). ¾ Click the “Edit Info” button in the Requisition, and then click the “Invitation to Bid” button. 45 CUNY e-PROCUREMENT SYSTEM (EPS) 46 CUNY e-PROCUREMENT SYSTEM (EPS) The Invitation to Bid (ITB) form is divided into 4 sections: 1. Receive Bids – Contains information such as the date/time when bids should be received; date/time of when questions regarding the bids should be received; delivery date; contact information of where bids are due, and college address. The fields marked with (*) are required. NOTE: Bid Due Location is already populated with the Purchasing Department information, but can be modified. 2. Line Items – Contains information of the item(s) you want to purchase. Once the bid is done, a Vendor ID would be populated with the total amount. Comments could also be entered, which will display underneath all items in the ITB. 47 CUNY e-PROCUREMENT SYSTEM (EPS) 3. Mail Merge Files – This is the information that would be sent to the vendors in order for them to start the bidding. This is a downloadable executable file that includes a mail merge template to generate ITBs, vendor information, and a mailing label template to generate mailing labels. Before creating the file, click on the “Bid Opening Sheet” button and enter a description in the Bid Opening Sheet. Make sure that you have entered all the vendors that you would like to include in the bidding. Click the “Add Vendor” button to include more vendors in the bidding process. To edit a vendor, click on the highlighted vendor name (in blue). Complete the Bid Opening Sheet Vendor form: • Click the “Select Vendor” button to select vendor information from a list. • Enter the vendor name or enter the first letters of the vendor name to search for the vendor in the “Search by Name” field and click “Go”. • Click on the vendor name. The vendor form is populated with the vendor information. NOTE: Leave the “Total Bid Amt” field empty, the purchasing department will enter the bid amount received once the vendor replies back. • Click the “Save and Add Vendor” button to save and add more vendors. Click the “Save and Close” button to save and go back to the previous Bid Opening Sheet form. Click the “Close” button to go back to the previous form without saving. • The Bid Opening Sheet includes the list of vendors. Before bidding starts, notice that “Total Bid Amount” says “No response” and “Awarded Amt” has $0. Comments can be added. 48 CUNY e-PROCUREMENT SYSTEM (EPS) When you are finished editing the Bid Opening Sheet, click the “Save” button to return to the Invitation To Bid form. To create the executable file with all vendor information, click on the “Create Mail Merge Files” button. 49 CUNY e-PROCUREMENT SYSTEM (EPS) • After you click on the button, you will see the Mail Merge Files Section. Follow the instructions on the right hand side to download the file and to run the macros that will generate the invitation to bid forms pre-populated with the vendor information you supplied. There are 2 macros that need to be run – one to generate the bid forms using the ITB template, and one to generate mailing labels to be used for mailing the “Invitation to bid” forms. 4. Comments/ File Attachments – Comments can be entered and files can be attached that are related to the bidding process. The history section shows the cycle of the bidding process. 50 CUNY e-PROCUREMENT SYSTEM (EPS) 7.3.2 RECEIVING BIDS Once bids are received, we need to record this information. The Purchasing Department determines which line item(s) are going to be purchased from which vendor(s) depending on the biddings received. To enter the bid amounts received: • Click on the links under the “Requisitions” section in the sidebar, find your Requisition and click on the Requisition number (displayed in blue). Click on the “Invitation To Bid” button in the Requisition. - OR • Click on the “By Bid Number” link under the “Bid Invitations” section in the sidebar and click on the Invitation To Bid number (displayed in blue). • In the Invitation To Bid form: ¾ Click on the “Bid Opening Sheet” button. ¾ Click the “Edit Info” button to update the vendor(s) section with the total bid amounts received and the amount awarded to each vendor(s). 51 CUNY e-PROCUREMENT SYSTEM (EPS) • Click on the vendor name (displayed in blue). • Complete the “Total Bid Amt” field with the response from the vendor. Click “Save and Close” to go back to the previous page. Click the “Close” button until you go back to the Invitation to Bid form. 52 CUNY e-PROCUREMENT SYSTEM (EPS) 7.3.3 AWARDING THE BID Once the bid(s) have been received, you will need to edit the Invitation To Bid (ITB) form and award the line item(s) to the vendor(s). • In the ITB form, scroll down to the “Line Items” section and click on the description of the line item (displayed in blue). • Enter the awarded amount and enter the “Awarded Vendor” info. by clicking on the “Select Vendor” button. 53 CUNY e-PROCUREMENT SYSTEM (EPS) • A window pops up with the vendors that replied with bids. Click on the vendor(s) you want to award the bid(s) to. The “Invitation to Bid Item” form is updated with the vendor information. Click the “Save and Close” button to save the information. 54 CUNY e-PROCUREMENT SYSTEM (EPS) • After saving the item, the Vendor ID is updated with the vendor you awarded the item to. Click on the vendor id (displayed in blue) to see the information for that vendor. Notice the “Awarded Amt”. 55 CUNY e-PROCUREMENT SYSTEM (EPS) 7.4 DRAFTING THE PURCHASE ORDER After the Purchase Order is assigned to the buyer, it is reviewed and submitted to the vendor. If the Procurement Method was Bid Procedure, then the Purchase Order(s) can be submitted after the vendor(s) reply back with their bid(s) and the line item(s) are awarded. Once submitted, a PO # is assigned and the Purchase Order can be tracked via the “Purchase Orders” sidebar options. To draft a Purchase Order: • Click on the links under the “Requisitions” section in the sidebar. ¾ Find your Requisition and click on the Requisition number (displayed in blue). ¾ Click on the “Edit Info” button. • Scroll down and click “Draft the Purchase Order” button to draft the PO. 56 CUNY e-PROCUREMENT SYSTEM (EPS) • The following pop-up window is displayed informing you that the Requisition will be closed and replaced by a Purchase Order. To continue, click OK. • The Purchase Order form is redisplayed with the status of “Draft”. NOTE: If an Invitation To Bid (ITB) was created for the Requisition, a draft PO will be created for each vendor that has been awarded line items in the ITB. 57 CUNY e-PROCUREMENT SYSTEM (EPS) 7.5 SUBMITTING THE PURCHASE ORDER Once the purchase order becomes a Draft, the FAS information needs to be completed in order for the PO to be submitted to FAS. To submit a Purchase Order: • Click on the links under the “Purchase Orders” section in the sidebar. The “Assigned to me” list displays all POs that have been assigned to you. • The “By Status” list displays all POs categorized by status. ¾ Find your Purchase Order by expanding the Draft category by clicking on the arrows in the list. ¾ Click on the “N.A.” link (displayed in blue). ¾ Click on the “Edit Info” button. 58 CUNY e-PROCUREMENT SYSTEM (EPS) NOTE: There is a reference link to the Requisition number and the Bid (ITB) number. • Clicking on the Req # link displays the Requisition information. Notice that the status is “Closed”. 59 CUNY e-PROCUREMENT SYSTEM (EPS) • Clicking on the Bid # link displays the Bid information. There is also a link to the Requisition from this form. 60 CUNY e-PROCUREMENT SYSTEM (EPS) 7.5.1 COMPLETING THE PURCHASE ORDER FORM The purchase order form has 6 sections – Requester; Vendor Information; Line Items; FAS and Other Info; Comments; and File Attachments sections. The Requester, Vendor Information, and Line Items sections are already completed. The FAS and Other Info section needs to be completed in order for the PO to be submitted. NOTE: Fields marked with (*) are required. A. REQUESTER INFORMATION Section B. VENDOR INFORMATION Section The vendor information can be edited – Select / Remove a vendor. 61 CUNY e-PROCUREMENT SYSTEM (EPS) C. LINE ITEMS Section The item information can be edited by clicking on the description (in blue). You can also add items and add comments that will appear below all line items. D. FAS AND OTHER INFO Section The fields marked with (*) are required in order for the PO to be posted to FAS. 62 CUNY e-PROCUREMENT SYSTEM (EPS) ¾ Bid Questionnaire Form – allows entry of information specific to the vendor and its certification. Click on the “Edit” button to complete. The completed information is added to the Purchase Order form. ¾ Utilization Plan Form – allows entry of information specific to the purchase order. Click on the “Edit” button to complete. The completed information is added to the Purchase Order form. 63 CUNY e-PROCUREMENT SYSTEM (EPS) E. COMMENTS / FILE ATTACHMENTS Section Comments and file attachments for the purchase order can be entered here. 64 CUNY e-PROCUREMENT SYSTEM (EPS) • Once everything is completed, the PO is ready to be submitted. Click on the “Submit PO” button to submit. If all the information is not yet completed, click on the “Save as Draft” button. Click on the “Delete PO” button to delete the PO, or “Close” button to exit the form without saving the changes. The history of the PO life-cycle is displayed. • When the “Submit PO” button is clicked, the following pop-up window is displayed. To continue, click the OK button. NOTE: If you choose to click the Cancel button, you will be returned to the previous screen. 65 CUNY e-PROCUREMENT SYSTEM (EPS) • If there are any required fields that have not been completed, a pop-up window similar to the following is displayed listing the items required. NOTE: The PO cannot be submitted until all required fields are entered (marked with *). • When the Purchase Order is submitted, the information is sent to the Financial Accounting System (FAS). If any errors are encountered in FAS, the following screen is displayed, describing the error and stating that it must be corrected before further action can take place. 66 CUNY e-PROCUREMENT SYSTEM (EPS) • When all errors have been resolved, a pop-up window is displayed confirming that the Purchase Order has been finalized. Click “OK” to continue. 67 CUNY e-PROCUREMENT SYSTEM (EPS) 8.0 FIXED ASSETS Purchase Orders for Fixed Assets can be viewed and edited by the Fixed Asset group in the same way as the other Purchase Orders. These POs can be accessed through the “Purchase Orders” section, or through the “Fixed Assets” section of the sidebar by: • “Expense Code” - displays a list of Fixed Asset Purchase Orders sorted by Expense Code. 68 CUNY e-PROCUREMENT SYSTEM (EPS) • “By PO Number” - displays a list of Fixed Asset Purchase Orders sorted PO number. 69 CUNY e-PROCUREMENT SYSTEM (EPS) 9.0 RECEIVING 9.1 FIRST TIME RECEIPT OF MERCHANDISE When merchandise is received, someone in the Receiving Department accesses the EPS system to record the shipment. To record the shipment: • Under the “Receiving Reports” section in the sidebar – Select “All By PO Number”. • Click on the PO number (displayed in blue). • Click on the “Edit Info” button. 70 CUNY e-PROCUREMENT SYSTEM (EPS) • Scroll down to the “Line Items” Section. Notice “Enter Quantity Of Merchandise Received” in red. 71 CUNY e-PROCUREMENT SYSTEM (EPS) • Click on Enter Qty (displayed in blue, under “Item No.”) to edit the Receiving Report Item form. Record the information of merchandise received: ¾ Date - The date items were received. Click the button next to the date entry box and select the date from the calendar (displayed in a pop-up window). ¾ Qty – The total number of items received. ¾ Prior Recvd – If the items arrive in different shipments, keeps track of what have been entered as received (calculated by the system). ¾ Total – The total number of items received. The system automatically calculates the total amount by adding the “Qty” to the “Prior Received” field. • Comments – You can enter comments regarding the item. • Click the “Save and Close” button to save the data entered or “Close” to close without saving the data. 72 CUNY e-PROCUREMENT SYSTEM (EPS) • The “Line Items” section in the Receiving Report form is updated with the data entered of the items received. 73 CUNY e-PROCUREMENT SYSTEM (EPS) 9.2 CENTRAL RECEIVING GROUP If the Central Receiving group does not handle inventory, it can acknowledge receipt of merchandise and notify the requester (who can enter items as received) by clicking on the “Acknowledge Receipt And Notify Requester” button. 9.3 SUBSEQUENT RECEIPT OF MERCHANDISE Since a Purchase Order may not be satisfied in one shipment, EPS allows multiple receipts to be recorded. The process for entering additional receipts is the same as for the first shipment. NOTE: • As long as Enter Qty is blue, receipts can be entered. If it is not blue, the recorded amount received is equal to or greater than the original amount ordered and the shipment could be an overage. • “Prior Recvd” shows the amount of merchandise received in the prior shipment, and “Total” accumulates the amount of merchandise received over all shipments. 74 CUNY e-PROCUREMENT SYSTEM (EPS) 9.4 COMPLETED RECEIPT OF MERCHANDISE When all the merchandise have been received and recorded, the status of the PO changes to “Submitted - Closed”. Click on the PO # (displayed in blue) and notice the status “Submitted – Closed”. 75 CUNY e-PROCUREMENT SYSTEM (EPS) 76