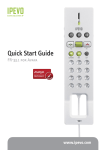
1
SOLO
SKYPE OFF-PC DESKTOP PHONE
IPEVO SOLO
USER MANUAL
002
Getting Started
Getting Started
Getting Started
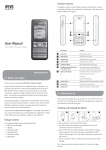
Your SOLO Phone: Buttons, Functions, and Locations
Check the Package Content
The IPEVO SOLO Phone package includes the following items:
• SOLO phone
• SOLO handset
• AC/DC power adaptor
• Ethernet cable
• User Manual
11
12
13
14
DC IN
003
004
Getting Started
Getting Started
4
Navigation/Confirm Buttons
Press
Press
to select highlighted items.
to move through the menus.
In standby mode, press these buttons to go to a shortcuts menu.
15 16
Location
Buttons
Functions/Press to
1
LED Light
• Blue light when phone is in standby mode.
• Green light when a call is in progress.
• Blinks if you have missed calls or voicemails.
2
Display
3
Soft Buttons
Press
to select options shown immediately above these buttons on
the display
• Press
to go to the Skype Status menu.
• Press
to go to the Contacts menu.
• Press
to go to the main Menu.
• Press
to go to the Missed calls menu.
5
End
6
0~9,*, #
• Press to enter numbers or characters
• Press
to shift between capital, lower-case letter and numbers.
7
Speed Dialing
Press
8
Call
Press
Press
to end an active call or reject or cancel a call.
Press
to return to standby.
to speed dial.
to call or answer a call.
In standby mode, press
to go to All calls menu.
005
006
Getting Started
Getting Started
9
Redial
Press
dial.
10
Mute
Press
press again.
to go to the Outgoing calls menu. Select from the lists and
Your SOLO Display Icons
to turn-off the microphone. To resume the conversation
11
Speaker
12
Volume
Press
13
Power connector
Connect to the power adapter
14
Handset jack
Connect the PHONE handset
15
Ethernet jack (WAN)
To connect the PHONE to your gateway, router, or modem (ADSL or cable).
16
PC-Out Ethernet jack (LAN)
To connect the PC.
Item
Press
to activate hands-free speakerphone mode. Press again to
return to handset mode.
to increase or press
to decrease the ear
speaker volume during a call.
New voice calls
2
New missed calls
3
New request waiting
4
Skype network alert
5
Skype status
Offline
online
Skype me
Away
Not available
Do not disturb
Invisible
6
Go to the Contact menu
11
Meaning
1
7
Speaker on
8
Line on hold
9
Mute
10
Network disconnected
11
Go to the Menu
007
008
Getting Started
Getting Started
Access Menu Functions
• From the standby display, press the [Left soft] button to go to the Skype’s menu.
• Press the directional buttons to move through the menus.
• Press the [Left soft] button to select the highlighted item or press the [Right soft] button to go back on level in
Press [Left]
Press [Right]
button to go left. button to go right.
the menus.
• To quickly resume standby display, press
Menu Table
Search
Press [Left Soft] button to
<Select>. Or press [Right soft]
button to go back one level in
the menu.
Press the [Left
soft] button to go
to the <Menu>.
Press [Up] button
to go up.
Press [Down]
button to go
down.
Press [OK] button
to select the
highlighted item.
Add Contact
Skype
Phone number
About
Status
Change status
Mood message
My profile
Details shown to all
Private details
Sign out
History
All calls
Missed calls
Incoming calls
Outgoing calls
Skype Voicemail
Contacts requests
Services
Skype Credit
SkypeIn
Skype Voicemail
Contacts
Sign out
Settings
General
Change
password
Auto sign in
Language
Software updates
Reset
Call divert
Call settings
Country code
Area code
Privacy
Calls
SkypeIn calls
Blocked users
Speed dials
Tones
Time and date
Network
Current status
DHCP setting
Static IP settings
PPPoE (Dynamic)
PPPoE (Static)
Phone settings
Brightness
Time out
Advanced
Software updates
Network proxy
Skype ports
009
010
Installation
Installation
Installation
011
Step 3:
Connect the power adapter to the SOLO located at the bottom of the Phone. Connect the power adapter to the
electrical outlet.
Connecting the Phone
SOLO
Step 1:
Connect the handset to the Phone handset jack located at the bottom of the Phone.
ADSL/Cable Modem
15 16
Step 2:
Use the provided Ethernet cable to connect the Phone Ethernet jack
located at the back of the Phone 15 to your ADSL or Cable modem.
PC
DC IN
Note:
DC IN
The default network settings of SOLO is DHCP which is used in most
cases, If the SOLO have failed to connect the internet network, you
may need to change the networking setting. Please consult your
Internet service provider or network administrator to have information
of your network configuration. To change the network settings:
ADSL/Cable Modem
15 16
SOLO
You can use the Phone embedded LAN switch to share the
internet connection between PC and SOLO, as above illustration.
1. Press MenuSettingsNetworkNetwork settings.
2. Scroll and select the settings you want.
3. Follow the screen instructions to configure your network settings.
012
Installation
Installation
Setting Up your SOLO Phone
Agreement
After you connect the power adapter to the electrical outlet, you are prompted to enter the basic settings for SOLO.
Choose your Country and Area Code
Read and accept the Skype
Agreement.
Select Language
Use [Up] or [Down] button
to scroll to a country.
Press <Select> to select the
highlighted item and enter
next menus.
Note:
If you want to change the language
setting later, please go to the Menu
SettingsGeneralLanguage
to change the language.
Enter area code and press
<OK> to enter next menus.
Use [Up] or [Down] button
to scroll to a language.
Press <Select> to enter
next menus.
Note:
If you want to change this settings later, please go to the MenuSettingsCall settings to
change the country and area code.
013
014
Installation
Installation
Press
to shift between capital,
lower-case letter and numbers.
Signing In to Skype
Time and Date
After you have successfully set up the Phone, you can sign in Skype. You can use an existing Skype account or
create a new account.
Create a new skype account
1
Press <Clear> to make
corrections.
Press <OK> to enter
next menus.
Use numerical keys to
enter time.
5
3
6
2
4
7
Note:
Enter the date and press
<OK> to enter next
menus.
If you want to change the settings
later, please go to the MenuSettings
Time and date to change the time
and date.
Use [down] button to scroll to
<Create new account>. Press
<Select> to enter next menus.
Enter Skype name and
password.
If you want the phone
to automatically sign
you in, press <Yes>
for automatic sign in.
015
016
Installation
Installation
Entering Text and
Numbers
Entering text
Press
1
-
9
repeatedly until the desired character appears on the screen.
You will be asked to enter text for some
features such as Skype name, password,
Add Contacts, etc.
abc mode.
Changing the text input mode
Text input mode
indicator: abc,
ABC, 123
Press to shift between
capital, lower-case letters
and numbers
Press repeatedly until the
desired character appears
on the screen.
017
018
Installation
Installation
Using ABC, abc Mode
Insert special characters
Key
Characters in order displayed
Upper Case
1
.
,
?
!
2
A
B
C
-
Lower Case
_
@
1
.
,
?
!
2
a
b
c
2
3
D
E
F
3
d
e
f
3
4
G
H
I
4
g
h
i
4
5
J
K
L
5
j
k
l
5
6
M
N
O
6
m
n
o
6
7
P
Q
R
S
p
q
r
s
8
T
U
V
8
t
u
v
8
9
W
X
Y
Z
x
y
z
+
0
+
0
0
7
9
w
-
_
@
1
abc mode.
7
Press [OK] to insert
a symbol.
9
Special Characters Table
Press [#] button to
show the <Insert
symbol> menu.
Press [Up] [Down] [Left]
[Right] to scroll to a symbol.
.
,
‘
?
!
“
-
(
)
@
/
:
_
;
+
&
%
*
=
<
>
₤
€
$
¥
°
[
]
{
}
\
~
^
i
§
¿
#
|
‘
019
020
Skype Calling
Skype Calling
Skype Calling
021
Make a Skype call
Skype features
Skype Call
Call other people on Skype for free.
SkypeOut™
SkypeOut™ allows you to place calls to regular telephones (landlines or mobiles) all over
the world. To SkypeOut™ you’ll need to purchase some Skype Credit.
SkypeIn™
With SkypeIn, you can get your own regular phone number. So if your friends who aren’t
using Skype want to call you by dialing a regular number, you can still receive the call in
Skype.
Skype Voicemail™
Skype Voicemail allow you to send and receive Voicemail messages. Skype Voicemail also
allows you to send pre-recorded voice greetings to any other Skype user.
For more information on these features, go to www.skype.com
1
Press <Contacts> to enter.
2
Use [Up] or [Down]
button to scroll to
a contact. Press
<Options> to enter.
Or press [Call] to
start a call.
3
Press <Select>
to enter.
4
Use [Up] or [Down]
button to scroll to
a number. Press
<Select> to start a
call.
5
Press <End> to end
the call.
022
Skype Calling
Skype Calling
Make a SkypeOut call
SkypeOut numbers must be entered in the following format:
“00” + “country code” + “area code” + “number”
You need to have Skype Credit
to make SkypeOut calls.
The call timer displays the talk
time of your call.
In standby mode, press
dial digits to enter a
number. Press [Call] to
start a call.
To mute microphone,
Press <Options> to enter
next menus. Or press
[Mute] button to mute.
To unmute microphone, Press
<Options> to enter next menus.
Or press [Mute] button again to
unmute.
If you have set up your country and area code,
you don’t have to dial the country and area
code while making a local SkypeOut call. Press
Menu>Settings>Call settings to check the
settings.
You need to have Skype Credit before making a SkypeOut call.
Please go to http://www.skype.com/helloagain.html to purchase
Skype Credit.
023
024
Skype Calling
Skype Calling
Answering a call
Placing a call on hold/Retrieving
When you receive a call, the phone rings and
displays the incoming call image. Simply lift up
During a call, you can put the call on hold to answer the second call.
the handset or press
to answer the call.
Rejecting a Skype call
Press
to reject the call.
Redialing the last number
1
Use [Up] or [Down] button
to scroll to a number.
Press [Call] to start a call.
Press [Redial] button
to open <Outgoing
calls> menus.
Press [End] to end
the call.
Press <Options> to
open <Options> menus.
2
Press <Select> to
hold the call.
3
To resume the call,
please <Options>.
4
Press <Select> to
resume the call.
025
026
Skype Calling
Skype Calling
Call diverting
Speed dials
You can forward Skype calls to a landline or mobile phone number when you are away from your home or office.
Assign speed dials
SOLO provide three speed dial buttons for 3 of your most frequently dialed numbers. To assign speed dial numbers
follows steps shown as below.
1
Press <Menu> to open
<Menu> menus.
2
Use [Right] button to
scroll to <Settings>.
Press <Select> to enter.
3
Use [Up] or [Down] button
to scroll to <Call divert>.
Press <Select> to enter.
4
1
Press <Select> to enter.
Press <Menu> to open
<Menu> menus.
3
2
Use [Right] button to
scroll to <Settings>.
Press <Select> to enter.
4
Use [Up] or [Down] button
to scroll to <Speed dials>.
Press <Select> to enter.
Use [Up] or [Down] button
to scroll to a Speed dial.
Press <Select> to enter.
6
5
Enter the number and
press <OK>.
Press <Select> to enter.
6
7
Press <Select> to enter
number or assign a contact.
5
Press <OK> to enter.
027
028
Skype Calling
Skype Calling
Skype Contacts
Dialing speed dial numbers
In standby mode, press
to call,
Searching & Add a contact
Viewing missed calls
To add a Skype or SkypeOut Contact, follow these steps:
If you have missed calls, the screen displays how many calls you have missed.
1
Press <Menu>
to open <Menu>
menus.
1
Press <View> to open
<Missed calls> menus.
2
3
Use [Left] and [Up] buttons
to scroll to <Search>.
Press <Select> to enter.
4
Enter the name
and press <OK>
to search.
Use [Up] or [Down] button
to scroll to a name Press
<Options> to enter.
2
Use [Up] or [Down] button to
scroll to a missed call item. Press
<Options> to enter next menus.
Or press [Call] to return the call.
3
Use [Up] or [Down] button
to scroll to <Details>.
Press <Select> to view the
missed call details.
9
Press <OK> . Skype will
send a request to the
contact for authorization.
8
Press <Select>
to enter.
7
Press <Options>
to enter.
6
Press <OK> to go
back the previous
menus.
5
Use [Down] button to
scroll to View profile.
Press <Select> to enter.
029
030
Skype Calling
About IPEVO
The new contact is added to your contact list. Skype will send a request to the contact for authorization.
Reset to default settings
The default settings are the original factory settings of your phone. If you want to reset your SOLO to the default
factory settings,
1. Press Menu>Settings>General>Reset
2. Scroll and select either <Reset all> or <Keep network settings>.
Product Warranty
Intended Use
This device is designed for telephoning within the Internet via Skype™. Any other use is considered unintended
use. Unauthorized modifications or reconstruction not described in this manual are not permitted.
Limited Warranty
This limited warranty (hereinafter the Warranty) is valid for the product SOLO (hereinafter the Product). The
Warranty is valid only in the country in which the product was originally purchased.
• The Warranty covers only manufacturing defects, and only insofar as the Product has been used and stored.
• The Warranty is issued by IPEVO, Inc. to the end purchaser of the Product (hereinafter the Customer).
About IPEVO
Service and Support
•
USA, Canada
International
•
Tel: 1-877-2-myIPEVO
Service mail: [email protected]
Tel: 886-02-2708-8038
Service mail: [email protected]
Service Skype ID: ipevo_cs
•
•
In accordance with the Warranty, the Customer has a sole claim to demand that the Product be repaired/
replaced and may not in accordance with the provisions of the Warranty assert further claims against the
manufacturer/retailer for indirect loss, including but not limited to loss of data or loss of profit.
The Warranty period runs for 12 months from the day on which the Customer originally purchased the
Product from IPEVO. Subsequent changes of ownership do not extend the warranty period.
The Warranty is valid solely on the condition that the Product is shipped to IPEVO within the warranty period.
In the event of a fault or defect in the Product, it must be shipped back to IPEVO. Products are repaired or
exchanged at IPEVO’s own discretion.
The warranty period is not extended for a repaired or replaced Product. Exchanged parts are the property of
IPEVO, Inc.
The Warranty is valid solely on the condition that the original proof of purchase issued to the original
purchaser is presented with the Product.
031
IPEVO, Inc.
2860 Zanker Road, Suite 100,
San Jose, CA 95134
USA
Tel 1-877-2-IPEVO
Service mail: [email protected]
http://www.ipevo.com