1
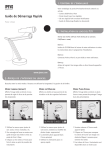
Hardware Features
The diagram outlines all the hardware elements for the phone. Becoming familiar with these terms will help to quickly refer to the various parts
of the hardware in this guide.
8
10
1
2
3
4
5
6
7
9
User Manual
IPEVO Wi-Fi Phone for Skype
www.ipevo.com
Description
Function
1
Left Soft Key
Select left menu option
2
Right Soft Key
Select right menu option
3
Navigation Key
Navigate the user menu/interface
4
Confirm Button
Accept the current selection
5
Call/Answer Button
Dial number/Answer incoming call
6
End/Ignore/Home Button (press);
Power Button (hold)
Hang up/Decline incoming call/Return to
main menu; Brings up the power off menu
7
Alphanumeric Keypad
Enter digits or letters on the display screen
#
symbols and special characters
+
insert space
*
input mode ABC/abc/123
8
Volume Control
Adjust the volume level of the speaker
9
Headset Jack
Connection for standard headset
10
Display Screen
Display user interface and phone status
01. Before You Begin
Thank you for purchasing the IPEVO Wi-Fi Phone for Skype!
We would like to introduce you to a different way of using Skype – one
we hope to be even more convenient and enjoyable than ever before.
With the Wi-Fi Phone for Skype, you now have access to your Skype
account from anywhere through a wireless Internet connection access
point. This means more mobility and freedom on top of all the great
benefits and features of Skype.
Throughout this guide, you will find tips and reminders on the common
issues encountered during installation. However, in the event of further
difficulties, problems, questions or doubts, please don’t hesitate to
contact customer service representatives.
If you feel that the Wi-Fi Phone for Skype has made Skype even better to
use, or if you just want to pass on any friendly tips, suggestions or advice
to the IPEVO team, please feel free to Skype us too at ipevocs1!
02. Getting Set Up
These simple steps will get you set up when you use the Wi-Fi Phone for
the first time. Not setting up the Wi-Fi Phone properly may compromise
its performance and battery life span.
Installing and Charging the Battery
1
2
3
4
Package Contents
The product package contains the following items:
• 1 x Wi-Fi Phone for Skype
• 1 x Battery
• 1 x Charging cradle
• 1 x Charging Cable
• 1 x Quick Start Guide
1. Remove the back cover from the Wi-Fi Phone.
2. Insert the battery into the battery compartment in the correct
orientation and close the back cover.
3. Place the Wi-Fi Phone onto the charging cradle, with the charging
cable connected to the cradle and power supply. Allow the Wi-Fi
Phone to fully charge for 3-5 hours before switching on the phone for
the first time.
4. To turn on the Wi-Fi Phone, simply press and hold down the Power
key ( ).
Next, setup your wireless network connection to access your Skype
account.
03. Setting Up the Wireless Network
Accessing Open Wireless Networks
Before you can make Skype calls, you need to connect to a wireless
network through a WiFi access point in your network environment.
By default the phone will automatically search and connect to the first
available open network. To connect to a specific network, cancel the
search with the Right Soft Key (Cancel) and go to Settings > Network >
Networks in range to connect to the network of your choice.
Accessing Secure Wireless Networks
Network that requires a security key will cause a prompt to appear for
user input. To enter information on the phone:
• Use the Input mode button to change between digits and letters on
your alphanumeric keypad.
• Use the *a/A button to change to lowercase, uppercase, or numeric
entry when entering a network key.
• Use the Symbol button to enter common symbols and signs.
All your network profiles are stored in the phone’s memory (under
Settings > Network > Preferred networks) so you can easily switch
between different networks depending on your location.
There are a number of configurable options for the WiFi phone under the
Settings > Network menu to add and delete wireless network profile in
your Preferred networks list, change the order and priority of network
connections, configuring network proxy host or port, as well as to view
the current network status.
Once you have successfully connected to the wireless network, you should
see the network connectivity and signal strength symbol displayed on
your screen. Now you can sign into your Skype account and start making
calls.
Creating a New Skype Account
Press the Left soft key (Select) on this option and enter your Skype name
and password.
Enter the Skype name and account password of your choice*, then
choose to Accept the terms and conditions. If the name is available, a
new account will be created and you will be signed into the account.
Otherwise you will be prompted to enter another name.
You can use your Skype account to call other people with Skype accounts
for free. In addition, Skype offers other free and paid features, including:
SkypeOut™ - make calls to traditional landline and mobile phones.
SkypeIn™ - a subscription feature that provides you with a phone
number to receiving Skype calls to your Skype account from traditional
landlines and mobile phones.
Skype Voicemail™ - send and receive voicemail messages and record a
greeting.
For more information about Skype and its features, please visit
www.skype.com
* The stipulations for the Skype name and password are as follows:
• Skype names can be between 6–32 characters, consisting of any combination of upper and
lowercase characters, numbers, and punctuation marks. However, you cannot use spaces or prefix
your name with a number or punctuation mark.
• Passwords can be between 4–20 characters, consisting of any combination of upper and lowercase
characters, numbers, and punctuation marks. However, you cannot use spaces, prefix your
password with a number or punctuation mark, or use your Skype name as a password.
05. Basic Operations
After signing into your Skype account, you can manage and configure
your account using the various screen elements and options displayed
on the phone’s LCD screen. The main screen also provides you with a
range of status indicators and access to the features and functions via
the menu interface.
04. Signing into Your Skype Account
2
After the wireless connection is established, a Skype sign in prompt
appears. You can choose to sign into an existing Skype account or create
a new user account. To enter input information at the prompt:
1
3
4
• Use the Input mode button to change between digits and letters on
your alphanumeric keypad.
• Use the *a/A button to change to lowercase, uppercase, or numeric
entry when entering a network key.
• Use the Symbol button to enter common symbols and signs.
5
6
7
8
Signing into an Existing Skype Account
Press the Left soft key (Select) on this option and enter your Skype name
and password.
By default your Skype ID and password will be saved, and you will be
automatically signed into the same account next time unless you switch
this feature off (Menu > Settings > General > Auto sign in). To automatically sign into a specified account, just switch this feature on when you
are logged into that account.
Since your account information is stored on-line, your contact list will be
automatically loaded/updated each time you sign into your account. If
you are signing into an existing account for the first time, it may take a
little while to load all your contact list information, especially if you have
a very large list of contacts. Please be patient while the information is
being processed.
Description
Notifications
1
Battery Level
Ringer Off
2
Network Signal Status/Strength
3
Notifications
4
Skype Status
5
Current Time
6
Call Timer
7
Left Soft Key Action
8
Right Soft Key Action
Mute
New Missed Calll
Skype Network Alert
New Voicemail / Request
Making Calls
Power Key Menu Items
To make calls to an existing Skype contact:
1. At the main menu, Press the Left Soft Key (Contact).
2. Select the contact you wish to call using the navigation keys.
3. Press the Call key.
To access the power-key menu, press and hold the “End/Power” key by
pressing “End/Power” for three seconds then release*. The power-key
menu provides you with fast access to frequently used Network and Skype
functions.
To make call by entering a phone number:
1. Press and hold the zero (0) key until the plus (+) sign appears on the
display.
2. Dial the country code followed by the phone number
(without the first zero).
3. Press the Call key.
The power-key menu display is context sensitive, which means that the
items available are dependent on your current network connection and
Skype sign-in status. When you are connected and signed in, most of the
items listed below will become available.
* If you hold onto the key for over four seconds, the phone will be switched OFF immediately.
For example, to talk to one of our friendly San Jose customer service
representatives, dial + 1 408 324 0148
Power Key Menu Items
Main Operations
Sign In (When not connected to a network)
Connect to a network and sign in to Skype.
Remember, you need to purchase Skype credit before you can make
SkypeOut calls (to mobile phones and landlines).
Switch Off
Power off the phone.
Silent
Switch off the ringtone.
You can use the Volume key to adjust both the ringer volume (prior to the
call) and receiver volume (during your conversation).
Change Status
Change your current login status.
My Profile
Change your Skype-profile information.
To end the current call, press the End key.
Sign In/Out
Sign in or out of Skype.
Find/View Networks
Detect and display available wireless networks.
Network Status
Display wireless-network status.
Receiving Calls
To answer an incoming call, press the Call key. Alternatively, if you
choose not to answer the call, you can either have the call sent to
Voicemail or press Ignore to send a busy signal to the caller.
During calls, there are also a number of options that can be accessed
using the Left Soft Key, including:
06. List of Frequently Used Functions
(accessed from main menu)
• Hold Calls
Options > Hold the call (during the call)
• Mute/Unmute Microphone
Options > Mute or unmute microphone (during the call)
Updating the Phone Software
To end the current call, press the End key.
When you want to update the software, simply go to Menu > Settings >
General settings > Software updates.
Main Menu Items
Below is a list of main menu items, and the main operations that you can
access within the menu.
Main Menu Items
Main Operations
Connect (When not connected to a network)
Connect to a wireless network.
Sign In (When not connected to a network)
Sign in to your Skype account.
Contacts (After you are signed in)
Lists your contacts and their current
Skype status.
History
Lists missed calls, incoming and outgoing
calls, voicemail, and authorizations.
Status
Displays your Skype connection status.
Add Contact
Adds a Skype or SkypeOut number to
your Contact list.
Search
Search for a particular Skype account
using either Skype name or email address.
Services
Setup for Skype credit, SkypeIn, and
voicemail services.
Settings
Access and configure Skype, wireless
network, and device settings.
By default, the Wi-Fi Phone automatically checks for software updates
each time it is powered on. To disable this feature, press Menu >
Settings > Advanced > Software updates.
• Selecting Language
Settings > General > Language
• Setting Time and Date
Settings > Time and Date
• Setting Country Code
Settings > Call settings
(This will be the country code used for SkypeOut calls using local
numbers)
• Changing Display Brightness
Settings > Phone settings > Brightness
• Changing Display Timeout
Settings > Phone settings > Timeout
(to reactive display, press any key)
• Changing Mood Message
Status > Mood message
(Type in your new mood message into the display)
• Setting Up Call Forward
Menu > Settings > Call divert
© 2009 IPEVO corp. All rights reserved. The IPEVO logo, and other IPEVO marks are owned by
IPEVO corp and may be registered. All other trademarks are the property of their respective owners.
Customer Service (International)
Email: [email protected]
Tel: +886-2-5550-8686
Customer Service (USA)
Email: [email protected]
Tel: +1-877-269-4738
GO! http://www.ipevo.com