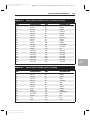
1
Color profile: Generic CMYK printer profile
Bigelow
Composite Default screen
/ Troubleshooting, Maintaining & Repairing PCs / Bigelow / 2686-8 / Chapter 43
43
VIDEO ADAPTERS AND
ACCELERATORS
CHAPTER AT A GLANCE
Understanding Conventional Video
Adapters 1515
Text vs. Graphics
ROM BIOS (Video BIOS)
More on DirectSound
More on DirectInput
More on Direct3D
More on DirectPlay
Determining the Installed Version of
DirectX
Reviewing Video Display Hardware 1517
MDA (Monochrome Display Adapter—1981)
CGA (Color Graphics Adapter—1981)
EGA (Enhanced Graphics Adapter—1984)
PGA (Professional Graphics Adapter—1984)
MCGA (Multi-Color Graphics Array—1987)
VGA (Video Graphics Array—1987)
8514 (1987)
SVGA (Super Video Graphics Array)
XGA (1990)
Replacing/Updating a Video Adapter 1540
Removing the Old Device Drivers
Exchanging the Video Adapter
Installing the New Software
Checking the Installation
Understanding Graphics Accelerators 1522
Video Speed Factors
AGP Overclocking 1547
AGP and BIOS Settings
3D Graphics Accelerator Issues 1531
The 3D Process
Key 3D Speed Issues
Improving 3D Performance Through Hardware
Troubleshooting Video Adapters 1549
Isolating the Problem Area
Multiple Display Support Guide
Unusual Hardware Issues
Award Video BIOS Glitch
Video Symptoms
Understanding DirectX 1536
Pieces of a Puzzle
More on DirectDraw
Video Feature Connectors 1543
AMI Multimedia Channel
Further Study 1570
The monitor itself is merely an output device—a “peripheral”—that translates synchronized analog or
TTL (Transistor to Transistor Logic) video signals into a visual image. Of course, a monitor alone is not
good for very much—except perhaps as a conversation piece or a room-heater. The next logical question
is: where does the video signal come from? All video signals displayed on a monitor are produced by a
1514
P:\010Comp\Bigelow\686-8\ch43.vp
Friday, July 21, 2000 9:50:28 AM
Color profile: Generic CMYK printer profile
Composite Default screen
Bigelow / Troubleshooting, Maintaining & Repairing PCs / Bigelow / 2686-8 / Chapter 43
UNDERSTANDING CONVENTIONAL VIDEO ADAPTERS
FIGURE 43-1
1515
A typical video adapter card
video adapter circuit (Figure 43-1). The term “adapter” is often used because the PC is adapted to the particular monitor through this circuit. In most cases, the video adapter is an expansion board that plugs into
the PC’s available bus slots. It is the video adapter that converts raw data from the PC into image data,
which is stored in the adapter’s video memory. The exact amount of memory available depends on the particular adapter and the video modes that the adapter is designed to support. The earliest adapters offered as
little as 256KB, while the latest adapters provide 32MB or more. The video adapter then translates the
contents of video memory into corresponding video signals that drive a monitor.
The actual operations of a video adapter are certainly more involved than described above, but you
can begin to appreciate the critical role that the video adapter plays in a PC. If a video adapter fails, the
monitor will display gibberish (or nothing at all). To complicate matters even further, many current software applications require small device drivers (video drivers). A video driver is a rather small program
that allows an operating system (such as Windows 95/98) to access a video adapter’s high-resolution and
high-color video modes with little or no interaction from the system BIOS. Video drivers have a profound
effect on your video performance and stability, and during troubleshooting it will be necessary for you to
isolate display problems to either the monitor, the video adapter, or video driver before a solution can be
found. This chapter explains the operation and troubleshooting of typical 2D and 3D video adapters.
Understanding Conventional
Video Adapters
The conventional frame buffer is the oldest and most well established type of video adapter. The term
frame buffer refers to the adapter’s operation—image data is loaded and stored in video memory one
“frame” at a time. Frame buffer architecture (as shown in Figure 43-2) has changed very little since PCs
first started displaying text and graphics. The heart of the frame buffer video adapter is the highly integrated display controller IC (sometimes called a CRTC or Cathode Ray Tube Controller). The CRTC generates control signals and supervises adapter operation. It is the CRTC that reads video RAM (or VRAM)
P:\010Comp\Bigelow\686-8\ch43.vp
Friday, July 21, 2000 9:50:29 AM
43
Color profile: Generic CMYK printer profile
Composite Default screen
1516
CHAPTER 43:
Bigelow / Troubleshooting, Maintaining & Repairing PCs / Bigelow / 2686-8 / Chapter 43
VIDEO ADAPTERS AND ACCELERATORS
contents and passes those contents along for further processing. Many new video boards use specially
designed IC groups (called chipsets) that are intended to work together. Chipsets provide fast, efficient
video performance while minimizing the amount of overhead circuitry needed on a video adapter.
TEXT VS. GRAPHICS
Video RAM also plays a vital role, since it is RAM that holds the image data to be displayed. The video
adapter can operate in two modes—text and graphic. In the text mode (the DOS “command line” mode),
ASCII characters are stored in video RAM. A character ROM, character generator, and shift register produce the pixel patterns that form ASCII screen characters. The character ROM holds a pixel pattern for
every possible ASCII character (including letters, numbers, and punctuation). The character generator
converts ROM data into a sequence of pixel bits and transfers them to a shift register. The shift register
produces a bit stream. At the same time, an attribute decoder determines whether the defined ASCII character is to be displayed as blinking, inverted, high-intensity, standard text, or a text color (for color monitors). The signal generator is responsible for turning the ASCII serial bit stream from the shift register into
the video and synchronization signals that actually drive the monitor. The signal generator may produce
either analog or TTL video signals, depending on how the particular monitor is to be operated. Today, virtually all color graphic monitors operate from analog video signals.
In the graphic mode (the Windows 98 desktop), video RAM locations will contain the color/gray-scale
information for each screen pixel rather than ASCII characters, so the character ROM and character generating circuitry used in text mode is bypassed. For example, monochrome graphics uses a single bit per
pixel, 16 color graphics uses 4 bits per pixel, 256 color graphics uses 8 bits per pixel, and so on. Pixel data
taken from VRAM by the CRTC is passed through the character generator without any changes. Data is
then sent directly to the shift register and on to the signal generator. It is the signal generator that produces
analog or TTL video signals along with sync signals, as dictated by the CRTC.
FIGURE 43-2
P:\010Comp\Bigelow\686-8\ch43.vp
Friday, July 21, 2000 9:50:31 AM
Block diagram of a frame buffer video adapter
Color profile: Generic CMYK printer profile
Composite Default screen
Bigelow / Troubleshooting, Maintaining & Repairing PCs / Bigelow / 2686-8 / Chapter 43
REVIEWING VIDEO DISPLAY HARDWARE
1517
ROM BIOS (Video BIOS)
There is one part of the classic video adapter that has not been mentioned yet—the video BIOS. The display controller requires substantial instruction changes when it is switched from text mode to any one of
its available graphics modes. Since the instructions required to re-configure and direct the CRTC depend
on its particular design (and the video board design in general), it is impossible to rely on the particular
software application or the PC’s BIOS to provide the required software. As a result, all video adapters
from EGA on use local BIOS ROM to hold the “firmware” needed by the particular display controller.
Current PC architecture allocates about 128KB of space from C0000h to DFFFFh within the upper memory area for devices with expansion ROMs, such as hard drive controllers and video adapters. Motherboard BIOS works in conjunction with the video BIOS, which is detected during the POST.
Reviewing Video Display Hardware
The early days of PC development left users with a simple choice between monochrome or color graphics
(all video adapters support text modes). In the years that followed, however, the proliferation of video
adapters have brought an array of video modes and standards that you should be familiar with before
upgrading a PC or attempting to troubleshoot a video system. This part of the chapter explains each of the
video standards that have been developed in the last 20 years and shows you the video modes that each
standard offers. Table 43-1 provides a comprehensive listing of the standard hardware- and software-supported video modes for a 3Dfx Voodoo3 video accelerator.
All of the display modes shown are not necessarily supported by all monitors or software. Check the
capabilities of your monitor and the requirements of your software before choosing a given display
mode or refresh rate.
MDA (Monochrome Display Adapter—1981)
The Monochrome Display Adapter (or MDA) is the oldest conventional video adapter available for the
PC. Text is available in an 80 column by 25 row format using 9x14-pixel characters. Being a text-only system, MDA offered no graphics capability, but it achieved popularity because of its relatively low cost,
good text display quality, and integrated printer (LPT) port. Figure 43-3 shows the video connector pinout
for an MDA board. The 9-pin monitor connection uses four active TTL signals: intensity, video, horizontal, and vertical. Video and intensity signals provide the on/off and high/low intensity information for each
pixel. The horizontal and vertical signals control the monitor’s synchronization. MDA boards have long
been obsolete and the probability of encountering one is remote at best.
CGA (Color Graphics Adapter—1981)
The Color Graphics Adapter (or CGA) was the first to offer color text and graphics modes for the PC. A
160x200 low-resolution mode offered 16 colors, but such low resolution received very little attention. A
320x200 medium-resolution graphics mode allowed finer graphics detail, but with only four colors. The
highest resolution mode provides 640x200 at two colors (usually black and one other color). The relationship between resolution and colors is important, since a CGA frame requires 16KB of video RAM. A resolution of 640x200 results in 128,000 pixels. With 8 bits able to represent 8 pixels, (128,000/8) 16,000 bytes are
adequate. A resolution of 320x200 results in 64,000 pixels, but with 2 bits needed to represent 1 pixel (4 pixels/byte), (64,000/4) 16,000 bytes are still enough. You can see that video RAM is directly related to video
P:\010Comp\Bigelow\686-8\ch43.vp
Friday, July 21, 2000 9:50:31 AM
43
Color profile: Generic CMYK printer profile
Composite Default screen
1518
CHAPTER 43:
TABLE 43-1
RESOLUTION
320x200
320x240
400x300
512x384
640x200
640x350
640x400
640x480
720x480
720x576
800x600
920x760
1024x768
1152x864
1280x960
1280x1024
1600x1024
1600x1200
1792x1344
1856x1392
1920x1080
1920x1200
1920x1440
2046x1536
Bigelow / Troubleshooting, Maintaining & Repairing PCs / Bigelow / 2686-8 / Chapter 43
VIDEO ADAPTERS AND ACCELERATORS
INDEX OF VIDEO MODES
NUMBER OF COLORS
256, 65K
256, 65K
256, 65K
256, 65K
16
16
256, 65K, 16.7M
256, 65K, 16.7M
256, 65K, 16.7M
256, 65K, 16.7M
256, 65K, 16.7M
256, 65K
256, 65K, 16.7M
256, 65K, 16.7M
256, 65K
256, 65K, 16.7M
256, 65K, 16.7M
256, 65K, 16.7M
256, 65K, 16.7M
256, 65K, 16.7M
256, 65K, 16.7M
256, 65K, 16.7M
256, 65K, 16.7M
256, 65K, 16.7M
VERTICAL FREQUENCY (HZ)
70, 85
60, 70, 75, 85
60, 70, 75, 85
60, 70, 75, 85
70
70
70, 85
60, 72, 75, 85, 100, 120, 140, 160
60, 72, 85
72, 100
60, 72, 75, 85, 100, 120, 140, 160
60, 75, 85
60, 70, 75, 85, 100, 120
60, 70, 75, 85, 100, 120
60, 75, 85
60, 70, 75, 85, 100
60, 76, 85
60, 65, 70, 75, 80, 85, 100
60, 75
60, 75
60, 72, 75, 85
60, 76, 85
60, 75, 85
60, 75
capacity. Since there is typically much more video RAM available than is needed for an image, video boards
support multiple video pages. Figure 43-4 shows the pinout for a typical CGA video connector. As with the
earlier MDA design, CGA video signals reserve pins 1 and 2 as ground lines, while the horizontal sync signal is produced on pin 8 and the vertical sync signal is produced on pin 9. CGA is strictly a digital display
system with TTL signals used on the Red (3), Green (4), Blue (5), and Intensity (6) lines.
+
+
+
–
FIGURE 43-3
P:\010Comp\Bigelow\686-8\ch43.vp
Friday, July 21, 2000 9:50:33 AM
Pinout of an MDA video connector
Color profile: Generic CMYK printer profile
Composite Default screen
Bigelow / Troubleshooting, Maintaining & Repairing PCs / Bigelow / 2686-8 / Chapter 43
REVIEWING VIDEO DISPLAY HARDWARE
FIGURE 43-4
1519
Pinout of a CGA video connector
EGA (Enhanced Graphics Adapter—1984)
It was not long before the limitations of CGA became painfully apparent. The demand for higher resolutions and color depths drove designers to introduce the next generation of video adapters, known as the
Enhanced Graphics Adapter. One of the unique appeals of EGA was its backward compatibility—an
EGA board would emulate CGA and MDA modes on the proper monitor, as well as its native resolutions
and color depths when using an EGA monitor. EGA is known for its 320x200x16, 640x200x16, and
640x350x16 video modes. More memory is needed for EGA, and 128KB is common for EGA boards
(although many boards could be expanded to 256KB).
The EGA connector pinout is illustrated in Figure 43-5. TTL signals are used to provide Primary Red
(3), Primary Green (4), and Primary Blue (5) color signals. By adding a set of secondary color signals (or
color intensity signals) such as Red Intensity (2), Green Intensity (6), and Blue Intensity (7), the total of six
color control signals allow the EGA to produce up to 64 possible colors. Although 64 colors are possible,
only 16 of those colors are available in the palette at any one time. Pin 8 carries the horizontal sync signal,
pin 9 carries the vertical sync signal, and pin 1 remains ground.
PGA (Professional Graphics Adapter—1984)
The Professional Graphics Adapter was also introduced in 1984. This system offered a then-revolutionary
display capability of 640x480x256. Three-dimensional rotation and graphic clipping was included as a
hardware function, and the adapter could update the display at 60 frames per second. The PGA was
incredibly expensive and beyond reach of all but the most serious business user. In actual operation, a
PGA system required two or three expansion boards, so it also represented a serious commitment of limited system space. Ultimately, PGA failed to capture any significant market acceptance. It is unlikely that
you will ever encounter a PGA board—most that ever saw service in PCs have long since been upgraded.
FIGURE 43-5
P:\010Comp\Bigelow\686-8\ch43.vp
Friday, July 21, 2000 9:50:36 AM
Pinout of an EGA video connector
43
Color profile: Generic CMYK printer profile
Composite Default screen
1520
CHAPTER 43:
Bigelow / Troubleshooting, Maintaining & Repairing PCs / Bigelow / 2686-8 / Chapter 43
VIDEO ADAPTERS AND ACCELERATORS
MCGA (Multi-Color Graphics Array—1987)
The Multi-Color Graphics Array (MCGA) had originally been integrated into the motherboard of IBM’s
PS/2-25 and PS/2-30. MCGA supports all of the CGA video modes and also offers several new video
modes, including a 320x200x256 mode that had become a preferred mode for game software of the day.
MCGA was one of the first graphic systems to use analog color signals rather than TTL signals. Analog
signals were necessary to allow MCGA to produce its 256 colors using only three primary color lines (red,
green, and blue, or “RGB”).
IBM also took the opportunity to employ a new, high-density 15-pin sub-miniature “D-type” connector, as shown in Figure 43-6. One of the striking differences between the “analog” connector and older
TTL connectors is the use of individual ground lines for each color. Careful grounding is vital since any
signal noise on the analog lines will result in color anomalies. If you inspect a video cable closely, you will
find that one or both ends are terminated with a square metal box, which actually contains a noise filter. It
is important to realize that although the MCGA could emulate CGA modes, older TTL monitors were no
longer compatible with analog RGB signal levels.
Although there were a number of notable technical improvements that went into the PS/2 design, none
of them could assure broad acceptance of the PS/2 series. However, the MCGA ushered in a new age of
analog display technology, and virtually all subsequent video adapters now use the 15-pin analog format
shown in Figure 43-6. While MCGA adapters are also (technically) obsolete, the standard lives on in
MCGA’s cousins, VGA and SVGA.
VGA (Video Graphics Array—1987)
The Video Graphics Array (or VGA) was introduced along with MCGA and implemented in other members of IBM’s PS/2 series. The line between MCGA and VGA has always been a bit fuzzy since both were
introduced simultaneously (both using the same 15-pin video connector), and VGA can handle every
mode that MCGA could. For all practical purposes, we can say that MCGA is a subset of VGA.
It is VGA that provides the familiar 640x480x16 screen mode that has become the baseline for
Microsoft Windows 95/98 Safe Mode displays. The use of analog color signals allows VGA systems to
produce a palette of 16 colors from 262,144 possible colors. VGA also provides backward compatibility
for all older screen modes. Although the PS/2 line has been discontinued, the flexibility and backward
FIGURE 43-6
P:\010Comp\Bigelow\686-8\ch43.vp
Friday, July 21, 2000 9:50:38 AM
Pinout of a VGA/MCGA/SVGA video connector
Color profile: Generic CMYK printer profile
Composite Default screen
Bigelow / Troubleshooting, Maintaining & Repairing PCs / Bigelow / 2686-8 / Chapter 43
REVIEWING VIDEO DISPLAY HARDWARE
1521
compatibility of VGA proved so successful that VGA adapters were soon developed for the PC. For a
time, VGA support was considered to be “standard equipment” for all new PCs sold then, but SVGA
boards have rapidly replaced VGA systems, and most SVGA adapters offer full VGA support.
8514 (1987)
The 8514/A video adapter is a high-resolution system also developed for the PS/2. In addition to full support for MDA, CGA, EGA, and VGA modes, the 8514/A can display 256 colors at 640x480 and
1024x768 (interlaced) resolutions. Unfortunately, the 8514/A was a standard ahead of its time. The lack
of available software and the demise of the PS/2 line doomed the 8514/A to extinction before it could
become an accepted standard. The XGA standard rapidly became the PC standard for high-resolution/high-color display systems on MicroChannel PC platforms.
SVGA (Super Video Graphics Array)
Ever since VGA became the de facto standard for PC graphics, there has been a strong demand from PC
users to move beyond the 640x480x16 limit imposed by “conventional” VGA to provide higher resolutions and color depths. As a result, new generations of extended VGA, or super VGA (SVGA), adapters
have moved relentlessly into the PC market. Unlike VGA, which adhered to strict hardware configurations, there is no generally accepted standard on which to develop an SVGA board—each manufacturer
makes an SVGA board that supports a variety of different—and not necessarily compatible—video
modes. For example, one manufacturer may produce an SVGA board capable of 1024x768x65K, while
another manufacturer may produce a board that reaches only 640x480x16M (more than 16 million colors).
This “mixing and matching” of resolutions and color depths has resulted in a very competitive (but
very fractured) market—no two SVGA boards are necessarily capable of the same things. This proliferation of video hardware also makes it impossible for applications software to take advantage of super video
modes without supplemental software called video drivers. Video drivers are device drivers (loaded
before an application program is started) that allow the particular program to work with the SVGA board
hardware. Video drivers are typically developed by the board manufacturer and shipped on a floppy disk
with the board. Windows 95/98 takes particular advantage of video drivers, since the Windows interface
allows all Windows applications to use the same graphics system rather than having to write a driver for
every application as with DOS. Using an incorrect, obsolete, or corrupted video driver can be a serious
source of performance and stability problems for SVGA installations. The one common attribute of
SVGA boards is that most offer full support for conventional VGA (which requires no video drivers), so
Windows can always be started “safely” in the conventional 640x480x16 VGA mode. There are only a
handful of SVGA board manufacturers that have abandoned conventional VGA support.
Today, most SVGA boards offer terrific video performance, a wide selection of modes, and
extremely reasonable prices. If it were not for the lack of standardization in SVGA adapters, VGA would
likely be considered obsolete already. The Video Electronics Standards Association (VESA) has started
the push for SVGA standards by proposing and supporting the VESA BIOS Extension (VBE), a universal
video driver. The extension (now at version 3.0) provides a uniform set of functions that allows application programs to detect a card’s capabilities and to use the optimum adapter configuration regardless of
how the particular board’s hardware is designed. Virtually all of the SVGA boards in production today
support the VESA BIOS Extensions, and it is worthwhile to recommend boards that support VESA
SVGA. Some SVGA boards even incorporate the extensions into the video BIOS ROM, which saves the
RAM space that would otherwise be needed by a video driver.
P:\010Comp\Bigelow\686-8\ch43.vp
Friday, July 21, 2000 9:50:39 AM
43
Color profile: Generic CMYK printer profile
Composite Default screen
1522
CHAPTER 43:
Bigelow / Troubleshooting, Maintaining & Repairing PCs / Bigelow / 2686-8 / Chapter 43
VIDEO ADAPTERS AND ACCELERATORS
XGA (1990)
The XGA and XGA/2 are 32-bit high-performance video adapters developed by IBM to support
MicroChannel-based PCs. XGA design with MicroChannel architecture allows the adapter to take control of the system for rapid data transfers. MDA, CGA, EGA, and VGA modes are all supported for backward compatibility. In addition, several color depths are available at 1024x768 resolution, and a
photo-realistic 65,536 colors are available at 640x480 resolution. To improve performance even further,
fast video RAM and a graphics co-processor are added to the XGA design. XGA is generally limited to
high-performance applications in MicroChannel systems. The migration to ISA-based PCs has been slow
because the ISA bus is limited to 16 bits and does not support bus-mastering as Micro-Channel busses do.
For PCs, SVGA adapters using the high-performance PCI (and now the AGP) bus will likely provide
extended screen modes as they continue to grow in sophistication as graphics accelerators.
Understanding Graphics
Accelerators
When screen resolutions approach 640x480 and higher, the data needed to form a single screen image can
be substantial. Consider a single 640x480x256 image. There are (640x480) 307,200 pixels. Since there
are 256 colors, 8 bits are needed to define the color for each pixel. This means 307,200 bytes are needed
for every frame. When the frame must be updated 10 times per second, (307,200 x 10) 3,072,000 bytes per
second (3.072MB/sec) must be moved across the bus (PCI or ISA bus). If a 65,536 color mode is being
used, 2 bytes are needed for each pixel, so (307,200 x 2) 614,400 bytes are needed for a frame. At 10
frames per second, (614,400 x 10) 6,144,000 bytes per second (6.144MB/sec) must be moved across the
bus—this is just for video information and does not reflect the needs of system overhead operations, such
as memory refresh, keyboard and mouse handling, drive access, and other data-intensive system operations. When such volumes of information must be moved across an ISA bus limited at 8.33 MHz, you can
see how a serious data transfer bottleneck develops. Even the PCI bus can be strained by higher video
modes (though the high-bandwidth data channel provided by AGP has eased this bottleneck). Such video
data “bottlenecks” result in painfully slow screen refreshes—especially under Windows, which requires
frequent refreshes.
Video designers seek to overcome the limitations of conventional video adapters by incorporating
processing power onto the video board itself rather than relying on the system CPU for graphic processing. By off-loading work from the system CPU and assigning the graphics processing to local processing
components, graphics performance can be improved by a factor of three or more. There are several means
of acceleration, the availability of which depends on the sophistication of the board (Figure 43-7).
Fixed-function acceleration relieves load on the system CPU by providing adapter support for a limited
number of specific functions, such as BitBlt or line draws. Fixed-function accelerators were an improvement over frame buffers, but they do not offer the performance of more sophisticated accelerators. A
graphics accelerator uses an application-specific chip (or ASIC) that intercepts graphics tasks and processes them without the intervention of the system CPU. Graphics accelerators are perhaps the most
cost-effective type of accelerator. Graphics co-processors are the most sophisticated type of accelerator.
The co-processor acts as a CPU that is dedicated to handling image data. Older graphics co-processors,
such as the TMS34010 and TMS34020, represent the Texas Instruments Graphical Architecture (TIGA),
which is broadly used for high-end accelerators. Unfortunately, not all graphics co-processors provide
increased performance at a level that warrants the higher cost.
P:\010Comp\Bigelow\686-8\ch43.vp
Friday, July 21, 2000 9:50:39 AM
Color profile: Generic CMYK printer profile
Composite Default screen
Bigelow / Troubleshooting, Maintaining & Repairing PCs / Bigelow / 2686-8 / Chapter 43
UNDERSTANDING GRAPHICS ACCELERATORS
FIGURE 43-7
1523
A typical video accelerator board
Figure 43-8 shows the block diagram for a basic graphics accelerator. The core of the accelerator is
the graphics chip (or video chipset). The graphics chip connects directly with the PC expansion bus.
Graphics commands and data are translated into pixel data, which is stored in video RAM. High-performance video memory offers a second data bus which, is routed directly to the video board’s RAMDAC
(random access memory video-to-analog converter). The graphics chip directs RAMDAC operation and
ensures that VRAM data is available. The RAMDAC then translates video data into red, green, and blue
analog signals along with horizontal and vertical synchronization signals. Output signals generated by the
RAMDAC drive the monitor. This apparent simplicity of the architecture is due to the extremely high
level of integration provided by the chipsets being used. Table 43-2 provides a listing of many 2D and 3D
graphics chipsets in use today.
FIGURE 43-8
P:\010Comp\Bigelow\686-8\ch43.vp
Friday, July 21, 2000 9:50:45 AM
Block diagram of a video accelerator board
43
Color profile: Generic CMYK printer profile
Composite Default screen
1524
CHAPTER 43:
TABLE 43-2
VIDEO ADAPTERS AND ACCELERATORS
LISTING OF POPULAR 2D AND 3D VIDEO CHIPSETS
MANUFACTURER
3dfx
3dfx
3dfx
3DLabs
3DLabs
3DLabs
Acer Labs
Acer Labs
Alliance Semiconductor
Alliance Semiconductor
Alliance Semiconductor
Alliance Semiconductor
ARK Logic
ARK Logic
Artist Graphics
Artist Graphics
Artist Graphics
ATI
ATI
ATI
ATI
ATI
ATI
ATI
ATI
ATI
ATI
ATI
Avance Logic
Avance Logic
Avance Logic
Avance Logic
Avance Logic
Avance Logic
Avance Logic
Avance Logic
Avance Logic
Avance Logic
Avance Logic
Avance Logic
P:\010Comp\Bigelow\686-8\ch43.vp
Friday, July 21, 2000 9:50:45 AM
Bigelow / Troubleshooting, Maintaining & Repairing PCs / Bigelow / 2686-8 / Chapter 43
PRODUCT
VSA-100 Chip (http://www.3dfx.com/)
Voodoo Series (Voodoo Rush to Voodoo 5)
Velocity Series (100—200)
Permedia (http://www.3dlabs.com/products/index.html)
GLINT 300SX
Oxygen (VX1—GVX1—GMX—ACX)
ALI-M3145 (http://www.acerlabs.com/)
ALI CAT-32/64
ProMotion-3210 (http://www.alsc.com/)
ProMotion-6410
ProMotion-6422
ProMotion-AT24
ARK1000PV
ARK2000PV
3GA Graphics Processor (http://www.artgraphics.com/)
Artist 3GA
Artist GPX
264VT (http://www.ati.com/na/pages/products/pc/pc_index.html)
3D RAGE
Mach32
Mach64
Mach64CT
Mach8
3D XPRESSION
XPERT (98, 99, 128, 2000, At Play, At Work, etc.)
3D CHARGER
All-In-Wonder (Pro, 128, 128 Pro)
RAGE (Magnum, Fury, FuryPro, Fury MAXX)
ALG 2032 (http://www.avance.com)
ALG 2064
ALG 2302
ALG 2308
ALG 2364
ALG 2401
ALG 25128
ALG 2564
ALG 27000
ALG 2101
ALG 2228
ALG 2301
Color profile: Generic CMYK printer profile
Composite Default screen
Bigelow / Troubleshooting, Maintaining & Repairing PCs / Bigelow / 2686-8 / Chapter 43
UNDERSTANDING GRAPHICS ACCELERATORS
TABLE 43-2
LISTING OF POPULAR 2D AND 3D VIDEO CHIPSETS (CONTINUED)
MANUFACTURER
Chips and Technologies
Chips and Technologies
Chips and Technologies
Chromatic Research
Cirrus Logic, Inc.
Cirrus Logic, Inc.
Cirrus Logic, Inc.
Cirrus Logic, Inc.
Cirrus Logic, Inc.
Cirrus Logic, Inc.
Cirrus Logic, Inc.
Cirrus Logic, Inc.
Cirrus Logic, Inc.
Cirrus Logic, Inc.
Cirrus Logic, Inc.
Cirrus Logic, Inc.
Cirrus Logic, Inc.
Cirrus Logic, Inc.
Cirrus Logic, Inc.
Cirrus Logic, Inc.
Cirrus Logic, Inc.
IIT (AGX)
IIT (AGX)
Intel Corp.
Intel Corp.
Lockheed Martin
Matrox
Matrox
Matrox
Matrox
Matrox
Matrox
Matrox
Matrox
Matrox
Matrox
Matrox
NCR
NCR
NVidia/SGS-THOMSON
P:\010Comp\Bigelow\686-8\ch43.vp
Friday, July 21, 2000 9:50:46 AM
1525
PRODUCT
64300 (purchased by Intel)
82c455/6
82c452
Mpact
CL-GD5420 (http://www.cirrus.com)
CL-GD5421
CL-GD5422
CL-GD5424
CL-GD5425
CL-GD5426
CL-GD5428
CL-GD5429
CL-GD5430
CL-GD5434
CL-GD5434-E
CL-GD5436
CL-GD5440
CL-GD5446
CL-GD5462
CL-GD54M40
CL-GD5480
AGX-015
AGX-016
Intel i740 (http://developer.intel.com/design/graphics/)
Intel i810 (integrated chipset—AGP)
Real3D
MGA-1064SG (http://www.matrox.com)
MGA-2064W
Mystique 220
Millennium II
m3D
Productiva G100
Mystique G200
Marvel G200
Marvel G400
Millennium G200
Millennium G400
77C22E+
77C32BLT
NV1/STG-2000 (http://www.nvidia.com/)
43
Color profile: Generic CMYK printer profile
Composite Default screen
1526
CHAPTER 43:
TABLE 43-2
Bigelow / Troubleshooting, Maintaining & Repairing PCs / Bigelow / 2686-8 / Chapter 43
VIDEO ADAPTERS AND ACCELERATORS
LISTING OF POPULAR 2D AND 3D VIDEO CHIPSETS (CONTINUED)
MANUFACTURER
NVidia
NVidia
NVidia
NVidia
NVidia
NVidia
Number Nine
Number Nine
Number Nine
Oak Technologies Inc.
Oak Technologies Inc.
Oak Technologies Inc.
Oak Technologies Inc.
Oak Technologies Inc.
Oak Technologies Inc.
Realtek Semiconductor Corp.
Rendition
S3, Inc.
S3, Inc.
S3, Inc.
S3, Inc.
S3, Inc.
S3, Inc.
S3, Inc.
S3, Inc.
S3, Inc.
S3, Inc.
S3, Inc.
S3, Inc.
S3, Inc.
S3, Inc.
S3, Inc.
S3, Inc.
S3, Inc.
S3, Inc.
S3, Inc.
S3, Inc.
S3, Inc.
Sierra Semiconductor
Sierra Semiconductor
P:\010Comp\Bigelow\686-8\ch43.vp
Friday, July 21, 2000 9:50:46 AM
PRODUCT
Riva 128
Riva 128ZX
Vanta
Riva TNT and TNT2
Quadro
GeForce 256
Imagine 128 Series 2 (http://www.nine.com/products/index.html)
Ticket To Ride
Ticket To Ride IV
OTI-057/67 (http://www.oaktech.com)
OTI-077
OTI-087
OTI-64105/107
OTI-64111
OTI-64217
RTG3105I (http://www.realtek.com.tw)
Vérité (http://www.rendition.com/)
Aurora64V+ (http://www.s3.com)
S3-801
S3-805/805p
S3-805I
S3-864
S3-868
S3-911
S3-924
S3-928
S3-964
S3-968
S3-ViRGE
S3-ViRGE/VX
Scenic/MX2
Trio32 (732)
Trio64 (764)
Trio64UV+
Trio64V+
Savage3D
Savage4
Savage2000
Falcon/64
SC15064
Color profile: Generic CMYK printer profile
Composite Default screen
Bigelow / Troubleshooting, Maintaining & Repairing PCs / Bigelow / 2686-8 / Chapter 43
UNDERSTANDING GRAPHICS ACCELERATORS
TABLE 43-2
1527
LISTING OF POPULAR 2D AND 3D VIDEO CHIPSETS (CONTINUED)
MANUFACTURER
Silicon Integrated Systems
Silicon Integrated Systems
Silicon Integrated Systems
Silicon Integrated Systems
Silicon Integrated Systems
Silicon Integrated Systems
Silicon Integrated Systems
S-MOS
Trident Microsystems
Trident Microsystems
Trident Microsystems
Trident Microsystems
Trident Microsystems
Trident Microsystems
Trident Microsystems
Trident Microsystems
Trident Microsystems
Trident Microsystems
Trident Microsystems
Tseng Labs, Inc.
Tseng Labs, Inc.
Tseng Labs, Inc.
Tseng Labs, Inc.
Tseng Labs, Inc.
Tseng Labs, Inc.
Tseng Labs, Inc.
UMC
UMC
UMC
Weitek
Weitek
Western Digital (Paradise)
Western Digital (Paradise)
Western Digital (Paradise)
Western Digital
PRODUCT
SiS6205 (http://www.sis.com.tw/products/multimedia.htm)
SiS6215
SiS6225
SiS6326
SiS6326AGP
SiS6326DVD
SiS300/301
SPC1500 (http://www.smos.com/)
TGUI9420/30 (http://www.tridentmicro.com)
TGUI9440AGi
TGUI9660/968x
TVGA8900CL
TVGA9000
TVGA9200Cxr
TVGA9400CXi
TVGA8900C
3DImage 975
3DImage 985
Blade 3D
ET4000/W32
ET4000/W32I
ET4000/W32p
ET4000AX
ET6000
VIPeR
VPR6000
UMC 86C408
UMC 86C418
UMC 8710
P9000
P9100
WD90C30 (http://www.wdc.com)
WD90C31
WD90C33
RocketCHIP
VIDEO SPEED FACTORS
There is no one element that defines the performance of an accelerator board. Overall performance is actually a combination of five major factors: the video accelerator chip(s) (a.k.a. the “chipset”), the video
RAM, the video BIOS/drivers, the RAMDAC, and the expansion bus architecture. By understanding how
P:\010Comp\Bigelow\686-8\ch43.vp
Friday, July 21, 2000 9:50:46 AM
43
Color profile: Generic CMYK printer profile
Composite Default screen
1528
CHAPTER 43:
Bigelow / Troubleshooting, Maintaining & Repairing PCs / Bigelow / 2686-8 / Chapter 43
VIDEO ADAPTERS AND ACCELERATORS
each of these factors relate to performance, you can make the best recommendations for system upgrades
or replacement boards.
Video accelerator Of course, the video accelerator chip itself (usually the graphics chipset being
used) is at the core of the accelerator board. The type of chip (that is, fixed-function, graphics accelerator,
or graphics co-processor) loosely defines the board’s capabilities. All other factors being equal, a board
with a graphics accelerator will certainly perform better than a fixed-function accelerator. Companies like
3dfx, ATI, Advance Logic, Chips & Technologies, Matrox, NVidia, S3 and Oak have developed many of
the video accelerator chips in use today. Many of the chips provide a 32-bit data bus (though even newer
designs are providing a 64-bit or 128-bit data bus), and they sustain very high data rates, but a data bottleneck across a 16-bit (that is, ISA) expansion bus can seriously degrade the IC’s effectiveness. Therefore,
means you should match the recommended board to the particular system—a state-of-the-art graphics
accelerator will not necessarily make your old i286 shine.
Video RAM Video adapters rely on RAM to hold image data, and video accelerator boards are no
exception. While the current amount of video RAM typically varies from 8MB to 16MB (some late-mode
video adapters offer as much as 64MB), the amount of RAM is not so important to a video accelerator as
the RAM’s speed. Faster memory is able to read and write image data faster, so adapter performance is
improved. The introduction of specialized video RAM (VRAM)—memory devices with two separate
data busses that can be read from and written to simultaneously—is reputed to be superior to conventional
dynamic RAM (DRAM) or EDO RAM, such as the kind used for ordinary PC memory. Recent DRAMs
have made speed advances that have narrowed that gap while still remaining very economical.
At this point, adapters with fast DRAM or EDO RAM are just about as fast as adapters with specialized video RAM for video modes up to 1024x768x256. For higher modes and color depths found on
high-end accelerators, specialized video RAM is still the way to go for optimum performance.
DDR-SDRAM (Double Data Rate SDRAM) memory looks promising for both system and graphics
memory. It effectively doubles its speed by using both edges of each clock cycle. Keep in mind that graphics board manufacturers are using the doubled rate in their specifications and advertising. AGP video
boards are also being produced in different versions and prices depending on the type and speed of the
memory provided on each adapter, and AGP video adapters can also access system RAM for certain video
data storage.
Video BIOS and drivers Software is often considered as an afterthought to adapter design, yet it
plays a surprisingly important role in accelerator performance. Even the finest accelerator board hardware
can bog-down when run under careless, loosely written code. There are two classes of software that you
must be concerned with: video BIOS and video drivers. The video BIOS is firmware (software that is permanently recorded on a memory device such as a ROM). Video BIOS holds the programming that allows
the accelerator to interact with DOS applications software. Current adapters have flash upgradeable
BIOS ROMs that allow the video adapter’s firmware to be updated without removing the video adapter
from the PC. VESA BIOS extensions are now being used almost universally as part of the video BIOS for
many accelerators as well as conventional frame buffer adapters. Adding VESA BIOS extensions to
video BIOS eliminates the need to load another device driver under DOS.
However, there are compelling advantages to video drivers. Windows 95/98 works quite well with
drivers (and generally ignores video BIOS entirely). Unlike BIOS ROMs, which can be troublesome to
upgrade, a video driver can change very quickly as bugs are corrected, enhancements are made, and performance is streamlined. The driver can be downloaded from a manufacturer’s BBS or web site on the
P:\010Comp\Bigelow\686-8\ch43.vp
Friday, July 21, 2000 9:50:46 AM
Color profile: Generic CMYK printer profile
Composite Default screen
Bigelow / Troubleshooting, Maintaining & Repairing PCs / Bigelow / 2686-8 / Chapter 43
UNDERSTANDING GRAPHICS ACCELERATORS
1529
Internet (or other online information service such as AOL) and installed on your system in a matter of minutes without any disassembling of the PC. It is also possible for you to use third-party video drivers. Hardware manufacturers are not always adept at writing efficient software, and a third-party driver developed
by an organization that specializes in software may actually let your accelerator perform better than the
original driver shipped from the manufacturer.
“Reference drivers” are often available from the video chipset maker’s web site. Video board manufacturers typically customize these drivers for their specific product. Customized reference drivers
often include performance improvements, but can be unstable because they have not been tested
on or written for specific video cards.
Just about every analog video system in service today is modeled after the 15-pin
VGA scheme, which uses three separate analog signals to represent the three primary colors. The color for
each pixel must be broken down into component red, green, and blue levels, and those levels must be converted into analog equivalents. The conversion from digital values to analog levels is handled by a digital-to-analog converter (or DAC). Each conversion also requires a certain amount of time. Faster DACs
are needed to support faster horizontal refresh rates. Current video boards incorporate RAMDAC rated at
up to 350MHz, which can support very high resolutions at reasonably high refresh rates. Remember that
each video adapter uses a palette, which is a subset of the colors that can possibly be produced. Even
though a monitor may be able to produce “unlimited” colors, a VGA board can produce only 256 of those
colors in any 256 color mode. Older video boards stored the palette entries in registers, but the large-palette video modes now available (64K colors through 16 million colors) require the use of RAM. Boards
that incorporate a RAMDAC (Random Access Memory Digital-to-Analog Converter) are preferred,
since accessing memory integrated with DACs tends to be much faster than accessing discrete RAM elsewhere on the board. Keep in mind that the RAM on a RAMDAC is used for holding palette information—not the actual image.
The RAMDAC
Expansion bus architectures Finally, graphic data must be transferred between the PC motherboard and the adapter, as you saw early in this section. Such transfer takes place across the PC’s expansion
bus. If data can be transferred between the PC and adapter at a faster rate, video performance should
improve. Consequently, the choice of bus architecture has a significant impact on video performance.
Video accelerators are available to support four bus architectures: ISA, VL, PCI, and AGP.
ISA. The venerable Industry Standard Architecture (ISA) has remained virtually unchanged since its
introduction with the PC/AT in the early 1980s. The ISA continues to be a mature interface standard for
most IBM-compatible expansion devices. The sheer volume of ISA systems currently in service guarantees the ISA a place on desktops for at least another ten years. However, ISA’s 16-bit data bus width, its
lack of such advanced features as interrupt sharing or bus mastering, and its relatively slow 8.33MHz
operating speed allow a serious bottleneck to form for the incredible volume of video data demanded by
Windows 95/98 and most graphics-intensive DOS applications. ISA works—but it is no longer the interface of choice to achieve optimum video performance. When recommending an accelerator product, look
to the newer busses for best results.
VL Bus. By the early 1990s, the Video Electronics Standards Association (VESA) had invested a
great deal of time and effort to develop a standard bus interface, which has been optimized for video operation. In essence, this video bus is “local” to the system CPU, allowing faster access without the 8.33MHz
limitation imposed by ISA. The actual bus speed is limited by the system clock speed. The VESA Local
bus (“VL bus” or “VLB”) achieved a remarkable level of industry acceptance and success in boosting
P:\010Comp\Bigelow\686-8\ch43.vp
Friday, July 21, 2000 9:50:47 AM
43
Color profile: Generic CMYK printer profile
Composite Default screen
1530
CHAPTER 43:
Bigelow / Troubleshooting, Maintaining & Repairing PCs / Bigelow / 2686-8 / Chapter 43
VIDEO ADAPTERS AND ACCELERATORS
video performance—especially when used with a high-quality graphics accelerator board. However, the
32-bit VL bus is generally limited to video systems. Other peripherals such as IDE hard drive controllers
have been built for the VL bus, but VL bus limitations frequently interfere with multiple VL cards in the
same system (especially with faster motherboards). As a result, existing VL-compatible PCs typically
offer only one or two VL expansion slots—the other expansion slots are ISA. Video accelerators are no
longer manufactured for the VL bus—virtually all high-performance video boards today are designed for
the PCI or AGP busses.
PCI. Intel’s Peripheral Component Interconnect (PCI) bus was one of the newest and most exciting
bus architectures to reach the PC. The PCI bus runs at a fixed frequency of 30 or 33MHz and offers a full
64-bit data bus that can take advantage of new 64-bit CPUs, such as Intel’s Pentium (though most implementations of the PCI bus are designed for a 32-bit implementation). The PCI bus overcomes the speed
and functional limitations of ISA, and the PCI architecture is intended to support all types of PC peripherals (not just video boards). Current PCI video boards now clearly outperform ISA and VL bus type video
adapters.
AGP. Intel developed and introduced an advanced “local bus” architecture called AGP (the “Accelerated Graphics Port”—a close cousin of PCI) intended to meet the increasing demands for speed and bandwidth needed to support real-time 3D graphics. AGP is a dedicated high-speed bus that directly connects
the chipset and the graphics controller. This connection creates a data channel specifically for graphics
(unlike the PCI bus, which must share bandwidth and system resources among the various PCI peripherals that are installed in any given system). The introduction of AGP removes data-hungry 3D and video
data transfers from the PCI bus. PCI device performance also benefits since video data transfers are no
longer required. The system BIOS, chipset, and operating system must all support AGP to take advantage
of AGP’s performance capabilities. The only operating systems that fully support AGP at this time are
Windows 98 and Windows 2000. Windows 95 OSR 2.1 has limited AGP support, but any AGP performance benefit will be limited. DirectDraw (part of DirectX) is constantly being updated because it is
responsible for controlling AGP’s use of main system memory.
While PCI specifications limit data transfer rates to a bandwidth of 132MB/sec, the 32-bit 66MHz
AGP bus has a base bandwidth of 264MB/sec. The AGP 2X specification supports a bandwidth of
533MB/sec by transferring data on both the rising and falling edges of the 66MHz clock (double-clocking) and also implements more efficient data transfer modes. The timing of data transfers is controlled by
strobe signals rather than the standard method of clock cycles—strobe signals are generated by the device
sending the data (either the PC or the AGP board). Generating both the data and the strobe signals allows
the sending device to precisely control the timing. Separating the data transfer timing from the bus clock
also allowed Intel to create an AGP 4X specification. By increasing the number of strobe signals from
three to six, Intel defined a “virtual” clock speed of 264MHz (4 X 66), and this improvement again doubles the potential bandwidth of the AGP connection to 1.06GB/sec.
A significant AGP feature is its ability to access system memory directly during rendering. In this situation, system memory is referred to as Non-Local Memory (NLM). The operating system can reserve portions of the system’s main memory for use by the graphics controller. There are two methods of using NLM
supported by Intel’s AGP specifications, and both require support from the operating system through an API
(such as DirectDraw) to utilize NLM for texture map storage and some z-buffering. The first method is
through Direct Memory Access (DMA). The DMA mode utilizes NLM only for mass storage of information like texture data. This restriction, which allows the graphic controller to keep fewer texture maps in
local memory (on the video board), is mainly intended to reduce system cost. Non-Local Memory can be
used for texture maps, thus allowing applications such as games to use larger maps; this process improves
P:\010Comp\Bigelow\686-8\ch43.vp
Friday, July 21, 2000 9:50:47 AM
Color profile: Generic CMYK printer profile
Composite Default screen
Bigelow / Troubleshooting, Maintaining & Repairing PCs / Bigelow / 2686-8 / Chapter 43
3D GRAPHICS ACCELERATOR ISSUES
1531
game realism and image quality without sacrificing performance or requiring more, expensive local memory. Direct Memory Execute (or DiME) is the second mode used by AGP adapters to utilize NLM. In this
mode—often referred to as Execute Mode—3D functions are actually performed in Non-Local Memory,
and the end result is then transferred to the graphics adapter for display. DiME can actually impair performance if the graphics adapter’s resources are superior to the host system’s components.
AGP has 32 multiplexed address and data lines. There are eight additional lines for sideband addressing. These eight extra sideband address lines allow the graphics controller to issue new address and command data for read/write requests simultaneously while data continues to move from previous requests on
the main 32 data/address lines. An additional AGP feature known as Fast Write enables the CPU to write
directly to the graphics card’s frame buffer without going through system memory. Fast Write is reported
to be up to 30 percent faster than standard AGP 4X, and 2D as well as 3D applications are supposed to benefit from AGP 4X Fast Write. Fast Write also requires chipset support, which currently means an Intel
i820 chipset or newer—but ALi and VIA should soon introduce chipsets with Fast Write support.
Intel designed the AGP specifications for its Pentium Pro and newer CPUs, so it does not produce
any chipsets to support both AGP and Socket 7 processors, such as the AMD or Cyrix CPUs. If you
want to take advantage of AGP performance using a Socket 7 processor, you will need to use a
Super 7 motherboard with an AGP-compliant chipset from ALi or VIA.
3D Graphics Accelerator Issues
Technically speaking, 3D graphics is the graphical representation of a scene or object along three axes of
reference (height, width, and depth) to make the scene appear more realistic. This technique “tricks” the
PC user into seeing a 3D image on a flat (a “2D”) screen. There has been an astonishing rise in the demand
for 3D video from all parts of the PC industry. 3D rendering has proven to be the technique of choice for
many types of high-end games, business presentations, computer-aided design, and multimedia applications. However, the use of 3D demands more of a PC than simply passing huge volumes of data across an
expansion bus—3D rendering requires complex mathematical calculations, determinations of coloring,
the inclusion of special effects, and conversion of the rendered scene to a 2D plane (the display)—and in
many cases, all this must be accomplished in real-time (15+ frames per second). Today, most video systems are upgraded for the express purpose of supporting 3D animation (usually in 3D computer games
such as Quake III). This part of the chapter examines some of the key factors involved on 3D rendering
and acceleration.
THE 3D PROCESS
To display a 3D object in real time, an object is first represented as a set of points (or vertices) in a 3D coordinate system (that is, x, y, and z coordinates). The vertices of the given object (the “object” may be a car, a
fighter plane, or a complete 3D world) are stored in system RAM and completely define the object. In
order to display this object on the flat 2D monitor, the object must be rendered.
Rendering is the act of calculating—on a “per pixel” basis—the different color and position information that tricks the viewer into perceiving depth on the 2D screen. Rendering also “fills in” the points on
the surface of the object that were previously stored only as a set of vertices. In this way, a solid
object—even shaded with shadows and fog for 3D effect—can be drawn on the screen. In order to render
an object, it is necessary to determine the color and position information. To accomplish this efficiently,
P:\010Comp\Bigelow\686-8\ch43.vp
Friday, July 21, 2000 9:50:48 AM
43
Color profile: Generic CMYK printer profile
Composite Default screen
1532
CHAPTER 43:
Bigelow / Troubleshooting, Maintaining & Repairing PCs / Bigelow / 2686-8 / Chapter 43
VIDEO ADAPTERS AND ACCELERATORS
the vertices of the object are segmented into triangles, and these triangles (a set of three vertices) are then
passed down the “3D processing pipeline” one at a time. The actual steps are shown below:
■ Triangularize the 3D object This process divides the 3D object into triangles (sets of three vertices).
■ Transformation Translates, rotates, and zooms the object as necessary on the basis of the “camera
angle.” This part of the rendering process is mathematically intensive.
■ Clipping Eliminates any portions of the object that fall outside of the “window” of the viewer’s line
of sight. Clipping also demands a fair amount of mathematical processing.
■ Lighting Calculates shadow or light information depending on where light sources in the world are
positioned. Other effects such as “fog” can also be included.
■ Map triangles to screen The triangularized, transformed, clipped, and illuminated object must then
be “mapped” to the 2D screen. Triangles that are farther away from the viewer’s viewpoint will be
smaller then those triangles that are closer.
■ Draw the triangles The triangles are then drawn to the screen using a variety of shading or texture
mapping techniques. This time-intensive process completes the scene that you see, and the entire process must be repeated for every frame generated by the game or other application.
KEY 3D SPEED ISSUES
Higher frame rates create realism and true-to-life atmosphere in 3D games. Speed is the main factor in
providing faster frame rates. If the frame rate of a game is too slow, the game becomes unplayable because
the time needed to react to an action in the game will be far too long. Consider playing a flight simulator if
the display was updated only once or twice per second. Frame rate is largely dependent on the speed of a
graphics accelerator. The speed of a 3D graphics engine is typically rated in terms of “millions of texels
(textured pixels) per second” or Mtexels/sec. It is also frequently rated in polygons (a.k.a. triangles) per
second. Current 3D graphics accelerators can provide several million texels per second. For example, the
3Dfx Voodoo3 AGP card can render 7 million triangles per second.
The speed of a 3D application is dependent on many tasks, but the most daunting tasks are 3D geometry and rendering. Geometry is the suite of calculations used to determine an object’s position and color on
the screen. Rendering (as you saw above) is the actual drawing of the object on the screen. A typical
graphics accelerator takes the load off of the CPU so that the CPU can devote more processing power to
other functions. More advanced CPUs (such as the Pentium MMX, Pentium II, or Pentium III with SME
technology) incorporate additional instructions that aid many of the calculation-intensive work needed in
3D environments. Three features that most often effect 3D speed are bus mastering, resolution, and color
depth.
With a PCI bus master graphics accelerator, a 3D graphics engine will never incur
latency (delays) during the rendering process, because once the CPU has prepared all of the triangles for rendering, the bus master will come and fetch the list of triangles asynchronously without requiring the CPU to
wait. There are two different implementations of bus mastering: the basic bus master and the scatter gather
bus master. A basic bus master is capable of operating independently from the host CPU for short periods of
time before it interrupts the host to ask for direction. During data-intensive operations like 3D, this approach
minimizes the advantages of bus mastering. By contrast, a scatter-gather bus master is able to operate
almost independently from the host CPU, achieving significant performance benefits. Bus mastering is
eliminated if graphics are implemented through AGP, since AGP is essentially a point-to-point connection
between the graphics adapter and core logic, and the graphics adapter is always considered to be the
“master” device.
Bus mastering
P:\010Comp\Bigelow\686-8\ch43.vp
Friday, July 21, 2000 9:50:49 AM
Color profile: Generic CMYK printer profile
Composite Default screen
Bigelow / Troubleshooting, Maintaining & Repairing PCs / Bigelow / 2686-8 / Chapter 43
3D GRAPHICS ACCELERATOR ISSUES
1533
Because of limitations in operating systems and graphics accelerators, most games and
multimedia applications have been developed for low resolutions (such as 320 x 200) to achieve high performance. Increasing resolution means displaying more pixels on the screen with every frame, thereby
placing more demand on the monitor and graphics board. Some applications developed in 320 x 200 can
be played at 640 x 400, but the extra pixels are simply a replication of existing ones, making the image
appear “blocky.” With today’s standards in software and fast hardware accelerators, developers can
include more unique pixel information in each frame, effectively increasing graphics detail at resolutions
as high as 800x600 or 1024x768. This technology allows gamers to play in high resolutions without any
performance loss.
Resolution
Using extra colors in 3D games makes the scenes much richer and more life-like. The
more colors used in a scene, the more detailed and realistic it looks, but more calculations are needed to
determine the color of each rendered pixel. With the new generation of 3D graphics accelerators, higher
color depths are supported without dramatic performance loss, and developers can now use more colors in
each scene. For example, developers can now use 16-bit (65K) or 24-bit (16.7M) color instead of the traditional 8-bit (256) color.
Color depth
IMPROVING 3D PERFORMANCE THROUGH HARDWARE
A 3D graphics accelerator improves 3D performance by relieving the host CPU of many of the computation-intensive tasks needed to render a scene. In most cases, these tasks are performed by graphics processors on the 3D video accelerator itself. Today’s 3D graphics accelerators are capable of an astonishing
array of features—some of which are highlighted below:
Perspective-correct texture mapping In real life, objects have details that allow us to recognize them. For example, an object made of wood is granular, while steel is smooth and shimmering. In 3D
applications, this detail is called “texture.” Applying two-dimensional texture images to 3D objects or
scenes make them appear more realistic. In the real world, our perspective relative to an object changes as
our position changes. For example, when you are walking along the side of a house, the house will have a
different perspective which each step. In order to create this experience in a 3D application, texture maps
must be “corrected” to fit the changing perspective. If the texture mapping is not perspective-correct, the
image will be visually incorrect and filled with artifacts from previous frames. While older 3D graphics
accelerators only provided non-perspective correct texture mapping in hardware, many of the newest 3D
graphics engines offer perspective correct textures at full rendering speed.
For greater realism in a scene, lighting is applied to objects to accentuate curves or create
ambiance (such as shadows). Lighting effects are limited in software (otherwise the frame rate would be
degraded). A key advantage of performing hardware-based 3D rendering is the ability to apply lighting
effects to polygons while maintaining full rendering speed. Current adapters offer the ability to support up
to eight hardware based “light sources.”
Lighting
Texture transparency The technique of texture transparency is similar to “chroma-keying” in
video. This technique draws one image on top of another, while giving the appearance that the images fit
there naturally. Mapping complicated objects in a 3D scene (such as trees) is a challenge for software
developers. They must be able to map the tree on a transparent polygon so that the background of the scene
will be shown through the “branches.” Objects like trees may not be essential, but they significantly
improve the overall realism of a scene. Without texture transparency, these objects are typically left out or
simplified. New 3D graphics chips support texture transparency in hardware, allowing developers to add
a higher level of detail while maintaining graphics performance.
P:\010Comp\Bigelow\686-8\ch43.vp
Friday, July 21, 2000 9:50:49 AM
43
Color profile: Generic CMYK printer profile
Composite Default screen
1534
CHAPTER 43:
Bigelow / Troubleshooting, Maintaining & Repairing PCs / Bigelow / 2686-8 / Chapter 43
VIDEO ADAPTERS AND ACCELERATORS
Hardware z-buffering The use of a z-buffer (or depth buffer) is necessary when two objects are
intersecting each other. The z-buffer determines which portions of the intersecting objects are visible.
However, many software developers do not use a z-buffer for all objects in the scene. They do not because
the z-buffer takes up space in the off-screen memory that could be used instead to store extra source textures for greater detail. For this reason, many 3D graphics chips provide an optional z-buffer, allowing the
developer to decide whether to use the off-screen memory for z-buffering or texture storage. If a game
using a z-buffer (such as Quake III) is played on a graphics accelerator that does not allow for a hardware
z-buffer, the game will not run—or will run at very low frame rates—since all z-buffering will need to be
done in software. This is where AGP’s use of Non-Local Memory for texture storage and z-buffering
helps to improve performance.
Palletized textures Storing source textures of 3D games in off-screen memory is very taxing on
the graphics frame buffer. Each time a new scene is created, all of its source textures need to be loaded in
off-screen memory for use by the graphics chip. Memory available to store textures is limited, because a
3D game accelerator generally has about 8MB of memory. This limit restricts the number of textures,
effectively reducing the detail and quality available in a scene. To compensate for this, developers can use
a method of palletized textures, which assigns a Color Look-Up Table (or CLUT) to each texture in the
scene. This technique allows the developer to use a smaller amount of colors for each texture instead of the
normal 16-bit color values (65K colors). This smaller color format (CLUT) requires less memory space
than the true 65K colors, so that more colors can be saved in memory to add detail to a scene. AGP specifications also address this issue by allowing main system memory to be used for storing textures.
However, most older 3D graphics accelerators do not support palletized textures, so the information
can be stored only in full 16-bit color format in the frame buffer, utilizing all of the available off-screen
memory. In such cases, the extra textures will have to be stored and retrieved from system memory, resulting in a serious hit on performance. Alternatively, textures can to be dropped from the scene by the graphics accelerator in order to maintain performance. Newer 3D graphics accelerators do provide full
hardware support for palletized textures and allow developers to create very detailed scenes with two to
four times as many textures. This capability gives 3D applications a significant performance boost,
because the applications do not rely on the speed of the system to convert the information to 16-bit colors.
Texture mapping methods Texture mapping is a data-intensive operation—a bitmap is wrapped
onto a 3D object or polygon to add more visual details (thus enhancing realism). The original bitmap used
as the texture to be mapped is also called the source texture. There are several ways to map textures onto a
3D object with perspective correction:
■ Point sampling This is the most common way to map a texture on a given polygon. Point sampling
allows the 3D graphics engine to approximate the color value of a given pixel on the resulting texture
map by replicating the value of the closest existing pixel on the source texture. Point sampling provides very good results when used in conjunction with tile-based MIP mapping and maintains high
performance levels at a low cost.
■ Filtering Some source textures may need a considerable amount of warping, which may lead to a
“blocky” appearance. Some graphics accelerator manufacturers use a bilinear filtering technique to
make the textures appear smoother. In bilinear filtering, four-source texel values are read, and their
color values are then blended together based on proximity. The resulting values will be used for the
texel to be drawn. While this technique is useful, the resulting quality is not comparable to using
high-resolution source textures. 3D graphics accelerators without support for palletized textures have
P:\010Comp\Bigelow\686-8\ch43.vp
Friday, July 21, 2000 9:50:49 AM
Color profile: Generic CMYK printer profile
Composite Default screen
Bigelow / Troubleshooting, Maintaining & Repairing PCs / Bigelow / 2686-8 / Chapter 43
3D GRAPHICS ACCELERATOR ISSUES
1535
to scale down the textures to store them and apply filtering to map them onto polygons. This process
results in poor quality rendering.
■ MIP mapping MIP-mapping is another way to improve the quality of the 3D texture mapped object.
The more alterations made to a texture to “fit” an object, the less it will resemble the source texture.
One way to avoid this severe deviation from the original texture is to create three copies, or MIP levels, of the same source texture (each in different sizes). MIP mapping can be implemented in three
ways: tile-based MIP mapping, per-pixel MIP mapping, and trilinear MIP mapping.
Fogging In order to maintain high performance, developers created “tricks” to reduce the amount of
rendering needed for a scene. One of these tricks is called fogging. It is mostly used in landscape scenes
such as flight simulators. Fogging allows the developer to “hide” the background of a scene behind a layer
of “fog”—mixing the textures’ color values with a monochrome color such as white. Some newer 3D
graphics chips support fogging in hardware.
Alpha-blending Blending is a visual effect that mixes two textures on the same object. Different levels of blending can be implemented to create visual effects. The simplest method is screen door or stippling. Only some pixels making up the object are rendered, producing a “see-through” effect. For
example, the developer would decide that an object would be 50 percent transparent. The graphics accelerator would then draw the background image, and then write only every second pixel of the object. This
approach is easy to implement in hardware and delivers a reasonable quality at a low cost. By contrast,
true alpha blending is a data-intensive operation, which involves reading the values of two source textures
and performing the perspective calculations on both textures simultaneously. This effect is very taxing on
performance and costly to implement, and only high-end 3D graphics cards use true alpha-blending in
hardware.
The technique of Gouraud shading (or smooth shading) draws smooth shadows
across the face of an object. This technique causes the viewer’s eyes to perceive depth and curvature information from the surface of the object. Gouraud shading works by reading the color information at the
three vertices of a triangle and interpolating the intensities in red, green, and blue smoothly between the
three vertices. Gouraud shading is the most popular algorithm used to draw 3D objects on a 2D screen.
Most objects can be rendered with amazing realism in 3D by using Gouraud shading, and this feature is
often available in 3D graphics accelerator hardware.
Gouraud shading
Double-buffering Everyone has seen the old animation trick of drawing a cartoon character on the
corner of a page of paper, and altering the drawing slightly on following pages of paper. When the sheaf of
paper is complete and the pages flipped rapidly, the cartoon character appears to move smoothly. Double-buffered 3D animation on the PC works in the same way—the next position of the character is being
drawn before the page is flipped. Viewing 3D animation without double buffering would be like looking
at the animated cartoon as if the character were being redrawn with every flip of the page (the animation
would appear to “flicker”).
Double-buffering requires having two areas reserved on the frame buffer of the 3D graphics card.
Both regions need to be the size of the visible screen, and one buffer is used to render the next frame of the
animation while the other displays the previously rendered animation frame on the monitor. Under Windows, double-buffering requires the use of bit-blitting to copy the animation from buffer to buffer.
Color dithering The number of colors that can be drawn to the visible screen depends on the number of
bits-per-pixel that carry color information. For instance, with 8 bits per pixel of color information, only 256
P:\010Comp\Bigelow\686-8\ch43.vp
Friday, July 21, 2000 9:50:50 AM
43
Color profile: Generic CMYK printer profile
Composite Default screen
1536
CHAPTER 43:
Bigelow / Troubleshooting, Maintaining & Repairing PCs / Bigelow / 2686-8 / Chapter 43
VIDEO ADAPTERS AND ACCELERATORS
colors can exist on the desktop at any one time. Color dithering is the process of mixing these defined colors
into small patterns to produce a wider spectrum of color without requiring extra video memory. This procedure is especially important in 3D, since techniques such as Gouraud shading require many shades of each
color used in each scene. If dithering were not handled in hardware, a 3D scene could contain only eight different main colors in 256-color mode (each color would require 32 shades to be programmed into the Color
Look-Up Table to roughly approximate Gouraud shading). With hardware support for color dithering, a
scene with many more colors may be rendered without requiring extra video RAM.
Anti-aliasing The technique of anti-aliasing is used for disguising the jagged edges of a curved line
or a line with very low or very high slope. These jagged edges are especially visible at lower resolutions,
with each pixel appearing as a “stair step” rather than a smooth line. Anti-aliasing is a way to use color
information to make up for a lack of screen resolution. It simulates higher resolution by using color information to trick our eye into seeing a smoother line or edge than the screen can physically allow. By adding
pixels of a slightly different color next to the line or curve at the transition points, the “edge” is blurred.
The eye sees this blur as a smooth edge rather than a different color.
Understanding DirectX
When Windows first emerged as a major operating system, its focus was primarily on file management and
utilities. High-performance graphics and other forms of multimedia were barely even dreamed of. This initial approach made it very difficult for Windows later to support graphics-intensive applications, such as
games, DVD, PC-TV, or MPEG video (and is largely the reason why DOS lingered for so long on many PC
platforms). Developers realized that in order for Windows to finally become independent of DOS, a means
of supporting high-performance multimedia functions would be required—and DirectX technology was
born. With Windows 95, DirectX emerged as a key element in graphics, sound, and interaction for multimedia platforms. This part of the chapter offers a basic overview of DirectX and its components.
PIECES OF A PUZZLE
Contrary to popular belief, DirectX is not one single piece of software. Instead, DirectX is actually a comprehensive collection of Windows 95/98 APIs (Application Programming Interfaces) that provide a standardized set of features for graphics, sound, input devices, multiplayer interaction, and application setup.
DirectX software is categorized into three layers: a foundation layer, a media layer, and a components layer.
Foundation The foundation layer forms the heart and soul of DirectX. It is a set of low-level APIs
that are the basis for all high-performance multimedia under Windows 9x. DirectX foundation APIs provide direct access to hardware acceleration, such as 3D graphics acceleration chips (in effect, allowing
Windows 9x to “talk” directly to hardware). The foundation layer uses the following APIs:
■
■
■
■
■
■
DirectDraw—provides graphics “surface” management.
Direct3D (Immediate Mode)—supplies low-level 3D features used in conjunction with DirectDraw.
DirectInput—supports a rich selection of input devices (including new “force feedback” joysticks).
DirectSound—provides sound and mixer effects.
DirectSound 3D—offers 3D sound effects from ordinary 2D speaker arrangements.
DirectSetup—installs software and drivers automatically.
P:\010Comp\Bigelow\686-8\ch43.vp
Friday, July 21, 2000 9:50:50 AM
Color profile: Generic CMYK printer profile
Composite Default screen
Bigelow / Troubleshooting, Maintaining & Repairing PCs / Bigelow / 2686-8 / Chapter 43
UNDERSTANDING DIRECTX
1537
Media The DirectX media layer consists of application-level APIs that take advantage of the system-level services provided by the DirectX foundation. The media-level services are device independent
and include features such as animation, behaviors, and video streaming. The DirectX media layer
includes five APIs:
■
■
■
■
■
Direct3D (Retained Mode)—offers a collection of 3D scene features.
DirectPlay—supports multiplayer/network play.
DirectShow—handles slide–show-type operation and features.
DirectAnimation—supplies animation support.
DirectModel—supplies 3D modeling support.
Components The components layer makes up the top level of the DirectX hierarchy. These are a
group of application-specific modules that can draw on all features available in the media and foundation
layers. DirectX components include NetMeeting (an online white-board for real-time group collaboration), ActiveMovie (a set of tools for rendering full-screen MPEG video and supporting playback of a
wide range of audio and video formats), and Netshow (enabling live broadcast of rich multimedia content
over the Internet, along with the compelling 3D worlds of VRML).
MORE ON DIRECTDRAW
Most Windows programs access “drawing surfaces” indirectly through Win32 device context functions,
such as GetDC. The application then writes indirectly to the device through the graphics device interface
(or GDI) system. The GDI is the Windows component that provides an abstraction layer that enables all
standard Windows applications to draw to the screen. The disadvantage of GDI is that it was not designed
for high-performance graphics software. It was made to be used by business applications, like word processors and spreadsheet applications. The GDI provides access to a video buffer in system memory (not
video memory) and does not take advantage of special features that some video cards provide. As a result,
the traditional GDI is great for most types of business software, but it is far too slow for multimedia or
game software.
DirectDraw circumvents this limitation by providing drawing surfaces that represent actual video
memory. With DirectDraw, an application can write directly to the memory on the video card—making
your graphics routines extremely fast. Surfaces are represented as contiguous blocks of memory, making it easy to perform addressing within them. DirectDraw also supports hardware-accelerated functions like bit-blitting and overlays. DirectDraw works with a wide variety of display hardware. It is
designed so that applications can determine the capabilities of the underlying display hardware and
then use any supported hardware-accelerated features. Any features that are not supported in hardware
can then be emulated in software.
In actual practice, DirectDraw is not a high-level graphics API that draws graphics “primitives” like
lines and rectangles. Instead, DirectDraw is a low-level API that operates at the graphics “surface” level,
providing the essential support for higher-level 2D and 3D graphics APIs that do draw and render.
MORE ON DIRECTSOUND
DirectSound is the audio component of DirectX. DirectSound enables hardware and software sound mixing, capture, and effects like 3D positioning and panning. In operation, DirectSound is essentially a sound
mixing engine—the application places a set of sounds in buffers (called secondary buffers). DirectSound
then combines these sounds and writes them into a primary buffer that holds the sound that the listener
P:\010Comp\Bigelow\686-8\ch43.vp
Friday, July 21, 2000 9:50:51 AM
43
Color profile: Generic CMYK printer profile
Composite Default screen
1538
CHAPTER 43:
Bigelow / Troubleshooting, Maintaining & Repairing PCs / Bigelow / 2686-8 / Chapter 43
VIDEO ADAPTERS AND ACCELERATORS
actually hears. DirectSound automatically creates a primary buffer, which typically resides in memory on
the sound card itself. The application creates the secondary buffers either in system memory or directly on
the sound card. DirectSound supports pulse-code modulation (PCM) sound data, but does not currently
support compressed wave formats. DirectSound does not include functions for parsing a sound file (it is
the responsibility of the developer to stream data in the correct format into the secondary sound buffers).
The DirectSound mixing engine does not simply mix several sounds together. It can also apply effects
to a sound as it is written from a secondary buffer into the primary buffer. Although these effects are audible using standard loudspeakers, they are more obvious and compelling when the user wears headphones.
Basic effects are volume/frequency control and panning (changing the relative volume between the left
and right audio channels), but DirectSound can also simulate 3D positional effects through the following
techniques:
■ Rolloff The further an object is from the listener, the quieter it sounds. This phenomenon is known
as rolloff.
■ Arrival offset A sound emitted by a source to the listener’s right will arrive at the right ear slightly
before it arrives at the left ear (the duration of this offset is approximately a millisecond).
■ Muffling The orientation of the ears ensures that sounds coming from behind the listener are slightly
muffled compared with sounds coming from in front. In addition, if a sound is coming from the right,
the sounds reaching the left ear will be muffled by the mass of the listener’s head as well as by the orientation of the left ear.
■ Doppler shift DirectSound automatically creates Doppler shift effects for any buffer or listener that
has a velocity. Effects are cumulative—if the listener and the sound source are both moving, the system automatically calculates the relationship between their velocities and adjusts the Doppler effect
accordingly.
MORE ON DIRECTINPUT
DirectInput provides high-performance access to input devices, including the mouse, keyboard, joystick,
and the new force-feedback (input/output) devices that are arriving on the market. DirectInput offers generalized device interfaces that support a much wider range of input and output devices than does the standard Win32 API functions. DirectInput works directly with device drivers—bypassing the Windows
message system, resulting in faster and more responsive access to input devices. DirectInput also supports
force feedback devices. Force feedback devices “respond” to an application with physical effects, such as
kick-back (when a trigger is fired), vibration, and resistance. Force feedback devices make many game
and entertainment experiences much more realistic and engaging. DirectInput also supports the Universal
Serial Bus for access to USB input devices.
MORE ON DIRECT3D
Direct3D is a drawing interface for 3D hardware. Using DirectDraw as a base, Direct3D actually draws
and renders the 3D scenes. You can use Direct3D in either immediate mode or retained mode. The
Direct3D immediate mode was developed as a low-level 3D API, and is ideal for developers who need to
port games and other high-performance multimedia applications to the Microsoft Windows operating
system. It is a device-independent way for applications to communicate with accelerator hardware at a
low level. By contrast, retained mode is a high-level 3D application programmer interface (API) for pro-
P:\010Comp\Bigelow\686-8\ch43.vp
Friday, July 21, 2000 9:50:51 AM
Color profile: Generic CMYK printer profile
Composite Default screen
Bigelow / Troubleshooting, Maintaining & Repairing PCs / Bigelow / 2686-8 / Chapter 43
UNDERSTANDING DIRECTX
1539
grammers who require rapid development or who want the support for hierarchies and animations.
Direct3D retained mode is built “on top” of immediate mode. The three components of the Direct3D
device are: the transform (formulas describing how to convert a coordinate in 3D space into 2D display
coordinates), the state variables (defining the styles for drawing operations), and the draw engine (actually generating the object).
MORE ON DIRECTPLAY
Applications generally and games in particular can be more compelling if they involve other persons, and
the PC provides a versatile platform for connections over networks or the Internet. Instead of forcing the
developer to deal with the differences that each connection scheme represents, DirectPlay provides
well-defined, generalized communication capabilities. DirectPlay is a software interface that simplifies
an application’s access to communication services.
A DirectPlay “session” is a communications channel between several machines. Before an application can start communicating with other machines, it must “join a session.” An application can do this in
two ways: it can identify all the existing sessions on a network and join one of them, or it can create a new
session and wait for other machines to join it. Once the application has joined a session, it can create a
player and exchange messages with all the other players in the session. Each session has one machine that
is designated as the host. The host is the owner of the session and is the only machine that can change the
properties of the session.
The most essential entity within a DirectPlay session is a player. A player represents a logical object
within the session that can send and receive messages. DirectPlay does not have any representation of a
physical machine in the session. Each player is identified as being either a local player (one that exists on
your machine) or a remote player (one that exists on another machine), and each machine must have at
least one local player before it can start sending and receiving messages. DirectPlay supports the concepts
of groups within a session. A group is logical collection of players. By creating a group of players, an
application can send a single message to the group and all the players in the group will receive a copy of
the message.
DETERMINING THE INSTALLED VERSION OF DIRECTX
Since DirectX is a collection of APIs, each application that uses DirectX is written to use a particular version of DirectX—the application needs the correct version of DirectX components installed under Windows 95/98. Otherwise, the application will not work. In most cases, DirectX is backward compatible, so
an application written for DirectX 3.x should work on a system with DirectX 5.x installed. But an application written for DirectX 5.x won’t work on a system with DirectX 3.x. As a technician, you’ll need to spot
DirectX version issues. You can use the following procedure to check the current version of DirectX
installed on a given system:
1
Using Windows Explorer or My Computer, locate the DDRAW.DLL file in the Windows\System
folder.
2
Use the right mouse button to click the DDRAW.DLL file, and then click Properties on the menu
that appears.
3
Click the Version tab.
P:\010Comp\Bigelow\686-8\ch43.vp
Friday, July 21, 2000 9:50:51 AM
43
Color profile: Generic CMYK printer profile
Composite Default screen
1540
4
CHAPTER 43:
Bigelow / Troubleshooting, Maintaining & Repairing PCs / Bigelow / 2686-8 / Chapter 43
VIDEO ADAPTERS AND ACCELERATORS
Compare the version number on the File Version line with the following list:
4.02.0095
DirectX 1
4.03.00.1096
DirectX 2
4.04.00.0068
DirectX 3 or 3a
4.05.00.0155
DirectX 5
4.05.01.1721
DirectX 5.1
4.05.01.1998
DirectX 5.2 (Windows 98 and later)
4.06.02.0436
DirectX 6.1
4.06.03.0518
DirectX 6.1a
4.07.00.0700
DirectX 7 and 7a
DirectX versions 3 and 3a use the same version of the DDRAW.DLL file. To determine whether you
are using version 3 or 3a of DirectX, use the procedure above to check the version of the
D3DRGBXF.DLL file:
4.04.00.0068
DirectX 3
4.04.00.0070
DirectX 3a
If the DDRAW.DLL file does not exist in the Windows\System folder, DirectX is probably not installed
on your computer.
DirectX 6.1 and above include a useful utility: the DirectX Diagnostic Tool. In Windows 98 you can
launch this utility from the System Information program in the System Tools menu folder under Accessories. You can also launch DirectX Diagnostic by clicking Start, selecting Run, and typing dxdiag in the
text box. This tool reports detailed information about the DirectX components and drivers installed on
your system. It lets you test functionality, diagnose problems, and changes to your system configuration
to work best.
Replacing/Updating a Video Adapter
Whether you’re building a new PC from scratch, upgrading your system, or replacing a failed video
adapter, you’ll need to install a new video card with confidence. In virtually all cases, you’ll need to
remove references to any original video card first, replace the old card with the new one, then install the
new drivers and video applet software under Windows 95/98. This part of the chapter highlights the general steps needed to upgrade your video system.
REMOVING THE OLD DEVICE DRIVERS
New video adapters can be quite sensitive to drivers and applet software from an old video device, so it’s
usually important for you to remove the drivers and all support software for your current video device
before removing the old card and installing the new one. Of course, if you’re installing a video device into
a new system, you won’t have to worry about this step. To remove the display utilities or control panels for
P:\010Comp\Bigelow\686-8\ch43.vp
Friday, July 21, 2000 9:50:53 AM
Color profile: Generic CMYK printer profile
Composite Default screen
Bigelow / Troubleshooting, Maintaining & Repairing PCs / Bigelow / 2686-8 / Chapter 43
REPLACING/UPDATING A VIDEO ADAPTER
1541
a display card you are currently using, you must first locate and identify them. There are four main places
where you should look for these items:
■ Check the user’s guide, installation instructions, or owner’s manual for the card you’re about to
remove. Any programs that would have been added to your system when you installed the card should
be described in the documentation. There may also be specific instructions for uninstalling the card’s
software from your system—if so, you should use those instructions to remove the card’s software
suite.
■ Many video-related programs add an item under the Programs entry on your Start menu. Such an item
may be listed by the name of the display card it is associated with or by the name of the company that
manufactured the card. Display utilities and control applets are often given their own specific names,
like the “3dfxTools” software for a new Voodoo3 card. If you find such a menu entry, look to see if
there’s an Uninstall option. If you find an Uninstall feature, that’s probably the best way to remove the
software from your system.
■ The Windows Control Panel probably contains the actual program icons for any display utilities or
control applets that may have been installed with the existing video card. This may help you to identify the program you wish to remove (though it probably will not give you a direct method for removing it). However, the Add/Remove Programs wizard in the Control Panel can probably remove the
software for you—once you know what software to remove.
■ The Windows StartUp folder may contain a shortcut to a display utility or control applet for the existing video card. If so, you can simply delete the shortcut from the StartUp folder to disable the program
(but doing that will not remove the software from your system). You may also wish to use the
Add/Remove Programs icon in the Control Panel to actually remove that software from your system.
Once the applet software is removed from the system, it’s time to select a default video mode and remove
the video adapter from your Windows 98 Device Manager:
1
Click Start, highlight Settings, click Control Panel, then double-click the Display icon.
2
Select the Settings tab.
3
Use the Colors drop-down to select the color-depth you need (for instance, 16 colors).
4
Move the Screen Area slider to a resolution of 640x480.
5
Click on the Apply button to test the selections you have made, then click OK to finalize the
selections.
6
Return to the Settings tab and click on the Advanced button to open the adapter’s Properties dialog.
7
Select the Adapter tab, then click Change.
8
When the Update Device Driver wizard appears, click Next.
9
On the next screen, select “Display a list of all the drivers in a specific location, so you can select
the driver you want,” then click Next.
10
Select “Show all hardware,” then scroll to the top of the list under “Manufacturers” and select
“(Standard display types),” then select “Standard PCI Graphics Adapter (VGA)” under Models
and click Next.
P:\010Comp\Bigelow\686-8\ch43.vp
Friday, July 21, 2000 9:50:54 AM
43
Color profile: Generic CMYK printer profile
Composite Default screen
1542
CHAPTER 43:
Bigelow / Troubleshooting, Maintaining & Repairing PCs / Bigelow / 2686-8 / Chapter 43
VIDEO ADAPTERS AND ACCELERATORS
11
Windows will install the standard VGA display driver and prompt you to restart your system for
the changes to take effect.
12
You should go ahead and restart your system to verify that the standard VGA display driver loads
properly.
When you restart the system, the standard VGA display driver is activated for use with your current display card. This should allow you to remove the old card and install the new one without the danger of
driver conflicts or incompatible video modes. Once the new card is installed, you can easily return to the
Display settings and configure the desired resolution and color depth again.
EXCHANGING THE VIDEO ADAPTER
Now it’s time to switch to your new video adapter. This is generally not a difficult process, but you’ll need
to pay attention to your particular system configuration. Remember to use an antistatic wrist strap and to
keep the new video card in its protective anti-static bag until you’re just ready to install it.
1
Turn off and unplug the PC, then remove the outer housing.
2
Locate the original video adapter (where the monitor cable attaches to the PC) and disconnect the
monitor cable.
3
If the original video adapter is integrated into the motherboard, check the motherboard’s user manual to see if there’s a jumper needed to disable that adapter. If so, set the required jumper so that the
on-board video adapter is disabled. If you must disable the on-board video adapter through the
CMOS Setup, we’ll do that later.
4
If the original video adapter is simply an expansion card, unbolt the bracket from the chassis and
remove the original card. Set it aside—preferably in an antistatic bag.
5
If you’re replacing a PCI-based video card with an AGP-based video card, check the motherboard’s user manual to see if there’s a jumper to enable AGP support—older AGP motherboards
often required this. If so, set the required jumper to that AGP is enabled.
6
Remove the new video card from its bag and insert it into its appropriate bus slot. Be sure that the
card is seated evenly and completely, then bolt the card’s bracket to the chassis.
7
If there’s another video/3D accelerator card in the system, you may need to attach that accelerator’s feature connector to the new video card.
8
Reattach power and restart the system.
9
When the system boots for the first time, be sure to boot directly to the CMOS Setup. If you must disable the old on-board video adapter through the CMOS Setup, you must do that now. If you’re installing an AGP video adapter in place of a PCI model, check to see if there are any AGP-related settings
needed to enable AGP support on the system. Save your changes and exit the CMOS Setup.
INSTALLING THE NEW SOFTWARE
Once the CMOS Setup has been updated and your changes (if any) have been saved, the system will start
to reboot. At this point, we’ll see if the new video card is identified properly and install the appropriate
drivers and support software to utilize its features.
P:\010Comp\Bigelow\686-8\ch43.vp
Friday, July 21, 2000 9:50:54 AM
Color profile: Generic CMYK printer profile
Composite Default screen
Bigelow / Troubleshooting, Maintaining & Repairing PCs / Bigelow / 2686-8 / Chapter 43
VIDEO FEATURE CONNECTORS
1543
1
Allow the system to boot normally. Since virtually all video cards are now PnP-compliant, Windows 95/98 should identify the new video device and query you for the appropriate drivers (typically provided on CD).
2
Place the CD into the CD-ROM drive. In most cases, the CD’s “autorun” feature will launch a
menu-driven installer that will allow you to load the card’s drivers and support software (3Dfx
Tools, 3Dfx TV, 3Dfx Tweaks, and so on).
3
Install the drivers and support software and reboot the system if necessary.
CHECKING THE INSTALLATION
Once the software is installed and the system reboots, you can check for the presence of your new video
adapter card, then reset the video mode to your liking.
1
From the Windows desktop, double-click My Computer, then double-click Control Panel.
2
Double-click the System icon, then select the Device Manager tab.
3
Double-click the Display Adapter entry to expand it.
4
Check the display adapter reference. You should see a reference to the new adapter that you just
installed. There should be no yellow exclamation marks or red “Xs” marking the adapter.
5
Close the Device Manager and double-click the Display icon.
6
Click the Settings tab, then click Advanced.
7
Check for tabs that mention your new display adapter (“3Dfx Info,” “3Dfx TV,” “3D Tweaks,”
and so on).
If you see the entry for your new video adapter in the Device Manager (and also in the advanced display
settings dialog) and no errors are indicated, chances are that your new video adapter is working properly.
You may now return to the Settings tab in your Display dialog and set the desired resolution and color
depth for your display.
Video Feature Connectors
In most cases, a video adapter is a single, self-contained piece of PC hardware. However, there are some
video add-on devices that require access to video signals or the video adapter hardware. A typical example
of this may be a 3D graphics accelerator board that works in conjunction with the existing video adapter.
In order to access video signals or the video adapter hardware, the video adapter provides a Video Feature
Connector (VFC) similar to the 26-pin card edge connector shown in Figure 43-9 (though many video
adapters now use an IDC “ribbon” cable header). The pinout for a “classical” 26-pin VFC is shown in
Table 43-3.
FIGURE 43-9
P:\010Comp\Bigelow\686-8\ch43.vp
Friday, July 21, 2000 9:50:55 AM
A typical video feature connector
43
Color profile: Generic CMYK printer profile
Composite Default screen
1544
CHAPTER 43:
TABLE 43-3
Bigelow / Troubleshooting, Maintaining & Repairing PCs / Bigelow / 2686-8 / Chapter 43
VIDEO ADAPTERS AND ACCELERATORS
PINOUT FOR A VIDEO FEATURE CONNECTOR
PIN (COMPONENT SIDE)
Y1
Y2
Y3
Y4
Y5
Y6
Y7
Y8
Y9
Y10
Y11
Y12
Y13
FUNCTION
PIN (SOLDER SIDE)
PD0 (DAC pixel data)
Z1
PD1
Z2
PD2
Z3
PD3
Z4
PD4
Z5
PD5
Z6
PD6
Z7
PD7
Z8
DAC Clock
Z9
DAC Blanking
Z10
Ext. Horiz Sync
Z11
Ext. Vert Sync
Z12
Ground
Z13
FUNCTION
Ground
Ground
Ground
Select Internal Video
Select Internal Syncs
Select Internal DAC
Not used
Ground
Ground
Ground
Ground
Not used
Not used
AMI MULTIMEDIA CHANNEL
In addition to the “classical” VFC found on many video boards, some current motherboards are incorporating advanced feature connectors to complement the on-board video system. American Megatrends
(AMI) provides an AMI Multimedia Channel VFC (AMI/VFC) on some of its motherboards. These connectors are designed to maximize multimedia performance with the motherboard’s video system, and a
connector is available for connecting multimedia building components (such as MPEG or video capture
modules) to the system board. Multiple protocols are supported through the same connector as follows:
■ Standard VFC mode.
■ Digital video stream (DVS) mode.
■ MPEG data port (MDP) mode or multimedia peripheral port (MPP) mode.
Standard VFC mode This VESA-compliant video feature connector interface synchronizes graphics output and lets pass-through signals from a video add-in board use the motherboard’s video circuits.
Table 43-4 lists the pinout for a 40-pin AMI/VFC in the “standard” mode. Note the similarities between
the first thirteen pins of the “classical” VFC and the standard AMI VFC.
DVS mode In digital video stream (DVS) mode, the interface is configured as a synchronous input
port, allowing the graphics controllers to be directly connected to certain video decoders through the VFC
interface. Some video decoders may require additional logic to encode the synchronization information
within the data stream. In DVS mode, the AMI/VFC consists of three independent signal groups: an 8-bit
data bus, a two-wire serial bus, and an audio interface. The pinout for a 40-pin AMI/VFC in the DVS mode
is shown in Table 43-5.
The MPEG data port (MDP) and multimedia peripheral port (MPP) modes are
mutually exclusive of each other—the support for a particular mode is determined by the revision of the
MDP/MPP mode
P:\010Comp\Bigelow\686-8\ch43.vp
Friday, July 21, 2000 9:50:56 AM
Color profile: Generic CMYK printer profile
Composite Default screen
Bigelow / Troubleshooting, Maintaining & Repairing PCs / Bigelow / 2686-8 / Chapter 43
VIDEO FEATURE CONNECTORS
TABLE 43-4
PIN
Y1
Y2
Y3
Y4
Y5
Y6
Y7
Y8
Y9
Y10
Y11
Y12
Y13
Y14
Y15
Y16
Y17
Y18
Y19
Y20
TABLE 43-5
PIN
Y1
Y2
Y3
Y4
Y5
Y6
Y7
Y8
Y9
Y10
Y11
Y12
Y13
Y14
Y15
P:\010Comp\Bigelow\686-8\ch43.vp
Friday, July 21, 2000 9:50:56 AM
1545
AMI MULTIMEDIA CHANNEL PINOUT (STANDARD VFC MODE)
DESCRIPTION
DATA0
DATA1
DATA2
DATA3
DATA4
DATA5
DATA6
DATA7
DCLK
BLK#
HSYNC
VSYNC
DGND
Not used
Not used
Not used
Not used
Not used
Not used
Not used
PIN
Z1
Z2
Z3
Z4
Z5
Z6
Z7
Z8
Z9
Z10
Z11
Z12
Z13
Z14
Z15
Z16
Z17
Z18
Z19
Z20
DESCRIPTION
DGND
DGND
DGND
EVIDEO
ESYNC
EDCLK
Not used
DGND
DGND
DGND
VFSENSE#
Not used
Key
Not used
Not used
Not used
Not used
Not used
Not used
Not used
AMI MULTIMEDIA CHANNEL PINOUT (DVS MODE)
DESCRIPTION
DATA0
DATA1
DATA2
DATA3
DATA4
DATA5
DATA6
DATA7
CLK
BS#0
Not used
Not used
DGND
Key
SA#
PIN
Z1
Z2
Z3
Z4
Z5
Z6
Z7
Z8
Z9
Z10
Z11
Z12
Z13
Z14
Z15
DESCRIPTION
DGND
DGND
DGND
BS#1
CONTRL
SB#
SDA
DGND
DGND
DGND
VFSENSE#
SCL
Key
Key
+5V
43
Color profile: Generic CMYK printer profile
Composite Default screen
1546
CHAPTER 43:
TABLE 43-5
PIN
Y16
Y17
Y18
Y19
Y20
Bigelow / Troubleshooting, Maintaining & Repairing PCs / Bigelow / 2686-8 / Chapter 43
VIDEO ADAPTERS AND ACCELERATORS
AMI MULTIMEDIA CHANNEL PINOUT (DVS MODE) (CONTINUED)
DESCRIPTION
SNRDY#
MASK0
REV
+12V
AUDL
PIN
Z16
Z17
Z18
Z19
Z20
DESCRIPTION
RESET#
Not used
RESVD
AGND
AUDR
graphics controller in use. MPP provides a direct connection to an MPEG decoder. It adds an additional
multiplexed address/data bus (which can be used to connect a range of third-party devices like MPEG2
decoders or audio processors). This bus uses ISA type control and either an 8-bit or 16-bit protocol. The
fully programmable control signals allow it to interface to a variety of devices with minimal external
logic. Table 43-6 illustrates the pinout for an AMI/VFC in MDP mode, while Table 43-7 shows the pinout
for an AMI/VFC in the MPP mode.
TABLE 43-6
PIN
Y1
Y2
Y3
Y4
Y5
Y6
Y7
Y8
Y9
Y10
Y11
Y12
Y13
Y14
Y15
Y16
Y17
Y18
Y19
Y20
P:\010Comp\Bigelow\686-8\ch43.vp
Friday, July 21, 2000 9:50:57 AM
AMI MULTIMEDIA CHANNEL PINOUT (MDP MODE)
DESCRIPTION
DATA0
DATA1
DATA2
DATA3
DATA4
DATA5
DATA6
DATA7
DCLK
SAD0
SAD1
SAD2
DGND
Key
SAD3
SAD7
SAD5
REV
+12V
AUDL
PIN
Z1
Z2
Z3
Z4
Z5
Z6
Z7
Z8
Z9
Z10
Z11
Z12
Z13
Z14
Z15
Z16
Z17
Z18
Z19
Z20
DESCRIPTION
DGND
DGND
DGND
IOR
IOW
RDY/INT
SDA/SAD4
DGND
DGND
DGND
VFSENSE#
SCL
Key
Key
+5V
RESET#
SAD6
RESVD
AGND
AUDR
Color profile: Generic CMYK printer profile
Composite Default screen
Bigelow / Troubleshooting, Maintaining & Repairing PCs / Bigelow / 2686-8 / Chapter 43
AGP OVERCLOCKING
TABLE 43-7
PIN
Y1
Y2
Y3
Y4
Y5
Y6
Y7
Y8
Y9
Y10
Y11
Y12
Y13
Y14
Y15
Y16
Y17
Y18
Y19
Y20
1547
AMI MULTIMEDIA CHANNEL PINOUT (MPP MODE)
DESCRIPTION
DATA0
DATA1
DATA2
DATA3
DATA4
DATA5
DATA6
DATA7
DCLK
SAD0
SAD1
SAD2
DGND
Key
SAD3
SAD7
SAD5
REV
+12V
AUDL
PIN
Z1
Z2
Z3
Z4
Z5
Z6
Z7
Z8
Z9
Z10
Z11
Z12
Z13
Z14
Z15
Z16
Z17
Z18
Z19
Z20
DESCRIPTION
DGND
DGND
DGND
IOR
IOW
RDY/INT
SDA
DGND
DGND
DGND
VFSENSE#
SCL
Key
Key
+5V
RESET#
SAD6
SAD4
AGND
AUDR
AGP Overclocking
The AGP bus was designed as a 66MHz bus architecture, and this 66MHz signal is almost always derived
from the motherboard’s Front Side Bus (FSB) clock. When motherboards only offered a 66MHz clock,
this arrangement was not a problem for AGP since the FSB clock and AGP clock were basically the same
thing. However, when motherboards went to 100MHz and 133MHz (and faster), the AGP bus needed to
be “derived” from the FSB. In many cases, the AGP clock is set from a motherboard jumper or through an
entry in the CMOS Setup. You’ll generally find these settings denoted as the AGP Ratio, and you can usually select 1:1, 2:3, and 1:2 depending on the FSB speeds available. You can see an example of how this
setting is used below:
■ If the FSB is 66MHz, set the AGP Ratio to 1:1, and the AGP clock will be 66MHz.
■ If the FSB is 100MHz, set the AGP Ratio to 2:3, and the AGP clock will be 66MHz.
■ If the FSB is 133MHz, set the AGP Ratio to 1:2, and the AGP clock will be 66MHz.
You can also see the potential for “overclocking”:
■ If the FSB is 100MHz, setting the AGP Ratio to 1:1 will cause the AGP clock to be 100MHz.
■ If the FSB is 133MHz, setting the AGP Ratio to 2:3 will cause the AGP clock to be 88.7MHz
P:\010Comp\Bigelow\686-8\ch43.vp
Friday, July 21, 2000 9:50:57 AM
43
Color profile: Generic CMYK printer profile
Composite Default screen
1548
CHAPTER 43:
Bigelow / Troubleshooting, Maintaining & Repairing PCs / Bigelow / 2686-8 / Chapter 43
VIDEO ADAPTERS AND ACCELERATORS
As a rule, it is unsafe to overclock the AGP bus, especially if you’re using AGP in the 2X or 4X data
modes. In most cases, an overclocked AGP bus will result in unstable video and system operation. In
extreme cases, the overclocked AGP card will be damaged.
AGP AND BIOS SETTINGS
The number of video BIOS settings has been increasing steadily—even before the introduction of AGP.
Every video card should include a list of recommended BIOS settings with its documentation (or available
from the manufacturer’s web site), and you should see that your CMOS Setup is configured properly for
your particular AGP video card. For example, look at the list of the recommended settings in Table 43-8 for a
Viper II Z200 card and you’ll get some idea of how important BIOS settings have become:
Not all listed options will be available on all motherboards. Should particular setting combinations fail,
try loading BIOS Defaults in the CMOS Setup.
TABLE 43-8
TYPICAL BIOS SETTINGS FOR AN AGP CARD
[BIOS SETTINGS: PCI/AGP GENERAL]
IRQ assignment
Boot with PnP O/S
Pallet snooping
PCI bursting
PCI latency timer
Peer concurrency
Video ROM BIOS Shadow
Video BIOS shadowing
Video BIOS cacheable
Video RAM cacheable
Byte-Merge
Decouple Refresh
Hidden Refresh
USWC options
Video Memory Cache Mode
Snoop Ahead
[BIOS Settings: AGP specific]
USB
PCI 2.1 compliance
Passive release/refresh
Delayed transactions
VGA BIOS Sequence
AGP/Graphics aperture size
Write Cache Pipeline
Read Around Write
Primary Frame Buffer
P:\010Comp\Bigelow\686-8\ch43.vp
Friday, July 21, 2000 9:50:58 AM
[toggle]
[enable]
[disable]
[disable]
[128]
[disable]
[disable]
[disable]
[disable]
[disable]
[disable]
[disable]
[disable]
[Uncache Speculative Write Combining]
[UC]
[disable]
[enabled]
[enable—also may assign IRQ to VGA]
[enabled]
[enabled/disabled—toggle, may also enable PCI
2.1 compliance]
[AGP-PCI, PCI-AGP, PCI]
[Target 1/2 installed RAM]
[disable]
[disable]
[disable]
Color profile: Generic CMYK printer profile
Composite Default screen
Bigelow / Troubleshooting, Maintaining & Repairing PCs / Bigelow / 2686-8 / Chapter 43
TROUBLESHOOTING VIDEO ADAPTERS
TABLE 43-8
1549
TYPICAL BIOS SETTINGS FOR AN AGP CARD (CONTINUED)
[BIOS SETTINGS: PCI/AGP GENERAL]
VGA Frame Buffer
Frame Buffer Posted Write
RAS-CAS Delay
Cache Read
CPU Wait Pipeline
AGP Master 1 WS Write
AGP Master 1 WS Read
AGP Ratio
AGP Multi Trans Timer
AGP Low Priority Timer
AGP 2x
AGP Turbo Mode
AGP Bus Turbo Mode
AGP Transfer Mode
[disable]
[disable]
[3T]
[disable] (VIA Motherboards)
[disable] (VIA Motherboards)
[enable/disable]*
[enable/disable]*
[set to 2/3 instead of 1/1]
[disable]
[disable]
[disable]
[disable]
[disable]
[1x]
* Must both be set the same—enable/disable
Troubleshooting Video Adapters
A PC video system consists of four parts: the host PC itself, the video adapter/accelerator, the monitor,
and the software (video BIOS and drivers). To deal with a failure in the video system, you must be able to
isolate the problem to one of these four areas. When isolating the problem, your best tool is a working (or
testbed) PC. With another PC, you can systematically exchange hardware to verify each element of the
video system.
The companion CD provides several tools that may help you analyze and tweak your video system.
Check out FastVid 1.10 (FASTV110.ZIP), Hz Tool 1.2 (HZTOOL.ZIP), and WinTune 98 1.0.32
(WT98_32.EXE).
ISOLATING THE PROBLEM AREA
The first step is to verify the monitor by testing it on a known-good working PC. Keep in mind that the
monitor must be compatible with the video adapter on which it is being tested. If the monitor works on
another PC, the fault lies in one of the three remaining areas. If the monitor fails on a known-good
machine, try the known-good monitor on the questionable machine. If the known-good monitor then
works on your questionable machine, you can be certain that the fault lies in your monitor, and you can
refer to the appropriate chapter here for detailed troubleshooting if you wish. If the monitor checks out,
suspect the video adapter. Follow the same process to check the video adapter. Try the suspect video
adapter on a known-good PC. If the problem follows the video adapter, you can replace the video adapter.
If the suspect video adapter works in a known-good system, the adapter is probably good. Replace the
adapter in the suspect machine, but try another expansion slot and make sure that the monitor cable is
attached securely.
P:\010Comp\Bigelow\686-8\ch43.vp
Friday, July 21, 2000 9:50:59 AM
43
Color profile: Generic CMYK printer profile
Composite Default screen
1550
CHAPTER 43:
Bigelow / Troubleshooting, Maintaining & Repairing PCs / Bigelow / 2686-8 / Chapter 43
VIDEO ADAPTERS AND ACCELERATORS
If both the monitor and the video adapter work in a known-good PC, but the video problem persists in
the original machine, suspect a problem with the PC motherboard. Try the working video adapter in
another expansion slot. Either the expansion slot is faulty, or a fault has occurred on the motherboard. Run
some PC diagnostics if you have some available. Diagnostics may help to pinpoint motherboard problems. You may then choose to troubleshoot the motherboard further or replace the motherboard outright
at your discretion.
When the video system appears to work properly during system initialization but fails with a particular application (or in Windows 95/98), strongly suspect a problem with the selected video driver. Since
almost all video adapters support VGA at the hardware level, set your application (or change the Windows
setup) to run in “standard VGA” mode (for Windows 95/98, you can start the PC in the “Safe Mode”). If
the display functions properly at that point, you can be confident that the problem is driver-related. Check
with the manufacturer to see that you have the latest video driver available. Reload the driver from its original disk (or a new disk) or select a new driver. If the problem persists in VGA mode, the trouble may be in
the video adapter. Problem isolation can be summarized by the points below:
■ Check the driver(s) Video drivers are critically important in Windows 3.1x/95/98. Older drivers
may contain bugs or be incompatible with certain applications. This situations account for the majority of all video problems. Obtain the latest video driver release and make sure it is properly installed
on the system. If the driver is current, try a generic video driver (usually available from the video
chipset manufacturer).
■ Check the physical installation See that the video board is installed properly in its expansion slot,
and make sure that any video card jumpers are set properly for the particular host system.
■ Check for memory conflicts The memory space used by video adapters is hotly contested territory
in the upper memory area. Printer drivers, sound cards, tape backups, SCSI adapters, and scanners are
just some of the devices that can step all over the memory space needed by a video board. Many of
today’s video boards require you to exclude a range of upper memory through your memory manager
(often A000h through C7FFh, though your particular video board may be different). Make sure that
any necessary memory exclusions are made in CONFIG.SYS at the memory manager’s command
line. You may also have to add an EMMExclude=A000-C7FF line to the [386enh] section of your
SYSTEM.INI file.
■ Suspect your memory manager Advanced real-mode memory managers such as QEMM or
Netroom use very aggressive techniques to “find” memory. Often, doing this interferes with video
operation. Try disabling any Stealth or Cloaking mode or try disabling your real-mode memory manager outright.
■ Check your system’s CMOS setup Today’s motherboards sport all manner of advanced features.
Try systematically disabling such attributes as: video cache, video RAM shadow, byte-merge, palette
snoop, or decouple/hidden refresh. If “PCI bus bursting” is used on the video bus, try disabling that
also. If the video system requires the use of an interrupt, make sure that the IRQ is not being used by
another device. If the user manual for your video card lists any special settings for your CMOS Setup,
verify that you’ve made the appropriate changes.
■ Compatibility Check the video adapter maker’s (and motherboard maker’s) web site for any known
compatibility issues. Current video adapters may have minimum power requirements or use some
features not supported by the motherboard’s chipset. This type of checking should be done before purchasing a video adapter for an upgrade.
P:\010Comp\Bigelow\686-8\ch43.vp
Friday, July 21, 2000 9:50:59 AM
Color profile: Generic CMYK printer profile
Composite Default screen
Bigelow / Troubleshooting, Maintaining & Repairing PCs / Bigelow / 2686-8 / Chapter 43
TROUBLESHOOTING VIDEO ADAPTERS
1551
MULTIPLE DISPLAY SUPPORT GUIDE
Traditionally, only one video adapter is allowed on the system, but Windows 98 seeks to “extend” the
desktop by supporting the use of more than one video adapter. This capability allows more open windows
and thus provides more information to the user at any given time. However, multiple display (or
“multi-monitor”) support is far from perfect, and it must be used with the right combination of system
BIOS, video adapter chipsets, and Windows 98/SE. This part of the chapter highlights some of the key
hardware requirements and issues common to multi-monitor operation.
Video Adapters
All of the video adapters used in a computer with multi-monitor support must be Peripheral Component
Interconnect (PCI) or Accelerated Graphics Port (AGP) devices using the multi-monitor compliant display drivers that are included with Windows 98. Industry Standard Architecture/Extended Industry Standard Architecture (ISA/EISA) display adapters are specifically not supported. Keep in mind that the video
adapters installed in your computer do not have to be identical. Each video adapter and monitor combination is separately enumerated by Windows 98 and can be configured to use different screen resolutions
and color depths. For example, the primary display can be set to 1024x768x256, and the secondary display can be set to 800x600x32K.
Video Chipsets/Drivers
Any combination of the following supported PCI-based video adapters can be used for multi-monitor
operation. The list below will serve as primary and secondary adapters, but only the list below may be used
for secondary video adapters. The drivers in Table 43-9 are supported by Microsoft and are included on
the Windows 98 CD:
The basic Permedia chipsets cannot be used on multi-monitor platforms, but the Permedia NT and
Permedia 2 can.
TABLE 43-9
VIDEO CHIPSETS/DRIVERS SUITABLE FOR MULTI-MONITOR OPERATION
ATI Mach 64 GX (GX, GXD, VT)
ATI Graphics Pro Turbo PCI
ATI Graphics Xpression
ATI WinTurbo
ATI Rage I, II, II+
ATI All-In-Wonder
ATI 3D Xpression+
ATI 3D Xpression
ATI 3D Xpression+
ATI Rage Pro (AGP and PCI)
ATI Xpert@Work, 4 and 8 MB
ATI Xpert@Play, 4 and 8 MB
ATI All-In-Wonder Pro
S3 765 (Trio64V+)
S3 Trio64V2 (DX/GX)
P:\010Comp\Bigelow\686-8\ch43.vp
Friday, July 21, 2000 9:51:01 AM
ATIM64.DRV
ATI_M64.DRV
ATIR3.DRV
S3MM.DRV
S3MM.DRV
43
Color profile: Generic CMYK printer profile
Composite Default screen
1552
CHAPTER 43:
TABLE 43-9
Bigelow / Troubleshooting, Maintaining & Repairing PCs / Bigelow / 2686-8 / Chapter 43
VIDEO ADAPTERS AND ACCELERATORS
VIDEO CHIPSETS/DRIVERS SUITABLE FOR MULTI-MONITOR OPERATION
(CONTINUED)
Diamond Stealth 64 Video 2001
STB PowerGraph 64V+
STB MVP 64
Miro 22SD
Hercules Terminator 64/Video
Number Nine 9FX Reality 332 (S3 Virge)
Number Nine 9FX Reality 334 (S3 Virge GX/2)
Number Nine 9FX Reality 772 (S3 Virge VX)
California Graphics V2/DX
Videologic GraphicsStar 410
Cirrus 5436
Cirrus Alpine
Cirrus 5446
STB Nitro 64V
S3 ViRGE
(ViRGE (325), ViRGE VX (988), ViRGE DX
(385), and ViRGE GX (385))
Diamond Stealth 3D 2000
Diamond Stealth 3D 3000
Diamond Stealth 3D 2000 Pro
Number Nine 9FX Reality 332
STB Nitro 3D
STB Powergraph 3D
STB Velocity 3D
STB MVP/64
STB MVP/64 3D
STB WorkStation (2 & 4 output)
Miro Crystal VR4000
ET6000
Hercules Dynamite 128/Video
STB Lightspeed 128
Compaq Armada
Trident 9685/9680/9682
Jaton Video—57P
CIRRUSMM.DRV
CIRRUSMM.DRV
S3V.DRV
ET6000.DRV
S3MM.DRV
TRID_PCI.DRV
Enabling Multi-Monitor Support
As you saw above, the primary requirement for multi-monitor support is that the video adapters must be
Peripheral Component Interconnect (PCI) devices or Accelerated Graphics Port (AGP) devices. You can
enable multi-monitor support with the following steps:
P:\010Comp\Bigelow\686-8\ch43.vp
Friday, July 21, 2000 9:51:01 AM
Color profile: Generic CMYK printer profile
Composite Default screen
Bigelow / Troubleshooting, Maintaining & Repairing PCs / Bigelow / 2686-8 / Chapter 43
TROUBLESHOOTING VIDEO ADAPTERS
1553
1
While the computer is turned off, add any additional video adapters and monitors.
2
Start Windows 98. Install the video adapter and monitor drivers (as necessary), then restart your
computer if you’re prompted to do so.
3
Click Start, highlight Settings, then click Control Panel.
4
Double-click the Display icon, then click the Settings tab.
5
In the Display box, click the adapter you want to use, and then click the “Extend my Windows
desktop onto this monitor” check box to select it.
6
Click OK.
Multi-Monitor Issues
Multi-monitor display technology is fairly well established under Windows 98/SE, but there are situations where problems will arise. The easiest way to test your multi-monitor setup is to start Paint or
WordPad under Windows 98. When Paint or WordPad is not running in full-screen mode, try to drag the
program from one monitor to the other. If you can do that, you’ll know that multi-monitor support is working correctly. If doing this presents problems, try the tips below to help isolate the trouble.
■ Disable the secondary display adapter to confirm that your program works properly on the primary
display adapter:
1
Click Start, highlight Settings, click Control Panel, then double-click the Display icon.
2
On the Settings tab, click the secondary monitor icon.
3
Click the “Extend my Windows desktop onto this monitor” check box to clear it, then click OK.
■ Avoid programs that do not fully comply with multi-monitor support:
■ Programs or drivers that modify the GDI.EXE file or the display driver.
■ Programs that use Adobe Type Manager.
■ Remote control programs such as pcANYWHERE.
■ Verify that the correct display driver is installed for the secondary display device:
1
Click Start, highlight Settings, click Control Panel, then double-click the Display icon.
2
On the Settings tab, click Advanced, then click the Adapter tab.
3
Verify that the installed video driver is the correct driver for the video adapter in your
computer. If it’s not, you should use the Update Driver wizard to install the correct driver(s).
■ Verify that the secondary monitor displays the following message when you start your computer:
If you can read this message, Windows has successfully initialized
this display adapter. To use this adapter as part of your Windows
desktop, open the Display option in the Control Panel and adjust the
settings on the Settings tab.
If this message is not displayed, confirm that the secondary display adapter is installed:
1
Click Start, highlight Settings, click Control Panel, then double-click the System icon.
2
On the Device Manager tab, double-click Display Adapters to confirm that all of your video
adapters have been correctly installed. If they haven’t been, you should recheck the
installation of any missing devices.
P:\010Comp\Bigelow\686-8\ch43.vp
Friday, July 21, 2000 9:51:01 AM
43
Color profile: Generic CMYK printer profile
Composite Default screen
1554
CHAPTER 43:
Bigelow / Troubleshooting, Maintaining & Repairing PCs / Bigelow / 2686-8 / Chapter 43
VIDEO ADAPTERS AND ACCELERATORS
■ Verify that the secondary display adapter has a supported chip set as listed in Table 43-9.
■ If you notice that the “Extend my Windows desktop onto this monitor” box is unavailable, you can
select the secondary monitor and try extending the desktop again:
1
Click Start, highlight Settings, click Control Panel, then double-click the Display icon.
2
On the Settings tab, click the secondary monitor icon. After you click the secondary monitor
icon, the “Extend my Windows desktop onto this monitor” check box should become
available.
UNUSUAL HARDWARE ISSUES
A lot of emphasis is placed on drivers and software configurations, but there are also quite a few unique
hardware problems that can affect your video system. Some of the most frequent problems are outlined in
the following sections.
Clock Speed and the VL Bus
Video boards that use the VL bus are very sensitive to motherboard clock speeds over 40MHz. If your
motherboard runs the VL bus at over 40MHz, it’s quite possible that you will have trouble with VL bus
video boards. The VESA specification states that one card can operate at 40MHz, or two can operate at up
to 33MHz (a best-case scenario). Some manufacturers don’t even guarantee that their cards will run at
40MHz—preferring to support bus speeds of 33MHz or less. So if your VL bus video board is running at
over 40MHz and it refuses to run properly, your best option is usually to step your bus speed down. Bus
speeds can usually be controlled by a motherboard jumper, or an entry in CMOS. If you cannot change bus
speed for any reason, try a different brand of VL card.
Version 2.0 of the VESA VL-Bus specification did add support for a 50MHz bus speed. Unfortunately,
VESA VL bus 2.0 is one of a few VESA specs that went largely ignored by video manufacturers. Just
because the VL bus 2.0 specification exists, do not assume that any VL bus motherboard will be
compatible.
“SLC” Motherboards and the VL Bus
If you have an older motherboard using an i486SLC-type CPU, some VL bus video boards will not operate properly when used with that particular motherboard. This reason is that the 32-bit VL bus was not
implemented properly in conjunction with the 16-bit data path of the i486SLC—this is a problem with the
motherboard’s design, not the particular video boards. Later-model motherboards with the i486SLC CPU
largely overcame this problem; take care, however, when using any VL bus video board on i486SLC
motherboards. Chances are that an older ISA video board will work just fine.
8514/a and COM4 Conflicts
The 8514/a video adapter was designed to coexist with a VGA adapter. To achieve this condition, the
8514/a uses a different range of addresses. Some of these are 16-bit addresses that are located at 42E8h,
82E8h, 92E8h, A2E8h, and E2E8h. Unfortunately, many serial controllers decode only the first 12-bits of
the I/O port address and assume that calls to x2E8h (like all of those listed above) are intended for the
serial port (that is, 2E8h) rather than the video card. Therefore, COM4 cannot be used on most machines
with an 8514/a compatible video card unless the address of COM4 can be changed on the serial card (usually via jumpers), or the serial controller decodes all 16 bits of the I/O port addresses. There is no other
way to get COM4 and any 8514/a compatible display adapter to coexist. Keep in mind that this is an issue
with the serial controller rather than the 8514/a video adapter.
P:\010Comp\Bigelow\686-8\ch43.vp
Friday, July 21, 2000 9:51:02 AM
Color profile: Generic CMYK printer profile
Composite Default screen
Bigelow / Troubleshooting, Maintaining & Repairing PCs / Bigelow / 2686-8 / Chapter 43
TROUBLESHOOTING VIDEO ADAPTERS
1555
ATI Mach, S3 Vision/Trio, and COM4 Conflicts
As you saw in the last section, 8514/a video adapters will often conflict with COM4 because of poor I/O
address decoding. ATI’s Mach chipsets and S3’s chipsets are based on IBM’s 8514/a standard and frequently suffer the same problems as the 8514/a video adapters.
AWARD VIDEO BIOS GLITCH
Motherboards using the Award Modular BIOS 4.50G series with Matrox video cards may have problems
loading drivers under Windows 95/98 because the 4.50G series of Award BIOS is not Plug-and-Play
compliant and cannot work under Windows 95/98. Upgrade the BIOS version on the motherboard to fix
this problem and set the following CMOS configuration under the PCI Configuration Setup:
■ PCI IRQ Activated By: LEVEL
■ If no other PCI devices are used in the system, set the “Slot X Using INT#” to: AUTO
■ Make sure the PCI IRQ is assigned to the slot the video card is in.
VIDEO SYMPTOMS
SYMPTOM 43-1
The computer is on, but there is no display The PC seems to initialize
properly. If you hear a series of beeps during system initialization, refer to Chapter 19 to determine the
error. Make sure that the monitor is turned on and plugged into the video adapter properly. Also check that
the monitor’s brightness and contrast controls are turned up enough (it sounds silly, but it really does happen). Try the monitor on a known-good PC. If the monitor works properly, suspect the video adapter.
Power down the PC and make sure the video adapter is seated properly in its expansion slot. If any of the
board contacts are dirty or corroded, clean the contacts by rubbing them with an eraser; you can also use
any electronics-grade contact cleaner. You may want to try the video board in another expansion slot.
Chances are that the video adapter has at least one hardware jumper or DIP switch setting. Contact the
manufacturer or refer to the owner’s manual for the board and check that any jumpers or DIP switch settings on the board are configured properly. If this is a new installation, check the adapter board settings
against the configuration of other expansion boards in the system. When the hardware settings of one
board overlap the settings of another, a hardware conflict can result. When you suspect a conflict, adjust
the settings of the video adapter (or another newly installed device) to eliminate the conflict. There may
also be a memory conflict. Some video adapters make unusual demands of upper system memory (the
area between 640KB and 1MB). It is possible that an EXCLUDE switch must be added to the
EMM386.EXE entry in a CONFIG.SYS file. Check the adapter’s instruction manual to see if there are
any memory configuration changes or optimizations that are required.
SYMPTOM 43-2
There is no display, and you hear a series of beeps when the PC
initializes The video adapter failed to initialize during the system’s POST. Since the video adapter is
not responding, it is impossible to display information—that is why a series of beeps are used. Bear in
mind that the actual beep sequence may vary from system to system depending on the type of BIOS being
used. You can probably find the beep code for your BIOS in Chapter 19. In actual practice, there may be
several reasons why the video adapter fails. Power down the PC and check that the video adapter is
installed properly and securely in an expansion slot. Make sure that the video adapter is not touching any
exposed wiring or any other expansion board.
P:\010Comp\Bigelow\686-8\ch43.vp
Friday, July 21, 2000 9:51:03 AM
43
Color profile: Generic CMYK printer profile
Composite Default screen
1556
CHAPTER 43:
Bigelow / Troubleshooting, Maintaining & Repairing PCs / Bigelow / 2686-8 / Chapter 43
VIDEO ADAPTERS AND ACCELERATORS
Isolate the video adapter by trying another adapter in the system. If the display works properly with
another adapter installed, check the original adapter to see that all settings and jumpers are correct. If the
problem persists, the original adapter is probably defective and should be replaced. If a new adapter fails
to resolve the problem, there may be a fault elsewhere on the motherboard. Install a POST board in the PC
and allow the system to initialize. Each step of the initialization procedure corresponds to a two-digit hexadecimal code shown on the POST card indicators. The last code to be displayed is the point at which the
failure occurred. POST cards are handy for checking the motherboard when a low-level fault has
occurred. If a motherboard fault is detected, you may troubleshoot the motherboard or replace it outright
at your discretion.
SYMPTOM 43-3
You see large blank bands at the top and bottom of the display in
some screen modes, but not in others Multi-frequency and multi-mode monitors sometimes
behave this way. This is not necessarily a defect, but it can cause some confusion unless you understand
what is going on. When screen resolution changes, the overall number of pixels being displayed also
changes. Ideally, a multi-frequency monitor should detect the mode change and adjust the vertical screen
size to compensate (a feature called auto-sizing). However, not all multi-frequency monitors have this
feature. When video modes change, you are left to adjust the vertical size manually. Of course, if there is
information missing from the display, there may be a serious problem with VRAM or the adapter’s graphics controller chip. In this event, try another video adapter board.
SYMPTOM 43-4
The display image rolls Vertical synchronization is not keeping the image
steady (horizontal sync may also be affected). This problem is typical of a monitor that cannot display a
particular screen mode. Mode incompatibility is most common with fixed-frequency monitors, but it can
also appear in multi-frequency monitors that are being pushed beyond their specifications. The best
course of action here is to simply reconfigure your software to use a compatible video mode (or reduce the
vertical refresh rate). If doing that is an unsatisfactory solution, you will have to upgrade to a monitor that
will support the desired video mode.
If the monitor and video board are compatible, there is a synchronization problem. Try the monitor on
a known-good PC. If the monitor also fails on a known-good PC, try the known-good monitor on the original PC. If the known-good monitor works on the suspect PC, the sync circuits in your original monitor
have almost certainly failed. If the suspect monitor works on a known-good PC, the trouble is likely in the
original video adapter. Try replacing the video adapter.
SYMPTOM 43-5
An error message appears on system startup indicating an invalid
system configuration The system CMOS backup battery has probably failed, and the video type
may have defaulted to EGA or MCA instead of VGA—resulting in the error. This is typically a symptom
that occurs in older systems. If you enter your system setup (either through a BIOS routine or through a
disk-based setup utility) and examine each entry, you will probably find that all entries have returned to a
default setting—including the video system setting. Your best course is to replace the CMOS backup battery and enter each configuration setting again (hopefully you have recorded each setting on paper already
or saved the CMOS contents to floppy disk using a CMOS backup utility). Once new settings are entered
and saved, the system should operate properly. If the CMOS still will not retain system configuration
information, the CMOS RAM itself is probably defective. Use a software diagnostic to check the
RTC/CMOS IC (and the rest of the motherboard) thoroughly. If a motherboard fault is detected, you can
troubleshoot the motherboard or replace it outright at your discretion.
P:\010Comp\Bigelow\686-8\ch43.vp
Friday, July 21, 2000 9:51:03 AM
Color profile: Generic CMYK printer profile
Composite Default screen
Bigelow / Troubleshooting, Maintaining & Repairing PCs / Bigelow / 2686-8 / Chapter 43
TROUBLESHOOTING VIDEO ADAPTERS
1557
SYMPTOM 43-6
Garbage appears on the screen or the system hangs up There are
a variety of reasons why the display may be distorted. One potential problem is a monitor mismatch.
Check the video adapter jumpers and DIP switch settings and be sure that the video board will support the
type of monitor you are using. It is possible that the video mode being used is not supported by your monitor (the display may also roll, as described in Symptom 43-4). Try reconfiguring your application software to use a compatible video mode. The problem should disappear. If it doesn’t, you will have to
upgrade to a monitor that will support the desired video mode.
Some older multi-frequency monitors are unable to switch video modes without being turned off,
then turned on again. When such monitors experience a change in video mode, they will respond by displaying a distorted image until the monitor is reset. If you have an older monitor, try turning it off, wait
several minutes, then turn it on again.
Conflicts between device drivers and terminate-and-stay-resident (TSR) programs will upset the display and are particularly prone to crashing the computer. The most effective way to check for conflicts is
to create a backup copy of your system startup files, CONFIG.SYS and AUTOEXEC.BAT. From the root
directory (or directory that contains your startup files), type:
copy autoexec.bat autoexec.xyz
copy config.sys config.xyz
The extension “xyz” implies that you can use any three letters, but avoid using “bak,” since many ASCII
text editors create backup file with this extension.
Now that you have backup files, go ahead and use an ASCII text editor (such as the text editor
included with DOS) to REM-out each driver or TSR command line. Reboot the computer. If the problem
disappears, use the ASCII text editor to re-enable one REMed-out command at a time. Reboot and check
the system after each command line is re-enabled. When the problem occurs again, the last command you
re-enabled is the cause of the conflict. Check that command line carefully. There may be command line
switches that you can add to the startup file that will load the driver or TSR without causing a conflict. Otherwise, you would be wise to leave the offending command line REMed-out. If you encounter serious
trouble in editing the startup files, you can simply re-copy the backup files to the working file names and
start again.
Video drivers also play a big part in Windows. If your display problems are occurring in Windows,
make sure that you have loaded the proper video driver and that the driver is compatible with the video
board being used. If problems persist in Windows, load the standard generic VGA driver. The generic
VGA driver should function properly with virtually every video board and VGA (or SVGA) monitor
available. If the problem disappears when using the generic driver setup, the original driver is incorrect,
corrupt, or obsolete. Contact the driver manufacturer to obtain a copy of the latest driver version. If the
problem persists, the video adapter board may be defective or incompatible with Windows. Try another
video adapter.
SYMPTOM 43-7
Your Viper II Z200 video card doesn’t work on a VIA or ETEQ-based
system This is the same on both Super 7 and Slot 1 based systems. The Viper II Z200 card does not
interact properly with the MVP3 or ETEQ chipsets. Check to see that the AGP driver and IRQ routing
drivers have been installed properly before attempting to install the display adapter. All the necessary
motherboard updates can be found in a file from: http://www.viatech.com/drivers/4IN1409.exe. This
patch is supposed to work for both the MVP3 and ETEQ chipset (Super 7) as well as the VIA Apollo Pro
chipset (for Pentium II systems).
P:\010Comp\Bigelow\686-8\ch43.vp
Friday, July 21, 2000 9:51:04 AM
43
Color profile: Generic CMYK printer profile
Composite Default screen
1558
CHAPTER 43:
Bigelow / Troubleshooting, Maintaining & Repairing PCs / Bigelow / 2686-8 / Chapter 43
VIDEO ADAPTERS AND ACCELERATORS
SYMPTOM 43-8
Your Viper V770 video card doesn’t work on an ALI-based system
This is the same on both Super 7 and Slot 1 based systems. This is probably because the ALI-based chipset
requires an AGP driver in order to support AGP cards such as the V770. Ensure that the latest AGP driver
from ALI has been installed from: http://www.acerlabs.com/acerlabs/drivers.htm. This patch is supposed to work for both the Aladdin V chipset (Super 7) as well as the Aladdin Pro II chipset (for Pentium II
systems—also referred to as the BXPro).
SYMPTOM 43-9
Your Viper II Z200 video card doesn’t work on an AMD Athlon-based
system This is almost always because the Athlon motherboard requires an AGP “miniport”
driver. Ensure that the latest AGP “miniport” driver has been installed from AMD:
http://www1.amd.com/athlon/config.
SYMPTOM 43-10
Selecting a screen resolution over 640x480 causes an HP Pavilion
system to reboot in the Safe Mode This is an HP BIOS problem. HP has a main board BIOS
upgrade for the Pavilion that should fix this. The release notes for this new BIOS indicate that it fixes a
problem with allocating IRQs to add-in AGP adapters (such as Nvidia-based display adapters). Check out
the HP site at www.hp.com.
SYMPTOM 43-11
When booting to Windows, you find a black screen, or Windows
indicates that the display adapter is not configured properly You may also find a yellow
exclamation mark on the video card in your Device Manager. In virtually all cases, this problem occurs
because the video card does not have an adequate IRQ assigned to it. Boot into your system to the CMOS
Setup and look for an option such as “Assign IRQ for PCI VGA”—see that it’s set to “enabled” or “auto.”
If the video card is not assigned to a suitable IRQ, and the system BIOS does not have an option to assign
an IRQ, you’ll need to contact your motherboard manufacturer and check for a BIOS update.
SYMPTOM 43-12
After installing 3D accelerator drivers, you find an error such as
“Invalid VxD dynamic link call from h3vddd(01)+0000 4974” In virtually every case, you’re
trying to use an AGP accelerator card under Windows 95 OSR2 without having the proper USB support
update installed. The file USBSUPP.EXE can be found on your Windows 95 CD (if the CD is labeled
“With USB Support”). In addition to proper USB support, this file also installs a new Virtual Memory
Manager (VMM) that may be required for the AGP version of your accelerator card (such as the
Monster Fusion) in Windows 95. If you do not have that file on your CD, it can be downloaded at:
ftp://ftp.opti.com/pub/chipsets/system/861/usbsupp.exe. Upgrading the OS to Windows 98/SE should
also correct this issue.
SYMPTOM 43-13
After upgrading from an older video card, you can access higher
colors, but cannot use resolutions over 640x480 This type of issue is seen frequently when
upgrading an older Stealth 64 card—true color modes are accessible, but resolutions above 640x480 are
not. This problem is almost always due to residual entries left in the Registry. Start your Registry editor
and check the following key:
HKEY_LOCAL_MACHINE/Config/0001/Display/Settings
Right next to the setting “Resolution” is an entry called “ScreenArea.” This entry was left over from a former “Virtual Desktop” and was probably set to 640x480. Remove this key, save your changes, and reboot
the system.
P:\010Comp\Bigelow\686-8\ch43.vp
Friday, July 21, 2000 9:51:04 AM
Color profile: Generic CMYK printer profile
Composite Default screen
Bigelow / Troubleshooting, Maintaining & Repairing PCs / Bigelow / 2686-8 / Chapter 43
TROUBLESHOOTING VIDEO ADAPTERS
1559
SYMPTOM 43-14
Windows 95 reports a memory conflict with a PCI-to-PCI bridge and
the AGP graphics adapter This PCI-to-PCI bridge is sometimes called the Intel 82443LX or
82443BX bridge. This is not a “real” error. The memory conflict that appears between the PCI bridge and
the AGP graphics adapter is a known conflict. This error is caused by the way Windows 95 reports memory usage and is not known to cause problems. Windows 98 does not report this problem, so you may
ignore the issue or upgrade if you wish.
SYMPTOM 43-15
There are problems with IE 5 after installing 3D accelerator drivers
For example, you may experience problems if you install Diamond Multimedia Monster Fusion video
drivers on a computer running Internet Explorer 5. In one case, you may receive the following error after
installing the Monster Fusion drivers on a system with IE 5 and restarting the PC:
EXPLORER caused an Invalid page fault in module EXPLORER.EXE at 015f:00401f31
In another case, Windows 95/98 may not start if you download and install Diamond video drivers from the
Diamond web site and then restart your computer. This trouble can occur because some Diamond video
drivers replace the COMCTL32.DLL file with a version that is not totally compatible with IE 5. Update
the drivers to the latest versions. For example, Diamond Multimedia now has updated drivers that
address this issue at www.diamondmm.com. As an alternative, you may extract a new copy of the
COMCTL32.DLL file:
1
Start Windows in the native DOS mode (the Safe Mode Command Prompt).
2
Rename the Comctl32.dll file in the \Windows\System folder to Comctl32.old by typing
ren c:\windows\system\comctl32.dll comctl32.old
at the command prompt, and then press ENTER. Now type
extract c:\window~1\setupw95.cab comctl32.dll /l c:\windows\system
and then press ENTER.
3
Restart the computer normally.
SYMPTOM 43-16
You notice a horizontal line scrolling down one side of the screen
with multiple monitors under Windows 98/SE This problem is almost always caused when
your monitors are too close to a fluorescent light source (or you’re using an unshielded monitor, and you
place it too close to another monitor). Most early monitors are unshielded, so they do not confine the magnetic field they emit. Later monitors are shielded, so that most of the magnetic fields they emit are confined within the monitor. If you place an unshielded monitor too close to another monitor, the magnetic
field emitted by the unshielded monitor may interfere with the other monitor. Move the unshielded monitor away from any monitors or fluorescent light sources it interferes with or place a shield (such as an ordinary “cookie sheet”) between the unshielded monitor and any monitors it interferes with. You may also
choose to replace the unshielded monitor with a shielded model.
SYMPTOM 43-17
You cannot drag a windows from one monitor to another under
Windows 98/SE This problem can occur if the window you’re trying to drag is maximized, or your
monitors are not positioned correctly. To work around this issue, restore the window to its previous size
before you drag it to a different monitor. To do this, simply click the Restore button (the middle button in
P:\010Comp\Bigelow\686-8\ch43.vp
Friday, July 21, 2000 9:51:04 AM
43
Color profile: Generic CMYK printer profile
Composite Default screen
1560
CHAPTER 43:
Bigelow / Troubleshooting, Maintaining & Repairing PCs / Bigelow / 2686-8 / Chapter 43
VIDEO ADAPTERS AND ACCELERATORS
the upper-right corner of a window). You should also verify your monitor’s position. Click Start, click
Help, click the Index tab, type multiple display support, and then double-click the “arranging monitors”
topic for detailed information.
A basic Permedia video adapter cannot currently be used as your primary video adapter (this
excludes the Permedia NT and Permedia-2).
SYMPTOM 43-18
You notice a black screen when you run a program requiring
DirectX under Windows 95/98 When you run a DirectX-based program, your monitor may display a black screen (or may display only wavy lines on a black background). This fault can occur if the
DirectX-based program changes the default refresh rate that your display adapter uses with the monitor.
Change the refresh rate to an acceptable level for your monitor and selected resolution (for example, 60Hz
or 72Hz):
1
Click Start, highlight Settings, then click Control Panel.
2
Double-click the Display icon, click the Settings tab, then click Advanced.
3
Click the Adapter tab and then click Adapter Default in the Refresh Rate box.
4
Click OK when you’re prompted to test the setting.
5
If the setting is displayed correctly, click Yes to keep the setting.
If this doesn’t work, try reducing the hardware acceleration for the video adapter:
1
Click Start, highlight Settings, then click Control Panel.
2
Double-click the System icon, click the Performance tab, then click Graphics.
3
Move the Hardware Acceleration slider to one notch from the left (the Basic setting), click OK,
click Close, and then click Yes when you’re prompted to restart your computer.
SYMPTOM 43-19
You encounter a blank screen after installing a secondary video
adapter for Windows 98 This trouble can occur if your computer has a built-in video adapter and
either your computer’s BIOS does not provide support for multiple video adapters or the secondary video
adapter is not supported for “multiple display” use. To correct this behavior, update your computer’s
BIOS and/or obtain a different video adapter that’s properly supported for Windows 98 multi-monitor
service.
SYMPTOM 43-20
You find that Riva 128 video adapters do not support multi-monitor
operation When you add a secondary video adapter to a system that uses a Riva 128 video adapter as
the primary video adapter, the computer may hang up. This problem is almost always caused by an incompatible driver that is used by the Riva 128 video adapter—consequently, Riva 128 video adapters are not
supported for use with the “multiple display” feature. If you want to use multiple monitors, you should use
only video adapters that are known to work in a multiple-monitor environment (see Table 43-9). Replace
the incompatible video adapter with a model that is compatible with multi-monitor operation.
SYMPTOM 43-21
You have trouble using the ATI Rage II PCI video card as a second
video adapter When you try the ATI Rage II PCI video adapter as a secondary display adapter under
Windows 98, the secondary display adapter may not work properly (if at all). When you view the ATI
Rage II PCI Properties dialog box in Device Manager, you may see an error message such as:
P:\010Comp\Bigelow\686-8\ch43.vp
Friday, July 21, 2000 9:51:05 AM
Color profile: Generic CMYK printer profile
Composite Default screen
Bigelow / Troubleshooting, Maintaining & Repairing PCs / Bigelow / 2686-8 / Chapter 43
TROUBLESHOOTING VIDEO ADAPTERS
1561
Multiple Display Support cannot start this device. The area of memory
normally used by video is in use by another program or device. To enable
Multiple Display Support, remove EMM386 or other memory managers from
CONFIG.SYS and restart your computer.
Try adding an EMMExclude entry to the SYSTEM.INI file:
1
Open the SYSTEM.INI file using any text editor (such as Notepad).
2
Add the following line to the [386enh] section of the SYSTEM.INI file:
emmexclude=c000-cfff
3
Save and then close the SYSTEM.INI file.
4
Restart your computer.
As an alternative, try adding the exclusion to the EMM386 command line of your CONFIG.SYS file:
1
Open the CONFIG.SYS file using any text editor (such as Notepad).
2
Add the following lines:
device=<windows>\himem.sys
device=<windows>\emm386.exe x=c000-cfff
where <windows> is the path to the folder in which Windows is installed.
3
Save and then close the CONFIG.SYS file.
4
Restart your computer.
The screen image becomes distorted when changing resolutions
This is known to occur with certain monitors under Windows 98 (such as the NEC 4FG). Some video
adapters (such as the Diamond Stealth 64, Video 2001, and S3 Trio 64V+) default to a refresh rate of
60Hz. NEC 4FG monitors can support only refresh rates of less than 60Hz at a resolution of 1280x1024 or
higher. For example, if you’re using an NEC 4FG monitor and you change the display resolution to
1280x1024 or higher, your screen may become distorted. This trouble can occur if you’re using a video
adapter that defaults to a refresh rate of 60Hz at such high resolutions. To correct this fault, optimize the
refresh rate of your video adapter before you attempt change the display resolution:
SYMPTOM 43-22
1
Click Start, highlight Settings, then click Control Panel.
2
Double-click the Display icon.
3
Select the Settings tab, then click Advanced.
4
Click the Adapter tab, then click Optimal in the Refresh Rate box.
5
Click OK, then click OK again when you receive the following message:
Windows will now adjust the refresh rate of your display. The screen
may flicker for a few moments while the settings are being changed. If
the display becomes garbled or unusable, simply wait and Windows will
restore your original settings.
6
Click Yes when you’re prompted to keep this setting, then click OK.
P:\010Comp\Bigelow\686-8\ch43.vp
Friday, July 21, 2000 9:51:05 AM
43
Color profile: Generic CMYK printer profile
Composite Default screen
1562
CHAPTER 43:
Bigelow / Troubleshooting, Maintaining & Repairing PCs / Bigelow / 2686-8 / Chapter 43
VIDEO ADAPTERS AND ACCELERATORS
SYMPTOM 43-23
You see wavy lines in the monitor’s display This is known to occur
under Windows 98 with monitors such as the MAG DX-1795. This problem can occur if your video
adapter is configured for 1600x1200 screen resolution, and the “Automatically detect Plug & Play monitors” check box is selected on the Monitor tab in Display Properties. To correct this problem, manually
install your monitor in Display Properties:
1
Click Start, highlight Settings, then click Control Panel.
2
Double-click the Display icon.
3
Click the Settings tab, then click Advanced.
4
On the Monitor tab, click the “Automatically detect Plug & Play monitors” check box to clear it,
then click Change.
5
Click Next, click “Display a list of all the drivers in a specific location, so you can select the driver
you want,” then click Next.
6
Click Show All Hardware.
7
In the Manufacturers box, click “MAG Technology Co., Ltd.,” then click “MAG DX-1795” in the
Models box.
8
Click Next, then follow the instructions on your screen to finish installing the monitor.
SYMPTOM 43-24
When returning to Windows from a DOS application, the Windows
screen “splits” from top-to-bottom This is a DOS problem that is seen under Windows that indicates an obsolete or corrupted video driver (for example, using a Windows 3.0 video driver under Windows 3.1)—chances are that the video adapter is running just fine. Make sure that the proper DOS
“grabber” file is installed and specified in the SYSTEM.INI file. Check with the video board manufacturer to obtain the latest assortment of drivers and grabber files. Try reinstalling the drivers from their
master disk. If you do not have current drivers available, try switching to the generic VGA driver.
SYMPTOM 43-25
The system hangs up during initialization, some characters may be
missing from the display, or the screen colors may be incorrect. These are classic symptoms of a hardware conflict between the video adapter and one or more cards in the system or an area of
memory. Some video boards use an area of upper memory that is larger than the “classical” video area. For
example, the Impact SVGA board imposes itself on the entire address range between A0000h and
DFFFFh. In this kind of situation, any other device using an address in this range will conflict with the
video board. A conflict may occur when the video board is first installed, or the board may work fine until
another device is added or modified.
Resolving a hardware conflict basically means that something has to give—one of the conflicting elements (IRQ lines, DMA channels, or I/O addresses) must be adjusted to use unique system resources.
From a technician’s viewpoint, it rarely matters which of the conflicting devices are changed, but remember that system startup files, device drivers, and application settings may also have to change to reflect
newly selected resources. You may also be able to resolve some memory conflicts by adding the
EXCLUDE switch to EMM386.EXE. The video adapter manual will indicate when an EXCLUDE
switch is necessary.
SYMPTOM 43-26
Your system is generating DMA errors with a VGA board in the
system, and video BIOS shadowing disabled This is a fairly rare symptom that develops only
on some older i486 systems and is usually due to an 8 bit VGA board in a system equipped with a slower
P:\010Comp\Bigelow\686-8\ch43.vp
Friday, July 21, 2000 9:51:06 AM
Color profile: Generic CMYK printer profile
Composite Default screen
Bigelow / Troubleshooting, Maintaining & Repairing PCs / Bigelow / 2686-8 / Chapter 43
TROUBLESHOOTING VIDEO ADAPTERS
1563
version of the i486 CPU (in the 25MHz range). The 8 bit access takes so long that some DMA requests are
ignored—thus an error is generated. If you find such a problem, try enabling video ROM shadowing
through the CMOS setup to allow faster access to video instructions. Also, you may try a newer revision of
the i486 CPU.
SYMPTOM 43-27
The system hangs up using a 16-bit VGA board and one or more
8-bit controllers This is typically a problem that arises when 8-bit and 16-bit ISA boards are used in
the same system. Due to the way that an ISA bus separates the 8-bit and 16-bit segments, accessing an 8 bit
board when there are 16 bit boards in the system may cause the CPU to (falsely) determine that it is accessing
a 16-bit board. When this occurs, the system will almost invariably crash. Try removing any 8-bit boards
from the system. If the crashes cease, you have probably nailed down the error. Unfortunately, the only real
correction is to either remove the 8-bit board(s) or reconfigure the board(s) to use a higher area of memory.
SYMPTOM 43-28
You have trouble sizing or positioning the display, or you see error
messages such as “Mode Not Supported” or “Insufficient Memory.” These kinds of
errors may occur in newer or high-end video boards if the board is not set up properly for the monitor it is
being used with. Most new video boards include an installation routine that records the monitor’s maximum specifications, such as resolution (and refresh frequencies), horizontal scanning frequencies, and
vertical scanning frequencies. If such data is entered incorrectly (or the monitor is changed), certain
screen modes may no longer work properly. Check the video adapter’s installation parameters and correct
its setup if necessary.
SYMPTOM 43-29
You frequently encounter GPFs when using QuickTime for
Windows 1.1 This is a notable problem with ATI Mach64 cards, but it has been known to occur with
other advanced video boards. Often, the problem can be corrected by making a change in the Windows
SYSTEM.INI file. For the ATI Mach64, you must turn DeviceBitmaps=off under the [macx] section. As
an alternative, start the ATI FlexDesk, type OPT (doing this starts a “hidden” window), then uncheck the
DeviceBitmap entry.
SYMPTOM 43-30
The video board will not boot up when used in a particular
motherboard Generally speaking, there are noted cases of hardware incompatibility between certain
video boards and motherboards. This condition usually causes a great deal of confusion because the video
board may work just fine when tested in a different motherboard, and other video boards may work well in
the original motherboard—the technician simply winds up chasing ghosts. A noted example of this problem is the Boca Research VGAXL1/2 refusing to work in a Micronics 486DX2/66 motherboard. The
solution to this problem demands that U13 on the video board be a Texas Instruments TI-74F04. If U13 is
a Motorola chip, you’ll need to send the board back for rework—strange but true. For general troubleshooting purposes, if a certain video board and motherboard refuse to work together, don’t waste your
time chasing ghosts—contact both the video board maker and PC (or motherboard) maker and see if there
are any reports of incompatibilities.
SYMPTOM 43-31
Diagnostics refuse to show all of the available video modes for a
particular board even though all video RAM was properly detected, or the board refuses
to operate in some video modes. When a video board does not respond to certain video modes
(usually the higher video modes), it is usually because there is a conflict in the upper memory area, and a
memory range needs to be excluded. If there is a memory manager at work (such as QEMM, 386MAX, or
P:\010Comp\Bigelow\686-8\ch43.vp
Friday, July 21, 2000 9:51:06 AM
43
Color profile: Generic CMYK printer profile
Composite Default screen
1564
CHAPTER 43:
Bigelow / Troubleshooting, Maintaining & Repairing PCs / Bigelow / 2686-8 / Chapter 43
VIDEO ADAPTERS AND ACCELERATORS
EMM386), try disabling the memory manager in CONFIG.SYS or boot the system from a clean floppy.
Try your diagnostic(s) again—chances are that the problem has disappeared. To fix this problem on a
more permanent basis, re-enable the memory manager using an exclude command. Try x=B100h-B1FFh
as the first parameter on the memory manager’s command line. If that does not work, try
x=A000h-BFFFh. Finally, try x=A000h-C7FF.
SYMPTOM 43-32
The characters shown in the display appear fuzzy This is often the
result of a speed problem where the system is running too fast for the VL bus video board. In virtually all
cases, you will find the VL bus to be running over 33MHz. Try slowing down the VL bus speed. This will
sacrifice video performance, but should stabilize the system. Chances are also very good that the system
has been locking up frequently—slowing down the video board should also correct such lock-ups.
SYMPTOM 43-33
Pixels appear “dropped” behind the mouse cursor, and graphic
images appear to break up under Windows There are two major causes for this older type of
problem: bad video RAM or a system ISA bus speed that is too fast. Check the CMOS Setup for an entry in
Advanced Setup such as “AT Bus Clock,” “ISA Bus Speed,” or “AT Bus Speed.” The corresponding
entry should be set to 8.33MHz. Otherwise, excessive speed may be resulting in “lost” video data. If the
bus speed is set properly, run a diagnostic to check the integrity of video RAM (you may have to replace
the video RAM or replace the video board entirely).
SYMPTOM 43-34
You encounter video-related conflicts in Packard Bell systems
The system refuses to boot or starts with “garbage” and erratic screen displays. This symptom is encountered most frequently with Boca video boards on Packard Bell systems with video circuits already on the
motherboard. Even when the on-board video has been disabled, reports indicate that the video circuitry
remains active and then conflicts with the add-on video board. Packard Bell indicates that their Vxxx.16
BIOS will correct this problem, so contact Packard Bell for an appropriate BIOS upgrade.
SYMPTOM 43-35
Text appears in an odd color For example, text that should be green
appears black. This is almost always the result of a problem with the palette decoding registers on the particular video board and will typically appear when using higher color modes (64k or 16M colors, for
example). Make sure that the video drivers are correct, complete, and up-to-date. If the problem persists,
you may need to replace the video board outright.
Remember that you can select myriad color and text “schemes” under Windows 95/98. Before you
conclude that color problems are caused by a faulty video card, be sure to try the “Windows Default”
desktop scheme.
SYMPTOM 43-36
When an application is started (under Windows), the opening
display appears “scrambled” While this might appear to be a video memory problem at first
glance, it is actually more likely to be related to a buggy video driver. Upgrade the video driver to the latest
version, or try a generic video driver (a “reference driver”) that is compatible with your video chipset.
SYMPTOM 43-37
The display colors change when exiting from a DOS shell under
Windows This problem has been noted with older video boards, such as the Diamond SpeedStar Pro,
and is almost always the result of a video board defect (usually a palette problem). For the Diamond board,
the product must be replaced with revision A2. For other video boards, such problems can usually be corrected by replacing the video board outright.
P:\010Comp\Bigelow\686-8\ch43.vp
Friday, July 21, 2000 9:51:07 AM
Color profile: Generic CMYK printer profile
Composite Default screen
Bigelow / Troubleshooting, Maintaining & Repairing PCs / Bigelow / 2686-8 / Chapter 43
TROUBLESHOOTING VIDEO ADAPTERS
1565
SYMPTOM 43-38
The computer locks up or crashes when starting an .AVI file
This problem is encountered frequently as computer users first begin to try multimedia applications.
Rather than being a problem with the video board specifically, the trouble is often due to using an outdated
version of Video for Windows. Make sure to use Video for Windows 1.1E or later. Video for Windows can
be downloaded from the Diamond Multimedia FTP site at; ftp://ftp.diamondmm.com/pub/misc/
vfw11e.exe. You may also need to edit the [DrawDib] section of the WIN.INI file and add an entry that
says; DVA=0. If no [DrawDib] section is present, you can add it. Remember to restart Windows after
making any changes. You may also be able to correct this type of problem by upgrading to Windows
98/SE, which should contain many of the very latest drivers and support components.
SYMPTOM 43-39
The computer is running very slowly (poor performance), and the
hard drive light is continuously lit This problem is particularly apparent with Diamond Edge 3D
video boards on systems with more than 16MB of RAM. The Diamond Edge 3D board comes with both
1MB and 6MB MIDI bank files. Diamond recommends that you use only the 6MB bank file on systems
with over 16MB of RAM. To change the size of the MIDI bank file being used:
1
Right-click on My Computer and choose Properties.
2
Open the System Control Panel and click on the Device Manager tab.
3
Click on the (+) symbol beside the “Sound, Video, and Game Controller” line.
4
Highlight “Diamond EDGE 3D PCI Multimedia Device,” click on Properties, and the click on
Settings.
5
You will then see the 1MB and 6MB MIDI bank selection. Select the 6MB option, choose OK, and
restart your computer when prompted.
You notice that .AVI files have distorted colors or “grainy” playback
This symptom usually occurs when playing 8-bit .AVI files that are not supported by DCI and can usually
be corrected by disabling the accelerated video playback features of the video board. For example, the
older Diamond ViperPro Video board is noted for this problem, and you would need to edit the
COPRO.INI file located in the \windows directory. In the [VCP] area, change the VCPEnable= line to
OFF. Save the .INI file and restart Windows.
SYMPTOM 43-40
SYMPTOM 43-41
The PCI video board will not work under Windows unless the
system’s PCI SCSI devices are disconnected This type of problem occurs only on certain
combinations of PCI system hardware. For example, this type of symptom has been documented using
Phoenix BIOS 4.04 and a UMC8810P-AIO motherboard on systems with an NCR SCSI controller and
SCSI devices. You can often correct such problems by correcting the Advanced System Setup in CMOS.
Start the CMOS Setup, go to the Advanced System Setup, and select PCI Devices. Set up the PCI slot for
the SCSI controller as IRQ9 and LEVEL edge select. The slot for the video board should have the IRQ set
to NONE, and LEVEL edge select. Change the Base Memory Address from 0080000000 to 0081000000.
SYMPTOM 43-42
There are boot problems when a new video board is installed
Typical symptoms include no video or eight beeps when the system is turned on. This problem is usually the
result of an outdated system BIOS that is not capable of detecting the particular video chipset in use—the
BIOS interprets this condition as meaning that there is no video board in the system, and an error is generated
accordingly. Contact the motherboard manufacturer (or PC maker) for an updated system BIOS. Most
BIOS versions dated after the fall of 1994 should be able to detect most modern video chipsets.
P:\010Comp\Bigelow\686-8\ch43.vp
Friday, July 21, 2000 9:51:07 AM
43
Color profile: Generic CMYK printer profile
Composite Default screen
1566
CHAPTER 43:
Bigelow / Troubleshooting, Maintaining & Repairing PCs / Bigelow / 2686-8 / Chapter 43
VIDEO ADAPTERS AND ACCELERATORS
SYMPTOM 43-43
There are boot problems when a PCI video board is installed
There are two common problems that account for this. First, the system BIOS did not complete the configuration of the video board correctly, and the board has not been enabled onto the PCI bus. The video board
manufacturer may have a utility available which can “remap” the video card to a new address outside of
physical memory. For the Matrox Millennium, use the PCIMAP.EXE utility. Other Matrox boards use the
MGABASE.EXE utility. Other PCI video board manufacturers probably offer their own utilities. The
second potential problem is that the system BIOS has assigned a base memory address to the video board
that is used by another device, or is reserved for use by the motherboard chipset. While the utilities mentioned above may often help to correct this problem, a more permanent fix is usually to update the system
BIOS. Investigate a BIOS upgrade from the motherboard (or PC) manufacturer.
SYMPTOM 43-44
The monitor overscans when entering a DOS shell from Windows
This creates a highly distorted image and can damage the monitor circuitry (if left for prolonged periods).
The cause of this problem is usually a bug in the video driver. For example, this type of problem is known to
happen when using the older Diamond SpeedStar Pro with drivers prior to version 1.06. Obtain the latest
video driver from the video board maker or try a generic video driver written by the video chipset maker.
SYMPTOM 43-45
You encounter an intermittent “Divide by Zero” error A l t h o u g h
there are several possible causes for this type of error, they are all related to flaws in software—in this
case, problems with the video driver or video “toolkit” that is installed with the particular video board. For
example, “Divide by Zero” errors can be corrected with the Diamond Stealth 64 Video 2001 series by
opening the InControl Tools package and changing a “Center to Viewport” selection to “Center to Desktop.” Similarly, the “Maximize to Viewport” selection should be changed to “Maximize to Desktop.”
Often, upgrading the video driver or video support tools will eliminate this problem.
SYMPTOM 43-46
During MPEG playback, the display flickers, shows low refresh
rates, or appears to be in an interlaced mode This is not necessarily an error. With some
video boards (such as the Diamond MVP1100), MPEG files cannot play correctly at high refresh
rates—typically over 72Hz. When an MPEG file is played, the driver will automatically switch to a 72Hz
vertical refresh rate and may cause an unexpected change in display quality during playback. After exiting
from the MPEG player, the original (higher) refresh rate will be restored. If a vertical refresh rate lower
than 72Hz was originally selected, then the vertical refresh rate will not change during MPEG playback,
so you should see no difference in the display.
SYMPTOM 43-47
You receive an error such as “There is an undetectable problem in
loading the specified device driver” when starting an MPEG player or other video tool
In almost all cases, the related driver is missing, installed improperly, or corrupt. Reinstall the MPEG
playback driver(s) for your particular video board, and make sure to use the latest version. If problems persist, check for the driver under the WIN.INI or SYSTEM.INI file and see that there is only ONE load= reference to the particular driver(s)—repeated references can cause conflicts or other loading problems.
Similar drivers (other MPEG drivers, for example) can also cause conflicts, so verify that the only drivers
being loaded are the ones used by your current video adapter and/or playback software.
SYMPTOM 43-48
On video boards with TV tuners, the TV window is blurry or fuzzy at
1024x768 or higher resolutions This symptom is particularly noted with the Diamond DVV1100.
Unfortunately, it is usually the result of limited bandwidth of the particular video board—specifically of the
P:\010Comp\Bigelow\686-8\ch43.vp
Friday, July 21, 2000 9:51:07 AM
Color profile: Generic CMYK printer profile
Composite Default screen
Bigelow / Troubleshooting, Maintaining & Repairing PCs / Bigelow / 2686-8 / Chapter 43
TROUBLESHOOTING VIDEO ADAPTERS
1567
video chipset. The only real option is to reduce the resolution to 800x600 or 640x480 when running the TV
and to lower the refresh rate to 60Hz. Contact your video board’s manufacturer—there may be an RMA or
other replacement/upgrade program that might be available to correct the issue.
SYMPTOM 43-49
On video boards with TV tuners, the reception does not appear as
good as that of an ordinary TV This problem has been noted in conjunction with Matrox
Media-TV boards and is usually due to the local cable company using the HRC carrier frequency instead
of the standard carrier frequency. For Matrox boards, you can correct the problem by modifying the
DVMCIMIL.INI file found in the \WINDOWS directory. Under the [Carrier] section, change the
CarrierType=0 entry to CarrierType=1. Other video/TV boards may utilize different .INI entries or allow
carrier selection through the use of an onboard jumper, but poor reception is almost always the result of an
unusual cable carrier.
SYMPTOM 43-50
You encounter errors such as “Insufficient video memory”
There is not enough video memory on the board to handle screen images at the resolution and color depth
you have selected. In most cases, the system may crash outright. Your immediate solution should be to
select a lower resolution or smaller color palette. If you are encountering such problems when attempting
to play .AVI or MPEG files, you should be able to select smaller video windows and lower color depth
without altering your Windows setup. As a more long-term solution, you should consider adding more
video memory or replacing the video board with one that contains more video memory.
SYMPTOM 43-51
The PCI video board is not working properly—there is a BIOS
conflict with PCI interrupt 1Ah The lower 32KB of the ROM BIOS has been redirected for high
memory use. Disable this memory with your memory manager by adding an exclude command such as:
x=f000-f7ff.
SYMPTOM 43-52
You encounter video corruption or sporadic system rebooting
when using an SLC-type motherboard This particular symptom has been most noted when
using Number Nine video boards with Alaris SLC2 motherboards. The SLC2 microprocessor uses a
32-bit internal data bus, but the external data bus (seen by the motherboard) is 16-bit. Most of the registers
on contemporary VL and PCI video boards are mapped as 32 bits and cannot be accessed as two 16-bit
registers. As a result, the video board simply cannot be used together with the particular motherboard.
You will have to upgrade the motherboard or use a different video board.
SYMPTOM 43-53
Video playback experiences long pauses while the hard drive
thrashes excessively This is a problem that appears under Windows 95/98, and is almost always
the result of disk caching problems. Start Windows Explorer and highlight the drivers responsible for
video playback (for a Motion Pixels video board, highlight MPXPLAY.EXE and MPXPLAY.PIF). Click
the right mouse button and select Properties. In the Memory page, make sure that the Protected option has
been set. Restart the video clip or restart Windows 95/98 if necessary. Also check your CONFIG.SYS and
AUTOEXEC.BAT files and verify that there are no caching utilities being loaded.
SYMPTOM 43-54
You cannot use the loop-through feature of your video board
Typical examples include the Number Nine 9FX Motion 771 VGA loop-through connector with a Reel
Magic board and a Number Nine driver. Unfortunately, this is often the result of a limitation with the
video board’s graphics processor IC (refusing to support loop-through functionality). To use loopthrough, try the standard VGA driver.
P:\010Comp\Bigelow\686-8\ch43.vp
Friday, July 21, 2000 9:51:08 AM
43
Color profile: Generic CMYK printer profile
Composite Default screen
1568
CHAPTER 43:
Bigelow / Troubleshooting, Maintaining & Repairing PCs / Bigelow / 2686-8 / Chapter 43
VIDEO ADAPTERS AND ACCELERATORS
SYMPTOM 43-55
Windows appears with a “black box” cursor and/or icons that fail to
appear on the screen In most cases, the problem is caused by an incompatibility with the motherboard’s noncompliant PCI BIOS (the motherboard’s BIOS does not comply with the PCI backward-compatibility requirement). To overcome this problem, set the video board’s memory aperture manually by
editing the SYSTEM.INI file located in the \WINDOWS directory. For example, when working with a
Number Nine 9GXE, find the [#9GXE] section of SYSTEM.INI, then add a command line such as;
APERTURE-BASE=0x8800 or APERTURE-BASE=31. Save the file and restart Windows. The actual
section for your particular video board may be different.
SYMPTOM 43-56
There are video problems, or the system locks up while using an
antivirus program This error occurs frequently when using memory-resident virus checking. Some
video boards allow you to compensate for this by editing the SYSTEM.INI file. For the Number Nine
9GXE board, find the [#9GXE] area in SYSTEM.INI, then set the FastMMIO= entry to OFF. Remember
to save the .INI file and restart Windows. The actual section for your particular video board may be different. As an alternative, you could also disable or remove the antivirus program or check with the antivirus
maker to see if there’s a patch or update that might improve the program’s compatibility.
SYMPTOM 43-57
An error indicates that there is not enough memory for playback or
re-sizing of the playback window This type of program is directly caused by a lack of system
(not video) memory in the PC. If your system uses SMARTDRV (Windows 3.1x), try reducing the memory used for caching. Try unloading various unneeded programs from memory and consider disabling any
RAM drives that may be active. Finally, consider adding more system RAM to the PC.
SYMPTOM 43-58
The video board refuses to accept a particular video mode
Mode problems are most frequent when attempting to use unusual palette sizes such as 32k or 64k colors.
Try setting the video board to 256 colors. If a higher color depth is needed, it may be possible to run the
video board in a palletized mode or gray-scale mode by adding command line switches to the video driver.
Refer to the instructions that accompany the particular video board for detailed information. You may
also consider a video BIOS upgrade or try using an upgraded VESA driver (such as UNIVBE 5.3 from
SciTech Software). Updated video drivers and/or firmware may also be available to correct the problem.
SYMPTOM 43-59
The video system cannot lock memory using QEMM and linear
video memory This is often a DOS problem with Motion Pixels video boards when using QEMM
7.04 and earlier versions. The DPMI has a bug when accessing physical memory above the DPMI’s host
memory. Upgrade the version of QEMM to 7.5 (or later) or play video under Windows instead.
SYMPTOM 43-60
The video system cannot lock memory under Windows, or the
system hangs This is also a problem noted most often with Motion Pixels video boards and is almost
always related to the use of a WINDPMI.386 DPMI driver loaded through SYSTEM.INI. WINDPMI.386
reports the wrong amount of free lockable DPMI memory. If your Windows platform is using Borland’s
WINDPMI.386, manually reduce the cache size with the /c option, or remove (or disable) the driver from
SYSTEM.INI entirely. You might also consider upgrading WINDPMI.386 to a later version. Contact
Borland technical support or the technical support department of the video board maker.
SYMPTOM 43-61
Other devices don’t work properly after the PCI video card is
installed For example, the sound card output is distorted, or a fast modem loses data. This can happen
often with newer video adapters. Some computers require that software wait for the hardware to be ready
P:\010Comp\Bigelow\686-8\ch43.vp
Friday, July 21, 2000 9:51:08 AM
Color profile: Generic CMYK printer profile
Composite Default screen
Bigelow / Troubleshooting, Maintaining & Repairing PCs / Bigelow / 2686-8 / Chapter 43
TROUBLESHOOTING VIDEO ADAPTERS
1569
to receive new data. Newer video board drivers are not normally set to do this because it slows them down
slightly (and it’s not necessary for most current computers). Under Windows 95/98, do the following:
1
Right-click on the Windows 95 desktop background.
2
Click the Properties menu item, then select the video board’s Settings tab.
3
Select the Advanced button, then click the Performance tab.
4
Clear the “Use automatic PCI bus retry” check box.
5
Finally, accept your changes and reboot the computer when instructed to do so.
Under Windows 3.1x, edit the SYSTEM.INI file in your \Windows directory to add the line
PciChipSet=1 to the particular video board’s section (that is, [mga.drv]).
SYMPTOM 43-62
A Windows 95/98 game doesn’t start or runs slower than normal
The program uses the Microsoft DirectX interface. DirectX may not be installed, or an older version of
DirectX is installed. Most programs that use DirectX install it as part of their installation, but some do not.
Also, some older programs may install an earlier version of DirectX (overwriting a later version). To see if
DirectX is installed:
1
Right-click on the Windows 95/98 desktop.
2
Click the Properties menu item and select the video adapter’s Settings tab.
3
Click the Advanced button and click the Information tab.
4
Look at the Microsoft DirectX Version label. DirectX 5.x (or later) should be the current version.
If the current version of DirectX is installed, you’re finished. Otherwise, you’ll need to install DirectX.
If the DirectX setup program asks if you want to replace the existing display drivers, click No.
SYMPTOM 43-63
You replace an older 3D accelerator with a newer one, but the new
accelerator is not working properly You often see this kind of trouble when replacing a 3Dfx
Voodoo card or Monster I card with a newer card such as a Monster Fusion. You’ll need to remove the
original Voodoo graphics card and clean out all of the old references to the card:
3Dfx provides an .INF file to remove these references. You can download it from:
http://www.3dfx.com/view_io.asp?ID=96.
Always make a complete backup of your Registry to a bootable floppy disk before making any
changes to the system Registry.
1
Click Start, select Run, then type regedit.
2
Locate the “HKEY_LOCAL_MACHINE/Enum/PCI” key and delete the VEN_121A&DEV
folder.
3
Locate the “HKEY_LOCAL_MACHINE/Software” key and delete the 3Dfx Interactive folder.
4
Locate the “HKEY_LOCAL_MACHINE/Software/Diamond” key and delete the Monster3D folder.
5
Locate the “HKEY_LOCAL_MACHINE/Software/Microsoft/Windows/Current Version/ControlsFolder/Display/shellex/Property Sheet Handlers” key and delete any folders pertaining to the original “Voodoo” card.
P:\010Comp\Bigelow\686-8\ch43.vp
Friday, July 21, 2000 9:51:10 AM
43
Color profile: Generic CMYK printer profile
Composite Default screen
1570
CHAPTER 43:
Bigelow / Troubleshooting, Maintaining & Repairing PCs / Bigelow / 2686-8 / Chapter 43
VIDEO ADAPTERS AND ACCELERATORS
6
Save your changes to the Registry, then use Windows Explorer to open the c:\windows\inf\other
folder.
7
Delete any *.INF file pertaining to the Monster3D, 3Dfx Interactive, the Monster Fusion, and so on.
8
Click Start, select Find, then choose Files and Folders. Search for any references to “glide” and
delete any file references that you find.
9
Search for files such as DD3DFX.DRV, DD3DFX16.DLL, DD3DFX32.DLL, and MM3DFX*.*
and delete those files if you find them.
10
Search for the FXMEMMAP.VXD file and delete it as well.
11
Finally, search for SST1INIT*.* and delete it.
12
Restart the computer and reinstall the drivers for the new Monster Fusion device.
Further Study
3dfx: http://www.3dfx.com/index.html
3DLabs: http://www.3dlabs.com/index.html
ATI: http://www.atitech.ca
Creative Labs: http://www.americas.creative.com/home.html
Data Expert: http://www.dataexpert.com.tw
Diamond Multimedia: http://www.diamondmm.com (Purchased by S3)
DirectX: http://www.microsoft.com/directx/
Fast Graphics: http://www.fastgraphics.com/
Guillemot: http://www.guillemot.com/
Hercules: http://www.hercules.com (Purchased by Guillemot)
Intel AGP: http://developer.intel.com/technology/agp/tutorial/index.htm
Matrox: http://www.matrox.com
Maximum Hardware: http://www.maximumhardware.com/
Number Nine: http://www.nine.com
Nvidia: http://www.nvidia.com/
Oak: http://www.oaktech.com
S3: http://www.s3.com/
STB: http://www.stb.com (Purchased by 3dfx)
Trident: http://www.trid.com
Tweak 3D: http://www.tweak3d.net/
VESA Standards: http://www.vesa.org/
Video Logic: http://www.videologic.com
Voodoo Extreme: http://www.voodooextreme.com/
P:\010Comp\Bigelow\686-8\ch43.vp
Friday, July 21, 2000 9:51:10 AM