1
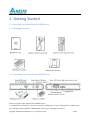
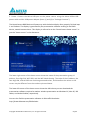
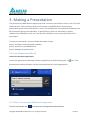
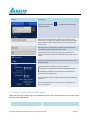
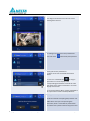
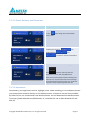
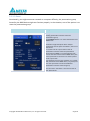
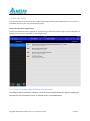
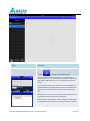
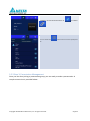
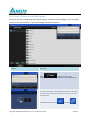
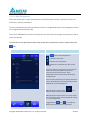
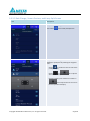
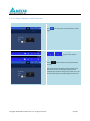
NovoConnect™ B360 Wireless Presentation & Collaboration System User Manual Version 0.96 Copyright © 2014 DELTA Electronics, Inc. All rights reserved. Page 1 Table of Contents TABLE OF CONTENTS ............................................................................. 2 1. GETTING STARTED ............................................................................. 5 1.1 Setting up your NovoConnect B360 device ....................................................... 5 1.1.1 Package Contents .......................................................................................... 5 1.2 Connecting your NovoConnect B360 Device ..................................................... 5 1.2 Downloading and Installing Software ............................................................... 7 2. WIFI SETUP ............................................................................................. 9 2.1 Hotspot Mode .................................................................................................. 9 2.2 Client Mode .................................................................................................... 10 3. MAKING A PRESENTATION .......................................................... 11 3.1 From Windows and Mac PC ............................................................................ 11 3.1.1 Step 1: Presentation Software Configuration............................................... 11 3.1.2 Step 2: Connect to your B360 device ........................................................... 12 3.1.3 Step 3: Presentation Management .............................................................. 13 3.1.3.1 Role Assignment ....................................................................................... 13 3.1.3.2 Role Change, Screen Preview, and 4-way Split Screen .............................. 14 3.1.3.3 Pause, Resume, and Disconnect ............................................................... 17 Copyright © 2014 DELTA Electronics, Inc. All rights reserved. Page 2 3.1.3.4 Annotation................................................................................................ 17 3.1.3.5 Reset......................................................................................................... 18 3.2 With iOS Tablet ............................................................................................... 19 3.2.1 Step 1: Configuration Software Configuration ............................................. 19 3.2.2 Step 2: Connect to your B360 device ........................................................... 21 3.2.3 Step 3: Presentation Management .............................................................. 22 3.2.3.1 Role Assignment ....................................................................................... 23 3.2.3.2 Role Change, Screen Preview, and 4-way Split Screen .............................. 25 3.2.3.3 Annotation................................................................................................ 28 3.2.3.4 Pause, Resume, and Disconnect ............................................................... 30 3.2.3.5 Reset......................................................................................................... 31 3.3 With Android Tablet ....................................................................................... 32 3.3.1 Step 1: Presentation Software Configuration............................................... 32 3.3.2 Step 2: Connect to your B360 device ........................................................... 34 3.3.3 Step 3: Presentation Management .............................................................. 35 3.3.3.1 Role Assignment ....................................................................................... 36 3.3.3.2 Role Change, Screen Preview, and 4-way Split Screen .............................. 38 3.3.3.3 Pause, Resume, and Disconnect ............................................................... 41 3.3.3.4 Reset......................................................................................................... 42 4. REMOTE VIEWER CONFIGURATION ........................................ 43 Copyright © 2014 DELTA Electronics, Inc. All rights reserved. Page 3 Copyright © 2014 DELTA Electronics, Inc. All rights reserved. Page 4 1. Getting Started 1.1 Setting up your NovoConnect B360 device 1.1.1 Package Contents 1.2 Connecting your NovoConnect B360 Device Steps to connect your NovoConnect B360 Device: 1. Video/Audio connection: Connect the Micro HDMI port to the TV/projector’s HDMI input port using the Micro-HDMI-to-HDMI cable (item (b) in “Package Contents”). Copyright © 2014 DELTA Electronics, Inc. All rights reserved. Page 5 2. Power: Connect the Micro-USB port to the power source using the Micro-USB-to-USB power cable and the USB power adapter (items (c) and (d) in “Package Contents”). The NovoConnect B360 device will power up with the below display after properly finished step 1 and 2 above. The display is generated by the presentation software residing in the B360 device, named remote viewer. This display is referred to as the “NovoConnect home screen” or just the “home screen” in the document. The lower right corner of the home screen shows the name of the presentation group, IP address, four-digit PIN, WiFi SSID, and the WiFi Mode Setting. The value of the IP address, the four-digit PIN, and the SSID are machine generated values, and therefore the values on the screen may be different from the numbers pictured above. The lower left corner of the home screen shows the URL where you can download the presentation software required to make a wireless presentation on Windows PC, Mac PC, iOS tablet, and Android tablet, respectively. You can also find the presentation software in Delta official website: http://www.deltaww.com/EduSolution Copyright © 2014 DELTA Electronics, Inc. All rights reserved. Page 6 1.2 Downloading and Installing Software The NovoConnect B360 device supports up to 64 concurrent participants across a mix of PC and Tablet devices. Each participant device will set up a connection with the presentation application, the remote viewer, residing on the B360 for it to make a presentation. You’ll need the below listed presentation software: On Windows PC - NovoConnect Desktop Streamer On Mac PC - NovoConnect Desktop Streamer On iOS tablet – NovoPresenter On Android tablet – NovoPresenter Note: Throughout the document, these four presentation application software and the B360 software Remote Viewer (no need to download) are highlighted in Italics font. Windows PC and Mac PC Downloading the Presentation Software Launch the web browser of your choice and enter the URL displayed on the NovoConnect home screen. In the example display screen shown above, you would enter http://192.168.43.1:8080 into the address line of the browser. You will then see the following screen displayed on your browser. Copyright © 2014 DELTA Electronics, Inc. All rights reserved. Page 7 Select the operating system type in the drop down menu and then click to download the NovoConnect Desktop Streamer software to your PC. Installing the Application Software Run either Desktop_Streamer_Setup_Windows.exe (for MS Windows based computers) or Desktop_Streamer _Setup_Mac.exe (for Macintosh computers) by double clicking the downloaded file on your computer. Follow installation instructions on the PC to complete the installation. Allow all security permissions for NovoConnect Desktop Streamer and all of its subcomponents. On Tablet Devices On iOS tablets, the iOS version of the NovoPresenter is required. You can download and install it from the Apple App Store. On Android tablets, the Android version of the NovoPresenter is required. You can download and install it from the Google Playstore. Once you have downloaded and installed the presentation software, you are ready to make a wireless presentation from your tablet device. Copyright © 2014 DELTA Electronics, Inc. All rights reserved. Page 8 2. WiFi Setup Depending on where your presentation content located, typically, you may select A) Client Mode – for content residing in a networked environment or the Internet cloud B) Hotspot mode – for content residing in your PC or Tablet C) Either – for content residing in your microSD card (up to 32G) The NovoConnect device defaults to start up in WiFi Hotspot mode. The quickest way to make a wireless presentation without setting up a WiFi AP is through Hotspot mode, you may skip to next chapter for steps to making a presentation. If you would like to make your presentation in a WiFi AP networked environment, please refer to the “Client Mode” section in this chapter. 2.1 Hotspot Mode Right out of the box, NovoConnect’s WiFi is set to function as a WiFi Hotspot and will stay in this configuration until you alter it. The default SSID for the WiFi Hotspot is “NVC_XXXXX”, where “XXXXX” is a machine generated string of characters and numbers. A mouse is required for the following steps. If you alter your settings and choose to revert to Hotspot mode, on the NovoConnect home screen, select WiFi-> Hotspot Mode->Apply. For the Windows PC presenter, click the network icon on task bar from Desktop. Select the SSID of the NovoConnect B360 device shown on the home screen, in the above example NVC_XYZAB, and click Connect. For the MAC presenter, click the network icon on task bar from Desktop. Select the NovoConnect SSID and click Join. Ignore any security warnings. For the tablet presenter, enable WiFi and go to the WiFi AP list. Select the NVC_XYZAB SSID. Ignore any security warnings. Copyright © 2014 DELTA Electronics, Inc. All rights reserved. Page 9 Note: In Hotspot mode operation, all participating presentation devices must be connected to the same WiFi HotSpot. 2.2 Client Mode In this mode, the NovoConnect device functions as a WiFi client and a WiFi AP router is needed for network connectivity. A mouse is required for the following steps. On the home screen of the NovoConnect, sequentially select WiFi->Normal Mode-> Config->Wireless & Networks-> Wi-Fi (ON), and select the desired WiFi AP SSID. Enter password if prompted. On the Windows PC, click the network icon . Select the desired WiFi AP SSID. Enter password if prompted. On the Mac, click the network icon . Select the desired WiFi AP SSID and click Join. Enter password if prompted. On the tablet, enable WiFi and go to the WiFi AP list. Select the desired WiFi AP SSID. Enter password if prompted. Copyright © 2014 DELTA Electronics, Inc. All rights reserved. Page 10 3. Making a Presentation The NovoConnect B360 device supports up to 64 concurrent participants across a mix of PC and Tablet devices. Each participant device will connect to the B360 device and forming a presentation group of up to 64 devices in total. The collaboration and coordination between the 64 participants group are achieved by: 1) participant list with role indicated, 2) specific capability sets defined for each role, and 3) tools available for concurrent operation of the participants. To make a presentation, you must follow the below 3 steps: Step 1: Configure the presentation software Step 2: Connect to your B360 device Step 3: Manage the presentation 3.1 From Windows and Mac PC Launch Presentation Application Launch the NovoConnect Desktop Streamer Application by double clicking the icon. The NovoConnect Desktop Streamer will be launched (pictured in the image below). 3.1.1 Step 1: Presentation Software Configuration Click the connection tab and access the configuration options below. Copyright © 2014 DELTA Electronics, Inc. All rights reserved. Page 11 Option Description Click the connection tab Desktop Streamer. to configure the NovoConnect Manually enter the IP address shown on your NovoConnect home screen, or select an IP address entry from the drop down menu that match the IP address shown on your NovoConnect home screen. Manually enter a name for this computer to be viewed in the presentation group among other participants. If PIN is required for a presentation group, check the “PIN required” box and enter the four-digit PIN shown on the home screen. Click the downward triangle on the far right side to access more detailed settings. Projection mode: Video Playback: for higher frame rate and Audio Presentation: for document and browser based presentation Remote Mouse: Support mouse event back channeled from NovoConnect to your desktop. About: Software version number of your NovoConnect Desktop Streamer. Save and Cancel buttons: You can save your configuration for future presentation. 3.1.2 Step 2: Connect to your B360 device Once you are done configuring your Desktop Streamer, click connect button to connect to your NovoConnect B360 device. Option Description Copyright © 2014 DELTA Electronics, Inc. All rights reserved. Page 12 Once you are done configuring the Desktop Streamer, click the button to start a presentation group on your B360 device if you are the first participant. If you are not the first participant, you will be joining a presentation group. You would see the tab lit up from white . In addition, you should see your desktop screen is wirelessly mirrored to the display of your projector or TV if you are the first participant. Please note that your PC screen resolutions may be changed to match projector resolution, and when disconnect from the NovoConnect device, the original screen resolution will be restored. The resolution of each PC in the same group will be changed as they start and join the presentation group, and restored when disconnect from the group. 3.1.3 Step 3: Presentation Management 3.1.3.1 Role Assignment There are three roles in a presentation group, namely the host, the presenter, and the participant. The first participant of the presentation is assigned the host role. Subsequent joiners are assigned the participant role. The host is defaulted to assume the presenter role until he handed over the presenter role to other participant. To show all current participants who have joined the presentation group, please click the tab. Copyright © 2014 DELTA Electronics, Inc. All rights reserved. Page 13 Icon Description Click tab to show participant list. Indicates the current Host Indicates the current presenter indicates the participant deny screen preview When no symbol appeared in the entry, it indicates that the participant is neither the host nor the presenter and it allows screen preview. Indicate the name to be seen by other participants is “Kevin” and there are currently a total of 3 participants. Toggle between and to allow or deny screen preview by host, respectively. 3.1.3.2 Role Change, Screen Preview, and 4-way Split Screen Icon Description To perform role change: Click Copyright © 2014 DELTA Electronics, Inc. All rights reserved. tab to show participant list. Page 14 Role Change: Highlight a participant by moving curser on the targeted participant. Click on to hand over the host role to the participant. Click on to hand over the presenter role. Role Change: When a participant is asked to be a host, a dialog box will appear on the participant’s screen. When a participant is asked to be a presenter, a dialog box will appear on the participant’s screen. The participant has to click “Yes” to acknowledge accepting the new role in 20 seconds. To perform screen preview: The host clicks first. tab to show participant list (Only the host can preview the participant’s screen.) Screen Preview: John’s iPad does not have symbol, indicates that John is allowing preview from host. Highlight and click on the middle part of the entry of John. Copyright © 2014 DELTA Electronics, Inc. All rights reserved. Page 15 Screen Preview: The diagram shows the screen of John’s iPad viewing from the host. To manage a 4-way split screen presentation: The host clicks tab to show participant list. 4-way split screen presentation: 1. Move curser over to highlight participant Oliver. 2. Click on a numbered box to assign a presenter’s on-screen display to the corresponding presentation screen #1-#4. Click the center box to assign a presenter’s on-screen display to full screen. 3. You should observe Oliver is being requested to be a presenter on Oliver’s Desktop Streamer. 4-way split screen presentation: 4. Oliver to decide if accepting the presenter role. After Oliver clicks yes to accept being the presenter, Oliver’s screen will be presented on one of the four quarters of the 4-way split screen. Copyright © 2014 DELTA Electronics, Inc. All rights reserved. Page 16 3.1.3.3 Pause, Resume, and Disconnect Icon Description To Pause/resume presentation: 1. Click tab to bring up the presentation control page. 2. Move your cursor to Toggle between tab. and to pause or resume presentation respectively. To disconnect from the presentation group: Click button to exit and close the presentation session with the B360 device. If the host exit presentation without handing over the host role, all participants will receive message to prompt for taking over the host role. The first to respond to the prompt will get the host role. 3.1.3.4 Annotation Occasionally, you might want to write, highlight, mark, video recording, or cut and paste portion your presentation material directly on the desktop screen. A simple to use tool, also provided by Delta for free, we recommend is the NovoScreenote. You can download the NovoScreenote from http://www.deltaww.com/EduSolution. It is available for use on both Windows PC and Mac PC. Copyright © 2014 DELTA Electronics, Inc. All rights reserved. Page 17 3.1.3.5 Reset Occasionally, you might encounter network or computer difficulty, the presentation group hosted by the B360 device might not function properly. In the situation, one of the options is to reset the presentation group. Icon Description The Quick Reset button is to restart all current existing presentation sessions within the presentation group. The Full Reset button is to restart the NovoConnect B360 device. Contention might take place when multiple participants click the quick reset button, the rule of the reset is: 1. The host can do a quick reset to reset all presentation sessions within the presentation group when the B360 is in contact with the host. 2. If the host lost contact with the B360 device, the current presenter is the next in line has the power to do a quick reset. 3. If neither the host nor the presenter is in contact with the NovoConnect B360 device, any participant can click quick reset to reset all established presentation sessions within the group. The rule of the “Full Reset” is the same as that of the “Quick Reset”. Copyright © 2014 DELTA Electronics, Inc. All rights reserved. Page 18 3.2 With iOS Tablet The NovoPresenter (pictured in the image below) apps enables iOS tablet device to connect to the B360 device to join the presentation group. Launch Presentation Application Launch the NovoPresenter application by selecting the NovoPresenter app on your iOS tablet. A sample screen view is provided in the image below. 3.2.1 Step 1: Configuration Software Configuration To configure the presentation software, you first select the NovoPresenter Apps by tapping on the apps on your iPad touch screen. A sample screen is provided below. Copyright © 2014 DELTA Electronics, Inc. All rights reserved. Page 19 Option Description Steps to Configure the NovoPresenter Apps. 1. Select to configure your NovoPresenter. Manually enter the IP address shown on your NovoConnect home screen here, or select an entry from the drop down menu that match the IP address shown on your NovoConnect home screen. You can also select the “Scan” button to scan the IP address of available NovoConnect within the same subnet. Select the drop down menu to see available NovoConnect device within your area. Manually enter a name for this computer to be identified in the presentation session among other participants. Slide on/off the “PIN Required” switch and enter the PIN shown on the NovoConnect device’s home screen if the PIN is required. Copyright © 2014 DELTA Electronics, Inc. All rights reserved. Page 20 3.2.2 Step 2: Connect to your B360 device Once you are done configuring your NovoPresenter, pictured in below diagram, you are ready to establish a presentation session with the B360 box. Option Description Steps to establish a presentation session: Select button to connect your NovoPresenter to the B360 device. If it successfully connected to the selected NovoConnect device, you would see your NovoPresenter screen is wirelessly mirrored to the display of your projector or TV if you are the first participant. Copyright © 2014 DELTA Electronics, Inc. All rights reserved. Page 21 In addition, you would see the tab lit up You can select the list. from white tab to see the current participant 3.2.3 Step 3: Presentation Management Once you are done joining a presentation group, you are ready to make a presentation. A sample screen view is provided below. Copyright © 2014 DELTA Electronics, Inc. All rights reserved. Page 22 3.2.3.1 Role Assignment There are three roles in a presentation group, namely the host, the presenter, and the participant. The first participant start the presentation session with a specific B360 is assigned the host role. Subsequent joiners are assigned the participant role. The host is defaulted to assume the presenter role until the host assigned the presenter role to other participant. To show all current participants who have joined the presentation group with the B360 device, please select the Icon tab. Description Copyright © 2014 DELTA Electronics, Inc. All rights reserved. Page 23 Select tab to show participant list. Indicates current Host Indicates current presenter indicates the participant who deny screen preview No graphic symbol indicates the participant who allow screen preview There are two participantsin the presentation session with iPad device and two participants with Windows PC and one with Mac PC. Indicated by the number on the icons, three of the four quarters are being used for presentation, namely 1, 2, and 4 respectively. In the picture shown on left, “Kevin” is the name to be seen by other participants. There are currently a total of 5 participants. Three participants are presenting at the moment. allow screen preview and two deny screen preview. Toggle between and screen preview by host. Copyright © 2014 DELTA Electronics, Inc. All rights reserved. to accept or deny Page 24 3.2.3.2 Role Change, Screen Preview, and 4-way Split Screen Icon Description To perform Role Change: First select tab to show participant list. To perform Role Change: Highlight a participant by selecting the targeted user. Select to hand over the host role to the participant john. Select of tab to request John to be the sole presenter. Select by tapping one of the four numbers in tab to assign John to four quarters to display. Copyright © 2014 DELTA Electronics, Inc. All rights reserved. one of the Page 25 To perform Role Change: When a participant is asked to be a host, a dialog box will appear on the participant’s screen. The participant has to select “Yes” or “No” to acknowledge in 20 seconds. To perform Screen Preview: The host clicks tab to show participant list. The icon indicates that a participant is denying screen preview. The icon indicates that a participant is allowing screen preview. Perform screen preview by selecting target participant’s entry in participant list. Copyright © 2014 DELTA Electronics, Inc. All rights reserved. Page 26 To perform 4-way split screen presentation: The host selects list. tab to show participant The host selects one participant to present. The host selects by tapping one of the four numbers in tab to assign the selected participant to display on one of the four quarters. In this example, you should observe John’s iPad is being requested to display on one of the four quarters of the 4-way split screen. After John clicks yes to accept being one of the four possible presenters, you would observe John’s screen is on one of the four quarters of the 4-way split screen. Copyright © 2014 DELTA Electronics, Inc. All rights reserved. Page 27 3.2.3.3 Annotation The NovoPresenter provides an on screen annotation tool for presenter to annotate directly on presentation material. The annotation tool can be enabled by toggling the tab as in the below picture. Icon Description Select tab to enable annotation tool Annotate with red marker. Annotate with blue marker. Annotate with black marker. Annotate with yellow transparent marker. Change finger touch from annotation (writing) mode to touch panel (operation) mode. Trash can. Eraser Copyright © 2014 DELTA Electronics, Inc. All rights reserved. Page 28 Undo. Copyright © 2014 DELTA Electronics, Inc. All rights reserved. Page 29 3.2.3.4 Pause, Resume, and Disconnect Icon Description Click page. tab to bring to the presentation control While presenting, the presenter toggle between and to pause and resume presentation respectively. Select session. button to exit from the presentation If the host exit presentation session without hand over the host role, all participants will receive a message to prompt for taking over the host role. The first to respond to the prompt will get the host role. Copyright © 2014 DELTA Electronics, Inc. All rights reserved. Page 30 3.2.3.5 Reset Occasionally, you might encounter network or computer difficulty, the presentation session between the participants and the B360 device might not function properly. In the situation, one of the options is to reset the presentation session. Icon Description To perform Reset: First select tab and select Device’s Reset. The Quick Reset button is to restart the current running presentation session. The Full Reset button is to restart the NovoConnect B360 device. Click the “Quick Reset” button to reset the presentation session. The arbitration rule: 1. The host can do a quick reset to reset a malfunctioned presentation session. 2. If the host lost contact with the NovoConnect B360 device, the current presenter is the next in list allowed to do a quick reset. 3. If neither the host nor the presenter is in contact with the NovoConnect B360 device, any participant can do quick reset to the presentation session by clicking the quick reset button. The arbitration rule of the “Full Reset” is the same as that of the “Quick Reset”. Copyright © 2014 DELTA Electronics, Inc. All rights reserved. Page 31 3.3 With Android Tablet Launch Presentation Application Launch the NovoPresenter application by selecting the NovoPresenter app on your iOS tablet. A wireless presentation and collaboration session can be started, managed, and controlled via functions provided by the NovoPresenter (pictured in the image below). 3.3.1 Step 1: Presentation Software Configuration When you first select the NovoPresenter Apps, you should see the below display. Copyright © 2014 DELTA Electronics, Inc. All rights reserved. Page 32 Option Description Steps to Configure the NovoPresenter Apps. 1. Select to configure your NovoPresenter. Manually enter the IP address shown on your NovoConnect home screen here, or select an entry from the drop down menu that match the IP address shown on your NovoConnect home screen. You can also select the “Scan” button to scan the IP address of available NovoConnect within the same subnet. Select the drop down menu to see available NovoConnect device within your area. Manually enter a name for this computer to be identified in the presentation session among other participants. Slide on/off the “PIN Required” switch and enter the PIN shown on the NovoConnect device’s home screen if the PIN is required. Copyright © 2014 DELTA Electronics, Inc. All rights reserved. Page 33 3.3.2 Step 2: Connect to your B360 device Once you are done configuring your NovoPresenter, pictured in below diagram, you are ready to start a new presentation or join an existing presentation session. Option Description Steps to Configure the NovoPresenter Apps. Select button to connect your NovoPresenter app to configured NovoConnect B360 device. If it successfully connected to the selected NovoConnect device, you would see your NovoPresenter screen is wirelessly mirrored to the display of your projector or TV if you are the first participant. You would see the tab lit up Copyright © 2014 DELTA Electronics, Inc. All rights reserved. from white Page 34 You can select the list. tab to see the current participant 3.3.3 Step 3: Presentation Management Once you are done starting or joining a presentation session, you would see a list of participants as pictured below. Copyright © 2014 DELTA Electronics, Inc. All rights reserved. Page 35 3.3.3.1 Role Assignment There are three roles in each presentation and collaboration session, namely the host, the presenter, and the participant. The first participant join the presentation session is assigned the host role. Subsequent joiners are assigned the participant role. The host is defaulted to assume the presenter role until the host assigns the presenter role to other participant. To show all current participants who have joined the presentation session, please select the tab. Icon Description Select tab to show participant list. Indicates current Host Indicates current presenter indicates the participant who deny screen preview The local machine is using “Kevin” as the name to be seen by other participants and there are currently a total of 5 participants. Three participants allow screen preview and two deny screen preview. There are two participants joining the presentation session with iPad device and two participants with Windows PC and one with Mac PC. Indicated by the number of the there are three active presenters. icons, Indicated by the number shown on it, three of the four quarters are being used for displaying, namely 1, 2, and 4 respectively. Toggle between and to accept and deny screen preview by host, respectively. Copyright © 2014 DELTA Electronics, Inc. All rights reserved. Page 36 Copyright © 2014 DELTA Electronics, Inc. All rights reserved. Page 37 3.3.3.2 Role Change, Screen Preview, and 4-way Split Screen Icon Description To perform Role Change: First select tab to show participant list. To perform Role Change: Highlight a participant by selecting the targeted user. Select to hand over the host role to the participant john. Select of tab to request John to be the sole presenter. Select by tapping one of the four numbers in tab to request John to use one of the four quarters to display. Copyright © 2014 DELTA Electronics, Inc. All rights reserved. Page 38 To perform Role Change: When a participant is asked to be a host, a dialog box will appear on the participant’s screen. The participant has to select “Yes” or “No” to acknowledge in 20 seconds. To perform Screen Preview: The host clicks tab to show participant list. The icon indicates that a participant is denying screen preview. The icon indicates that a participant is allowing screen preview. Perform screen preview by selecting target participant’s entry in participant list. Copyright © 2014 DELTA Electronics, Inc. All rights reserved. Page 39 To perform 4-way split screen presentation: The host selects list. tab to show participant The host select one participant to present. To perform 4-way split screen presentation: The host selects by tapping one of the four numbers in tab to request the selected participant to use one of the four quarters to display. In this example, you should observe John’s iPad is being requested to perform presentation on one of the four quarters of the 4-way split screen. To perform 4-way split screen presentation: After John clicks yes to accept being one of the four possible presenters, you would observe John’s screen is presented on one of the four quarters of the 4-way split screen. Copyright © 2014 DELTA Electronics, Inc. All rights reserved. Page 40 3.3.3.3 Pause, Resume, and Disconnect Icon Description Click page. tab to bring to the presentation control While presenting, the presenter toggle between and to pause and resume presentation respectively. Select session. button to exit from the presentation If the host exit presentation session without hand over the host role, all participants will receive a message to prompt for taking over the host role. The first to respond to the prompt will get the host role. Copyright © 2014 DELTA Electronics, Inc. All rights reserved. Page 41 3.3.3.4 Reset Occasionally, you might encounter network or computer difficulty, the presentation session between the participants and the B360 device might not function properly. In the situation, one of the options is to reset the presentation session. Icon Description To perform Reset: First select tab and select Device’s Reset. The Quick Reset button is to restart the current running presentation session. The Full Reset button is to restart the NovoConnect B360 device. Click the “Quick Reset” button to reset the presentation session. The arbitration rule: 1. The host can do a quick reset to reset a malfunctioned presentation session. 2. If the host lost contact with the NovoConnect B360 device, the current presenter is the next in list allowed to do a quick reset. 3. If neither the host nor the presenter is in contact with the NovoConnect B360 device, any participant can do quick reset to the presentation session by clicking the quick reset button. The arbitration rule of the “Full Reset” is the same as that of the “Quick Reset”. Copyright © 2014 DELTA Electronics, Inc. All rights reserved. Page 42 4. Remote Viewer Configuration The Remote Viewer is the application software on the NovoConnect B360 device that hosts the presentation group. The Remote Viewer manages and controls all presentation sessions between the presentation software of the participant device and the B360. In addition to the presentation management, mentioned in previous chapters, the remote reviewer supports the configuration of the below attributes. WiFi Display Setting Reset Meeting Room Please go to the NovoConnect home screen to locate the attributes. You will need a USB based mouse to perform the setting. Icon Description To select WiFi mode: Hotspot Mode sequentially select WiFi->Normal Mode-> Config->Wireless & Networks-> Wi-Fi (ON) Client Mode WiFi->Normal Mode-> Config->Wireless & Copyright © 2014 DELTA Electronics, Inc. All rights reserved. Page 43 Networks-> Wi-Fi (ON) Display To configure the HDMI output quality. Select one of the below values: Auto automatically determines the optimal resolution 1024x768, 1280x800, 720p (1280x720), 1080p (1920x1080) Settings To access and change Android system settings. Reset To reset the NovoConnect B360 device: Press and hold on the Reset tab 2 seconds. The B360 device will restart. Presentation Group Name (Defaulted to Meeting Room) To modify the name of the presentation group shown on the home screen: Click on the name and key in new name on the popup up window with the popup soft keyboard. Copyright © 2014 DELTA Electronics, Inc. All rights reserved. Page 44