1
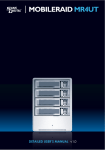
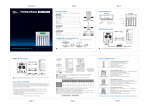
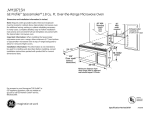
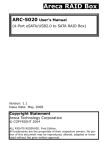
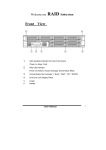
User's Guide for ESFWBU2SATA525QAR6
Kit includes
Introduction
ESFWBU2SATA525QAR6 is most cost-effective SATA II disk drive RAID subsystem with
- ESFWBU2SATA525QAR6 RAID Subsystem.
completely integrated high performance and data protection capabilities.
- FireWire Beta -to- Beta Cable in length of 2.0m.
ESFWBU2SATA525QAR6 takes full advantage of high-speed 1394/USB serial bus and Serial
- USB 2.0 A-to-B type Cable in length of 1.5m.
ATA Bus allowing for multi-user and multitasking performance. ESFWBU2SATA525QAR6
- e-SATA 7pin plug to e-SATA 7pin plug cable in length of 1.5m.
delivers the performance required for servers and I/O demanding applications such as
- AC Power Core
Video-On-Demand, database servers, workstations, high-end desktops, and image systems.
- CD-title (MRAID Manager Utility and Manual)
ESFWBU2SATA525QAR6 allows two HDD failure without impact on the existing data and failed
- User's Guide & RAID Manual
drive rebuild is transparent to the host. Environmental information is accessible either via the
control panel/serial port or Ethernet port.
Features
Overview
- LCD Control Panel: To simplify the RAID setup and management of the associated disk drives.
- Allows manual RAID configuration and status monitoring.
- Uses hardware monitor to monitor system voltage, temperature and fan activity.
- Displays warning message on LCD screen when respective disk encounters problems.
- Support up to 5 SATA or SATA II drives.
- Support RAID 6.
- USB 2.0, FireWire 800 (1394b) and SATA ComBo interface.
POWER
BUSY
ENT
FAULT
ESC
Specificaitons
Power
ESFWBU2SATA525QAR6 combines three key components:
1). CF-S40X (Quadra 5.25" Bays SCSI Enclosure)
2). FWBU2-DSATA01-H (e-SATA, FireWire800 (IEEE 1394b) & USB 2.0 to SATA Bridge Board)
3). ARC-5030 (ATA/SATA-RAID-SATA Subsystem)
1). Case & Power Supply(CF-S40X) :
- Patented handle bar design for easy carrying and transportation
ARC-5030
ATA/SATA-RAIDSATA II Subsystem
- Provide four 5.25" device bay
- The inner metal mounting bracket provide the screw hole for 5.25" devices
- Power indicator LED and HDD access LED
- Provide Power Switch on the front panel
- Built-in 220W switching power supply/ Manual-switch input (115 or 230V AC)
- Built-in 80x80 mm cooling fan
- Dimension: 200 mm (W) x 292 mm (D) x 186 mm (H)
HDD Tray 0~4
2). FWBU2DSATA01 Bridge Board:
- e-SATA Port: One e-SATA Signal 7pin Receptacle Connector
- SATA Transfer Rate: 150Mbytes/s
- FireWire Ports: Two Biligual-9pin
- 1394 Bus Transfer Rate: 100/200/400/800 Mbps
- USB 2.0 Port: One USB B-Type connector
- USB Bus Transfer Rate: High Speed (480 Mbit) And Full Speed (12 Mbit)
Power Cord
Cooling Fan
- SATA Port: One SATA Signal 7pin Connector
- SATA Transfer Rate: 150Mbytes/s
- Provide pin header for Power indicator LED and SATA Access LED
- SCSI I 50pin Low Density Centronics Connector Form Factor
Power Switch
(Fit to most standard SCSI enclosure)
3). ARC-5030 (ATA/SATA-RAID-SATA II Subsystem):
- Form Factor: 3 Consecutive 5.25" Drive Bays.
- Provide five SATA Mobile Rack for 3.5" Serial ATA HDD.
- Support up to UDMA 133/100/66/33 and SATA II 3.0Gbytes/s.
- Support RAID level 0, 1, (0+1), 3, 5, 6 and JBOD.
- Onlin Capacity expansion, RAID level/stripe size migration.
Bridge Board RS-232 Port
- Online Dynamic Volume Set Capacity expansion.
- Support Greater than 2TB per Volume set.
- Hot-Swap, Hot-Spare and Auto-Rebuilding Function Support
115
- Redundant Flash Image for Adapter availability.
Power Switch
- Web Browser-Based RAID Manager via Archttp Proxy through RS-232 port for Windows and
230
Linux System.
- Firmware-embedded Web Browser-Based RAID Manager, SMTP manager, and SNMP agent
via Ethernet
Switching power supply/ Manual-switch input
port with no software required.
* Default is 230V
- OS Independence, require no device driver
1
User's Guide for ESFWBU2SATA525QR6
Step 1. Hardware Installation
6. Secure the drive to the mobile tray with #6-32x5L screws you just removed.
1. Switch the lock keypad to the "open" position.
2. Press the blue button to unlock and swing down the lever.
7. Gently and firmly slide the mobile tray back into the RAID system.
Be sure to position it correctly and the lever should be at 90-degree angle.
3. Pull and remove the mobiletray out of the housing.
8. Push in the mobile tray and make sure it is seated firmly in the back panel.
4. Unscrew the dummy HDD(plastic).
9. Switch the lock keypad to the "close" position.
10. Set up Power Switch and connect Power Cord on back side.
5. Pull the steel plate sideway to remove the dummy HDD (plastic).
115V
2
230V
Set up Power Switch
User's Guide for ESFWBU2SATA525QAR6
Step2. Configure RAID Subsystems
Be aware this will destroy all your existing data on these drives, so make sure you
have backup!
4. Press ENT key to Stripe Size.
Total :
Select:
320.0GB
320.0GB
Voltage level, Temperature, Fan Indicator
5. Using up or down arrow select stripe size and press ENT key to confirm it.A larger
stripe size provides better-read performance, especially if your computer does
mostly sequential reads. However, if you are sure that your computer does random
read requests more often, choose a small stripe size.
Fault LED Indicator Status
HDD LED Indicator Status
Stripe Size
64k Bytes
HDD Tray 1~5
1. Turn on the ESFWBU2SATA525QA-R6, the main menu appears on the LCD screen.
6. Press ENT key to create the RAID.
Areca Tecyhnology
192.169.001.100
1
2
3
SEL: To Create
EXIT: To Abort
4
5
7. Press ENT key to select foreground initialization (Faster completion) or press
ESC to select the background Initialization (Instant available).
2. Press on ENT key and up arrow key to input your password. You must enter space
to end of line. The RAID subsystem password is default setting at 0000 by the
manufacture.
SEL: FGrnd Init
EXIT: BGrnd Init
Verify Password :
0000
_
8. Initialize the volume set you have just configured. Press ESC key to go back
main menu.
ARC-5030-VOL#00
Initialize 4.0%
2. Press ENT key to set Volume and Raid Setup.
Quick Volume And
Raid Set Setup
1
3. Using up or down arrow key select RAID level and press ENT key to confirm it.
2
3
9. Initialize is completed.
ARC-5030-VOL#00
Initialize Done
Total 5 Disks
Raid 5
3
4
5
User's Guide for ESFWBU2SATA525QAR6
Step3. System Set up
Mac OS:
Mac OS 9.2 and earlier, does not support creating partitions on an external drive. To do that, you
would need to purchase additional 3rd party software, connect the drive to the internal SATA
connection or upgrade to OS X. Initializing the drive can be done on all Operating Systems.
Partitioning & Formatting
For Mac OS X, use the Disk Utility to format and create partitions on your external disk.
1: Select "Disk Utility" in the utilities folder.
2: Choose your external drive and format it according to your requirement.
PC running WinME:
MS-DOS command "fdisk" (press Enter to confirm)
1: Type "fdisk" and press Enter.
2: Select "Y" and press Enter.
3: Enter "5" to change the drive.
4: Select the drive you want to format.
5: Choose "1" and follow the onscreen instructions.
Installation on PC
Win2000, WinXP and Win2003 with a USB, Firewire SATA connection:
1: Turn on your Computer and start Windows.
2: Connect the storage enclosure and turn it on.
3: Let Windows search and install the driver automatically.
4: Open "My Computer" to see your external hard drive.
PC running Win2000 , WinXP or Win2003:
Disk Management Program
1: Right click on "My Computer" and choose "Manage" .
2: Select "Disk Management".
3: Choose the drive you want to format and right click on it for further commands (Choose New
If there is the USB, Firewire or SATA Device string without any yellow "!" marks or red "X" marks
under the [Disk drives] of "Device Manager" as shown, the encloure is installed correctly.
Partition).
4: Follow the Partition Wizard.
4
User's Guide for ESFWBU2SATA525QAR6
WinME with a USB, Firewire or SATA connection:
Installation on a Macintosh
1: Turn on your Computer and start Windows.
Mac OS 9.x or 10.x with a USB 2.0, Firewire or SATA connection:
2: Connect the storage enclosure and turn it on.
3: Let Windows search and install the driver automatically.
1: Turn on your computer and start Mac OS.
4: Open "My Computer" to see your external hard drive.
2: Connect the storage enclosure and turn it on.
3: No driver installation required.
4: The external drive will mount and show up on your desktop.
Unplug Procedure:
For safe removal of your drive and to assure that no data is lost, always follow the unplug procedure.
If there is the USB, Firewire or SATA Device string without any yellow "!" marks or red "X" marks
under the [Disk drives] of "Device Manager" as shown, the encloure is installed correctly.
If not, an error message will show up.
1: Drag the external hard drive icon into the trash bin.
2: Turn off your device.
A few tips on how to connect your external
storage enclosure:
Unplug Procedure:
For safe removal of your drive and to assure that no data is lost, always follow the unplug procedure.
If not, an error message will show up.
- For Win2000, WinXP or Wn2003, you must be logged on as Administrator or have administrator
privileges to install new hardware.
1: Click on the taskbar icon for external hardware.
- No driver installation for Windows ME, 2000, XP, 2003, Mac OS and Linux.
2: Choose your external hard drive and confirm to remove it .
- For SATA, if the system doesn't recognize the drive, connect the SATA device before booting
your Operating System. Your SATA host card may not support hot-swap.
- Only one interface at a time can be used.
- Only one computer at the time can access the drive.
- Do not cover the Enclosure and leave enough room around it for the drive to cool down.
- Do not expose the product to water or humid conditions.
- Always check for visible damage and defects of power and interface cables before using it.
- For new hard disk drive, you must format it before you use it. See "Partitioning and Formatting".
- WinME do not recognize NTFS formatted drives, so if you want to use your drive on this platforms,
we recommend you to use FAT32 instead.
- If you want to use your drive on a PC running Microsoft Windows as well as on your Mac, we
recommend you to use a PC to format the drive. Choose FAT32 when formatting and do not
change anything on the partition or format on your Mac, otherwise the PC will not be able to recognize
the drive anymore.
- If you use Win2000 or WinXP and FAT32, the biggest single partition you can create will be 32GB.
To create larger partitions, you need to use the DOS command under WinME or change to NTFS
format.
About this Manual:
This manual covers all interfaces and combinations for the USB 2.0, Firewire and SATA storage
enclosure. Images and descriptions might therefore slightly vary between this manual and the
actual product you have.
5