1
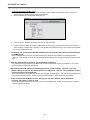
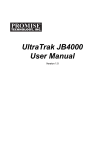
SeriTek /1S2
™
Serial ATA PCI Host Adapter
for the Macintosh
User’s Manual
FirmTek, LLC
www.firmtek.com
Copyright
Copyright © 1999-2003 FirmTek, LLC. All rights reserved. No part of this manual may be reproduced, translated by any
means, photocopied, or transmitted in any form without the prior written permission of FirmTek.
Trademarks
FirmTek, UltraTek, AV-Tek, SeriTek names and logotypes are trademarks of FirmTek, LLC. Apple, Macintosh, Power
Macintosh, Mac, OS 8, OS 9, OS X, and the Mac logo are registered trademarks of Apple Computer, Incorporated. The
"Built for OS X" graphic is a registered trademark of Apple Computer, Incorporated, and used under license.
All other manufacturer product names mentioned in this manual are for identification purposes only and are trademarks or
registered trademarks of their respective owners.
Changes
FirmTek reserves the right to make any changes to product design, specifications, or details without notice. Actual product
photos or screenshots may look different from those provided.
Notice
The material content of this manual is for informational purposes only. It is possible the content of this manual may contain
technical inaccuracies, typographical, or other errors. FirmTek assumes no liability for any errors, omissions, or from the
use of this manual that may result from such errors, including, but not limited to loss of data or profits.
Before installing SeriTek/1S2 or any other hardware or software, you are responsible for backing up data contained on any
storage devices. After hardware or software installation, you are responsible for backing up data on any storage devices at
frequent intervals. FirmTek, LLC is not liable for any loss of data or damage to equipment resulting from the use of
SeriTek/1S2.
TABLE OF CONTENTS
I.
Introduction................................................................................... 1
II.
Hardware Installation ..................................................................... 3
III. Software Setup.............................................................................. 4
IV. Troubleshooting .......................................................................... 12
V. Product Support .......................................................................... 14
VI. Product Warranty and Disclaimers................................................. 14
VII. Regulatory Compliance Statements ............................................... 15
SeriTek/1S2 User’s Manual
I. Introduction
Welcome
Congratulations and thank you for purchasing the SeriTek/1S2 Serial ATA host adapter for your Macintosh. This product is
yet another innovative solution from the innovative folks at FirmTek.
About This User’s Manual
This User’s Manual was written with the assumption you are familiar with your Power Macintosh computer, and are
comfortable with opening its case. For further information, and to get acquainted with your computer, please refer to your
Power Macintosh User’s Manual.
About Serial ATA Technology
An evolutionary replacement for Parallel ATA, Serial ATA (Advanced Technology Architecture) is an interface that allows
you to add hard drives and peripherals to your Macintosh. Serial ATA offers insulated cables that are thinner and longer
with smaller 7-pin connectors which results in easier installation and improved airflow, compared to wider and shorter
Parallel ATA cables. Improved airflow translates into a cooler operating environment for your Macintosh.
About the SeriTek/1S2 Serial ATA PCI Host Adapter
The SeriTek/1S2 Host Adapter provides an easy and affordable way for Macintosh users to take advantage of the latest in
Serial ATA storage interface technology. Macintosh users can achieve SCSI-like high-performance and data protection
without the SCSI price. SeriTek/1S2 boosts overall system performance with data transfer rates of up to 150MBytes/sec or
1.5Gbits/sec.
SeriTek/1S2 Key Features and Benefits
•
•
•
•
•
•
•
•
•
Affordable 2-port internal host controller providing high performance support for two storage devices.
48-bit LBA support for hard drive sizes larger than 137GB.
Plug-and-Play ease of use, completely self-contained booting functionality, no driver installation necessary.
Boosts overall system performance with data transfer rates of up to 150MBytes/sec or 1.5Gbits/sec.
Bus master operation enhances multitasking during disk transfers and increases CPU efficiency: The CPU is free to handle other
tasks during data transfers between the PCI Bus and system memory.
Serial ATA cables can be up to 1 meter (39 inches) in length.
Reduced setting on storage devices (no master/slave) means easier installation and replacement.
Ideal for a variety of Power Macintosh applications: Desktop publishing, Audio/Video storage and editing, photo storage and editing,
servers, and gaming.
Data protection: Supports OS X RAID, OS 9 Software RAID (third party software), and other storage utilities.
1
SeriTek/1S2 User’s Manual
SeriTek/1S2 Specifications
Bus Type
Internal Connectors
Drive Types
Supported
ATAPI Device
Support
Data Transfer
Rates
Drive Modes
Supported
Advanced Data
Features
Onboard Flash
ROM
Cables Supported
Warranty
Physical
Dimensions
Power
Requirements
Environmental:
Temperature
• 32 bit, 33/66MHz PCI
• Compliant 32-bit PCI bus version 2.2
• 2-port internal Serial ATA interface connectors
support up to two hard drives or peripherals
• Serial ATA hard drive
• Backward compatible with Ultra DMA 133/100/66
hard drive*
• Yes*
• Up to 150MBytes/second or 1.5Gbits/second burst
data transfer rate
• Serial ATA
• UltraDMA modes 6/5/4/3/2/1/0, PIO modes 4/3/2/1/0*
• Fully compliant with Serial ATA 1.0a specification
• Bus Mastering off-loads data I/O handling from CPU
• Complete 32-bit CRC error checking, for all bits
transmitted (command, data, and status), offers
enhanced data protection for high-speed Serial ATA
drives
• Dual independent data channels allows for separate
device timings
• Automatically identifies and configures drive types*
• Automatically detects and supports devices utilizing
many transfer modes including UltraDMA
6/5/43/2/1/0, PIO 4/3/2/1/0*
• Allows easy upgrades to the latest firmware
• 7-pin SATA cable, up to 1 meter in length
• Two year limited parts & labor
• 120mm x 64mm (W x H) Without bracket
• 5V ± 5%
• Operating: +5°C to +55°C
• Non-Operating: -25°C to +70°C
• Operating: 20% to 80%
• Non-Operating: 15% to 90%
• EN55022/1998, EN55024/1998 (European
Community)
• FCC Part 15 Class B (US)
* IDE to Serial ATA converter module required for Parallel ATA and Ultra ATA133/100/66/33 drives
Environmental:
Relative Humidity
EMC Compliance
2
SeriTek/1S2 User’s Manual
SeriTek/1S2 System Requirements
Operating System
• Macintosh OS 8.XX to 9.XX
• Macintosh OS X version 10.2 or later
Hardware
• PCI based Power Macintosh with available PCI expansion slot
• Available hard drive or peripheral power connector
• One or two Serial ATA hard drives or peripherals
• Parallel ATA hard drives and peripherals with optional Serial ATA to Parallel ATA converter
Materials Required
• Standard medium -sized Phillips screwdriver
• Four screws for mounting the Serial ATA hard drive or peripheral, usually provided by the hard drive vendor
• Hard drive mounting bracket or sled
II. Hardware Installation
Caution:
Prior to installing the SeriTek/1S2 host adapter and hard drive(s) or peripheral(s), please make sure your data is
backed up.
The SeriTek/1S2 host adapter and your Macintosh contain sensitive components that can be permanently damaged by
Static Electric Discharge. Be sure you’re working in an area free of static electricity to prevent them from being
damaged. Use a wrist grounding strap if you have one or regularly touch a metal part of the computer chassis such as
the power supply case or a port access cover to discharge any built-up static electricity from your body. Make sure to
handle the SeriTek/1S2 host adapter by its bracket or around its edges to avoid damage to the card by static electricity.
Introduction
This section describes the proper method of installing your SeriTek/1S2 and hard drives or peripheral.
Hard Drive Installation
1.
2.
3.
4.
Properly shut down your Macintosh and disconnect the AC power cord.
Depending on the model of your Macintosh, open the side panel or top cover. On some models, you may need to
open a plastic cover to access the PCI slots. Please refer to your Macintosh user’s manual for more information
about gaining access to PCI slots and hard drive or peripheral bays.
Remove the hard drive or peripheral from their protective shipping materials. To avoid touching components
which might be damaged by static electricity, hold the hard drive or peripheral around its edges.
Mount the hard drive or peripheral in an available drive expansion bays. Use the screws provided by your hard
drive or peripheral vendor to secure the drive in the drive mounting bracket or drive mounting sled, depending on
the model of your Macintosh.
SeriTek PCI Host Adapter Installation:
5.
6.
7.
8.
Choose an empty PCI expansion slot where you will install the SeriTek/1S2 host adapter.
Remove the screw and detach the PCI expansion port access cover secured to the computer case.
Remove the SeriTek/1S2 from its protective materials. Make sure to hold the card around by its bracket or around
its edges to avoid touching components which might be damaged by static electricity.
Position the PCI card bracket by facing it towards the rear of the computer. Align the gold connectors of the
SeriTek/1S2 over the PCI slot and gently press it into the PCI slot until the card is firmly seated. If the card is
properly seated, the upper ear of the PCI card bracket should line up with the screw mounting location. Using the
same screw that was removed earlier; secure the card to the Macintosh computer case.
Cable Installation:
9.
If the Serial ATA hard drive or peripheral uses a newer 15-pin power receptacle, attach the 15-pin end of the 4- to
15-pin power connector provided by your hard drive or peripheral vendor to the drive’s 15-pin power receptacle,
and the 4-pin end to an available system power connector.
3
SeriTek/1S2 User’s Manual
10. If the hard drive or peripheral provides a legacy 4-pin power connector, connect an available system power
connector onto the 4-pin power receptacle on the drive. Note: If your hard drive or peripheral provides both 4-pin
and 15-pin power connectors, please do not connect both 4-pin and 15-pin power cables at the same time as this
may result in damage to your equipment.
11. Attach one end of the Serial ATA data cable to the Serial ATA hard drive or peripheral, and the other end to an
open connector on the SeriTek/1S2. Note: If the Serial ATA cable provided has an angled connector on one end,
connect this end to the hard disk or peripheral. This will help to insure the drive and cables will fit properly within
the Macintosh chassis.
12. Repeat steps 9 and 10 to install a second hard drive or peripheral.
Caution: The Serial ATA data cable has keyed L-shaped 7-pin connectors at each end. Be sure to connect the
cable using the proper orientation to the SeriTek/1S2 host adapter and the hard drive or peripheral interfaces. If
you are having difficulty connecting the cable, try reversing the orientation of the connector. It should easily snap
into place. Please do not force the cable connector onto the host adapter and hard drive or peripheral interface.
13. Close your Macintosh computer case and re-attach the AC power cord.
Ready for Use
Your SeriTek/1S2 host adapter and hard drive or peripheral are now installed. The SeriTek/1S2 host adapter features
fully self-contained Macintosh booting functionality and will be recognized by your Macintosh computer when you
power it on, along with your hard drive or peripheral.
III. Software Setup
Introduction
This section describes a method of formatting your Serial ATA hard drive(s) using Apple’s Drive Setup utility (OS 8.XX
or OS 9.XX) or Apple’s Disk Utility (OS X). If you decide to use a third party drive setup utility, please refer to the
documentation provided with the utility.
Peripherals such as CD-ROM/-R/-RW, DVD-ROM/±R/±RW are typically ready to use but may require third party
software (such as authoring software or DVD playback software) to utilize their complete set of features.
Caution:
Please make sure your data is backed up before attempting to format or change the partition layout of your hard
drives.
4
SeriTek/1S2 User’s Manual
Formatting Serial ATA Hard Drives with Macintosh OS 8.XX Through OS 9.XX
1.
2.
Turn on your Macintosh computer.
Open Apple’s Drive Setup.
To find and open this application:
a) Hold down the Command key and press the “F” key simultaneously.
b) Type in “Drive Setup” in the field with the blinking cursor
c) Press Return key (See Figure 1).
Figure 1: Finding Apple's Drive Setup Utility
5
SeriTek/1S2 User’s Manual
3.
Locate and double click on the Drive Setup “application program” utility (see Figure 2).
Figure 2: Running Apple's Drive Setup Utility
4.
When the list of hard drives appears, carefully select the drive you wish to format by clicking on it (See Figure 3). If
this is a new, unformatted drive, it may show up as <not initialized>. Note: For ideal performance and
compatibility, SeriTek/1S2 uses SCSI emulation which allows your Serial ATA drive to appear as a SCSI drive.
Figure 3: Example of selecting a drive to format
6
SeriTek/1S2 User’s Manual
5.
Click the Initialize button to format the hard drive (see Figure 4). As an alternative, you may use the Custom Setup
option if you are comfortable with customizing the hard drive’s partition layout. For more details on the Custom
Setup option, please refer to your Power Macintosh User’s Manual.
Figure 4: Initializing the Hard Drive
6.
7.
8.
9.
After the hard drive is successfully initialized, it should appear on the desktop as “untitled.”
The hard drive may be renamed by selecting the word “untitled” and typing your own name or description for your
new drive.
Repeat steps 4 through 7 if you wish to format a second hard drive connected to SeriTek/1S2.
Select the File pull-down menu within Apple’s Drive Setup utility and choose Quit to exit the application
Formatting Serial ATA Drives Using Macintosh OS X Version 10.2 or Later
1.
2.
Turn on your Macintosh computer.
Open Apple’s Disk Utility which is located in the Utilities folder of the Macintosh OS X start-up volume.
To open this application:
a) Double click the Mac OS X startup volume
b) Double click the Applications folder
c) Double click the Utilities folder
d) Double click the Disk Utility icon (See Figures 5 and 6 for examples)
7
SeriTek/1S2 User’s Manual
Figure 5: Locating Apple’s Disk Utility
Figure 6: Alternate method for locating Apple’s Disk Utility
3.
Review the list of hard drives show within Disk Utility (see Figure 7). Drives currently in use should have a list of
volume names below it. New, unformatted drives typically have no volume names listed. Carefully select the drive
you wish to format. Note: Some versions of Apple Disk Utility incorrectly display Serial ATA hard drives as having
the Connection Type of “Slave.” Serial ATA hard drives are all in fact “Master” drives. Later versions of Apple
Disk Utility correctly display Serial ATA hard drives as “Master.” If your Serial ATA hard disk is listed as “Slave,”
don’t worry, its performance will not be affected.
8
SeriTek/1S2 User’s Manual
Figure 7: Example hard drive listing
4.
After carefully selecting the hard drive you wish to format, select the Erase tab in Apple’s Disk Utility (see Figure
8).
Figure 8: Selecting the Erase tab in Apple’s Disk Utility
`
5.
6.
7.
8.
9.
For Volume Format, the most common choice is “Mac OS Extended.”
In the Name field, you may type a name of description for your new hard drive.
If you wish to have your new hard drive be recognized by Mac OS 9.XX, select the Install Mac OS 9 Drivers
checkbox. Users who dual-boot both Mac OS 9.XX and Mac OS X 10.2 and later may want to select this option.
This will allow the formatted volume to be recognized by both Mac OS versions.
Click the Erase button to format the hard drive.
Once the hard drive is initialized, it will be depicted as an icon on your Mac OS X desktop.
Creating a RAID Volume with Serial ATA Hard Drives Using Macintosh OS X version 10.2 or Later
The Mac OS X 10.2 or later RAID (Redundant Array of Inexpensive Disks) capability allows you to increase volume
sizes, provide data redundancy in case of a hard drive failure, or increase performance by allowing you to join multiple
drives into a single volume.
9
SeriTek/1S2 User’s Manual
Two RAID types are supported, Stripe and Mirror. A volume that is striped (also known as RAID 0) has its data broken
up and spread across multiple hard drives. Read/write performance, especially for sequential access, is improved
when the data is read and written across multiple drives simultaneously. No data integrity is provided with striping
however, and since data is spread across multiple drives, if one of the hard drives fails, all of the volume’s data will be
lost.
A volume that is mirrored (also known as RAID 1) has its data duplicated from one hard drive onto another. A mirrored
volume offers data integrity and immediate access to data in the event one hard drive fails. Because data is mirrored
and duplicated across two hard drives, only half of the combined capacity of the two drives is available.
1.
2.
3.
4.
Turn on your Macintosh computer.
Open Apple’s Disk Utility which is located in the Utilities folder of the Macintosh OS X start-up volume.
To open this application:
a) Double click the Mac OS X startup volume
b) Double click the Applications folder
c) Double click the Utilities folder
d) Double click the Disk Utility icon (See Figures 5 and 6 for examples)
Review the list of hard drives show within Disk Utility (see Figure 7). Drives currently in use should have a list of
volume names below it. New, unformatted drives typically have no volume names listed.
Select the RAID tab in Apple’s Disk Utility (see Figure 9).
Figure 9: Selecting the RAID tab in Apple’s Disk Utility
5.
6.
7.
8.
9.
Carefully select and drag a hard drive to add as a member of the new RAID volume onto the Disk status window.
Repeat step 5 for each member for the RAID volume.
Choose a RAID Scheme: Stripe or Mirror.
Name the new RAID volume.
For Volume Format, the most common choice is “Mac OS Extended” (See Figure 10).
10
SeriTek/1S2 User’s Manual
Figure 10: Example drives and options for a RAID volume
10. After reviewing the options you selected, click on the Create button to initialize the new RAID volume (see Figure
11).
Figure 11: Creating a new RAID volume
11. After the RAID volume is successfully initialized, it should appear on the desktop.
11
SeriTek/1S2 User’s Manual
IV. Troubleshooting
• The SeriTek/1S2 host adapter does not seem to be recognized
Check the SeriTek/1S2 adapter by ensuring it is properly seated in the PCI slot on the Macintosh motherboard.
• My hard drive or peripheral won’t work
Check cables and connections. Ensure the 7-pin Serial ATA cable is properly oriented to the connectors on the
SeriTek/1S2 host adapter and hard drive or peripheral. If the hard drive or peripheral requires a 15-pin power
connection, ensure it is powered properly with the 15-pin to 4-pin power connector provided by the hard drive or
peripheral vendor, connected to an available system power connector.
• Apple’s Drive Setup utility (OS 8.XX or OS 9.XX) or Disk Utility (OS X) does not display the Serial
ATA hard drive or peripheral
After checking the cables and connections, advanced users may use the Apple System Profiler to determine whether
your Macintosh computer recognizes if the SeriTek/1S2 is properly seated in a PCI slot and operating properly.
Apple System Profiler under Mac OS 9
1. Open the Apple System Profiler by clicking on the Apple icon to pull down the Apple menu and selecting Apple
System Profiler.
2. Select the Devices and Volumes tab (See Figure 12).
Figure 12: Selecting Devices and Volumes tab
3.
In the PCI section, SeriTek/1S2 should show up as a “SCSI card” (see Figure 13).
Figure 13: Example SeriTek/1S2 depicted in Apple System Profiler
4.
If SeriTek/1S2 is not listed, shut down your Macintosh computer and try re-seating it in the PCI slot by removing
and reinserting it. Repeat steps 1 through 3. If the SeriTek/1S2 still doesn’t show up in the Apple System
Profiler, try moving it to another PCI slot.
12
SeriTek/1S2 User’s Manual
Apple System Profiler under Mac OS X
Open the Apple System Profiler by clicking opening the Finder, clicking Applications at the top, opening the
Utilities folder and double clicking on Apple System Profiler.
2. Select the Devices and Volumes tab (See Figure 14).
1.
Figure 14: SeriTek/1S2 listed under Devices and Volumes tab
3.
In the PCI section, SeriTek/1S2 should show up as an “ata” Card Type.
4.
If SeriTek/1S2 is not listed, shut down your Macintosh computer and try re-seating it in the PCI slot by removing
and reinserting it. Repeat steps 1 through 3. If the SeriTek/1S2 still doesn’t show up in the Apple System Profiler,
try moving it to another PCI slot.
• The transfer rate on my Power Macintosh 8500 seems less than the Serial ATA specified maximum
of 150Mbytes/sec.
Early Power Macintosh computers, typically built before the “beige G3” was available, have limited hardware
resources. These limited resources severely limit data transfer rates of many storage technologies, including Serial
ATA.
• Does the SeriTek/1S2 work with all Power Macintosh computers?
No, SeriTek/1S2 only works with Power Macintosh computers with at least one PCI slot available. If your system
lacks PCI slots you cannot use SeriTek/1S2.
• My older Parallel ATA hard drives and peripherals have jumper settings. However I can’t find
jumper settings on my new Serial ATA hard drive or peripheral. How can I set it to Master or Slave;
is there any way to set the SCSI ID?
Serial ATA hard drives and peripherals are internally configured as Master drives. Only one drive can be attached to
each Serial ATA bus/connector. There is no need to change settings on either the drive or the controller.
• I have an old Parallel ATA drive which I am trying to use with a Parallel ATA to Serial ATA
converter, but it doesn’t seem to work.
Some older Parallel ATA drives do not comply with current ATA standards. Parallel ATA to Serial ATA converters
cannot recognize such drives.
13
SeriTek/1S2 User’s Manual
V. Product Support
Technical Support
For additional information on how to use SeriTek/1S2, download the latest firmware updates, or for technical assistance,
please visit us at www.firmtek.com, or email us at [email protected].
Please provide the following information when contacting us:
• Product model and serial number
• Firmware version (You may use the Apple System Profiler as described in the troubleshooting section to determine the
firmware version. Look for ROM# and Revision #)
• Macintosh model
• Macintosh OS type and version (example: Mac OS X, version 10.2)
• Hardware and software installed on your system
• Contact information including daytime telephone number and email address
• A detailed description of the question or problem
Return Merchandise Authorization
If FirmTek technical support determines the product needs to be repaired or replaced, a Return Merchandise Authorization
(RMA) number and shipping address will be provided. Please pack in the original shipping container all of the original
packaging - including the static bag, all hardware, software, cables, and other accessories that came with the original
product. You are responsible for shipping and insurance costs, and any damage incurred due to improper packaging or
transport.
FirmTek reserves the right to determine whether the product is to be repaired or replaced with new or refurbis hed parts, or
with a new or refurbished product. Standard United States return shipping charges will be paid by FirmTek. Foreign and
other shipping methods such as express shipping are available for an additional charge.
Write down the RMA number on the outside of the shipping container, and include the following information with the
shipment:
• A description of the problem
• A copy of the original purchase invoice
• Return shipping address
• Contact information including daytime telephone number and email address
FirmTek, LLC reserves the right to refuse shipments missing a valid RMA number.
VI. Product Warranty and Disclaimers
FirmTek warrants to the original buyer only that this product shall be free from defects in material and workmanship for a
period of 2 years from the original date of purchase. This warranty is valid only when the original purchase invoice is
provided. This warranty shall not apply to any defects resulting from improper handling, misuse, misapplication, abuse, or
unauthorized modification(s) which are performed by end user.
FirmTek, LLC reserves the right to make changes to any products described in this manual at any time without notice.
FirmTek, LLC assumes no responsibility for the use or reliability of hardware or software that is not supplied by FirmTek,
LLC or its affiliated companies. FirmTek, LLC does not assume any responsibility or liability arising out of the application or
use of any product described in this document, except as expressly agreed to in writing by FirmTek, LLC; nor does the
purchase or use of a product from FirmTek, LLC convey a license under any patent rights, copyrights, trademark rights, or
any other intellectual property rights of FirmTek, LLC or third parties.
14
SeriTek/1S2 User’s Manual
VII. Regulatory Compliance Statements
Federal Communications Commission Radio Frequency Interference Statement
WARNING: Changes or modifications to this unit not expressly approved by the party responsible for compliance could void
the user’s authority to operate the equipment.
This equipment has been tested and found to comply with the limits for a Class B digital device, pursuant to Part 15 of the
FCC rules. These limits are designed to provide reasonable protection against harmful interference in a residential
installation. This equipment generates , uses, and can radiate radio frequency energy, and if not installed and used in
accordance with the instruction manual, may cause harmful interference to radio communications. However, there is no
guarantee that interference will not occur in a particular installation. However, if this equipment does cause interference to
radio or television equipment reception, which can be determined by turning the equipment off and on, the user is
encouraged to try to correct the interference by one or more of the following measures:
• Reorient or relocate the receiving antenna.
• Increase the separation between equipment and receiver.
• Connect the equipment to an outlet on a circuit different from that to which the receiver is connected.
• Consult the dealer or an experienced radio/television technician for help.
• Use a shielded and properly grounded I/O cable and power cable to ensure compliance of this unit to the specified limits
of the rules.
This device complies with part 15 of the FCC rules. Operation is subject to the following two conditions: (1) this device may
not cause harmful interference and (2) this device must accept any interference received, including interference that may
cause undesired operation.
CE European Union Compliance Statement
EMC compliance:
Emissions:
EN55022: 1998, Class B
Immunity:
EN55024: 1998
EN61000-4-2: 1995+A1: 1998
EN61000-4-3: 1995+A1: 1998
EN61000-4-4: 1995
EN61000-4-6: 1996
EN61000-4-8: 1993
15
Notes
SeriTek/1S2 TSLKC200C0730