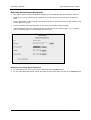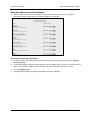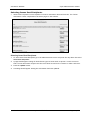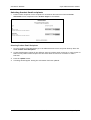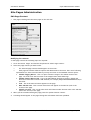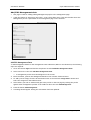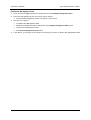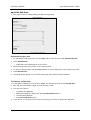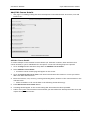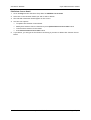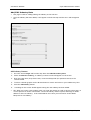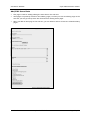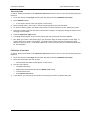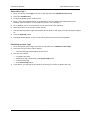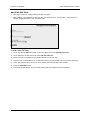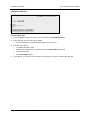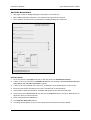
1
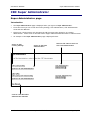
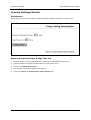
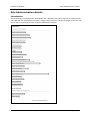
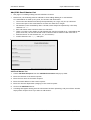
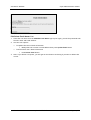
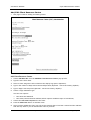
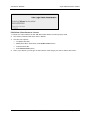
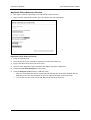
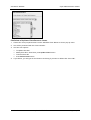
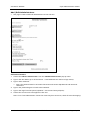
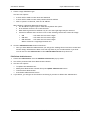
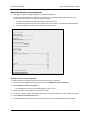
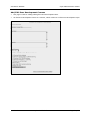
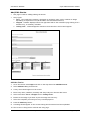
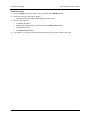
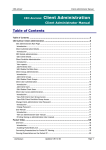
Asia Pacific Website Super Administrators manual ASIA PACIFIC WEBSITE: Super Admin. Super Administrators Manual | Administrators Introduction | Corporate Administrator | Client Administrator | Table of Contents Table of Contents .....................................................................................1 CRC Super Administrator ............................................................................2 Super Administrator page ................................................................................... 2 Introduction .................................................................................................. 2 Country Settings Details..................................................................................... 3 Introduction .................................................................................................. 3 Password Expiration Days & Page Time Out ............................................................ 3 Site Administration details ................................................................................. 4 Introduction .................................................................................................. 4 Add/Edit Email Master List ................................................................................ 5 Add/Edit Client Resource Centre......................................................................... 7 Download a Clients File Structure........................................................................ 9 Replicate Client Resource Centres ......................................................................10 Add /Edit Administrators .................................................................................12 Selecting Default Email Recipients......................................................................14 Selecting Industry Email Recipients.....................................................................15 Selecting Issues Email Recipients........................................................................16 Selecting Product Email recipients......................................................................17 Site Pages Administration ..................................................................................18 Edit Page Content ..........................................................................................18 Add/Edit Management data ..............................................................................19 Add/Edit MRI Data..........................................................................................21 Add/Edit Executive Development .......................................................................22 Add/Edit Exec Development Courses ...................................................................24 Add/Edit Course Details...................................................................................26 Add/Edit Industry Data ....................................................................................28 Add/Edit Issue Data ........................................................................................30 Add/Edit Issue Data ........................................................................................30 Add/Edit Product Data ....................................................................................32 Add/Edit Product FAQ’s ...................................................................................34 Add/Edit PDF Files .........................................................................................36 Add/Edit Newsletters......................................................................................38 Add/Edit Stories ............................................................................................40 User Manual ..................................................................................................42 View an Administration User manual ...................................................................42 Printing/Saving an Administration User manual ......................................................42 ACNielsen Updated: 05/12/03 Page 1 of 42 Asia Pacific Website Super Administrators manual CRC Super Administrator Super Administrator page Introduction • The Super Administration page is displayed after you login as a Super Administrator. • From this screen you can access the Country Settings, Site Administration, CRC Administration areas and User Manuals. • Please note, this document only discusses the CRC functions when logged on as a supper administrator. Please refer to the CEO Advisor Supper Administration document for CEO functions. • An example of the Super Administration page is displayed below: Access to CRC Country Settings Access to CRC Site Administration Select a CRC client to work on as a Client Administrator Click to view CRC &CEO Administrator manuals ACNielsen Updated: 05/12/03 Page 2 of 42 Asia Pacific Website Super Administrators manual Country Settings Details Introduction This is where you can set the Password Expiration Days and Page Time Out at Country level. Password Expiration Days & Page Time Out 1. Type the number of days required before a clients user login password will expire. 2. Type the number of minutes required before a Time out will occur. 3. Click on the Update Setting button. 4. The message ‘Information Updated’ will appear. 5. Choose the Return to Administration without Editing link. ACNielsen Updated: 05/12/03 Page 3 of 42 Asia Pacific Website Super Administrators manual Site Administration details Introduction This is where you can add/edit the Email Master List, add/edit client CRCs, replicate an existing client CRC, add/edit site administrator accounts, change email recipients, edit the site pages on the site, add files to the server and perform the corporate administration duties. ACNielsen Updated: 05/12/03 Page 4 of 42 Asia Pacific Website Super Administrators manual Add/Edit Email Master List • This page is for adding/editing Internal ACNielsen Contacts. • Please note, the following must be adhered to when Adding/Editing an e mail address: An e mail address is made up of 2 parts, the account and the domain. o o o o o o o The account and domain must always be separated by an @ sign; only one @ is allowed. The account part of the email must be at least one character in length. Sub domains (come immediatley after a domain) must always be separated by a Full Stop character i.e. “.”. Each sub domain must contain at least one character. There is no limit to the number of sub domains that may be included an an e mail address but please note that, the last sub domain must conatian at leat 2 characters but more than 3. Valid characters for sub domains are, a-z, 0-9 inclusive, Invalid characters are "/ ; : ," and space. Add Email Master List 1. Choose Add Email Recipient from the Add/Edit Email Master List pop-up field. 2. Enter the surname of the email recipient. 3. Enter the first name of the email recipient. 4. Enter the email address of the email recipient. 5. Enter the relevant department (category) of the email recipient. 6. Click on the Add Email button. 7. A message will appear stating that the information has been uploading. And you will have another empty email recipient form if you want to add another. ACNielsen Updated: 05/12/03 Page 5 of 42 Asia Pacific Website Super Administrators manual Edit/Delete Email Master List 1. Chose the one name from the Add/Edit Email Master pop-up list again, you will be presented with the user name and email address. 2. You have two options: • To Update that user’s Email information • • Modify that user’s name or email address then press Update Email button To delete that user’s Email information • Press Delete Email button 3. Note: If you delete a recipient, you will get an alert button confirming if you want to delete this record. ACNielsen Updated: 05/12/03 Page 6 of 42 Asia Pacific Website Super Administrators manual Add/Edit Client Resource Centre • This page is used for adding and editing clients. Add Client Resource Centre 1. Choose Add New CRC from the Add/Edit Client Resource Center pop-up field. 2. Type the new client name. 3. Select a client image then select/deselect the display logo option (Optional). 4. Type in the number of Days before Password Expiration (Optional – overwrites Country default). 5. Type in Page Time Out period (Optional – overwrites Country default). 6. Choose a Login Validation type. You have two options: • User Name and Password • User Name, Password and IP Address (which requires IP address input in field below) 7. Choose the ACN email recipient for this client. 8. Press the Add Client button to add this client. 9. Once you have added this client you will get the message that it has been created and the Add New CRC will loop back so you can add another client if you wish. ACNielsen Updated: 05/12/03 Page 7 of 42 Asia Pacific Website Super Administrators manual Edit/Delete Client Resource Centres 1. Choose one client name from the Add/Edit Client Resource Centre pop-up menu. 2. You will be presented with that client’s details. 3. You have two options: • To Update that CRC • Modify that CRC’s detail then press Update Client button • To delete that CRC • Press Delete Client button 4. Note: If you delete, you will get an alert button confirming if you want to delete this client. ACNielsen Updated: 05/12/03 Page 8 of 42 Asia Pacific Website Super Administrators manual Download a Clients File Structure • This page is used for downloading the Client site structure. Add New CRC • This function is not available at the moment. Download the Client File Structure 1. Choose one client name from the Download a Client File Structure pop-up menu. 2. The windows File Download menu appears. 3. Click Save to save the selected file structure to the specified location. ACNielsen Updated: 05/12/03 Page 9 of 42 Asia Pacific Website Super Administrators manual Replicate Client Resource Centres • This page is used for replicating a new CRC based on the exist one. • After you have replicated one CRC, you can edit the new CRC individually. Replicate Client Resource Centre 1. Press the replicate link. 2. Then choose the client you want to replicate from the drop down list. 3. Type in the NEW client name you want to use. 4. Select a client image then select/deselect the display logo option (Optional). 5. Choose the ACN Email Recipient for this client. 6. Press the Replicate Client button to add this client. • Once you have added this client you will get the message that it has been created and the Replicate client form will loop back so you can replicate another client if you wish. • You can now see this client in the Add/Edit Client Sites drop down list. ACNielsen Updated: 05/12/03 Page 10 of 42 Asia Pacific Website Super Administrators manual Edit/Delete a Replicate Client Resource Centre 1. Choose the client portfolio name from the Add/Edit Client Resource Centre pop-up menu. 2. You will be presented with the client’s details. 3. You have two options: • To Update that CRC • Modify that CRC’s detail then press Update Client button • To delete that CRC • Press Delete Client button 4. If you delete, you will get an alert button confirming if you want to delete this client CRC. ACNielsen Updated: 05/12/03 Page 11 of 42 Asia Pacific Website Super Administrators manual Add /Edit Administrators • This page is used to add/edit Administrators of the web site. Add Administrators 1. Choose the Add New Administrator from the Add/Edit Administrator pop-up menu. 2. Type in the User Name (up to 30 characters - email addresses are valid as a login name). 3. Type in their Password. • Note: The password must be at least 8 characters and contain alphabetical and numerical characters. 4. Type in the password again to Confirm the Password. 5. Type in the Page Time Out period (Optional – overwrites Country default). 6. Choose the Access Level to be applied to this user. Note: For a Client administrator choose the client they have access to (check all boxes that apply). ACNielsen Updated: 05/12/03 Page 12 of 42 Asia Pacific Website Super Administrators manual 7. Choose a Login Validation type. You have two options: • A check will be made on User Name and Password • A check will be made on User Name, Password and IP Address • Note: If option 2 is selected, enter the IP address. When defining a Partial IP addresses please note: o The IP address requires input in field directly below this option. o An IP address can be a Full or Partial match. o When defining a Partial IP address only th e far most right digits may be removed. o A Partial IP address must conform to one of the following formats and cannot be empty. • ddd - will match the left most 3 digits • ddd.ddd - will match the left most 6 digits • ddd.ddd.ddd - will match the left most 9 digits Where d must be a single digit between 0-9 8. Click the Add Administrator button when done. • Once you have added this Administrator you will get the message that it has been created and another empty Administrator Admin form will loop back so you can add another if you wish. You can now see this Administrator in the Add/Edit Administrator drop down list. Edit/Delete Administrators 1. Choose the Administrator from the Add/Edit Administrator pop-up menu. 2. You will be presented with that Administrators details. 3. You have two options: • To Update that Administrator • Modify that Administrator’s detail then press Update Administrator button • To delete that Administrator • Press Delete Administrator button 4. If you delete, you will get an alert button confirming if you want to delete this administrator. ACNielsen Updated: 05/12/03 Page 13 of 42 Asia Pacific Website Super Administrators manual Selecting Default Email Recipients • This page is used to modify the default settings for email sending within the ACNielsen web site. • Email server is for the email server’s address, so that the web server knows where to send the mails. • Career Opportunity is used to define the Email Recipient for the contact form on the bottom of the Career opportunity page. • Contact us define the Email Recipient for the Email form on the Contact us page. • Undirected Email define the Email Recipient has not been set for an Email page… e.g. A product page, an industry page etc. So the email will not be lost. Modifying the Default Email Recipients 1. For the Email server, enter a new server address and click Update button. 2. For the other Email Recipients, select the value from the drop down list, then click Update button. ACNielsen Updated: 05/12/03 Page 14 of 42 Asia Pacific Website Super Administrators manual Selecting Industry Email Recipients • Industry email recipients receive requests for information directed from the ‘For Further Information’ forms completed on the Industry Pages on the website. Selecting Industry Email Recipients 1. To select Industry Email Recipients go to the Administration section and press the title Industry Email Recipients. 2. A page should appear stating all the different types of industry email recipients. In each section to select a new industry email recipient use the scroll down list names and click on mouse. 3. Press the Update button. 4. A message should appear stating the information has been updated. ACNielsen Updated: 05/12/03 Page 15 of 42 Asia Pacific Website Super Administrators manual Selecting Issues Email Recipients • Issues email recipients receive requests for further information directed from the ‘For Further Information’ forms completed on the Issues pages on the website. Selecting Issues Email Recipients 1. To select Issue Email Recipients go to the Administration section and press the drop down list titled Issue Email Recipients. 2. A page should appear stating all the different types of issue email recipients. In each section to select a new issue email recipient use the scroll down list and click on mouse to make a selection. 3. Press the Update button. 4. A message should appear stating the information has been updated. ACNielsen Updated: 05/12/03 Page 16 of 42 Asia Pacific Website Super Administrators manual Selecting Product Email recipients • Product email recipients receive requests for information directed from the For Further Information forms completed on the Product Pages on the website. Selecting Product Email Recipients 1. To select Product Email Recipients go to the Administration section and press the drop down list titled Product Email Recipients. 2. A page should appear stating all the different types of product email recipients. In each section to select a new product email recipient use the scroll down list and click on mouse to make a selection. 3. Press the Update button. 4. A message should appear stating the information has been updated. ACNielsen Updated: 05/12/03 Page 17 of 42 Asia Pacific Website Super Administrators manual Site Pages Administration Edit Page Content • This page is dealing with the static pages on the web site. Modifying the contents To edit page content the following steps are required: 1. Go to the section ‘Pages’ and find the drop down list titled ‘Page content.’ 2. Select the page content you wish to edit. • • The selected page content should appear on the screen. Each page will feature different options and administration functions. Here are a following explanations for functions and features you may encounter in the Standard Content option: o o o o o Sidebar Flagging Banner – This is to place a banner/image in the sidebar menu of the page. You must write the file name of the image/banner with HTML tags. Sidebar Flagging Banner URL – This is the URL address the banner/image is linked and directed to. You must write the URL address (for example, http://www.acnielsen.co.nz) in this field. Title – This is the main title that appears on the page. Main Side bar title – This is a main title which will appear in the side bar (left of the screen) of the page. Side bar sub title – This is a sub title which will feature under the main title in the side bar (left of the screen) of the page. 3. When you have finished editing the page press the ‘Update Content’ button. 4. A message should appear on the page stating that information has been uploaded. ACNielsen Updated: 05/12/03 Page 18 of 42 Asia Pacific Website Super Administrators manual Add/Edit Management data • This page is used for adding/editing Management people to the management page. • It has the feature of selecting a rank from 1-10 in a drop down menu. This rank decides where the Management person is positioned on the management page on the web site. Add/Edit Management Data To add management details to the management team subsection (Who we are subsection) the following steps are required. 1. Go to the section Pages and find the drop down list titled Add/edit Management Data. 2. Select and click on the title Add New Management Data. • A management profile form should appear on the screen. 3. Enter the Name, position and background details in the relevant field text boxes. 4. To add a picture image click the browse button next to the field title Image Name. Browse and select the image from the subdirectories. 5. Select where you wish to aesthetically place the profile on the site page by ranking the profile against other management profiles in the field box above the title Add Management. 6. Press the button Add Management. 7. A message should appear stating the information has been updated. ACNielsen Updated: 05/12/03 Page 19 of 42 Asia Pacific Website Super Administrators manual Edit/Delete Management Data 1. Go to the section Pages and find the drop down list titled Add/Edit Management Data. 2. Select the management profile you wish to edit or delete. • The selected management profile will appear on the screen. 3. You have two options: • To Update that Management Data • Modify that Management Data’s detail then press Update Management Data button • To delete that Management Data • Press Delete Management Data button 4. If you delete, you will get an alert button confirming if you want to delete this Management Data. ACNielsen Updated: 05/12/03 Page 20 of 42 Asia Pacific Website Super Administrators manual Add/Edit MRI Data • This page is used for adding/editing the Market Insight data. Add Market Insights data 1. To Add Market insights go to the section Pages and find the drop list titled Add/Edit MRI Data. 2. Select Add MRI Data. • A MRI data form should appear on the screen. 3. Enter the page name and content in the relevant fields. 4. To select a header graphic use the Browse button to search and select in your subdirectory files. 5. Press Add MRI Data. 6. A message should appear on the screen stating that information has been updated. Edit Market Insights data 1. To edit Market insights go to the section ‘Pages’ and find the drop list titled ‘Edit MRI data.’ 2. Click and select the Market insight section you wish to edit. 3. You have two options: • To Update that MRI Data • Modify that MRI Data’s detail then press Update MRI Data button • To delete that MRI Data • Press Delete MRI Data button 4. If you delete, you will get an alert button confirming if you want to delete this MRI Data. ACNielsen Updated: 05/12/03 Page 21 of 42 Asia Pacific Website Super Administrators manual Add/Edit Executive Development • This page is used for adding/editing Executive Developments. • An Executive Development is made up of three parts. The Executive Development itself, the Courses (Seminars) and Course Details (Seminar Dates). • The Exec Development is the Page Content for the web site. • The Exec Development Courses are related the course name of the Executive Development. • The Course Details are the dates, costs etc for that course. Add New Executive Development To add Executive Development Section the following steps are required: 1. Go to the section Pages and find the drop down list Add/Edit Exec Development. 2. Select Add New Exec Development. • A training data content form should appear on the screen. 3. Enter page name and content in the relevant fields. 4. To select a header graphic use the Browse button to search and select in your subdirectory files. 5. Press Add Exec Development button. 6. A message should appear on the screen stating the new exec development has been added. ACNielsen Updated: 05/12/03 Page 22 of 42 Asia Pacific Website Super Administrators manual Edit/Deleting Executive Development To edit Executive Development Section the following steps are required: 1. Go to the section Pages and find the drop down list Add/Edit Exec Development. 2. You have two options: • To Update that Executive Development • Modify that Executive Development’s detail then press Update Exec Development button • To delete that Executive Development • Press Delete Exec Development button 3. If you delete, you will get an alert button confirming if you want to delete this Executive Development. ACNielsen Updated: 05/12/03 Page 23 of 42 Asia Pacific Website Super Administrators manual Add/Edit Exec Development Courses • This page is used for adding/editing Executive Development Data. • An Executive Development Course is a seminar, which relates to an Executive Development topic. ACNielsen Updated: 05/12/03 Page 24 of 42 Asia Pacific Website Super Administrators manual Add New Course To add a new course/seminar the following steps are required. 1. Go the Administration section and select the drop down list titled Add/Edit Exec Development. 2. Select Add New Course. 3. A course content form should appear on the screen. 4. Enter the name of the seminar/course in the text field called Seminar or Course Title. 5. Enter a description of the course in the Description text field. Please remember not to include information about something like costs, dates or location. 6. Select the email recipient of course queries. 7. Tick the boxes of the site pages you wish course/seminar information to appear. 8. Press Add Seminar/course button. 9. A message should appear on the screen stating that information has been updated. • N.B For purposes of courses and seminars having multiple location details (IE a course which is held in a country on different dates) course information has been spilt into two different forms. Edit/Delete Courses To edit or delete existing seminars and courses in the Executive Development section the following steps are required: 1. Go to ‘Page’ section and select the drop down list titled ‘Add/Edit Exec Development’. 2. Select the course or seminar you wish to edit/delete. 3. The selected course/seminar information should appear on the screen. 4. You have two options: • To Update that Seminar/Course • Modify that Executive Development’s detail then press Update Seminar/Course button • To delete that Seminar/Course • Press Delete Seminar/Course button 4. If you delete, you will get an alert button confirming if you want to delete this Seminar/Course. • N.B All dates related to the deleted executive development course or seminar will also be deleted. ACNielsen Updated: 05/12/03 Page 25 of 42 Asia Pacific Website Super Administrators manual Add/Edit Course Details • This page is for adding/editing Executive Development Course details such as Location, Cost and Duration etc. Add New Course Details To create multiple course/seminar location details (I.E. different locations, dates and times for a course/seminar) or just to add details for one specific course the following steps are required. 1. Go to the Page section and select drop down list Add/Edit Course Details. 2. Select Add New Course Detail. • A seminar/course content page will appear on the screen. 3. Go to the Seminar and Course Title scroll down list and select the seminar or course you wish to add a new date and location to. 4. Enter the location, cost, currency, starting and ending dates, duration of the course/seminar in the relevant fields. • Please remember to fill out the date in the following format dd/mm/yy. 5. Press Add Seminar/Course Date button. 6. A message should appear on the screen stating that information has been uploaded. • N.B For every new course/seminar location detail you must add a Exec Development Date form and repeat all steps in this section. ACNielsen Updated: 05/12/03 Page 26 of 42 Asia Pacific Website Super Administrators manual Edit/Delete Course Detail 1. Go to the Page section and select drop down list Add/Edit Course Detail 2. Select the course/seminar details you wish to edit or delete. 3. The selected information should appear on the screen. 4. You have two options: • To Update that Seminar/Course Detail • Modify that Seminar/Course’s detail then press Update Seminar/Course Date button • To delete that Seminar/Course Detail • Press Delete Seminar/Course Date button 5. If you delete, you will get an alert button confirming if you want to delete this Seminar/Course Detail. ACNielsen Updated: 05/12/03 Page 27 of 42 Asia Pacific Website Super Administrators manual Add/Edit Industry Data • This page is used for adding/editing the Industry to the web site. • Once the Industry has been added, it will appear on both Site map and the site’s side navigation bar. Add Industry Content 1. Go to the section Pages and find the drop down list Add/Edit Industry Data. 2. Select the Add New Industry, an industry content form should appear on the screen. 3. Enter the page name, drop down name, content and keywords (for optimum search) in the relevant fields. 4. To select a header graphic use the Browse button to search and select in your subdirectory files. 5. Press the Add Industry button. 6. • A message on the screen should appear stating the new industry has been added. NB: When you create a new industry page, you must also assign an email recipient to that page, to receive queries for further information. Go to Edit Industry email recipient and assign an email address to this new Industry. If the email address isn’t there you will need to Create Email Recipient for this industry. ACNielsen Updated: 05/12/03 Page 28 of 42 Asia Pacific Website Super Administrators manual Edit Industry Data 1. Go to the section Pages and find the drop down list Add/Edit Industry Data. 2. Select the Industry data you wish to edit. • The selected industry data should appear on the screen. 3. You have two options: • To Update that Industry • Modify that Seminar/Course’s detail then press Update Industry button • To delete that Industry • Press Delete Industry button 4. If you delete, you will get an alert button confirming if you want to delete this Industry. ACNielsen Updated: 05/12/03 Page 29 of 42 Asia Pacific Website Super Administrators manual Add/Edit Issue Data • This page is used for adding/editing the Issue data to the web site. • Issue pages are primarily related to the Industry pages, so when you view an Industry page on the web site you will get a drop down box filled with all relating Issues pages. • When you add an issue page to the web site, you are asked to select at least one related Industry pages. ACNielsen Updated: 05/12/03 Page 30 of 42 Asia Pacific Website Super Administrators manual Add Issues Data To edit or delete Issues data in the Industries and Issues section of the live site the following steps are required: 1. Go to the sections titled Pages and find the drop down list titled Add/Edit Issues Data. 2. Select Add New Issue. • A new issues content form will appear on the screen. 3. Enter the page name, down name, content and keywords in the relevant fields. 4. To select a header graphic use the Browse button to search and select in your subdirectory files. 5. Select the sections you wish the issues information to appear on simply by ticking the boxes left of the page section names. 6. Press the Add Issues Page button. 7. A message should appear on the screen stating that the information has been updated. • NB: When you create a new Issues page, you must also assign an email recipient to that page, to receive queries for further information. Go to Edit Issues email recipient and assign an email address to this new Issue. If the email address isn’t there you will need to Create Email Recipient for this individual. Edit/Delete Issues Data To edit or delete Issues data in the Industries and Issues section of the live site the following steps are required: 1. Go to the sections titled Pages and find the drop down list titled Add/Edit Issues Data. 2. Select the Issues data you wish to edit. • The selected issue data should appear on the screen. 3. You have two options: • To Update that Issue • Modify that Issue’s detail then press Update Issue button • To delete that Issue • Press Delete Issue button 4. If you delete, you will get an alert button confirming if you want to delete this Issue. ACNielsen Updated: 05/12/03 Page 31 of 42 Asia Pacific Website Super Administrators manual Add/Edit Product Data • This page is used for adding/editing Product data to the web site. • Product pages are primarily associated with the existed issues pages. • When you add a product page to the web site, you are asked to select at least one related Issue pages. ACNielsen Updated: 05/12/03 Page 32 of 42 Asia Pacific Website Super Administrators manual Add Product Data To add product data in the ‘Industries and Issues’ section of the live site the following steps are required: 1. Go to the sections titled Pages and find the drop down list titled Add/Edit Product Data. 2. Select the Add New Product. 3. A product content page should appear on the screen. 4. Enter the page name, drop down name, content and keywords (for optimum search) in the relevant fields. 5. To select a header graphic use the Browse button to search and select in your subdirectory files. 6. Select the sections you wish the product information to appear on simply by ticking the boxes left of the page section names. 7. Press the Add Product Page button. 8. A message should appear on the screen stating that the information has been updated. • NB: When you create a new Product page, you must also assign an email recipient to that page, to receive queries for further information. Go to Edit Product email recipient and assign an email address to this new Product. If the email address isn’t there you will need to Create Email Recipient for this individual. Edit/Delete Product Data To edit product data in the ‘Industries and Issues’ section of the live site the following steps are required: 1. Go to the sections titled Pages and find the drop down list titled Add/Edit Product Data. 2. Select the product data you wish to edit/delete. • The selected product data should appear on the screen. 3. You have two options: • To Update that product • Modify that Seminar/Course’s detail then press Update Product Page button • To delete that product • Press Delete Product Page button 4. If you delete, you will get an alert button confirming if you want to delete this product. ACNielsen Updated: 05/12/03 Page 33 of 42 Asia Pacific Website Super Administrators manual Add/Edit Product FAQ’s • This page is used for adding/editing Product Frequently Asked Questions. • FAQs are primarily related to the particular products. • When you add a new FAQ to the web site, you are asked to select at least one related product. ACNielsen Updated: 05/12/03 Page 34 of 42 Asia Pacific Website Super Administrators manual Add product FAQ’s 1. Go to the section titled Pages and click on the drop down list Add/Edit Product FAQs. 2. Select the Add New FAQ. 3. A FAQ form should appear on the screen. 4. Enter a short summarized version of the question in the text field titled ‘Administration list heading’ (this information is an introductory version of the question). 5. For a detailed version of the question fill out the text box title ‘Question.’ 6. Write the answer in the text box titled ‘Answer.’ 7. Tick the related product pages associated with the question and topic you wish the FAQS to appear on. 8. Press the Add FAQ button 9. A message should appear on the screen stating the information has been uploaded. Edit/Delete product FAQS 1. Go to the section titled ‘Pages’ and click on the subsection ‘Add/Edit Product FAQs’. 2. Select the FAQ you wish to edit or delete. • The selected FAQ should appear on the screen. 3. You have two options: • To Update that FAQ • Modify that FAQ’s detail then press Update FAQ button. • To delete that FAQ • Press Delete FAQ button. 4. If you delete, you will get an alert button confirming if you want to delete this FAQ. ACNielsen Updated: 05/12/03 Page 35 of 42 Asia Pacific Website Super Administrators manual Add/Edit PDF Files • This page is used for adding/editing the PDF file type. • When adding a new PDF file to the web site, you must select a ‘Site Location’ from the list of Market Insights supplied in the drop down list. To add a new PDF files 1. Go to the section Pages and click on the drop down list titled Add/Edit PDF Files. 2. Scroll down the list and select the title Add New PDF file. 3. Enter the title of the PDF file you wish to appear on the live site. 4. Type the file located address or click Browse button to find the PDF file on your local directory. 5. In the Site Location drop down list select where you wish the PDF to be located. 6. Press the Add PDF button. 7. A message should appear on the screen stating that information has been updated. ACNielsen Updated: 05/12/03 Page 36 of 42 Asia Pacific Website Super Administrators manual Edit/Delete PDF files To edit a PDF files 1. Go to the Pages section and click on the drop down list Add/Edit PDF Files. 2. Select the PDF file you wish edit or delete. • The selected PDF file’s details should appear on the screen. 3. You have two options: • To Update that PDF’s title • Modify that Seminar/Course’s detail then press Update PDF Info button • To delete that PDF • Press Delete PDF button 4. If you delete, you will get an alert button confirming if you want to delete this PDF file. ACNielsen Updated: 05/12/03 Page 37 of 42 Asia Pacific Website Super Administrators manual Add/Edit Newsletters • This page is used for adding/editing the newsletter to the web site. • When adding/editing a newsletter, the related issue page must be selected. • There must be at least one story existed before adding/editing the newsletter. Add Newsletter 1. Go to the section titled Pages and click on the drop down list Add/Edit Newsletters 2. If there is no story existed in the Add/Edit Stories list, the message ‘There must be at least one story before you can add a Newsletter’ appears. 3. If there is any story existed in the Story list, a Newsletter form should appear on the screen. 4. Enter the Issue name, Newsletter title, Date, Introduction of this newsletter. 5. Select Live to make the newsletter available displayed from the selected Issue page. 6. Select stories from Unselected list box and put into Selected list box, use Up or Down button to adjust the place of selected stories. 7. Enter email address into Email box. 8. Click Add New Newsletter button. 9. A message should appear on the screen stating the new Newsletter has been added. ACNielsen Updated: 05/12/03 Page 38 of 42 Asia Pacific Website Super Administrators manual Edit/Delete Newsletter 1. Go to the ‘Pages’ section and click on the drop down list ‘Add/Edit Newsletter’. 2. Select the Newsletter you wish to edit or delete. • The selected newsletter’s details should appear on the screen. 3. You have two options: • To Update that Newsletter • Modify that newsletter’s detail then press Update Newsletter button • To delete that newsletter • Press Delete Newsletter button 4. If you delete, you will get an alert button confirming if you want to delete this newsletter. ACNielsen Updated: 05/12/03 Page 39 of 42 Asia Pacific Website Super Administrators manual Add/Edit Stories • This page is used for adding/editing the stories. • Story Types: o o o Story – story with short summary, displayed on newletter page, with or without an image depending on impotance level (as decided in the Newsletter function) Snippett – headline displayed down the right hand side of the newsletter page linking of to a smaller story, no summary included. Talking Point – column desgned to stand out from the other articles and snippets. Add New Stories 1. Go to the section titled Pages and click on the drop down list Add/Edit Stories 2. Select Add New Story from the list. 3. A story form should appear on the screen. 4. Enter Story name, Headline, summary and Story body into relevant edit boxes. 5. Select/Not select This is a Snippet and/or Talking Points. 6. Browse to the image if you want to put the image into the story. 7. Select the template you need your story to be displayed in. 8. Press the Add Story button. 9. A message should appear on the screen stating the information has been uploaded. 10. The screen is rolling back to a blank new story page. ACNielsen Updated: 05/12/03 Page 40 of 42 Asia Pacific Website Super Administrators manual Edit/Delete Story 1. Go to the Pages section and click on the drop down list Add/Edit Stories. 2. Select the story you wish edit or delete. • The selected story’s details should appear on the screen. 3. You have two options: • To Update that story • Modify that Seminar/Course’s detail then press Update Story button • To delete that story • Press Delete Story button 4. If you delete, you will get an alert button confirming if you want to delete this story. ACNielsen Updated: 05/12/03 Page 41 of 42 Asia Pacific Website Super Administrators manual User Manual • The Administrator User Manual page is used to view the CRC user manuals in .pdf format. • Administrator User Manuals may also be printed or saved locally. • An example of the Administrator User Manual page is displayed below: View an Administration User manual Open a manual by either, 1. Clicking on the appropriate link from beneath the Title header. 2. Clicking on the appropriate .pdf icon beneath the Type header. 3. Right clicking on either the link or icon and selecting Open or Open in new window from the pop up box. Printing/Saving an Administration User manual Print/Save a manual by either, 1. Right clicking over the appropriate link/icon from beneath the Title/Type header and select Print Target or Save Target As . . . from the pop up box. 2. Open the manual in a separate window and select File > Print from the menu bar. ACNielsen Updated: 05/12/03 Page 42 of 42