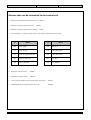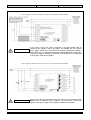
1
BPT Spa
PREVENTION
THEFT
FIRE
GAS
Centro direzionale e Sede legale
Via Cornia, 1/b
33079 Sesto al Reghena (PN) - Italia
http://www.bpt.it mailto:[email protected]
CMP32 – CMP64
BURGLAR ALARM CONTROL UNITS
INSTALLATION MANUAL
CMP32_CMP64_inst_UK_24838400 11-06-10
Page 1 of 60
CONTENTS
CMP32 – CMP64 .............................................................................................................................................................. 1
BURGLAR ALARM CONTROL UNITS ...................................................................................................................... 1
INSTALLATION MANUAL......................................................................................................................................... 1
CONTENTS ...................................................................................................................................................................... 2
SAFETY NOTES .............................................................................................................................................................. 4
INTRODUCTION ............................................................................................................................................................ 5
INTRODUCTION .......................................................................................................................................................... 5
GENERAL...................................................................................................................................................................... 6
GENERAL DIAGRAM FOR CONTROL UNIT CMP32 ............................................................................................. 7
GENERAL DIAGRAM FOR CONTROL UNIT CMP64 ............................................................................................. 8
DEVICES THAT CAN BE CONNECTED TO THE CONTROL UNIT .................................................................... 10
TECHNICAL CHARACTERISTICS .......................................................................................................................... 11
TECHNICAL FEATURES OF CONTROL UNITS .................................................................................................... 11
Electrical characteristics.......................................................................................................................................... 11
Mechanical characteristics....................................................................................................................................... 11
Climatic characteristics............................................................................................................................................ 11
Package .................................................................................................................................................................... 11
TECHNICAL FEATURES OF THE CONTROL CARD ............................................................................................ 12
INPUTS OF THE SYSTEM COMPONENTS............................................................................................................. 13
TERMINAL BOARDS FOR CONTROL UNITS CMP32 E CMP64........................................................................ 14
CONNECTION DIAGRAMS........................................................................................................................................ 15
CONNECTION TO ELECTRICAL MAINS ............................................................................................................... 15
CONNECTION TO BATTERY BB065 ...................................................................................................................... 15
CONNECTION OF SYSTEM BUS............................................................................................................................. 16
Example of connection of system bus........................................................................................................................ 16
Connection of keyboards, key-locks and expansion modules on bus........................................................................ 17
CONNECTION OF SIRENS MODEL SA01L ............................................................................................................ 17
CONNECTION OF SENSORS.................................................................................................................................... 18
Connection of only one sensor per input .................................................................................................................. 19
Connection of several sensors in series per input..................................................................................................... 19
CONNECTION OF CONTACTS FOR SHUTTERS CFSST AND VIBRATION SENSORS SVAMB (ONLY ON
EXPANSION EBI08) ................................................................................................................................................... 21
CONNECTION OF OUTPUTS ................................................................................................................................... 21
CONNECTION TO TELEPHONE LINE .................................................................................................................... 22
CONNECTION OF SERIAL PORT RS232 ................................................................................................................ 22
Connection to a PC for local programming ............................................................................................................. 22
Connection to Nehos Bpt System .............................................................................................................................. 23
Connection to a serial printer................................................................................................................................... 23
CONNECTION TO OPTIONAL CARDS ................................................................................................................... 24
Connection of the ESV01 module ............................................................................................................................. 25
Connection of the EGM01 module............................................................................................................................ 26
OTHER SYSTEM COMPONENTS ............................................................................................................................. 27
KEYBOARDS TDP01, TDI01, TAI01 ........................................................................................................................ 27
KEY-LOCKS IN5XX AND ELECTRONIC KEYS KEY04 ....................................................................................... 28
EXPANSION MODULES FOR INPUTS AND OUTPUTS ....................................................................................... 29
ANTI-TAMPERING COVERING EBTAM FOR EXPANSION MODULES EBI08-EBO08................................... 31
ADDITIONAL POWER SUPPLIERS ......................................................................................................................... 32
CMP32_CMP64_inst_UK_24838400 11-06-10
Page 2 of 60
GENERAL INFORMATION ON PROGRAMMING THE CONTROL UNIT ...................................................... 34
AREAS ......................................................................................................................................................................... 34
KEYBOARDS AND KEY-LOCKS............................................................................................................................. 35
CODES ......................................................................................................................................................................... 36
INPUTS ........................................................................................................................................................................ 38
OUTPUTS .................................................................................................................................................................... 41
CONTROL UNIT TIMER CONTROLS...................................................................................................................... 42
SPECIAL FUNCTIONS............................................................................................................................................... 43
TELEPHONE SIGNALLING OF EVENTS................................................................................................................ 44
PARAMETERS FOR TELEPHONE NUMBERS ....................................................................................................... 45
PARAMETER FOR TELEPHONE CALLS................................................................................................................ 45
TIMER PROGRAMMER............................................................................................................................................. 46
AUTOMATIC CALENDAR........................................................................................................................................ 46
CLOCK......................................................................................................................................................................... 47
INSTALLATION............................................................................................................................................................ 48
INSTALLATION AND VOLUMES ........................................................................................................................... 48
FASTENING OF CONTAINER .................................................................................................................................. 48
PASSAGE OF CABLES .............................................................................................................................................. 48
COMMISSIONING........................................................................................................................................................ 49
PRELIMINARY OPERATIONS ................................................................................................................................. 49
DEFAULT CODE SETTINGS..................................................................................................................................... 49
ADDRESSING OF FIRST KEYBOARD .................................................................................................................... 50
ADDRESSING OF SUBSEQUENT KEYBOARDS................................................................................................... 51
ADDRESSING OF KEY-LOCKS ............................................................................................................................... 51
ACTIVATION OF EXPANSION MODULES ............................................................................................................ 52
INCLUSION OF EXPANSION MODULES ............................................................................................................... 53
TEST............................................................................................................................................................................. 54
Inputs test.................................................................................................................................................................. 54
Siren test ................................................................................................................................................................... 54
Tamper test ............................................................................................................................................................... 55
Battery test ................................................................................................................................................................ 55
Output test................................................................................................................................................................. 55
FINAL OPERATIONS................................................................................................................................................. 56
PROGRAMMING OF USER CODES AND KEYS.................................................................................................... 57
MODIFICATION OF COMMUNICATION AND INSTALLER CODES............................................................... 58
PROCEDURE FOR OPENING THE CONTAINER ................................................................................................. 59
RESETTING DEFAULT SETTINGS .......................................................................................................................... 60
RESETTING DEFAULT CODES ............................................................................................................................... 60
RESETTING DEFAULT PARAMETERS .................................................................................................................. 60
CMP32_CMP64_inst_UK_24838400 11-06-10
Page 3 of 60
SAFETY NOTES
!
Attention
Carefully read the instructions before starting installation. Perform work as specified by the
manufacturer.
It is prohibited to use the product for purposes other than those specified or which are improper.
It is prohibited to tamper with or modify the product.
The removal of the labels on the card will void the guarantee.
Use original spare parts.
Installation, programming, commissioning and maintenance of the product must only be performed by
qualified technicians who have been properly trained in compliance with current standards. Installation
of security systems is regulated and may be performed by persons who possess the legally required
qualifications, including compliance with accident prevention
Work in sufficiently lighted areas that are conducive to health and use tools, utensils and equipment that
are in good working order.
Upon completion of installation, always check for correct operation of the unit and the system as a whole.
Do not install the control unit outdoors or in areas where it is exposed to seepage or splashes of water.
Handle the control unit with care. It contains electronic parts that are fragile and sensitive to humidity.
The electronic cards can be seriously damaged by discharges of static electricity. If they are to be handled,
wear suitable clothing and anti-static footwear, or at least ensure static electricity has been discharged by
touching with the fingertip a metallic surface connected to the earth system (e.g. the chassis of a household
appliance).
The unit is powered at mains voltage, 230 V AC - 50 Hz. Therefore, it must be provided with an earth
connection using the appropriate terminals. Failure to connect all accessible metal parts to the earth will
make the unit unsafe to use.
For the 230 V AC power supply, it is essential to use a cable with double insulation (with double sheath),
as set forth in electrical safety standards
Use wire terminals for connection to the mains at 230V AC - 50Hz.
Protect the appliance using a suitable disconnection device to protect the power supply network such as an
easily accessible bi-polar switch (or other).
Use a cable passage hole only for the passage of the cable for connection to the 230V AC - 50Hz mains
Weld the joints between wires to prevent false alarms caused by oxidation of the wires.
Always disconnect the power supply before doing any work in the unit.
The electrical system must comply with current standards in the country of installation.
Use only shielded cables for connecting devices to the control unit.
The control unit can only be connect to a PSTN (analogue) or ADSL line. Connection to digital lines (such
as ISDN) will damage the circuits of the control card.
The backup battery should only be replaced by qualified personnel. Dispose of the unit in accordance with
current standards. Use only sealed lead batteries.
CMP32_CMP64_inst_UK_24838400 11-06-10
Page 4 of 60
INTRODUCTION
Introduction
This manual is valid only for the control units CMP32 and CMP64. Functional differences between the control units
are specified.
The CMP32 and CMP64 control units offer advanced features for security and access control, while at the same time
being simple to programme and use.
The control units are enclosed in a fully closed metal container that holds the electronic card where it is possible to
make the main connections and where 8 basic inputs are located.
The minimum outfitting includes connection to the control unit, by means of a system serial bus RS485, of a remote
keyboard with an LCD with two lines of 16 characters sold separately (TDP01 in wall-mounted version or TDI01 in the
elegant recessed version, with which it is possible to carry out all system management and programming operations.
Programming can also be done using the dedicated PC programming software (via standard RS232 port present in the
control unit), further simplifying commissioning.
With the key-locks of the series IN5xx, which can be connected directly to the system bus, it is also possible to manage
the system by means of KEY04 electronic contact keys.
The keyboards TDI01 (with LCD) and TAI01 (no display) are installed in standard boxes of either six or three modules.
At the client's discretion, it will be possible to mount the front plate that best suits the setting where the system will be
installed. Compatibility with the most commonly available civil series on the market is ensured by a series of adaptors.
On the same system bus, there can be connected the expansions with 8 inputs (EBI08) and the expansions with outputs
(EBO08).
The CMP32 and CMP64 control units are designed to meet any security needs for medium and large systems, in either a
civil or industrial ambit.
Both models share the same functional features and the same peripherals, where available, which can be connected to
the system bus. Based on required performance, it is thus possible to select the control unit that best adapts to the
system while at the same time conserving the possibility to expand and also to replace the control unit with a larger size.
CMP32_CMP64_inst_UK_24838400 11-06-10
Page 5 of 60
General
• Memorization of all programmed parameters in non-volatile memory, which will be maintained even in the event of
failure of primary and secondary power supplies.
• Possibility to divide the system into 8 independent areas (collection of inputs). By matching, during programming,
keyboards (TDP01, TDI01 and TAI01), key-locks (IN5xx), user codes and inputs of these areas, it is possible to
divide the system into distinct blocks, which may be independent from one another.
• Possibility to expand the system with remote expansion modules of 8 inputs (EBI08) or 8 outputs (EBO08) which
can be connected to the system bus with the advantage of drastically reducing the length of wiring with respect to
centralized solutions.
• Management of 4 different types of connection of anti-intrusion sensors to the inputs of the control unit or of the
peripheral modules: normally closed, normally open, single balance, double balance. The inputs on the remote
expansion modules EBI08 can also be configured for direct connection to sensors for shutters (CFSST) or vibration
sensors (SVAMB).
• Management of 32 (CMP32) or 64 (CMP64) user codes with various priorities and access permission. The users
may either use a keyboard code or a properly programmed KEY4 electronic key. The electronic keys and the remote
keyboards are not provided with the control unit, but they may be purchased separately.
• Possibility to assign a symbolic name to inputs and areas for improved comprehension of the information
memorized in the control unit and shown via the keyboards.
• Possibility to forward telephone calls to 8 different numbers, either to security companies (using standard formats
Ademco Contact ID and Fast Format) or to private users by means of voice messages that can be recorded using the
optional card ESV0. In the latter case, receipt of the message can be confirmed by pressing the 5 key on the
receiving telephone. Communications may take place via the PSTN interface that is already present on the control
unit, or via GSM network by the connecting the optional card EGM01.
• Possibility to request remote assistance via PC from the installer through the call procedure aimed at the 9th
telephone number.
• Remote control function via Gsm which makes it possible to give commands to the control unit through a phone call
(available for the control units with firmware version 2.01 or later).
• Management of timer controlled events through the creation of 8 different programmes each composed of 20 steps
(timer-controlled actions) which can be matched to a weekly schedule which also includes 32 possible "holidays"
with different behaviour. Each step may turn the control unit on or off, control a single area or an output, or block a
single code.
• The available outputs may be controlled by the activation of inputs, by typing in codes, by the occurrence of defects,
or by certain statuses of the control unit.
• Memorization of events in the control unit in a loop, easily visible by users and technicians. 200 events can be
recorded in the CMP32 and 300 in the CMP64.
CMP32_CMP64_inst_UK_24838400 11-06-10
Page 6 of 60
General Diagram for Control Unit CMP32
CMP32_CMP64_inst_UK_24838400 11-06-10
Page 7 of 60
General Diagram for Control Unit CMP64
CMP32_CMP64_inst_UK_24838400 11-06-10
Page 8 of 60
General characteristics
CMP32
Inputs for sensors
Inputs on board
Max. additional inputs (1)
Max. total inputs
Inputs for anti-tampering connection
Outputs for alarm and programmable devices
Live output for alarm devices
Relay output for alarm devices
Open Collector programmable outputs on board control unit
Max. programmable additional outputs (2)
Max. total programmable outputs
8
24
32
56
64
1 (can be de-activated)
relay contact in exchange with voltage 13.8 V DC
relay contact in exchange free of voltage
8
24
56
32
64
Other outputs for connection of external devices
RS485 system serial bus line
Interface RS232 for local programming
PSTN interface for remote telephone connection
1
1
1
Devices that can be connected to system bus
Keyboards (TDP01 – TDI01 – TAI01)
Key-locks (IN5xx)
Expansion modules with 8 inputs (EBI08)
Expansion modules with 8 outputs (EBO08)
max 8
max 8
max 3
max 3
Optional devices that can be connected to control unit
Voice synthesis module 4 messages (ESV01)
GSM module (EGM01)
Main functional features
Output time (unique to each area)
Input time (2 time for each area)
Burglar alarm time
Tamper alarm time (anti-tampering)
Technological alarm time
Auxiliary alarm time
Bypasses
Type of inputs
Memorizable code numbers
Number of events stored in memory
Number of independent areas
Management of self-connection timer
Standard communications protocols for security companies
Programming
Level of security as per CEI 79-2:
CMP64
max 7
max 7
1
1
programmable from 0 to 255 seconds
programmable from 0 to 255 seconds
programmable from 0 to 255 seconds
programmable from 0 to 255 seconds
programmable from 0 to 255 seconds
programmable from 0 to 255 seconds
manual programmable in groups
normally closed, normally open, single balance,
double balance, impulse (2)
32
64
200
300
8
YES
Ademco, Fast Format
through keyboards TDP01, TDI01 or with PC software
2nd LEVEL
(1) with expansion modules EBI08 (2) with expansion modules EBO08
CMP32_CMP64_inst_UK_24838400 11-06-10
Page 9 of 60
Devices that can be connected to the control unit
•
Remote wall-mounted keyboard with LCD - TDP01;
•
Remote recessed keyboard with LCD
•
Remote recessed keyboard with no display - TAI01;
•
Key-lock IN5xx (xx found in table below) usable only with KEY04 electronic keys
“xx”
- TDP01;
Model
“xx”
Model
MA
Ticino Magic
GB
Gewiss 20
LV
Ticino Living
VN
Vimar Idea black
LI
Ticino Living International
VB
Vimar Idea white
TL
Ticino Living Light
AN
Ave Noir
PB
Gewiss Play Bus
AB
Ave Blanque
•
Expansion 8 inputs on bus
- EBI08;
•
Expansion 8 outputs on bus
- EBO08;
•
Voice synthesis module can be connected in control unit
- ESV01;
•
GSM module can be connected in control unit
- EGM01;
CMP32_CMP64_inst_UK_24838400 11-06-10
Page 10 of 60
TECHNICAL CHARACTERISTICS
Technical features of control units
Electrical characteristics
Main power supply
Main power supply voltage
Input current
Transformer primary protection fuse
Transformer secondary protection fuse
230V AC (-15%,+10%) - 50Hz
100 mA
315 mA delayed
3.15 A delayed
Secondary power supply
Housed battery:
1 sealed lead battery 12V / 7Ah - BB065 (not included).
Power source
Nominal output voltage
Maximum output current
13.8 V DC
1.0 A for CMP32 - 1.5 A for CMP64
Battery charger
Nominal output voltage
Maximum output current
Protection fuse
13.8 V DC at 20° C
0.4 A
Resettable electronic fuse
Mechanical characteristics
Total weight without battery
Dimensions of box of control unit (L x H x D) mm
Thickness of sheet metal
painting:
Degree of protection
3.5 Kg
292 x 360 x 92
1.0 mm;
with epoxy polyester powder, grey RAL 9010;
IP30
Climatic characteristics
Operating temperature
Maximum relative humidity in operation
Storage temperature
Maximum relative humidity for storage
-5°C ÷ + 40°C
93% without condensation
-10°C ÷ +50°C
85% without condensation
Package
In the package of the unit you will find:
•
•
•
•
•
•
•
this manual (A393inst),
the programming manual (A393prog);
the user's manual (C393),
the control unit CMPxx,
16 electrical resistances of 1 kΩ 1/4W ;
1 resistance of 150 Ω 1/4W for the termination of the bus line;
anti-opening and anti-removal device;
Battery and mains connection cables are not included.
CMP32_CMP64_inst_UK_24838400 11-06-10
Page 11 of 60
Technical features of the control card
Power supply
Power supply voltage
Empty current input
13.8 V DC
250 mA
Live output for alarm devices (terminals + MCA + PCA)
Type
Nominal voltage
Maximum available current
Relay output with line protected by self-resettable electronic fuse
13.8 V DC
500 mA
Output with no voltage for alarm devices (terminals C, NC and NA)
Type
Capacity of contact
Relay output
8 A 24 V DC
Auxiliary output 12 V DC
Type
Nominal voltage
Maximum available current
Line protected by self-resettable electronic fuse
13.8 V DC
500 mA
Auxiliary output 12 V DC for system bus
Type
Nominal voltage
Maximum available current
Line protected by self-resettable electronic fuse
13.8 V DC
500 mA
Auxiliary output 12 V DC for output terminal board
Type
Nominal voltage
Maximum available current
Line protected by self-resettable electronic fuse
13.8 V DC
500 mA
Electronic programmable outputs (8)
Type
Maximum available current
Maximum applicable voltage
Open Collector
Max 50 mA with protection resistance 100 Ω
12 V DC – 24 V DC (with external power supplier)
Communications line RS232
Type
Technical characteristics
Voltage
Communication port dedicated to connection of a PC for programming the control
unit or a printer or connection to the NeHos Bpt system.
1200 baud, no parity, 8 bit, 1 stop bit
+12V / -12V
CMP32_CMP64_inst_UK_24838400 11-06-10
Page 12 of 60
Inputs of the system components
Devices
Input in mA
Control unit CMP32/CMP64
250
LCD wall-mounted keyboard TDP01
30 in stand-by; 115 backlit
LCD recessed keyboard TDI01
30 in stand-by; 115 backlit
Recessed keyboard TAI01
30 in stand-by; 40 backlit
Key-lock IN5xx
30
Expansion module 8 inputs on bus EBI08
30
Expansion 8 outputs on bus EBO08
30
Voice synthesis module ESV01
15
GSM module EGM01
30 in stand-by; 300 in communication
The voltage limits for the correct operation of all devices are 9.5 – 16 V DC.
!
Attention
If it should be necessary to have a greater current than that provided by the control units (for the supply of power to
sensors, diallers, sirens, etc.), it will be necessary to install one more additional power suppliers, for example V12D3.
CMP32_CMP64_inst_UK_24838400 11-06-10
Page 13 of 60
TERMINAL BOARDS FOR CONTROL UNITS CMP32 E CMP64
Terminals
, V AC
+,-,A,B
NC, NA,C
+MCA
+PCA
Meaning
Terminals for connection of the output of the transformer
Terminals for the connection of the system bus: power supply + data line
Contact in exchange free of voltage of the alarm relay that switches to alarm condition;
duration of energizing = time of alarm;
Terminal with presence of voltage of 13.8 V DC which is removed when control unit is in alarm
status; usable for connection to self-powered sirens, radio bridges, telephone diallers, etc.
Terminal with presence of voltage 13.8V DC in alarm status which is removed when the control
unit is in standby status; usable for external or internal sirens that are not self-powered
Terminals for power supply of sensors;
Terminals for connection of anti-tampering device of control unit.
+,-,+,-,
24H, Z1, - , Z2 , Z3 , - ,Z4,
Terminals for connection of sensors;
Z5, - , Z6 , Z7 , - , Z8
O1 , O2 , O3 , O4 ,
O5 , O6 , O7 , O8 , Terminals for connection of loads controlled by programmable outputs;
+,+
Terminals for connection of control unit to telephone line; L = Line – T = Telephones
L,L, ,T,T
CMP32_CMP64_inst_UK_24838400 11-06-10
Page 14 of 60
CONNECTION DIAGRAMS
Connection to electrical mains
!
Attention
The unit is powered at mains
voltage, 230 V AC - 50 Hz.
Therefore, it must be provided
with an earth connection using
the appropriate terminals.
Failure to connect all accessible
metal parts to the earth will
make the unit unsafe to use.
Always remember to earth the
cover of the control unit using
the pre-headed wire.
Attention
!
Protect the unit with an easily accessible bi-polar switch for
disconnection from the primary energy source.
Connection to battery BB065
!
CMP32_CMP64_inst_UK_24838400 11-06-10
Attention
Battery replacement must be performed only by
qualified personnel.
Dispose of the unit in accordance with current
standards.
Use only sealed lead batteries.
Page 15 of 60
Connection of system bus
Table of devices that can be connected to system bus for each model of control unit.
CMP32
Caution
Keyboards (TDP01 – TDI01 – TAI01)
Key-locks (IN5xx)
Expansion modules with 8 inputs (EBI08)
Expansion modules with 8 outputs (EBO08)
CMP64
max 8
max 8
max 3
max 3
max 7
max 7
Example of connection of system bus
Caution
The devices present along the system bus are to be connected strictly in parallel with one another (with "in and
out" connection). The bus line must terminate with a termination resistance RT of 150 ohm 1/4 Watt, provided
with the control unit, to be connected between terminals A and B of the most distant peripheral.
Connect the serial communication line only with twisted pair, shielded cable, connecting the shields to the
various sections of the wire. Finally , connect the shield only on the control unit side, connecting it to the
negative terminal of the power supply of the control card.
The maximum total length of the wiring is 1000 m. Keep in mind that the total input on the bus line may not
exceed the maximum current available for external devices.
The section of the power cables of the devices on the bus must be properly dimensioned so that the correct
operating voltage on the devices is ensured. The maximum distance which can be reached is closely connected to
the section of the power cord of the bus line and the absorption of each device.
For example, a cable of 2 x 0.75 mm2 through which a current of 100 mA passes causes a drop of approximately
1V every 200m. If the drop is excessive (due to the length of the connections and/or the current input) it will be
necessary to use additional power suppliers.
It is highly inadvisable to make shunted connection of the bus. If the topology of the system does not allow
straight-line connection of the various devices, follow the wiring instructions shown in the figure below at right.
NO
CMP32_CMP64_inst_UK_24838400 11-06-10
YES
Page 16 of 60
Connection of keyboards, key-locks and expansion modules on bus
As an example, a connection diagram is provided for all the various devices that can be connected to the system bus.
Connection of sirens model SA01L
Below is the connection diagram of a siren model SA01L: for other types of sirens refer to the connection diagrams
provided in the instructions.
Terminal 4 of the siren (+ PCS) is used to reset the flasher.
The siren flasher can behave in two ways: If terminal 4 is
connected as in the figure, in case of alarm the flasher will continue
to flash until the control unit is turned off by the user, thus
providing an external visual memory of the alarm occurrence. If the
aforesaid terminal is not connected, the flasher will only operate in
conjunction with the sounding of the siren.
To obtain this function it is necessary to programme the output
used (in figure O1) as the activated output by the event "system
disconnected".
The tamper of the siren can be connected to any input which is to
be programmed as "tamper".
CMP32_CMP64_inst_UK_24838400 11-06-10
Page 17 of 60
Connection of sensors
The sensors may be connected to the control unit according to one of the 4 modes shown below.
Caution
The control unit is factory set with connection of sensors with contact normally
closed with single balance. If you want to connect them differently, you will need to
properly programme the inputs so as to avoid false alarms.
Inputs not balanced for sensors with NC contact
Standby condition
Alarm condition
Line cut
Short circuit on line
input closed at earth
open input
as open input
NOT DETECTED
Inputs not balanced for sensors with NA contact
Standby condition
Alarm condition
Line cut
Short circuit on line
open input
input closed at earth
NOT DETECTED
as input closed at earth
Inputs with single balance for sensors with NC contact
Standby condition
Alarm condition
Line cut
Short circuit on line
input closed at earth
with resistance RFL = 1 KΩ
open input
open input alarm
input closed at earth Tamper alarm
Inputs with double balance for sensors with NC contact
Standby condition
Alarm condition
Line cut or tampering
with sensor
Short circuit on line
input closed at earth
with resistance RFL = 1 KΩ
input closed at earth
with heating element
RFL + RA = 2 KΩ
open input Tamper alarm
input closed at earth Tamper alarm
The connection of the sensors without balance, although permitted by the control
unit, does not allow recognition of a short circuit or cutting of the detection line
which is accidental or intended to neutralize the burglar alarm. It is therefore not
advisable to use it for the connection of burglar alarm sensors, while it is admissible for the connection of sensors
connected to inputs programmed as "technological" or "auxiliary".
Caution
CMP32_CMP64_inst_UK_24838400 11-06-10
Page 18 of 60
Connection of only one sensor per input
Connection for sensors with contacts
normally closed or open
without balance
Connection for sensors with contacts
normally closed
with single balance
Connection for sensors with contacts
normally closed
with double balance
Connection of several sensors in series per input
Connection in series for sensors with contacts normally open or normally closed without balance
Connection in series for sensors with contacts normally closed with balance
Caution
Connect the
sensors to the terminals of the control unit only with shielded cable, connecting the shields to the
various sections of the wire. Finally , connect the shield only on the control unit side, connecting it to the negative
terminal of the power supply of the control card.
No external anti-tampering device can be connected to the terminals “tamper e –“ on the control card, which are
exclusively dedicated to the connection of the anti-tampering device of the container of the control unit.
CMP32_CMP64_inst_UK_24838400 11-06-10
Page 19 of 60
For the connection of sensors (single or in series) without balance or with single balance, the anti-tampering outputs
(TAMPER) of the sensors and of the siren can be connected in series to one another to an input (also to an
expansion module EBI08) programmed as "tamper".
For connection with double balance it is not possible to connect the sensors in series.
i
Information
The connection diagrams for the sensors illustrated previously are valid also for the use of the expansion module
EBI08 for connection of 8 additional inputs. You only need to consider the corresponding terminals on the
expansion modules in place of the terminals on the card in the control unit.
The previously illustrated connection diagrams refer to a generic terminal board for the sensors. Refer to the
instruction manual for each sensor to make the proper connections.
CMP32_CMP64_inst_UK_24838400 11-06-10
Page 20 of 60
Connection of contacts for shutters CFSST and vibration sensors
SVAMB (only on expansion EBI08)
Connection of one sensor
Connection of two sensors
The direct connection of these sensors (without the
use of optional analysis cards) is possible only on
the expansions EBI08 and requires setting of type of
input as "impulse count".
Connection of outputs
The 8 Open Collector programmable outputs on the control card
were designed to drive devices that do not require more than 50
mA for their activation, with maximum applicable voltage of 12
– 24 V DC. The diagram of this principle is shown in the figure.
If it is necessary to control loads that require current in excess of
the limit of the outputs, it is advisable to use a low-input interface
relay (coil resistance of at least 600 ohm for a supply voltage of
12 V DC). In "anti-parallel" to the bobbin there must be inserted
a protection diode against overloads due to inductivity of the
load. A suggested diode is model 1N4007 or equivalent.
If the Open Collector outlet is used to turn on a LED diode, in
series with the LED diode there should be inserted a current
limitation resistance (for example resistance of 1000 ohm, ½ watt
for power supply of 12 V DC).
The figure refers to the terminal board of the control units CMP32/CMP64. The same indications are true for the four
Open Collector programmable outputs with which each expansion module EBO08 is equipped.
Caution
It is possible to direct loads powered by an external source directly to the control
unit (e.g. loads powered at 24 V DC with separate external power supplier) provided
they do not exceed the limits of available current and applicable voltage for each
output. In this case, the negative of the external power supply source must be
connected to the negative of the control unit.
CMP32_CMP64_inst_UK_24838400 11-06-10
Page 21 of 60
Connection to telephone line
If you want to connect the control unit to a telephone
line, for connection with security agencies or for
sending voice messages, it is necessary to make the
connection shown in the figure. It is obligatory to
connect the control unit directly to the external
telephone line (terminals L,L), while any other devices
which may be present (telephones, fax, etc.) must be
connected downstream from the control unit (terminals
T,T).
In this way, the control unit will have priority availability of the telephone line if it is necessary to send messages. This
will keep line from being occupied by receivers which, inadvertently or not, have been left off the hook. The earth
terminal must be connected to the earth of the electrical system. Make sure this connection is good.
!
Attention
Wire the telephone line with cables that are independent of any other cable in the system so as to prevent
damage to the system.
The control unit can only be connected to a PSTN (analogue) or ADSL line (if appropriate filter or splitter
installed upstream). Connection to digital lines (such as ISDN) will damage the circuits of the control card.
The installer must provide the user of the burglar alarm system with all required correct information on the
method of connecting the control unit to the telephone line.
Connection of serial port RS232
Connection to a PC for local programming
The connection shown here is the one to be used
if you want to connect a PC to the control units
for local programming, equipped with dedicated
software.
The connection is the standard one of cables
normally available on the market.
CMP32_CMP64_inst_UK_24838400 11-06-10
Page 22 of 60
Connection to Nehos Bpt System
The control units CMP32 – CMP64 can also be
connected to the serial port of the INTERFACE
BUS of the NeHos BPT system, to allow
supervision on a NeHos monitor. For further
information refer to the documentation on the
NeHos system.
In this case, the connection to be made is shown
here.
Connection to a serial printer
The control units can also be connected to a
printer with a serial port for printing events.
In this case it is necessary to make one of the
two connections shown here, depending on
whether the printer is equipped with a DB9 or
DB25 connector.
Events will be printed in a single line of 48
characters.
!
Attention
Do not touch the pins of the connectors of the serial ports with your fingers.
It is advisable to insert the cable first in connector DB9 of the control unit and then in the connector of the
device to be connected to the control unit.
Before connecting the cables, it is advisable to eliminate any charge of static electricity which may be
present by touching with your fingertips a metallic surface that is connected to the earth of the electrical
system (e.g. the chassis of a household appliance).
CMP32_CMP64_inst_UK_24838400 11-06-10
Page 23 of 60
Connection to optional cards
The control units can be optionally equipped with card ESV01 for recording four voice messages. They can also be
equipped with module EGM01 for transmitting telephone messages via the GSM telephone network.
!
Attention
All of the cards card must be assembled only and exclusively with the control unit completely de-energized,
thus disconnected from both the mains supply and the batteries.
The electronic cards may be seriously damaged by discharges of static electricity. Before handling them, if
possible, put on ESD wrist straps as protection against the accumulation of electrostatic charges. Otherwise,
at least make sure to have removed any residual charge beforehand by touching your finger tips to a metal
surface connected to the earthing system (ex: the chassis of a household appliance).
To access the control card, follow the instructions in the chapter on installation.
CMP32_CMP64_inst_UK_24838400 11-06-10
Page 24 of 60
Connection of the ESV01 module
Caution
The ESV01 should be connected to
the control unit card using the two
dedicated connectors, as illustrated
in the figure, making sure that all
the contacts are properly inserted.
CMP32_CMP64_inst_UK_24838400 11-06-10
Page 25 of 60
Connection of the EGM01 module
Caution
Fix the EGM01 module to the
container of the control unit using
the 3 adhesive bases supplied in the
package.
Assemble the antenna outside the
control unit using one of the
preformed holes located on the top
part of the container. Insert the
connector of the antenna cable into
the appropriate socket on the side
of the module.
The EGM01 module should be
connected to the control unit card
using the connection cable included
with the module. This cable should
be inserted in the corresponding
connector of the control unit as
illustrated in the figure, making
sure that it is coupled properly.
CMP32_CMP64_inst_UK_24838400 11-06-10
Page 26 of 60
OTHER SYSTEM COMPONENTS
Keyboards TDP01, TDI01, TAI01
LCD keyboard TDP01
for wall assembly
LCD keyboard TDI01
for recessed assembly
keyboard TAI01
for recessed assembly
Meanings of LEDs and icons.
LED
Colour
mains
green
on/off
green
alarm
red
partial
yellow
Symbol
On
Meaning
Flashing
Off
network presence
battery failure
lack of network
connected
output time
not connected
alarm memory
No alarm /
Ready for connection
-
-
Alarm (with system connected) /
Not ready (with system disconnected)
System partially inserted
or inputs temporarily bypassed
If you are in the TECHNICAL MENU, this is signalled by all four LEDs flashing simultaneously.
Use of keys
When the keys are touched, there is an effect that you can feel and a beep of the buzzer built into the keyboard. It is
possible to de-activate the buzzer singularly on each keyboard simply by simultaneously pressing the keys
To reactivate the buzzer, press the 2 keys again.
and
.
They are used in the technical menu in the windows for the selection of the areas and telephone numbers
to be associated to codes, inputs, events, etc., in the user menu for the insertion of codes, for the selection
of areas to connect/disconnect and in other windows where it is necessary to make selections.
….
They are used mainly for scrolling the menus in the various levels. The key⇒ scrolls forward, the key⇐
goes backwards. Scrolling is in loop form.
In all windows where the values to be set is pre-determined it allows scrolling of various options.
Scrolling is in loop form.
o
In any window, the key *
( X on the TDP01 ) goes back one level in the menu display.
In the "Function" window of the technical menu it makes it possible to enter the selected function with the
keys ⇐ ⇒. In windows where it is necessary to insert a numeric or alphanumeric string, it makes it
possible to enter modify mode and at the end to confirm the insertion.
In the user menu it is used to confirm insertion of a code.
CMP32_CMP64_inst_UK_24838400 11-06-10
Page 27 of 60
Special combinations of keys
Key Combination
Action
+
Key Combination
Action
< User Code> +
Switches the control unit
On / Off
< Installer Code> +
Accesses the Technical
Menu
Disables the keypad Buzzer
for more than 2 seconds
+
+
Displays
address
the
keypad
+
+
Sets the keypad address =1
< User Code> +
Starts the Partial
Arming Procedure
Zeros the keypad address
< User Code> +
Accesses the User Menu
+
Increases display contrast
< User Code> +
Tests inputs
+
Decreases display contrast
< User Code> +
Resets Alarm Memory
for more than 5 seconds
+
+
for more than 5 seconds
+ < User Code>
Aggression Alarm
Acoustic signals of the keyboards
Event
Sound of the buzzer
Entry time
Continuous sound
output time
Continuous sound with inputs closed
Intermittent sound with inputs open
Alarm time
Continuous sound
The sound of the buzzer upon occurrence of the three events described above can in any case be de-activated for each
single keyboard.
Key-locks IN5xx and electronic keys KEY04
Meaning of the LEDs
LED
Colour
Meaning
On
Flashing
green
connected
output time
not connected
alarm
red
Alarm (system connected)
Not ready (system disconnected)
alarm memory
no alarm / ready
for connection
partial
yellow
System partially inserted
-
-
on/off
Off
The key-lock is usable only with keys KEY04.
CMP32_CMP64_inst_UK_24838400 11-06-10
Page 28 of 60
Expansion modules for inputs and outputs
If the number of inputs and outputs on the control card in the control unit is not enough to meet system requirements, it
is possible to use the expansion modules EBI08 (8 additional inputs) and EBO08 (4 additional Open Collector outputs
and 4 with relay with dry contact).
Expansion modules with 8 inputs EBI08
Expansion modules with 8 outputs EBO08
The expansion modules can be located along the system and they communicate with the control unit by means of the
system bus to be connected with the previously described methods. They can be installed in 4 ways: in a common
recessed box; on the wall with two plugs using the holes in the fastening tabs; on DIN rail using the appropriate hook;
in the container of the control unit or additional power suppliers.
The modules are to be installed in places that are protected from humidity
!
Attention
Caution
and dust.
For housing them, avoid using a recess box which is already used for the
passage of cables for 230V mains voltage.
If you want to power the sensors connected to an input module with an
external power supplier, remove the jumper for enabling 12V DC external
power supply, which can be accessed on the inside by opening the container.
CMP32_CMP64_inst_UK_24838400 11-06-10
To reach Level II of safety as prescribed by Standard CEI 79-2, it is possible to
install on each module the anti-tampering cover EBTAM which is described
below.
Page 29 of 60
The control unit recognizes each module by means of the address which can be programmed by means of the DIP
switches on the card which are accessible from outside without the need to open the container.
CMP32
Ind. DIP switch position
1
ON-OFF-OFF-OFF
2
OFF-ON-OFF-OFF
3
ON-ON-OFF-OFF
CMP64
Ind.
1
2
3
4
5
6
7
DIP switch position
ON-OFF-OFF-OFF
OFF-ON-OFF-OFF
ON-ON-OFF-OFF
OFF-OFF-ON-OFF
ON-OFF-ON-OFF
OFF-ON-ON-OFF
ON-ON-ON-OFF
Alongside there is a description of all the addressing
configurations which can be assigned to the modules for
each model of control unit.
Caution
If, for the addressing of a module, one of the configurations is used which is not
included, the control unit will ignore the module.
Caution
In order to avoid malfunctions, be careful not to assign the same address to modules
of the same type. You can however assign the same address to an input module and
to an output module.
For connection of the sensors to the input modules and for the guiding of loads by means of the 4 Open Collector
outputs of the output modules, refer to the information on the inputs and outputs on the control card of the control unit.
The inputs on the remote expansion modules can also be configured for direct connection to sensors for shutters
(CFSST) or vibration sensors (SVAMB).
Relay output connection (EBO08)
An example is shown here of possible connection of loads to the 4
output relays of the output mode. The output contact of each relay
has a default setting of normally open. If it is necessary to use
normally closed contacts, place the jumper of the relay, accessible
inside by opening the container, in the position shown for the output
“O1”. The capacity of the relay contacts is 1 A, 12 – 24 V DC.
If it is necessary to open the containers and handle the cards, wear bracelets
!
Attention
CMP32_CMP64_inst_UK_24838400 11-06-10
that prevent the build-up of static electricity. Otherwise, at least make sure
to have removed any residual charge beforehand by touching your finger
tips to a metal surface connected to the earthing system (ex: the chassis of a
household appliance).
Page 30 of 60
Anti-tampering covering EBTAM for expansion modules EBI08-EBO08
The use of this accessory is indispensable if the expansion modules EBI08 and EBO08 are to be used while desiring to
keep the system at the Security Level II of the control units.
To correctly install the EBTAM Cover, following the
instructions below:
Install the modules to the wall or solidly to the bottom
of a container, or in any case onto a perfectly flat
surface, by means of the plugs, using the holes located
on the fixing tabs;
If the module has already been enabled, temporarily
exclude it using the “Peripheral Configuration” of the
Technical Menu in order to avoid false tamper alarms;
Remove the “Tamper Disable” jumper and connect
the terminal of the Cover in its place;
Then fix the Cover to the module with the screws provided, being very careful that, in the chosen position, the lever
of the Cover's microswitch is operated and the connection cable between Cover and Module is not accidentally
positioned between the two elements;
In the event it was necessary to temporarily exclude the module, restore it using the “Peripheral Configuration”
function of the Technical Menu.
CMP32_CMP64_inst_UK_24838400 11-06-10
Page 31 of 60
Additional power suppliers
If the total consumption of the devices exceeds the capacity of current supply of the power supplier of the control unit
or the length of the cables is such that the drop in ohms in them does not allow proper power supply of the devices that
make up the system, you will need to use additional power suppliers.
The following are some examples of connection diagrams.
Power supply of sensors
connected to the inputs of the control unit
Power supply of loads
driven by the control unit outputs
Power supply of some devices connected to the system bus line.
The negative terminals of each additional power supplier must be connected
!
to one another and with the negative terminal of the control unit using a
cable with a minimum cross-section of 1 mm2 to ensure to the extent
possible that the earths of the various connected devices are equipotential.
Attention
The positive terminals of each additional power supplier must be connected
only to the powered devices or connections. It is absolutely prohibited to
connect the positive terminals of the additional power suppliers to one
another or to connect a positive terminal of a power supplier to the positive
of the power supply of the control card of the control unit.
CMP32_CMP64_inst_UK_24838400 11-06-10
Page 32 of 60
Power supply of sensors connected to inputs of an expansion module EBI08
!
Attention
If you want to power the sensors connected to an input module with an
external power supplier, remove the jumper for enabling 12V DC external
power supply, which can be accessed on the inside by opening the container.
Then connect the + terminal located between terminals B and Z1 to the positive
of the power supplier. All negative terminals of the module are to be connected
to the negative of the power supplier.
Power supply of loads driven by the outputs of an expansion module EBO08
!
Attention
If you want to increase the loads driven by the outputs of an expansion module
EBO08 with an additional power supplier, you will need to connect the
negative of the power supplier to the negative terminal of the module.
CMP32_CMP64_inst_UK_24838400 11-06-10
Page 33 of 60
GENERAL INFORMATION ON PROGRAMMING THE CONTROL UNIT
Areas
Each system can be divided into 8
areas, assigning a burglar alarm input
to one of them (or to more than one of
them, which however is not
advisable).
The areas can also be assigned
keyboards, key-locks and user codes.
These properties are very useful if you
want to connect the system partially,
or if you want to differentiate access to
certain areas based on the user code.
The facility protected by the alarm
system will therefore be divided into
several areas logically separated from
one another.
Each area may have its own exit time, i.e. the delay with which the control unit recognizes as an alarm the violation of
any input belonging to the area immediately after connection of the area, and two different entry times, i.e. the time the
system waits between the violation of an input defined as "delayed" and the disconnection of the area before the
violation is recognized as an alarm.
Each area may or may not be set up for the "forced on" function, which is the possibility to connect the area even if at
the moment of connection one or more inputs assigned to it are open i.e. violated (for example, a window protected by a
magnetic contact that has inadvertently been left open). If the "forced on" option is enabled, the area will be connected
even if there are open inputs, which will be temporarily bypassed by the control unit and which will again be included
the next time the area is disconnected. Otherwise, the control unit will interrupt connection of the area and wait until all
the inputs that belong to it are closed, i.e. not violated.
For greater immediacy in the visualization of events, each area can be assigned an alphanumeric description of 16
characters.
Finally, an area can be defined as a slave of other areas. This means that the area described as slave can not be
independently connected, but will be connected when at least one area that controls it (master area) is connected and it
will be disconnected only when all areas that control it are disconnected. The slave areas must not be associated to
codes to control their status, since this depends only on the status of the control areas. Furthermore, it is not possible to
create slave area combinations, i.e., a slave area cannot control other slave areas. It is useful to assign this attribute to
areas with common passage to others or surrounded by other master areas (e.g. A7 in the figure above, defined as slave
of areas A1, A2, A3, A4).
The default setting, which can be freely modified, establishes that:
each input is assigned to area 1;
areas 1 and 2 have exit time, entry time 1 and entry time 2 of 20 seconds. All the
Information
other areas have these times set to 0.
the "forced on" option is disabled ( = ”NO”) for all areas;
no area is defined as slave of one or more other areas;
the assigned description is "Area n" where n= area number
i
i
Information
CMP32_CMP64_inst_UK_24838400 11-06-10
The control units CMP32 and CMP64 manage a maximum of eight areas.
Page 34 of 60
Keyboards and key-locks
As previously stated, also keyboards
and key-locks can be assigned to one
or more of the defined areas. With the
exception described below, they will
be the only ones that can be connected
or disconnected using that device.
In the example, keyboards T1 and T2
control areas A1 and A2, keyboard T3
controls areas A3, A4, A5 and A6,
key-lock I1 controls areas A3 and A4,
key-lock I2 controls areas A5 and A6.
Area A7, defined as slave, is not
controlled directly by keyboards or
key-locks.
As previously mentioned, for each keyboard, along with the areas it controls, it is possible to establish whether or not it
is to emit a sound signal during the entry and exit time and during alarm time and whether or not it is to forward the
tampering signal to the control unit.
The default setting, which can be freely modified, establishes that:
all keyboards and key-locks are assigned to all areas;
for the keyboards, the sound signal is enabled during the entry and exit time and
during the alarm time;
forwarding of the tampering signal is disabled for all keyboards in order to allow
commissioning.
i
Information
i
Information
CMP32_CMP64_inst_UK_24838400 11-06-10
A maximum of 8 keyboards and 8 key-locks can be connected on the bus line to
the CMP32 and CMP64 control units;
Page 35 of 60
Codes
Also the user codes (32 for CMP32 and 64 for CMP64) can be assigned to a set of areas, which will be the only ones
that will be able to be connected and/or disconnected by that code. Also, each code will have its own level of priority,
which will allow or disallow a series of operations as specified in the table below.
Functions that can be performed directly also from outside the user menu
Action
Total or partial connection/disconnection of the areas assigned to the code
regardless of those assigned to the keyboard / key-lock
Total or partial connection/disconnection of the areas assigned to the code
corresponding to those assigned to the keyboard / key-lock
Silencing of alarms of all areas (1)
Silencing of alarms of associated areas (1)
Forced connection of any area by successive pressing of key↵ (2)
Resets Alarm Memory
Accesses the User Menu
Level 4
Level 3
Level 2
YES
NO
NO
YES
YES
YES
YES
YES
YES
YES
NO
YES
YES
YES
YES
Level 4
YES
YES
Yes
YES
YES
YES
YES
YES
YES
YES
YES
YES
Level 3
YES
YES
NO
YES
NO
NO
YES
YES
YES
NO
NO
YES
Only
connection
NO
YES
NO
NO
NO
Functions which can be performed in the user menu
Action
Display of events memory
Temporary exclusion of inputs
Setting of date and time
Variation of own user code / programming of own key
Variation of user codes of others / programming keys of others
Deletion of user codes
Tests inputs
Siren test
Forwarding of phone call for remote assistance
Enable /disable access to remote programming by installer.
Enable operation with timer programmer
Extension of timer programmer
(1)
The alarms are silenced by any operation (turning on or off, turning on partially, etc.) validly carried out with a code
with a level of priority of 2, 3, 4;
(2)
Forced connection can always be actuated with codes with a level of priority of 3 or 4 by again pressing
during
the exit time while the display shows open inputs;
(3)
Telephone calls in progress are placed on hold by any operation (turning on or off, turning on partially, etc.) validly
carried out with a code with a level of priority of 3 and 4;
A code programmed with level of priority 1 does not cause any action except for possible activation of outputs; only the
valid typed data is memorized. This level of priority is for example usable with "patrol" codes.
i
Information
The default setting, which can be freely modified, establishes that:
all areas are assigned to all user codes;
the highest level of priority (4) is assigned to all user codes (4)
only one user code exists (the first) equal to “1234”;
the installer code, which is the only code that allows access to the technical menu,
is equal to “11223”;
the communication code, which is the unique password to be inserted in the
programming software, both remote and local, is equal to “54321”.
CMP32_CMP64_inst_UK_24838400 11-06-10
Page 36 of 60
i
Information
The setting of parameters of each user code can be made only in the technical menu.
The assignment of codes for each user can be made only in the user menu by a code
with a level of priority of 4;
User
Level A1 A2 A3 A4 A5
A6
1
4
YES YES YES YES YES YES
2
4
YES YES YES YES NO NO
3
3
YES YES YES YES YES YES
4
3
YES YES YES YES NO NO
5
2
YES YES YES YES NO NO
6
1
YES YES YES YES YES YES
The illustrated example shows what happen in practice:
User 1 can connect or disconnect any area because all areas have been assigned to him. Also, since the code is level
4, he can perform this operation from any keyboard;
User 2 can connect or disconnect only areas 1, 2, 3, 4 from any keyboard, since the code is level 4. Therefore, he
may never connect or disconnect areas 5 or 6, not even for example from keyboard T3;
User 3 may connect or disconnect any area because all areas have been assigned to him, but to perform the
operations he is subject to the restrictions placed on the keyboards, since his level of priority is 3. He may control
areas 1 and 2 from keyboard T1 or T2, areas 3, 4, 5, 6 from keyboard T3;
User 4 may connect and disconnect only areas 1, 2, 3, 4 and he is also subject to the restrictions placed on the
keyboards, since his level of priority is 3. He may control areas 1 and 2 from keyboard T1 or T2, and areas 3 and 4
from keyboard T3;
User 5 may only connect areas 1, 2, 3, 4 and he is also subject to the restrictions placed on the keyboards, since his
level of priority is 2. He may connect areas 1 and 2 from keyboard T1 or T2, and areas 3 and 4 from keyboard T3;
Finally, User 6 has all areas assigned, but since his level of priority is 1 he can neither connect nor disconnect any
area from any keyboard. As previously stated, information typed in by a code with level 1 is in any case memorized
and can, if set, cause activation of an output.
CMP32_CMP64_inst_UK_24838400 11-06-10
Page 37 of 60
Inputs
The definitions of each burglar alarm input is fundamental to the creation of a safe, functional system. The following is
a description of some of the parameters that can be programmed for each of them.
Type
The type of each input can be defined in one of the following ways:
1
2-3
4
5
6
7
8
9
10
11
12
13
Active only when the control unit is connected.
If unbalanced it activates the relay output of the MAIN ALARM and continuous sounding of
the buzzer, and the alarm LED on the keyboard comes on.
Also, the alarm telephone call is made to the associated telephone numbers.
Active
only when the control unit is connected.
Delayed 1 (2)
If unbalanced it starts ENTRY TIME 1 (2), associated to the area to which it belongs, during
which the valid code must be typed in to disconnect the control unit. During this time the buzzer
emits a continuous sound.
If the control unit is not disconnected the BURGLAR ALARM relay output will be activated, as
well as the intermittent sound of the buzzer and the alarm LED on the keyboard.
Also, the alarm telephone call is made to the associated telephone numbers.
Input active with control unit connected.
Passage
It acts as a delayed input if an input of the type DELAYED 1 (2) belonging to any area starts the
ENTRY TIME 1 (2). It acts as an immediate input in all other situations.
Instantaneous
input active whether the control unit is connected or disconnected.
Tamper
If unbalanced it activates the relay output of the MAIN ALARM, the output defined for the
tamper alarm, continuous sounding of the buzzer, and the alarm LED on the keyboard comes
on.
Technological Instantaneous input active whether the control unit is connected or disconnected.
If unbalanced it activates the output defined for the TECHNOLOGICAL ALARM, continuous
sounding of the buzzer, and the alarm LED on the keyboard comes on.
Instantaneous input active whether the control unit is connected or disconnected.
Emergency
If unbalanced it activates continuous sounding of the buzzer, and the alarm LED on the
keyboard comes on.
Instantaneous input active whether the control unit is connected or disconnected.
Aggression
If unbalanced it activates the relay output of the MAIN ALARM and continuous sounding of
the buzzer, and the alarm LED on the keyboard comes on.
Input active whether the control unit is connected or disconnected.
Silent alarm
If unbalanced, NO output is activated and NO visual or acoustic signal is provided on the
keyboards. It can be used to activate an output and/or a telephone call.
Instantaneous input active whether the control unit is connected or disconnected.
Auxiliary
If unbalanced it activates the output defined as AUXILIARY ALARM, the emission of a
continuous sound of the buzzer of the keyboards and the alarm LED on the keyboards.
Input used to connect/disconnect areas associated to it. When the input is unbalanced they
Key type 1
change status between connected and disconnected in step mode.
Input used to connect/disconnect the areas associated with it. When the input is unbalanced it
Key type 2
inserts the areas associated with the input, whereas when the input is balanced it disconnects the
areas associated with the input. Contrasting commands given by the keyboards, key-locks, or
timer programmers have priority over a command given by the key input.
Block of timer Input active whether the control unit is connected or disconnected.
programmer If unbalanced it freezes the actions of the timer programmer until it is once again balanced. Any
actions that are not performed during the block will NOT be performed when the timer
programmer is restored to normal operation.
Immediate
CMP32_CMP64_inst_UK_24838400 11-06-10
Page 38 of 60
Status
The status of each input can be defined as:
1
Included
2
Off
3
In test
The input is active according to the modes defined by the programmed TYPE. In this status, in
alarm conditions, the outputs for local alarm, telephone calls, optical signals and memorization
of the event are activated.
In this status, the input is always inactive, regardless of the status of the control unit. The
corresponding tamper alarm signal is also de-activated.
The input is active according to the modes defined by the programmed TYPE. In this case, in
the event of an alarm, the alarm outputs are NOT activated, whereas the optical signals, the
telephone calls and the memorization of the event remain active.
Balancing
An input can be described as:
1
2
3
4
5
Single balance
Double balance
Normally open
Normally closed
Impulse count
For connection of the sensors, refer to the previously illustrated diagrams.
ONLY the inputs on the remote expansion modules can be configured as
IMPULSE COUNTS for direct connection to sensors for shutters (CFSST) or
vibration sensors (SVAMB).
Associated areas
Each input must be associated to one of the eight areas into which the system is divided.
It is not advisable to associate a single input to more than one area. If an input is associated to more than one area, it
will be active if at least one of the areas is connected and inactive only if all areas are disconnected.
Gong option
Attribute which can be assigned to inputs defined as “immediate”, “delayed” or “passage”.
An input defined as “Gong”, if unbalanced with the control unit connected, has its behaviour defined by the
corresponding type, whereas with the control unit disconnected it activates the buzzer of the keyboards for about three
seconds.
It operates in a manner that is similar to the doorbell that rings automatically when entering certain shops.
Auto-exclusion
This is the parameter that indicates the maximum number of alarm conditions per single arming cycle, after which the
input will be auto-excluded temporarily until the disarming of the area associated with it.
Events memory option
This parameter indicates which input status must be memorized in the events memory.
No memory
Alarm memory
Restore memory
Restore and alarm memory
no condition of the input is memorized
only the unbalancing of the input is memorized;
only the re-balancing of the input is memorized;
both conditions are memorized;
Since phone calls (see below) take into account the contents of the events memory (provided the telephone numbers to
be called have been properly selected for the inputs), there may be phone calls in the event of unbalancing, or the rebalancing of the input or in both cases bases on how the memorizations for each input were selected.
CMP32_CMP64_inst_UK_24838400 11-06-10
Page 39 of 60
Inputs in “AND”
It is possible to establish that an input provokes an alarm only if another input is also in the same alarm status. Each
input can be in AND with only one input different from it. Several inputs can be in AND with the same input.
Cascaded AND conditions between several inputs (ex.: an input in AND with another that is in turn in AND with a
third) are not handled.
Description
For greater immediacy in the visualization of events, each input can be assigned an alphanumeric description of 16
characters.
Impulse count
Only for inputs defined as "impulse count", belonging exclusively to one of the expansion modules EBI08 which may
be present, the following three parameters must be set if you intend to connect the sensors for shutters CFSST or
vibration SVAMB.
Impulse amplitude
It determines the minimum amplitude that the pulse must have in order to be considered valid (range 0-3). Set to “0” if
CFSST shutters sensors are connected.
Number of impulses
This determines the number of the pulses that must be reached in order to cause the alarm condition (range 1-15).
Interval amplitude
This determines the duration of the time interval in which must be recorded the set number of pulses in order to cause
the alarm condition (range 0 – 255 sec.).
CMP32_CMP64_inst_UK_24838400 11-06-10
Page 40 of 60
Outputs
The outputs on the control card or those belonging to the expansion modules EBO08 can be activated by inputs, codes,
failure signals or by events to be associated with the areas.
Outputs activated by inputs
To each input it is possible to match one or more outputs (identified by their number) that will be activated if the input
becomes unbalanced. For this type of output, the following parameters can be programmed:
Always
1
Command Enabled
Disabled
the output is always controlled by the unbalancing of the input regardless of the
connection status;
the output is controlled by the unbalancing of the input if one or more areas associated
with it are connected;
the output is controlled by the unbalancing of the input if no areas associated with it are
connected;
the output follows the progress of the input to which it is associated. Therefore it
active as long as the input is unbalanced and is once again inactive when the input
again balanced;
the impulsive input is activated when the input with which it is associated
Impulsive unbalanced. It remains active for the programmed activation time, and then
deactivates automatically;
Stable
is
is
2
Type
3
Activation This establishes the duration of activation of the impulsive output. The output remains active even
if, during that time, the cause that determined activation should reoccur.
time
is
it
Outputs activated by codes
For each code, it is possible to associate one or more outputs (identified by their number) which will be activated if it is
validly typed in, regardless of the status of the control unit. The activation will in any case be impulsive. The following
parameter can be programmed for this type of output:
1
Activation This establishes the duration of activation of the impulsive output. The output remains active even
if, during that time, the cause that determined activation should reoccur.
time
Outputs activated by failure signal
For each failure signal, including "fuse failure", "power outage" and "battery failure", it is possible to associate one or
more outputs (identified by their number) which will be activated if it occurs regardless of the status of the control unit.
The output will remain active as long as this failure persists. For this type of output, the following parameters can be
programmed:
Negative
security
1
Type
Positive
safety
The output is normally inactive. It is activated when a failure condition is present.
By connecting a relay to a negative security open collector output, the coil of the relay
is normally de-energized, and is energized when the output is activated.
For relay outputs on EBO08 the coil is normally de-energized.
The output is normally active. It is de-activated when a failure condition is present.
By connecting a relay to a positive security open collector output, the coil of the relay is
normally energized, and is de-energized when the output is activated.
For relay outputs on EBO08 the coil is normally energized.
CMP32_CMP64_inst_UK_24838400 11-06-10
Page 41 of 60
Outputs activated by events associated with areas
For each area and for each event including burglar alarm, tamper alarm, technological alarm, auxiliary alarm, system
partially connected, area not ready for connection, area disconnected, area with inputs temporarily bypassed, it is
possible to associate one or more outputs (identified by their number) which will be activated if the event occurs
regardless of the status of the control unit. For the outputs controlled by "Alarm" events, the duration is determined by
the relative parameter; for those controlled by other events, the output will remain enabled for the entire duration of the
event itself.
For this type of output, as with the previously described outputs activated by failure signals, either positive security or
negative security can be programmed.
If no output is associated to one or more events from among burglar alarm, tamper alarm, technological alarm, auxiliary
alarm, if one of them occurs it will cause activation of the burglar alarm relay of the control card.
On the contrary, if one or more events from among burglar alarm, tamper alarm, technological alarm, auxiliary alarm
have been assigned outputs relative to one or more areas, if one of them occurs it will cause activation of the selected
output, while the burglar alarm relay will not be activated.
Control unit timer controls
The duration of activation of the outputs connected to the events burglar alarm, tamper alarm, technological alarm,
auxiliary alarm can be set independently. The range is 0-255 seconds.
CMP32_CMP64_inst_UK_24838400 11-06-10
Page 42 of 60
Special functions
The following parameters can be set:
1
Interval of selftest
This determines how often, in hours, the control unit automatically performs the functional
self-test.
This period is also the time that elapses from the start-up of the control unit and the first selftest. If the value is set to 000, there will be no self-test.
2
Battery test
This determines how often, in minutes, the control unit automatically performs a dynamic test
of the battery. If the value is set to 000, there will be no test.
3
This establishes the length of time after which a power failure is considered an anomaly and,
Delay of signal
for power failure if programmed, the event is inserted in the events memory.
On
4
Automatic start
Off
Previous
YES
5
Printer output
NO
When the power comes back on, the control unit will automatically be placed
in connected status, if the control unit mains or battery power supply have
failed.
When the power comes back on, the control unit will automatically be placed
in disconnected status, if the control unit mains or battery power supply have
failed.
When the power comes back on, the control unit will automatically be placed
in its previous status, if the control unit mains or battery power supply have
failed.
The RS232 output is set up for connection to a serial printer for online printing
of events.
The RS232 output is set up for connection to a serial printer for offline printing
of events or for connection to the interface bus of the NeHos BPT system.
6
Alarm output
Dedicated In the event of a burglar alarm, the alarm relay and the outputs +MCA e +PCA
+ burglar will be activated, as will all programmable outputs associated to that event.
alarm
In the event of a burglar alarm, the alarm relay and the outputs +MCA e +PCA
Only
will not be activated, but only all programmable outputs associated to that
dedicated
event.
7
Keyboard
message
System
status
Status
of areas
8
GSM
remote
control
Enabled
(2.01 versions of
firmware
and
Disabled
subsequent)
This enables the function, making it possible to give commands to the control
unit by means of a telephone call. The instructions for how to do this are in the
user menu.
Disables the function.
9
Shutdown
command
If GSM remote control is enabled, it makes it possible to deactivate the system.
Disables the function.
10
Caller
recognition
Enabled
Disabled
Enabled
Disabled
CMP32_CMP64_inst_UK_24838400 11-06-10
The keyboards with show the messages "system connected" without specifying
the inserted areas, or "system disconnected".
The keyboards will show the messages “areas xxxxxxxx”, precisely specifying
the connected areas, or "system disconnected".
In this case, the GSM remote control will accept incoming calls only from
numbers contained in the phone book of the control unit.
If the GSM remote control is enabled, it makes it possible to accept incoming
calls from any number.
Page 43 of 60
Telephone signalling of events
For each of the following events
Power supply failure (fuses);
Power mains failure;
Battery failure
Burglar alarm or tamper alarm
Silent or aggression alarm
Technological alarm
Help alarm
Self-test failed
Auxiliary alarm
Control unit disconnected;
Control unit connected
Control unit partially connected
Reset alarms
It is possible to choose to which of the eight available telephone number to send on of the four voice messages provide
on the optional card ESV01. (The ninth telephone number is reserved for the request of remote assistance).
CMP32_CMP64_inst_UK_24838400 11-06-10
Page 44 of 60
Parameters for telephone numbers
For each telephone number, the following parameters can be set:
1
Number
This is the number, including the area code, to be called. It consists of the corresponding
numerals, and possibly the characters C (key ⇑ ), to be used for a PABX switchboard, followed
by an extension number for requesting an outside line, and P (key ⇓ ) to insert a pause during
dialling.
2
System number
This determines the number used by the security firm to identify the user that sent the signal.
As agreed upon with the security firm, it can contain from 3 to 6 numerals.
3
This determines the maximum number of telephone calls that the control unit is to make for
Communications each number (1 - 20). In carrying out the programmed sequence, the control unit may try again
immediately after dialling a number, or it may attempt to dial any other programmed numbers,
attempts
depending on what is programmed in the sequence of telephone calls (see below).
4
Protocol
This is to be used for communication with a security firm that has a receiver that
communicates with this protocol.
This is to be used for communication with a security firm that has a receiver that
communicates with this protocol.
To be used for connection with a service centre equipped with the special Brahms
software for remote management/programming.
To be used for communication addressed to a normal telephone user for the receipt
of voice messages.
To be used for communication addressed to a normal telephone user for the receipt
of digital messages.
Fast
Format
Contact
ID
Remote
PC
Voice
message
SMS
5
Connection
This determines whether the first attempted call is to be made via PSTN.
This determines whether the first attempted call is to be made via GSM.
PSTN
GSM
Parameter for telephone calls
For each telephone call (in multi-frequency mode) the following parameters can be set:
1-1-2-2
1
Sequence
1-2-3-4
YES
2
End cycle
Calls
NO
3
Stop
YES
communications
NO
4
Dial tone
5
Dialling pause
YES
NO
In the event of failed communication (e.g. if the called number is busy), the same
number is immediately dialled again.
In the event of failed communications, the communicator will continue with the
cycle, dialling other programmed telephone numbers.
For digital messages (Fast Format or Contact ID protocols), the first successful call
will stop further calls to that number. For voice messages, the first user that presses 5
after receiving a message stops all subsequent calls, thus interrupting the
programmed cycle.
For digital messages (Fast Format or Contact ID protocols), the first successful call
will not stop further calls to that number. For voice messages, a user who presses 5
after receiving a message stops all subsequent messages to that number, whereas the
programmed cycle continues.
The cycle of telephone calls can be interrupted by typing in a valid user code with a
priority of 3 or 4.
The cycle of phone calls cannot be interrupted.
The control unit must check for a dial tone before dialling the number.
The control unit does not need to check for a dial tone before dialling the number.
Time lapse between two consecutive calls to the same number (0 - 255 seconds).
CMP32_CMP64_inst_UK_24838400 11-06-10
Page 45 of 60
Timer Programmer
The CMP32 and CMP64 control units are equipped with a timer programmer with 8 possible programmes, each with 20
different steps, by means of which it is possible to time-control the connection/disconnection of the control unit or of a
single area, the activation of an output or the temporary locking of codes with a certain level of priority assigned. For
each of the 20 steps that make up the 8 programmes, it is possible to set the following parameters:
1
Hours
Hour of activation of the program step
2
Minutes
Minute of activation of the program step
Action
None
Control unit
Output
Area
Lock codes
Address
If the action concerns the control unit it has no effect.
If the action concerns an output it determines the number of the involved output.
If the action concerns an area it determines the number of the involved area.
If the action concerns the locking of codes, it determines the priority of the codes to be locked.
3
4
No action associated with step
The action associated with the step concerns the control unit.
The action associated with the step concerns an output.
The action associated with the step concerns an area.
The action associated with the step concerns the locking of codes.
If the action concerns the control unit or an area, it causes its connection.
If the action concerns an output, it causes its activation.
If the action concerns the locking of codes, it causes them to be unlocked.
If the action concerns the control unit or an area, it causes its disconnection.
OFF If the action concerns an output, it causes its deactivation.
If the action concerns the locking of codes, it causes them to be locked.
ON
5
Status
6
Extension
YES
NO
The programmed action is subject to suspension for a limited time (e.g. to postpone the
time of automatic connection to make allowance for persons working overtime).
The programmed action is not subject to suspension.
Automatic calendar
With the CMP32 and CMP64 control units, each of the 8 timer programmers can be assigned to a day of the week, and
it is possible to set 32 annual holidays (defined by day and month of observance) so as to establish an automatic weekly
calendar. It is also possible to establish the month, day, and the starting and ending of summer time to adjust the
programming of the set time.
Finally, for each action which is defined as extensible, it is possible to establish the duration in minutes of each
extension (30 – 60) and the maximum number of requests for extension allowed for each single step ( 0 – 4 ). The
request for activation of extension takes place from the user menu with a priority code of 3 or 4 and starts the extension
time, during which ALL automatic actions controlled by the timer programmer and subject to extension are suspended.
At the end of the extension time, the suspended actions will be performed.
Before the extension time is up, another request may be carried out, for a number of times compatible with what is
programmed. Vice versa, if you want to interrupt the extension, just connect the control unit or the concerned area.
If you ask for another extension before the first one is finished, any remaining time will NOT be added to a new
extension period but instead it will be lost. This means you will only be able to use one entire extension period for each
additional request. Therefore it is advisable to renew the extension request near the end of the previous time so as to
make better use of this function.
CMP32_CMP64_inst_UK_24838400 11-06-10
Page 46 of 60
Clock
The control unit is equipped with a clock (software) that is reset whenever you completely power off the control unit,
i.e. no mains power and without battery. Therefore, it must be set each time it is powered on.
It is essential to set the time and date precisely. This will allow correct event recording and all operations connected
with time programming.
The parameters that can programmed when setting the date and time are day, month, year, hours, minutes, seconds.
CMP32_CMP64_inst_UK_24838400 11-06-10
Page 47 of 60
INSTALLATION
Installation and volumes
The control units must be installed in an easily
accessible area, at least for maintenance. To respond
to this need, along the entire perimeter of the
container, a free space of about 500 mm must be
left in order to allow easy installation and removal
of the cover, allow easy access to maintenance
workers and make it easier to lay cables for the
network and for connection to other devices.
!
Attention
Place the control unit in a clean, dry location that is not subject to any sort of shock or
vibrations. The temperature should be between -10° and +50° C . Non-condensed
relative humidity must not exceed 93%.
Fastening of container
Install the container as follows:
Open the cover by loosening the four screws on the front,
as shown in the figure at left.
Remove the cover from the container.
Using the container as a template, mark the positions for
the fastening holes. Make sure the wall is flat at the
selected location.
Drill holes in the wall that will house the container and
insert the plugs required to fasten the container.
Fasten the base of the container firmly to the wall using
screws.
Passage of cables
For the passage of cables, it is possible to use the holes
on the base of the container or to punch out the preformed holes on the upper part of the container.
Place the battery as shown on the figure.
!
Attention
Ensure that there is no chance of accidental contact
between the cables and the container, since the container
is made of conductive material.
CMP32_CMP64_inst_UK_24838400 11-06-10
Page 48 of 60
COMMISSIONING
Preliminary operations
Fasten the control unit in the selected place.
Place the anti-tampering and anti-opening device in its housing slot and connect it to the terminals
“tamper , -“ of the control card. Check that the DIP switch for enabling/disabling the anti-tamper
device is in the position "Anti-Tamper Disabled" as shown in the figure, in order to prevent
undesired activations of the alarm relay during commissioning.
Connect any accessory cards (ESV01, EGM01) to the control card.
Position and connect by system bus the keyboards (TDP01, TDI01, TAI01) and any key-locks (IN5xx) and
expansion modules (EBI08, EBO08). Make sure the latter are properly addressed and carefully follow the
connection instructions.
Position and connect the sensors to the inputs of the control unit and to the expansion modules. Follow the
connection instructions carefully.
Position and connect the siren and any loads controlled by the outputs of the control unit and the of the modules.
Follow the connection instructions carefully.
If required, connect the control unit to the telephone line. Follow the connection instructions carefully.
Connect the control unit to any external devices (printers, PC, etc.). Follow the connection instructions carefully.
Connect the control unit to the power mains. Follow the connection instructions carefully. Check that the LED that
indicates mains power present, located on the control card, comes on.
Place and connect the battery using the Faston connectors. Follow the connection instructions carefully.
Caution
The following paragraphs provide a brief description of some functions which are
useful when commissioning the system. Refer to the Programming Manual and User's
Manual for a complete description of all other options.
Default code settings
The default setting for installer, communication and user codes is included in the following table.
Installer Code
11223
Communication code
54321
User Code
1234
Caution
Allows access to the technical menu (with the system disconnected) and therefore
to all system programming and maintenance.
This is the password to be used if you want to programme the control unit via PC,
locally or remotely.
This is the first preset user code with a priority level of 4, which allows access to
the user menu and to all operational functions of the control unit, such as
connection, disconnection, sectioning and so on.
For obvious security reasons, it is not advisable to leave the default codes. Use the
appropriate functions to replace the default codes with personal codes that are
unique to each installation.
CMP32_CMP64_inst_UK_24838400 11-06-10
Page 49 of 60
Addressing of first keyboard
In order to proceed with programming so as to be able to use the burglar alarm system, you will need to install at least
one LCD keyboard model TDP01 or TDI01.
The keyboards, and also the key-locks, do not have any DIP switches for programming. At first start-up of the system,
the display of the keyboards will show a standby message for a few seconds, followed by a message stating that the
keyboard is not available
P L E A S E
W A I T
N O T
A V A I L A B L E
To assign the address “1” to a keyboard, which must be powered but not necessarily
connected to the bus, simply press the combination of keys shown here for 5 seconds until
you hear a beep. After it has been addressed, and if it is connected to the bus, the control
unit will automatically recognize the keyboard. After a few seconds, a message will appear
with the condition of the system.
+
+
A message will appear for a few seconds on the type of control unit being used, followed by a message indicating that
the systems is disconnected.
C M P X X
B R A H M S
S Y S T E M
A L A R M
O F F
From this moment, it is possible to use all the features the system offers.
Caution
This method of addressing should be used with caution. Make sure you do not have
more than one keyboard with the same address, which would shut down the system.
If this happens, it is advisable to disconnect one of the keyboards with the
duplicated address, and delete its address before reconnecting the unit.
The address of each keyboard can be seen by pressing the combination of keys alongside.
The following message will appear:
K E Y P A D
+
+
+
+
X X
Finally, it is possible to delete the address of each keyboard by pressing the combination of
keys shown alongside for 5 seconds. You will hear a beep and the following message will
appear:
N O T
A V A I L A B L E
CMP32_CMP64_inst_UK_24838400 11-06-10
Page 50 of 60
Addressing of subsequent keyboards
To address subsequent keyboards, proceed as follows.
Enter the technical menu by typing in < installer code> (11223) followed
1 by the key
2 The message "peripheral maintenance" will appear. Press the key
3 The message "peripheral installation" will appear. Press the key
4 The message "installation of keypad" will appear. Press the key
I N S T A L L A T I O N
O F
K E Y P A D
1
5 The display will show the message shown alongside:
Use the keys to select
the address to be assigned to the keyboard and press the key
K E Y P A D
x
I N S T A L L ?
6 The display will show the message shown alongside:
To continue, press the key.
7 To assign the selected address, within 60 seconds press the key
on the keyboard to be addressed.
K E Y P A D
When addressing has occurred, the message shown
8 alongside appears:
O K
To install additional keyboards, repeat steps 4 - 8.
Addressing of key-locks
To address any key-locks which may be present in the system, you will need to carry out the following procedure.
Enter the technical menu by typing in < installer code> (11223) followed
1 by the key
2 The message "peripheral maintenance" will appear. Press the key
3 The message "peripheral installation" will appear. Press the key
4 Use the key to select
"installation of key-lock" and press the key
5 The display will show the message shown alongside:
Use the keys to select
I N S T A L L A T I O N
O F
K E Y - L O C K
1
the address to be assigned to the key-lock and press the key
6 The display will show the message shown alongside:
K E Y - L O C K
x
I N S T A L L ?
To continue, press the key.
To assign the selected address, insert in the key-lock a KEY04 key, even one that is not programmed, within 60
7 seconds.
When addressing has occurred, the message shown
8 alongside appears:
K E Y - L O C K
O K
P L E A S E
P R E S S
*
To continue, press the key.
To install additional key-locks, repeat steps 4 - 8.
CMP32_CMP64_inst_UK_24838400 11-06-10
Page 51 of 60
Activation of expansion modules
The expansion modules do not need to be addressed by the keyboard, since their address is set via the DIP switches on
the modules. It is however necessary to carry out the procedure described below to allow the control unit to recognize
each installed unit. This procedure also identifies any errors in addressing the modules due to the assignment of
undesired addresses or which are in excess of the limits for each control unit, as previously described, or due to the
assignment of the same address to several modules of the same type.
Enter the technical menu by typing in < installer code> (11223) followed by the
1 key
2 The message "peripheral maintenance" will appear. Press the key
3 The message "peripheral installation" will appear. Press the key
4a Use the key to select
“installation of input modules" and press the key
5a The display will show the message alongside:
Use the keys to select
O F
I N S T A L L A T I O N
I N P U T
M O D . 0 0 1
the address of the module to be activated and press the key
I N P U T
M O D .
I N S T A L L E D
When the operation is complete, the message shown
6a alongside appears:
x
Verify that the expansion modules have been activated by checking that the LED for communication on bus
7a system is flashing.
The LED of the module will go off, but only until you configure the
module (see following page).
To continue, press the key.
Caution
Carry out the illustrated procedure for all the modules present: a non-installed module is
not queried by the control unit even if correctly addressed and correctly installed
electrically.
To activate additional modules, repeat steps 4a – 7a.
To install any output modules which may be present, repeat steps 1 -3 and then
4b Use the key to select
“installation of output modules" and press the key
5b The display will show the message shown alongside:
Use the keys to select
I N S T A L L A T I O N
O U T P U T
M O D 0 0 1
the address of the module to be activated and press the key
When the operation is complete, the message shown
6b alongside appears:
O F
M O D .
O U T P U T
I N S T A L L E D
x
Verify that the expansion modules have been activated by checking that the LED indicating communication on
7b bus system is flashing.
To continue, press the key.
CMP32_CMP64_inst_UK_24838400 11-06-10
The LED of the module will go off, but only until you configure the
module (see following page).
Page 52 of 60
Inclusion of expansion modules
The expansion modules are default set as bypassed, i.e. even though they are recognized (via the procedure on the
previous page), they are not considered by the control unit for the purposes of identifying the causes of the alarm. To
include the expansion modules, proceed as follows.
1 Enter the technical menu by typing in < installer code> (11223) followed by the key
2 The message "peripherals maintenance" will appear. Press the key
3 Use the key to select
“peripheral configuration" and press the key
4a "Configuration of input modules" will appear. Press the key
5a
E N A B L E
1
2
3
I N P U T
E N A B L E
1
2
3
4
I N P U T
5
6
7
The display will show one of the windows
alongside, depending on whether the control unit is a
CMP32 or a CMP64.
With the numerical keys 1-7 it is possible to include/bypass the modules in the system. The module with the
physical address corresponding to the key is either included (# symbol) or bypassed (empty)
To continue, press the key.
To include any output modules which may be present, repeat steps 1 -3 and then
4b Use the key to select
“configuration of output modules" and press the key
E N A B L E
1 # 2 # 3
5b
O U T P U T
The display will show one of the windows
alongside, depending on whether the control unit is a
CMP32 or a CMP64.
E N A B L E
O U T P U T
1 # 2 # 3
4 # 5
6 # 7
With the numerical keys 1-7 it is possible to include/bypass the modules in the system. The module with the
physical address corresponding to the key is either included (# symbol) or bypassed (empty)
To continue, press the key.
The inputs will subsequently be identifiable singularly according to the following numbering criteria:
On control card
Module “1”
Module “2”
Module “3”
Module “4”
Module “5”
Module “6”
Module “7”
CMP32
CMP64
Z1 Z2 … Z8 Z1 Z2 … Z8
1 2 ... 8 1 2 ... 8
Z1
9
17
25
Z2
10
18
26
…
…
…
…
Z8
16
24
32
CMP32_CMP64_inst_UK_24838400 11-06-10
Z1
9
17
25
33
41
49
57
Z2
10
18
26
34
42
50
58
…
…
…
…
…
…
…
…
Z8
16
24
32
40
48
56
64
Page 53 of 60
Test
After correctly programming all inputs and all outputs, it is possible to perform a series of functional tests to check that
the corrections have been made correctly. To access the test functions you will need to:
Enter the technical menu by typing in < installer code> (11223) followed
1 by the key
2 Use the keys to select
“run test” and press the key
3 You can now use the keys to select
the type of test to run.
You can choose from among "input test", "siren test", "tamper test ", "battery test " and "output test ".
Once you have selected the desired type of test, press the key
to run it.
Inputs test
Besides checking that the connections are correct, this function also lets you run tests on every single sensor which can
be deliberately activated to check that when it opens, the corresponding message appears. Alarms which are
intentionally caused in this way will also be recorded in the events memory. You can refer to the memory later to check
the sequence.
a Use the keys to select
“input test” and press the key
If all inputs are closed, the display will show the
A L L
If instead one or more inputs are open, the display
*
b1 message shown alongside:
b2 will show the message shown alongside:
T E S T
P A S S E D
Z O N E
T E S T
* Z O N E
y
X X X
< input description xxx>
< xxx> is the number that represents the open input; <y> may assume the value “A” if intrusion alarm condition
is signalled, or “T” if the tampering condition is signalled.
If there are more than one input open, the display will alternate messages on each one of them.
To avoid false signals, it is advisable to check, for each input, that the type of balance assigned corresponds to
what is actually done on the system.
c Upon completion, to go back to step 3 to select the test to be run, press the key
Caution
Remember that if you have not yet configured one or more inputs, the test will show them
as closed.
Siren test
This function lets you check the correct operation of the alarm relay of the devices it activates.
a Use the keys to select
“siren test” and press the key
b1 The display will show the message shown alongside:
b2
B U R G L A R
A L A R M
S I R E N
T E S T
?
To run the test press the key
The control unit will activate the alarm relay for a few seconds.
The alarm relay will be activated for a few seconds, and B U R G L A R
A L . > > * < <
the display will show the message shown alongside:
S I R E N
T E S T
c Upon completion, to go back to step 3 to select the test to be run, press the key
CMP32_CMP64_inst_UK_24838400 11-06-10
Page 54 of 60
Tamper test
This test makes it possible to check the correct operation of the anti-opening and anti-tampering device of the control
unit and the anti-tamper input of the control unit (terminals “tamper -“) without setting off undesired alarms.
a Use the keys to select
“tamper test” and press the key
b1 The display will show the message shown alongside:
C N T
U N I T
T A M P E R
C L O S E
Place the DIP switch for enabling/disabling of the anti-tamper in the position "anti-tamper
enabled" as shown in the figure alongside.
U N I T
T A M P E R
O P E N
Check operation of the anti-opening and anti-tampering device by simulating the final position with the control
unit closed. Check that the display correctly alternates "control unit anti-tamper open" and "control unit antitamper open", depending on whether both ends of the device are activated or not.
The display will show the message shown alongside
b2 and the buzzer will sound:
C N T
Again position the DIP switch for enabling/disabling the anti-tamper device
in the
c position "Anti-Tamper Disabled" as shown in the figure alongside, in order to prevent
undesired activations of the alarm relay during subsequent commissioning.
d Upon completion, to go back to step 3 to select the test to be run, press the key
Battery test
This function lets you check correct operation of the charge status of the battery.
a Use the keys to select
b
“battery test” and press the key
The display will show one of the messages shown
alongside, depending on whether the test has been
passed or not.
B A T T E R Y
B A T T E R Y
O K
F A U L T
c Upon completion, to go back to step 3 to select the test to be run, press the key
Output test
This function makes it possible to check proper operation of the outputs on the control card and on the expansion
modules which may be present, and the devices activated by them.
a Use the keys to select
“output test” and press the key
b1 The display will show the message shown alongside:
Use the keys to select
O U T P U T
the output you want to test and press the key
The output will be activated for a few seconds, and the
b2 display will show the message shown alongside:
O U T P U T
X X X
to run the test.
X X X
> > * < <
c Upon completion, to go back to step 3 to select the test to be run, press the key
CMP32_CMP64_inst_UK_24838400 11-06-10
Page 55 of 60
Final operations
Once all tests have been successfully completed, you need to enable the anti-opening and anti-tampering device, and
close the cover of the control unit.
a Use the keys to select
“tamper test” and press the key
b The display will show the message shown alongside:
C N T
U N I T
T A M P E R
C L O S E
Place the DIP switch for enabling/disabling of the anti-tamper in the position "anti-
c tamper enabled" as shown in the figure alongside.
The display will show the message shown alongside:
C N T
U N I T
T A M P E R
O P E N
d Close the container of the control unit with the four fastening screws.
Check that the display shows the message shown
e alongside:
f Upon completion, repeatedly press the key
exit from the technical menu Press the key
CMP32_CMP64_inst_UK_24838400 11-06-10
C N T
U N I T
T A M P E R
C L O S E
until the display shows the message confirming
to confirm that you want to exit the technical menu.
Page 56 of 60
PROGRAMMING OF USER CODES AND KEYS
The following procedure lets you change the preset user code and add more user codes if necessary. By default, all
codes have a level of priority 4 and all areas are assigned to them. To modify these settings, use the function "user code
configuration" in the technical menu.
1 Enter the user menu by typing in < user code> (1234) followed by the key
2 Use the keys to select
“new code” and press the key
U S E R
3 The display will show the message shown alongside:
0 0 1
Use the keys to select
4
the number of the user for which you are going to create the new code
C O D E
X X =
<new code>
The display will show the message shown alongside:
5
Use the numerical keys 0,1,..,9 to insert the code. Make sure you do not insert an existing code.
When you have completed insertion,
press the key .
When the operation is complete, the message shown
C O D E
A C C E P T E D
alongside appears:
To continue, press the key
or the key
If you have chosen to continue, the display will
6 show the message shown alongside.
7
to exit
C O D E
X X
I N S E R T
A
K E Y
At this point, you will need to insert a key into one of the key-locks in the system.
When the operation is complete, the message shown
* * *
E X E C U T E D
alongside appears:
*
T O
E N D
To continue, press the key.
*
*
*
.
Repeat steps 3 – 6 for all users for whom you wish to create a code.
If the same key is going to be used for more than one system, it is possible to
distinguish the various systems by setting the hardware system number via the DIP
switches on the control card of the control unit.
The figure alongside shows all possible combinations.
CMP32_CMP64_inst_UK_24838400 11-06-10
Address
1
2
3
4
5
6
7
DIP switch position
ON-OFF-OFF-OFF
OFF-ON-OFF-OFF
ON-ON-OFF-OFF
OFF-OFF-ON-OFF
ON-OFF-ON-OFF
OFF-ON-ON-OFF
ON-ON-ON-OFF
Page 57 of 60
MODIFICATION OF COMMUNICATION AND INSTALLER CODES
The following procedure makes it possible to change the installer code and the communication code:
1
Enter the technical menu by typing in < installer code> (11223) followed
by the key
2
Use the keys to select
3
The display will show the message shown
alongside:
4
With the numerical keys 0,1,..,9 insert the installer code. When you have completed insertion, press
the key .
5
When the operation is complete, you will see
the message shown alongside:
6
With the numerical keys 0,1,..,9 insert the communication code.
“modify installer codes" and press the key
I N S T A L L E R
C O D E
- - - - - -
C O M M U N I C .
C O D E
- - - - - -
=
=
When you have completed insertion,
press the key .
CMP32_CMP64_inst_UK_24838400 11-06-10
Page 58 of 60
PROCEDURE FOR OPENING THE CONTAINER
To prevent activation of the alarm relay and the devices connected to it, if you need to access the control card for
maintenance, you will need to follow the procedure shown below.
Enter the technical menu by typing in < installer code> (11223) followed
1 by the key
2 Use the keys to select
“run test” and press the key
3 Use the keys to select
“tamper test” and press the key
4 The display will show the message shown alongside.
Open the container of the control unit by removing the
5 four fastening screws. The display must show
C N T
U N I T
T A M P E R
C L O S E
C N T
U N I T
T A M P E R
O P E N
the message shown alongside.
Place the DIP switch for enabling/disabling of the anti-tamper in the position "anti-tamper
6 disabled" as shown in the figure alongside.
The display must show the message shown alongside.
C N T
U N I T
T A M P E R
C L O S E
C N T
U N I T
T A M P E R
C L O S E
7 Proceed with required maintenance.
Upon completion of maintenance, repeat steps 1-3.
8 The display must show the message
shown alongside.
Again place the DIP switch for enabling/disabling of the anti-tamper in the position "anti-
9 tamper enabled" as shown in the figure alongside.
The display must show the message shown alongside.
C N T
U N I T
T A M P E R
O P E N
10 Close the container of the control unit with the four fastening screws.
Check that the display shows the message shown
11 alongside:
12 Upon completion, repeatedly press the key
exit from the technical menu Press the key
CMP32_CMP64_inst_UK_24838400 11-06-10
C N T
U N I T
T A M P E R
C L O S E
until the display shows the message confirming
to confirm that you want to exit the technical menu.
Page 59 of 60
RESETTING DEFAULT SETTINGS
The CMP32 and CMP64 control units have two different types of reset for the default settings, which allow the installer
to cancel incorrect or undesired programming and codes from the keyboards.
Resetting default codes
If one ore more codes have been forgotten that allow access to the technical or user menus or use of the system, it is
possible to use the following procedure to return only the codes to the default configuration.
Open the container of the control unit by following the previously described procedure.
With the control unit powered on, place DIP switch no. 4 on the control unit to the ON
position, as shown in the figure alongside.
Press the reset key on the control card for one second.
As soon as you note that LED DL3 starts flashing rapidly, turn DIP switch no. 4 on the
control unit to OFF, as shown in the figure alongside.
The display will now show the message indicating that code resetting is in progress, followed by the message that
code resetting is complete.
I N I T I A L I Z A T I O N
R U N N I N G
K E Y P A D
O K
P R E S S
O N E
K E Y
Upon completion, just press any key.
Close the container of the control unit by following the previously described procedure.
Caution
The described procedure not only restores the default settings of the installer,
communication and user codes. it also deletes all other previously memorized use codes,
which also makes any other keys that may have been programmed unusable.
It also deactivates all peripherals, although all programming performed is preserved in
memory. Therefore, upon completion, it is necessary to repeat the previously described
procedure for the activation of the expansion modules.
Resetting default parameters
To reset all default programming parameters, it is necessary to use the default parameters in the technical menu.
Enter the technical menu by typing in < installer code> (11223) followed
1 by the key
2 Use the keys to select
“Default parameters" and press the key
3 The display will show the message shown alongside.
D E F A U L T
C O N F I G .
c o n f = Y E S ,
x =
N O
To continue, press the key.
4 The display will show the message shown alongside.
5
D E F A U L T
C O N F I G .
R U N N I N G
After a certain time required to perform the operation, the window will show "default parameters". Navigate in
the technical menu or exit with the key
CMP32_CMP64_inst_UK_24838400 11-06-10
Page 60 of 60