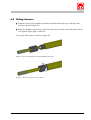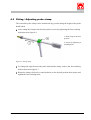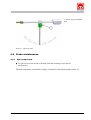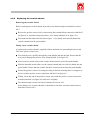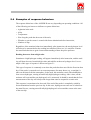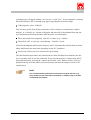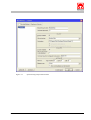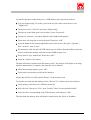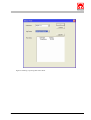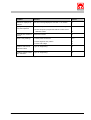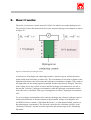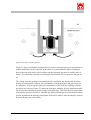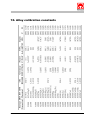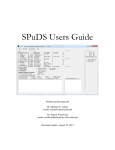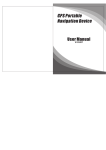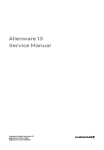
1
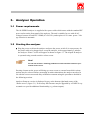
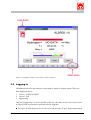
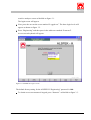
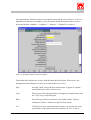
User Manual
Analyser
Type: ALSPEK H
Equipment-No.:
Revision: 1.2
Year of make: 2006
FOSECO GmbH
Gelsenkirchener Str. 10
D - 46322 Borken
Telefon:
Telefax:
0 28 61 / 83 - 0
0 28 61 / 83 - 3 38
User Manual Alspek H
TABLE OF CONTENTS
DECLARATION OF CONFORMITY
1.
TU
WELCOME
1-6
Introduction
1-6
UT
TU
1.1
UT
TU
UT
1.2
TU
TU
Post shipment checking procedure
UT
TU
Information on copyright and other property rights
1-8
Information for the user
1-8
UT
TU
UT
1.4
TU
UT
TU
1.5
TU
Training support
UT
TU
1.6
TU
1-10
Attendance record
1-11
UT
UT
2.
TU
UT
SAFETY
UT
TU
2.1
TU
TU
Information on signs and symbols
UT
TU
Safety instructions for operating personnel
UT
3.
TU
UT
ANALYSER OPERATION
UT
TU
UT
3.1
TU
Power requirements
UT
TU
Starting the analyser
UT
3.3
TU
TU
3.4
TU
Logging in
UT
TU
3.5
TU
TU
3.7
UT
UT
3-19
Setting Date and Time
3-23
Setting alloy
3-23
UT
TU
3-18
UT
TU
3.6
TU
3-16
Changing the password
UT
3-15
3-15
UT
UT
Logging out
UT
2-13
3-15
UT
3.2
TU
2-12
UT
2.3
TU
2-12
UT
2.2
TU
2-12
UT
General
UT
TU
1-9
UT
TU
1.7
TU
UT
Examples for topics in training lessons
UT
TU
1-7
UT
1.3
TU
UT
UT
TU
TU
UT
User Manual Alspek H
3.7.1 Setting standard alloy
TU
UT
TU
3-24
UT
3.7.2 Setting custom alloy parameters
TU
3.8
UT
TU
3-25
UT
Entering sensor calibration values
3-25
On-Board Diagnostics
3-27
UT
TU
UT
3.9
TU
TU
UT
TU
UT
3.9.1 Temperature error messages
3-28
3.9.2 Sensor indicator
3-29
TU
UT
TU
TU
UT
UT
TU
UT
3.9.3 Short circuit error
TU
UT
TU
3-30
UT
3.9.4 Diagnostics screen
TU
3.10
TU
UT
TU
3-31
UT
Data logging
UT
TU
3-32
UT
3.10.1 Batch numbers
TU
UT TU
3.10.2 Logger screen
TU
3-33
UT
UT TU
3-35
UT
3.10.3 Making notes
TU
4.
UT TU
3-36
UT
PROBE OPERATION
TU
UT
TU
4.1
TU
Probe overview
UT
TU
4-39
4.1.2 Sensors
4-40
UT
TU
TU
TU
UT
Fitting Sensors
UT
TU
4.3
TU
4.4
Probe maintenance
UT
TU
4.4.1 Hub components
TU
UT
TU
4.4.3 Replacing thermocouple
4-49
UT
UT
TU
UT
4.4.4 Replacing the ceramic insulators
4-49
4.4.5 Replacing the ceramic sheath
4-50
UT
TU
UT
TU
UT
TU
UT
MEASUREMENT PROCEDURE
TU
UT
TU
5.1
TU
5-51
Procedure
5-51
TU
UT
5.2
TU
UT
TU
5.3
TU
UT
5-53
UT
5.4
TU
Sensor life
UT
TU
5-51
UT
Prior to measurement
UT
Examples of response behaviour
UT
TU
5-54
UT
CONNECTION TO PC OR COMPUTER NETWORK
UT
TU
6.1
TU
4-43
UT
TU
TU
6.
4-43
UT
4-44
UT
TU
TU
4-42
UT
4.4.2 Checking electrical connections
TU
5.
4-41
UT
Fitting / Adjusting probe clamp
UT
TU
UT
UT
4.2
TU
4-39
UT
4.1.1 Probe “hot end“
TU
TU
4-39
UT
UT
UT
PC software installation
TU
UT
6-59
6-59
User Manual Alspek H
6.2
TU
Getting connected
UT
TU
6-60
UT
6.2.1 Direct connection to PC
TU
UT
TU
6-60
UT
6.2.2 Connection to Ethernet network
TU
6.3
UT
TU
Remote Viewer
UT
TU
6.4
TU
TU
6-61
UT
6-62
UT
Downloading / processing data: “Review” software
UT
TU
6-63
UT
6.4.1 Understanding “Review”
TU
UT
TU
6-63
UT
6.4.2 Setting up for the first time
6-64
6.4.3 Downloading data
6-65
TU
UT
TU
TU
UT
UT
TU
UT
6.4.4 Plotting / exporting data
TU
7.
UT
UT
TU
7.1
TU
Startup error screen
7-76
UT
UT
TU
7.3
TU
Troubleshooting
UT
TU
7.4
TU
7-77
UT
TU
7-78
UT
SYSTEM SPECIFICATIONS
UT
TU
Description
UT
TU
8.2
TU
8-80
UT
Technical Performance
UT
TU
8.2.1 Response time
TU
UT
TU
Salient Features
8-80
UT
TU
UT
TU
UT
8.3.1 The analyser unit
TU
UT
TU
8-80
UT
8.3.2 The measuring probe
8-81
8.3.3 The sensor
8-81
TU
UT
TU
UT
8-80
UT
8-80
UT
8.3
8.4
8-80
UT
8.2.2 Reproducibility
TU
TU
8-80
UT
8.1
TU
UT
Technical assistance
UT
TU
7-76
7-76
TU
7.2
TU
UT
Summary of analyser error messages
UT
8.
6-69
UT
ERROR MESSAGES AND TROUBLESHOOTING
TU
TU
TU
UT
TU
TU
UT
UT
Analyser connections / maintenance
TU
UT
8-81
User Manual Alspek H
8.4.1 Power
TU
UT
TU
8-81
UT
8.4.2 Ethernet
TU
UT
TU
8-81
UT
8.4.3 Analyser maintenance
TU
UT
TU
UT
T
APPENDIX
9.
10.
HOW IT WORKS
ALLOY CALIBRATION CONSTANTS
8-82
T
Declaration of Conformity
Product design
Make:
Type designation:
Analysing system
ALSPEK H
has been developed, designed and manufactured in
compliance with EU directives
2006/95/EG
2004/108/EG
Low voltage,
Electromagnetic compatibility
within the sole responsibility of
Company:
FOSECO GmbH
Gelsenkirchener Str. 10
46325 Borken, Germany
The following harmonised
standards are applied:
DIN EN ISO 12100
Safety of machines, plants,
and equipment
DIN EN 60204-1:2006 Safety: Electrical equipment
DIN EN 61000-6-3/-4 EMC Emission of interference
DIN EN 61000-6-1/-2 EMC Interference resistance
Complete technical documentation is available. The
operating manual for the equipment is provided in
the original language and in the user’s language.
Place, Date
Signature
Info on signing person
1.
Welcome
1.1 Introduction
The ALSPEK H hydrogen measurement system provides rapid, accurate measurement of
hydrogen dissolved in molten aluminium and its alloys. The system can be used to:
1.
2.
3.
Perform spot measurements to check melt hydrogen levels prior,
to casting continuously monitor dissolved hydrogen levels,
Monitor a melt treatment in order to achieve a desired hydrogen level e.g. degassing.
The probe is of robust construction and has been designed in a modular fashion to allow
easy replacement of any component. Calibration is assured through individual calibration of
each ALSPEK H sensor prior to shipment in a precisely controlled hydrogen atmosphere.
The ALSPEK H analyser employs state of the art hardware and has been built to withstand
the demanding operating conditions of a foundry shop floor. The analyser’s numerous features are accessed via a touch sensitive colour screen, supplied with a replaceable protective
cover. The analyser offers secure and reliable data collection and storage and is managed by
a login system to prevent unauthorised access. Sophisticated On Board Diagnostics (OBD)
continuously monitor the condition of the sensor and inform the operator in case of problems. The unit may be controlled remotely by direct connection to a PC computer or from
anywhere in the world by connection to an Ethernet computer network.
This operating manual is essential tool for the successful and safe use and operation of the
ALSPEK H hydrogen measuring system viz. Analyser.
The operating manual holds important information, the knowledge of which is prerequisite
for the proper, safe and efficient use of the analyser and to reduce repair cost and downtimes and to maintain and improve the reliability and service life of the analyser.
Stand 15.04.08
The operating manual must be readily available at the analyser and it shall be studied and
the information be applied by every person who is engaged in work details at/ with the analyser, as there are:
– Operation, including set-up, fault correction during normal operation, removal of production waste, general care of the system, disposal of operating and auxiliary media,
– Service and maintenance (general service, inspection, maintenance/repair) and/or
– Transport of the analyser.
1.2 Post shipment checking procedure
The components supplied with an analyser and a probe are listed on table 1.1. Please use
this list to check the shipment has arrived intact. The actual shipment may also include additional components ordered as spares (e.g. spare thermocouple, ceramic sheath)
BAUTEIL
Analyser
Probe
MENGE
Analyser
1 off
Probe cable
1 off
Power cable
1 off
PC Ethernet cable
1 off
PC software disc
1 off
Probe handle
1 off
Thermocouple
1 off
Ceramic sheath
1 off
“Short Circuit” cap
1 off
“Open Circuit” cap
1 off
Sensor(s)
(depends on order)
Table 1.1. ALSPEK H shipment checklist
Note!
The probe handle, thermocouple, and ceramic sheath are supplied preassembled.
Stand 15.04.08
1.3
Information on copyright and other property rights
The operating manual shall be treated as a confidential document. It shall be made available
to authorised personnel only. Access by third persons may be granted only after prior written approval through FOSECO GmbH.
FOSECO, the logo and ALSPEK are registered Trade Marks of the FOSECO Group of
Companies, used under licence. All rights reserved. No part of this publication may be reproduced, stored in a retrieval system of any nature or transmitted in any form or by any
means, including photocopying and recording, without the written permission of the copyright holder. Applications should be addressed in the first instance to FOSECO GmbH.
Violation of this directive and/or such rights are subject to legal proceedings, and damage
claims may be presented. We, FOSECO GmbH, reserve the right to execute commercial
protection rights. All statements, information and data contained herein are published as a
guide and although believed to be accurate and reliable (having regard to the manufacturer’s practical experience) neither the manufacturer, licensor, seller, or publisher represents nor warrants, expressly or impliedly: (1) their accuracy/reliability, (2) that the use of
the product(s) will not infringe third party rights, (3) that no further safety measures are required to meet local legislation. The seller is not authorised to make representations nor
contract on behalf of the manufacturer/licensor. All sales by the seller are based on their
conditions of sale available on request.
1.4 Information for the user
The operating manual is an essential elements of the ALSPEK H analyser. The user shall
ensure that all operating personnel will comply with these directives.
The user shall complement the operating manual with respect to existing national directives
on accident prevention and environmental control, including information regarding supervisory activities by authorities and pertinent mandatory reports, e.g. as to work organisation,
work sequence and allocation of personnel.
Aside from general compliance with the operating manual and applicable directives on accident prevention the user shall also ensure that generally approved and qualified technical
rules for safe and proper working.
Without prior approval by FOSECO GmbH the user/operator must not effect any changes,
alterations, modifications or backfitting at the analyser which may in any way affect the safety of system. This also applies to the fitting and set-up of safety devices, safety valves and
Stand 15.04.08
to any welding work at load-bearing structures.
Spare parts to be used for the analyser must comply with the technical specifications set
forth by FOSECO GmbH. This is always ensured when using original replacement parts.
Only trained and authorised personnel shall be allocated for the analyser. Users shall designate responsibilities for operation, set-up, service, maintenance and repair!
1.5 Training support
As a company / user you are responsible for informing and instructing your personnel on
existing legal provision and directives on accident prevention as well as on safety devices
and safety measures at and for the analyser. Such training should consider the professional
qualification of the respective employees.
The operating personnel must have understood the instructions and users / supervisors shall
ensure that the instructions are followed and applied. Full compliance with the information
provided during such training is prerequisite for correct and safety-conscientious working
of your personnel. Therefore, the company / user shall keep a written record of training seminars which shall be countersigned by all participants.
The following pages show a range of topics for training lessons including a form sheet to be
copied for the attendance record.
Stand 15.04.08
1.6
Examples for topics in training lessons
SAFETY
Directives on accident prevention
General legal provisions
General safety instructions
Measures for emergency situations
Personal protection equipment
Safety instructions for using the ALSPEK H analyser
Use of safety devices at the ALSPEK H analyser
Safety devices in the vicinity of the ALSPEK H analyser
Meaning of signs and symbols
________________________________________________
________________________________________________
OPERATING THE ANALYSER
Use of operating and control elements for the ALSPEK H analyser
Training of operating personnel in the use of the operating manual
Operating experience gained at the user’s ALSPEK H analyser
Use of operating media, auxiliary media and accessories
Special experience from the use of the ALSPEK H analyser
Correcting of operational faults and discrepancies
________________________________________________
________________________________________________
SERVICING AND MAINTENANCE
Correct use of cleaning agents, lubricants
Special experience from service, maintenance and general care of the ALSPEK analyser
________________________________________________
________________________________________________
Stand 15.04.08
1.7
Attendance record
ACKNOWLEDGEMENT OF TRAINING
Training subject / topic:
Date:
Instructor:
NO. LAST NAME, FIRST NAME
1
2
3
4
5
6
7
8
9
10
11
12
13
14
15
16
17
Stand 15.04.08
Instructor’s signature:
SIGNATURE
2.
Safety
2.1
General
The analyser has been designed and manufactured according to the latest state-of-the-art
and in compliance with approved rules for operational safety.
Nevertheless, danger situations may develop for user, operator or third persons or the analyser or other goods if the system …
– is operated by untrained or non-authorised personnel,
– is not used as designed,
– is improperly serviced or maintained.
2.2
Information on signs and symbols
The following signs and symbols are used in this operating manual to designate situations
of important information:
CAUTION !
This sign warns of damage to the analyser or its equipment if the respective precautions are not observed.
All PRECAUTIONARY MEASURES must be complied with.
NOTE !
This sign advised of specific situations or conditions which shall be complied with to ensure the proper, safe and efficient use of the analyser.
All notes should be complied with to ensure the correct use of the analyser
as designed.
• The eye-catching point designates work or control steps. The listed steps must be
followed in the sequence from top to bottom!
Stand 15.04.08
– This dash designates itemised information.
2.3
Safety instructions for operating personnel
The analyser may be used only when it is technically o.k. and when it is operated in full
compliance with pertinent safety rules and instructions! Faults or discrepancies which in
any respect may affect the operational safety must be correct with no delay!
Every person who is engaged with the mounting, installation, commissioning, operation,
service or maintenance must have read and understood the contents of this operating manual – with particular emphasis on chapter 2 Safety. In particular, this applies to personnel
who are not regularly active at the analyser.
This operating manual must be readily available in the immediate vicinity of the analyser!
Pertinent directives for accident prevention as well as other generally accepted rules and directives for health and work safety shall be complied with.
Responsibilities for the various activities and work details must be clearly defined and adhered to. This is the only way to preclude false handling and/or control inputs – particularly
in danger situations.
The user/operator shall enforce that operating personnel will wear personal protection
equipment. Where required or dictated by relevant directives, personal equipment such as
protective goggles, leather or metal-coated gloves and safety shoes must be worn!
Personnel shall not wear open/long hair, loose clothing or jewellery! This is to preclude the
possibility of injuries by getting caught or pulled into the machine by rotating parts!
If you should observe any safety-relevant changes of the analyser’s operating behaviour or
any other discrepancy, the analyser must be shut down, and the situation must be reported
to the responsible staff!
First-Aid equipment (First-Aid kit, etc.) shall be provided in the immediate vicinity of the
analyser!
Before starting any work at the analyser which affect the operation, set-up, updating of the
analyser or which may affect the safety devices, the Start/Stop switching processes must be
realised strictly according to the information in the operating manual!
Closely observe the information for maintenance and repair work when performing any in-
Stand 15.04.08
spection, service, maintenance or repair at the analyser!
Any work at the analyser shall be performed by trained and authorised personnel only.
When selecting personnel for such tasks, users shall observe the minimum legal age!
Only trained and authorised personnel shall be permitted to work at / with the analyser!
Personnel under training or apprentices shall be permitted at or near the analyser only when
supervised by an experienced person!
Stand 15.04.08
3. Analyser Operation
3.1 Power requirements
The ALSPEK H analyser is supplied with a power cable which mates with the standard IEC
power socket on the front panel of the analyser. The unit is suitable for use with all AC
voltages between 85 and 265 V RMS (47 to 63 Hz), and requires 60 VA max. power. Voltage selection is automatic.
3.2 Starting the analyser
• Plug the power cord into the analyser and press the power switch. It is not necessary for
the probe cable to be plugged in to set up the analyser. After approximately 5 minutes
the analyser “Home” screen will appear as shown on figure 3.1. The Alpsek H analyser
is operated using a touch sensitive colour screen.
Note!
Do not use solvents / cleaning products on touch sensitive screen or protective screen cover.
Pressing a button on the screen will bring up a new screen or a menu from which various
options may be selected. Before measuring in molten aluminium, the analyser needs to be
set with the correct sensor and alloy calibration constants using the procedures detailed in
the following sections.
Analyser firmware version is displayed in grey at the bottom right hand corner of the
“Home screen” (figure 3.1). If necessary the firmware may be upgraded by a FOSECO representative to provide additional functionality (e.g. alarm outputs).
Stand 15.04.08
Figure 3.1 ALSPEK H “Home” screen with no sensor connected
3.3 Logging in
Unauthorised access to the analyser is prevented by means of a login system. There are
three logging in levels:
1.
2.
3.
Service - FOSECO GmbH
Service - Full
Engineering
Only the “Engineering” level is accessible to the user; the other access levels exist in order
to allow FOSECO personnel to perform software upgrades.
• To log in, first lift the protective screen cover and press the “Login” button on the touch
Stand 15.04.08
sensitive analyser screen as labelled on figure 3.1.
The login screen will appear.
• Next, press the area on the screen marked “Logged out”. The three login levels will
appear as shown on figure 3.2.
• Press “Engineering” and then press in the white area marked “Password”.
An on-screen keyboard will appear.
Figure 3.2 ALSPEK H “Login” screen
The default factory setting for the ALSPEK H “Engineering” password is: 100.
• To obtain an on-screen numeric keypad, press “Numeric” as labelled on figure 3.3.
Stand 15.04.08
Figure 3.3 ALSPEK H “Password” screen
• Enter the default “Engineering” password 100 then press “Ok” (If a mistake is made,
characters can be deleted using the “BSpc” (Backspace) key).
The analyser will return to the “Home” screen similar to figure 3.1, except the word
“Logged Out” in the top left corner of the screen will be replaced with “Engineering” to indicate that the user is logged in.
3.4 Logging out
• To log out, press on the area labelled “Engineering” in the top left corner of the screen.
• Then press the “Logout” button.
Stand 15.04.08
3.5 Changing the password
Figure 3.4 ALSPEK H password entry
The ALSPEK H analyser is shipped with the “Engineering” password set to 100. This password may be changed by the user for increased security.
• To change the password, first log in following the instructions in section 3.3.
• Next, press the “Action” button in the bottom right hand corner of the screen (labelled on
figure 3.1).
• From the “Root Menu” which appears, press “Operator”.
• Now press the button along the top of the screen labelled “Security”, then press
“Access”.
The security access screen will appear as shown in figure 3.5.
• Press the area next to “New Password”.
An on-screen keyboard will appear as shown in figure 3.3.
Stand 15.04.08
• Use the on-screen keyboard to input the new password.
Stand 15.04.08
Any alphanumeric characters may be used and the passwords are case sensitive. To access
alphanumeric characters or numbers, press the buttons along the bottom of the on-screen
keyboard labelled “Alphabet”, “Alphabet 2”, “Numeric”, “Symbols” as required.
Figure 3.5 ALSPEK H-Menü "Sicherheits-Zugang"
Underneath the keyboard are six keys with the functions listed below. When active, the
background colour changes to yellow for as long as the key is active.
Shift
Pressing “Shift” causes the next entered letter to appear in capitals;
subsequent letters will be in lower case.
Caps
When pressed, all subsequent letters will appear in capital letters until
the “Caps” key is operated again.
BSpc
Press this key to delete a character if a mistake is made. This key
(backspace) deletes a character to the left of the cursor.
Ovr
If selected, the next entered character replaces (overwrites) the existing character to the right of the cursor position. If “Ovr” is not se-
Stand 15.04.08
lected, the next entered character is inserted into the existing text
string at the cursor position.
OK
Used to save the new text string and to return to the page from which
the keyboard was called.
Cancel
Causes a return to the page from which the keyboard was called
without saving the new string.
Please Note!
The character on each display key is always a capital letter, whether or not
the actual character being entered is in capitals or lower case.
After entering the new password, enter it a second time for confirmation in the area marked
“Retype Password”.
Note!
There is also a section named “Remote Password”. This password is required when connecting to the analyser using the PC software (section 6).
To avoid confusion it is recommended to set the remote password the
same as the analyser password you have just entered.
• After keying in and then re-typing the remote password, press “Apply”.
A blue bar will appear in the top right hand corner of the screen to indicate that the analyser
is busy.
• Wait until this disappears (this can take about 1 minute), then return to the “Home”
screen by pressing the “Action” button in the bottom right corner of the screen, then
“Home” from the operator menu.
Stand 15.04.08
3.6 Setting Date and Time
The time and date are displayed in the top right hand corner of the analyser screen.
• To adjust these, first log in following the instructions in section 3.3.
• Next, press the “Action” button in the bottom right hand corner of the screen (labelled on
figure 3.1).
• From the “Root Menu” which appears, press “Operator”.
• Now press the button along the top of the screen labelled “System”, then press “Clock”.
• Press the area to the right of the words “Current Date” or “Current Time”.
This will bring up the on-screen keyboard similar to figure 3.4.
• After changing the time or date, press “Ok” then “Apply”.
A blue bar will appear in the top right hand corner of the screen to indicate that the analyser
is busy.
• Wait until this disappears (this can take about 1 minute), then return to the “Home”
screen by pressing the “Action” button in the bottom right corner of the screen, then
“Home” from the operator menu.
3.7 Setting alloy
In order to measure the dissolved hydrogen level, the ALSPEK H analyser requires two alloy calibration values which depend on the chemistry of the melt. Prior to measurement, the
appropriate calibration values must be set either by selecting from standard preprogrammed alloys or by entering the alloy constants manually.
• Whilst on the “Home screen” (figure 3.1), press the “Alloy” button.
After a short wait the “Select alloy” screen will appear.
Stand 15.04.08
3.7.1
Setting standard alloy
The analyser is pre-programmed with the calibration values for the following common alloys:
LM2, LM5, LM6, LM13, LM16, LM20, and LM25
These are listed on the “Standard Alloys” section of the “Select alloy” screen (figure 3.6).
• To select a standard alloy, press the button corresponding to the desired alloy, then press
“Exit”.
The selected alloy will now appear on the “Home” screen.
Figure 3.6 “Alloy” screen
Please Note!
It is necessary to be logged in to select an alloy from this list.
Stand 15.04.08
3.7.2
Setting custom alloy parameters
If the desired alloy is not included on the list of standard alloys, a “Custom” alloy may be
specified by programming the analyser with two constants “C” and “D”. A list of “C” and
“D” values for a wide range of alloys is provided in Appendix B of this manual.
• To calibrate the analyser for a custom alloy, first log in following the instruction in
section 3.3.
• Next press the “Edit C” button on the “Select alloy” screen.
• A box called “Custom Write C” will appear.
• Press the area next to the word “Constant” (currently contains a zero).
A numeric keypad will appear on the screen.
• Enter the appropriate value for constant “C” and press “Ok”. Then press “Write now”.
• Repeat this procedure for the constant “D” and then log out (section 2.4) to prevent
unauthorised users from changing the custom alloy calibration constants.
Note!
Note that it is necessary to be logged in to change the custom alloy calibration values.
• The operator may select the custom alloy from the “Standard Alloys” section of the
“Select alloy” screen.
3.8 Entering sensor calibration values
Each ALSPEK H sensor has been individually calibrated in a furnace containing a known
hydrogen concentration. The calibration procedure results in four calibration constants,
which can be found in the ALSPEK H sensor packaging. These are detailed in table 3.1.
Stand 15.04.08
Constant
Purpose
A
Hydrogen measurement
B
Hydrogen measurement
R700
R700 Sensor diagnosis
R750
R750 Sensor diagnosis
B
B
B
Table 3.1
B
ALSPEK H sensor calibration constants
Whenever a new sensor is fitted to the ALSPEK H probe, the analyser needs to be programmed with the new calibration constants for that sensor.
• To do this, first log in as “Engineering” as detailed in section 3.3.
• On the “Home” screen, press the “Sensor” button.
After a short wait the “Sensor calibration” screen will appear on which the current calibration settings are shown (see figure 3.7).
• To enter a new calibration value for the constant “A”, press “Edit A”.
• A box called “Custom Write A” will appear.
• Press the area next to the word “Constant” (currently contains a zero).
A numeric keypad will appear on the screen.
• Enter the correct value for constant “A” and press “Ok”.
• Then press “Write now”.
• Repeat this procedure for the other constants B, R700, and R750 .
• Then press “Exit” to return to the “Home” screen.
• Finally, log out (section 3.4) to prevent unauthorised users from changing the sensor
calibration constants.
Stand 15.04.08
Figure 3.7 ALSPEK H “Sensor calibration” screen
3.9 On-Board Diagnostics
The Alspek H analyser is equipped with sophisticated On Board Diagnostic (OBD) hardware. If the analyser detects a problem with the sensor, the thermocouple, the probe, or the
operating temperature, it will display an appropriate error message and will immediately
display “NO DATA” in place of the hydrogen reading to prevent erroneous readings from
being taken. The error messages will only appear on screens which involve data collection
i.e. the “Home” and “Data Logger” screens.
Stand 15.04.08
Figure 3.8 “Set constant A” screen
3.9.1
Temperature error messages
Thermocouple Failure
The analyser continuously checks the thermocouple whilst measuring and will display a
“Thermocouple Failure” error message if a problem is detected.
Temperature too low
The minimum probe operating temperature is 650◦C. If the thermocouple reading is below
this level, the analyser will display the message “Temperature Too Low” and will not display a hydrogen reading. This message will appear on the screen immediately after the
probe is plugged into the analyser (assuming the probe is cold).
Stand 15.04.08
Temperature too high
Standard sensors
ALSPEK H sensors are rated at a maximum operating temperature of 800◦C. If the temperature exceeds 820◦C, the analyser will display the error message “Temperature Too
High”. If this occurs, the probe should be removed from the melt immediately.
High temperature sensors
For customers wishing to measure at temperatures greater than 800◦C, high temperature
sensors are available which can measure up to 825◦C. These sensors measure accurately in
the temperature range 775–825◦C and are not suitable for use at <775◦C. For high temperature applications it is recommended that the analyser firmware is upgraded to version V109
or higher as this extends the analyser measurement range from 820◦C to 830◦C.
3.9.2
Sensor indicator
An ALSPEK H sensor has a certain lifetime which will be determined by the way in which
the sensor is used. After prolonged exposure to the melt, the sensor will eventually deteriorate due the extremely aggressive conditions which exist in molten aluminium. Failure in
this manner can be termed ”sensor depletion” as it results from a loss of hydrogen ion conductivity in the sensor. Sophisticated On Board Diagnostics (OBD) built into the ALSPEK
H analyser are able to continuously monitor the sensor’s hydrogen ion conductivity. However, because hydrogen ion conductivity is a non linear function of temperature, the analyser must perform complex data analysis to evaluate the condition of the sensor. This functionality is provided by the “Sensor Indicator” feature, visible on the analyser’s “Home”
screen. Figure 3.9 shows a typical view of the main analyser “Home” screen when measuring in molten aluminium.
Stand 15.04.08
Figure 3.9 Analyser “Home” screen under measurement conditions
The analyser displays the hydrogen level, melt temperature, and alloy. The “Sensor Indicator” is visible as a coloured bar toward the bottom of the screen. As the sensor begins to experience depletion, the “Sensor Indicator” bar will increase in size and will change colour in
the sequence blue, green, orange, red. When the sensor indicator has reached the end of the
red region a change of sensor is required. In this case the analyser will replace the hydrogen
reading with “NO DATA”, and the error message “Replace Sensor - Failing” will appear.
3.9.3
Short circuit error
If the analyser detects a short circuit between the sensor electrodes, the hydrogen reading
will be replaced with “NO DATA”, and the error message “Replace Sensor - Short Circuit”
will appear. This may be caused by failure of the sensor due to aluminium ingress in which
case a new sensor should be used.
Stand 15.04.08
3.9.4
Diagnostics screen
To assist with troubleshooting, a “Diagnostics” screen is available. This collects all the data
which is being used to calculate the hydrogen level and displays it on a single screen in order to quickly and easily identify problems, should they occur.
• To access the “Diagnostics” screen, press the “Action” button in the bottom right corner
of the “Home” screen (see figure 3.1).
• Select “Goto Group” then select “Diagnostics”.
Figure 3.10 shows a typical view of the “Diagnostics” screen when measuring in molten
aluminium. The meaning of the items shown on the “Diagnostics” screen is detailed on table 3.2.
• To exit from the “Diagnostics” screen and return to the “Home” menu, press the
“Action” button in the bottom right corner of the screen (see figure 3.1), then select
“Home”.
Figure 3.10 Analyser “Diagnostics” screen under measurement conditions
Stand 15.04.08
3.10 Data logging
The ALSPEK H analyser has a built-in high capacity data logger, which records a measurement every 10 seconds. The unit is capable of storing up to 17 days of data. For security
reasons it is not possible to stop the data logger; it records all the time whenever the analyser is switched on even if the probe is not in molten aluminium. After the 17 days of
available memory is used up, data older than 17 days is discarded and new data is added.
Therefore, to avoid data loss, the analyser should be synchronised with a PC computer and
the new data downloaded at regular intervals (e.g. every week). Details of synchronising the
analyser with a PC computer are provided in section 6.4.3.
Item
Meaning
Raw sensor [V]
Voltage output from sensor [V]
Raw Temperature
Temperature from thermocouple [°C]
Probe fitted
Detects if probe is connected
Probe impedance
Probe impedance [kΩ]
A
Sensor constant A
B
Sensor constant B
C
Alloy constant C
D
Alloy constant D
R(700)
Sensor constant R700 [kΩ]
R(750)
Sensor constant R750 [kΩ]
Hydrogen
Hydrogen reading [ml/100g]
Rc
(Internal calculation)
Sensor Indicator
Numeric value of “Sensor Indicator”
Temperature
Temperature used in calculations [°C]
Table 3.2
Stand 15.04.08
B
B
B
Explanation of “Diagnostics” screen
B
3.10.1 Batch numbers
When making dissolved hydrogen measurements it is important to give the data a batch
number. As discussed in the preceding section, the data logger is permanently recording all
data, which can make individual sets of readings difficult to identify. The batch numbering
system allows unique identification of measurement sets, which can then be isolated and
plotted / transferred to a spreadsheet later on using the PC software.
Starting a batch
Immediately prior to starting a set of measurements, a new batch should be started.
• To enter the “Batch” screen, press the area at the top of the screen as indicated on figure
3.11.
The “Batch” screen will appear as shown in figure 3.12.
Figure 3.11 How to select “Batch” screen.
Stand 15.04.08
• To start a new batch press “New”.
• To enter a batch number press the white area next to “Melt code” (figure 3.13).
The standard on-screen keyboard will appear.
• Enter an appropriate melt code e.g.Furnace name, alloy, date then press “Ok”.
• Finally press “Start” to begin the new batch.
The batch name and status will be shown in the area at the top of the screen highlighted on
figure 3.11.
Stopping a batch
After completing a set of measurements it is important to remember to stop the batch.
• Press the area at the top of the screen as indicated on figure 3.11 to enter the “Batch”
screen and press “Stop”.
Figure 3.12 Analyser “Batch” screen.
Stand 15.04.08
3.10.2 Logger screen
The ALSPEK H analyser has the capability to plot hydrogen level and temperature on a
chart in real time. This facility can be used to determine when the probe reading has stabilised after immersion, to monitor a degassing melt treatment, or to monitor fluctuations in
the hydrogen level as molten metal is added to a furnace etc. To access the chart, press the
“Logger” button on the “Home” screen (see figure 3.9).
The logger will load and plot the most recently recorded data on the chart and will continue
to plot new data. The total time shown on the chart is 40 minutes, and each grey vertical
line is 6 minutes 40 seconds apart.
Note!
Please note that in the current version of the analyser firmware (V108),
pressing the button labelled “High Speed” on figure 2.14 has no effect of
the chart speed. It is intended that a future software release will allow
switching between low and high speed chart recording modes.
Figure 3.13 Analyser “Batch” screen.
Stand 15.04.08
History
The entire contents of the analyser’s memory can be accessed using the “History” function.
To enter “History”, press and hold anywhere inside the data logger chart for a couple of
seconds. Unlike the chart on the “Logger” screen, the “History” is displayed vertically.
• Pressing lightly on the black area inside the “History” screen will bring up a horizontal
line.
The hydrogen level and time corresponding to the position of the line will be digitally displayed along the top on the “History” screen as shown on figure 3.15.
• To change the digital display to temperature, press the location shown on the top left of
figure 3.15.
• Press and hold the navigation bar shown on figure 3.15 to navigate through the data
stored on the analyser.
The time and date will appear when the navigation button is pressed to allow easy browsing
through the data.
3.10.3 Making notes
A note may be added to the data at any point. This note will be permanently associated with
the time at which it was entered and may be viewed at a later date either via the PC software or on the “History” screen.
• To make a note, press the button showing three horizontal lines circled in red on figure
3.10.
• Then press “Note” and use the on-screen keypad to enter a comment.
• Then press “Ok”.
Stand 15.04.08
Figure 3.14 Analyser “Logger” screen.
Stand 15.04.08
Figure 3.15 Analyser “History” screen.
Stand 15.04.08
4. Probe Operation
4.1 Probe overview
Figure 4.1 shows a fully assembled ALSPEK H probe. The metal handle includes a removable clamp and a hub, where all electrical connections are made. The replaceable ceramic
sheath is fitted to the handle by means of a collar, and replaceable sensors are fitted to the
end of the ceramic sheath.
1: Sensor
2: Ceramic sheath
3: Threaded collar
4: Adjustable clamp
5: Handle
6: Hub
7: Cable socket
Figure 4.1. Fully assembled ALSPEK H probe
4.1.1
Probe “hot end“
Figure 3.2 shows the “hot end” end of the ALSPEK probe (i.e. the end to be immersed in
molten aluminium) without a sensor fitted. The thermocouple, which also acts as the negative sensor electrode, runs through the centre of the probe. This component is spring-loaded
by means of a mechanism located in the probe hub, ensuring that the end of the thermocouple is in permanent contact with the negative sensor electrode when a sensor is fitted. The
threaded ceramic component is made from electrically conducting ceramic. This allows
sensors to be secured to the end of the probe and also acts as the positive sensor electrode.
A replaceable ceramic insulator is fitted to the thermocouple to prevent electrical contact
between the positive and negative electrode wires.
Stand 15.04.08
1: Thermocouple tip (- electrode)
2: Ceramic-Insulator
3: Threaded ceramic
( + electrode)
4: Ceramic sheath
Figure 4.2. “Hot end” of ALSPEK H probe (no sensor fitted)
4.1.2 Sensors
An ALSPEK H sensor is shown on figure 4.3. When in position, the sensor negative electrode shown makes contact with the thermocouple tip. Each sensor is fitted with a threaded
graphite cap which screws onto the threaded ceramic at the hot end of the probe. When in
molten aluminium, the positive sensor electrode and graphite cap are in electrical contact,
as the molten metal is an electrical conductor.
1: Positive sensor electrode
2: Negative sensorelectrode
3: Threaded graphite cap
(positive sensor electrode)
Figure 4.3. An ALSPEK H sensor
Stand 15.04.08
4.2 Fitting Sensors
• Hold the sensor by the graphite cap and locate the thermocouple tip on the end of the
sensor as shown in figure 4.4.
• Rotate the graphite cap clockwise and screw the sensor onto the end of the probe. Do not
over tighten; finger-tight is sufficient.
A correctly fitted sensor is shown on figure 4.5.
Figure 4.4. Sensor pushed against spring loaded thermocouple
Figure 4.5. Probe with sensor correctly fitted
Stand 15.04.08
4.3 Fitting / Adjusting probe clamp
The removable probe clamp can be mounted at any position along the length of the probe
handle shaft.
• After setting the clamp in the desired position, secure by tightening the four retaining
bolts shown on figure 4.6.
1: Slide clamp to desired
position
2: Secure by tightening 4
retaining bolts
Figure 4.6. Fitting clamp
• To change the angle between the probe shaft and the clamp, remove the four retaining
bolts as shown on figure 4.7.
• Rotate the clamp (clockwise or anticlockwise) to the desired position then replace and
tighten the four retaining bolts.
Stand 15.04.08
1: Secure using 4 retaining
bolts
Figure 4.7. Adjusting clamp
4.4 Probe maintenance
4.4.1
Hub components
• To gain access to the inside of the hub, undo the retaining screws shown
on figure 4.8.
The hub components are labelled on figure 4.9 and their functions detailed on table 4.1.
Stand 15.04.08
1: Hub lid retaining screws
Figure 4.8. Hub lid in closed position, secured by retaining screws
4.4.2
Checking electrical connections
We recommend that the probe’s electrical connections are checked regularly (every week)
in order to ensure accurate measurements. Inparticular dirt, carbon, and condensation of
volatile alloying components can create a partially conducting layer at the hot end of the
probe. This can be corrected quickly and easily by replacing the ceramic insulators, as detailed later in section 4.4.4.
The probe should be checked at 25◦C under open circuit and short circuit conditions. Each
ALSPEK H probe is provided with an “open circuit cap” and a “short circuit cap” to facilitate this. To perform electrical testing the following will be required:
1.
2.
3.
A digital multimeter. We recommend a high quality unit e.g. Fluke 87
“Open circuit test cap” (provided with the ALSPEK H probe)
“Short circuit test cap” (provided with the ALSPEK H probe)
• Screw the “open circuit” cap onto the end of the probe and set the multimeter to measure
resistance.
Stand 15.04.08
• Set the multimeter to measure resistance and verify that the probe’s electrical
connections agree with table 4.2. For example, table 4.2 states that an open circuit should
exist between point 1 (negative thermocouple connection - see table 3.1) and point 2
(Positive sensor connection - see table 4.1).
• To check this, push one of the multimeter terminals onto the brass terminal block (1),
and push the second multimeter terminal onto the brass terminal block (2).
The multimeter should indicate an open circuit.
• Take care not to touch the metallic part of the multimeter terminals with fingers as this
will introduce noise and prevent a correct measurement.
Stand 15.04.08
Figure 4.9. Hub components and electrical connections
Stand 15.04.08
Number
Identity
1
Negative thermocouple connection
(white)
2
Positive sensor connection (clear colour)
3
Positive thermocouple connection
(green)
4
Negative sensor connection (black)
5
Thermocouple
6
Hub casing
7
Graphite cap
8
Probe cable socket
9
Bayonet thermocouple fitting
10
Clamp for positive sensor wire
Table 4.1. Identity of electrical connections
Table 4.2. Checking probe electrical connections: Open circuit cap (OC=“Open Circuit”)
Stand 15.04.08
Table 4.3. Checking probe electrical connections: Short circuit cap (OC=“Open Circuit”)
• After verifying the probe connections under open circuit conditions, unscrew the open
circuit cap and fit the short circuit cap.
• Verify that the resistance between points 2 and 4 (the sensor positive and negative
terminals) is <20Ω as shown in table 4.3.
Note!
Note that the only difference between table 3.3 and table 3.2 is the connection between the sensor positive and negative terminals (2 and 4)
shown in bold. Therefore there is no need to re-check all the other connections with the short circuit cap; the table is included in its entirety to
avoid confusion.
Table 4.4 provides details of what action to take if the probe’s electrical connections do not
agree with tables 4.2 and 4.3.
Stand 15.04.08
Connection Using cap
between
Problem
Solution
See
section
2 und 4
Open circuit
Not open circuit
Replace ceramic insulators
4.4.4
2 und 4
Short circuit
>20 Ω
Replace ceramic
sheath
4.4.5
1 und 3
Any
>50 Ω
Replace thermocouple 4.4.3
2 und 6
Any
Not open circuit
Replace ceramic
sheath
1 und 6
Any
Not open circuit
Replace thermocouple 4.4.5
Table 4.4
4.4.3
4.4.3
Correcting electrical connection problems (at 25°C)
Replacing thermocouple
• Open the hub and release the wires coming from the thermocouple by unscrewing the
hub terminal connections 1, 3, and 4 as labelled on figure 4.9.
The thermocouple is mechanically attached to the hub by a bayonet fitting labelled 9 on figure 3.9.
• Rotate the bayonet fitting anticlockwise and carefully pull the thermocouple all the way
out of the probe.
• Perform this process in reverse to fit a new thermocouple.
4.4.4
Replacing the ceramic insulators
The thermocouple (which also acts as the sensor negative electrode) is fitted with ceramic
insulators (shown in white on figure 4.2) to prevent an electrical short circuit. To replace
the insulators, first remove the thermocouple following the procedure detailed in the above
section.
• Pull firmly on the insulators to remove them from the thermocouple.
• To fit new insulators, slide the first insulator over the thermocouple and push all the way
to the end until the metal collar on the thermocouple is reached.
• Slide on the remaining insulators and re-fit the thermocouple.
Stand 15.04.08
4.4.5
Replacing the ceramic sheath
Removing the ceramic sheath
Before replacing the ceramic sheath, first remove the thermocouple as detailed in section
4.4.3.
• Release the positive sensor wire by unscrewing the terminal block connection (labelled 2
on figure 4.9), and unscrewing the positive wire clamp (labelled 10 on figure 4.9).
• Next undo the threaded collar shown on figure 3.1 (by hand), and carefully detach the
ceramic sheath from the probe handle.
Fitting a new ceramic sheath
A replacement ceramic sheath is supplied with an insulated wire protruding from one end.
This is the positive sensor wire.
• First feed the wire carefully through the probe handle and into the hub. Ensure that the
wire passes through the positive wire clamp labelled 10 on figure 3.9.
• Next, locate the metal collar of the ceramic sheath into the end of the probe handle.
• Slide the threaded metal collar over the ceramic sheath and screw this (by hand) into the
probe handle. Ensure that the ceramic sheath is securely fastened into the probe handle.
• Secure the positive sensor wire using the clamp in the hub ensuring there is enough wire
left to reach the positive sensor connection labelled 2 on figure 4.9.
• Finally, locate the end of the positive sensor wire inside the positive sensor connection
terminal (labelled 2 on figure 4.9) and screw in tightly.
• The thermocouple can now be fitted as detailed in section 4.4.3.
After fitting a new ceramic sheath it is advisable to check the electrical connections as
detailed in section 4.4.2.
Stand 15.04.08
5. Measurement Procedure
5.1 Prior to measurement
Analyser position
• Ensure that the protective screen cover is down so that the touch sensitive analyser
screen is protected from aluminium splashes.
• Stand the analyser on a firm surface at least 1 metre away from the melt.
• Ensure that the analyser is not in the path of any access required by the operator.
• Protect the analyser from heat radiation by positioning it such that the screen is facing
away from the melt. The maximum operating temperature for the analyser is 50◦C.
Ensure that the analyser does not exceed this temperature in service.
Reminder!
Do not clean the touch sensitive analyser screen or screen protector with
solvents (see section 8.4.3 for guidelines on cleaning the screen).
Checking analyser setup
Before making a measurement:
• Ensure analyser is set to the correct alloy (see section 3.7).
• Ensure analyser is calibrated for the sensor currently in use (see section 3.8).
• Ensure melt is below 800 °C. (or below 825 °C if a high temperature sensor is being
used.)
5.2 Procedure
Proceed as follows:
• Ensure that the protective screen cover is down so that the touch sensitive analyser
Stand 15.04.08
screen is protected from aluminium splashes.
• Clamp the probe firmly above the melt, ensuring that the cable is clear of the molten
metal (Maximum cable temperature = 250 °C).
• Ensure that the probe hub does not exceed 250 °C.
• Scrape the melt surface to remove dross.
• Slowly lower the probe into the melt. Ensure that the cap is between 15 - 30 cm beneath
the melt surface. If the cap is immersed less than the minimum depth (<15cm) then
erroneous hydrogen readings may occur. Do not immerse deeper than 30 cm as this may
cause the handle to overheat.
• Wait for the dissolved hydrogen reading to stabilise. This typically takes 1 - 5 minutes.
However, the response time can vary for a number of reasons discussed in section 5.4. It
is helpful to view the analyser “logger” screen to judge when the reading has stabilised
(see section 4.10.2).
• After completing the measurements, remove the probe from the melt, clamp securely or
place on a firm heat resistant surface away from the heat, and allow to cool.
Stand 15.04.08
Note!
The probe may be immersed into the melt at an angle, provided that the
minimum immersion depth is achieved and the immersion angle does not
result in the hub or probe cable being heating above their maximum rated
temperature.
Precautions
–
–
–
–
–
Ensure that the temperature of the analyser does not exceed 50°C in service.
Take care not to drip molten aluminium onto the probe cable.
Do not expose the probe to temperatures above 830 °C.
Never hang the probe from the cable.
Do not immerse the probe deeper than 30 cm.
Use with degasser
When using the probe with a degassing unit, position the probe as far away as possible from
the rotor (ideally 75 cm - 1 m). Mounting too close to the rotor may result in:
– Damage to the probe due to collision with the rotor.
– Erratic readings caused by bubbles of purging gas passing beneath the sensor.
5.3 Sensor life
An ALSPEK H sensor has a certain lifetime which will be determined by the way in which
the sensor is used. After prolonged exposure to the melt, the sensor will eventually deteriorate due the extremely aggressive conditions which exist in molten aluminium. Failure in
this manner can be termed ”sensor depletion” as it results from a loss of hydrogen ion conductivity in the sensor. Sophisticated On Board Diagnostics (OBD) built into the ALSPEK
H analyser are able to continuously monitor the condition of the sensor. If the analyser detects a problem with the sensor it will immediately display an appropriate error message indicating the nature of the problem. If a “Replace Sensor” error message appears, the probe
should be removed from the melt and the sensor changed. The On Board Diagnostic features of the ALSPEK H analyser are discussed in detail in section 3.9.
The sensor life will depend on the type of measurements made (e.g. continuous immersion,
batch testing) and on the physical conditions (alloy, temperature, degree of agitation in the
melt).
Stand 15.04.08
5.4 Examples of response behaviour
The response behaviour of the ALSPEK H can vary depending on operating conditions. All
of the following are known to influence response behaviour:
–
–
–
–
–
–
Agitation in the melt
Alloy
Temperature
How long the probe has been out of the melt,
Whether or not the sensor is coated with frozen aluminium before immersion,
Number of dips.
Regardless of the transient behaviour immediately after immersion, the true hydrogen level
will always be measured after the reading has stabilised. However, it is useful to examine
the transient behaviour to gain a better understanding of how the probe performs.
Reading decreases from a high value
Sometimes a high hydrogen reading will appear immediately after immersion, and the reading will then decrease from this high value and stabilise at the true hydrogen level. An example of this type of response is shown on figure 5.1.
This type of response is commonly seen when the probe has been used for the first time that
day. If the probe is exposed to air at room temperature for many hours (e.g. overnight), it
takes on moisture from the atmosphere. In the melt, this moisture reacts with aluminium to
form excess hydrogen, causing an artificially high hydrogen reading. After a time, all the
moisture will react and the true hydrogen level is measured. It should be noted that the first
measurement of the day will always take longer than usual to respond in a static melt.
This response is sometimes also observed if the end of the probe is completely sealed by
frozen aluminium from the previous dip. In this case, hydrogen can come out of solution as
the metal freezes, causing an artificially high hydrogen level around the sensor at the start
of the next dip.
Stand 15.04.08
Reading increases from a low value
A low hydrogen level may appear immediately after immersion, which will gradually increase to the true hydrogen level. An example of this type of response is shown on figure
5.2.
This is a common response behaviour which tends to occur if the probe was not sealed with
frozen aluminium when removed from the melt after the previous dip.
Slow response curve
After a number of repeated dips, a slow response similar to that shown on figure 4.3 may be
seen in a static melt. This is likely to be caused by the build up of a dross or oxide layer on
the end of the probe. This can be corrected by removing the probe from the melt and carefully wiping the molten aluminium from the end of the probe (particularly the very bottom)
using graphite or alumina insulating blanket/wool.
Stand 15.04.08
Figure 5.1. Probe response: decreasing from a high value
Stand 15.04.08
Figure 5.2. Probe response: increasing from a low value
Stand 15.04.08
Figure 5.3. Probe response: Slow response
Stand 15.04.08
6. Connection to PC or computer network
6.1 PC software installation
The ALSPEK H analyser is supplied with a comprehensive suite of computer software to
allow downloading and archiving of logged data, and to allow remote operation / control of
the analyser. Before installation of the software, please ensure that your PC meets the
minimum requirements listed below :
–
–
–
–
–
PC must be running Windows XP or Vista
For all operating systems, Internet Explorer 4.01 (or greater) must be installed
At least 32MB of RAM is required; 64MB preferred
At least 100 MB hard disc space free
PC must be set to at least 65536 colours
Please follow these instructions carefully to ensure a correct installation:
• Insert the PC software CD into the PC’s CD rom drive and double click on “Setup.exe”.
• Follow the on-screen instructions and accept the license agreement to install the
software.
After installation, the following programs may be found by clicking “Start”, “All Programs” then “Recorders”, summarised on table 6.1.
Program Name
Purpose
Remote Viewer
Remote viewing and control of analyser
Review
Downloading / archiving data
Quick Chart
(Not utilised at present4)
It is intended that future ALSPEK H analysers will include a removable memory card for use with the Quick Chart software.
Table 6.1. PC software suite
Stand 15.04.08
6.2 Getting connected
The connection between the ALSPEK H analyser and a PC computer or computer network
is made via the RJ-45 Ethernet socket on the front panel. If you only wish to connect the
analyser to a single PC, this can be done relatively easily by following the instructions in
section 6.2.1.
To connect to an internal computer network (Intranet) the analyser requires the network settings detailed in section 6.2.2, which should be available from your IT department. Please
contact a FOSECO representative to program the analyser with these settings.
6.2.1
Direct connection to PC
To connect the analyser directly to a PC, a cross-over Ethernet cable is required (supplied
with ALSPEK H analyser). This type of cable has the “send” and “receive” wires crossed
over inside the cable with the consequence that the “send” wire from the ALSPEK is connected to the “receive” wire on the PC (and vice versa) allowing the two to communicate.
In order for the PC to communicate directly with the ALSPEK H, the PC’s IP address also
needs to be on the same subnet as the analyser’s IP address. This means it’s IP address must
be the same as the ALSPEK’s, apart from the last number. The factory setting for the
ALSPEK H IP address is 192.168.3.100. Therefore setting the PC’s IP address to, for example 192.168.3.101, will allow the two units to communicate directly.
• To change the IP address of a PC running Microsoft Windows XP click “Start”, “Control
Panel”, “Network and Internet Connections”, “Network Connections”. If “Network and
Internet Connections” is not visible, click “Switch to Category View” toward the top left
of the window. Then right click on the icon labelled “Local Area Connection” and select
“Properties”. Left click once on “Internet Protocol (TCP/IP) and click “Properties”. Left
click once on the button “Use the Following IP Address” and fill in the following:
IP-Address:
192.168.3.101
Subnet Mask:
255.255.255.0
• Leave the other fields blank. Click “OK” then “Close” on the “Local Area Connection
Properties” window, and close any other windows.
• Finally, connect the analyser to the PC using a crossover Ethernet cable.
Stand 15.04.08
The connection is now complete and the analyser can now be accessed via the PC using the
procedures detailed in this section.
Note !
If the PC is being used on a computer network it may be inconvenient to
keep changing the IP settings between the network and the analyser. To
avoid this we recommend installing a second Ethernet network card (<50
Euros) on the PC for dedicated use with the analyser.
6.2.2
Connection to Ethernet network
The analyser can connect to the network automatically using an IP address from a BootP
server, or the network settings can be entered manually. In the latter case, the following are
required:
1. IP-address
2. Subnet Mask
3. Default Gateway
Please contact a FOSECO representative to set up the analyser on a Ethernet computer network.
Firewall settings
If the analyser is situated behind a firewall, the following ports will need to be opened by
your system administrator if you wish to access the analyser from outside the firewall.
Program name
Ports used
Remote viewer
126, 50010
Review
20, 21
FTP access
20, 21
Table 6.2
Stand 15.04.08
Firewall settings
6.3 Remote Viewer
The “Remote Viewer” program allows remote operation of the analyser directly via the
Ethernet cable, or over a computer network.
• To start “Remote Viewer” click “Start”, “All Programs”, “Recorders”, “Remote
Viewer”. The setup screen will appear.
• In the “Host name” section type in the analyser’s IP address. If the analyser is connected
directly to a PC this will be 192.168.3.100.
• In the “User name” section type “Engineering”. Tick the “Password required” box and
leave the “Start as lite” box unticked.
• To connect to the analyser, press ‘Start”.
• When prompted, enter the “Engineering” password (default is 100).
If your computer is running Microsoft Windows XP, a message may appear regarding the
firewall settings.
• If this happens, select “Unblock”.
This will open up the firewall ports necessary for the software to communicate with the
analyser. After a short wait, the analyser “Home” screen will appear. The analyser can now
be controlled via the PC exactly as if the user is standing in front of the unit. Please refer to
section 3 for full details of how to operate the analyser (logging in etc).
Figure 6.2 Setup of “Remote Viewer” software
Stand 15.04.08
6.4 Downloading / processing data: “Review” software
6.4.1
Understanding “Review”
The “Review” program allows the following:
1.
2.
3.
Downloading of data from the analyser.
Generating charts of data. These may be saved and printed.
Exporting data to a spreadsheet e.g. Microsoft Excel
Analyser data files
The logged data inside the analyser’s memory is stored in special files with the file extension “.uhh”. These are encoded for security reasons and can only be decoded using the “Review” program. The “uhh” files themselves can only be transferred to the PC via the
Ethernet socket. The data transfer process is performed using the “Review” program and,
once it has been set up, data can be downloaded and plotted on a chart / exported to a
spreadsheet quickly and easily. “Review” maintains a permanent record of all data which
has ever been recorded by the analyser, allowing complete data archiving in excess of the
limitations of the analyser’s memory.
The “Master Archive” folder
All data downloaded from the analyser to the PC is stored in the “Master Archive” folder.
The purpose of the “Master Archive” folder is to maintain a copy on the PC of what is on
the analyser. Periodically (e.g. every week), the analyser and PC should be synchronised
(see later) so that any new data recorded by the analyser can be transferred to the PC. Bear
in mind that the analyser’s memory is limited to 400 hours (17 days) of data. Eventually,
this will run out and when this happens, old data will be overwritten by new data. On the
other hand, the PC has a huge storage capacity on its hard disc. Nothing is deleted from the
“Master Archive” folder and, provided the analyser and PC are synchronised periodically,
this will contain all data measured during the lifetime of the analyser.
Stand 15.04.08
“Database” files
In order to use the data it must be decoded. After data is added to the “Master Archive”
folder, it gets decoded and stored in a “Database” file. Whenever data is examined (e.g. on
a chart) using “Review”, this data has come from the “Database” file. The software will
automatically use the “Default database”. This is stored in:
C:\Program files\Recorders\Review\review.erv
6.4.2
Setting up for the first time
• To start “Review”, click “Start”, “All Programs”, “Recorders”, “Review”.
If this is the first time the program has been started you will be prompted to setup the “Master Archive” folder. Accept the default location of:
C:\Program Files\Recorders\Review
Next, a dialogue box will appear asking “Do you want to temporarily enable Review Full
features?”
• Click next to “Don’t ask me this again” so that it is ticked then click “No”.
In order to retrieve data it is necessary to give the software details of the analyser. This only
needs to be done once; in future when “Review” loads, it will remember the settings needed
to communicate with the analyser.
• Click “Instrument” then “Setup” then “TCP/IP”. The instrument list should be blank.
• Click “Add Instrument” in the bottom left corner.
• Type the analyser’s IP address into the box labelled “TCP/IP address or host name” (this
will be 192.168.3.100 unless modified by a FOSECO representative).
• In the “Identifier” box, type in a name for the analyser (e.g. ALSPEK H), then click
“OK”.
“Review” has now been set up to work with the analyser; the next time the software is started it will remember the above settings.
Stand 15.04.08
Figure. 6.3
6.4.3
Setup of “Bridge” software
Downloading data
• To download data from the analyser, click “Instrument” then “Auto Backup + Transfer”.
The instrument name (ALSPEK H) as defined in the previous section will appear in the left
hand pane.
• In the “Instrument user name” box, enter “Engineering” and next to “Instrument
password”, enter the Engineering password (set to 100 by default).
• Click inside the box labelled “Backup enabled” so that it is ticked.
The “Destination” for the backup files is filled in automatically and should correspond to
the location of the “Master Archive” folder defined in section 6.4.2, followed by the instrument name defined earlier in the “Add Instrument” window.
• Click inside the box labelled “Transfer enabled” so that it is ticked.
• To perform the data transfer click the “Transfer now” button.
Stand 15.04.08
A dialogue box will appear asking “Are you sure”; click “Yes”. If your computer is running
Microsoft Windows XP, a message may appear regarding the firewall settings.
• If this happens, select “Unblock”.
This will open up the firewall ports necessary for the software to communicate with the
analyser. A “Comms Log” window will appear and data will be downloaded from the analyser and transferred into the database (this may take several minutes).
• When the transfer has completed, close the “Comms Log”’ window.
• Then click “OK” to close the “Auto Backup + Transfer” screen.
After downloading the data from the analyser, the PC automatically transfers data to the database which may take some time depending on the PC’s hardware.
• Please wait for this process to finish before proceeding.
This data download procedure only downloads new data which has been added to the analyser’s memory since it was last connected. Every time the analyser is connected to the PC
and synchronised (by pressing the “transfer now button”), the “Master Archive” file gets
updated with any new data which was recorded since last time the analyser and PC were
synchronised.
Note!
It is recommended to perform this procedure at regular intervals (e.g.
every week) to ensure that the PC maintains a complete copy of all data
recorded by the analyser.
Stand 15.04.08
Figure. 6.4
Stand 15.04.08
Synchronising analyser data with PC
To transfer data from a Mk3 analyser to a USB memory stick proceed as follows:
• Log in as Engineering. To do this, press in the top left of the screen where it says
“Logged out”.
• Then press next to “User ID” and select “Engineering”.
• Then press on the blank space next to where it says “Password”.
• Then press “Numeric” towards to bottom of the window that appears.
• Then enter 100 using the on-screen keypad. Then press “OK”
• Press the button in the bottom right hand corner of the screen, then press “Operator”,
then “Archive”, then “Local”.
• Put a memory stick into the left USB socket (the one furthest from the Ethernet network
socket). Ensure the memory stick has at least 32MB of space on it.
• Press where it says “mediacard” then select “usb1”
• Press the “Archive All” button.
The data will now be transferred to the memory stick. The analyser will display a message
when the data transfer is complete (this may take a few minutes).
• When this message appears, press “OK”.
• Then remove the memory stick from the analyser.
All the data will be in a folder called “History” in the memory stick.
To load the new data into the database of the “Review” PC software proceed as follows:
• Insert memory stick into a free USB slot on the PC.
• Start “Review” then go to “File”, then “Transfer” then “From removable Media”.
• Select the drive corresponding to the USB memory stick and press “OK”.
The data from the memory stick will then be transferred to the “Review” database.
Stand 15.04.08
6.4.4
Plotting / exporting data
The procedure described in section 6.4.3 retrieves the data files from the analyser and stores
them in the PC’s database. The data may now be retrieved from the database and plotted on
a chart, tabulated, or exported to a spreadsheet.
Click “File” then “New Chart”. The “Chart Setup” window will appear as shown on
figure 6.5.
• Click the “Add Point..” button.
• Click next to “Instrument” and select the ALSPEK analyser from the drop down menu,
• and next to “Log Group” select “Hydrogen Analyser”.
• Then click “Add All”. Click “OK” on the “Chart Setup menu” (figure 6.5).
A chart will be displayed showing hydrogen (in red) and temperature (in blue) plotted against time on the x axis.
Stand 15.04.08
Figure 6.5 Plotting / exporting data: Chart Setup
• To view the desired data press the “Go To” button circled in red on figure 6.7.
The “Go To” menu will now be displayed which allows easy navigation to the desired data.
There are three ways to navigate to the desired data:
1.
2.
3.
Relative date and time
Specific date and time
Batch
Stand 15.04.08
Figure 6.6 Plotting / exporting data: Select Point
Stand 15.04.08
Figure 6.7 Default data chart
If the data was not recorded as a batch (see section 3.10.1) then it will be necessary to navigate to the data using either of the first two options. In this case, the relative or specific time
and date should be specified and also the duration of data to be displayed.
• If the desired data was recorded as a batch, press the “Find Batch” button.
This will bring up the “Batch Selector” screen, which is a list of all the data batches that
have been recorded.
• Select the desired batch, the click “OK”. Ensure that the “Show entire batch” option is
ticked then click “OK”.
An example of a set of data is shown on figure 6.9.
• The time scale can be adjusted by clicking the arrow circled in red on figure 6.9.
The chart can be printed or saved by selecting “Print” or “Save Chart” from the “File”
menu.
Stand 15.04.08
Exporting data to a file or spreadsheet
• To export data, click “File” then “Export”.
Figure 6.8 "Go To menu"
There are three ways of selecting which data to export.
1.
2.
3.
Current view
Batch
Specific point in time + duration
Stand 15.04.08
Figure 6.9 Example of a set of data
• Select the data to be exported using one of the above options.
A quick way to transfer the data to a spreadsheet is to press the “Copy to Clipboard” button.
• Then create a new blank spreadsheet in your spreadsheet application and select “Paste”
from the “Edit” menu of the spreadsheet.
Alternatively, data may be saved to a file by pressing the “Copy to File” button.
• The file may then be imported to the spreadsheet.
The file will contain the data in the format “Time Messages Hydrogen Temperature” separated by “Tabs”.
• It may be necessary to re-size the columns in your spreadsheet application in order to
display the data properly.
• Figure 6.11 shows a set of data exported to Microsoft ExcelTM.
Stand 15.04.08
Figure 6.10 Exporting data to a file or spreadsheet
Figure 6.11
Stand 15.04.08
Data exported to Microsoft ExcelTM
P
P
7. Error messages and troubleshooting
7.1 Summary of analyser error messages
A comprehensive list of the different analyser error messages with causes and solutions it
given on table 7.1.
7.2 Startup error screen
When the analyser starts up it checks its hardware to see if it is functioning properly. If
there is a problem then the “Startup error” screen will appear as shown on figure 7.1. The
most likely cause for the “Startup error” screen being displayed is damage to the touch sensitive screen. Alternatively, if pressure is being applied to the screen while the analyser is
starting up then the “Startup error” screen will also appear. If this screen is displayed then
perform the following checks:
1.
2.
3.
Inspect the screen for signs of damage.
If no damage is apparent, carefully clean the screen using a soft cloth.
Check for grit or debris along the edges of the screen, which may be applying pressure.
Note!
Note that if no action is taken the “Startup error” screen will proceed to
the “touch-screen calibration” screen. To see if the problem has cleared,
switch the analyser off then on again. If the problem is not resolved then
please contact FOSECO GmbH to arrange for repair.
Stand 15.04.08
Figure 7.1 The “Startup error” screen
7.3 Troubleshooting
A list of possible problems with solutions is given on table 7.2.
Melt voltage
Due to the design of the probe, the sensor positive electrode is electrically common with the
melt. Under normal circumstances this will not cause any problems and no special electrical
connections to the melt are required. However, if noise / erratic readings are permanently
displayed by the analyser despite replacing the sensor (section 4.2) and checking the
probe’s electrical connections (section 4.4.2), then please arrange for the melt voltage to be
checked by a qualified electrician.
The AC melt voltage should be <100 mV. Anything more than this will cause unreliable
hydrogen readings. A high melt voltage may be caused by an electrical problem for example, a furnace element working loose and finding an electrical conduction path to the melt
Stand 15.04.08
(e.g. by touching the outside of an electrically conductive silicon carbide crucible). A problem such as this should be repaired by a qualified electrician.
A high melt voltage may also be caused by electromagnetic induction (e.g. induction heated
furnace, electromagnetic pump). In this case, the melt voltage can be reduced by earthing
the melt. Please contact FOSECO GmbH to arrange a melt earthing solution.
Earthing of furnace casing
Bad earthing of the furnace casing can also be a source of electrical noise. If noise problems
persist then please contact a qualified electrician to check the earthing of the furnace casing
and to resolve the problem if necessary.
7.4 Technical assistance
If you require technical assistance please contact you FOSECO GmbH representative.
Error message
Cause
Solution
Probe not connected
Probe not connected
Connect probe cable to analyser
Temperature too low
Temperature is < 650 °C
1. Ensure melt temperature is >650 °C
2. Wait for probe to heat up
Temperature too high
Probe temperature is >820 °C 1. Remove probe from melt
2. Ensure melt temperature is <800 °C
3. Re-immerse probe
Replace Sensor-Failing
Replace Sensor-Short
Thermocouple failure
Table 7.1
Stand 15.04.08
Sensor needs replacing
Replace sensor
Probe electrical problem
Check connections (section 4.4.2)
Sensor aluminium ingress
Replace sensor Circuit
Probe electrical problem
Check connections (section 4.4.2)
Thermocouple failure
Replace thermocouple
Probe cable not connected
Connect probe cable
Summary of analyser error messages
Problem
Solution
Section
“NO DATA” displayed by
analyser
Note error message displayed. See table 7.1 for solution
7.1
Hydrogen reading higher /
lower than expected
1. Ensure alloy calibration constants are set correctly.
3.7
2. Ensure analyser is programmed with the correct sensor
calibration values
3.8
Unusually slow sensor response
Clean end of sensor
5.4
Erratic / noisy readings
1. Check probe connections.
4.4.2
2. Check degasser rotor position.
5.2
3. Check melt voltage.
7.3
Unable to enter sensor
calibration values
Log in as “Engineering”
3.3
Unable to change custom
alloy calibration
Log in as “Engineering”
3.3
Table 7.2
Stand 15.04.08
Troubleshooting: problems and solutions
8. System Specifications
8.1 Description
“A portable analyser for the direct and continuous measurement of dissolved hydrogen in
both foundry and wrought aluminium alloys.”
"Ein tragbares Analysegerät für die direkte und dauernde Bestimmung des gelösten Wasserstoffgehalts in Legierungen bei Gießereien und Schmieden"
8.2 Technical Performance
8.2.1
Response time
Time to indicate equilibrium hydrogen concentration in a static melt typically 5 minutes
from point of immersion. During continuous measurement of hydrogen thereafter, response
time to a change in hydrogen concentration is <5 seconds.
8.2.2
Reproducibility
Reproducibility, +/- 0.01 ml/100g or 3 % of hydrogen concentration.
8.3 Salient Features
8.3.1
The analyser unit
The analyser unit has the following features:
1.
2.
3.
4.
5.
The unit is of robust and portable construction being set in a briefcase style aluminium
carrying case.
The unit is provided with a touch screen which gives access to several display and diagnostics screen options.
The main screen shows continuous hydrogen and temperature readings together with
sensor condition indicator and sensor failure alarm.
The second screen gives a real time and continuous graphic display plotting changes in
both hydrogen level and temperature.
A data logger automatically records up to 17 days of measurements. Data history can
Stand 15.04.08
6.
7.
8.3.2
be accessed directly via the touch screen or downloaded to a PC computer for subsequent conversion into a graph.
A third screen gives full diagnostic information on calibration constant settings and
sensor outputs.
Maximum operating temperature 50 °C
The measuring probe
The measuring probe has the following features:
1.
2.
8.3.3
The probe is of metal and ceramic construction. Connection to the analyser is by an
armoured cable with quick fit connectors on both ends.
The probe is fitted with a thermocouple for continuous measurement of metal temperature.
The sensor
The sensor has the following features:
1.
2.
3.
4.
The sensor is individually calibrated.
The sensor is a replaceable unit with a quick screw fit onto the end of the probe.
The sensor is a self contained unit requiring no outside gas source for reference or
purging purposes.
The sensor is capable of measuring and recording changes of hydrogen concentration
during a degassing treatment with an inert gas.
8.4 Analyser connections / maintenance
8.4.1
Power
The unit is suitable for use with all AC voltages between 85 and 265 V RMS (47 to 63 Hz),
and requires 60 VA max. power. Voltage selection is automatic.
8.4.2
Ethernet
Ethernet socket is a 10 BaseT connection.
Stand 15.04.08
8.4.3
Analyser maintenance
Cleaning
Clean the analyser screen regularly using a soft cloth. Ensure no dirt / debris become attached to the screen or between the screen and analyser enclosure.
NOTE!
Do not use solvents / cleaning products on touch sensitive screen or protective screen cover.
Internal battery life
The analyser has an internal battery with a lifetime of 2 years. Please contact FOSECO
GmbH to arrange a replacement battery after this time.
Stand 15.04.08
APPENDIX
Stand 15.04.08
9. How it works
The probe is based on a ceramic material (CaZrO3-In) which can conduct hydrogen ions.
The principle of how this material can be used to measure hydrogen concentration is shown
on figure 9.1.
Figure 9.1 Solid electrolyte hydrogen sensor
A dense piece of hydrogen ion conducting ceramic is shown in green, and this has been
painted with metal electrodes on either side. The concentration of electrons is higher on the
right hand side than on the left because the hydrogen concentration is higher. This results in
the right hand side becoming negatively charged and the left positively charged. Therefore,
if the voltage across the ceramic is known and the hydrogen concentration on one side is
known (the “reference” hydrogen concentration), then the hydrogen concentration on the
other side can be calculated. This type of arrangement is called a “hydrogen concentration
cell”.
To use a hydrogen concentration cell to measure hydrogen the reference hydrogen concentration must be known at all times otherwise the measured voltage is meaningless. All
ALSPEK H sensors contain a “Solid State Reference”; a solid material which generates a
known hydrogen concentration. The electrode exposed to the solid state reference is the
“Reference Electrode” and the electrode exposed to the measured gas is the “Measuring
Electrode”.
Stand 15.04.08
Figure 9.2 Principle of probe operation
Figure 2.2 shows a schematic arrangement of a probe to measure hydrogen concentration in
molten aluminium. At the end of the probe there is a porous diffusion barrier. Hydrogen
dissolved in the melt comes out of solution and the hydrogen gas enters a sealed cavity as
shown. The measuring electrode of a hydrogen concentration cell is exposed to the gas cavity.
The voltage from the hydrogen concentration cell is measured and, because the reference
hydrogen concentration is known, the concentration of hydrogen gas in the gas cavity can
be calculated. To work out the hydrogen concentration in the melt, the solubility of hydrogen needs to be known. Figure 9.3 shows the hydrogen solubility for pure aluminium and it
can be seen that solubility depends strongly on temperature. Therefore the melt temperature
must also be measured in order to calculate the dissolved hydrogen level. Hydrogen solubility also depends on the alloying components in the melt, which is why the analyser needs to
be set to measure the correct alloy.
Stand 15.04.08
Figure 9.3 Hydrogen solubility as a function of temperature for pure aluminium in equilibrium with 1 atm hydrogen gas
Stand 15.04.08
10. Alloy calibration constants
Stand 15.04.08
Stand 15.04.08
Stand 15.04.08