1
DISASSEMBLE USING STEPS 15 THROUGH 18 ONLY
WHEN PARTS ARE DIRTY OR DAMAGED.
NOTE: The Extractor Spring is under compression and
may be easily lost when the Extractor Pin is removed.
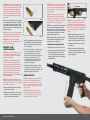
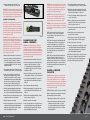
15. Remove the Extractor Pin by pushing it out with a
punch or the tip of a Bullet. See Figure 28.
DON’T LOSE IT!
FIGURE 30
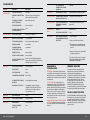
16. Remove the Extractor and Extractor Spring. See
Figure 29.
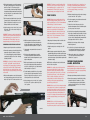
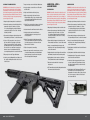
ith Hammer cocked, depress Buffer Retainer with
17. W
a punch or Bullet tip to release the Buffer and Spring.
See Figure 30.
CAUTION! The Buffer is under compression from
the Action Spring.
NOTE: The Hammer needs to be cocked to allow the
Buffer and Buffer Spring to clear Lower Receiver.
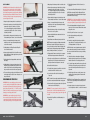
emove the Buffer and Action Spring from the
18. R
Lower Receiver for cleaning. See Figure 31.
AAC DOES NOT RECOMMEND ANY
FURTHER DISASSEMBLY.
FIGURE 27
FIGURE 31
INSPECTION/CLEANING/LUBRICATION
WARNING! Before cleaning your firearm, make sure
it is completely unloaded (both the chamber and the
magazine) and engage the safety mechanism by
placing the safety lever in the “S” or “SAFE” position.
Failure to follow these instructions may cause property
damage, personal injury and/or death.
WARNING! After each use, follow the lubrication and
maintenance directions in this Owner’s Manual. If the
firearm is immersed in water, it must be thoroughly
cleaned and lubricated as soon as possible. In case
of saltwater immersion, first flush all parts with fresh
water, then dry, clean and lubricate the firearm. If the
firearm does not function properly, have it checked and
corrected by an AAC Authorized Repair Center before
further use. Failure to follow these instructions may lead
to firearm malfunctions which could result in property
damage, serious personal injuries and/or death.
After discharging your rifle, clean it as soon as possible
to avoid corrosion. When your firearm has not been
fired, you should clean it at least once or twice a year
if you live in a temperate climate, or as often as once a
week in a tropical climate.
FIGURE 28
FIGURE 29
AAC — BLACK RIFLE MANUAL
If you get your firearm wet, clean it as soon as possible
to avoid the onset of corrosion/rust. Use a high quality
rifle cleaning kit that includes a cleaning rod; swab
holder; cotton flannel bore patches; pipe cleaners; a
small toothbrush; brass wire bristle bore and chamber
brushes and a Cleaner/Lubricant/Preservative (CLP in
Army terminology). Plus, a small brush (old toothbrush)
for cleaning parts and dislodging dirt build-up, and pipe
cleaners or Q-tips for cleaning Gas Key and Gas Tube
and other hard to reach areas.
NOTE: The procedures below describe cleaning your
firearm with a standard military issue multi-piece
rod cleaning kit. Other commercial cleaning kits may
include alternate cleaning instructions which may be
just as effective.
2. R
emove the magazine, pull and hold the bolt fully
rearward to inspect the chamber. See Figure
11. Visually and physically verify the Chamber is
completely unloadedSee the section “Clearing/
Unloading Your Rifle”.
WARNING! Excessive use of a lubricant could adversely
affect the function and safe operation of your firearm.
Failure to properly maintain your firearm can not only
damage your firearm, it can expose you and others to
unnecessary risks of property damage, personal injury
and/or death.
3. D
isassemble the firearm per the instructions in
the “Disassembling Your Firearm,” section of
this manual.
When the firearm is to be stored, it should be
carefully cleaned and thoroughly oiled. Outside
metal surfaces should be wiped with Rem Oil ™
occasionally. When the firearm is to be reused, all
excess lubrication must be removed. The chamber
and bore must be thoroughly wiped dry. For safe and
dependable operation of your firearm, the barrel and
action must be cleaned periodically.
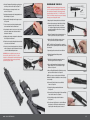
5. Attach the Patch Holder to the Cleaning Rod, but
leave it two turns short of tight.
NOTE: Remington’s Rem Oil ™ is available from your
local dealer. If your dealer is out of stock, ask him to
order Rem Oil™ from his Remington Distributor.
WARNING! The use of non-recommended lubricants
or cleaners could adversely affect the function and
safe operation of your firearm. Do not use congealing
lubricants. The use of non-congealing lubricants such
as Rem Oil™ is strongly recommended. The use of
improper lubricants could cause property damage,
personal injury and/or death
CLEANING THE BORE
WARNING! Unload the firearm before cleaning. Look
into the ejection port and visually check the chamber
and magazine to make sure there are no cartridges in
the firearm. Always wear eye protection when handling,
disassembling and reassembling the firearm. Failure to
follow these instructions may cause property damage,
personal injury and/or death.
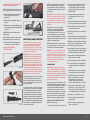
The bore of your rifle has Lands and Grooves called
“Rifling”. Rifling makes the bullet spin very fast as it
moves down the Bore and down range. It is difficult
to push a new, stiff Bore Brush through the Bore.
You will find it much easier, and more effective, to
pull your Bore Brush through the Bore. Also, because
the brush will clean better if the bristles follow the
grooves (this is called tracking), you want the Bore
Brush to be allowed to turn as you pull it through.
ALWAYS CLEAN FROM CHAMBER TOWARD THE
MUZZLE. Follow these steps:
1. Always keep the firearm pointed in a safe direction.
4. Attach the three Cleaning Rod Sections together, but
leave each one about two turns short of being tight.
6. Holding only the Upper Receiver in one hand, Point
Muzzle down.
7. Insert the threaded end of the Cleaning Rod into the
Chamber. Guide the Rod carefully through the Bore.
CAUTION: Do not let the Cleaning Rod or its threaded
end scratch the Bore or Chamber. About 2 - 3 inches
of the Rod should protrude out of the Muzzle.
8. A ttach the Handle Section of the Cleaning Rod to the
end of the Rod sticking out of the Muzzle, and swab
out the Bore with a patch moistened with “CLP”.
9. Remove Patch Holder and attach the Bore Brush
(leaving it two turns short of tight).
10. Remove the Handle Section of the Cleaning Rod.
11. Insert the threaded end of the Cleaning Rod into
the Chamber. Guide the Rod carefully through
the Bore.
12. Attach the Handle Section of the Cleaning Rod to
the end of the Rod sticking out of the Muzzle.
13. Pull the Brush through the Bore and out the
Muzzle. You should be able to see the Rod
twisting as you pull it - this is the Brush
“tracking” in the rifling. Never reverse the
direction of the Bore Brush while it is in the Bore.
14. After one pull, take off the Handle Section and
repeat steps 11 - 13 three to four times. If the
three rod sections and the Bore Brush become
screwed tightly together, loosen them two turns.
epeat steps 5 – 14 until the bore is clean.
15. R
16. Push a clean patch saturated with Rem Oil™
through the barrel.
17. Push a clean dry patch through the barrel to
remove excess lubricant.
17