1
Exodus
User Manual
Providing DICOM Connectivity for the Medical Community
Laurel Bridge Software, Inc.
302-453-0222
www.laurelbridge.com
Document Version: 3.16.8
Document Number: LBDC-000039-031608
Last Saved: 10/20/2015 12:45:00 PM
Exodus User Manual
©2005-2015 Laurel Bridge Software, Inc. All Rights Reserved
v3.16.8
- ii -
Contents
1.
What is Exodus? .................................................................................................................................... 1
2.
Migration Basics .................................................................................................................................... 2
3.
4.
2.1.
Overview ....................................................................................................................................... 2
2.2.
Workflow....................................................................................................................................... 2
Installation ............................................................................................................................................ 3
3.1.
Recommended System Specification ............................................................................................ 3
3.2.
Software Prerequisites .................................................................................................................. 3
3.3.
Installing SQL Server 2008 R2 SP2 Express x64 ............................................................................. 3
3.4.
Installing SQL Server 2012 Express x64 with Tools ....................................................................... 4
3.5.
Installing SQL Server 2014 Express x64 with Tools ....................................................................... 4
3.6.
Archive Configuration Prerequisites ............................................................................................. 5
3.7.
Main Install.................................................................................................................................... 5
Getting Started...................................................................................................................................... 6
4.1.
Overview ....................................................................................................................................... 6
4.2.
Migration Types ............................................................................................................................ 6
4.3.
Exodus Application Configurations & License Options ................................................................. 6
4.3.1.
Exodus Migration Controller ................................................................................................. 6
4.3.2.
Exodus Assessment ............................................................................................................... 7
4.3.3.
Exodus Priors Fetcher ........................................................................................................... 7
4.3.4.
License Mode: Charge By ...................................................................................................... 7
4.3.5.
License Mode: Segment Types.............................................................................................. 8
4.4.
5.
Installing a License ........................................................................................................................ 8
4.4.1.
Installing a license file ........................................................................................................... 8
4.4.2.
Activating a license over the internet ................................................................................... 8
4.5.
Creating a Migration ................................................................................................................... 10
4.6.
Running a Migration ................................................................................................................... 10
User Interface Details.......................................................................................................................... 11
5.1.
Sessions / Segments Panel .......................................................................................................... 11
5.2.
Session Configuration Dialog ...................................................................................................... 12
5.3.
Segment Configuration Dialog .................................................................................................... 13
5.4.
Exam Viewer ............................................................................................................................... 14
Exodus User Manual
©2005-2015 Laurel Bridge Software, Inc. All Rights Reserved
v 3.16.8
- iii 5.5.
Query Viewer .............................................................................................................................. 15
5.6.
History Dialog .............................................................................................................................. 15
5.7.
Activity Monitor .......................................................................................................................... 15
5.8.
Operation Progress Panel ........................................................................................................... 16
5.9.
Tool Bar ....................................................................................................................................... 16
5.10. Menu Bar..................................................................................................................................... 16
6.
7.
8.
Segments............................................................................................................................................. 18
6.1.
Overview ..................................................................................................................................... 18
6.2.
Normal Segment ......................................................................................................................... 18
6.3.
Specific Segment ......................................................................................................................... 18
6.4.
List Segment ................................................................................................................................ 18
6.5.
Priors Segment ............................................................................................................................ 18
6.6.
Fixed Segment ............................................................................................................................. 20
Operations .......................................................................................................................................... 21
7.1.
Query........................................................................................................................................... 21
7.2.
Move ........................................................................................................................................... 21
7.3.
Validate ....................................................................................................................................... 22
Filters................................................................................................................................................... 24
8.1.
Conditions ................................................................................................................................... 24
8.2.
Original Attribute Sequence ....................................................................................................... 24
8.3.
Standard Actions ......................................................................................................................... 25
8.4.
Mapping List Action .................................................................................................................... 27
8.5.
Composer Action Examples ........................................................................................................ 33
8.5.1.
Working with DICOM sequences ........................................................................................ 35
8.5.2.
Modifying private tags ........................................................................................................ 35
8.6.
De-Identify Filter Action .............................................................................................................. 37
8.6.1.
DICOM Attribute Tags to Anonymize .................................................................................. 37
8.6.2.
Miscellaneous Settings........................................................................................................ 38
8.6.3.
Pixel Regions to Anonymize ................................................................................................ 39
8.6.4.
One-Way Anonymization .................................................................................................... 39
8.6.5.
Additional Notes ................................................................................................................. 40
8.7.
Re-Identify Filter Action .............................................................................................................. 40
Exodus User Manual
©2005-2015 Laurel Bridge Software, Inc. All Rights Reserved
v 3.16.8
- iv 8.7.1.
Additional Notes ................................................................................................................. 41
Appendix A:
How to not migrate (drop) non-image DICOM objects ...................................................... 42
Appendix B:
Creating a Priors Fetch Segment for Exodus Priors Fetcher ............................................... 45
Appendix C:
Exodus FAQ ......................................................................................................................... 46
1.
How do I know how many Exams I am allowed to move? ......................................................... 46
2.
What do the numbers at the bottom of the Main Dialog mean? ............................................... 46
3.
What does the number under the Query Progress Bar mean if I do not have a Date Range
Segment? ................................................................................................................................................ 47
4.
Exodus seems to be running slow, what can I do? ..................................................................... 47
5.
Should I Query and Move and Validate all at the same time? ................................................... 47
6.
How do I configure Exodus to use Tag Filters? ........................................................................... 48
7.
How do I apply a filter to all images (datasets)? ......................................................................... 49
8.
How do I validate a migration where new images are added to the destination ...................... 50
9.
I do not want to migrate SR (Structured Report) objects. How can I perform a Validation? .... 50
10.
After querying the Source I do not see any exams in the Exam Viewer, what should I do? ...... 53
11.
Exodus was shut down for several days, will my Priors Segment catch-up? .............................. 53
12.
Where can I find more information on Regular Expressions used by Exodus? .......................... 53
13.
My low priority Segments do not get run; what is wrong with my configuration? .................. 53
14.
I want to use a Mapping List Action with private tags ................................................................ 53
15.
How does Exodus respond to C-ECHO messages?...................................................................... 53
16.
Help I’m stuck! ............................................................................................................................ 54
Exodus User Manual
©2005-2015 Laurel Bridge Software, Inc. All Rights Reserved
v 3.16.8
-1-
1. What is Exodus?
Exodus is a collection of software applications that assist in the automation of DICOM migration tasks.
Exodus applications focus on reliability, flexibility, and a simplified user experience.
Legacy archives often have features that present challenges for moving DICOM data, including:
Merger of two or more archives
Access to historical relevant priors
Mismatched patient/study information
Archive vendor proprietary issues
Private DICOM tag handling
Non-compliant/inconsistent DICOM data
Unknown size of the job
Uncertainty of completeness
Inability to validate the data moved
Excessive manual effort
Inability to pre-fetch relevant priors
Unresponsive support
Exodus allows the user to automate the process of collecting the information needed from a legacy
archive to assess, plan, configure, perform, and validate a DICOM Migration. This collected information
can be used to assess exactly what data the user has and help decide exactly what needs to be moved
and what needs to be changed.
Using built-in validation and reporting systems, the user is able to determine exactly what has moved
and what has not. Exodus ensures that exams are moved in a timely way and that they are available for
use in their entirety on the new archive - all automatically.
From start to finish, the goal of Exodus is to provide a complete and transparent view of the issues
related to moving DICOM studies, plus provide options to automatically control and report the
movement of the DICOM data in a simple, high-level way; freeing the user to concentrate on other tasks.
Exodus Applica tions
Exodus comes in three basic application configurations:
Certain features described in this document may not be applicable depending on the application in use:
Exodus Migration Controller
Migrate DICOM studies from one archive to another—the complete archive migration solution.
Exodus Assessment
Assess the contents of the source archive prior to a migration and/or validate the results of a
previous migration.
Exodus Priors Fetcher
Fetch prior exams when a patient becomes scheduled on the worklist.
Exodus User Manual
©2005-2015 Laurel Bridge Software, Inc. All Rights Reserved
v 3.16.8
-2-
2. Migration Basics
2.1. Overview
A data migration is defined as the process of transferring data from one location to another. A
determination of what exams should be moved is made and a list of exams to move are collected and
subsequently moved. To ensure that the exam was processed properly by the destination, a query may
be issued to the destination to verify the existence and/or validity of the exam.
2.2. Workflow
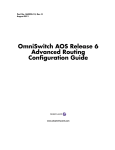
DICOM migrations function through a set of third-party DICOM commands that allow a client to
interrogate an archive for content and then selectively issue move requests to transfer that data to
another system. In the simplest case, the third-party client never sees the actual data:
Image Transfer
Destination
Archive
Source
Archive
Query/Move Request
Exodus
Validate Request
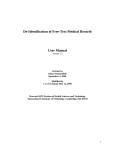
If the data needs to be changed in any way (also known as “filtering”) it must pass through a system that
can do so. The main difference is that the move destination as far as the source is concerned is the
system that will do the filtering. This filtering system is responsible for forwarding the image on to the
final destination:
Image Transfer
Image Transfer
Destination
Archive
Source
Archive
Query/Move Request
Exodus User Manual
Exodus
Validate Request
©2005-2015 Laurel Bridge Software, Inc. All Rights Reserved
v 3.16.8
-3-
3. Installation
3.1. Recommended System Specification
Intel i5, 4GB RAM, 256GB HD or better
- Windows 7, Windows 8.1, Windows Server 2008 R2, or Windows Server 2012 R2
- SQL Server 2008 R2 x64, SQL Server 2012 x64, or SQL Server 2014 x64. Express edition may be
used in most installations.
3.2. Software Prerequisites
Laurel Bridge Exodus utilizes several components that must be installed for it to work properly. The
software prerequisites are:
Microsoft .NET Framework 3.5 SP1
Microsoft SQL Server
Microsoft SQL Management Studio
Microsoft .Net Framework 3.5 SP1 and Microsoft SQL Server should be installed before running the
Exodus.msi installer.
3.3. Installing SQL Server 2008 R2 SP2 Express x64
These are instructions for installing SQL Server Express in its most basic configuration for use by Exodus.
These instructions are valid for Windows 7 and Windows Server 2008. If you have older versions of SQL
Server installed or if you are installing the full version of SQL Server or if you are using SQL Server
authentication mode then your installation procedure may be different.
1. Log in to Windows as a user with administrative privileges. This will be the user
for the migration.
2. Run the SQL Server 2008 R2 SP2 Express x64 installer
3. On the Setup screen select New installation or add features to an existing installation
4. On the License Terms screen Accept the license, click the Next> button
5. On the Setup Support Files screen make sure all of the checkboxes are checked for
all of the Instance Features, click the Next> Button
6. On the Instance Configuration screen the defaults should be correct.
The named instance should be SQLExpress. Allow it to install in the
default location, which should be C:\Program Files\Microsoft SQL Server\
7. On the Server Configuration screen the defaults should be fine
for the Service Accounts tab and the Collation tab defaults.
8. On the Database Engine Configuration screen on the Account
Provisioning tab, select Windows Authentication Mode. The
Current user (who must have Administrative Privileges) should be in
the list under Specify SQL Server Administrators. If it is not, click
the button to Add Current User. Leave the defaults on the other two
tabs.
9. On the Error Reporting screen click the Next> button.
10. Installation should complete in several minutes.
Exodus User Manual
©2005-2015 Laurel Bridge Software, Inc. All Rights Reserved
v 3.16.8
-4-
3.4. Installing SQL Server 2012 Express x64 with Tools
These are instructions for installing SQL Server Express in its most basic configuration for use by Exodus.
These instructions are valid for Windows 7, Windows 8.1, Windows Server 2008 R2 and Windows Server
2012. The installation procedure may differ if an older version of SQL Server is installed, if the full
version of SQL Server is preferred, or if SQL Server authentication mode must be enabled.
1.
2.
3.
4.
5.
6.
7.
8.
9.
10.
Log in to Windows as a user with administrative privileges
Run the SQL Server 2012Express x64 with tools (SQLEXPRWT_x64_ENU.exe) installer
On the Setup screen select New installation or add features to an existing installation
On the License Terms screen Accept the license, click the Next> button
On the Product Updates screen choose whether to check for updates based on your
corporate policy.
On the Feature Selection screen make sure all of the checkboxes are checked for
all of the Instance Features. Make sure that the Management Tools checkboxes are
checked, click the Next> Button
On the Instance Configuration screen the defaults should be correct
The named instance should be SQLExpress. Allow it to install in the
default location, which should be C:\Program Files\Microsoft SQL Server\
On the Server Configuration screen the defaults should be fine
for the Service Accounts tab and the Collation tab defaults
On the Database Engine Configuration screen on the Account
Provisioning tab, select Windows Authentication Mode. The
Current user (who must have Administrative Privileges) should be in
the list under Specify SQL Server Administrators. If it is not, click
the button to Add Current User. Leave the defaults on the other two
tabs.
Installation should complete in several minutes
3.5. Installing SQL Server 2014 Express x64 with Tools
These are instructions for installing SQL Server Express in its most basic configuration for use by Exodus.
These instructions are valid for Windows 7, Windows 8.1, Windows Server 2008 R2 and Windows Server
2012. The installation procedure may differ if an older version of SQL Server is installed, if the full
version of SQL Server is preferred, or if SQL Server authentication mode must be enabled.
Log in to Windows as a user with administrative privileges
Run the SQL Server 2014Express x64 with tools (SQLEXPRWT_x64_ENU.exe) installer
On the Setup screen select New installation or add features to an existing installation
On the License Terms screen Accept the license, click the Next> button
On the Microsoft Update screen choose whether to check for updates based on
your corporate policy.
6. On the Feature Selection screen make sure all of the checkboxes are checked for
all of the Instance Features. Make sure that the Management Tools checkboxes are
checked, click the Next> Button
7. On the Instance Configuration screen the defaults should be correct
The named instance should be SQLExpress. Allow it to install in the
default location, which should be C:\Program Files\Microsoft SQL Server\
1.
2.
3.
4.
5.
Exodus User Manual
©2005-2015 Laurel Bridge Software, Inc. All Rights Reserved
v 3.16.8
-58. On the Server Configuration screen the defaults should be fine
for the Service Accounts tab and the Collation tab defaults
9. On the Database Engine Configuration screen on the Account
Provisioning tab, select Windows Authentication Mode. The
Current user (who must have Administrative Privileges) should be in
the list under Specify SQL Server Administrators. If it is not, click
the button to Add Current User. Leave the defaults on the other two
tabs.
10. Installation should complete in several minutes
3.6. Archive Configuration Prerequisites
Both the Source PACS and the Destination PACS must be configured to communicate with each other
and with Exodus. This may include configuring a new AE Title, hostname/port configuration on the
Source and/or Destination PACS. The typical configuration changes are summarized below:
For any Migration:
1) The Source PACS should recognize Exodus as a DICOM Query/Retrieve SCU device.
2) The Destination PACS must recognize Exodus as a DICOM Query/Retrieve SCU device.
For Migrations where exams will be routed or filtered by Exodus:
1) The Source PACS must be configured with Exodus as a DICOM C-MOVE destination (C-STORE
SCP).
2) The Destination PACS must be configured with Exodus as a DICOM C-STORE client (C-STORE
SCU).
For Migrations where exams will not be routed or filtered by Exodus:
1) The Source PACS must be configured with the Destination PACS as a DICOM C-MOVE
destination (C-STORE SCP).
2) The Destination PACS must be configured with the Source PACS as a DICOM C-STORE client
(C-STORE SCU).
Exodus itself can be configured to use any AE title and any available port may be used as its
DICOM port. Section 5.2, Session Configuration Dialog, of the manual describes the
configuration of Exodus itself.
3.7. Main Install
After installing the prerequisites, the Exodus application installer (Exodus.msi) should be run. For
machines with an older version installed, this installer will upgrade your previous install appropriately,
while maintaining your configuration settings.
Exodus User Manual
©2005-2015 Laurel Bridge Software, Inc. All Rights Reserved
v 3.16.8
-6-
4. Getting Started
4.1. Overview
Exodus manages migrations by creating a database known as a session that contains all the
configuration information as well as all the state and tag information for every exam it knows about.
Groups of exams are viewed and operated upon by creating configurable views known as segments
within a session.
A session represents a separate database that stores configuration information about a migration.
Information about the source, destination, and validation archives is included, as well as settings for
each of these operations (e.g. timeouts, schedules, delays, etc.). In addition to this information, the list
and state of every query and exam is contained within a session which represents the work that has
been done for a given migration. While multiple sessions can be configured, typically only one is needed
for a given migration.
A segment provides the definition of what to query and represents a logical grouping of exams to
migrate based on those queries. There are multiple types of segments available allowing for various
methods by which to gather listings of exams to work on. A given migration can be broken up into
multiple segments or left as one segment representing the entirety of the migration.
Recommendation: For DICOM Migrations of approximately 500,000 studies or more, Laurel
Bridge recommends, if possible, that the migration be divided into multiple sessions within
Exodus, each limited to no more than 500,000 studies. Performance issues have been noted for
sessions larger than 500,000 studies.
4.2. Migration Types
Exodus supports two types of migrations: File and Archive. The type of migration defines where the
source data is located. For file-based migrations, data is collected recursively from a directory; for
archive-based migrations data is housed in a DICOM-compatible archive. Both migrations are processed
very similarly and have: query phases where a list of exams is collected; move phases where the chosen
exams are moved; and a validate phase where the moved exams are verified. In fact, after indexing the
information from the raw DICOM image files from disk into a built-in archive, file-based migrations
function exactly like an archive-based one (i.e. – both are communicating with a source archive – one is
simply built-in).
4.3. Exodus Application Configurations & License Options
Exodus comes in three basic configurations: Exodus Migration Controller, Exodus Assessment, and
Exodus Priors Fetcher. Information on which version you are licensed for can be found by clicking Help
> About Laurel Bridge Exodus. Certain features described in this document may not be applicable
depending on the application you are using:
4.3.1. Exodus Migration Controller
This application configuration is the complete archive migration solution, allowing the user to migrate
DICOM studies from one archive to another:
Exodus User Manual
©2005-2015 Laurel Bridge Software, Inc. All Rights Reserved
v 3.16.8
-7
Provides functionality to assess, plan, perform, validate, and report activities associated with
performing a DICOM migration from a single source archive to a single destination archive at a
given site.
Includes advanced dataset filtering, tag morphing, and data element processing in real-time as
data migrates, e.g., standardize dataset contents based on a master patient index or other site
specific standards, rules, or workflows.
Includes all functions available in Exodus Assessment and Exodus Priors Fetcher (described
below).
4.3.2. Exodus Assessment
This application configuration allows the user to assess the contents of the source archive prior to a
migration or validate the destination data following a migration:
Provides functionality to query source DICOM archive to build Exodus database of study
demographics, including ability to validate a previously performed DICOM migration.
Does NOT provide migration functionality, i.e., does not move studies from a source to a
destination archive.
Provides ability to run pre-qualification algorithms against the imported DICOM demographic
data.
Pre-qualification criteria have been developed based upon typical problems encountered during
a DICOM Migration, e.g., blank accession numbers, blank patient names, duplicate MRNs for
same patient, etc.
Results of this pre-qualification, or custom pre-qualification filters developed by customer,
provides valuable information for developing migration strategy, including problem
identification and mitigation.
Provides ability to validate a previous migration by comparing of source and destination using
Exodus Validation rules and levels; includes the ability to generate comprehensive reports off
what actually did migrate and what did not.
4.3.3. Exodus Priors Fetcher
This application configuration allows the user to fetch prior exams when a patient becomes scheduled
on the Worklist.
Provides functionality to monitor a modality Worklist (or pseudo Worklist) to identify scheduled
exams and move patient prior studies from a single DICOM source archive to a single DICOM
destination.
Does NOT provide Exodus Assessment capabilities.
Does NOT permit the mass migration of studies via the standard processes available in Exodus
Migration Controller – only fetches one patient’s priors at a time.
4.3.4. License Mode: Charge By
Exodus comes in two modes: Charge By Exam and Charge By Move. Information on which mode you
are licensed for can be found by clicking Help > About Laurel Bridge Exodus.
Charge By Exam: Licensed by number of exams (i.e. - a given exam can move multiple times and
will only count against the total once).
Exodus User Manual
©2005-2015 Laurel Bridge Software, Inc. All Rights Reserved
v 3.16.8
-8
Charge By Move: Licensed by number of moves (i.e. – a given exam can move multiple times,
but will be counted against the total once for each move).
4.3.5. License Mode: Segment Types
Exodus can be configured to support any or all of the available segment types. Information on which
segment types you are licensed for can be found by clicking Help > About Laurel Bridge Exodus.
4.4. Installing a License
The first step after launching Exodus is to install a license. When the About Laurel Bridge Exodus
dialog appears there are two options to install a license. Information on the status of your license,
including when it expires, can be found on this dialog available at any time by clicking Help > About
Laurel Bridge Exodus.
4.4.1. Installing a license file
Clicking the Install License… button will open a file searcher dialog allowing you to browse to a fully
activated license file. You will use this button to install a license if a fully activated license was provided
to you via email (for example, a MAC-based license) or you downloaded from www.laurelbridge.com or
you performed a web activation.
4.4.2. Activating a license over the internet
Clicking the Activate License… button will open the License Activation form. You will need to provide a
16-digit Product Serial Number to activate your license. All fields on the form must be filled out. If the
Exodus server does not have internet access you will need the 16-digit Activation Request Code (ARC)
Exodus User Manual
©2005-2015 Laurel Bridge Software, Inc. All Rights Reserved
v 3.16.8
-9from the License Activation Form. You can proceed to
https://www.laurelbridge.com/product_activation.php and enter your 16-digit Product Serial Number
and the 16-digit Activation Request Code (ARC). After completing the steps on the web activation form
you can download a fully activated Exodus license. You can then use the Install License… button on the
About Exodus dialog to install your activated license.
Exodus User Manual
©2005-2015 Laurel Bridge Software, Inc. All Rights Reserved
v 3.16.8
- 10 -
4.5. Creating a Migration
To begin using Exodus to control a migration, you need to create a session to define the source and
destination archives and at least one segment to define what queries you want to issue and the resulting
exams you want to work on.
To create a session, click File > New Session (or right-click in the Sessions / Segments panel and select
New Session). After you enter the desired session name a configuration dialog will appear that contains
network settings for all the archives involved in the migration, alert settings for email notifications, and
advanced settings for timeouts, rates, schedules, delays, try counts, etc. Context help is available by
clicking the
icon present next to each field in the dialog.
To create a segment, select the new session and right-click New Segment in the Sessions / Segments
panel. After you enter the desired segment name a configuration dialog will appear that contains
settings for the type, priority, and type-specific selection information. Context help is available by
clicking the
icon present next to each field in the dialog.
4.6. Running a Migration
After creating a session and at least one segment you can begin a migration. To do so, check mark the
desired segments in the Sessions / Segments panel, check mark the appropriate operations at the
bottom of the main dialog (Query, Move, and Validate), and click the Run button on the toolbar. The
progress bars on the bottom of the screen will reflect how far along each of the selected operations are.
Once there are no more operations to complete, the migration will automatically stop.
While the operations can be run independently of one another, they are still sequential. At least one
successful query has to complete before there can be any exams eligible to move. Similarly, at least one
successful move has to complete before there can be any exams eligible to validate.
Exodus User Manual
©2005-2015 Laurel Bridge Software, Inc. All Rights Reserved
v 3.16.8
- 11 -
5. User Interface Details
To configure Exodus to control a migration you must first create a session to define the source and
destination archives and then you must create at least one segment to define what queries to issue and,
as a consequence, the resulting exams to work on.
5.1. Sessions / Segments Panel
The Sessions / Segments panel (shown in Figure 1) is available on the left hand side of the main window.
It is a two-level tree control that contains and shows the available sessions (top level) and each session’s
available segments (bottom level).
Only one session can be active at a time and is represented on the
display by bold text (Figure 1 shows example session 1 as the currently
active session and example session 2 as an inactive session). Only the
active session displays its segments, each of which can be checked to
select it for viewing and running.
Figure 1 - Sessions / Segment Panel
When the migration is running, the checkboxes are replaced by icons representing the state of the
segment. A green icon means the segment is in progress. A white icon means the segment is not
currently loaded. A red icon means some unexpected error has occurred (dynamic segments only). A
black icon means that the segment is currently loaded and complete.
The session panel itself has a context menu (shown in Figure 2) available
by right-clicking any blank space within in to access two options:
Figure 2 - Sessions / Segment
Panel Context Menu
New Session: Creates a new session
Import Session: Imports a session from a file
Each session entry also has a context menu (shown in Figure 3) available by right-click. Note: some
context menu options are disabled depending on whether the particular session is active or not and
whether multiple sessions are selected.
Figure 3 - Session Context Menu
Exodus User Manual
Open: Activates a session
New Segment: Creates a new segment for a session
Save Report: Generates an import report (file-based
migrations only) or a progress report about all of the contained
segments and their composite exams contained within a session
Export: Exports a session, typically for backup
Clone: Creates a new session with the same settings and
segments as the selected session
Advanced: Perform advanced options including optimizing
the database, resetting query/move/validate errors, and resetting
all query/move/validate progress (to redo all work)
Delete: Deletes a session
Rename: Renames a session
Properties: Displays the session configuration dialog
©2005-2015 Laurel Bridge Software, Inc. All Rights Reserved
v 3.16.8
- 12 Each segment also has a context menu (shown in Figure 4) available by right-click. Note: certain options
are disabled when multiple segments are selected.
Save Report: Generates a progress report about the exams
contained within a segment
Generate Sample: Creates a sample of representative data from
the given segment (selected by date and modality)
Advanced: Performs advanced options including resetting
query/move/validate errors and resetting all query/move/validate
progress (e.g., to redo all work)
Figure 4 - Segment Context Menu
Delete: Deletes a segment
Rename: Renames a segment
Properties: Displays the segment configuration dialog
5.2. Session Configuration Dialog
The session configuration dialog (shown in Figure 5) contains all the connectivity and alert information
about a migration. Details about each entry field are available by clicking the
icon next to a particular
field. The contents of the various menu tabs are described below.
Network: The network tab contains the
connectivity information for the source,
destination, and validation archives. The validation
archive is the system that responds to query
requests after an exam is moved and is typically the
same physical machine as the destination archive
(unless routing occurs, for example). Click the
advanced button to specify validation archive
information if it is different from the destination
archive.
General: The general tab contains the migration
type (archive or file-based), migration level (study
or series), reset time/action, and the alert
information including email server configuration,
alert recipient, and alert type information. The
migration type and level cannot be changed after
the session is created. Email alerts are sent out to
the specified email addresses depending on what
Figure 5 - Session Configuration Dialog
events occur and what alert types are registered
for. When a stop trigger (certain number of successive failed query, move, or validate
operations) is reached alerts are sent out to email addresses registered for Error Alerts. When a
new day is reached daily reports are sent out to email addresses registered for Daily Reports.
Query: The query tab contains specific information about the query operations including
timeouts, try counts, delays, partitioning modes, and user defined tags. User defined tags are
non-standard tags that aren’t normally requested during a query. Any DICOM tag can be
queried, but there is no guarantee that an archive will return data for a particular tag. See 7.1
for more details on the query operation including user defined tags.
Exodus User Manual
©2005-2015 Laurel Bridge Software, Inc. All Rights Reserved
v 3.16.8
- 13
Move: The move tab contains specific information about the query operations including
timeouts, move order, pre-checks, try counts, delays, and schedule. The move schedule is
defined on a per hour basis with three basic modes: Normal, Off, and Rated. During Rated
mode, the configurable rate (given as a percentage) is used. Right-clicking the move schedule
will bring up a presets menu allowing you to select from popular schedule configurations. See
7.2 for more details on the move operation.
Validate: The validate tab contains specific information about the query operations including
timeouts, try counts, delays, and rules. Each validation rule consists of a set of options including
the tags to use to find the exam on both the source and destination archives, level from which
to obtain image count or list information for comparison, and comparison logic to use to
compare the collected data (e.g. – equal to, greater than, etc.). See 7.3 for more details on the
validate operation.
Filters: The filters tab contains the configuration window used to create image (dataset) filters
that are used to change image information during the migration. If image filtering is enabled all
images are routed through Exodus (via C-STORE from the source) before being forwarded on the
destination (via C-STORE to the destination). The filtering mechanism can be configured to
allow data transfer as uncompressed, compressed, or both (via forcing the source to negotiate a
particular transfer syntax).
Test: Selecting the test tab allows the user to initiate a series of connectivity and compatibility
tests for the entered information. It is recommended that any errors revealed by testing be
addressed as they are likely the result of misconfiguration that will impede the migration or limit
the information returned from the given archives.
5.3. Segment Configuration Dialog
The segment configuration dialog (shown in Figure 6) contains the information that defines a segment
and the queries and exams the segment contains. Each segment type has a different set of fields
available that apply to that particular segment type. Details about each entry field are available by
clicking the
icon next to a particular field.
General: The general tab contains the segment type and
general selection criteria for the segment. The available types
include Normal, Specific, List, Priors, and Fixed. See section 6
for more information on each segment type.
Normal: Provides a date range to query, one day
at a time, backwards through time
Specific: Provides specific patient data to be
queried in a single query
List: Provides a list of exams to query and move,
provided by a file or command
Priors: Provides a set of patient matching
Figure 6 - Segment Configuration
requirements, used after querying for a list of patients from a modality worklist server
or command-line output to then use to match against the exams queried from a source
archive
Fixed: Used as a simple fixed list of studies, usually created by right-clicking an exam or
set of exams and selecting “Add To Segment”.
Advanced: The advanced tab contains specialized selection criteria used to refine the segment
definition explicitly. Also available is a move schedule that can be optionally enabled which will
Exodus User Manual
©2005-2015 Laurel Bridge Software, Inc. All Rights Reserved
v 3.16.8
- 14 override the global session move schedule. The move schedule is defined on a per hour basis
with three basic modes: Normal, Off, and Rated. During Rated mode, the configurable rate
(given as a percentage) is used. Right-clicking the move schedule will bring up a presets menu
allowing you to select from popular schedule configurations.
5.4. Exam Viewer
The exam viewer (shown in Figure 7) is
available on the right hand side of the main
window (if activated by clicking View >
Exams) and contains a list of all the exams
that are contained within any loaded
segment (i.e., segments with a checkmark
next to them).
Figure 7 - Exam Viewer
Columns can be reordered by dragging the column headers left or
right within the viewer. Columns can be sorted on by clicking on a
particular column header. The direction of the sort (i.e., ascending or
descending) is toggled on each subsequent click. Columns can be
hidden by right-clicking on any column header and using the menu
that appears (shown by Figure 8) to toggle the visibility of a particular
column.
Figure 8 - Column Display Menu
Each exam listed in the viewer has a context menu (shown in Figure 9)
available by right click. Note: certain options are disabled if configuration
information about specific archives (e.g., source, destination, validate) is
missing.
Move: Move selected exam(s) after setting to Waiting
Validate: Validate selected exam(s) after setting to Moved
Fetch: Move selected exam(s) to local machine
Set Status: Override the selected exam(s) status (setting to a
status
of Validated will set the status to be Validated (0) to indicate that it
Figure 9 - Exam Menu
was validated manually)
Add to Segment: Add the selected exam(s) to a new or existing list segment
View History: View the move/validate history for selected exam
Copy: Copy the selected row(s)/cell text to the clipboard
Save: Save the selected exam(s) information to a file
The exam search pane (shown in Figure
10) is available above the exam viewer (if
activated by clicking View > Exams Search
or the small magnifying glass icon in the
Figure 10 - Exam Search Pane
viewer title bar) and allows the list of
exams displayed in the exam viewer to be limited by a set of match requirements. This can be used to
find a logical subset of all the loaded exams without defining a new segment. Every column in the exam
viewer can be used in the exam filter control with a number of match modes (e.g. Equal To, Greater
Than, etc.). The exam filter control only limits the exams displayed. It does not, however, change the
Exodus User Manual
©2005-2015 Laurel Bridge Software, Inc. All Rights Reserved
v 3.16.8
- 15 loaded segment definitions. Thus, if an exam is contained within a loaded segment it is still eligible to be
moved and/or validated regardless of whether it is displayed in the viewer.
To increase performance (especially when doing a large number of queries) the exam viewer can be
locked (i.e., updates to the viewer are disabled) by clicking the small lock icon in the viewer title bar.
5.5. Query Viewer
The query viewer is available on the right hand side of the main window (if activated by clicking View >
Queries) and displays a list of all the queries that are contained within any loaded segment (i.e.,
segments with a checkmark next to them). Column display, context menu options, searching, and
locking are similar to the exam viewer dialog options. See section 5.4 for more details.
5.6. History Dialog
The history dialog (shown in Figure 11) is
available by right-clicking on a single exam or
query and selecting View History. The entire
history for a given item is listed with the time
and result along with any comments (typically
error comments).
For validate operations each rule for a given
score attempted is listed as a separate
operation. For each try the information that
was returned from the source and validation Figure 11 – Exam History Dialog
archives is listed to the right in the Results
panel. A short explanation as to why a validation operation failed or passed is displayed in the
Comments box.
5.7. Activity Monitor
The Activity Monitor can be opened by clicking the
Activity Button on the Tool Bar. The
Activity Monitor displays DICOM Associations that have been routed by Exodus. Association
Information is not persisted forever. Association information is persisted based on the configuration
parameters set on the Exodus Options Form. You can right-click on the Activity Monitor at any time to
open a pop-up dialog that will allow you to remove all Association Information.
Exodus User Manual
©2005-2015 Laurel Bridge Software, Inc. All Rights Reserved
v 3.16.8
- 16 -
5.8. Operation Progress Panel
The operation progress panel
(shown in Figure 12) is
Figure 12 - Operation Progress Panel
available at the bottom of the
main window and is used to display the individual progress of the Query, Move, and Validate operations
for the loaded segments. Each section of the operation panel has a checkbox to control whether that
operation will run when a migration is run. When running, these checkboxes are replaced by a spinning
animation to indicate that a specific instance of a given operation (e.g., a single move) is occurring or a
pulsing animation to indicate that a given operation is waiting for more work to do. Progress is
represented through a progress bar (blue for success and red for failure) as well as through numeric
statistics below each progress bar. The estimated amount of time remaining for a given operation is
also displayed.
5.9. Tool Bar
Figure 13 - Tool Bar
The tool bar (shown in Error! Reference source not found.) is shown at the top of the main window and
contains multiple buttons for controlling, configuring, and viewing a migration.
Run : Starts a migration involving the selected operations on the loaded segments
Stop: Stops a migration (prompts if operation currently in progress)
[Session]: Displays the session context menu
[Segment]: Displays the segment context menu
[Record Log]: Starts full-detail logging to user-defined file for simplified debugging purposes
Flashes if there are exams moving through the Image Routing component. Click to
open the Activity Monitor.
If clicked then View Filters will be applied to the Exam Viewer and Query Viewer
In addition to these controls, an exam viewer row selector is available on the far right which displays the
current selected row and the total number of rows available for display in the viewer.
Figure 14 - Menu Bar
5.10. Menu Bar
The menu bar (shown in Figure 14) is available at the top of the main window. Menu drop-down
options are:
File > New Session: Creates a new session
File > Import Session: Imports a session from a file
Exodus User Manual
©2005-2015 Laurel Bridge Software, Inc. All Rights Reserved
v 3.16.8
- 17
File > Record Log: Starts full-detail logging to user-defined file
File > Exit: Exits the program (after stopping migration)
View > Queries: Toggles the display of the query viewer
View > Exams: Toggles the display of the exam viewer
View > Queries Search: Toggles the activation/display of the query search pane
View > Exams Search: Toggles the activation/display of the exam search pane
View > Sessions / Segments: Toggles the activation/display of the session/segments viewer
Tools > Query Client: Displays a query dialog that performs C-FIND requests
Tools > Log Viewer: Displays a log viewer dialog with display filtering options
Tools > Options: Displays an options dialog to set program options (e.g. – logging)
Help > Getting Started: Displays a guide on how get started with the program
Help > User Manual: Opens this user manual
Help > About Laurel Bridge Exodus: Displays an about dialog containing program and license
information
Exodus User Manual
©2005-2015 Laurel Bridge Software, Inc. All Rights Reserved
v 3.16.8
- 18 -
6. Segments
6.1. Overview
A segment provides the definition of what to query and represents a logical grouping of exams to
migrate based on those queries. There are multiple types of segments available allowing for a variety of
ways to identify and gather collections of exams. The set of queries done to gather exams may collect a
larger list of exams into the database than will be shown in the segment display. In other words, every
exam returned by a given query won’t necessarily be part of the segment that initiated the query. This
is because of the limited query functionality available in DICOM and especially in legacy archives. A
given migration (session) can be broken up into multiple segments or left as one segment representing
the entirety of the migration.
All segment types have segment-specific criteria as well as shared criteria including a Name, Priority,
Custom SQL Selection String, and Move Schedule Override (except in Assessment versions of Exodus).
6.2. Normal Segment
Normal segments are the most typical segment type for a historical (date-based) migration. This
segment type defines a Date range to query: one day at a time with the most recent date queried first.
A Modality selector is also available with the option for Inclusive (i.e., that modality is included in list of
modalities) or Exclusive (i.e., that modality is not included in list of modalities) logic.
6.3. Specific Segment
Specific segments allow for selective information to be gathered from a single query. In order to limit
the query scope a selective piece of information that is to be queried for must be included; typically
these are: UID, Accession #, Patient Id, and/or Patient Name. In addition, Date and Modality options
are available to further restrict the selection criteria.
6.4. List Segment
List segments allow for a list of exam UIDs to be provided to Exodus. Each UID in the list will be queried
to gather additional information about the exam. Lists can be provided to Exodus as either a File or as
the output of a Command. This list can be repopulated on a configurable Interval.
6.5. Priors Segment
Priors segments allow a list of relevant prior exams to be gathered from a particular Date range. Exams
are considered to be priors when they match based on a configurable set of criteria. The list of exams
used to trigger a search for priors may come from a list of upcoming exams gathered from a Worklist
server or from the standard output of a Command (see the format below). The set of match tags that
can be used include Patient Name, Patient Id, Patient Dob*, Patient Sex*, Modality, and Body Part* (*
indicates a tag that is available when it has been added to the session as a user-defined tag). The
matching modes between the upcoming exam list and potential prior exams include Exact (matches
values that match exactly), Smart (matches values in a criteria specific manner to avoid minor
inconsistencies common to that specific tag), Map (matches values after translating upcoming exam
values through a mapping given by a file), and Custom (matches values using a custom SQL string). Prior
exams are no longer considered priors after the upcoming exam they match has been off of the
upcoming exam list, gathered at a given Interval, for more than the time given by the Fall Off time. Each
Exodus User Manual
©2005-2015 Laurel Bridge Software, Inc. All Rights Reserved
v 3.16.8
- 19 new exam can match a given number of match criteria specified by Max Matches. The reset time and
action (Charge By Move mode only) allows for exams to be reset to the Waiting state (with Reset
action) or to be deleted (with the Delete state) after a configurable amount of time for use with
transient/temporary destinations or large capacity sources.
Smart priors matching follows these guidelines for comparing upcoming exam values with potential
prior exam values (values are not case sensitive):
Patient Name: Matches when either name (after being stripped of spaces and carets) is a subset
of the other (e.g. – SMITH^BOB^J matches SMITH^BOB)
Patient Id: Matches by ignoring leading zeros (e.g. – 0001234 matches 1234)
Patient Dob: Matches when dates differ by one day or less (e.g. – 19900101 matches
19900102)
Patient Sex: Matches when first letter matches (e.g. – Male matches M)
Modality: Matches when upcoming exam value in an item in the list of values in the prior exam
(e.g. – MR matches MR\CT)
Body Part: Matches when upcoming exam value in an item in the list of values in the prior exam
(e.g. – CHEST matches CHEST\HEAD)
Map priors matching functions the same for all tags. Matches occur when the upcoming exam value is
contained within a list of keys in a map file and the associated value for that key is contained within the
list of values in the prior exam. For example, if the upcoming exam has a value for Patient Id of 123456
and the map file has a mapping for 123456 to 56789 then this will match any potential prior exam that
has a Patient Id of 56789 and not one that has a value of 123456. As another example, if the upcoming
exam has a value for Body Part of HEAD and the map file has a mapping for HEAD to BRAIN and HEAD to
HEAD then this will match any potential prior exam that has a Body Part of HEAD or HEAD\CHEST or
BRAIN or BRAIN\ARM, etc.
The format of the standard output to be provided when using the Command mode to supply the list of
exams follows an XML format, structured as follows:
<Exams>
<Exam
PatientName=”<name>”
PatientId=”<id>”
PatientDob=”<yyyymmdd>”
PatientSex=”<sex>”
Modality=”<modality>”
BodyPart=”<body part>” />
...
<Exams>
Notes:
Attributes are not required.
The order is not significant.
Newlines aren’t significant.
Exodus User Manual
©2005-2015 Laurel Bridge Software, Inc. All Rights Reserved
v 3.16.8
- 20 -
6.6. Fixed Segment
Fixed segments allow for a simple user-defined list of studies that are added through the user interface
(as opposed to a file of UIDs, for example). These segments are usually created and managed by rightclicking on an exam or set of exams and selecting “Add To Segment” and “Remove From Segment”. A
fixed segment might be used to manually and pre-emptively move selected exams for a particular
patient, for instance.
Exodus User Manual
©2005-2015 Laurel Bridge Software, Inc. All Rights Reserved
v 3.16.8
- 21 -
7. Operations
7.1. Query
Every segment definition results in a set of queries that are performed against the source archive one at
a time. Each query returns a set of exams that match the given query. To protect against potential
DICOM query limitations, some queries are purposefully made more generic than might be expected.
The result of this is that not all of the exams that return necessarily match the exact segment definition.
However, regardless of the precision of the query, the resulting exams are post-processed to mark only
the exams that match the segment definition. The end result is that each high level segment definition
results in the appropriate, intelligent queries which will, in turn, provide the appropriate exam entries to
the Exodus data base.
Normally, the set of queries is defined at segment creation/modification time. For dynamic segments
like Priors and List, the query list changes periodically. Thus, dynamic segments will never finish as far
as the application is concerned. Human assessment is required to determine when the dynamic
segment is no longer needed. For example, the Priors segment can fetch prior exams for any patient on
the worklist server. Since new patients can be added at any time, the segment is never truly complete.
However, once all the exams on the source archive have been migrated, the segment is effectively
complete. This determination is not automatically made, but the human assessment can be aided by
examining the completeness of a secondary segment that contains a list of all the exams on the source
archive.
Queries are tried a configurable number of times (until success) with a configurable timeout. Once a
query is marked as failed it must be manually reset (available in the segment and session context
menus). The delay in between queries is also configurable. In addition to the standard tags displayed in
the exam viewer, any other tag, known as a user-defined tag, can be requested during all queries. These
settings are found in the session configuration dialog.
When migrating at the study level any user defined tag can have its query level overridden to the series
level forcing a single query at the series level for each study returned in the base query. The overridden
tag will have its information coalesced from the information at the series level and grouped together by
backslashes. So, for example, if you wanted to fetch Body Part Examined, but you knew it was only
available at the series level. You would add a user defined tag for it (in the session configuration dialog)
and override it by right-clicking the word “Study” next to it and then selecting “Series.” In this example,
the final returned study entries, that are stored in the internal database, would contain the Body Part
Examined values from the series level.
7.2. Move
Each segment is made up of exams that match the given segment definition. Each exam contained in a
segment is eligible for move provided its status is Waiting.
Each move is tried a configurable number of times (until success) with a configurable timeout. Moves
are skipped (and marked as Moved) if the move pre-check is configured and the score passes (the precheck process is identical to the validation process and can be thought of as pre-move validation where
a certain score must be met to skip the move). The number of simultaneous moves is also configurable
and may be limited due to configuration settings on the source archive. The move schedule that defines
the delay in between moves and when moves should not take place is also configurable on a per hour
Exodus User Manual
©2005-2015 Laurel Bridge Software, Inc. All Rights Reserved
v 3.16.8
- 22 basis. Delays between moves are available in Rated mode and are a function of the percentage of the
duration of the most recent move. These settings are found in the session configuration dialog.
Exams with failed move status can be reset individually by the exam viewer context menu or at the
segment/session level through the segment and session context menus. This is typically done to cause
the exam move to be retried.
7.3. Validate
Each exam contained in a segment is eligible for validation provided its status is Moved (when using the
Exodus Assessment application the necessary status is Waiting). The purpose of validation is to ensure
that exams were successfully received and processed by the destination archive. The validation archive
can be, and generally is, the same archive as the destination unless the destination is a router or
gateway.
Validation consists of applying a set of rules, with a given rank, where each rule is processed (starting
with rank 1) until a successful match is found. The resulting validation rank is the highest (i.e., lowest
numbered) rank for which a match occurred. Thus, more stringent requirements should be used for
higher ranks.
The first step in validation is to locate each exam or set of exams on the source and destination archives.
Each rule consists of a configurable set of tags specified by the Tags list that will be used as the match
tags in the queries to the source and destination. The matching values used are the values collected
previously during the initial query phase of the migration. Depending on which tags are used and the
content of each archive, one or more exams may be returned from each archive. In the ideal situation,
validation would have one rule, matching solely on the exam UID, to return one result from each
archive. However, since UIDs can potentially be changed during a migration, either intentionally or
otherwise, this is not always possible. Choosing a different set of match tags can provide an alternate
way of locating exams as well as a way to ensure that certain tags were not changed. However, if one or
more of those tag values are changed during migration that exam will not be located on the destination.
Thus, care should be taken to choose the appropriate match tags that will ensure that exams will be
located correctly.
The next step is to determine from which level data will be obtained; this is designated by the Level
selection. The options include Study which is a count of the number of images in a particular study
(Number of Study Related Instances), Series which is a count of the number of images in each of the
series in a particular study (Number of Series Related Instances), and Image which is a list of all the
images in a particular study (SOP Instance UID). This decision is generally determined by the capabilities
of the archives involved, as some systems do not support certain options. Image level validation is
stricter as it requires that not only the counts match, but that the exact list of images are the same.
The next step is to determine how the data collected is compared; this is designated by the Comparison
selection. When retrieving count information (Study or Series), the options for comparison are
numerically based (e.g. – Equal To, Greater Than, Less Than or Equal To, etc.) or list based (e.g. – Equal
To, Contains, etc.) when retrieving list information (Image level). Note, that if either the source or the
destination is set to return count information, then numerical based comparisons are used, as the list
data is converted to count data for comparison (e.g. – a list of 5 images will be converted to “5”). This
allows for flexibility in terms of the comparison such that, for example, any exam that has at least as
Exodus User Manual
©2005-2015 Laurel Bridge Software, Inc. All Rights Reserved
v 3.16.8
- 23 many images for a particular study on the validation archive as on the source archive can be considered
a match. The options should be read as:
“results from source archive are <comparison option> the results from the validation archive”.
The last step is to determine how duplicates and multiple responses are processed, if allowed, as
designated by the Duplicates and Multiples selections. When retrieving count information (e.g. – Study
Image Count), the options are numerical based (e.g. – Sum, Max, Min, etc.) and list based (e.g. –
Unique) when retrieving list information. Duplicate responses for count based selections (Study or
Series) occur when more than a single DICOM C-FIND response for a given UID is returned. For list
based selection (Image), duplicates occur when a duplicate image UID is returned. Duplicates are
symptomatic of some DICOM incompatibility. Multiple responses occur when more than single exam
UID is returned and would typically only be allowed when validation is expected to find multiple exams
on either the source or the destination (e.g. – two exams are intentionally merged during the migration).
These settings represent advanced capabilities and should only be used for specific cases. As such, the
default is to Disallow these types of responses, resulting in a failed validation step.
Exodus User Manual
©2005-2015 Laurel Bridge Software, Inc. All Rights Reserved
v 3.16.8
- 24 -
8. Filters
Filters allow image (or dataset) header elements to be changed as Exodus receives them from the
Source archive. Filters can also be used to modify DICOM C-FIND and C-MOVE messages as they are
sent/ received to/from the Source and Destination archives.
A new Filter can be created
by selecting the Filters tab
on the Session Properties
Dialog (Figure 15). The
special C-FIND and C-MOVE
filters can be created from
the Query, Move and
Validate tabs.
To add a dataset filter,
press the green plus button
located under the Filters
list. This will create a new
Filter with the name “New
Filter ?” where “?” is the
next available number,
starting at 1. Filter names
are customizable and can
be modified at any time by Figure 15 - Session Properties, Filters Dialog
clicking on the name. The
list of Filters may be reordered by selecting a Filter and then pressing the up or down arrows under the
list display box. Filters are applied in order, top to bottom, so ordering is important.
Once a Filter place holder has been created the next step is to configure its Conditions and Actions.
8.1. Conditions
A Filter’s Conditions determine whether or not its Actions
will be applied to the image being processed. A Filter may
have multiple conditions, therefore option are provided
that all Conditions must match (“Match All”) or any Conditions can match in order (“Match Any”) for the
Filter to be applied. The other configuration is to have no Conditions, thereby causing the filter to be
always applied with no conditional matching.
For each Condition select the Dicom Tag condition type (additional types may be added in the future).
Configure the rest of the Condition based upon the desired test. Conditions may be removed by
pressing the red minus sign located to the left of each condition, and sorted via the up and down arrow
buttons.
8.2. Original Attribute Sequence
The original tag value of a filtered tag can optionally be stored in the DICOM original attribute sequence
by checking the Create Original Attribute Sequence checkbox. If left unchecked, the original values
modified by the filter will not be recorded in the original attribute sequence.
Exodus User Manual
©2005-2015 Laurel Bridge Software, Inc. All Rights Reserved
v 3.16.8
- 25 -
8.3. Standard Actions
If the Conditions testing is satisfied, then any Actions defined by a filter will be applied to the image /
dataset.
The Change Case action changes the case of the selected tag to either upper-case or lower-case.
The Copy action copies the tag specified in the From field to the tag specified in the To field.
The Composer action supports the merging and splitting of elements. It can also be used to
manipulate DICOM sequence elements with ease. It uses regular expressions to parse values from
DICOM tags and combine the values into other DICOM tags. For example, it can take parts from two
different tags and combine them to make a new value in a third tag. Regular expressions are
specified to parse each input tag and substitution patterns determine how the output tags are
constructed.
In the “Input Elements” table, specify the tags and how the regular expressions should parse each value
into groups – the regular expressions go into the “Input Patterns” column. The groups that are
produced are specified in the Output Patterns column of the “Output Elements” table. The first match
in the first input element is referred to as “${1.1}”, the second match in the first input element is
“${1.2}”, and the third match in the second input element would be “${2.3}”, and so on.
The Output Elements specify what parts of the input elements to combine and how to combine them;
note that the parts can be used multiple times and also combine them with plain text.
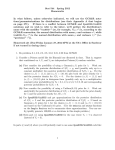
The Execute action executes a piece of specialty custom code that is stored in a local file and that
adheres to a particular coding interface. For example:
public class DateComparisonFilter : IFilterAction
{
public void ApplyAction(CFGGroup config, DicomSessionSettings dss,
RelevantTagMarker tagMarker, ref DicomDataSet dds)
Exodus User Manual
©2005-2015 Laurel Bridge Software, Inc. All Rights Reserved
v 3.16.8
- 26 {
// custom code
}
}
Note: Contact Laurel Bridge Software for more information on creating custom Execute filters.
The Find/Replace action changes the value of the selected tag via hardcoded values or .Net style
regex values.
The Insert/Overwrite action creates the specified Tag (if it didn’t already exist) or overwrites the
specified tag (if it did already exist) with the specified Value.
The Move action moves the tag from its original location to its final location. Once moved, the tag
will not be present in its original location. Note that this is not the same as the copy action.
The New UID action replaces the Unique Identification (UID) value of the specified UID type tag in
the Tag field with a new, auto-generated UID value.
The Pad action pads the specified tag with the specified character. The Left and Right radio buttons
specify whether to pad the left or right side of the value. The new total length of the tag value is
specified by the Length field. If the length of the original value is equal to or greater than the Length
field, the value will not be changed.
The Prepend/Append action prepends or appends the specified text to the specified tag’s value.
The Regex Substitution action performs a regular expression match on the specified tag’s value
using the given Pattern. It then replaces the value with the Replace string which may contain regex
variables from the match. The Test box can be filled with an example tag value and clicking the
green arrow processes the test data.
Exodus User Manual
©2005-2015 Laurel Bridge Software, Inc. All Rights Reserved
v 3.16.8
- 27 -
The Remove action removes the specified tag. If the Only if Empty checkbox is checked, the tag will
be removed only if the specified tag’s value is empty.
The Trim action removes the specified characters from the left, right, or both sides of the specified
tag’s value.
The Drop Image action drops any images (datasets) that match the conditions and then returns
either a successful C-STORE Response message or a failure C-STORE response message to the Source
archive.
8.4. Mapping List Action
Overview:
The Mapping List action allows the user to define and specify an external file that lists match tags and
replace tags. When creating a Mapping List action in Exodus, the user specifies the format of the
mapping list file to be used. The example below shows that the mapping list file will contain three
comma-separated fields, in this case: an accession number, a patient ID, and a patient’s name. If the
match tags on any given row match the current dataset, the values of the replace tags are substituted
into the dataset. Below is an example of a mapping list file that matches the format specified by the
mapping list action below:
Mapping list file contents:
PIKR0004,PAT124,SMITH^JOSEPH
ABC123,PAT45,MINER^STEVEN
Mapping list action specification:
Exodus User Manual
©2005-2015 Laurel Bridge Software, Inc. All Rights Reserved
v 3.16.8
- 28 -
Exodus User Manual
©2005-2015 Laurel Bridge Software, Inc. All Rights Reserved
v 3.16.8
- 29 Example: Creating a Mapping List filter
Create your Mapping List Filter under the Filters tab of the Session Properties Dialog:
The Actions section has limited screen space and you have to scroll to see it in pieces. You can increase
the size of that area of the dialog box by hovering slightly above the Actions label and getting a handle
to that portion of the screen. Examples of scrolling the Actions are shown in the three screenshots
below.
Exodus User Manual
©2005-2015 Laurel Bridge Software, Inc. All Rights Reserved
v 3.16.8
- 30 -
If you look at all three of the previous example screen shots in succession you’ll see selected a mapping
list filter that uses a comma delimited file called c:\MapFilter.csv and that should contain three match
tags (Accession number, Patient ID and Patient’s Sex were chosen in this example, although any tags
may be chosen); and two replacement tags (Patient’s Name and Patient ID were chosen in this
example). Note that in screen 1 the “No Match” action is set to “Abort Association”, this means that only
datasets that match an entry will be moved, others will not be moved. If "Abort Association" is chosen
and an exam contains an instance for which no match is found, then the association for that instance is
aborted. If "Continue" is chosen, the instance will be sent on to the destination without a mapping being
applied. Exodus issues Move requests to the source PACS and has no control over the association
boundaries chosen by the source to fulfill those requests. Exodus will however continue to issue Move
requests for subsequent Exams in your migration.
To the left of each tag on the screen is the Column number – which indicates which column in the file
contains that data element.
Here’s an example of what a MapFilter.csv file might look like for the sample definition:
Exodus User Manual
©2005-2015 Laurel Bridge Software, Inc. All Rights Reserved
v 3.16.8
- 31 -
Please note that this is a contrived example; in practice, a mapping list file like this should not ever be created—the first two
lines show two different patients with the same Patient ID. This example is used to make a point about matching rules below.
Here’s the Exodus main Screen after attempting a migration. Since the MapFilter.csv was so small, only
the first two exams visible in the exam viewer below partly matched the mapping list criteria.
The Query tool shows that the (first and only) moved study contains data from line 2 of the mapping list
CSV file; note that this study didn’t match line 1 since the “sex” field did not match.
Exodus User Manual
©2005-2015 Laurel Bridge Software, Inc. All Rights Reserved
v 3.16.8
- 32 -
The second study listed on the Exodus main screen didn’t move – Query Tool shows that on the source
archive for that study UID, patient Michelle Davis was marked as having Gender “M” so it wasn’t a
match. The “No match action” was set to “Abort Association,” which caused the Move to fail. If the “No
match action” had been set to “Continue,” then the exam would have moved, but its header data would
not have been modified.
Exodus User Manual
©2005-2015 Laurel Bridge Software, Inc. All Rights Reserved
v 3.16.8
- 33 -
8.5. Composer Action Examples
The Composer action uses .NET regular expressions to parse an element’s value and combine the parts
into new elements.
1) Swap two tags – Swap the Patient’s Name and the Patient ID to be in each other’s place you
would specify the following inputs:
Tag
Input Pattern
0010,0010 (.*)
0010,0020 (.*)
The regexes shown here mean that the entire value should be one capturing group. Then
the outputs would look like this:
Tag
Output Pattern
0010,0010 ${2.1}
0010,0020 ${1.1}
This results in the first pattern ${1.1} from the first input tag ${1.1} being put into the
second output tag (0010,0020), and the first pattern ${2.1} from the second input tag ${2.1}
being put into the first output tag (0010,0010). (In this case, the first pattern is also the
Exodus User Manual
©2005-2015 Laurel Bridge Software, Inc. All Rights Reserved
v 3.16.8
- 34 entire value.) So if you started with “John Doe” and “1.2.3.4.5” in Name and ID respectively,
your result would be a Patient ID of “John Doe” and a Patient’s Name of “1.2.3.4.5”.
2) Split one tag into two tags –To take the Accession Number (0008,0050) and keep only the
first 10 characters in it and put the rest of it into the Requested Procedure ID (0040,1001).
In this case, the regex for the input pattern has to specify how to split the Accession
Number.
Tag
Input Pattern
0008,0050 (^.{10})(.*)
This regex means the first 10 characters will be the first capturing group and everything else
will be the second capturing group.
Then the outputs would look like this:
Tag
Output Pattern
0080,0050 ${1.1}
0040,1001 ${1.2}
This means that the first capturing group – the first 10 characters – will go into the
Accession Number; everything else from the Accession Number will go into the Requested
Procedure ID. If the initial Accession Number was “ABCDEF1234567890”, then you would
have “ABCDEF1234” as the Accession Number and “567890” as the Requested Procedure ID.
(Note that the output tag does not necessarily have to be parsed as an input.)
3) Combine two tags – To take parts of the Accession Number and parts of the Requested
Procedure ID and “mix and match” them.
Tag
Input Pattern
0008,0050 (^.{10})(.*)
0040,1001 (^.{6})(.{4})
These regular expressions mean to split the first tag into two capturing groups – the first
one having 10 characters and the second one having whatever is left – and to split the
second tag into two capturing groups, one of the first 6 characters and the second of the
following 4 characters.
Then the outputs might look like this:
Tag
Output Pattern
0080,0050 ${1.1}---{$2.2}---${2.1}
0040,1001 ${2.1}${1.2}
If the initial Accession Number was “ABCDEF1234567890” and the initial Requested
Procedure ID was “1.2.3.4.5.6.7.8.9.0”, then the resulting Accession Number would be
“ABCDEF1234---4.5.---1.2.3.”; the resulting Requested Procedure ID would be
Exodus User Manual
©2005-2015 Laurel Bridge Software, Inc. All Rights Reserved
v 3.16.8
- 35 “1.2.3.567890”. Note that the patterns can be used multiple times and also combined with
plain text.
8.5.1. Working with DICOM sequences
A sequence may be entered as a tag by appending it to a numeric tag (the traditional group-element
pair) with a period (“.”). You may also indicate an item in the sequence with “#” and the sequence item
ID, followed by the tag indicating the sequence. There may be multiple sequences and sequence IDs as
part of one “tag”. Examples are shown below:
Simple tag - 0010,0010
Tag within sequence - 0080,0100.0008,0060
Tag within specific sequence item - 0080,0100.#0.0008,0060
Tag within nested sequence with sequence items
0080,0100.#1.0080,0100.#0.0008,0060
If no item number is specified, the first item (#0) is assumed. Specify the last element in a sequence by
“#L” (upper-case is important!) if the number of sequence items is unknown. Specify the next item in
the sequence via “#N” (again, case is important) to append to the sequence. For example:
0080,0100.#L.0010,0010.#N.0008,0060
Please notice that:
The sequence IDs (e.g., #1) and the tag-value pairs for the sequences are all separated by
periods (“.”).
The tags for the sequences are simple group-element pairs themselves.
8.5.2. Modifying private tags
Private tags can be modified using the Composer Filter Action. But first, you must add a private data
dictionary to Exodus so Exodus can know the VR (Value Representation) and VM (Value Multiplicity) of
the private tags.
In the C:\ProgramData\Laurel Bridge Software\Exodus\cfg directory create a new directory called
dicom. In that directory create a file called ext_data_dictionary. The ext_data_dictionary file must not
have an extension. Its full pathname should be: C:\ProgramData\Laurel Bridge
Software\Exodus\cfg\dicom\ext_data_dictionary
The contents of the file shall look like this:
#
# The following is an example extended data dictionary file.
# If this file is named "ext_data_dictionary",
#
[ elements ]
0029,1020 = CS,1,Example Private Attribute 1
0039,1020 = US,1,Another Example Private Attribute 2
0049,1001 = DS,1,Private DS attribute 3
0049,1002 = UL,1,Private UL attribute 4
0049,1003 = SL,1,Private SL attribute 5
Exodus User Manual
©2005-2015 Laurel Bridge Software, Inc. All Rights Reserved
v 3.16.8
- 36 0049,1004 = UI,1,Private UI attribute 6
A line beginning with a pound sign ‘#’ is a comment.
The line [elements] must be present and can exist only once in the file. All other lines define private
DICOM elements and should be specified in the format:
gggg,eeee (where gggg is the group number and eeee is the element number) followed by an equals
sign, followed by three comma-delimited fields: VR, VM, and the long text description.
For example, to add private tag 0029,1020 to the data dictionary with a VR of CS and a VM of 1, the
ext_data_dictionary file should have the following line added under the [elements] line:
0029,1020 = CS,1,Example private attribute text description
You must restart Exodus after creating or modifying your private dictionary.
Exodus User Manual
©2005-2015 Laurel Bridge Software, Inc. All Rights Reserved
v 3.16.8
- 37 -
8.6. De-Identify Filter Action
The De-Identify Filter Action provides a mechanism to remove and replace certain attributes within a
DICOM dataset that may lead to patient identification.
8.6.1. DICOM Attribute Tags to Anonymize
By default, this list is populated with attributes suggested in PS 3.15 Annex E Attribute Confidentiality
Profile in the 2011 DICOM specification. Attribute Tags not in the default data dictionary cannot be
added. This includes specific private tags. The following options are specified for each attribute in the
data grid shown above under DICOM Attribute Tags to Anonymize:
Attribute Tag Name – Specifies the name of the attribute tag to be anonymized if present in a
given DICOM dataset’s header data.
VR – Indicates the attribute’s Value Representation. This becomes useful when determining an
appropriate replacement value for de-identification when “AutoFill” is selected.
Tag – Indicates the attribute tag of the attribute to be anonymized.
Exodus User Manual
©2005-2015 Laurel Bridge Software, Inc. All Rights Reserved
v 3.16.8
- 38
Action – Specifies the replacement action to use for a given attribute when determining the
replacement value. The available replacement actions are determined based on the attribute’s
VR. The following list contains all available replacement actions:
o Hash (SH, LO, PN elements) – For SH, LO, and PN elements, the replacement value will
be a trimmed hash string (using SHA256) of the original value.
o GenerateUID – For a given UI element, a new UID will be generated for the replacement
value.
o TransformUID – For a UI element, the existing UID will be transformed in a consistent
manner to allow for repeatability. For instance, this option is typically selected for SOP
Instance UIDs to allow a given UID to map to the same new UID across multiple
instances of the De-Identify Filter Action.
o Replace – Replace the current DICOM attribute value with an appropriate replacement
value based on the attribute’s VR. The replacement value is predetermined and is not
configurable.
o UserDefined – Replace the current attribute value with the given replacement string
defined in the “Value” column.
o Default – Replace the current DICOM attribute value with a user-specified value. For
example, specifying the default of ‘M’ for Patient’s Sex will set all instances of Patient’s
Sex to ‘M’ by default.
o Delete – Specifying this option will remove the given attribute from the de-identified
dataset. If “Delete” is selected for a given attribute and the attribute is present in a
sequence (SQ), that sequence will be removed from the de-identified dataset.
Value – If “UserDefined” is selected as a replacement value action, the string specified in the
Value column will be used as a replacement value for the given attribute. This value will appear
as is. Care should be taken when entering a value for non-standard string VR types (“CS” for
instance).
Delete – Press the delete button in order to remove the given attribute from the list of
attributes to de-identify.
8.6.2. Miscellaneous Settings
These settings allow for finer-grained control over common options needed during de-identification.
Anonymize Pixel Data – If selected, the list of rectangles defined in the Pixel Regions to
Anonymize grid will be removed from the DICOM dataset’s pixel data. This includes pixel data
in (7FE0, 0010), and not any additional overlays or private tags. This option will be skipped if no
valid pixel data is present in the DICOM dataset.
Enable Re-Identification – If checked, the original values for each attribute anonymized will be
persisted in the resulting de-identified dataset using the specified public certificate. More
information about this process is specified later in this section.
Retain Date and Time Information – If this option is checked, all date and time information (DT
and TM elements) will not be anonymized. This option may be useful when performing clinical
trials, where the DICOM dataset’s date and time information may need to be retained after deidentification.
Skip Unsupported Images – When anonymizing a dataset’s pixel data (again referring only to
pixel data in (7FE0, 0010),) enabling this option will cause the filter to not anonymize the pixel
data for all unsupported photometric interpretations. For instance, anonymizing the pixel data
for all DICOM datasets with a photometric interpretation of ‘YBR_FULL’ will automatically be
Exodus User Manual
©2005-2015 Laurel Bridge Software, Inc. All Rights Reserved
v 3.16.8
- 39 -
skipped. The header data for these datasets will still be anonymized. For a list of all supported
image types, see section 8.6.3, Pixel Regions to Anonymize.
Private Group – The Private Group box specifies which group will be used during the deidentification process. In particular, after De-Identification, this private group will hold the
Encrypted Attribute Sequence containing the original data.
Enable Logging – Checking this option will enable logging for the de-identification process.
8.6.3. Pixel Regions to Anonymize
This grid specifies which rectangles to anonymize in a DICOM dataset’s pixel data (7FE0, 0010). Each
rectangle is defined by indicating the location of each side of the rectangle in relation to the original
image, specified in terms of a percentage. For instance, the example form shows two rectangles
covering the entire top and bottom 10 percent of an image.
Clicking Configure allows the user to define an appropriate replacement pixel value for each type of
supported photometric interpretation via the following dialog box:
The supported photometric interpretations for de-identification are as follows:
MONOCHROME 1
MONOCHROME 2
RGB
All other photometric interpretations will cause an error, unless Skip Unsupported Images is enabled.
Note that multi-frame images are not supported for pixel data anonymization.
8.6.4. One-Way Anonymization
For one-way anonymization of the patient demographic data and/or pixel data (re-identification cannot
be performed), the following feature must be unchecked in the Misc Settings group box:
Enable Re-Identification
NOTE: If the Enable Re-Identification setting is enabled without a valid Public Certificate, the deidentification will fail with the following error:
‘LaurelBridge.DCS.DCSException: Failed to apply filter action --->
System.Security.Cryptography.CryptographicException: Cannot find the requested object.’
Exodus User Manual
©2005-2015 Laurel Bridge Software, Inc. All Rights Reserved
v 3.16.8
- 40 -
The Public Certificate Path text box will be disabled when performing one-way anonymization. A valid
public certificate is only necessary when Enable Re-Identification is checked. A valid certificate should
either be purchased or generated by the user.
The expected certificate file formats are:
the public certificate (export format PEM) .crt
the private certificate (export format PKCS #12) .p12
8.6.5. Additional Notes
Pixel data and header data re-identification are only available with a valid public and private certificate.
Disable Use Original Attributes Sequence for all de-identification filters if you are going to anonymize
SOP instances. Having this option enabled will defeat the purpose of anonymization by embedding the
list of attribute tags and their original values that changed after applying the de-identification filter
action.
The De-Identify Filter Action also supports removing all private tags from the DICOM dataset’s header
data. The current options and their descriptions are as follows:
Do Nothing – Leave the private tags as they are. By default, this option is selected.
Remove All – Remove all private tags from the DICOM dataset’s header data. This does not
include any private tags added during the de-identification process. This removal is
unidirectional and cannot be undone, even during re-identification.
Encrypt All – Remove all private tags from the DICOM dataset’s header data. This does not
include any private tags added during the de-identification process. This option can only be
enabled if Enable Re-Identification is selected and a valid public certificate is provided.
8.7. Re-Identify Filter Action
Exodus User Manual
©2005-2015 Laurel Bridge Software, Inc. All Rights Reserved
v 3.16.8
- 41 The Re-Identify Filter Action allows restoration of previously anonymized patient demographic
information and pixel data for a given DICOM dataset.
The patient demographic information and pixel data restoration are only available as long as a valid
private certificate (and password) is available. This private certificate must pair with the public
certificate used to de-identify the original DICOM dataset.
Select one of the following actions when re-identifying a dataset to dictate how to handle the original
SOP Instance UID:
Restore Original UID – Select this option to restore the original SOP Instance UID. This option will
not create a Referenced Image Sequence (0008, 1140).
Create a New UID and Reference Original – Select this option in order to create a new SOP
Instance UID and create a Referenced Image Sequence (0008, 1140) that references the original
SOP Instance UID that was de-identified.
Create a New UID and Do Not Reference Original – This option will create a new SOP Instance
UID for the re-identified dataset without creating a Referenced Image Sequence (0008, 1140).
8.7.1. Additional Notes
Enable Logging – This option enables logging for the re-identification process.
Patient Identity Removed (0012, 0062) Attribute Tag will be added to the re-identified dataset in all
cases, including selecting “Restore Original UID”.
As per PS 3.15 Annex E Attribute Confidentiality Profile, the following Attribute Tags are added when
re-identifying a given DICOM dataset, unless restoring the original SOP Instance UID:
Patient Identity Removed (0012, 0062)
Purpose of Referenced Code Sequence (0040, A170)
Referenced Image Sequence (0008, 1140)
Exodus User Manual
©2005-2015 Laurel Bridge Software, Inc. All Rights Reserved
v 3.16.8
- 42 -
Appendix A:
How to not migrate (drop) non-image DICOM objects
If a user wants to drop a non-image type of object, such as a structured report (SR), he can create a filter
with a Drop Action set to Drop the particular type of instance. However, one must be aware that this
action could result in Validation failures because there will be missing instances on the Destination
PACS when it comes time to compare source and destination files.
One way to work around this is to create a second validation rule that will query at the Image level of
the source system and drop any C-FIND Response DIMSE messages (C-FIND-RSP) that contain a response
for the given non-image object type.
Example—Do not migrate Structured Report objects:
Let us assume we need to drop all Basic Text Structured Reports (DICOM SOP Class:
1.2.840.10008.5.1.4.1.1.88.11)
Step 1: Create a tag filter to Drop any Instance of DICOM Basic Text SR and return a C-STORE-RSP of
success. Displayed below is the Filters Tab of the Session Properties Dialog showing this configuration.
Exodus User Manual
©2005-2015 Laurel Bridge Software, Inc. All Rights Reserved
v 3.16.8
- 43 Step 2: Create a Level 2 Validation Rule that Queries the Source PACS at the Image Level. Displayed
below is the Validate Tab of the Session Properties Dialog showing this configuration.
Exodus User Manual
©2005-2015 Laurel Bridge Software, Inc. All Rights Reserved
v 3.16.8
- 44 Step 3: Create a Validate Command Filter to Request SOP Class UID tag from Source PACS. Displayed
below is the Validate Command Filters Dialog. This dialog can be reached by clicking the “View” button
on the Validate Tab of the Session Properties Dialog.
Step 4: Create a Validation Command Filter to drop Basic Text SR from responses from the Source PACS.
Displayed below is the Validate Command Filters Dialog. This dialog can be reached by clicking the
“View” button on the Validate Tab of the Session Properties Dialog.
Exodus User Manual
©2005-2015 Laurel Bridge Software, Inc. All Rights Reserved
v 3.16.8
- 45 -
Appendix B:
Creating a Priors Fetch Segment for Exodus Priors Fetcher
With the Exodus Priors Fetcher application version, you can only create Priors Segments.
For this configuration, you must turn on Delayed Query functionality. Exodus will first query the
Worklist to search for Patient ID’s that are currently on the Worklist. For each Patient ID received from
the Worklist, Exodus will query the Source PACS for exams with that Patient ID. Then, according to the
other rules configured on the Priors Segment, Exodus will migrate the Priors found.
To set up a Priors Segment for Exodus Priors
Fetcher, as shown in the figure to the right:
Set Delayed Query to On
Set the Fall Off (hrs) entry to be a large value,
such as 1000 or more
See Section 6.5 for more information about Priors
Segment configuration.
You may also want to turn on the Move Precheck
feature on the Session Properties Move tab, see
figure at right.
The Move Precheck uses the Validation Rules to
check the Destination PACS for the existence of an
Exam before trying to move it. This will prevent
unnecessary moving of exams that may already be
present on the destination.
Exodus User Manual
©2005-2015 Laurel Bridge Software, Inc. All Rights Reserved
v 3.16.8
- 46 -
Appendix C:
Exodus FAQ
Listed below are a collection of Frequently Asked Questions about Exodus and its use in migration
related scenarios. Additional questions may be submitted to [email protected] .
1. How do I know how many Exams I am allowed to move?
In the upper right-hand corner of the Main Dialog, the number of Remaining Exams on your currently
installed license is displayed (see below). This number is just that, how many more Moves you can
perform. You can still query and validate once this number reaches 0 (zero), but you will not be able to
migrate any more exams without a new or upgraded product license.
2. What do the numbers at the bottom of the Main Dialog mean?
If you are doing a typical migration with Date Range Segments, then the Query number under the Query
progress bar is the number of days that have been successfully queried and the total number of days
remaining to query. The number of failed queries is shown in parentheses. (See also FAQ 3 below.)
Under the Move progress bar in the bottom middle of the Main Dialog, you see the number of Exams
successfully moved and the total number of Exams that have been found so far. The number of failed
Moves is shown in parentheses. These move numbers are representative of the currently selected
Segments in the left panel. Under the Validate progress bar, the number of Exams that Validated to
one of currently defined Validation Criteria is displayed, next to the total number of exams to validate.
The number of Exams with a state of Validate Failed is displayed in parentheses. These numbers are
representative of the currently selected Segments.
Exodus User Manual
©2005-2015 Laurel Bridge Software, Inc. All Rights Reserved
v 3.16.8
- 47 -
3. What does the number under the Query Progress Bar mean if I do not have a Date Range
Segment?
If you create a List Segment from a file or a command then the number of Patient IDs or number of
Study UIDs will be displayed.
If you create a Fixed Segment by selecting exams from another segment, then 0 (zero) Queries will be
displayed.
4. Exodus seems to be running slow, what can I do?
Locking the View of the Query Viewer and Exam Viewer will reduce some significant display-related
computation performed by Exodus. Doing this is especially useful if you are not actively watching the
migration and are just letting it run. You should click the Padlock icon on both viewers.
Another technique to improve apparent performance is to query the entire source first, and then do the
Moves and Validations as a separate step. Querying is typically quite fast an may take less than a day for
even
very
large
archives.
5. Should I Query and Move and Validate all at the same time?
For typical PACS to PACS migrations, we recommend querying the entire possible range of dates of the
Source PACS before migrating any Exams. You want to know a count of how many exams you have to
move before starting. You will most likely move a sample of the Source PACS’ data to the Destination
during the assessment phase of the migration to check for image quality, etc. You will need to
prequalify the Source PACS data and create any tag morphing filters where appropriate. In order to
have a good representative sample and prequalification, you will need to query for everything first.
Also, Querying and Moving simultaneously may reduce performance of the Exodus tool.
Exodus User Manual
©2005-2015 Laurel Bridge Software, Inc. All Rights Reserved
v 3.16.8
- 48 -
6. How do I configure Exodus to use Tag Filters?
Open the Session Properties Dialog. Select the Filters Tab. Set the Image Routing option to On With
Filters.
Exodus will send the Exodus AE Title as the Move Destination to the Source PACS once you have
selected On With Filters. Exodus will also use the Exodus AE Title as the move destination for On
Without Filters.
You must have the Exodus AE Title and port number configured in the Source PACS as a Move (or DICOM
Storage ) destination. You must have the Exodus AE Title and port number configured in the Destination
PACS as a source for images (datasets).
Exodus will process each and every image and DICOM
object sent to it and apply Tag Filters in the order that
they are presented on the Filters Tab; from the top to
bottom of the list. The output of one filter is the input to
the next filter in the list, allowing you to chain many
filters together. After filtering is complete, Exodus will
then forward the filtered datasets on to the destination
PACS.
Exodus User Manual
©2005-2015 Laurel Bridge Software, Inc. All Rights Reserved
v 3.16.8
- 49 -
7. How do I apply a filter to all images (datasets)?
Leave the Conditions section of the filter definition empty and click the Match All radio button.
Exodus User Manual
©2005-2015 Laurel Bridge Software, Inc. All Rights Reserved
v 3.16.8
- 50 -
8. How do I validate a migration where new images are added to the destination
If you are validating a previous migration with the Exodus Assessment tool, new images or reports may
be added to the exams on the destination PACS after the original migration has been completed. This
change could affect the Number Of Study Related Instances returned by a Study Level query to the
Destination PACS, therefore, the default image counting Validation rules will not work as originally
expected.
To accommodate this change in image counts, you should create a Validation rule that queries at the
Image Level on both the Source and Destination PACS and set the comparison mode to be Contained By.
If the list of SOP Instance UID’s returned from the Source PACS is contained in the list of SOP Instance
UID’s returned from the Destination PACS, then the Validation will succeed.
9. I do not want to migrate SR (Structured Report) objects. How can I perform a Validation?
Sometimes you cannot migrate Structured Reports -- this is accomplished with a Drop Image filter. But
now you have guaranteed that Validation will fail because the instance counts on the Source and
Destination will be different. In that case we can configure a Validation rule to do the Source query at the
Series or Image level and ignore the responses that are for SR SOP classes. Then Exodus will count the
instances and compare to the instances on the destination. You could do that for any SOP class of
course, it does not have to be SR.
Exodus User Manual
©2005-2015 Laurel Bridge Software, Inc. All Rights Reserved
v 3.16.8
- 51 Figure 16 Create a Validation Rule to Compare Series Level to Study level
Figure 17 Create a Filter to Drop SR Images
Exodus User Manual
©2005-2015 Laurel Bridge Software, Inc. All Rights Reserved
v 3.16.8
- 52 Figure 18 Create a Validation Command Filter to insert Modality as a return tag
Figure 19 Create a Validation Command Filter to Drop Responses containing SR in the modality tag
Note: You may need to Drop Responses based on SOP Class UID(s) instead of the Modality tag in some
cases.
Exodus User Manual
©2005-2015 Laurel Bridge Software, Inc. All Rights Reserved
v 3.16.8
- 53 -
10. After querying the Source I do not see any exams in the Exam Viewer, what should I do?
Is your source PACS configured properly to move to Exodus or directly to the Destination?
Are you sure that there are exams in the queried date range on the Source PACS?
Can you verify that the exams are accessible and retrievable on the Source PACS? Can you view them on
the Source PACs in its image viewer? Can you push them off of the Source PACS via a DICOM C-Store?
Do the exams need to be loaded into the PACS cache from long term storage and the system is waiting
for you to load a tape or DVD.
Use the Query Client (available from the Tools menu) to probe the Source PACS. Exodus, by default,
queries per day using a date range of today-today e.g. if you are querying for January 1, 2007, then the
query sent will be 20070101-20070101. Some PACS do not support this date range query format. You
should try a single day query of 20070101 or a two-day range of 20070101-20070102. You can then
reconfigure Exodus to use the preferred format on the Query Tab of the Session Properties.
11. Exodus was shut down for several days, will my Priors Segment catch-up?
Yes, if you have a Priors Segment and Exodus is stopped or shutdown, it will query for the missed days
when the migration is restarted. You must have the Query checkbox checked for the extra queries to
happen.
12. Where can I find more information on Regular Expressions used by Exodus?
Exodus uses .Net style regular expressions and more
http://msdn.microsoft.com/en-us/library/az24scfc(v=vs.90).aspx
information
can
be
found
at
13. My low priority Segments do not get run; what is wrong with my configuration?
If you have multiple Segment(s), the highest priority segment(s) will run to completion then the next
highest priority segment(s). Segments with the same Priority setting will run a round robin fashion. This
will allow you to set a high priority Priors Segment and guarantee that Priors will always be migrated
ahead of the normal migration segments.
14. I want to use a Mapping List Action with private tags
To do this you must use a mapping list filter coupled with a Composer Action Filter. Your mapping list
filter will have to update standard DICOM tags. These standard tags will be used as temporary place
holders. The Composer Action can then copy the values from temporary place holders into the desired
private tags.
For example, if you wanted to insert a private Patient ID into a private tag via a mapping file, you could
have your mapping file overwrite tag 0010,1000 (Other patient Ids) which is a seldom used standard
tag). From there the Composer Action could copy the value from tag 0010,1000 to the private tag. You
could then use a Remove Action to delete the temporary tag. See the section on Composer Action for
information about working with private tags.
15. How does Exodus respond to C-ECHO messages?
If you are using the Image Routing feature on the Filters tab then Exodus will forward inbound C-ECHORQ messages to the Destination PACS configured for the current Session. C-ECHO-RSP messages will
be relayed from the Destination PACS to the original requester. If Image Routing is configured to On
With Filters then filters will be applied to the C-ECHO messages, possibly resulting in unexpected results.
Exodus User Manual
©2005-2015 Laurel Bridge Software, Inc. All Rights Reserved
v 3.16.8
- 54 If Image Routing is not being used then Exodus will not respond to C-ECHO-RQ messages.
16. Help I’m stuck!
Email: [email protected]
Or
Submit a request at: http://www.laurelbridge.com/request_support.html
Laurel Bridge Software, Inc.
Tel.: 302-453-0222
www.laurelbridge.com
Exodus User Manual
©2005-2015 Laurel Bridge Software, Inc. All Rights Reserved
v 3.16.8