1
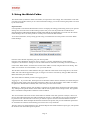
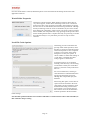
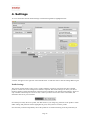
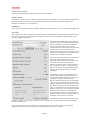
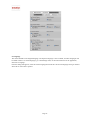
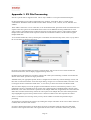
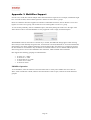
User Guide V5.1a Updated 18th May 2015 Page 1 Contents CONTENTS 2 1. EFF OVERVIEW 4 ABOUT THE PRODUCT MEDIA FILE SUPPORT EFF VERSIONS MEASURE COMPLY EFF OPTIONS WATCHFOLDER DOLBY E DIALOG INTELLIGENCE P2 SUPPORT 4 4 4 4 5 5 5 5 5 5 2. BASIC OPERATING GUIDE 6 THE UI STEP ONE -‐ SELECT A MODE STEP TWO -‐ SELECT A PROFILE STEP THREE -‐ SELECT A SINGLE SOURCE FILE STEP THREE A – MULTIFILES STEP FOUR -‐ LOGS AND GRAPHS STEP FIVE -‐ FIXING A FILE 6 6 6 7 7 8 10 3. USING THE WATCH FOLDER 11 IMPORTANT NOTE WATCH FOLDERS – ANALYSIS WATCH FOLDERS – CORRECTION WATCH FOLDERS – ERRORS WATCH FOLDERS – REPORTS AUTO START WATCHFOLDER 11 12 13 13 14 16 4. SETTINGS 18 PROFILE SETTINGS MEASUREMENT DIALOG INTELLIGENCE PPM/VU METERS PEAK METERS CORRECTION FIX AND NORMALISE TRUE PEAK PROCESSOR (TPP) (OPTION) HOW EFF CHANGES AUDIO LEVELS CHANNEL LAYOUT UI LANGUAGE 18 19 20 21 21 21 22 22 22 22 23 5. PARAMETERS, THRESHOLDS AND TOLERANCES 24 LOUDNESS SPECIFICATION LOUDNESS INTEGRATION TIME LOUDNESS UNITS 24 24 24 Page 2 25 25 25 25 25 26 26 26 26 26 26 27 ERROR! BOOKMARK NOT DEFINED. 27 27 27 27 27 28 28 LOUDNESS RANGE (LRA) PROGRAM LOUDNESS PROGRAM LOUDNESS TOLERANCE LOUDNESS SPECIFICATIONS IN DETAIL B.S 1770-‐1 B.S 1770-‐2 EBU R128 (CONFIGURABLE) SHORT TERM LOUDNESS MOMENTARY LOUDNESS ATSC A/85 TR-‐B32 LEQ(A) EBU MODE PPM SCALE PPM THRESHOLD PPM TOLERANCE VOLUME METER (VU) TRUE PEAK LOUDNESS RANGE WARNING MEASUREMENT/CORRECTION WINDOW 6. FREQUENTLY ASKED QUESTIONS 30 WHAT ARE PPM, VU AND LOUDNESS? WHY ARE LOUDNESS AND PPM IMPORTANT? WHAT IS BS 1770/1771? WHAT IS EBU R128? WHAT IS TRUE PEAK MEASUREMENT? WHAT FILE FORMATS DOES EFF SUPPORT? WHAT ARE MOMENTARY, SHORT TERM AND PROGRAM LOUDNESS? WHAT IS ‘GATING’? WHAT IS LOUDNESS RANGE (LRA)? WHY DO SOME FILES TAKE LONGER TO FIX? 30 30 30 31 31 31 31 31 31 31 7. LIST OF UNITS USED IN LOUDNESS MEASUREMENTS 33 8. WORKSTATION SPECIFICATION 34 APPENDIX 1. P2 FILE PROCESSING 35 APPENDIX 2. DOLBY E SUPPORT 37 APPENDIX 3. MULTIFILES SUPPORT 38 MULTIFILES OPERATION 38 APPENDIX 4. COPYRIGHT INFORMATION 41 LOGOS LICENSES 41 41 Page 3 1. eFF Overview Emotion File Finish (eFF, but pronounced simply as ‘F’) is an automated software product designed to ensure loudness compliance for multimedia files. The software allows both analysis and normalisation to a number of user-defined specifications. eFF is available on Windows and OSX platforms. Most operations are identical, and where they differ this is identified in the manual. About the Product eFF opens media files and measures Loudness, PPM and VU. Loudness can be measured to the following standards: − BS 1770 (at version 3 at time of writing) − BS 1771 (this is a standard for metering loudness) − EBU R128 − ATSC A/85 − TR-B32 − OP59 − AGCOM 219/09/CSP − Leq (A) eFF is EBU mode compliant as specified by EBU Tech 3341. The Loudness values can be measured in LUFS (if using R128), LKFS (BS 1770/1771 and non-European Loudness standards) and LU (if a specific reference level is given, following BS1771). The PPM values are measured and displayed to both Type I Ballistics (used by DIN and Nordic Scales) and Type II Ballistics (used by BBC and EBU Scales). Volume (VU) is measured to Direct, France or US/Australia standards. True Peak is measured in line with the method specified in BS1770-3. eFF allows you to normalise audio levels within files so they meet user-defined specifications. Media File Support eFF supports the following media file types − wav, including ‘normal wav, Broadcast wav, and the RF64 extension (all are normally .wav) − aiff − mpeg PS − MXF (OP1A) − MXF (OP Atom) support included in P2 option, and with multifile option. − MOV (all standard (not reference mov) versions that use PCM audio) − LXF Nexio − GXF Note that reference MOV files are not supported. However the audio essence is usually carried in .WAV files and these are supported. eFF supports a range of Dolby features as options. This includes support for dialog intelligence, and for analysing and adjusting media files containing Dolby E encoded audio. Emotion Systems has also developed the eNGINE, which as Dolby E encode and decode capability, along with several other optional features. eFF Versions eFF is available in two versions, Measure and Comply Measure This is a manual tool that measures individual files in a variety of formats, and reports on the loudness and audio levels present in the files. Measure works with media files containing up to 16 channels of audio. The Page 4 audio can be present as multiple mono streams, or single streams containing multiple audio tracks. Measure lets you create PDF reports. It does not create new media files. Comply Comply adds the ability to work with 'Multifiles', which are when a full soundtrack consists of multiple mono WAV, AIFF or OP-ATOM MXF files. It can correct files by creating new versions with adjusted audio levels. When Comply has to increase audio levels to meet a Program Loudness requirement, it automatically uses its built in True Peak processor to ensure that the new audio still meets the True Peak threshold defined in profiles. eFF Options The following options are available for eFF. Watchfolder This option adds one watchfolder to eFF. The watchfolder has to be associated with one of the user created profiles. eFF watchfolder runs on the users desktop, from a normal user log-in, and monitors one folder. As files appear in that folder, eFF measures them according to your configuration, then creates a new media file, and an XML and PDF report. The watchfolder option also includes the ability to create a daily summary report in XML format, listing everything processed in a 24 hour period. The summary report is automatically closed and a new report started each night. Dolby E This option lets eFF measure and adjust one Dolby E soundtrack within all formats of media files. Dialog Intelligence This option lets eFF measure loudness using Dolby's Dialog Intelligence algorithm to gate the audio, to only include dialog sections. When eFF corrects a file, you can select the Dialog Intelligence gated Loudness value, instead of the Program Loudness value. All other combination of measurements remain available in conjunction with this option. Dialog Intelligence is commonly used for ATSC A85 measurements. P2 Support This option provides support for the P2 file format, and eFF is capable of processing the XML files within a P2 fileset, and can correctly read and correct the sequential MXF files used by P2. This option is only compatible with the Comply version of eFF. Page 5 2. Basic Operating Guide This section contains a quick start guide to using eFF to analyse and correct a media file. The UI Step One - Select a Mode Start by selecting Manual mode from the drop down menu. Steps Two to Four explain how to use eFF in Manual mode. The next chapter of the manual describes how to use the Watch Folder. P2 mode (optional) is described in an appendix. Step Two - Select a Profile In Manual Mode first select a profile from the drop down box. The program allows you to create any number of profiles and save them to a database. During installation, a sample database from Emotion Systems will Page 6 normally be installed. Any profile in the database can be edited or deleted as required. Clicking where the screen image shows “Australia” will display the list of preconfigured profiles that are available. Alternatively, jump to section 3 of this manual for information on how to configure your own profiles. Step Three - Select a Single Source File Start by clicking the Select Source button, which allows a .wav, .mov, .mpeg (.mpg), .aiff (.aif), .mxf or .lxf file to be opened. Note that regular wav, broadcast wav and RF64 wavs are supported. Eff supports stereo pairs containing Dolby E data, if the Dolby option is purchased. If not, it will be necessary to exclude those tracks in the channel layout dialog. The file will be analysed and the maximum values displayed in the summary window. Any values above their thresholds will be displayed in red. Please Note: WAV, AIFF files, MPEG-1 Layer II, LXF, QuickTime and OP1a MXF Files are supported. Only those with the following properties can be tested: ● Up to 8 channels (up to 16 channels with appropriate option) ● Sample Rate 48 kHz and 44.1kHz ● 16 or 24 bit ● Uncompressed audio The following additional property is supported only in MPEG-1 Layer II files ● MP2 Audio Step Three A – MultiFiles eFF can accommodate samples consisting of multiple files in the WAV, AIFF and MXF-OP-ATOM formats, instead of selecting a single file as in Step Three. This function is only available in eFF Comply. Please refer to Appendix Three for details on how to using Multifiles. Once the files have been loaded the resultant graphs can be viewed using the graph functions. eFF will also display data about the files such as loudness range, maximum loudness, etc. Page 7 Step Four - Logs and Graphs The data that can be displayed graphically or in logs is limited to the measurements specified in the active profile. If any required measurement is missing, edit the profile to add it in, then re-measure the file. A log of all the loudness and PPM values can be shown in the logs section. Logs can display all values calculated, or only show values where the value exceeds the user-configured threshold. This tab will also display summary information such as maximum values, loudness range, and True peak. Any values which exceed defined thresholds will be shown in red. eFF allows the user to break down the audio file in to a number of different channel configurations, with the graphs and logs of each of these channel groupings made visible independently. eFF can work with media files containing up to sixteen channels of audio, and options are provided to direct eFF as to how to partition the detected audio, into groupings of mono, stereo and 5.1 as applicable. These are divided into channel groups, which are displayed together. For example eight channel being displayed as eight mono will have eight channel groups, each with a separate log and graph. Eight channel being displayed as 5.1 plus stereo will have 2 channel groupings, one showing the 5.1 section and one showing the stereo section. To navigate between the different channel groups click on the appropriate tab along the top of the logs area. Within each group tab there is the option to view either loudness or PPM. Under either of these tabs either a graph or a log can be displayed. In the example shown below, we are looking at an eight channel file, arranged as four stereo pairs. The 'StereoOne' button is highlighted, so we are seeing the graph and results from the first stereo pair. To see the graph and results for the second stereo pair, we should click 'StereoTwo', and so on. Page 8 By default, graphs display time in seconds on the horizontal axis, but will instead display timecode if the option is selected. In this case, the timecode will be based on actual timecode if this was detected in the source file, or zero-based timecode will be used. To view only the errors and where they occur in the file select the ‘Errors Only’ checkbox. A graph will be displayed in the graph tab. The graph will display each channel within the channel grouping. This can be detached from the main UI by clicking the detach button or exported via a png image using the save function. The graph will display each channel within the channel grouping. Page 9 Step Five - Fixing a File Click on the Select Destination Button to choose a file directory for the fixed file. The filename will automatically default to the original filename, and this name can be edited as required. Note that for 'multifile' mode, eFF instead writes out a folder of new files, but it is not possible to specify the names of these files, so instead you must choose a new folder. Click the Process Button to create a fixed file. The file will be fixed according to the profile chosen in Step One. For more information on how to change these parameters see Chapter Four. Once the file has been fixed a notification message will appear. Page 10 3. Using the Watch Folder The Watch Folder (sometimes called a Hot Folder) is an option for eFF Comply. The watch folder works with one of the saved profiles. When you save the watch folder settings, you are also selecting the profile to be used by the watch folder. Important Note It is important to note that the Watch folder UI does not display the settings profile being used. If you open the Settings area, and look at the 'Profiles Setting' tab, this lets you review the profiles BUT THIS IS NOT NECESSARILY THE PROFILE BEING USED WITH THE WATCHFOLDER. You must click the 'Watch Folder Settings' tab to see which profile is currently active within the Watch Folder. To use the watch folder, start by setting up and saving a measurement/correction profile. Then click 'Watch Folder Settings'. From the 'Select Profile' dropdown, pick your chosen profile. From the 'Select WorkFlow' dropdown, select “Analyse” to use the watchfolder for normal loudness compliance. The alternative setting is to use the watch folder for automatic transcoding of PCM to Dolby E. Click 'Select Watch Folder', and select the location of the folder to watch, using the file browser dialog. This folder can a location on an internal disk, or on your local network. The file filters check boxes enable different file types within the watch folder. In the image above, the watch folder will work will all supported file types, as all types are 'ticked'. Note that any file types not ticked will not be detected by the watch folder. The watch folder mechanism provides two logging options. 'Logging On' – If you select this, eFF keeps track of filenames and the date last modified, for all files that pass through the watch folder. This means that if eFF detects that a file is placed into the watch folder for which it recognises the filename/date modified, then it will not be processed a second time. 'Hashing On' – With this setting, eFF calculates a signature for each file that is dropped into the watch folder. Any subsequent file placed into the watch folder with the same signature will not be processed. The signature that is calculated is independent of filename or date modified. The various folders and actions for the watch folder are defined in four tabs, split into 'Analysis', that covers moving and renaming files that pass without needing processing, or files that fail, and you don't wish them to be processed. The Correction tab covers how you choose to process and move files that failed to meet the original thresholds. Where multiple thresholds are defined in the profile, eFF provides additional options that are used if the file cannot be automatically processed to meet every threshold. The Error tab covers unsupported file types, whilst the Reports tab enables different report types, and specifies the locations into which the reports are placed. Page 11 There are a lot of options available within the watch folder interface, based on requests from users. However a typical workflow will only use a few of the options. The following section describes each of these in more detail. Watch Folders – Analysis On the 'Analysis', we define 'Passed' files to be those files that already meet the targets defined in your chosen profile, without any processing being required. For these files, you can choose to rename the files with the addition of a user defined string of characters, and/or by adding a timestamp onto the filename. Whether you choose to rename the file or not, you have an option to move the file to another location. We recommend that you move files out of the watch folder once they have been analysed by eFF. Likewise, we define 'Failed' files to be those that do not meet the targets defined in the profile. The same Rename and Move options exist for Failed files, as for Passed files. This mechanism gives you the option for an output folder for failed files, so that if you wish to reject these files and ask the supplier to fix, they are all kept together. Alternatively you may wish to fix all the failed files, without renaming them. In this instance, you would move the failed files to a temporary folder. Then in the correction tab you would select to correct these files, and to move them to the final output folder, which could be the same folder that the 'passed' files were moved to. Using a temporary folder is essential if you do not wish to rename the files. If it is prefered to create new files with a different filename, this can be done directly on the 'Correction' tab. Page 12 Watch Folders – Correction In the majority of cases, you would select the 'Correct Failed Files' option at the top of this section. Therefore all files that did not meet the required thresholds will be submitted to the processing section of eFF. They will be adjusted in line with the settings defined in the chosen profile. Rename and Move options are available, which work in an identical fashion to those on the 'Analysis' tab. Now that the file that failed has been processed to meet the targets, you can use the 'Delete Original File' option to remove the original source. If you don't ever wish to delete the source file, then you can use the 'move failed files' option on the analysis page in conjunction to the 'correct failed files' on this page, so that you have one output folder containing all the files that failed before they were processed, and a second output folder containing all the files that previously failed and have now been corrected. Of course this option doubles the number of files. Lastly on the 'correction' tab there are options concerning files that cannot be processed by eFF to meet all parameters. For example, when eFF reduces the gain in order to meet a Program Loudness target, then a configuration choice to normalise PPM levels may not be achievable. In this instance, eFF can move the file to an output folder, and optionally generate warning messages. For files that cannot be processed to meet all configured targets, the file is not processed at all. Ie it is not partially processed, but left untouched, and we recommend manual inspection and processing for all files thus segregated. Watch Folders – Errors Page 13 The Errors tab concerns media files that eFF is unable to correctly open. This would typically be for files where there is an error in the coding, or it uses a type of codec not yet supported by eFF. These files can be moved and an optional error report created. When you come across unsupported file types, please contact [email protected] to see if an update to eFF is available that corrects the issue. If not, then if possible please provide a file sample to Emotion Systems so that we can potentially add support. Watch Folders – Reports The final tab in the Watch folder section concerns optional reporting. Here you can configure eFF to create an XML Analysis report for every file that is processed, which can optionally also create graphs as png files, plus eFF can also directly create PDF reports, in which case the graphs will be embedded within the PDF. There are also daily summary reports available. These reports are produced each day, around 1am, and each day the previous days file is closed and retained, and a new file started. Underneath there are options to specify the destination for the various report types. This concludes the detail on how to configure the watch folder. The next stage is to enable watch folder processing. First set the Mode to Watch Folder. Once selected, the manual part of the UI will be disabled. As soon as the mode is set to Watch Folder, the Watch Folder Monitor window appears, and will list all the processable media files contained in that folder. This provides a visual check before you start. Page 14 Once the watch folder is selected, additional options can be selected from the Settings menu in the main application menu bar. Watch Folder Properties This dialog controls using the Watch Folder in instances when files are very slow to appear, such as when monitoring a FTP site. It is normal in FTP sites for files to stop growing occasionally, and sometimes to remain the same size for several minutes, then resume being transferred. Although directly monitoring a FTP site is not recommended, if you need to do this, then clicking the ‘Add Delay’ check box lets you specify a time in minutes. When enabled, eFF will permit files to stop growing for this period of time before deciding that the file is complete and ready for processing. Note that this will add a delay to every file that is processed so only use when essential. Local File Cache Options This dialog provides controls that can speed up watch folder operation, when the files are stored at a network location, and network speeds are slow compared to direct access speeds. In the initial dialog there are only two options, to choose whether to enable file caching. If ‘Cache Files’ is enabled, then other settings appears as shown here. If using this option, we recommend selecting ‘New Directory’ and choosing a local folder to hold your cached files. This way you know exactly where these files are. For most circumstances, selecting to cache both Source and Destination files will provide the fastest processing, although this is dependent upon your hardware. When using this option, source files are copied across the network to the local cache folder, and processed there, with destination files being created in that same location. Once created, the new files are then moved to the destination location specified in the main Watch Folder settings. Note that this option should not be used if the watch folder is on the hardware where eFF is installed, as this would slow the processing. Page 15 Once everything is configured as required, click the Start Watch Folder Button. Clicking the Pause Button will pause the Watch Folder. If the Watch Folder is in the middle of processing a file – it will complete process that file before pausing. Please be patient, the Pause command will be actioned once the processing has finished. The files in the Watch Folder will be displayed in the Watch Folder Monitor view. The filename, processing status and file status is shown. The processing status is as follows eFF has not processed this file eFF has successfully finished processing this file The files that have been tested are given a range of status messages. File Failed File Failed Then Corrected Waiting for Processing Still Copying Processing Levels in the file exceeded the thresholds in the configuration. Levels in the file exceeded the thresholds in the configuration, and a new file has been created that meets the configured thresholds eFF has not yet started on this file eFF has detected new files being placed in the hot folder, but the copy operation has not yet completed. This file is now being processed. When files start processing, a progress bar appears at the bottom right of this view. This bar fills from 0 to 100% for each separate process being carried out in each file. Each audio group is analysed individually, so if there are four stereo pairs in the file, this will go from 0 to 100% four times for analysis. If your profile also corrects files, then each stereo pair being corrected would also go individually from 0 to 100%. To end the Watch Folder session, click the Stop Watch Folder button. eFF will then wait until it has finished processing any files it is working on before closing the watch folder. Auto Start Watchfolder If you only use the Watchfolder, eFF can be set to auto start directly with an active watchfolder. You need to start eFF from a command line, using 'eFF WATCHFOLDER'. In OSX, the command would be something like - Page 16 open eFF-V3_3_9-10dEval.app --args WATCHFOLDER In Windows, the command would be something like "program files (x86)\emotion systems\eff" WATCHFOLDER Page 17 4. Settings To access the Profile and Hot Folder Settings Click the Settings Button, highlighted below. A drawer will appear to the right side of the Main Window. To hide this drawer click the Settings Button again. Profile Settings This section contains details on how to set a profile. When the program is used for the first time a default profile is created. This can be configured or deleted as required. The 'Profile settings' are where you choose loudness standard, and the thresholds for measurement and adjustment. The 'Watch Folder Settings', which are only available in the Enterprise version of eFF, is where you choose the location of the watch folder, and destination choices for processed files. In an attempt to clarify the active profile, note that whenever you change any parameter in the profile or watch folder settings, that parameter will be highlighted in green, until you have saved the profile. Note also that you must independently choose the profile for use whilst measuring, from the profile that you Page 18 are currently editing. In other words, you could select a profile names 'France' whilst measuring files, and then decide to edit a profile called 'Germany'. This will not affect your 'France' profile. However eFF will attempt to detect that you have edited a profile that is not selected, and prompt you to change to the newly edited profile, when you next select a file to measure First Click on the Profile Settings Tab. Then, at the 'Select Profile' dropdown, either choose an existing profile, or select 'Add New +' to create a new profile. Enter the profile name in the correct box and click save settings. Profiles can be deleted by pressing the delete button. This will delete the profile being displayed in the settings tab. When eFF is opened for the first time it will create a placeholder profile named Example Profile - this can be renamed or edited as required. When a profile is saved, eFF will prompt the user to reload the file using the saved profile settings. Each profile has three different sections of settings – Measurement, Correction and Channel Layout Measurement The Measurement section allows the settings to be customised. Within this section eFF can be customised to analyse loudness and PPM, as well as to cope with a variety of different specifications and requirements such as True peak or Loudness Range. When the profile has been set up accordingly, press the Save Settings button to save. If the settings tab is closed before saving then any changes made will be lost. If a setting has been altered it will be highlighted. When the Save Button is clicked the settings will return to normal. Page 19 In the Measurement tab, start by clicking the Loudness specification drop down, as highlighted in the screen image above. Then select the appropriate Loudness 'types' that you wish to measure. The available choices vary depending on the base selection. For example, choosing R128 as the base specification then provides a choice of Program, Short Term and Momentary Loudness, whereas choosing TRB-32 only has the Program Loudness available. Dialog Intelligence When selecting ATSC A-85 as the base loudness specification, the option to select Dialog Intelligence is also available. Dialog Intelligence is specified in A85 as an optional algorithm that may be used. Normally a delivery specification will state whether this is to be used or not. However the most important factor is to be consistent, as programs normalised with dialog intelligence will usually be at a different level to programs normalised Page 20 without dialog intelligence. Dolby specify that the Speech Threshold should be 20% as default. PPM/VU Meters In addition to Loudness, eFF can measure audio levels in other standards. So you may include measurement of PPM, and you would select the required standard from the 'Scale' dropdown, and enter an appropriate threshold, or measure VU as an alternative. Peak Meters Lastly, eFF can measure True Peak, using the algorithm specified in BS1770-3, or it can measure Sample Peak. Correction The Correction Tab shows a summary of all the parameters and thresholds set in the Measurement Tab, allows the user to set up a measurement window, and lets you choose what actions eFF takes with files that do not meet the configured parameters. Just under the measurement summary, there is options to specify a measurement window, that can be configured in seconds or in timecode. This is provided so that the bars and tone section at the start of many files is not included in the analysis, so doesn’t cause incorrect measurements, and of course so that the level of the tone is not adjusted when the audio levels in the main part of the file are adjusted. If you select 'Seconds' then you can enter a Start Time, which is the delay from the very beginning of the file, before measurement and correction starts. The second parameter, Duration, is optional, but if a value is entered, this is defining a 'window'. Audio within this window is measured, and potentially adjusted, whilst audio outside this window is entirely unchanged. The 'Timecode' option is only suitable for use with files that contain a defined timecode. A start timecode value is entered in a similar way compared to using the 'Seconds' mode. However this start timecode is now an absolute value, not a delay from the start of the file. For example, if the file does have timecode, and the first frame in the file is 09:58:45:00 and a start value of 10:00:00:00 is entered, then eFF treats the file as starting at 9:58:45, and 'plays' the file until timecode 10:00:00:00 is reached, then starts measuring. In this case, this would give the same results as being in Seconds mode, and specifying a Start value of 75 seconds. The 'Duration' value in Timecode mode is still treated as an offset, so in the above example, to have a duration of 30 seconds, the Duration value would be entered as 00:00:30:00. If you specify a timecode value, but eFF does not detect timecode in the source file, then a warning is displayed, and eFF reverts to measuring and correcting from the very start of the file. Page 21 Fix and Normalise At the bottom of this configuration page, you select either 'Fix' or 'Normalise'. If the Fix box is checked then the audio will only be attenuated if any given threshold is exceeded. If the Normalise Options box is checked the audio will be lifted or reduced so that it is at the threshold level whether it was previously above or below the threshold. If you wish to normalise to multiple parameters, eFF will ensure that none of the parameter thresholds are exceeded. Note that the eFF applies gain correction to adjust the file. This is a constant value throughout the file, and the same gain parameter is used on all audio channels within a group. Therefore it is not possible to adjust every file to meet multiple parameters. If this is the case, eFF will display a suitable warning message. With the True Peak parameter, eFF will only ever reduce the levels in a file to ensure this value is not exceeded. It does not make sense to increase the level in a file to hit a True Peak value, and eFF will never do this. True Peak Processor (TPP) The True Peak Processor scans through the audio looking for areas that already exceed the chosen True Peak threshold, or will exceed the threshold after the file has been adjusted to a target Program Loudness value. Any audio that will exceed the True Peak threshold are selectively attenuated using our unique 'DNA' process, such that the audio will not breach the specified targets. Of course in order to ensure that the mix is not affected any more than necessary, eFF will always apply the identical DNA changes to all channels of an audio group in the same places. How eFF changes audio levels Note that when eFF adjusts the audio level, it will always make an identical adjustment on every audio channel of a group. Ie all 6 channels in a 5.1 group would have the same level of adjustment, and both channels in a stereo group would have the same level of adjustment. If eFF is working with a file containing several separate audio tracks (ie an 8 channel file consisting of four stereo pairs) then each audio track is measured and processed independently. This means that gain or attenuation is applied separately to each audio track, as required so that each track ends up meeting the configured target. Apart from when the measurement window function is used, as described above, or the True Peak Processor is used, the entire duration of the file will be given the exact same level of adjustment. Therefore there is no change to the audio mix, and no loss of quality because of any form of clipping or compression. Apart from possible rounding errors due to limited bit resolution, the actual attenuation process used by eFF is reversible. Channel Layout When files contain more than a single audio channel, there are choices about how the channels are being used. Frequently there is no information in the file describing the layout, and therefore eFF includes tools to allow the user to specify the channel layout. Additionally, MXF files in particular frequently contain unused audio channels. These have no effect in normal use, but it is undesirable for eFF to measure and normalise the audio levels in channels that are present, but not being used. The Channel Layout controls show the different layouts that eFF supports, and indicates the default choices that eFF will make when a given number of channels are detected in a file. The choice of active channels dynamically changes in the UI, based on the selected channel option. Thus if eFF finds two channels in a file, this can be treated as one stereo pair, or as two mono tracks, depending on the configuration. eFF handles up to 16 channels of audio. The 'Advanced' settings are for instances where a stereo pair is actually two separate (mono) language tracks within the source file, but will a selected mono track will be broadcast in both left and right on playback, for example. Therefore eFF has to know the playout configuration, and can then measure and correct the loudness based on how loud it will be on playout, rather than how loud it is within the actual file. Page 22 UI Language The eFF UI defaults to the English language. The Japanese language is also available, and other languages will be added in future. To switch languages, go to the Settings menu, on the main menu line for the application, and select ‘Language’. From the dialog that appears, select the chosen language then click OK. The chosen language setting is retained when eFF is closed and re-opened. Page 23 5. Parameters, Thresholds and Tolerances Loudness Specification The Loudness Integration Specification can be set to: • • • • • • • • • B.S 1770-1 B.S 1770-2 EBU R128 (configurable) ATSC A/85 TR-B32 Leq(A) EBU Mode OP59 AGCOM 219/09/CSP (Note that BS 1770-3 only differs from BS 1770-2 in that the True Peak measurement algorithm has been changed slightly. EFF measures loudness using the algorithm specified in BS1770-2/3. EFF measures True Peak using the algorithm specified in BS1770-3). Each specification has slightly different properties including: • • • • Integration Time Units Gating Short Term and Momentary Options (See below for a detailed explanation of each specification) Loudness Integration Time The Integration Time specifies the sliding window time interval over which the loudness measurement is calculated. The value can be set from 0.1s to 29s. Loudness Units Page 24 The Loudness Units can be set to LKFS, LU, LUFS or dBFS. These are dependent on which Loudness Specification is chosen. If LU is chosen as the units, a reference level must also be set. If LUFS, dBFS or LKFS is chosen the reference will be set to 0 and the Reference Line Edit disabled. Loudness Range (LRA) The Maximum Loudness Range, or LRA can be defined. This is the greatest value that the loudness is permitted to be. LRA is somewhat related to dynamic range, but is a measure calculated to ignore the effects of the very loudness and the very quietest material, so is more representative of the range that commonly occurs. As a very rough guide, typical commericals might have a LRA of under 5, and typical sitcoms and documentaries might have LRA values under 10. However original cinema material can have LRAs exceeding 25, and such a wide variation is not always suitable for certain listening environments. Therefore it can be useful to monitor LRA. Program Loudness The Program Loudness Threshold can be defined. Program Loudness (sometimes referred to as Integrated Loudness) is a value taken over the entire duration of the file. It takes overlapping 400ms blocks and discards those below the absolute threshold of -70 LKFS to obtain a loudness value. It then calculates a relative threshold, which is a definable LU value (referred to in eFF as the Relative Gate) below this loudness value. It then discards all blocks below this relative threshold and calculates the program Loudness value with the remaining data. Program Loudness Tolerance The Tolerance of the Program Loudness can be set. This is the value that any of the Loudness Values can be above the Loudness Threshold without being considered an error. A common specification is for Program Loudness to be -23 LUFS +- 1LU. Therefore you would enter '1' into the Tolerance box. Loudness Specifications In Detail B.S 1770-1 Integration Time is variable. eFF will prompt 3s. Gating is not applicable to this specification, so the ‘Program Loudness’ measurement is not available. Units are LKFS (LU may also be used). Threshold is variable. eFF will prompt -23 LKFS. Page 25 B.S 1770-2 • Integration Time is variable. eFF will prompt 3s. • Program loudness is enabled for this specification. eFF prompts a threshold of -23 LKFS and a relative gate of 10 LU. • Units are LKFS (LU may also be used). • Threshold is variable. eFF will prompt -23 LKFS. • EBU R128 (configurable) • • • This Specification allows two loudness measurements – Short Term and Momentary (both use the B.S 1770 algorithm) Program Loudness is enabled and values are variable. eFF prompts a threshold of -23 LKFS and a relative gate of 10 LU Units are LUFS (LU may also be used) Short Term Loudness • • Integration Time is variable. eFF will prompt 3s Threshold is variable. eFF will prompt -23 LUFS. Momentary Loudness • • Integration Time is variable. eFF will prompt 0.4s Threshold is variable. eFF will prompt -23 LUFS. ATSC A/85 • This uses the B.S 1770 algorithm • Gating is not selected but can be enabled • Units are LKFS • Threshold is usually -24 LKFS • The optional Dialog Intelligence algorithm provided by Dolby is typically used for A85 measurements. TR-B32 • Uses B.S 1770-2 algorithm • Measures a single program loudness value over the entire file with threshold at -24 LKFS and a relative gate of 10 LU Page 26 Leq(A) • This specification uses the Leq algorithm with an AWeighted filter • Integration Time is variable. eFF will prompt 10s • Gating is not applicable to this specification • Units are dBFS • Threshold is variable. eFF will prompt -23 dBFS PPM Scale This determines which PPM Scale to use. The PPM Scale can be set to BBC, EBU, Nordic or DIN. Nordic and DIN use Type I Ballistics. BBC and EBU use Type II Ballistics. The scale can also be set to dBFS using either Type I or Type II Ballistics. PPM Threshold The Maximum PPM Threshold can be defined. This is the greatest value that the PPM is permitted to be. Any value above this will be considered an error. This value can be defined as a decimal. PPM Tolerance The Tolerance of the PPM Values can be set. This is the value that any of the PPM Values can be above the PPM Threshold without being considered an error. This value can be defined as a decimal. (This parameter is only considered in the measurement settings) Volume Meter (VU) A Volume meter can be used as an alternative to the PPM meter. This option allows users to specify a threshold and tolerance as well as specify which scale to display the values on. Options include Direct, US/Australia and France scales; each with different reference values. True Peak The Maximum True Peak Threshold can be defined. This is the greatest value that the True Peak is permitted to be. Any value above this will be considered an error. Page 27 Loudness Range Warning This feature will alert the user to an excess Loudness Range (LRA). The maximum and minimum loudness values can be set. Any samples which have a Loudness Range greater or lower than these will cause the value for loudness range to be highlighted in red in the process information window. Measurement/Correction Window eFF has a feature to define a measurement window, such that eFF only measures audio within this window. If the window is used, the audio levels are only adjusted within this window. This covers the issue of line-up tones, or other unwanted material from leading to an incorrect measurement. The 'Measurement/Correction Window' works in two different ways, depending on whether you choose 'Seconds' or 'Timecode'. If you select 'Seconds' then you can enter a Start Time, which is the delay from the very beginning of the file, before measurement and correction starts. The second parameter, Duration, is optional, but if a value is entered, this is defining a 'window'. Audio within this window is measured, and potentially adjusted, whilst audio outside this window is entirely unchanged. The 'Timecode' option is only suitable for use with files that contain a defined timecode. A start timecode value is entered in a similar way compared to using the 'Seconds' mode. However this start timecode is now an absolute value, not a delay from the start of the file. For example, if the file does have timecode, and the first frame in the file is 09:58:45:00 and a start value of 10:00:00:00 is entered, then eFF treats the file as starting at 9:58:45, and 'plays' the file until timecode 10:00:00:00 is reached, then starts measuring. In this case, this would give the same results as being in Seconds mode, and specifying a Start value of 75 seconds. The 'Duration' value in Timecode mode is still treated as an offset, so in the above example, to have a duration of 30 seconds, the Duration value would be entered as 00:00:30:00. Page 28 6. Licensing eFF uses a software licensing scheme. All versions of eFF from V5 onwards have a license setting on the applications main menu bar. The options vary depending on whether you are using evaluation software, or have purchased a full license. For full licenses, this opens a dialog providing a range of options. Release License If your hardware is attached to the internet, and you activated your license using our automatic license server, then you can use the Release License option to un-license eFF, and to put your original license back on to our server. Having done this, our server will let you install and activate the license onto a new computer, just following the instructions on your original delivery note, and re-using your original serial number. Refresh Features You will only need to do this if advised by Emotion Systems. If you purchase a new option for eFF, and activated your license from our automatic license server, then Emotion Systems will enable the new option on our server. Using Refresh Features causes eFF to re-read our license server, and will consequently enable the new option. Feature Passwords If your license was activated manually, rather than from our License Server, then it is necessary to use Feature Passwords to enable options that you have purchased. You may be provided some codes to enter as part of manual activation, and if you upgrade with a new option, you would need a new code to enable the option. Block License Only use this option if requested by Emotion Systems. It is used when you need to move your eFF license to a new computer, and when the original license was activated manually, so that our License Server is not able to Release the license. If you click on Block License, then click OK, your license is permanently removed from your computer. A dialog will display two codes, and these must be sent to [email protected] in order to enable your license onto our license activation server once again. Activation Data This displays information relating to your license. Note however that only the first 20 or so digits of your serial number are displayed. Do not use this part serial number when installing and re-licensing on to a new computer, as only the original and full serial number will work. The full serial number is shown on your original delivery note, and copies of this are available on request from [email protected] Page 29 7. Frequently Asked Questions What are PPM, VU and Loudness? PPM (Peak Program Meter) is a commonly used measure, showing the (near) instantaneous level of the audio. Frequently there is a second meter added, supplying a ‘peak hold’ function, making it easier to see the maximum levels reached. The PPM measurement is specified in IEC 60268-10. There are two ballistics in common use (ballistics refers to the speed of response, so how quickly the metered reading increases or decreases as the signal increases or decreases). The ballistics are called 'Type I' and 'Type II'. Type I ballistics are used in DIN PPM measurements. Type II ballistics are used in BBC and EBU PPM measurements. VU (Volume Unit) is a simpler method of measuring the volume of a file. This meter measures the amplitude of the signal sent through without applying filters, although a large averaging function is added to both the rise and fall of the meter, giving it a 'slow' response. It is considered rather outdated since the introduction of PPM and Loudness meters. Loudness is a newer measurement, and attempts to put a figure on ‘how loud’ the material appears to be to a listener. How a person ‘hears’ the loudness is based on many factors, such as type of programme material, the listeners mood and health, and whether they like the programme material, so it is quite subjective. The Loudness measurement attempts to put a number on how an average listener might respond to the programme material. Why are Loudness and PPM important? Loudness and PPM are used as references to control the maximum audio levels in broadcast material. The issue is that a program and the commercial that follow it may have the same maximum PPM levels, but the commercial will frequently be perceived as louder. Having a loudness measurement means that there is now a tool such that the audio levels in the commercial may be adjusted to provide the same perceived loudness as the program that preceded it. What is BS 1770/1771? BS1770 is an ITU standard, which provides the basic algorithm for measuring Loudness. It also contains the algorithm for true peak measurement. BS1770 does not state which averaging period to use, nor what thresholds are appropriate. BS1771 is the ITU standard, which describes how a real time loudness meter should look and respond. In relation to eFF, the important detail from BS1771 is that it introduces the concept of measuring in LU, or loudness units, which are arranged such that the target loudness is 0LU. BS1770 measures using LKFS, or Loudness Full Scale, K weighted. On the LKFS scale, the target loudness will be a negative figure, such as -18 LKFS. Technically speaking, LU and LKFS are not the same as dB. However the specification is designed such that a change in level of 1 dB will change the LU or the LKFS figure by a value of 1. There are three different versions of BS 1770. The most recent is BS1770-3 and this supersedes the previous version. The essential changes in the different versions are as follows BS1770 – original. Defined loudness measurements BS1770-2. Added a specific gating method, now used for Program Loudness. BS1770-3. Included a tightly defined True Peak measurement algorithm. This was loosely defined in previous versions, meaning that equipment from different manufacturers could give different readings. With the algorithm specified in BS1770-3, True Peak readings from any product should Page 30 agree. What is EBU R128? R128 is a specification written by the EBU. It uses the loudness algorithm in BS1770 as its core technology, but R128 specifies three different scenarios, and the threshold and averaging periods for each scenario. Two of these are very similar to BS1770, whilst the third adds a gate function, which excludes very quiet signals from the calculation of the result. The R128 specifies reporting values in LUFS, or Loudness Units, Full Scale. What is True Peak Measurement? The PPM measurement contains a small amount of time averaging of the audio. Thus the actual instantaneous level may be higher than the PPM value. Additionally, as audio is converted from digital to analogue, a Reconstruction filter has to be used. This filter has to recreate values ‘between’ every pair of sample points, which could be higher or lower than the value of the actual samples. In fact, the true peak level of audio is often around 8dB higher than the maximum PPM value. For the audio not to clip when converted to analogue, there must be sufficient headroom available for the True Peak measurement not to exceed 0dB, which is why the maximum PPM value is always set less than the maximum. EBU R128 states that the true peak level should not exceed -1dB. What file formats does eFF support? Currently eFF supports wav (including Broadcast wav and RF64 wav), mov, AIFF, MPG and OP1a and OP-Atom MXF files. In all file types, the eFF supports up to 8 channel audio or up to 16 channel if the '16 channel' option is purchased. Both 48kHz and 44.1kHz are supported. For MOV files, eFF supports uncompressed RGB, or YUV Quicktime video formats. It also supports most formats with compressed video as long as they have uncompressed audio. What are Momentary, Short Term and Program Loudness? These are terms introduced in EBU R128 to classify loudness measurements made with different integration times. Momentary loudness uses an integration time of 0.4 seconds whereas short term uses 3 seconds. Program loudness gives a single loudness value for the entire file, that is to say the integration time is equal to the total file length. Program loudness also uses a gating technique to calculate the total loudness. What is ‘Gating’? This is a term used in EBU documentation; aimed at reducing the impact of background noise and clutter on the loudness value of a file. If a specification includes something like -6 Relative gate, or 6rel, this means that the gate audio level works 6 LU below the main measurement threshold. So if your threshold is -23 LKFS, then the gate would be -29 LKFS. So the gate threshold is -6 LKFS relative to the main threshold. What is Loudness range (LRA)? This measurement describes the difference between the minimum and maximum loudness values measured in a program. It is a statistical measure, and avoids extremes, so that a single very loud gunshot during a program will not affect the LRA measurement. The EBU R128 does not specify a maximum permissible LRA figure, but suggests it should be monitored to ensure the figure remains fairly constant. As a guideline, the EBU suggests that the LRA is unlikely to exceed 25 LU. Why do some files take longer to fix? Page 31 Some of the Quicktime files may take longer to fix due to their size. During fixing, the entire file must be copied, not just the audio data, and this can take several minutes. The wave files, which are much smaller, take significantly less time to copy. In terms of fixing - having a fast disk subsystem will speed up copying time and therefore reduce the time it takes to fix the file. Some measurements are slower to calculate than others. For example, True Peak is computationally the slowest value to calculate, so adding or removing this calculation from a profile makes a significant difference to the processing time. Page 32 8. List of Units used in Loudness Measurements ● ● ● ● ● LU - This stands for Loudness Units, defined in BS1771 LKFS - Loudness units, Full Scale, K Weighted, defined in BS1770 LUFS - Loudness units, Full Scale, defined in EBU R128. dBFS – Decibel, Full scale used for measuring volume with PPMs Reference Level - This applies to measuring loudness on the LU or LUFS scales, and is the offset applied to the results of the loudness calculation, such that the target figure is defined as 0 on whichever scale is chosen. This does not apply when using the LKFS scale. Page 33 9. Workstation Specification The following workstation specifications are recommended in order to take full advantage of the eFF application: eFF is available on both Windows and Mac OSX. The software is compatible with all versions of Windows 7 and Windows 8, including Server 2008 R2 and Server 2012, and all versions of OSX from 10.5 (Leopard) to 10.9 (Mavericks). However 10.8 onwards require a manual configuration change to the Security and Privacy settings before eFF is permitted to run. To make this change, open the ‘System Preferences’, then select the Security and Privacy icon. On the General page, as shown above, you must allow apps to be downloaded from – Anywhere. Once this change has been made, eFF can be downloaded and installed. Windows XP is not supported. At time of release of eFF V5, OSX 10.10 (Yosemite) is not supported, but support will be added Q2 2015. For processing wav and aiff files, any computer of modest specifications is suitable. A dual core pentium based system with 4GB RAM is likely to be fine. For processing uncompressed QuickTime and MPEG, a decent specification is required, due to the size of the basic files. We recommend a third generation Core i7 based machine with minimum 8GB RAM, to achieve best performance. For watchfolder based applications, where files are stored on the network, the limitations on processing times are likely to be the speed of the network and the speed of network-based storage. If this user manual does not cover any specific issues, please contact [email protected] Tel +44 (0) 1635 203 000 Page 34 Appendix 1. P2 File Processing eFF has a special mode to support P2 files. This is only available as a cost option with eFF Enterprise. P2 files should always exist within a defined directory structure. At the 'Root' there is a folder named 'CONTENTS'. Within that folder should be folders titled 'AUDIO', 'CLIP', 'VOICE', 'ICON', 'PROXY' and 'VIDEO. These folders contain one or more video files, in OP Atom MXF format, plus all the audio associated with each separate video file, again in OP Atom MXF format. There are are BMP files showing thumbnails for each video sequence, plus XML files that contain the structure of each separate sequence. The P2 fileset supports multiple video and associated audio sequences within the CONTENTS container, and the media may span multiple MXF files. To use P2 files within eFF, start by selecting 'P2' or 'P2 Batch' from the main drop down, at the very top left of the UI. The main UI changes to the P2 UI. P2 mode is used when manually processing a single P2 fileset, and provides access to all the normal eFF measurement features, such as display of graphs and logs and so on. P2 Batch mode is intended to be used when working with a file system containing a number of individual P2 filesets. In this mode, operation is largely automated XXXXX Select your appropriate profile, which is configured in the usual way from the 'Settings' section, and then click to 'Select Root Folder'. In the 'File Open' dialog, navigate to a CONTENTS folder, and select it. Do not navigate into the CONTENTS folder itself – it is necessary to choose the actual CONTENTS folder. The UI will now display a list of all 'programs' found within the P2 fileset, towards the top of the UI, and underneath is shows a scrollable list of the various clips contained in the CONTENTS folder, showing video thumbnails, a list of how the material is spanned across multiple MXF files (if applicable) and a list of all if the audio files associated with each clip. Where the video spans across multiple files, the name of this particular clip is highlighted in green and its position in time is shown in relation to the other clips that are related. There is a 'check-box' for each clip, where you may choose whether to include each particular clip in processing. All clips that are selected will be analysed, by clicking the 'Analyse All' button. If the 'Correct Files' check box is ticked, then new files will be created. In order to maintain the integrity of the P2 fileset, all newly created files adopt the same name and folder locations as the original source files. The original files are moved into a new folder called 'OLD_AUDIO', Page 35 which also includes a timestamp in the folder name. The default analysis and processing takes place on the 'All Programs' tab. If you wish for the normal eFF type interface, and full details for each item, select the 'Single Program' tab. Note though that 'Single Program' gives access to the full set of analysis tools, but does not provide any new file creation features. To adjust levels and create new files, it is necessary to use the 'All Programs' tab. In this section, you start by selecting an individual program to analyse/process, from the drop down on the left. The drop down contains the list of all programmes, with the spanned ones correctly shown as containing multiple clips. During processing, eFF will open the required audio files that match the selected video program, and takes into account the channel layout defined in the main Settings. Once the selected program has been analysed, the usual status information, graphs and logs are accessible from the UI. Page 36 Appendix 2. Dolby E Support eFF can optionally support Dolby E. There is also an option to use Dolby’s Dialog Intelligence measuring algorithm. As a loudness compliance tool, the Dolby option lets eFF opens a Dolby E encoded media file, such as MXF. Once the file is selected, eFF can decode the audio to PCM, measures the levels and compares those measurements to any of the Loudness standards supported in eFF. Then eFF can modify the audio to make it comply to a loudness standard, re-encode the audio back to Dolby E, then wrap it back into a file that is identical to the source, apart from having modified audio levels and modified Dolby E metadata. When used in this way, eFF can measure Program Loudness using the whole duration, as required in R128, or it can measure dialogue only, using the optional Dolby Dialog Intelligence algorithm. Loudness Compliance operations with Dolby E encoded files When eFF is used to analyse files, the detection of Dolby E encoded tracks is automatic. If no Dolby E tracks are discovered, then the channel layout information configured in the profile is used. If any Dolby E encoded tracks are detected, then all other tracks are treated as stereo PCM tracks. The layout for the Dolby E track is determined by the Dolby metadata. If eFF is used to adjust the loudness of Dolby E tracks, then the new file will contain the same structure as the source. PCM stereo tracks in the source will be adjusted independently. The separate sections within the Dolby section are also adjusted independently. For example, if the Dolby data indicates a 5.1 track and a stereo track, then the levels in the 6 channels of the 5.1 are adjusted up or down in order to make the loudness of the 5.1 grouping meet a target value, and the levels in the 2 channels of the stereo are also adjusted up or down to make that signal meet the loudness requirement. Therefore different adjustments are made to the stereo as compared to the adjustment made to the 5.1 data. In the case of loudness compliance, the Dolby metadata in the output file is largely unchanged, and there is no user control of this metadata. Page 37 Appendix 3. Multifiles Support In most cases, media files contain multiple audio channels within a single file. For example, an MXF file might have 16 tracks of audio, which could be split into a mixture of stereo and 5.1 groups. However sometimes material is supplied as a number of individual mono files, and two files have to be used together to create a stereo group, and six files have to be used together to create a 5.1 group. To cater for this possibility, eFF has a 'Multifile' option, selected by ticking the check box to the right of the 'Select Source' button. Note that Multifiles are only supported in eFF Comply and eFF Enterprise. With Multifile selected, eFF works in a similar way to normal, but additional dialogs appear when choosing files to analyse. EFF internally merges the files, and measures True Peak, PPM and VU for each individual file, and measures your chosen loudness parameters across the merged file. Note that if a 5.1 grouping is selected, the LFE channel is not included in any calculations of Loudness. However all six channels will be adjusted if eFF is being used to correct a file. Multifile works with WAV, AIFF and MXF-OP-ATOM files. EFF supports the following groupings of individual filesñ ñ ñ ñ ñ 4x stereo as 7.1 audio 8x mono as 7.1 audio 6x mono files for 5.1 audio 3x stereo for 5.1 audio 2x mono for stereo. Multifiles Operation To use multifiles, select the check box and click 'Select Source'. Firstly select whether the source files are WAV, AIFF or MXF-OP-ATOM, and then select the number of files to open, and how the audio should be grouped. Page 38 For 2x monos acting as stereo Load the independent left and right channel files into the appropriate box. For 3x stereos acting as 5.1 Load the files containing left and right, central and LFE, back left and back right into the appropriate box. For 6x monos acting as 5.1 Load the files containing left, right, left back, right back, central and LFE channels into the appropriate box. For 8x monos acting as 7.1 Load the files containing left, right, centre, LFE, left back, right back, left side and right side channels into the appropriate box. For 4x stereos acting as 7.1 Load the files containing left and right, centre and LFE, left back and right back, left side and right side channels into the appropriate box. Clicking 'OK' takes you to a dialog to select all the different files that you need eFF to measure. However, if the 'AutoDetect' box is selected, then a 'Configure' button appears. Selecting this displays a dialog where you define a unique string that eFF searches for in the filenames, and thereby can automatically assign files to the correct channels. The user designates a 'string' for each channel and eFF will search a folder of files for the appropriate string in the filenames, and use that file as the corresponding channel. Common practice is to number files from 0 to the maximum, or to use .L. .R. .C. .LFE. .Ls. .Rs. somewhere in the filename, and to have a '.' character before and after the unique identifier. Note that the search strings in this dialog are CASE SENSITIVE. Once these are entered, click Save. You now have to specify a folder that contains the set of files for the particular job. Note this implies that each folder can only contain the multifiles for one job. Each additional fileset must be stored in a unique folder. Once the files have been internally combined and measured, you have a couple of choices. If you have included the optional 'WAV Extract' facility, then you can create a single WAV file that contains the data from the individual files. Thus this creates multi-channel WAV files. Page 39 If you wish to loudness process the files, you must then select a destination folder. Note that eFF creates new files having the identical filenames to the original files, and therefore the new files must be written in to a new folder. When eFF processes a set of files, it always applies the identical adjustment to all channels. So to adjust the Program Loudness, identical gain or attenuation is applied to all channels. If you are using the True peak Processor, then the amount of processing is determined by the channel with the highest True Peak value, but the amount of correction required to correct that channel is also applied to all other channels. This ensures that the 3D location of a sound is not affected, as it would be if only a single channel were processed. Page 40 Appendix 4. Copyright Information Logos The Emotion Systems logo and the eFF logo, both as shown below, are trademarks of Emotion Broadcast Systems Ltd and must not be used without permission. Licenses Emotion Systems software uses libraries from the FFmpeg project under the LGPLv2.1 The eFF products include three libraries – avcodec-53.dll, avformat-53.dll and avutil-51.dll These libraries are not modified in any way by Emotion Systems. No part of the FFmpeg libraries used by Emotion Systems are owned by Emotion Systems, and Emotion Systems puts no restrictions on the use of FFmpeg libraries supplied with eFF software beyond those required by the FFmpeg project. Although Emotion Systems software is supplied under a EULA, the FFmpeg libraries are specifically excluded from this EULA. Source code for the three specified FFmpeg libraries is available on request from Emotion Systems, or can be downloaded from www.ffmpeg.org Additional information on FFmpeg may be found at http://www.ffmpeg.org/ Page 41