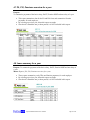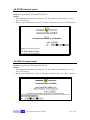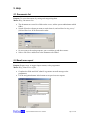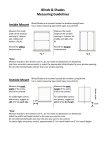
1
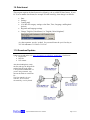
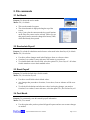
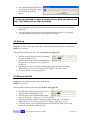
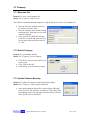
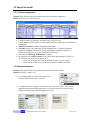
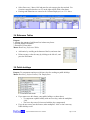
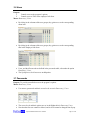
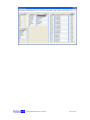
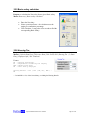
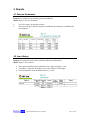
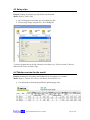
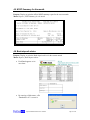
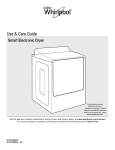
PayEasy +HR Payroll and Human Resource Management Software User Manual Version 2.01 A&A Computers Ltd, www.aacomputers.co.tz April 2009 Table of contents 1. Introduction: Payroll and HRM system............................................................................. 4 1.1 Help system ...................................................................................................................... 4 1.2 Navigation buttons ........................................................................................................... 5 1.3 Menus ............................................................................................................................... 5 1.4 Learning to use PayEasy+HR .......................................................................................... 6 1.5 If you experience problems .............................................................................................. 6 1.6 Network............................................................................................................................ 7 1.7 Multiple companies .......................................................................................................... 7 1.8 Calculations for the payroll .............................................................................................. 7 1.9 Date format....................................................................................................................... 8 2. File commands ...................................................................................................................... 9 2.1 Set Month ......................................................................................................................... 9 2.2 Recalculate Payroll........................................................................................................... 9 2.3 Reset Payroll .................................................................................................................... 9 2.4 Post Month ....................................................................................................................... 9 2.5 Back up........................................................................................................................... 10 2.6 Restore data file.............................................................................................................. 10 2.7 Company ........................................................................................................................ 11 2.7.1 Make new File......................................................................................................... 11 2.7.2 Switch Company ..................................................................................................... 11 2.7.3 Update Software Manually...................................................................................... 11 2.8 Purge............................................................................................................................... 12 Data Entry............................................................................................................................... 13 3.1 Leave adjustment............................................................................................................ 13 3.2 Loans .............................................................................................................................. 13 3.3 Payroll for month ........................................................................................................... 14 3.3.1 Contract employees ................................................................................................. 14 3.3.2 Seasonal workers..................................................................................................... 14 3.4 Reference Tables ............................................................................................................ 15 3.5 Public holidays ............................................................................................................... 15 3.6 Users............................................................................................................................... 16 3.7 Passwords ....................................................................................................................... 16 3.8 Company Info................................................................................................................. 17 3.9 SDL ................................................................................................................................ 17 Payroll and Human Resources Software Page 2 of 32 3.10 Grades and Levels ........................................................................................................ 17 3.11 Disciplinary .................................................................................................................. 19 3.12 Export Reports.............................................................................................................. 19 3.13 Employee info .............................................................................................................. 19 3.14 Picture........................................................................................................................... 20 3.15 Status ............................................................................................................................ 20 3.16 Factor............................................................................................................................ 21 3.17 Deposited...................................................................................................................... 21 3.18 Overtime....................................................................................................................... 21 3.19 Leave ............................................................................................................................ 22 3.20 PAYE ........................................................................................................................... 22 3.21 Earnings........................................................................................................................ 23 3.22 Deductions.................................................................................................................... 23 3.23 Copy Earnings and Deductions .................................................................................... 24 3.24 Pensions and insurances ............................................................................................... 24 3.25 Basic salary calculator.................................................................................................. 26 3.26 Housing Tax ................................................................................................................. 26 4. Reports ................................................................................................................................ 27 4.1 Pension Summaries ........................................................................................................ 27 4.2 Loan History................................................................................................................... 27 4.3 Salary slips ..................................................................................................................... 28 4.4 Tabular overview for the month..................................................................................... 28 4.5 NSSF Summary for the month ....................................................................................... 29 4.6 Bank deposit advise........................................................................................................ 29 4.7 P9, P10, Pensions overview for a year ........................................................................... 30 4.8 Leave summary for a year .............................................................................................. 30 4.9 PAYE bi-annual report................................................................................................... 31 4.10 SDL bi-annual report.................................................................................................... 31 5.1 Documents list................................................................................................................ 32 5.2 Email error report ........................................................................................................... 32 1. Introduction: Payroll and HRM system 1.1 Help system Context Sensitive Help: • Click on the button on forms. Help Index: • To access a help topic, choose Help | Help Index, and select the topic from the Topics list on the left. • To display a See also topic, click on the blue underlined text along the top of the PayEasy+HR Help window. • Most data fields have balloon help – place the mouse pointer on the field for it to appear: • Open the training file HRM_training.mde to see what data to enter, and what the reports look like. If you experience problems with this software, send the developer an email: select the option Help | Email Error report. • Payroll and Human Resources Software Page 4 of 32 1.2 Navigation buttons Purpose: Navigations buttons let you move between records. First record Previous record Curren t Next record Last record Number of records New record 1.3 Menus Purpose: With menus you select activities. Menu options may be greyed out and inaccessible because of: • The current month was already posted. • Your rights do not allow you access these options. A black triangle indicates that a menu has sub menus: Payroll and Human Resources Software Page 5 of 32 1.4 Learning to use PayEasy+HR Purpose: guidance in learning to use the PayEasy+HR software Menu: Help | Help Index | Starting PayEasy+HR Below are the steps to start working with PayEasy+HR. To print out the table, use Help | Help Index | Starting PayEasy+HR, and click the Print button. Tick √ when you have completed a task. # √ 1 2 3 4 5 6 7 8 9 10 11 12 13 14 15 16 17 18 19 20 21 22 23 24 25 26 27 28 Area Step See topics Learn the Program interface Move between records, make a new record Learn about the date format used Learn how to insert pictures Complete Company data Enter PAYE data Set the SDL percentage Optionally: Set salary grades and levels Enter pensions information Edit pull-down lists Select what employee tabs to see. Change password, Set up users Enter employee info View and print employee reports Start payroll Set leave balance brought forward Enter loan information Edit salaries – incomplete months, leave Edit salaries – Overtime Edit salaries – financial adjustments Check if the payroll is correct View and print salaries Post salaries Salary information for previous months Backing up Create a new company file Select another data file Set up for multi-user access Update the software Navigation buttons Date Format Picture / logo Company information PAYE SDL Grades and Levels Pensions Reference tables Tabs in Employee info (1) Passwords (2) Users, Rights Employee info Reports: Print and View (1) Reset payroll (2) Recalculate Leave adjustment Loans (1) Factor (2) Leave Overtime (1) Deductions (2) Earnings (3) Deposited Tabular overview for the month (1) Reports: Print and View (2) Export reports Post Month Set month Backup, Restore Make a new company file Link to Data file Network Download Updates Preparation of the program: Configuration Employee information Payroll processing Maintenance 1.5 If you experience problems If the software produces errors: • • • Choose to see the answers to Frequently Asked Questions: Help | Help Index | FAQ1, FAQ2 Choose Help | Email Error Report. See section 5.2 for instructions. Send an email to [email protected] and ask for assistance. Payroll and Human Resources Software Page 6 of 32 1.6 Network The software can be used stand-alone, or multi-user on a network. To make it multi user: • Use the Windows Explorer to copy your HRM_be.mde file to a shared drive. • Link to it using File | Company | Switch company. CAUTION: Copy the HRM_be.mde file, but do not move it. This would make it impossible for the software to start up. The software can be used stand-alone, or multiuser on a network. 1.7 Multiple companies The software can be used for multiple companies. To do this, make data files for each company, and switch between them, as described in sections 2.7.2 1.8 Calculations for the payroll This is the algorithm used in calculating payroll values: Calculate Overtime BasicPerHour = Basic / Hours in month TotalOverTime = OT rate11-4 * OT hours11-4 * BasicPerHour Calculate Gross Gross = Factor * Basic + TotalOverTime + Earnings Taxable - Deductions Taxable Calculate Pension PensionBase = Basic for ZSSF, Gross for all others. Pension Employee = EmployeePercentage * PensionBase Pension Employer = EmployerPercentage * PensionBase Calculate Taxable Taxable = Gross - Pension Employee + Housing Taxable + Loan Taxable Calculate PAYE PAYE = Offset + Percentage * (Taxable - LowValue) Calculate Take Home Take Home = Gross - Pension Employee - PAYE - DeductForLoan – Deductions + Earnings Payroll and Human Resources Software Page 7 of 32 1.9 Date format This program requires the date format to be dd/mm/yy, the so-called UK date format. If your PC is set to another date format, for example US with mm/dd/yy, then change it as follows: • • • • • • Start Settings Control panel (if in Win XP category settings: select Date, Time, Language, and Regional options) Regional and Language settings Change "English (United States)" to "English (United kingdom)" As a date separator, use the / symbol. So you would enter the year’s last day as 31/12/06 and not as 31.12.06 or 31-12-06. 1.10 Download Updates Updates are posted on the web: www.aacomputers.co.tz/PayEasy_updates.htm. The files are: • Program file • Help file • User manual After downloading them, unzip the files and copy the Program file and the Help file to the folder C:\Program Files\HRM 2008. If you are using a network, copy them to this folder on each client PC. The User manual is for you reference, to be accessed electronically, or to be printed. Payroll and Human Resources Software Page 8 of 32 2. File commands 2.1 Set Month Purpose: To choose the active month. Menu: File | Set Month • • • This sets the month for reports. The selected month is displayed along the top of the screen. Only if you select the current month, the payroll options on the Data Entry menu can be selected. Below you see that payroll entries cannot be changed for January 2008, which had already been posted. 2.2 Recalculate Payroll Purpose: To refresh all calculations and reference values used in the form Payroll for Month. Menu: File | Recalculate • • • Use this to reflect changes made in the Employee form, or reference values. Overtime, Leave taken, Loan or Advance will remain as you set them. To reload default values for all fields, select the option File | Reset Payroll. All values for this month are reset to their standard values. 2.3 Reset Payroll Purpose: To load the default values for this month. Menu: File | Recalculate Payroll. • • • Use this to set all fields to their default values. Any changes that you made to Overtime, Leave taken, Loan or Advance will be reset to zero To refresh all calculations and reference values, but keeping changes you made to Overtime, Leave taken, Loan or Advance, select the option File | Recalculate Payroll. 2.4 Post Month Purpose: To permanently store this month's payroll information. Menu: File | Post month • Use this option after you have printed all payroll reports and are sure no more changes are needed. Payroll and Human Resources Software Page 9 of 32 • After posting the payroll, that data can no longer be changed! Unless you made a backup prior to posting: It is strongly advised to make a backup of your data just before you post. This allows you to undo a posting! • • After posting the payroll, the payroll information for the next month is automatically initialized. You may return to the reports of previous months with the option File | Set Month. You cannot change payroll values while in previous months. 2.5 Back up Purpose: To make a spare copy of the data. Before backing up, the data file is compressed. Menu: File | Back up Caution: Before backing up, make sure that all users are logged off! • • • • The data is stored in the back-end, its standard file name is HRM_be.mde. The File name, Source and destination paths are set in Data entry | Reference files | Tab: Back up, Reports. The backup file receives a suffix consisting of the date and time, for example: HRM_080126_1135.mde was created on 26th January, 2008, at 11:35 hrs. To restore the file, see the section below. 2.6 Restore data file Purpose: To return data of a previously made backup. Menu: File | Restore Caution: Before restoring, make sure that all users are logged off! • • • • The data that is used by the software is stored in the back-end, called HRM_be.mde The File name, Source and Destination paths are set in Data entry – Reference files – Tab: Back up The backup files have suffixes consisting of the date and time. For example: HRM_080126_1135.mde was created on 26th January, 2008, at 11:35 hrs. To restore the file, use the Window Explorer to delete the file HRM_be.mde, and rename the backup file to HRM_be.mde Payroll and Human Resources Software Page 10 of 32 2.7 Company 2.7.1 Make new File Purpose: To create a new company file. Menu: File | Company | Make new file This software can handle multiple companies. Only the Sysop can create a new company file. • • • Enter the file name, without extension – the software will add “.mde”. Enter the company name, and the starting month and year. Note that once set, these cannot be changed. After you click on “Make file and open it” the file is created, and opened for you. Its user name and password are both set to ‘1234’. 2.7.2 Switch Company Purpose: To open another data file. Menu: File | Company | Switch Company • • • Click Browse and select the data file you want to open Click “Link to data file” After linking, you will need to re-logon. 2.7.3 Update Software Manually Purpose: To update file structures needed by the latest update. Menu: File | Company | Update Software Manually • After downloading the update files, when PayEasy+HR opens for the first time, file structures are adjusted. If for some reason this updating process was interrupted, restart PayEasy+HR and select Update Software Manually. Payroll and Human Resources Software Page 11 of 32 2.8 Purge Purpose: To remove old records from the data file, thereby reducing its size. Menu: File | Purge Caution: Before Purging data, make a back-up! • All records with dates ending in the year you selected will be erased when you click on Purge. Payroll and Human Resources Software Page 12 of 32 Data Entry 3.1 Leave adjustment Purpose: To change the stored values for Leave brought forward. Menu: Data entry | Leave Adjustment • Adjust leave to: o Set balances when starting the payroll system. o Make corrections. 3.2 Loans Purposes: 1. To record loans issued, and their monthly deductions. 2. To adjust recorded loans. Menu: Data entry | Loans • • • The Issue date must be in the current month. The Monthly Amount is calculated as Loan Amount / Terms. The Monthly Amount is shown in Data Entry | Payroll for Month, and can be edited. • To adjust a loan, select an Employee who has a loan running. Answer Yes when asked • Enter a negative or positive amount with which to adjust: Payroll and Human Resources Software Page 13 of 32 3.3 Payroll for month 3.3.1 Contract employees Purpose: Edit entries in the active month's payroll for the contract employees. Menu: Data Entry | Payroll for month. • • • • • • To add or remove an employee, use Data Entry | Employee info. Use the factor field for employees who worked less than a month: upon recruitment or termination. Annual Leave taken: enter the days taken in the month. Overtime: select a rate, and hours for that month and rate. The hourly overtime amount is calculated from the basic salary and the hours worked per month., as entered in the Employee info form, Employment details tab. Select and edit Earnings, Deductions as required. By default, the first bank account receives the full take home amount. If there is a second bank, you may enter an amount in it. o Once posted, the payroll cannot be updated anymore, see Post month. o In the bottom of the screen results for the selected employee are shown. 3.3.2 Seasonal workers Purpose: Edit entries in the active month's payroll for the seasonal workers. Menus: Data Entry | Muster roll. • To set employment as Casual, select Data entry | Employee Info and set Type to “Casual”. • To define the Casual categories, select Data entry | Reference Data | Tab: Casuals and define their names and payment rates. In the same screen you can also set the number of working days, and working hours per day. Payroll and Human Resources Software Page 14 of 32 • • Select Data entry | Muster Roll and enter for each category the days worked. For Overtime categories that have an ‘H’ on the right of their fields, enter hours. Earnings and deductions are entered as for Contract Employees, see 3.3.1 above. 3.4 Reference Tables Purpose: 1. Manage the contents of pull-down lists in data entry forms. 2. Record default information. 3. Record PAYE tax tables. Menu: Data Entry | Reference Tables • • Add entries by scrolling to the bottom of the list, and enter data. Delete an entry: select the entry by clicking to the left of it, and press the Del button. 3.5 Public holidays Purpose: To compensate employees with leave days for working on public holidays Menu: Date Entry | Reference data | Tab: Employment • • If you want to use this feature, enter public holidays as shown above o To compensate a public holiday with one leave day, make the multipliers ‘1.00’ o The leave days earned is increased with the days compensated. If you do not want to use this feature, make multipliers ‘0.00’ or don’t enter any Public holidays at all. Payroll and Human Resources Software Page 15 of 32 3.6 Users Purpose: 1. Control access to the program’s options. 2. Control access to Tabs in the employee Info form. Menu: Data entry | Users • By ticking in the columns of the user groups, they gain access to the corresponding menu item. • By ticking in the columns of the user groups, they gain access to the corresponding tabs in the Employee Info form. • Users, and their Passwords are defined in the passwords table, also under the option Data Entry | Users The SysOp access level has access to all options. • 3.7 Passwords Purpose: To provide controlled access to the program’s options. Menu: Data entry | Users • User names, passwords and their access levels are set in Data entry | Users. • • The access levels and their options are set in the Rights table in Data entry Users. Note that the first user cannot be deleted, and its level cannot be changed from Sysop. Payroll and Human Resources Software Page 16 of 32 3.8 Company Info Purpose: To enter company information that is used in report headers. Menu: Data entry | Reference Data | Tab: Company. • • Add a logo: look for help under Picture / Logo Note that the name of the organization cannot be changed. 3.9 SDL Purpose: To set the SDL percentage Menu: Data Entry | Reference Data | Tab: PAYE, SDL • Set SDL to the percentage required: • If your company is exempted, set the SDL percentage to zero. 3.10 Grades and Levels Purpose: Grades and levels allow using salary scales. Menus: 1. Defined in Data Entry | Reference Tables | Tab: Grades, Level Salaries. 2. Used in Data Entry | Employee Info | Tab: Employment Details. The salaries are based on a matrix of Grades and Levels as shown below: Main levels → Levels → Grades ↓ 1 2 3 etc Management Executive Management Junior Management Operations Senior Operations Junior Operations Support Skilled Support Unskilled support Basic salaries are entered here You can name the Grades, Main levels and Levels. Basic Salaries are entered in the table Grade | Level | Basic Salary. Payroll and Human Resources Software Page 17 of 32 Payroll and Human Resources Software Page 18 of 32 3.11 Disciplinary Purpose: To record misconducts of employees, and their consequences Menus: 1. Defined in Data Entry | Reference Tables | Tab: Disciplinary 2. Used in Data Entry | Employee Info | Tab: Disciplinary. 3.12 Export Reports Purpose: To export reports to Excel for further processing. Menu: Data Entry | Reference data | Tab: Folders • • Almost all reports are automatically exported to a folder of your choice, whenever you open them. The file name and path is displayed at the top of the screen: • • The previous copy, if any, will be overwritten, unless you renamed it. To set the export folder, use Data Entry | Reference data | Folders. 3.13 Employee info Purpose: 1. To enter employees' information for reference. 2. To supply information for payroll and HRM reports. 3. To track employees' information over time. Menus: 1. Data entry | Employee Info 2. Define entries in pull down fields: Data Entry | Reference tables. Payroll and Human Resources Software Page 19 of 32 • To attach reports, click on the blue arrows and browse to the target document. • To add a photograph see section 3.14. 3.14 Picture Purpose: Paste pictures and logo into forms. Menu: (1) Data Entry | Employee Info | Tab: Personal (2) Data Entry | Reference Data | Tab: Company) Pictures / graphics are set in two places: • Employee’s photograph. o The employee photograph is used in the report “Employee Info sheets”. o To add a photograph: Copy (CTRL+C) a jpg file with photograph of approximately 100x 120 pixels. Select the picture box, and paste (CTRL+V) it. • Organization’s logo. o The logo is printed at the top of all reports. o To add a logo: Copy (CTRL+C) a jpg file with logo of approximately 100x 500 pixels. Select the picture box, and paste (CTRL+V) it. 3.15 Status • The Status field captures the current employee status in Data entry | Employee info: • Edit the status fields in Data Entry | Reference table | Employee info. The active tick box indicates whether an employee is included in the payroll, and receives salary. Payroll and Human Resources Software Page 20 of 32 3.16 Factor Purpose: 1. The factor allows you to issue only a fraction of the monthly salary. Factor affects the basic salary, and leave earned values. 2. Used to yield the effective days worked for casual workers. Menu: Data Entry | Employee Info This factor is always set to ‘1.0000’ except: • When employment started or ended during the month, so that Factor can be entered as a fraction representing the days employed in that month. If an employee starts working on June 17th, then Factor = (30-17) / 30 = 0.4333 • When an employee has been on sick leave for more than 60 days, and the basic salary is reduced with 50% • For casual workers. 3.17 Deposited Purpose: To select on what account what amount should be deposited. Menu: Data Entry | Employee Info • • The deposited amount for the first bank account is calculated to be equal to the Take Home amount. If there’s a second account, you may choose to enter here the whole amount or part of it. The other account’s amount is reduced so that the total remains equal to the take home amount. 3.18 Overtime Purpose: 1. Configure the overtime types and their rates 2. Set overtime for employees, for the month Menu: 1. Data Entry | Employee Info 2. Data entry | Reference tables | Tab: Financial • • • • Overtime is calculated as Rate x hours x (basic salary/hour) The rates are selected in the Payroll for month form. The hours are entered there also. The basic salary per hour information is entered in Data Entry | Employee info – Employment details. Basic salary follows from Grade and Employment level; Hours from Hours per month: The rates are entered in Data entry | Reference tables | Tab: Financial. Payroll and Human Resources Software Page 21 of 32 3.19 Leave Purpose: To record employee Annual Leave. Menu: Data entry | Payroll for month | Field: Leave • Annual leave taken: the number of leave days taken in the current month is entered here. The summary shows: • • • Brought forward: leave brought forward from the previous month. This value can be changed through Data entry | Leave adjustment. Earned: value entered under Data Entry | Employee info | Employment details. Carried forward: leave carried forward to the next month. 3.20 PAYE Purpose: Select, or add a new PAYE table Menu: Data Entry | Reference tables | Tab: PAYE, SDL The Pay-As-You-Earn deduction is calculated from a table, updated every other year or so by the TRA. Give each table a name (in the example above: “2004”) and enter for each income band the Minimum, Maximum and Percentage, found on page one of the PAYE booklet. Offset is calculated. • Select the table that is currently used in the payroll: Payroll and Human Resources Software Page 22 of 32 3.21 Earnings Purpose: To define and use employee earnings. Menus: (1) Data Entry | Reference Data | Earnings and Deductions (2) Data entry | Employee Info | Tab: Employment details (3) Data entry | Payroll for month • Define the Earnings in Data Entry | Reference Data | Earnings and Deductions • • • The name of the Earning is set in the column Earnings. Tick ‘recurrent’ if the earning should be added each month. In the type column, indicate if the quantity of the next column is either % of the basic salary, % on Gross salary, a fixed value in TZS, or a number of days. Tick Taxed if the Earning is taxable. Note that % on Gross can not be taxed. • • To set a recurrent earning for an employee, select Data entry | Employee Info | Tab: Employment details: • In Data entry | Payroll for month you can adjust recurrent Earnings and add other Earnings. 3.22 Deductions Purpose: Define and use employee deductions. Menus: (1) Data Entry | Reference data | Earnings and deductions (2) Data entry | Employee Info | Tab: Employment details (3) Data entry | Payroll for month Define employee Deductions with Data Entry | Reference data | Earnings and deductions • • The name of the Deduction is set in the column Deductions. Tick ‘recurrent’ if the Deduction should be added each month. Payroll and Human Resources Software Page 23 of 32 • • In the type column, indicate if the quantity of the next column is either % of the basic salary, % on gross salary, a fixed value in TZS, or a number of days. Tick Taxed if the Deduction is taxable. Note that % on Gross can not be taxed. • To set a recurrent Deduction for an employee, select Data entry | Employee Info | Tab: Employment details: • In Data entry | Payroll for month you can adjust recurrent Deductions and add other Deductions. 3.23 Copy Earnings and Deductions Purpose: To copy the Earnings and Deductions of the previous month. Menu: Date Entry | Reference data | Tab: Earnings, Deductions • • Earnings and Deductions are automatically entered on these options: o Post month o Reset payroll When the tick box Copy Earnings and Deductions has been: o Ticked, Earnings and Deductions of the previous month are literally copied to the current month. Any calculations as configured in the Earnings and Deductions are not considered. o Un-ticked, only the recurrent Earnings and Deductions are entered, and amounts are calculated as configured. 3.24 Pensions and insurances Purpose: To define pensions and insurances Menu: 1. Data Entry | Reference data | Tab: Pension, Insurance 2. Data Entry | Employee data | Tab: Financial • Pensions are defined in Data Entry | Reference data | Tab: Pension, Insurance Payroll and Human Resources Software Page 24 of 32 • NSSF and PPF are based on the Gross Salary, unless you tick the On Basic box. Zanzibar pensions are based on the Basic Salary. Pensions are not taxed (refer to Income Tax Act 2006 Section 61 Sub-sections 1 & 2) • Enter pension and insurance information for employees in Data Entry | Employee data | Tab: Financial. Select Fixed Amount for employees who contribute pensions abroad. • These pension reports are available: o Official NSSF monthly report: Reports | Pensions | NSSF summary for the month o Pension summaries: Reports | Pensions | Pension summaries o Monthly pensions paid: Reports | Tabular overview for the month o Yearly pensions paid: Reports | P9, P10, Pension summary for a year • To produce a report, select Reports – Pensions – Pension Receipts NSSF or Pension receipts All Select the employee, and then run the report • • Payroll and Human Resources Software Page 25 of 32 3.25 Basic salary calculator Purpose: to calculate the Net salary from a given Basic salary Menu: Data entry | Basic salary calculator. • • • Enter the Net salary Select a pension scheme – the calculator uses the employee contribution percentage. Click Calculate. It may take a few seconds to find the corresponding Basic Salary. 3.26 Housing Tax Purpose: Calculate the Housing benefit Menus: (1) Set in Data Entry | Reference Data | Tab: PAYE, SDL | Housing Tax (2) Data Entry | Employee Info | Tab: Financial Factors: BP EC MVR RP = = = = Benefit Percentage* Expenditure Claimed by the Company Market Value Rent Rent Paid by Employee Housing Benefit = min ( max ( BP, EC), MVR ) RP * In 2008 BP is 15% of the Gross Salary, excluding the Housing Benefit Payroll and Human Resources Software Page 26 of 32 4. Reports 4.1 Pension Summaries Purpose: To summarize the monthly pension contributions Menu: Reports | Pension Summaries • • You select reports by pension provider. The report lists gross salaries, employee contribution and employer contribution for each employee. 4.2 Loan History Purpose: To summarize loans issued, and their deductions and balances. Menu: Reports | Loan History • • • This report summarizes loans information, for a single employee, or all. To produce a report for all employees, leave the Employee field empty. Loan information is entered under Data Entry | Loans. Payroll and Human Resources Software Page 27 of 32 4.3 Salary slips Purpose: Display or print the pay slips for the current month. Menu: Reports | Salary Slips • • By selecting previous months, you can reprint pay slips. Print a range of slips using the File | Print dialog box To print a signature box in the slip’s bottom, select Data entry | Reference data | Financial and tick Print Footer on Salary Slips. 4.4 Tabular overview for the month Purpose: Summarizes all earnings and deductions for all employees in a month. Menu: Reports | Tabular Overview for the Month | Detailed Overview • Use this report to check the payroll before producing pay slips. Payroll and Human Resources Software Page 28 of 32 4.5 NSSF Summary for the month Purpose: Display or print the official NSSF summary report for the current month. Menu: Reports | NSSF Summary for the month 4.6 Bank deposit advise Purpose: Display or print the Bank deposit advice for the current month. Menu: Reports | Bank deposit advise • Each Bank appears on its own sheet. • By entering a folder name, a file “Bankadvise.xls” is sent to it. Payroll and Human Resources Software Page 29 of 32 4.7 P9, P10, Pensions overview for a year Purpose: To summarize payments of the basic salary, PAYE, Pension NSSF and net salary of a year. • • • This report summarizes data for the P9 and P10 form, and summarizes Pension payments, for each employee. By selecting a previous year, historical reports are made. Note that if a month has not yet been posted, it is NOT included in this report. 4.8 Leave summary for a year Purpose: To summarize payments of the basic salary, PAYE, Pension NSSF and net salary of a year. Menu: Reports | P9, P10, Pensions overview for a year • • • These reports summarize yearly TRA and Pension payments, for each employee. By selecting a previous year, historical reports are made. Note that if a month has not yet been posted, it is NOT included in this report. Payroll and Human Resources Software Page 30 of 32 4.9 PAYE bi-annual report Purpose: to generate the TRA report ITX215.01.E Menus: 1. Enter information for this form in Reports | P9, P10, Summary information for a year | Info for TRA forms 2. Run the report with Reports | P9, P10, Summary information for a year | PAYE statement 4.10 SDL bi-annual report Purpose: to generate the TRA report ITX220.01.E Menus: 1. Enter information for this form in Reports | P9, P10, Summary information for a year | Info for TRA forms. 2. Run the report with Reports | P9, P10, Summary information for a year | SDL statement. Payroll and Human Resources Software Page 31 of 32 5. Help 5.1 Documents list Purpose: To access documents, by sorting and categorizing them. Menu: Help | Documents List • • • • The documents are stored in a folder on the server, ask the system administrator which folder. Search: Select the column you want to search items in, and set Match to Any part of field and Search to All for best search results: No sort: remove the sorting sequence you set with the up and down arrows. Select: click Select and browse to the document to be linked. 5.2 Email error report Purpose: Report errors, or suggest improvements, to the programmer. Menu: Help | Email Error report • • Complete the fields and click "submit" to generate an email message to the programmer. Use the navigation buttons in the bottom to see previous error reports. Payroll and Human Resources Software Page 32 of 32