1
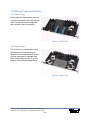
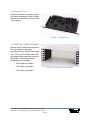
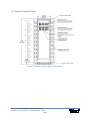
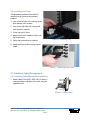
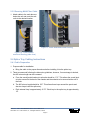
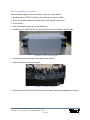
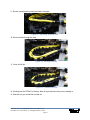
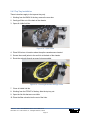
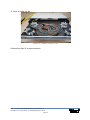
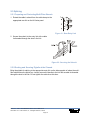
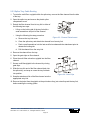
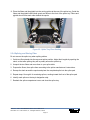
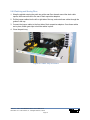
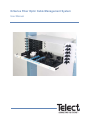
N-Series Fiber Optic Cable Management System
User Manual
N-Series Fiber Optic Cable Management System
User Manual, Part Number 138727
Copyright 2010, Telect, Inc., All Rights Reserved
Telect and Connecting the Future are registered trademarks of Telect, Inc.
1730 N Madson St., Liberty Lake, Washington
Telect assumes no liability from the application or use of these products. Neither does Telect convey any
license under its patent rights nor the patent rights of others. This document and the products described
herein are subject to change without notice.
About Telect
Telect offers complete solutions for physical layer connectivity, power, equipment housing and other
network infrastructure equipment. From outside plant and central office to inside the home, Telect draws on
more than 25 years of experience to deliver leading edge product and service solutions. Telect is
committed to providing superior customer service and is capable of meeting the dynamic demands of
customer and industry requirements. This commitment to customer and industry excellence has positioned
Telect as a leading connectivity and power solution provider for the global communications industry.
Technical Support
E-mail: [email protected]
Phone: 888-821-4856 or 509-921-6161
Telect, Inc. • USA +1.509.926.6000 • Mexico +52.33.3836.37.52
www.telect.com • © 2010 Telect, Inc., All Rights Reserved, 138727
Page ii
N-Series Fiber Optic Cable Management System
User Manual Table of Contents
Chapter 1: Description ................................................................................................. 1
1.1 Overview .......................................................................................................................... 1
1.2 N-Series Trays and Chassis ............................................................................................ 2
1.2.1 Patch Trays ............................................................................................................. 2
1.2.2 Splice Trays ............................................................................................................ 2
1.2.3 Storage Trays .......................................................................................................... 3
1.3 N-Series Flexible Chassis ................................................................................................ 3
1.4. System Specifications ..................................................................................................... 4
1.4.1 Mechanical .............................................................................................................. 5
1.4.3 Environmental Specifications .................................................................................. 5
Chapter 2: Installation .................................................................................................. 7
2.1 Installation Considerations ............................................................................................... 7
2.1.1 Inspection ................................................................................................................ 7
2.2 Installing Trays ................................................................................................................. 7
2.2.1 Rack-Mounting the N-Series Chassis ..................................................................... 7
2.2.2 Installing the Trays .................................................................................................. 8
2.3 Installing Cable Management .......................................................................................... 8
2.3.1 Installing Cable Management Hardware ................................................................. 8
2.3.2 Securing Multi-Fiber Cable ...................................................................................... 9
2.4 Splice Tray Cabling Instructions ....................................................................................... 9
2.4.1 Cable Preparation ................................................................................................... 9
2.4.2 Tray Cabling Instructions ...................................................................................... 10
2.4.3 Top Tray Installation .............................................................................................. 13
2.5 Splicing .......................................................................................................................... 15
2.5.1 Preparing and Protecting Multi-Fiber Strands ....................................................... 15
2.5.2 Routing and Securing Pigtails at the Chassis ....................................................... 15
2.5.3 Splice Tray Cable Routing .................................................................................... 16
2.5.4 Splicing and Storing Fiber ..................................................................................... 17
2.6 Patching ......................................................................................................................... 18
2.6.1 Patch Tray Cable Routing ..................................................................................... 18
2.6.2 Patching and Storing Fiber .................................................................................... 19
2.7 Storing Cables ............................................................................................................... 20
Telect, Inc. • USA +1.509.926.6000 • Mexico +52.33.3836.37.52
www.telect.com • © 2010 Telect, Inc., All Rights Reserved, 138727
Page i
Chapter 3: Service ...................................................................................................... 21
3.1 Owner Maintenance ....................................................................................................... 21
3.2 Technical Support .......................................................................................................... 21
3.3 In-Warranty Service ....................................................................................................... 21
3.4 Out of Warranty Service ................................................................................................. 21
3.5 Repacking for Shipment ................................................................................................. 22
List of Figures
Chapter 1: Description .................................................................................................. 1
Figure 1 - Patch Tray ................................................................................................................... 2
Figure 2 - Splice Tray ................................................................................................................... 2
Figure 3 - Storage Tray ................................................................................................................ 3
Figure 4 - N-Series Chassis (4RU) .............................................................................................. 3
Figure 5 - Sample N-Series Bay Configuration ............................................................................ 4
Chapter 2: Installation .................................................................................................. 7
Figure 6 - Installing Tray .............................................................................................................. 8
Figure 7 - Attaching Rear Links ................................................................................................... 8
Figure 8 - Cable Clamp ................................................................................................................ 8
Figure 9 - Cable Attachment and Routing .................................................................................... 9
Figure 10 - Cable Attachment and Routing (side view) ............................................................... 9
Figure 11 - Back Cover of Bay ................................................................................................... 10
Figure 12 - Open Link Lids ......................................................................................................... 10
Figure 13 - Securing Jacket to Link ........................................................................................... 11
Figure 14 - Routing Subunits ..................................................................................................... 11
Figure 15 - Closed Link Lids ...................................................................................................... 11
Figure 16 - Securing Fiber at Exit .............................................................................................. 12
Figure 17 - Lid on Splice Cassette ............................................................................................. 12
Figure 18 - Open Links .............................................................................................................. 13
Figure 19 - Routing Subunits through Links ............................................................................... 13
Figure 20 - Cables in Splice Tray................................................................................................ 14
Figure 21 - Rear Entry Link ........................................................................................................ 15
Figure 22 - Securing the Subunit ............................................................................................... 15
Figure 23 - Channel Detachment ............................................................................................... 16
Figure 24 - Gate Clips ................................................................................................................ 16
Figure 25 - Splice Tray Fiber Routing ........................................................................................ 17
Figure 26 - Channel Detachment ............................................................................................... 18
Figure 27 - Gate Clips ................................................................................................................ 18
Figure 28 - Patch Tray in Chassis .............................................................................................. 19
Figure 29 - Storage Tray in Chassis .......................................................................................... 20
Telect, Inc. • USA +1.509.926.6000 • Mexico +52.33.3836.37.52
www.telect.com • © 2010 Telect, Inc., All Rights Reserved, 138727
Page ii
Chapter 1: Description
N-Series Fiber Optic Cable Management System
1.1 Overview
N-Series is an advanced, integrated fiber optic cable management system. It provides a central
location for fiber splicing, patching, and storage. It includes a chassis, one or more trays, and
accessories. N-Series is designed for a 19” or 23” equipment racks and can accommodate
central office, outside plant, and customer premise environments.
N-Series is a completely integrated system. Depending on the configuration you order, it can
include
•
network frame relay racks and accessories
•
three types of chassis
•
three types of trays: patch, splice and storage
•
routing and protection hardware for fiber cable
•
multifiber cable assemblies, and 2mm or 3mm fiber cable assemblies
N-Series chassis come in three sizes: singe-tray, four-tray, and six-tray configurations. Each
metal chassis includes a rear access door, spring-loaded door latches, cable management
hardware, and mounting screw.
The following are the three types of trays that can be placed in the N-Series chassis:
•
Splice
− rear access - IFC and pigtails enter tray from rear
− left rear/right front
− combination right rear/left front - IFC and pigtails enter trays from front and rear
•
Patch
•
Storage
Each plastic tray includes provision for slack cable, cable management hardware, designation
strips, and warning labels.
Telect, Inc. • USA +1.509.926.6000 • Mexico +52.33.3836.37.52
www.telect.com • © 2010 Telect, Inc., All Rights Reserved, 138727
Page 1
1.2 N-Series Trays and Chassis
1.2.1 Patch Trays
Pre-configured N-Series patch trays help
to minimize installation time and manage
cable. All standard network capacities
and connector types are available.
Figure 1 - Patch Tray
1.2.2 Splice Trays
The N-Series line includes splice trays
(with heat-shrink fusion splices) for
applications where patches and splices
must be segregated in separate trays.
Fiber counts range includes 12 and 24
fibers to match standard applications.
Figure 2 - Splice Tray
Telect, Inc. • USA +1.509.926.6000 • Mexico +52.33.3836.37.52
www.telect.com • © 2010 Telect, Inc., All Rights Reserved, 138727
Page 2
1.2.3 Storage Trays
Engineered to hold the excessive patch
cord length increasingly found in today’s
network racks, each tray stores up to 24
3-mm jumpers.
Figure 3 - Storage Tray
1.3 N-Series Flexible Chassis
Telect N-Series Chassis are designed to
offer the ultimate in high cable
termination density. Chassis sizes range
from 1 RU to 4 RU (19-inch width) to fit
any capacity requirement and maximize
rack space. The following chassis
configurations are available:
•
4 RU high/6-tray chassis
•
3 RU high/4-tray chassis
•
1 RU high/1-tray chassis
Figure 4 - N-Series Chassis (4RU)
Telect, Inc. • USA +1.509.926.6000 • Mexico +52.33.3836.37.52
www.telect.com • © 2010 Telect, Inc., All Rights Reserved, 138727
Page 3
1.4. System Specifications
Figure 5 - Sample N-Series Bay Configuration
Telect, Inc. • USA +1.509.926.6000 • Mexico +52.33.3836.37.52
www.telect.com • © 2010 Telect, Inc., All Rights Reserved, 138727
Page 4
1.4.1 Mechanical
1.4.1.1 Dimensions
4 RU Chassis:
19" W x 7" H x 10.4" D
483 mm W x 178 mm H x 264 mm D
3 RU Chassis:
19" W x 5.25" H x 10.4" D
483 mm W x 133 mm H x 264 mm D
1 RU Chassis:
19" W x 1.75" H x 10.4" D
483 mm W x 44 mm H x 264 mm D
Minimum bend radius:
30 mm throughout system
Laser radiation protection:
Adapter location prevents exposure
1.4.1.2 Connections
Termination count: Up to 144 per chassis
Termination type:
SC/UPC, SC/APC, FC/UPC, LC/UPC
Supported multifiber cables: IFC
Supported patch cables:
Simplex or duplex, 2.0 mm (recommended), 3.0 mm
1.4.3 Environmental Specifications
Humidity
Temperature
0 to 90%, non-condensing
-5 to 55 degrees C
Telect, Inc. • USA +1.509.926.6000 • Mexico +52.33.3836.37.52
www.telect.com • © 2010 Telect, Inc., All Rights Reserved, 138727
Page 5
This page intentionally left blank.
Telect, Inc. • USA +1.509.926.6000 • Mexico +52.33.3836.37.52
www.telect.com • © 2010 Telect, Inc., All Rights Reserved, 138727
Page 6
Chapter 2: Installation
N-Series Fiber Optic Cable Management System
2.1 Installation Considerations
These installation procedures address patch trays in the rear access and front/rear access
configurations.
Each chassis comes with a 19” or 23” rack-mount bracket with fiber routing components installed
and the necessary screws for mounting.
The following equipment is required for installation:
•
fiber cable preparation tools and materials
•
screwdrivers
•
test set
2.1.1 Inspection
Compare the contents of the N-Series shipping container with the packing list to ensure all of the
components are there. Contact Telect or your supplier if anything is missing: 1-800-551-4567 or
[email protected].
Telect is not liable for shipping damage. If the shipping container is damaged, keep it for the
carrier’s inspection. Notify the carrier.
Keep the container until you have checked equipment operation. If you experience any problems,
contact Telect at the number or e-mail above.
2.2 Installing Trays
2.2.1 Rack-Mounting the N-Series Chassis
1. If possible, mount the chassis intended for splicing between 20” and 50” from the floor for
easy access and central location.
2. Mount the chassis to the rack with four 12-24 mounting screws.
Telect, Inc. • USA +1.509.926.6000 • Mexico +52.33.3836.37.52
www.telect.com • © 2010 Telect, Inc., All Rights Reserved, 138727
Page 7
2.2.2 Installing the Trays
This procedure provides instructions for
chassis that do not have trays already
installed.
1. Line up the left side of the left tray guide
with channel in the chassis.
2. Line up the right side of the tray-guide
with channel in chassis
3. Close tray until it clicks.
4. Attach front links if installed to fiber routing components.
Figure 6 - Installing Tray
5. Open rear access door on chassis.
6. Attach rear links to fiber routing components.
Figure 7 - Attaching Rear Links
2.3 Installing Cable Management
1. Attach clamp (Part # 027-1000-1001) to either a
mounting flange or directly to the rack using the
supplied screw.
Cable
Clamp
Cable
2.3.1 Installing Cable Management Hardware
Rack
Figure 8 - Cable Clamp
Telect, Inc. • USA +1.509.926.6000 • Mexico +52.33.3836.37.52
www.telect.com • © 2010 Telect, Inc., All Rights Reserved, 138727
Page 8
2.3.2 Securing Multi-Fiber Cable
1. Attach cable to the rack above or
below the unit and route the subunits to the desired location.
Figure 9 - Cable Attachment and Routing
Figure 10 - Cable Attachment and Routing (side view)
2.4 Splice Tray Cabling Instructions
2.4.1 Cable Preparation
1. Prepare cable for installation.
a. Bring the cable to the proper dimensions before installing it into the splice tray.
2. Telect recommends following the dimension guidelines; however, if more storage is desired,
the 900 micron length can be increased.
a. From the overall jacket breakout to subunits should be 17.5”. This allows the overall jacket to be secured to the back of the chassis and the subunits to be secured at the exit of
the links.
b. The 900 micron length should be 105”. This allows three loops around the spools and
also two loops inside the splice tray.
c. Each external loop is approximately 15.75”. Each loop in the splice tray is approximately
18”.
Telect, Inc. • USA +1.509.926.6000 • Mexico +52.33.3836.37.52
www.telect.com • © 2010 Telect, Inc., All Rights Reserved, 138727
Page 9
2.4.2 Tray Cabling Instructions
These instructions apply to all trays except the top tray in each chassis.
1. Working from the FRONT of the bay, open the tray you intend to cable.
2. Remove the splice cassettes from the tray by removing the center screw.
3. Close the tray.
4. Slide all trays above the tray you are cabling out.
5. Working from the BACK of the bay, remove back cover from chassis to expose links.
Figure 11 - Back Cover of Bay
6. Push all links from above trays to the sides of the chassis.
7. Open all link lids on the incoming path.
Figure 12 - Open Link Lids
8. Place the coiled 900 micron fiber in the area from where the splice cassettes were removed.
Telect, Inc. • USA +1.509.926.6000 • Mexico +52.33.3836.37.52
www.telect.com • © 2010 Telect, Inc., All Rights Reserved, 138727
Page 10
9. Secure overall jacket to end link at back of chassis.
Figure 13 - Securing Jacket to Link
10. Route subunits through the links.
Figure 14 - Routing Subunits
11. Close all link lids.
Figure 15 - Closed Link Lids
12. Working from the FRONT of the bay, slide all trays above the tray you are cabling in.
13. Slide the tray you would like to cable out.
Telect, Inc. • USA +1.509.926.6000 • Mexico +52.33.3836.37.52
www.telect.com • © 2010 Telect, Inc., All Rights Reserved, 138727
Page 11
14. Secure the fiber at the exit of links.
Figure 16 - Securing Fiber at Exit
15. Place first splice cassette in chassis.
16. Wind fibers #1 - 12 around the storage spools.
17. Enter the splice cassette and secure fibers to cassette with tie.
18. Place lid on splice cassette.
Figure 17 - Lid on Splice Cassette
19. Place the next splice cassette on top of the first one.
20. Wind fibers #13 - 24 around the storage spools.
21. Enter the splice cassette and secure fibers to cassette with tie.
22. Place the lid on the splice cassette.
23. Secure both cassettes with screw removed in Step 2.
24. Continue with the rest of the trays in the chassis.
25. When finished with all trays, re-install the rear door.
Telect, Inc. • USA +1.509.926.6000 • Mexico +52.33.3836.37.52
www.telect.com • © 2010 Telect, Inc., All Rights Reserved, 138727
Page 12
2.4.3 Top Tray Installation
These instructions apply to the topmost tray only.
1. Working from the BACK of the bay, remove the rear door.
2. Gently pull links out of the back of the chassis.
3. Open all visible link lids.
Figure 18 - Open Links
4. Place 900 micron in location where the splice cassettes were located.
5. Secure the overall jacket to the end link at the back of the chassis.
6. Route the subunits through as many links as possible.
Figure 19 - Routing Subunits through Links
7. Close all visible link lids.
8. Working from the FRONT of the bay, slide the top tray out.
9. Open the link lids that are now visible.
10. Place the fiber subunits into the rest of the links.
Telect, Inc. • USA +1.509.926.6000 • Mexico +52.33.3836.37.52
www.telect.com • © 2010 Telect, Inc., All Rights Reserved, 138727
Page 13
11. Close all visible link lids.
Figure 20 - Cables in Splice Tray
Continue from Step 15 in previous section.
Telect, Inc. • USA +1.509.926.6000 • Mexico +52.33.3836.37.52
www.telect.com • © 2010 Telect, Inc., All Rights Reserved, 138727
Page 14
2.5 Splicing
2.5.1 Preparing and Protecting Multi-Fiber Strands
1. Extend the cable’s subunit from the cable clamp to the
appropriate rear link on the N-Series panel.
Figure 21 - Rear Entry Link
2. Secure the subunit to the entry link with a cable
tie threaded through the slots in the link
Figure 22 - Securing the Subunit
2.5.2 Routing and Securing Pigtails at the Chassis
Bring the pigtails for splicing to the appropriate entry link on the side opposite of where the multifiber cable enters the splice tray. Loosely secure the bundle to the link with a cable tie threaded
through the slots in the link. Do not tighten the cable tie at this time.
Telect, Inc. • USA +1.509.926.6000 • Mexico +52.33.3836.37.52
www.telect.com • © 2010 Telect, Inc., All Rights Reserved, 138727
Page 15
2.5.3 Splice Tray Cable Routing
1. To route the multi-fiber or pigtails within the splice tray, remove the fiber channel from the side
of the tray.
2. Open the splice tray and remove the plastic splice
compartment cover.
3. Detach the fiber channel from its tray link in either of
the following two ways:
•
Lift up on the locking tab of the tray link with a
small screwdriver and pull off the channel.
•
Using the following four-step procedure:
Figure 23 - Channel Detachment
a. Remove the tray link screw.
b. Close the splice tray and detach the channel from its entry link.
c. Push a small screwdriver into the last small hole underneath the attachment point to
release the locking tab.
d. Pull the channel from the entry link.
4. Remove the channel from the tray.
5. Open the gate clips on fiber channel.
6. Place the multi-fiber subunits or pigtails into the fiber
channel.
7. Secure multi-fiber/pigtails in the channel by closing
gate clips.
8. Slide the tray-link end of the fiber channel back into
the splice tray, and snap or screw the tray link back
into position.
Figure 24 - Gate Clips
9. Snap the attachment link of the fiber channel onto the
appropriate entry link.
10. Remove the jacket from the pigtails at the point where they just extend beyond the tray link,
before entering the routing guides.
Telect, Inc. • USA +1.509.926.6000 • Mexico +52.33.3836.37.52
www.telect.com • © 2010 Telect, Inc., All Rights Reserved, 138727
Page 16
11. Place the fibers and the pigtails into the routing guides at the rear of the splice tray. Guide the
fibers and the pigtails behind both spools and down to the front of the splice tray. Fibers and
pigtails should cross each other behind the spools.
Figure 25 - Splice Tray Fiber Routing
2.5.4 Splicing and Storing Fiber
Do not remove the splice tray when splicing cables.
1. Guide two fiber strands into the rear-most splice position. Adjust their lengths by spooling the
slack, so that after splicing they will lay neatly across the splice tray.
2. Unspool the two fibers and move them to your splice table.
3. Prepare the fibers, then splice them according to the splice manufacturer’s instructions.
4. Rewrap the slack around the spools and place the completed splice into the splice pad.
5. Repeat steps 1 through 4 for remaining splices, working toward the front of the splice pad.
6. Identify each splice on the tray’s designation strip.
7. Reattach the splice compartment cover and close the splice tray.
Telect, Inc. • USA +1.509.926.6000 • Mexico +52.33.3836.37.52
www.telect.com • © 2010 Telect, Inc., All Rights Reserved, 138727
Page 17
2.6 Patching
2.6.1 Patch Tray Cable Routing
1. Open the patch tray.
2. Detach the fiber channel from its tray link in either of
two ways:
•
Lift up on the locking tab of the tray link with a small
screwdriver and pull off the channel.
•
Using the following four-step procedure:
a. Remove the tray link screw.
b. Close the patch tray and detach the channel
from its entry link.
Figure 26 - Channel Detachment
c. Push a small screwdriver into the last small hole underneath the attachment point to
release the locking tab.
d. Pull the channel from the entry link.
3. Remove the channel from the tray.
4.
Open gate clips on fiber channel.
5. Place the pigtails into the fiber channel that connects to
the rear of the tray.
6. Place the jumper cables into the channel that connects
to the side of the tray.
7. Secure multi-fiber/pigtails in the channel by closing
gate clips.
8. Slide the tray-link end of the fiber channel back into the
patch tray.
Figure 27 - Gate Clips
9. Snap the attachment link of the fiber channel onto the appropriate LINXS chassis entry link.
10. Open the tray and reattach the channel’s tray link.
Telect, Inc. • USA +1.509.926.6000 • Mexico +52.33.3836.37.52
www.telect.com • © 2010 Telect, Inc., All Rights Reserved, 138727
Page 18
2.6.2 Patching and Storing Fiber
1. Wrap the pigtails entering the patch tray at the rear fiber channel around the slack cable
spools, then connect them to the rear of their respective adapters.
2. Pull the jumper cables into the left or right side of the tray, and route these cables through the
guides in the tray.
3. Connect the jumper cables to the front side of their respective adapters. Once these cables
are in place, attach gate clips to hold the cables in place.
4. Close the patch tray.
Figure 28 - Patch Tray in Chassis
Telect, Inc. • USA +1.509.926.6000 • Mexico +52.33.3836.37.52
www.telect.com • © 2010 Telect, Inc., All Rights Reserved, 138727
Page 19
2.7 Storing Cables
You may use the N-Series storage to store excess patch cords and as a cross-over point for
patch cords.
1. Open the storage tray.
2. Place the patch cords into the fiber channels.
3. Secure the cords in the channel with the gate clips supplied with the tray.
4. Route the cords around the spools to take up the slack.
5. Close the tray.
Figure 29 - Storage Tray in Chassis
Telect, Inc. • USA +1.509.926.6000 • Mexico +52.33.3836.37.52
www.telect.com • © 2010 Telect, Inc., All Rights Reserved, 138727
Page 20
Chapter 3: Service
N-Series Fiber Optic Cable Management System
3.1 Owner Maintenance
Telect’s N-Series Cable Management System does not require any preventative maintenance. If
equipment is not working properly, contact technical support and be advised of the following
warning and alert.
!
WARNING
WARNING! Fiber cables transmit laser or invisible infrared light. To avoid eye damage or blindness, never look directly into fibers or connections.
!
ALERT
ALERT! Only qualified technicians may install and maintain this product.
3.2 Technical Support
By e-mail: [email protected]
By phone: 888-821-4856 or 509-921-6161
3.3 In-Warranty Service
Contact your Telect equipment distributor, or call a Telect Customer Service Representative:
1-800-551-4567
1-509-926-6000
Telect will repair or replace defective products within the limits of the warranty. See “Repacking
for Shipment” in this section.
NOTE: Call a Customer Service Representative for a Return Material Authorization (RMA) before
returning any equipment.
3.4 Out of Warranty Service
The procedure for out-of-warranty service is the same as for in-warranty service; however, Telect
charges a processing fee. You must submit a Purchase Order along with a Return Material
Authorization (RMA) before returning equipment. Call a Customer Service Representative for
assistance in acquiring these forms.
The processing fee guarantees a repair estimate and is credited against actual material and
labor costs.
Telect, Inc. • USA +1.509.926.6000 • Mexico +52.33.3836.37.52
www.telect.com • © 2010 Telect, Inc., All Rights Reserved, 138727
Page 21
3.5 Repacking for Shipment
1. Tag the equipment showing owner’s name, address, and telephone number, together with a
detailed description of the problem.
2. Use the original shipping container if possible. If you do not have it, package the equipment in
a way to prevent shipping damage. Include the RMA inside the container and legibly print the
RMA number on the outside of the package, near the shipping address.
3. Insure the package.
NOTE: Telect is not liable for shipping damage.
Telect, Inc. • USA +1.509.926.6000 • Mexico +52.33.3836.37.52
www.telect.com • © 2010 Telect, Inc., All Rights Reserved, 138727
Page 22