1
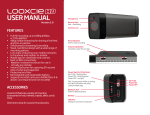
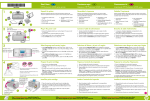
PV-500 User's Manual
PV-500 User's Manual
English
1
PV-500 User's Manual
~ Contents ~
Overview------------------------------------------------------------------------------------ 3~4
Accessories ----------------------------------------------------------------------------------- 5
Function Modes ------------------------------------------------------------------------------ 6
Basic Operation------------------------------------------------------------------------- 7~14
Turn ON / OFF PV-500------------------------------------------------------------------7
Select Functions-------- ----------------------------------------------------------------7
SETUP---------------------------------------------------------------------------------7~9
Adjust Volume--------------------------------------------------------------------------- 9
REC Button------------------------------------------------------------------------10~11
Basic Operation - Link with Other Equipments---------------------------- 12~14
Charging-------------------------------------------------------------------------------- 14
Introduction to all the Functions---------------------------------------------------- 15~20
Video Playback------------------------------------------------------------------------- 21~24
Video Editing--------------------------------------------------------------------------------- 25
Supported Video File Format--------------------------------------------------------------26
Audio Playback------------------------------------------------------------------------- 27~28
Audio Editing--------------------------------------------------------------------------------- 29
Supported Audio File Format------------------------------------------------------------- 29
Photo Browsing------------------------------------------------------------------------ 30~31
Slide Show + Audio ------------------------------------------------------------------ 31~32
Photo Editing Mode------------------------------------------------------------------- 32~33
Support Photo File Format---------------------------------------------------------------- 33
Record----------------------------------------------------------------------------------- 34~36
Audio Line in Rec---------------------------------------------------------------- 34~35
Video Line in Rec---------------------------------------------------------------- 35~36
Specifications-------------------------------------------------------------------------------- 37
Supported Video File Format-------------------------------------------------------- 38~39
Precautions----------------------------------------------------------------------------- 40~41
2
PV-500 User's Manual
I Overview
4 PV-500 Main device
7
6
5
4
3
2
1
9
1. Power ON/OFF Button
2. AV Input Jack/CCD Power Supply
3. Stop/REC Button
4. Exit Button
5. AV Output Jack
3
6. USB Jack
7. DC 5V In Jack
8. SD Card Slot
9. IR Transceiver
10.Reset Button
PV-500 User's Manual
4 Remote Control
1. Power ON Button
2. LCD/TV Switch
3. Recording Button
4. Five-direction Key
5. Volume Button
6.Setup Button
7.ESC/STOP
4
PV-500 User's Manual
I Accessories
Stereo Earphones
RCA Cable
USB Cable
-
O+
- 3.7V Li-io n
O
O
- NPFor Full BATTERY
1 2 0/
D-L
17
AC adaptor
Battery
Video Sensor
(Optional)
Remote Controller
5
User’s Manual
PV-500 User's Manual
I Function Modes
Main Menu
Video Files
Audio Files
Photo Files
Recorder Setting
Program Setting
11:00
4 Movie : Video file playback
4 Audio : audio file Playback
4 Photo : browse images and pictures
4 Record : external audio source recording and
external video source recording
4 Setting : set various functions
6
PV-500 User's Manual
I Basic operation
4 Turn on / off the player
PV500
Digital Video Recorder
Turn On: Stir the Power On/Off button
on PV-500 to turn on the power
and the greeting screen will
appear.
Turn off: Stir the Power On/Off button on
PV-500 or press the Power
button on the remote control to
immediately turn off PV-500.
4 Select Functions
1. After the player is turned on, it will show the screen of Main Menu,
press5 /6 /3 /4 to select desired functions.
2. After selection, press4; to enter the function that you've selected.
Main Menu
Video Files
Audio Files
Photo Files
Recorder Setting
Program Setting
11:00
4 SETUP
1. While you enter Video, Audio, Image modes, and various standby
modes, press SETUP botton to edit the settings.
Video Files
Delete
One
Protect
Off
Video Repeat
All
File Information
11:00
7
PV-500 User's Manual
2. Select the item in the main menu: Press5 or6 to move the cursor.
Video Files
Delete
One
Protect
Off
Video Repeat
All
File Information
11:00
3. Enter the submenu: Press4 or4; to enter the submenu.
Video Files
Delete
One
Protect
Off
Video Repeat
All
File Information
11:00
4. Select the item in the submenu: Press5 or6 to select the desired item.
Video Files
Delete
One
Protect
On
Video Repeat
All
File Information
11:00
5. Confirm the setting: Press4; to confim the change of the setting.
Video Files
Delete
One
Protect
Off
Video Repeat
All
File Information
11:00
8
PV-500 User's Manual
6. Do not make any change and return to main menu: Press3 or<.
Video Files
Delete
One
Protect
Off
Video Repeat
All
File Information
11:00
7. Exit SETUP: Press SETUP button or press< right after finishing the
operation described in 6.
Main Menu
Video Files
Audio Files
Photo Files
Recorder Setting
Program Setting
11:00
4 Adjust Volume
While playing Video, Audio or Slide + Audio, you adjust the sound
volume by pressing the Volume buttons, volume varies in 10 steps.
1/14
21.MP3
11:00
9
00:03:28
PV-500 User's Manual
4 REC Button
1. Record:Slide upward the Stop/REC key on the side of the unit or
press REC key on the remote control to start recording.
00:00:05
2. Stop:
(1) Slide downward the Stop/REC key on the side of the unit to stop
recording and return to main menu.
(2) Press stop key on remote control to stop recording and return to
preview screen.
High
Press REC to Start Record
10
00:28:00
PV-500 User's Manual
3. In other Modes: in the modes other than the above-mentioned mode,
when you increase the REC button on PV-500 it will "lock" the access
and decreasing it can unlock the access. (this function is not
available on the remote control)
11
PV-500 User's Manual
I Basic Operation - Link with Other Equipments
4 External Video Source Recording
On
Off
A/V In
DC 5V Out
Pause
Rec
1. By connecting with an external video sensor, it can record the video
into video files in MPEG4 format (the file format is AVI).
PV-500
4 Output to TV Screen
1. Output the image to the TV through an RCA cable.
A/V OUT
Rec
TV
A/V In
DC 5V Out
W
Off
R
On
Y
Pause
Video in Audio in
PV-500
12
PV-500 User's Manual
2. On the Main Menu screen enter to Program Setting and scroll down
to Display to select the display device from LCD or TV.
A/V OUT
Pause
Rec
TV
R
W
On
Off
Y
A/V In
DC 5V Out
Video in Audio in
PV-500
4 Connect to PC
1. Connect the two ends of the USB cable to PV-500 and PC.
A type
DVD
16Xmax
DVD
16Xmax
B type
Pause
Rec
B type
On
Off
A/V In
DC 5V Out
A type
PV-500
13
PV-500 User's Manual
2. "USB Mode" will appear on the screen and disappear 5 seconds later
, and then it can be operated.
USB mode
I Charging the Battery
4 When the power goes down, power LED indictor blinks
(blue) and the meter with no bars displays on the bottom
right corner of the screen, which indicates that the power of
the host exhausts and please recharge it immediately.
4 Connect the main device with the power supply and then
plug the power supply into the electrical outlet. The LED
light will always be on (orange light).
Precautions:
!
!
The device will turn off the LED light to keep the life-span of the
battery, please unplug the power supply promptly after finishing
charging the battery.
For the first time usage, charge the battery for at least 12 hours.
Make sure the power is off when charging battery.
14
PV-500 User's Manual
I Introduction to all Setting Functions
1. Operate in Main Menu: Press5 /6 /3 /4 to select the function, then
press4; to enter the Setup Menu.
Main Menu
Video Files
Audio Files
Photo Files
Recorder Setting
Program Setting
11:00
2. Enter the Setup Menu
Program Setting
Program Setting
Video Repeat
All
Slide Show+Audio
Yes
Audio Repeat
Single
Slide Show Effect
Off
Back Light OFF
No
Thumbnail Preview
Off
Slide Show Repeat
No
TV Format
NTSC
Slide Show Time
3 sec
TV out Adjustment
Zoom
11:00
11:00
Program Setting
Program Setting
LCD
Display
Firmware Upgrade
Language
English
Load Setup Defaults
Format
SD
Storage Information
Schedule Presetting
Time Setting
11:00
11:00
(1) Video playback repeat mode: allows you to repeat the playback
of the selected single/all video files or stop after the playback of
all video files.
(2) Audio playback repeat mode: for audio files in a similar way as
that for video files.
(3) Thumbnail Preview: allows you to select on/off.
(4) Slide show repeat Mode: make a slide show of all the image files
once or repeatedly.
15
PV-500 User's Manual
(5) Slide Show Time Delay: set the time delay between each image
as 3, 5, 7, or 10 seconds.
(6) Slide Show + Audio: make a slide show of the image files and
meanwhile playback Audio files automatically (the image and
audio files must be put in the same folder).
(7) Slide Show Effect: allows you to select on/off.
(8) Back Light Off Timer: set the time delay to turn off the backlight
during playback to 30 seconds, 1 minute, 3 minutes or never turn
off.
(9) TV Format: select the format of the TV to be NTSC or PAL.
(10) TVout Adjustment:
0 TVout Zoom Adjustment: press5or6to select the zoom of TVout..
Program Setting
TV out Zoom Adjustment
Up
Long Down:Default
Down
Click Enter : Done
Click ESC : Cancel
11:00
0 TVout Position Adjustment: press5or6or3or4to select the
zoom of TVout..
Program Setting
TV out Position Adjustment
Up
Left
Long Down:Default
Right
Down
Click Enter : Done
Click ESC : Cancel
11:00
(11) Display Selection: it can be switched between LCD and TV.
(12) Language: choose the language of the operating interface.
(13) Format: format SD card.
16
PV-500 User's Manual
(14) Schedule Presetting:
Press3 or4 to select the items for the reserved recording, press
4; to confirm the setting.
0
Schedule Presetting
11:00
→ External Audio Recording
→ External Video Recording
0 Time setting: please see "Basic Operation - SETUP" for the
procedure of operating the buttons to set the start/end time and
the quality for the two kinds of reserved recording modes.
Schedule Resetting
Schedule Resetting
Audio Line in REC Start
Audio Line In REC Stop
Year
06
Year
06
Month
10
Month
10
Date
19
Date
19
Hour
17
Hour
Minute
00
Minute
20
00
11:00
11:00
Schedule Resetting
Audio Line In REC Select
Quality
Low
Setting
Off
11:00
17
PV-500 User's Manual
0 Precautions:
! It is needed to set the "Setup" item as "ON" to successfully book
the reserved recording.
! The reservation will be executed only when the device is in Power
on State.
! The recorded files will be stored in the "MyRecord" folder in the
Video/Audio folder.
0 Recording Fail:
! When there are conflicts in the time setting or when the storage
space is not enough: it will show a red forbidden sign to warn
that the reserved recording will not be operated, so please set
up again.
Schedule Resetting
11:00
! Interrupt by unknown reasons during recording (low battery, no
signal, insufficient space,... etc.): it will show a red forbidden
sign to warn that the reserved recording failed.
Schedule Resetting
11:00
(15) Time Setting: please see "Basic Operation - SETUP" for the
procedure of operating the buttons.
18
PV-500 User's Manual
Time Setting
Year
06
Month
10
Date
19
Hour
17
00
Minute
11:00
(16) Firmware Upgrade: insert the memory card which contains
updated software into the device and press Enter button, after
the system is updated, it will reboot automatically; if the message
"Update Error" is shown, it means that there are errors during
updating, it might be that the software is incomplete or the
memory card has some problem, please use other memory
cards, or reboot the device after inserting the memory card;
Toshiba, SanDisk or Panasonic memory cards are.
Program Setting
Upgrade System
F220LM V4.20c
for test only
Cancel
Ok
11:00
(17) Load Setup Defaults: select to reset default values.
Program Setting
Recover
Ok
Cancel
11:00
(18) Storage Information: show the size and the residual space.
19
PV-500 User's Manual
0 PV-500 uses SD card as its storage medium. Make sure
a SD card is inserted to the device before use. A “SD”
symbol will appear on bottom right of the screen then the
unit is ready for recording.。
Program Setting
Storage Information
Total Space
Free Space
11:00
20
487MB
445MB
PV-500 User's Manual
I Video Playback
4 Operations in Main Menu
Press5 /6 /3 /4 to select the video playback function, then press4; to
enter.
Main Menu
Video Files
Audio Files
Photo Files
Recorder Setting
Program Setting
11:00
4 Operations in File List Mode
Press5or6to choose the file you want to playback, then press4;(if the
filename is too long, press3or4to make the adjustment to show the
complete filename; press<: return to the upper level menu).
Video Files
<MyRecord>
Beer02_640x480.avi
V0828001.avi
Beer03_640x480.avi
The day after tomorrow.avi
V0828002.avi
V0828003.avi
(Select file)
11:00
(Play the selected file)
4 Fast Playback
1. Double Speed Playback: press4 during normal playback, the video
file will be played with a speed two times quicker; press4; to return
to the normal playback speed.
2X
21
PV-500 User's Manual
2. 4 Times Speed Playback: press4 twice or press4 during Double
Speed Playback, the video file will be played with a speed four
times quicker; press4; to return to the normal playback speed.
4X
2X
3. 8 Times Speed Playback: press4 three times or press4 during 4
TImes Speed Playback, the video file will be played with a speed
eight times quicker; press4; to return to the normal playback
speed.
8X
3X
4 Slow motion function
1. 1/2 Speed Slow Motion: press4 after pauseing the playback, the
video file will be played in 1/2 Slow Motion; press ENTER button
to return to the normal playback speed.
1/2
2. 1/4 Speed Slow Motion: press4 twice after pausing the playback,
the video file will be played in 1/4 Slow Motion; press ENTER
button to return to the normal playback speed.
22
PV-500 User's Manual
1/4
2X
3. 1/8 Speed Slow Motion: press4 three times after pauseing the
playback, the video file will be played in 1/8 Slow Motion; press4;
button to return to the normal playback speed.
1/8
3X
4 Reverse Playback
The Index bar will go back as the video played reversely; press4; to
return to normal playback.
2X
4 Pause
Pause the Video, Index Bar and the playing time counting: Press4;
once again to return to normal playback.
00:38:18
23
PV-500 User's Manual
4 Stop
Press< to stop playing and return to File List Mode
Video Files
<MyRecord>
Beer02_640x480.avi
V0828001.avi
Beer03_640x480.avi
The day after tomorrow.avi
V0828002.avi
V0828003.avi
11:00
4 Video Capture
1. Capture Image while the Video is playing: Press PAUSE first and
then press REC.
00:25:08
2. Return to normal Playback:Press4; to return to normal playback.
3. The number of the captured pictures while the Video is playing is
limited within 30, these files will be stored in "MyRecord" folder under
photo mode with the filename: V0913001 (V-video, 0913 - MMDD,
serial number 001-999 ); if the number of captured pictures exceeds
30, it will show the message "ABOVE RECORDING LIMITED TO 30
FILES" or "ABOVE RECORDING LIMITED TO 999 FILES" if the seria
number exceed 999 in one day, press< to exit the messasge and
return to PAUSE state.
! Precautions: This function works only after pressing PAUSE
during normal playback.
24
PV-500 User's Manual
I Video Editing
4 During Video Playback
Press SETUP button, the video will be paused, and the setting items will
appear, please see "Basic Operation - SETUP" for the procedure of
operating the buttons.
00:25:08
Video Repeat
All
Full Screen
On
Display
LCD
4 In File List Mode
Press SETUP button, the setting items will appear, please see "Basic
Operation - SETUP" for the procedure of operating the buttons.
Video Files
Delete
One
Protect
Off
Video Repeat
All
File Information
11:00
25
PV-500 User's Manual
I Supported Video File Format
File Format
Resolution
Bit rate
Frame rate
Under 720*480
Under 4 Mbps
Under 30 fps
AVI(DivX 4/5.0)
AVI(DivX 2/3)
MPEG1(DAT, M
PG—VCD file
format)
ASF
RM
WMV
VOB (DVD file
format without
copy protection)
MJPEG(AVI)
a-law, u-law
Notice: ● can be played in PV-500 directly.
X can not be played directly, and is not able to be converted.
26
PV-500 User's Manual
I Audio Playback
4 Operations in Main Menu
Press5 /6 /3 /4 to select the file you want to play, after the file is
selected, press4; to enter Audio Playback function.
Main Menu
Video Files
Audio Files
Photo Files
Recorder Setting
Program Setting
11:00
4 Operations in File List Mode
Press5or6to select the file you want to play, after the file is selected,
press4;(if the filename is too long, press3or4to make the
adjustment to show the complete filename; press<: return to the
upper level menu) .
Audio Files
<MyRecord>
21.MP3
36.MP3
45645.MP3
Don’t Stop.MP3
NOELLE.MP3
NEW.MP3
11:00
4 Fast Playback
During Fast Playback, the Index bar and the playing time counting will
become faster along with the file playback; press4; to rerturn to the
normal playback.
1/14
21.MP3
11:00
27
00:03:28
PV-500 User's Manual
4 Reverse Playback
During Reverse Playback, the Index bar and the playing time counting
will become reversed along with the reverse playback; press4; to
rerturn to the normal playback.
1/14
00:01:05
21.MP3
11:00
4 Pause
By pressing PAUSE button, the Audio, the Index bar and the playing
time counting will be paused; press4; once again to return to normal
playback.
1/14
00:01:05
21.MP3
11:00
4 Stop
Press< to stop the playback immediately and return to File List Mode.
Audio Files
<MyRecord>
21.MP3
36.MP3
45645.MP3
Don’t Stop.MP3
NOELLE.MP3
NEW.MP3
11:00
28
PV-500 User's Manual
I Audio File Editing
4 During Audio Playback
Press SETUP button, the audio playback goes on, the setting items
appears, please see "Basic Operation - SETUP" for the procedure of
operating the buttons.
1/14
00:01:05
Audio Repeat
All
Back
Light OFF
21.MP3
Display
No
LCD
11:00
4 In File List Mode
Press SETUP button, and the setting items will appear; please see
"Basic Operation - SETUP" for the procedure of operating the buttons.
Audio Files
Delete
One
Protect
Off
Audio Repeat
Single
File Information
11:00
I Supported the form in audio frequency
File Format
MPEG1 layer-3 version 1/2/2.5 stereo
MPEG1 layer-3 version 1/2/2.5 Joint-stereo
WMA(64 kbps~320 kbps)
WAV
29
PV-500 User's Manual
I Photo Browsing
4 Operations in Main Menu
Press5 /6 /3 /4 to select Image Browsing Mode and press4; to enter.
Main Menu
Video Files
Audio Files
Photo Files
Recorder Setting
Program Setting
11:00
4 Operations in File List Mode
Press5or6to select the file you want to play, afte r the file is selected,
press4;(if the filename is too long, press3or4to make the adjustment
to show the complete filename; press< : return to the uppe r level menu) .
Photo Fileso
<MyRecord>
Tree.JPG
Bird.JPG
IMG0036.JPG
IMG0038.JPG
14.JPG
15.JPG
11:00
4 Select the Photo for Browsing
Press5or6to select to browse the previous or next image.
30
PV-500 User's Manual
4 Zoom in the Photo by 2 times / 4 times
1. Zoom in by 2 times: press4;(while the image is enlarged, press
5/6 /3/4to move the position).
2X
2. Zoom in by 2 times: press4;two times.
4X
! Notice:
The screen will show the current magnification -- 2X/4X;
if the image is displayed in full screen state and 4X is
shown,and at this moment if you press4;without see
any effect, it means that the image has been maginified
to its maximum extent and it is impossible to enlarge any
more.
I Slide Show + Audio
file listIn File List Mode or Image Browsing Mode, press SETUP
button to show the setting items, select "Start Slide Show" and press
4;to start the Slide Show + Audio function ( the image files and the
Audio files that you want to play need to be stored in the same folder).
31
PV-500 User's Manual
(In File List Mode)
Photo Files
Photo Files
Slide Show Start
LCD
Slide Show Time
3 sec
Thumbnail Preview
Off
Slide Show + Audio
Yes
Delete
One
Slide Show Effect
Off
Protect
Off
File Information
Slide Show Repeat
No
11:00
11:00
(During Image Browsing)
Slide Show Start
Display
Slide Show Repeat
No
LCD
File Information
3 sec
Slide Show Time
Slide Show + Audio
Yes
Slide Show Effect
Off
4 Pause
1. Pause Slide Show:
Press4;or<to pause Slide Show.
2. Cancel Pause:
While Slide Show is paused, press4;again.
4 Stop the slide to broadcast
Press<once, after pressing PAUSE button.
I Photo Editing Mode
4 During Photo Browsing
Press SETUP button, the setting items appear, please see "Basic
Operation - SETUP" for the procedure of operating the buttons.
32
PV-500 User's Manual
Slide Show Start
LCD
Display
Slide Show Repeat
No
Slide Show Time
3 sec
Slide Show + Audio
Yes
Slide Show Effect
Off
File Information
4 In File List Mode
Press SETUP button, the setting items appear, please see "Basic
Operation - SETUP" for the procedure of operating the buttons.
Photo Files
Photo Files
LCD
Slide Show Start
Slide Show Time
3 sec
Thumbnail Preview
Off
Slide Show + Audio
Yes
Delete
One
Slide Show Effect
Off
Protect
Off
File Information
Slide Show Repeat
No
11:00
11:00
I Supported Photo File Format
Encoding
Baseline
Progressive
File Format
JPG
Lower than 4096x4096 Lower than 1024x1024
33
PV-500 User's Manual
4 Audio Line in REC
I Record
1. Select Record Function:
Press5 /6 /3 /4 in Main Menu to select Record function, then press
4; to enter.
Main Menu
Video Files
Audio Files
Photo Files
Recorder Setting
Program Setting
11:00
2. Select Audio Line in REC
Recorder Setting
Audio Line In REC
Video Line In REC
Motion Detect
11:00
3. Start Record:
Press REC button to start recording, the file will be stored in
"MyRecord" folder.
Audio Line In REC
Press REC
A
98:26:40
11:00
B
1.
High
2.
Low
34
PV-500 User's Manual
4. Stop:
During the recording, press< or REC button to stop the recording
immediately and return to the standby mode.
5. The recorded Video file will be stored in the "MyRecord" folder in
MOVIE and the recorded sound file will be stored in the "MyRecord"
folder in MUSIC.
4 Video Line in REC
1. Select Recording Function: In Main Menu: press5 /6 /3 /4 to select
the recording function, and press4; to enter.
Main Menu
Video Files
Audio Files
Photo Files
Recorder Setting
Program Setting
11:00
2. Select Video Line in REC:Select External Video Source Recording,
press ENTER button to enter standby mode (make sure to connect
the video sensor to the AV IN jack on PV-500, it will record the video
into a MPEG4 file whose format is AVI).
Recorder Setting
Audio Line In REC
Video Line In REC
Motion Detect
11:00
35
PV-500 User's Manual
3. Start recording:When in main menu screen, slide upward the
Stop/REC key on the side of the unit or press REC key on the remote
control to start recording.
00:00:05
4. Preview mode:In preview mode, the screen will display capacity
of recording time on top left corner and picture quality setting
displayed on top right corner. At this time you can press REC key on
the remote control to start recording. Press STOP key on remote
control to return to preview mode.
High
00:28:00
Press REC to Start Record
5. Stop recording:
(1) Slide downward the Stop/REC key on the side of the unit to stop
recording and return to main menu.
(2) Press stop key on remote control to stop recording and return to
preview screen.
6 . The video files will be saved in the “Movie” MyRecord folder and
audio files will be saved in the “Audio“ MyRecord” folder.
36
PV-500 User's Manual
I Specifications
Timer
Time
Display
! Resolution480 x R.G.B x 234
! 2.36 inch TFT-LCD with LED backlight
! NTSC/PAL composite output
AV IN/OUT
! AV input/output through two φ2.5mm jacks
LED Indication
Light
! LED1 - Charging (orange)
! LED2 - Power (blue)
! LED3 - Signal Source Detection (green)
! LED4 - Audio/Video recording, file operation (red)
Storage Device
! SD card (Support SDHC card)
Computer
Connection
! USB 2.0 mini connector
Power System
! Rechargeable/Exchangeable Lithium Ion Battery
3.6V 1250mAh.
! Power supply 100~240 V, 50~60 Hz
Dimension /
Weight
! 79.9 x 51.9 x 22.3 mm
! 86.6 g / 68 g, with/out the battery respectively.
System
Requirements
! Operating system: Window2000, Window XP
! CPU: Intel Pentium III 800 MHz and beyond
! Relevant hardware accessories: USB port, Mouse,
CD-ROM, Windows-compatible display with a
required resolution of 1024 x 768
37
PV-500 User's Manual
I Supported Video File Format
4 Supported Video File Format
File Format
Resolution
Bit rate
Frame rate
Under 720*480
Under 4 Mbps
Under 30 fps
AVI(DivX 4/5.0)
AVI(DivX 2/3)
MPEG1(DAT, M
PG—VCD file
format)
ASF
RM
WMV
VOB (DVD file
format without
copy protection)
MJPEG(AVI)
a-law, u-law
Notice: ● can be played in PV-700 directly.
X can not be played directly, and is not able to be converted.
38
PV-500 User's Manual
4 Supported the form in audio frequency
File Format
MPEG1 layer-3 version 1/2/2.5 stereo
MPEG1 layer-3 version 1/2/2.5 Joint-stereo
WMA(64 kbps~320 kbps)
WAV
4 Supported Image File Format
Encoding
Baseline
Progressive
File Format
JPG
Lower than 4096x4096 Lower than 1024x1024
39
PV-500 User's Manual
I Precautions
Before using this product, please read this manual in detail to ensure you are
using this product properly.
During the recording in various REC Modes, all button-pressing is disabled.
All the recorded files are stored in the "MyRecord" folder.
After the setting of Reserved Recording functions, the setting will
be executed only when the "SET" item is selected as "ON" afterwards.
Reserved Recording functions will be executed after the device is
turned off.
If the file is corrupted so that it cannot be played, The sysrem will return to the
file detailed list.
Only the files with the extension of MP3, WMA, WAV, ASF, AVI, BMP
and JPG can be played.
The player can distinguish an unlimited number of files/folders. However,
within a folder, only up to 999 files can be distinguished.
In the Video files, only the audio in MP3 and WMA format is supported, AC3,
DTS, AAC and other formats are not supported.
All data in the device may be deleted due to excessive impact, lightning,
power surge etc., the manufacturer does not bear or guarantee the losses
caused in the above conditions, please protect and back up the data in the
device properly.
Please avoid serious vibration; physical vibration might damage the LCD.
Please do not apply heavy pressure on the player; the player may be
damaged because of heavy pressure.
When the memory card is taken out from your PV-500, the card may feel
warm due to long-time operation, it is a normal phenomenon.
If the memory card is inserted in the wrong direction, the card can not be
pushed completely into the bottom of the slot, please do not push hard to
avoid damaging the card and the device.
While connecting the device to a PC through USB, you can read directly from
the SD card and run the files in the storage device.
If you connect the device to a PC through USB, and use the computer to
format the storage device, please use FAT32 format.
Please do not scrub the LCD with hard materials, because the LCD is easy to
be damaged. If you want to remove the dust on the LCD screen, please clean
the body with a soft dry cloth, if dirt or stains are left, you can clean it with a
little soft cleansing liquid; do not use volatile solutions because they will
cause chemical reactions, thus the device might be deformed or discolored.
If the device is moved from a cold place to a warm one, the LCD screen will
fog up; if this situation takes place, please turn off your PV-500 and wait for
about one hour before use.
D
D
D
D
D
D
D
D
D
D
D
D
D
D
D
D
D
40
PV-500 User's Manual
D Please do not store or use your device in the following places:
1. Extremely humid or dusty places.
2. Places with direct sunlight or a high temperature, e.g.: it will damage your
PV-500 in a closed car in the summer or a very cold place.
3. Places with heavy vibration or strong magnetic fields, e.g.: close to
automobiles, voltage transformers or magnets.
41