1
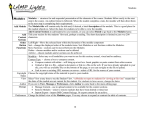
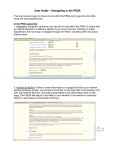
iSite Enterprise Radiology PACS Objectives Login to iSite Enterprise Search for patients Select and view exams Manipulate the images Set up personal folders iSite Enterprise Overview: Web-based medical image distribution system that delivers diagnostic-quality images to clinicians in the healthcare environment Used by: Referring Physicians, Surgeons and members of the patient care team Logging in to iSite Enterprise Use your Novell login to access Citrix Logging in to iSite Enterprise Select PACS from your available icons Logging in to iSite Enterprise Your username for PACS is your Novell username Access iSite PACS using your Novell username and password Select Active Directory from the “Log on to” drop down list Logging in to iSite Enterprise After login you will see the Tip of the Day To see additional information, select Next Tip, or by pressing N on your keyboard Logging in to iSite Enterprise Close the pop up by selecting Close, or pressing the letter C To disable this popup, uncheck the box at the bottom of the dialog box Screen Overview After closing the Tip of the Day you will see the iSite Enterprise Start-Up Window Shortcuts Bar Logout Patient Search Options Folders List User Preferences iSite Manual Screen Overview Shortcuts Bar: Customizable lists to frequently accessed folders, exams and filters Shortcuts Bar Screen Overview Folders List: List of all the folders, filters and tools in iSite Enterprise Folders List Screen Overview Patient Directory: Patient, exam search engine and sort function Patient Search Options Screen Overview Preferences: User, System and Machine Preference dialog boxes User Preferences Screen Overview Help: iSite Enterprise's user manual iSite Manual Screen Overview Logout Button: Exit application and return to login window Logout Patient Search Options Default Query Patient Name MRN Exam Date (free text or drop down, date format is M/D/YYYY) Patient Location Patient Search Options Additional search criteria can be found with a left-click on the “+” next to the word Query Patient Search Options Expanded search options include; Accession Modality Referring Physician Organization will always be UNM HSC Patient Search Enter patient information and left-click the Query button Patient Search List populates with all patients matching your search criteria This will show you the patient jacket Left-click the (+) to open the patient jacket Patient Search After the left-click the (+) to open the patient jacket, the (+) becomes an arrow listing all your patient studies Patient Search Within the patient jacket, exam status symbols may be located to the left of the exam details Marked Read Report available Locked exam ! Exception Patient Search Double left-click on any study to view patients images and reports This will take you to the Exam Canvas Page Exam Canvas Page Exam Canvas Overview Current Exams Opened Patient Demographics Patient Timeline (History and Navigation Menu) Exam Notes Shelf Bar Close exam and return to directory Exam Canvas Overview Current Exams Opened • Displays total opened Exam Canvas Overview Patient Demographics •Name •Sex •Birth Date •MRN Exam Canvas Overview Patient Timeline • Patient history and navigation menu displays all of the patient's studies in iSite Exam Canvas Overview Exam Notes • Clip board will indicate when exam documentation is present Exam Canvas Overview Shelf Bar • Exam specific menu and information Exam Canvas Overview Close exam and return to directory Patient Exams Hovering over a study in the history timeline will display further details on the exam Patient Exams The exam rack or shelf bar shows image and series details Patient Exams First View is the thumbnail view Patient Exams Double left-click on the thumbnails to expand the image view Patient Exams With the curser over the image you can scroll through CT, MRI and Ultrasound series Patient Exams To move between X-Ray images use the F8 and F9 keys Patient Exams – Screen Overlay Screen Overlays provide patient and exam information Different screen overlays are set for each modality type F6 key toggles screen overlay on/off Patient Exams – Screen Overlay F6 key toggles screen overlay on/off Here is an image with the overlay turned off Patient Exams – Exam Rack Exam Rack: The set of images in a study Navigating through stacked series 1. 2. 3. Mouse wheel Select “C” on keyboard for loop Right – click for context menu Patient Exams - Context Menu Single Image Menu Series Image Menu Right-click on image for context-menu Patient Exams - Window Width/ Level Options for changing Window Width and Levels With the mouse, hold down left button, move mouse horizontally and vertically Right – click to open image context menu Patient Exams - Window Width/ Level WW/WL menu Default WWL: Applies iSite WWL values Modality default: Applies modality WWL values Histogram Calculation: Uses histogram calculation to set WWL Patient Exams - Measurement Tools to measure specific areas of an image Measurement menu: Ruler: Linear measurements (pixel or mm) Angle: Degree measurement for specified region Region of Interest (ROI): Average data value for a circular region of an image Freehand ROI: Similar to ROI but allows free-hand selection of ROI Point Value: The value of data points at a specific point on the image pixel Measurement Palette: Floating measurement palette Patient Exams - Annotation Annotations are user specific, they will not effect the patient record You may add symbols and text to an image Annotation sub-menu: Line Arrow Triangle Circle Text Freehand Spine Labeling: Sagittal/Lateral Images Patient Exams Left-click additional exams on patient timeline to open more studies Patient Exams Number of open exams will show on Control Strip Right-click to navigate between exams Patient Exams The patient history timeline shows exams in different stages Symbols and colors indicate exam status Patient Exams All studies with an X have no associated images A red X indicates missing images A green X indicates a cancelled exam Patient Exams Studies with I on the time line have images Green lettering indicates no report Blue lettering indicates a report is available Patient Exams An additional documentation indicator is located at the upper left of the thumb nail, a clip board will display three different ways 1 2 3 Patient Exams Blank Clip board = No Documentation Patient Exams Clip board with a yellow note = A note has been posted with additional exam comments Open document with a double left-click Patient Exams Clip board with Red Lines = Final or Prelim report from Radiology Open the document with a double left-click Patient Exams If documentation is present, leftclick on the clip board to display the file Patient Exams Right-click on the shelf bar for additional options Folders List Folders List In the Folders List you may create a personal folder This folder is only seen by you It can be used for your own needs, for example, for rounds Folder List To create a folder, right – click on Personal Folders Choose Add new Folder Name folder, for example, Port Chest Folder List To use your folder, go back to the patient directory Locate patient and desired exam Drag and drop the exam into the folder Folder List Open to review items you put in your folder You may also set you entire folder to Anonymous with a right – click to your folder Folder List The Anonymous folder turns blue and the patient data is replaced by iSite generated info Warning: Ultrasound and other modalities that have patient data embedded on the image will not change, only the iSite patient date will be anonymized Folder List To return your folder to it’s original state, right – click and uncheck Anonymous Folder List You can review each study you viewed in the “My History” folder History cannot be deleted by the user Additional Icons In the upper right corner are three additional Icons Additional Icons User Preferences Philips iSite Manual/Help Logout (to insure a proper logout use the X) User Preferences Users have several options in the Preferences section Default settings are in place, please review your options in this section User Preferences Do not use the Change Password option – your password is your Novell password which would be changed using the standard password change web site User Preferences Keyboard shortcuts can be reviewed iSite Help Here you can find useful information on how the system functions *Please note, not all functions discussed in this manual are items implemented buy the University of New Mexico Hospital Radiology Department iSite Log out Use the “X” to logout from iSite will prevent locked images and or sessions Would you like more? If you would like additional information on features and settings within iSite, please sign up for the PACS iSite class offered through CLT