1
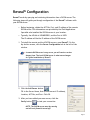
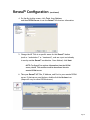
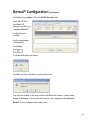
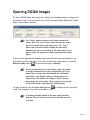
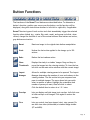
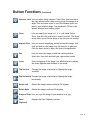
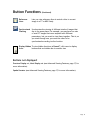
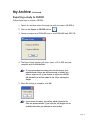
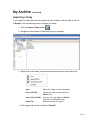
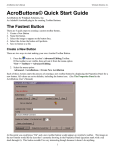
User Manual
Table of Contents
Welcome to Reveal™ ........................................................................ 3
Recommended System Requirements ................................................... 4
Installing Reveal™ ............................................................................ 5
Reveal™ Configuration....................................................................... 7
Opening DICOM Images.....................................................................10
Reviewing Images........................................................................... 11
Button Functions ........................................................................... 12
Keyboard Hotkeys .......................................................................... 16
Advanced Viewing Features .............................................................. 17
My Archive ................................................................................... 19
Page 2
Reveal™ is a powerful, easy-to-use PACS viewer by Sound-Eklin™. We thank you for
purchasing Reveal™, and we are confident that it will be one of the most useful
tools in your digital imaging solution.
Some of the powerful features you’ll find in Reveal™ 2.01:
• User-friendly, intuitive interface
•
•
•
•
•
•
•
•
•
•
•
•
•
•
•
•
•
•
•
•
•
•
Window/level (with user-defined presets)
Zoom/pan and magnify (with match scale)
Rotate/flip
Undo/redo
Invert (with window/level feature)
Overlays toggle
Measurement and measurement calibration
(with use of image calibration ball)
ROI (ellipse, rectangle) with mean and standard deviation
Clipboard (with export to image and video)
Thumbnails
Multi-frame image support
Image stacking/stack sorting
(image number, slice location, acquisition time)
Synchronized stacking
Cine
Study anonymization ability
Multiple image layout choices
Spatial locator
Reference lines
Protractor
Image text annotations
DICOM header viewer/editor
Drag & drop image export
Page 3
Recommended System Requirements
To guarantee optimum performance of Reveal™, your computer system should meet
the specifications given below.
NOTE: A faster processor and more powerful video cards
will improve performance.
• Windows XP (SP1, SP2, SP3), Windows Vista Business Edition or Windows
Vista Ultimate Edition (32 bit only) Note: Vista machines must have UAC
turned OFF for Reveal™ to work properly.
• Intel Core 2 Duo or AMD Athlon 60 x 2 processors with 2GB RAM or more
• 250MB video card or higher
• Gigabit ethernet card
• CDRW/DVDRW
• 1024 X 768 monitor resolution (with 32bit True Color)
• 3.5 .Net Framework
• Broadband Internet connection for installation updates
• Static IP address or set dynamic range
Page 4
Installing Reveal™
Requirements for installing Reveal™ on your PC:
• Be sure to have an internet connection before you begin.
• A static IP address is required for all computers installing Reveal™.
• Reveal™ is a licensed product; be sure to obtain your license key prior to
installation. The key is valid only for the number of licenses purchased.
(If you would like to purchase additional licenses, please contact our Inside
Sales department at (800) 268-5354 Option 1.)
• Log on to your computer as an administrator to install Reveal™
1. Run the Reveal™ setup from the computer’s desktop.
2. Follow the setup’s prompts, clicking Next after each completed step:
Page 5
Installing Reveal™
(continued)
3. Allow Reveal™ to update by accessing the internet. Accept any license
agreements,and click Next to continue when prompted. If not already
installed, .Net Framework must be installed at this point. Your system
will prompt you if an update is needed on your computer an internet
connection is required for this portion of the install. Accept the license
agreements and continue with the .Net install.
4. Click on the Reveal™ Workstation icon on the desktop.
5. Install the license key provided with your Reveal™
Install CD, and click Activate.
6. Restart your computer.
Reveal™ is now installed. Next, proceed to Reveal™ Configuration
to configure your DICOM server.
Page 6
Reveal™ Configuration
Reveal™ works by querying and retrieving information from a DICOM server. The
following steps will guide you through configuration of the Reveal™ software with
your DICOM server.
• Before beginning, obtain the AE Title, Port, and IP address of the remote
DICOM server. This information was provided by the Field Applications
Specialist who installed the DICOM server at your location.
• Typically, the AE title is SOUNDSERV1, and the Port is 5678.
The IP address will be the IP address of the DICOM server.
1. To install the remote and local DICOM servers, open Reveal™. On the
My Archive screen, click the Server Configuration tab at the left of the
window.
A remote DICOM server is any server you will send or receive
images from. The local DICOM server is what serves images
in a given installation of Reveal™.
2. Click the Add Server button.
Fill in the Server Name, Host (DICOM server’s IP address),
Location, AE Title, and Port. Click OK.
3. After you have added your new server, click the
Verify button
to test your connection.
NOTE: The DICOM server must be running
and all local firewalls turned off!
Page 7
Reveal™ Configuration
(continued)
4. On the My Archive screen, click Tools, then Options,
and then DICOM Server to set the Reveal™ local server information.
5. Change the AE Title to a specific name for this Reveal™ station
(such as “workstation1” or “treatment”), and use a port not already
in use by another Reveal™ workstation. Once finished, click Next.
NOTE: For Reveal™ to retrieve information from the DICOM
server, the AE Title and Port need to be entered into the
remote DICOM server.
6. Take your Reveal™ AE Title, IP Address, and Port to your remote DICOM
server. If that server runs Nucleus, double-click the Nucleus icon.
(Steps will vary for other DICOM servers.)
Page 8
Reveal™ Configuration
(continued)
Click Tools, then Options, then the DICOM Providers tab.
Enter the AE Title,
Host Name (IP
address), and Port you
created in Reveal™.
Set the Timeout
to 1200.
Set the compression
to Send As Is.
Click Verify.
A Success dialog box will appear.
Click OK, and then click Yes to restart the service.
You will now be back in the main Nucleus DICOM Server window. System status
should be Running. Close Nucleus and return to the computer running Reveal™
Reveal™ is now configured and ready to use.
Page 9
Opening DICOM Images
To open a DICOM study, first search for a study in the database (query), using any of
the search criteria. You can search any or all of the search fields (Patient ID, Patient
Name, Owner Name, Species).
The “Today” button searches for all exams created with
today’s date. The “Last 7 Days” button searches for exams
that were created within that time period. The “Clear”
button clears all search fields including the date range.
Remember that you are searching by the exam date, not the
date on which the images were made (sometimes those dates
differ).
Once you have queried the database and found the study you are looking for, you
will need to retrieve the study. To do this, double-click on the exam, or click the
Retrieve Study button
to retrieve the study to Reveal™.
You will notice that prior to retrieving a study, the number
of images contained in the study is displayed as (0/1); this
means that no images have been loaded into this Reveal™
workstation. After double-clicking or using the Retrieve
Study button, the number will change to (1/1) or however
many images are in the study. These images are now loaded
on this local Reveal™ workstation for interpretation.
To open the study, click the Open Study button,
itself. Your images are now open and ready to view.
or double-click on the study
To compare multiple studies in the same viewing window,
hold the CTRL key and select all retrieved studies you wish
to include.
Page 10
Reviewing Images
Once you have opened the study, you can review it in the Reveal™ viewing window.
To start, window and level will default to your right mouse
key (hold and drag across the image on an angle). To zoom,
click and drag with the left mouse key. Use the wheel on the
mouse to toggle between images in the series.
When you have finished reviewing your study, right-click the Patient tab.
You can then click Close, or click the My Archive tab to open a new study.
Page 11
Button Functions
The functions of the Reveal™ tool buttons are described below. To determine a
button’s function, position your cursor over the button, and its function will be
displayed, along with instructions whether to left-click or right-click, if applicable.
Reveal™ has two types of tools: action tools that immediately trigger the selected
function when clicked (e.g., rotate, flip, undo, reset), and mouse tools that, when
clicked, change the function of one of the mouse buttons. Blue buttons are active,
gray buttons are inactive.
Reset Resets an image to its original state before manipulation.
Undo
Undoes the last action applied to the image, up to 100
actions.
Redo Redoes the last undone action.
Show
Thumbnails
Displays the study’s or studies’ images. Drag and drop to
move the images into the viewing window. To close the box,
left-click on the main active window with the current image.
Layout Manager
Allows for multiple viewing panes to be opened. The Layout
Manager determines the number of rows and columns in the
viewing window. The tile section lets you compound one
pane to multiple images. The arrow down lets you quickselect a number of panes. Highlight the orientation and
number of panes you want, then left-click to select.
Click the default box to return to a 1 X 1 view.
Overlays
Lets you display and hide image text overlays. Left-click once
to hide overlays on all images. Click again to restore the
overlays.
Cine Lets you control cine loops (speed, start, stop, pause). For
use with cine video (ultrasound) or stacked image studies
(CT and MRII).
Page 12
Button Functions
(Continued)
Window/ LevelLets you adjust image contrast. Select this, then hold down
the right mouse button while moving across the image at an
angle. Click the down arrow to copy the Window/Level and
paste it onto another image. Your keyboard’s F2 key is the
default Window/Level setting (Auto).
Zoom
Lets you magnify an image by 1, 2, 4, or 8 times. Select
Zoom, then left-click and hold to zoom in and out. The down
arrow allows you to fit the image to the tile you are viewing.
Magnify Glass Lets you move a magnifying window around the image. Leftclick and hold on the image once this function is selected.
Click the down arrow to select the level of magnification.
Pan Lets you move the image around the viewing window.
Select this, then click and hold your right mouse button.
Invert
Shows a negative of the image. Use Window/Level to adjust
the image lightness and darkness in this mode.
Flip Vertical Changes the image orientation by flipping the image
vertically.
Flip Horizontal Changes the image orientation by flipping the image
horizontally.
Rotate Left Rotates the image counterclockwise 90 degrees.
Rotate Right Rotates the image clockwise 90 degrees.
Drag and Drop Lets you copy the image to your desktop as a .jpg.
Show Clipboard
Displays the Show Clipboard window.
Page 13
Button Functions
(Continued)
Stacking
Lets you change the order of CT images. Use the down arrow
to set different orientations, such as acquisition time, slice
number, or slice location.
Hanging
Protocols
Lets you change the image order by hanging protocols.
Use the down arrow to select different orientations.
Change Sort
Order Changes the order of images based on the sort preset.
This function opens the Study Sort Order Editor. Mostly for
equine, CT, and MRI use.
Text Annotation
Lets you add text to the image. Click once to open the
editor, then place the text on the image. You can then use
the drag-and-drop or the clipboard to export the image
with text.
Match Scale
Lets you copy the scale of one selected image (yellow box)
and paste it onto all other images in the viewing window.
Multiple images must be displayed for this function to work.
Probe
Lets you keep a reference point while reviewing a series of
CT images.
Ruler
Creates a line for measuring. Left-click and hold, then
release and left-click again to set the line.
Elliptical ROI
Draws a circle or ellipsis. Left-click and hold, then release
and left-click again to set. Ellipsis size stats will be displayed.
Rectangular
ROI
Draws a rectangle. Left-click and hold, draw the rectangle,
release, and left-click again to set the rectangle.
Rectangle size stats will be displayed.
Protractor
Takes angular measurements on the image. Left-click once
and draw your first line, then left-click and release to draw
the second line. Click a third time to set the angle.
Page 14
Button Functions
(Continued)
Reference Lines Lets you view reference lines to match a slice to a scout
image in a CT or MRII Study.
Synchronized
Stacking
Synchronizes the viewing of different stacks of images that
are in the same plane. For example, you may have two sets
of axial CT images that were acquired with different
parameters, but you want to view them together. That is, as
you stack through one, you want the other to be
synchronized according to slice location.
Display HiddenTo view hidden functions in Reveal™, click once to display
Icons
buttons that are hidden due to monitor size.
Buttons not displayed:
Previous Display set, Next Display set (see Advanced Viewing Features, page 17, for
more information).
Spatial Locator (see Advanced Viewing Features, page 17, for more information).
Page 15
Keyboard Hotkeys
Function Hotkey
Close Application
Alt+F4
Close Workspace Ctrl+F4
Tools/Options Ctrl+O
Undo/Redo Ctrl+Z / Ctrl+Y
Cine (Activate) C
Zoom (Activate) Z
Pan (Activate) P
Pan (Control) Ctrl+Left-Click or Ctrl+(arrow keys)
Window/Level (Activate) W
Flip Horizontal H
Flip Vertical V
Rotate Right R
Rotate Left L
Invert I
Show/Hide Text Overlay O
Page 16
Advanced Viewing Features
Measurement Calibration
Most DICOM images come calibrated; that is, the size of each pixel in millimeters
is encoded into the image. Some, however (most commonly ultrasound), are
not. Such images are easily identifiable by measurements given in pixels rather
than centimeters. Non-calibrated images can be calibrated manually by using the
Calibration Tool:
1. Using the Ruler button
, draw a line that corresponds to a known
physical length in the image. (The longer the line is, the more accurate
the resulting image calibration will be.) Ultrasounds often contain a scale
of some form that can be used to calibrate the image.
2. Right-click on the measurement and select Calibrate.
3. In the dialog box that appears, enter the physical
length that the line corresponds to.
4. Click OK.
5. The measurement should now appear in cm.
Manual calibration applies only to the current image being
viewed, one at a time. If multiple images are open, they must
each be calibrated separately. You can manually calibrate
images that are already calibrated. However, use extreme
caution in doing this. Fiducials must be used in projectionbased modalities (i.e., DX) in order to calibrate the image
properly, and this calibration is for interpretative reference
only. Physical measurements should be preformed to confirm
interpretative results with calibrations in all modalities.
Matching Scale
Using the Match Scale tool allows you to simplify visual comparison of measurements
and ROI, particularly for comparisons of current and previous studies. To match scale
for all visible images:
1. Set the desired zoom for one of the visible display sets
(yellow-surrounded image).
2. Click the Match Scale button.
Page 17
Advanced Viewing Features (Continued)
Sorting/Stacking Images
For CT studies it is often useful to sort images in a display set by various criteria,
such as image number or slice location. To sort images:
1. Select the display set to be sorted.
2. Select the sort criteria from the drop-down menu next to the
Stack button.
Reference Lines
Apply reference lines to help you see the intersection of images in different planes.
To turn on reference lines:
1. Click the Reference Lines button.
2. Click on the display set whose images you want to see intersect with
images in the other display set. The first, last, and current reference lines
are displayed by default; stacking through a display set will cause the
current reference lines to “move.” Numbers beside each reference line
correspond to the numbers of the intersecting images.
3. Clicking again on the Reference Lines button will remove all lines.
Previous Display Set and Next Display Set
When reviewing multiple display sets in one exam, you can easily move forward and
back between sets using right and left arrows.
Spatial Locator
This tool allows you to pick a reference point that corresponds to all image planes.
It is used mostly in CT and MRI studies.
Clipboard
The clipboard is used to hold manipulated or non-manipulated images from a series
at one location. You can export directly from the clipboard to your computer in .jpg
or video.
Page 18
My Archive
From the My Archive screen you can perform many different tasks unrelated to
image viewing. These include importing from other media, (i.e., CDs or email),
creating CDs of an exam or multiple exams, or even exporting exams to your
computer.
Once you have queried/retrieved a study, you can apply all the study functions
as needed.
Page 19
My Archive
Open Study (Continued)
Once a study has been retrieved from the server or other
external source, this button allows you to open the viewing
window for the study.
Retrieve Study After searching for a study, you can retrieve it to the local
Reveal™ workstation using this function. (Double-clicking on
the study will perform the same action.)
Send Study
This function sends a study to another DICOM server that is
set up in your server’s tab. Note: There is no need to send
a study back to the remote DICOM server once it has been
retrieved. It will always reside on the remote server.
Delete Study This button removes the retrieved study from the local
Reveal™ workstation. Note: It will not remove the study from
the Sound Nucleus DICOM server.
Import Study Allows you to import DICOM images from sources other
than your remote DICOM server (i.e., CDs, email, removable
storage devices).
Export to
CD / DVD
Creates a CD or DVD with images.
Export Study Use this to export a study to your computer for email or
to Folder
any other purpose.
Anonymize Study
Use this function to remove patient information and create
an anonymous study. This is useful for showing clients two
exams without disclosing the name of the other client.
Page 20
My Archive
(Continued)
Exporting a study to CD/DVD
Follow these steps to create a CD/DVD:
1. Search for and then select the study you wish to create a CD/DVD of.
2. Click on the Export to CD/DVD button.
3. Choose to export as a DICOM DIR only or as a DICOM DIR and JPEG CD.
4. The Export Study window will open. Insert a CD or DVD into your
computer and click Write Disk.
To copy more than one study, press the Ctrl key on your
keyboard and click on the retrieved study or studies you
wish to export to CD. If you choose to export as a DICOM
DIR, Reveal™ Lite will be added to the CD for viewing the
images.
5. When the writing is complete, click OK.
If you choose to cancel, you will be asked if you wish to
clear the queued studies. If you click No, the images will be
available next time you attempt to write a disk.
Page 21
My Archive
(Continued)
Exporting a Study to a Folder
Use the following steps to export a study from Reveal™ to your computer:
1. Search for and then select the study you wish to export.
2. Click on the Export Study to Folder button.
3. Choose to export as a DICOM DIR or as JPEG Files.
4. Select the destination on your computer to export to.
DICOM DIR files must be opened by a PACS viewer such as
Reveal™. JPEG images can be opened on any computer but
cannot be manipulated as they can be in Reveal™. If you
wish to export only one image, use drag and drop or the
clipboard, in the image viewing window of the study.
Page 22
My Archive
(Continued)
Importing a Study
If you receive a study that was not acquired at your location, and you wish to view it
in Reveal™, use the following steps to import the study:
1. Click the Import Study button.
2. Navigate to the location of the study on your computer.
3. Right-click on the study, and choose the import function you wish to use.
Open — Opens the images to view only Import
Import (DICOM) —
Imports the study to this location of
Reveal™ only
Import (Non-DICOM) — Lets you view .jpg images in Reveal™
(will save in this location only)
Dump Files — Removes the files for import
4. The images will now be viewable in Reveal™.
Page 23
My Archive
(Continued)
Anonymize Selected Study
This function of Reveal™ lets you remove the information (such as Patient ID,
Patient’s Name, Date of Birth, Study Description, or Accession Number) from a study.
These changes are made only locally, on your Reveal™ workstation, and are not
changed on any other Server. The anonymized study will be an additional study on
your Reveal™ workstation and will not overwrite the original study. To anonymize a
study:
1. Click on the Anonymize Selected Study button.
2. Choose the changes you wish to make.
3. Click OK to save the changes.
Page 24