1
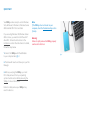
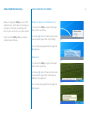
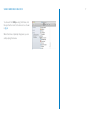
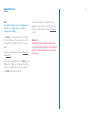
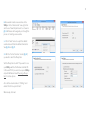
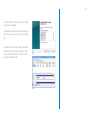
SSD2go
User Manual
1
TABLE OF CONTENTS
2
Introduction3
Package contents3
System requirements4
Support4
Technical Specifications14
SSD2go14
SSD2go Twin15
SSD2go Pro 16
Quickstart5
Getting help16
Safely removing the SSD2go6
Safely removing in Windows6
Safely removing in Mac OS X7
Troubleshooting17
The SSD2go does not mount17
Choosing a file system 17
Opening Disk Management18
Installation8
Windows XP and Windows Server 20038
Linux8
Configuring the SSD2go9
Configuring on Windows10
Configuring on Mac OS X13
Legal Information18
Copyright18
Acknowledgments18
INTRODUCTION
Welcome to the User Manual for your SSD2go.
With stunning real word transfer speeds of up
to 460MB/s and 85000 IOPS it will change your
mobile workflow.
The SSD2go is fully compliant with USB 3.0 and
backwards compatible up to USB 1.1, making
sure you can use it anywhere.
The SSD2go Twin features two SSD drives in
one compact package.
Furthermore, The SSD2go Pro is additionally eSATA compatible, giving you full SATA3
6Gbit/s performance.
This manual will guide you through configuring
and starting to use the SSD2go.
PACKAGE CONTENTS
Your SSD2go comes out of the box ready to use.
Follow the Quickstart instructions and you are
ready to go.
Note:
You can get the up-to-date version of this
manual at: www.angelbird.com/downloads
3
SSD2go
1 × USB 3.0 cable
SSD2go Twin
2 × USB 3.0 cable
SSD2go Pro
1 × USB 3.0 cable
1 × eSATAp cable
Note:
Please keep the packaging. In the unlikely event
that you have to return the product for servicing or repair it must be returned in the original
packaging.
SYSTEM REQUIREMENTS
Your computer must meet certain requirements
in order to have your SSD2go function correctly.
Minimum requirements
You need one free USB port.
To be able to use both drives of the SSD2go
Twin, you need two USB ports.
To make use of the eSATA functionality of the
SSD2go Pro, you need one free eSATA (for data
transfer) and a USB port (for power).
SUPPORT
Optimal performance
For optimal performance your computer must
be equipped with USB 3.0 ports which support
UASP. Consult your computer manual to see if
your USB 3.0 ports support UASP.
For UASP you need at least Window 8,
Windows 7 (with UASP drivers), Mac OS X 10.8
or later, or any recent Linux distribution to have
the best performance.
For optimal performance with the SSD2go Pro
you need an eSATA 6Gb/s port. Consult your
computer manual to see if your eSATA ports
support SATA 6Gb/s.
4
For support visit the Angelbird Support website
at www.angelbird.com/support, or check the
Getting help section.
You can download an up-to-date version of this
manual at www.angelbird.com/downloads.
QUICKSTART
Your SSD2go comes ready to use for Windows
Vista, Windows 7, Windows 8, Windows Server
2008 and Mac OS X 10.6.5 and later.
If you are using Windows XP, Windows Server
2003 or Linux, you need to install the exFAT
driver first. Follow the instructions in the
Installation section. Once the driver is installed,
follow the steps below.
1. Connect the SSD2go with the USB cable
to your computer like in fig. 1.
2. The drive will mount and show up in your File
Manager.
3. Before you unplug the SSD2go, you must
first safely remove it from your operating
system. See the section Safely removing the
SSD2go for more information.
Failure to safely remove your SSD2go may
result in data loss.
5
Note:
If the SSD2go does not mount on your
computer, check the Troubleshooting section
for help.
Warning!
Failure to safely remove the SSD2go properly
could result in data loss.
fig. 1
SAFELY REMOVING THE SSD2go
SAFELY REMOVING IN WINDOWS
Before you unplug the SSD2go you must first
safely remove it, which means instructing your
computer to finish and stop writing to the
drive. If you do not do this, you could lose data.
Windows 8, Windows 7 and Windows Vista
In the case of the SSD2go Twin, you need to
safely remove both drives.
As shown in fig. 2 a list of devices which can be
unmounted will appear. Click “Eject SSD2go”.
6
To unmount the SSD2go, single-click the eject
button in the system tray.
fig. 2
You can safely unplug when the message from
fig. 3 appears.
Windows XP
To unmount the SSD2go, single-click the eject
button in the system tray.
fig. 3
As shown in fig. 4 a list of devices which can be
unmounted will appear. Click “Safely remove
USB Mass Storage Device”.
You can safely unplug when the message from
fig. 5 appears.
fig. 4
fig. 5
SAFELY REMOVING IN MAC OS X
7
To unmount the SSD2go using the Finder, click
the eject button next to the drive icon as shown
in fig. 6.
When the drive completely disappears you can
safely unplug the device.
fig. 6
INSTALLATION
WINDOWS XP AND
WINDOWS SERVER 2003
LINUX
No installation is needed for most computers.
Only if you use Windows XP, Windows Server
2003 or Linux you need to install the exFAT
driver.
Please visit
http://support.microsoft.com/kb/955704
and download the exFAT driver installation
package for your Windows version.
Most Linux distributions do not have the exFAT
driver pre-installed. In this section we show
how to install the exFAT driver on Ubuntu and
Debian based systems.
The instructions below explain how to install
this driver.
Once you have downloaded the installation
package, start it and follow the instruction on
your screen to install the exFAT driver.
1. Open a terminal. In Ubuntu you can use the
Unity start button or press the key combination
ctrl+alt+t.
Note:
You can skip this chapter if you do not use
Windows XP, Windows Server 2003 or Linux.
8
2. Install the driver packages by giving the
command sudo apt-get install
fuse-exfat exfat-utils and following the
instructions on your screen.
3. Reboot your computer.
After this, you are ready to use the SSD2go.
CONFIGURING THE
SSD2go
Note:
The SSD2go already comes preconfigured out
of the box, so usually there is no need to
configure your SSD2go.
The SSD2go is configured by partitioning and
formatting the drive. You may want to do this
if the default configuration does not suit your
needs.
There are separate instructions for Windows
and Mac OS X.
The default configuration for the SSD2go is the
MBR partition table and a single exFAT partition.
The sections below explain how to configure
your SSD2go with these settings.
9
If you want a different configuration than
explained here, check your operating system
manual or check the links in the Getting Help
section.
Warning !
Partitioning and formatting are both operations that will delete the data on the SSD2go!
Be sure to make a backup of your data before
continuing.
CONFIGURING ON
WINDOWS
10
The Disk Management application is used to
partition and format drives. We can open it by
pressing the key combination Win+R. This will
show the “Run” dialog. Type diskmgmt.msc
and press Enter.
Note
If you cannot find the physical disk representing the SSD2go, disconnect it, wait a few seconds, and reconnect it. You will see the
SSD2go disk disappear and appear.
Note
Alternative ways of opening the
Disk Management application are shown in the
Troubleshooting section.
2. If there are any volumes on the SSD2go, you
need to remove them first. Make sure you only
delete the volumes on the SSD2go, not any
other disks.
Partitioning a disk means the creating of separate volumes (drive letters, mount points) on a
single physical disk. We will create only a single
volume on the disk.
Warning !
Deleting a volume will delete all data from that
volume!
1. First we need to find the SSD2g. The
window is divided into two parts, as shown in
fig. 7. On top is a list of volumes and on the
bottom a list of physical disks. In the list of
physical disks, locate the SSD2go.
The SSD2go will be the physical disk on the
bottom of the list, but above any CD drive.
fig. 7
Right-click on the volume you wish to remove,
and click “Delete Volume”, as shown in fig. 8.
Repeat this for all volumes on the SSD2go.
fig. 8
11
3. Now we will create a new volume on the
SSD2go. In the “Unallocated” area, right-click
and choose “New Simple Volume” as shown in
fig. 9. Windows will now guide you through the
process of creating a new volume.
3.A. Click “Next” twice to accept the default
volume size and then the default drive letter.
See fig. 10 and fig. 11.
3.B. On the “Format Volume” screen (fig. 12),
you need to select the filesystem.
fig. 9
fig. 10
fig. 11
fig. 12
Set the filesystem to exFAT if you want to use
your SSD2go with both Windows and Mac OS
X. Choose NTFS If you want to use your SSD2go
only with Windows. Read Choosing a file system for other options.
Also set the volume name to “SSD2go” and
enable “Perform a quick format”.
When ready, click next.
12
3.C. Click finish to confirm you want to create
the volume as in fig. 13.
3.D. Windows will now create the volume, and
it will show up in the list of volumes as in fig.
14.
Now the volume has been created. The drive
will mount and show up in “Computer” (Windows 8, Windows 7, Windows Vista) or “My
Computer” (Windows XP).
fig. 13
fig. 14
CONFIGURING ON MAC OS X
13
The Disk Utility is used to format and partition
drives. It can be found under
Applications → Utilities → Disk Utility.
Partitioning a disk means the creating of
separate volumes on a single physical disk. We
will create only a single volume on the disk.
Start the Disk Utility and follow the steps below.
fig. 15
1. Select SSD2go from the list of disks as in fig.
15.
2. Select the erase tab and select a Format. See
fig. 15. Choose exFAT if you want to use your
SSD2go with both Windows and
Mac OS X. For more information, read the
Choosing a file system section. Click “Erase”
when you have made a choice (fig. 16).
Warning !
After clicking “Erase” all data will be deleted
from the drive.
3. Mac OS X will now create and mount the
volume.
fig. 16
TECHNICAL SPECIFICATIONS
SSD2GO
14
Type
Portable USB SSD drive
Features
In-drive UPS, Overload protection, TCG OPAL
Auto-TRIM, ECC, RAISE, EMS protection
Built-in cache, SMART
Connectivity
Full Size USB 3.0 5Gbit/s (x2 for Twin)
Flash
Grade A Intel® or Micron® Synchronous MLC
Warranty
3 Years
Controller
SandForce® SF-2281/2282 Series
Target User
Consumer, power user from home, gaming to
business
Sustained Read speed
Up to 460MB/s
Standard Capacity
120/240/480 GB (SSD2go)
Sustained Write speed
Up to 460MB/s
IOPS
85000
Operating temperature (load)
30°C to 35°C
Size
127mm x 66mm x 10mm
(5.0“ x 2.59“ x 0.39“)
Access Time
< 0.1ms
MTBF
> 2,000,000 hours
TECHNICAL SPECIFICATIONS
SSD2GO TWIN
15
Type
Portable USB SSD drive
Features
In-drive UPS, Overload protection, TCG OPAL
Auto-TRIM, ECC, RAISE, EMS protection
Built-in cache, SMART
Connectivity
Two times full Size USB 3.0 5Gbit/s
Flash
Grade A Intel® or Micron® Synchronous MLC
Warranty
3 Years
Controller
SandForce® SF-2281/2282 Series
Target User
Consumer, power user from home, gaming to
business
Sustained Read speed
Up to 460MB/s
Standard Capacity
Any combination of 120, 240 or 480 GB drives
Operating temperature (load)
30°C to 35°C
Size
127mm x 66mm x 20mm
(5.0“ x 2.59“ x 0.79“)
Sustained Write speed
Up to 460MB/s
IOPS
85000
Access Time
< 0.1ms
MTBF
> 2,000,000 hours
GETTING HELP
TECHNICAL SPECIFICATIONS
SSD2GO PRO
Type
Portable USB SSD drive
Connectivity
Full Size USB 3.0 5Gbit/s
eSATA SATA3 6Gbit/s
Warranty
3 Years
Target User
Consumer, power user from home, gaming to
business
Standard Capacity
Any combination of 120, 240 or 480 GB drives
Operating temperature (load)
30°C to 35°C
Size
127mm x 66mm x 20mm
(5.0“ x 2.59“ x 0.79“)
Features
In-drive UPS, Overload protection, TCG OPAL
Auto-TRIM, ECC, RAISE, EMS protection
Built-in cache, SMART
Flash
Grade A Intel® or Micron® Synchronous MLC
Controller
SandForce® SF-2281/2282 Series
Sustained Read speed
Up to 460MB/s
Sustained Write speed
Up to 460MB/s
IOPS
85000
Access Time
< 0.1ms
MTBF
> 2,000,000 hours
16
For general information regarding
partitioning, see
http://en.wikipedia.org/wiki/Disk_partitioning.
For more information on formatting and
partitioning in various operating systems you
can read the resources below.
Windows
http://windows.microsoft.com/en-US/windows-vista/Create-and-format-a-hard-diskpartition
Mac OS X
Open Disk Utility and choose
Help → Disk Utility Help.
Ubuntu Linux
https://help.ubuntu.com/12.10/ubuntu-help/
disk-partitions.html
For other help, check the Angelbird Support
section at www.angelbird.com/support.
TROUBLESHOOTING
17
THE SSD2GO DOES NOT MOUNT
CHOOSING A FILE SYSTEM
If you are using Windows XP, Windows Server
2003 or Linux you first need to install the exFAT driver.
A file system / format is the way a computer
stores files on a disk. Different file systems
have different advantages and disadvantages.
Mac OS X, Windows and Linux have support for
a number of different file systems.
You can read the installation instructions in the
Installation section.
The SSD2go comes preconfigured with exFAT.
Angelbird recommends exFAT since it works
with most modern computers.
Note:
FAT32 has a file size limit.
The largest a file can be is 4 Gigabyte.
NTFS 5
All Windows versions
Mac OS Extended 6
All OS X versions / Linux.
EXT4 7
Linux
Use the information below to choose the best
file system for you.
exFAT 1,2
Windows 8 / Windows 7 / Windows Vista / Windows Server 2008 / Mac OS X 10.6.5
and later
FAT32 3,4
All Windows version / Mac OS X / Mac OS 9 / Linux.
(1) Windows XP, Windows Server 2003 supported with the
Microsoft exFAT driver.
(2) Linux supported with the 3rd party exFAT driver.
(3) With FAT32 the maximum file size is 4 Gigabyte.
(4) Called “MS-DOS (FAT)” in the Mac OS disk utility.
(5) Mac OS X, Linux supported with the 3rd party NTFS-3G driver.
(6) Windows supported with the 3rd party Boot Camp IFS driver.
(7) Mac OS X supported with the 3rd party Paragon ExtFS driver.
LEGAL INFORMATION
18
OPENING DISK MANAGEMENT
COPYRIGHT
ACKNOWLEDGMENTS
Depending on your personal preferences
opening the Disk Management application may
work differently. Below we give a some
alternative options to open this application.
Copyright © 2013 Angelbird Technologies
GmbH. All rights reserved.
SSD2go is a registered trademark of Angelbird
Technologies GmbH in the United States and
other countries.
Windows 8
• Start a search in the “Settings” category for
“Format”, and click “Create and Format hard
disk partitions.”
• Press Win+X, and click on
“Disk Management”.
Windows 7, Windows Vista
• Open the start menu. In the search field, type
“Format”. Click “Create and Format hard disk
partitions.”
All Windows versions
• Right-click on “Computer”, choose “Manage”,
then select “Disk Management” under
“Storage” in the list of categories on the left.
• Press Win+R to open the run dialog. Type
diskmgmt.msc and press Enter.
Windows is a registered trademark of Microsoft
Corporation in the U.S. and other countries.
Apple, Mac and OS X are registered trademarks
of Apple Inc. in the U.S. and other countries.
Linux is a registered trademark of Linus
Torvalds in the U.S. and other countries.
Intel is a registered trademark of Intel
Corporation in the U.S. and/or other countries.
Micron is a registered trademark of Micron
Technology, Inc.
SandForce is a registered trademark of LSI
Corporation in the U.S. and/or other countries.
201307171617
Angelbird Technologies GmbH
Millennium Park 6
6890 Lustenau
Austria
Tel: +43 5577 21515
Fax: +43 5577 21515 99
Email: [email protected]
VAT No. ATU66365211
www.angelbird.com
For support, please visit
www.angelbird.com/support
19