1
Table of Contents
Chapter 1 - Getting Started
1
Important Handling Information
15
Introduction
1
Patents, Trademarks & Copyrights
16
What’s Inside?
1
Regulatory Information
16
Getting Started
Step One (Connect Your Display)
Step Two (Connect Your Mouse and Keyboard)
Step Three (Connect Your External Hard Drive)
Step Four (Connect to the Network)
Step Five (Connect the Power Cord)
Step Six (Turn Your Computer On)
1
1
2
2
2
2
2
Glossary
17
Corporate Information
17
Your Operating System
openSUSE Linux
Windows 7/8
2
3
3
Move Data Onto Your X7A Modular Computer
Downloading/Installing Programs from the Internet
Installing Programs from a USB Thumb Drive
Installing Programs from a DVD/CD
Copying Existing Files to the X7A Modular Computer
from an Older PC
3
3
3
Chapter 2 - External Components
5
Chassis Design
Channels & Guides
Attaching & Mounting
5
5
6
Chapter 3 – Internal Components
7
The Classic Motherboard
7
The Primary I/O Board and Secondary I/O Board
7
The Dangers of Static Electricity
8
Removing & Replacing Boards
8
Turn Off Your X7A Modular Computer
8
Restarting Your X7A Modular Computer
8
Chapter 4 – BIOS Settings
9
Accessing the BIOS Settings
9
Navigating the BIOS Menu
9
Changing the Boot Device Priority
9
3
3
Saving Your Settings and Exiting the BIOS Setup Utility
10
Chapter 5 – Troubleshooting
11
Primary Checklist
11
Xi3 Modular Computers Hate These
12
Energy Saving Settings
12
Service & Support
13
Chapter 6 – Legal Stuff
15
Important Safety Information
15
Xi3 Corporation’s mission is to provide efficient and
low-maintenance technological solutions that improve lives
with minimal environmental impact. We’ve designed the
X7A Modular Computer to meet the latest ENERGY STAR®
guidelines for energy efficiency. ENERGY STAR is a U.S. Environmental Protection Agency voluntary program to reduce
energy consumption and pollution. Xi3 computers are energy efficient and come with default ENERGY STAR settings
recommended for optimal energy savings. For specifics, see
“Energy Saving Settings” on page 12 of this manual.
Table of contents
i
Chapter 1 - Getting Started
Introduction
Ask 100 people how long they kept their last computer and roughly 90 will likely answer between 3 to 5 years.
Why is that? Why can’t personal computers have a useful life of 6, 8 or even 10 years? The answer is “They can.”
Introducing the Xi3 Modular™ Computer (Model X7A) from Xi3 Corporation.
More than 10 years in development and protected by more than 1,000 trademarks, copyrights, patents and patents pending
worldwide, the X7A Modular Computer breaks the mold for PCs by making it possible for virtually anyone to update, upgrade
and/or modify their computer, and as a result, extend its useful life beyond what has been possible before.
Clearly, this reality gives you—the computer owner—greater control of your computing life, as well as decreasing the amount
of money you spend for the ability to compute during the life of your X7A Modular Computer. It also means that you can help
cut back on the millions and millions of computers that end up in landfills around the world each year, a growing problem of
eWaste for the environment.
Thank you for inviting Xi3 Corporation into your life and for becoming part of the Xi3 Revolution.
What’s Inside?
When you open the box containing your Xi3 Modular Computer, you
should find:
• One Xi3 Modular Computer (Model X7A),
• One Power Cord,
• One Power Adaptor,
• One X7A Modular Computer Quick-start Guide/Limited Warranty sheet.
Getting Started
On this and the following pages, we will walk you through the steps
to begin using your X7A Modular Computer right away.
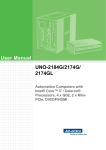
Shown to the right is an illustration of the standard I/O Plate of the
X7A Modular Computer.
Step One (Connect Your Display)
To get started, first connect your monitor cable to your display and
then to either a miniDP port or the DisplayPort/HDMI combo port on
the back of your X7A Modular Computer. {NOTE: The X7A Modular
Computer can be connected to virtually any type of display, including a computer monitor, screen, LCD or even a television display
at a maximum resolution of up to 4096x2160 pixels. Within these
parameters, the X7A Modular Computer can support up to 4 monitors simultaneously as long as the total resolution is not greater than
4096x2160. If you choose to do so, you may connect additional
monitors to the X7A Modular Computer now or at a later time.}
Chapter 1 Getting started 1
Step Two (Connect Your Mouse and Keyboard)
Connect your keyboard cable to any USB port on the back of your
X7A Modular Computer. Next, connect your Computer Mouse cable
to a different USB port on your X7A Modular Computer. {NOTE: If your
keyboard and mouse share a combo USB cable, connect this to any USB
port. Additionally, you can also use a wireless keyboard and/or mouse with
the X7A Modular Computer; if you choose to do so, insert the wireless
USB keyboard and/or mouse module(s) into any USB port(s) on the back
of the X7A Modular Computer.}
Step Three (Connect Your External Hard Drive)
If you will not be using an external hard drive, skip this step. If, however,
you will be using an external hard drive, connect this device into the
appropriate port on the back of your X7A Modular Computer: USB or
eSATAp. {NOTE: When we refer to external hard drives in this Step,
we are NOT referring to USB sticks or thumb drives. This is especially
noteworthy as a USB thumb drive cannot be used to launch a Windows
Operating System. Additionally, although it is possible to launch
openSUSE and other Linux Operating Systems with a USB thumb drive,
we strongly recommend against doing so as this will seriously degrade
the performance of the Operating System. Additionally, if you are using an
eSATA hard drive and it is not powered via a separate power cord, you will
need to connect the eSATA hard drive to your X7A Modular Computer with
an eSATAp cable, which provides power to your drive.}
Step Four (Connect to the Network)
If you intend to surf the World Wide Web or use email, you will need a network connection. For many X7A Modular Computer
owners, this will involve plugging an Ethernet cable into the Ethernet Port on the back of your computer. (See photo on
Page 1 for location of the Ethernet Port.) If, however, you want to connect to a network wirelessly, you will need a wireless
connection for your X7A Modular Computer, such as a wireless network adaptor, which can be plugged into one of the
unused USB Ports on the back of your computer.
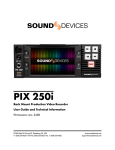
Step Five (Connect the Power Cord and Power Adaptor)
First join the Power Cord to the Power Adaptor as shown in the illustration
to the right. Next connect the small round end of the Power Cord to the
Power Cord port (labeled 19Vdc) found on back of the X7A Modular
Computer. Then insert the three-prong AC plug directly into an electrical
wall outlet (or a surge protector/power strip). When your Power Cord/
Power Adaptor are properly connected to your X7A Modular Computer
and is similarly plugged into an electrical outlet or via surge protector/power strip, a green indicator light on the Power
Adaptor will begin to glow, signifying that it is receiving power. Similarly, an orange LED indicator light inside the X7A Modular
Computer will light up when the computer itself is receiving power. {NOTE: If either indicator light does not come on, make
sure all power cord connections are connected properly.}
Step Six (Turn Your Computer On)
As shown in the illustration on page 1 of this User Manual, the Power Button is found in the upper right-hand corner of the
back of the X7A Modular Computer. Briefly depress this Power Button to turn on your X7A Modular Computer. {NOTE: You
should also turn on your computer monitor/display at this time.}
Your Operating System
The standard Operating System for the Xi3 Modular Computer (Model X7A) is openSUSE Linux. However, based upon your
preferences, you may have purchased your computer with a different Operating System pre-installed, such as Windows® or
even an Internet-based operating system. {NOTE: The X7A Modular Computer will work with any 32- or 64-bit Operating
System designed for x86-based computers, such as variants of UNIX®, AIX®, other Linux Operating Systems, and even Webor Cloud-based Operating Systems.}
Chapter 1 Getting started 2
Listed below are instructions for getting started with the two most common operating systems.
openSUSE Linux
After completing Steps One through Six above (including turning on
your X7A Modular Computer and your computer monitor/display), the
main screen of the openSUSE Linux operating system should appear
on your computer monitor, signifying that you are ready to begin using
your X7A Modular Computer. {NOTE: When shipped from the factory,
the initial Root Password on an X7A Modular Computer pre-loaded with
openSUSE Linux is xi3password – all in lowercase. Please reset your
Root Password after initial use.}
Windows 7/8
After completing Steps One through Six on the previous pages
(including turning on your X7A Modular Computer and your computer
monitor/display), the main screen of your Windows operating system
should appear on your computer monitor, signifying that you are ready
to begin using your X7A Modular Computer.
Move Data Onto Your X7A Modular Computer
If you purchased your X7A Modular Computer with certain Software
Applications pre-installed on your machine, you should be able to see
and use these programs once you have turned on your computer.
Loading additional Software Applications onto your X7A Modular
Computer can be accomplished either by downloading/installing these programs via the Internet or by transferring/installing
the programs from a DVD/CD disc or USB drive onto your X7A Modular Computer.
Downloading/Installing Programs from the Internet
To download and install Software Applications from the Internet onto your X7A Modular Computer, take the following steps.
1. Make sure you are connected to the Internet.
2. Go to the appropriate page on the web.
3. Follow the instructions for downloading the application.
4. Download and install the application.
Installing Programs from a USB Thumb drive
To install Software Applications from a USB thumb drive onto your X7A Modular Computer, take the following steps.
1. Insert the USB thumb drive into an open USB port on the back of your X7A Modular Computer.
2. Within the Operating System, highlight the Software Applications you wish to install onto your X7A Modular Computer.
3. Follow the Operating System instructions and install the Software Applications to your X7A Modular Computer hard drive.
Installing Programs from a DVD/CD
To install Software Applications from a DVD or CD onto your X7A Modular Computer, take the following steps.
1.Connect an external DVD/CD drive to your X7A Modular Computer (typically through an available USB port on the back
of your X7A).
2.Insert the DVD or CD into your DVD/CD drive.
3.Within the Operating System, highlight the Software Applications you wish to install onto your X7A Modular Computer.
4.Follow the Operating System instructions and install the Software Applications to your X7A Modular Computer hard drive.
Copying Existing Files to the X7A Modular Computer from an Older PC
If you have files, photos, videos or other forms of data on your existing computer that you would like to move onto your X7A
Modular Computer, there are several ways to accomplish this. If you have a lot of files to copy and you have access to a DVD
or CD burner, you can copy these files onto a DVD or CD and then follow the steps outlined above in the Installing Programs
Chapter 1 Getting started 3
from a DVD or CD or Installing Programs from a USB thumb drive sections. You will be installing files instead of “programs.”
There are also numerous software applications that are free, or for a nominal fee, that can be installed onto your X7A Modular
Computer and will walk you through the file transfer process step by step.
If you have only a few files to copy, however, you may choose to email the files to yourself as this is often the easiest way
to move files from one computer to another. Simply send an email to yourself from your old computer and attach the files
you want to that email. Then open the email on your X7A Modular Computer and save the files onto your new X7A Modular
Computer. Begin
Once you have successfully booted-up/turned-on your X7A Modular Computer and have installed and/or transferred all of the
Software Applications and files/data onto your new machine, you’re ready to start using your new X7A Modular Computer.
Chapter 1 Getting started 4
Chapter 2 - External Components
There are three main building block concepts within the design and make up of any Xi3 Modular Computer. In this chapter,
we’ll address the external modularity of the X7A Modular Computer.
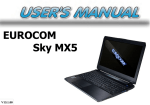
Chassis Design
The X7A Modular Computer is unlike any other
computer ever invented. This uniqueness
starts with the external chassis. As shown in
the illustration to the right, the X7A Modular
Computer chassis is made up of 4 pieces, held
together by 8 screws.
The I/O Plate allows users to access and use the various
Communication, Video and Audio Ports, and the Power
Buttons on the back of an Xi3 Modular Computer. The I/O
Plate further serves to hold the boards of the computer in
place when the I/O Plate and boards are slid into the four
channels found inside the chassis.
Channels & Guides
The front, top and bottom of the outside of an Xi3 Modular
Computer chassis are concave. Each of these concave surfaces
are matched with a pair of channels that run the entire length
of the chassis, with one each near the outer edges of the top,
front and bottom of the chassis. These channels are designed to
accept corresponding guides to allow an Xi3 Modular Computer
to be mounted or attached to many types of surfaces in multiple
environments.
Chapter 2 External Components 5
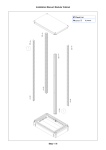
Attaching & Mounting
As noted in Channels & Guides on the previous page, one value of
the channels found on the outside of any Xi3 Modular Computer
chassis is the ability to use an Xi3 Mounting Bracket to semipermanently or permanently attach or mount an X7A Modular
Computer to
• A wall,
• A ceiling,
• A desk or table,
• To the back of a computer monitor (as shown to the right), or to
• Any rigid surface.
This ability to use the channels found on the outside of each X7A
Modular Computer chassis and corresponding guides on Xi3
Mounting Brackets is an example of the innovative external design
of the Xi3 Computer Architecture.
Chapter 2 External Components 6
Chapter 3 – Internal Components
So how does building block approach work inside an Xi3 Modular
Computer? Actually, there are three main aspects to internal modularity
within the design and make up of any Xi3 Modular Computer.
The Classic Motherboard
The standard motherboard of a computer is a printed circuit board that
holds/contains all of the various components and devices on one PCB,
including the processor(s), RAM, storage/hard drive, external communication ports, power supply, etc. In the case of an Xi3 Modular Computer, this
is not so.
X7A Modular Computers utilize the Xi3 Computer Architecture to divide the
classic motherboard into 3 interconnected but separate boards, specifically
• The Xi3 Processor Board, and
• Two Xi3 Input/Output (I/O) Boards.
Xi3 Modular Computer components
being removed from the Chassis
The Xi3 Processor Board is located in the middle of the 3 boards shown
to the right and it contains the microprocessor or brains of your X7A
Modular Computer. The RAM (or short-term memory) for your X7A Modular
Computer is also housed on this module.
The Primary I/O Board and Secondary I/O Board
Connected Boards
The Primary I/O Board (PIO) on the right side of the
illustration is responsible for handling the majority of all
external communications, as this is where users can
access and connect most cables and devices to the
X7A Modular Computer. The (PIO) and the Secondary
I/O Board (SIO) are also the boards most likely to be
updated and/or replaced as new capabilities and/or
functions are introduced into the marketplace.
Not only does this ability to replace a PIO and SIO
make it possible to extend the useful life of your X7A
Modular Computer for years beyond today’s standard
Secondary I/O Board Processor Board Primary I/O Board
of 3 to 5 years, it also means that you will be able to
change the main purpose of your computer in the
future. In other words, if you purchased this X7A Modular Computer for basic computing purposes (such as word processing,
surfing the Web, email, and the like), you might decide to transform this machine into a Home Automation computer in the
future: a device that controls your heating, air conditioning, lighting, security system and more. And making such a change
could be as simple as changing the PIO or SIO Board in your X7A Modular Computer with a new board and connecting your
Modular Computer to your home network.
Optional PIO and SIO Boards will be available from Xi3 Corporation and Authorized Xi3 Partners in the future.
Chapter 3 Internal Components 7
The Dangers of Static Electricity
Like all computers, X7A Modular Computers are powered by electricity. As a result, a random static electricity charge can
cause serious damage to your X7A Modular Computer (just as it can to any electrical device).
If you choose to open your X7A Modular Computer for any reason, you must do everything possible to prevent an accidental
static electrical discharge. Specifically,
• DO ground yourself, while seated, before touching or handling your X7A Modular Computer by touching any grounded metallic object NOT connected to or touching the X7A Modular Computer.
• DO NOT open or work on your X7A Modular Computer in a carpeted room or a room with a linoleum floor.
• DO NOT work on or open your X7A Modular Computer during or prior to an electrical storm.
Removing & Replacing Boards
Upgrading, updating and/or replacing a PIO or SIO Board within an X7A Modular Computer is as simple as following the 12step process below:
1. Turn off your X7A Modular Computer (as noted above).
2. Disconnect the Power Cord/Power Adaptor and all other cords from your X7A Modular Computer.
3. Unscrew the 4 screws on one honeycombed endcap of the X7A Modular Computer chassis. {NOTE: This requires a
Torx T-10 wrench or bit.}
4. Remove the honeycombed endcap.
5. Slide out the 3 boards and I/O Plate from inside the X7A Modular Computer chassis.
6. Remove the I/O Plate from the 3 boards.
7. Detach the PIO Board or SIO Board (as needed) by pulling it upward and away from the Xi3 Processor Board.
8. Attach the replacement PIO or SIO Board by clicking it into place in the corresponding slots on the Xi3 Processor Board.
9. Reattach the I/O Plate onto the 3 boards.
10. Slide the 3 boards and the I/O Plate back into the X7A Modular Computer chassis. {NOTE: If your new PIO or SIO Board
is not identical to the one being replaced, you will need to use a new I/O Plate. You should have received this new I/O
Plate with your new PIO or SIO Board.}
11. Reattach the honeycombed endcap by screwing the 4 screws back into place.
12. Reconnect the Power Cord/Power Adaptor and all other cords to your X7A Modular Computer.
Turn Off Your X7A Modular Computer
Here are the simple steps to turn off or shut down your X7A Modular Computer.
1. Close any open files on your X7A Modular Computer.
2. Close any applications in use on your X7A Modular Computer.
3. Close any open web browsers.
4. For openSUSE Linux users:
a. Find and click on the openSUSE icon found in the bottom left-hand corner of your display screen.
b. Next click once on the “Kickoff Application Launcher” icon. Then use your cursor to mouseover the “Leave” icon.
Next click once on the “Shutdown” icon.
c. The openSUSE Linux Operating System will now automatically shutdown in 30 seconds. Or you can expedite the
shutdown by clicking your cursor once on the “Turn off computer” button.
5. For Windows users:
a. Click on the Start icon in the bottom left-hand portion of your monitor.
b. Click on the Shut Down icon.
Restarting Your X7A Modular Computer
You can restart your X7A Modular Computer by briefly depressing the Power Button on the back of the computer.
Chapter 3 Internal Components 8
Chapter 4 – BIOS Settings
Your Xi3 Modular Computer (Model X7A) includes a BIOS (Basic Input/Output System) facility which is a low-level software
that is constantly running while your system is on. The BIOS has several functions, but perhaps most importantly it checks the
hardware to make sure everything is working properly, then proceeds to load the Operating System. Most X7A owners should
not need to interact with the BIOS, but it has some settings that may be important to you depending on how you use your
computer.
Accessing the BIOS Settings
To access the BIOS settings menu, do the following:
• Turn on or restart your computer.
• Press the DEL (Delete) key repeatedly before the Operating System begins loading.
Shortly, you should see the Main BIOS Setup screen, which looks like this:
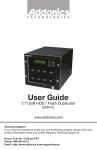
Navigating the BIOS Menu
You can use the left/right arrow keys on your keyboard to navigate between screens, and the up/down keys to navigate between individual settings items. As each item is selected, some help and explanation of the item is displayed in the right-hand
pane of the screen.
Changing the Boot Device Priority
If your computer is not loading its Operating System properly, or if you have attached a new device (e.g. a removable DVDROM or USB drive) and want to boot from that device instead, you may need to change your boot device settings to get the
desired result.
• Navigate to the “Boot” menu screen using your left/right arrow keys
• On the Boot screen you will see the current priority ordered list of devices that the system will attempt to load its Operating System from:
• (If applicable) Plug in your boot device with power off, then access BIOS the next time your “Power On” your
computer.
• Your primary internal SSD will appear in the list something like this: “(xx)GB SATA III 6G mSATA w/E”.
• And a USB drive (thumb drive) may look like this: “USB KEY” or “USB HDD”.
• And a Network Boot Device (i.e. “PXE Boot”) will look like this: “[Qualcomm Atheros Boot]”.
• You can change the priority order of devices by using the up/down arrow keys to highlight a device and then selecting the
appropriate Boot device.
Chapter 4 BIOS Settings 9
Note: To boot from an external device, select “Hard Drive BBS Priorities” listing and move the device to Boot Option #1 in that
list then press Escape to go back to the Boot Menu. Also move device to Boot Option #1 under Boot Option Priorities then
save and exit. (Do not select the “UEFI:” version of device).
TIP: If you want to just make a one-time change to select a different boot device, you can also do this using the “boot on
the fly” method and avoid getting into the BIOS Setup menu. Specifically, instead of pressing the DEL (Delete) key as above,
press the F7 key instead. A boot device menu will appear. Just select the boot device you want from the list.
Saving Your Settings and Exiting the BIOS Setup Utility
When you are satisfied with your new BIOS settings and ready to test them, simply toggle through the on-screen menu to the
“Save & Exit” Tab, then highlight “Save Changes and Exit”, press Enter and select “Yes” on the screen. Following these steps
will save all of your BIOS changes and re-boot your X7A Modular Computer normally.
Chapter 4 BIOS Settings 10
Chapter 5 – Troubleshooting
Below is a list of some common problems computer owners can encounter and descriptions of how to deal with problems if
they occur with your Xi3 Modular Computer (Model X7A).
Primary Checklist
CONDITION: Display/monitor connected to your X7A Modular Computer goes black or suddenly “freezes.”
• You may need to force your X7A Modular Computer to shut down. You can do so by depressing and holding the power
button on the back of your X7A for approximately 5 seconds. {NOTE: You will know your X7A Modular Computer is shut
down because the internal indicator light is orange and not green.}
• Try restarting your X7A Modular Computer.
• Make sure all power cords are connected properly to your X7A Modular Computer and to a functioning electrical outlet.
• Make sure that all other cables are connected properly to your X7A Modular Computer, including Computer Monitor,
Mouse, Keyboard, Internet connection and any other peripheral devices.
• Briefly press the Power Button on the back of your X7A Modular Computer; this should restart your X7A Modular
Computer. If not, please contact Xi3 Technical Support at 1-855-Xi3-HELP (1-855-943-4357) or email support @Xi3.com.
CONDITION: X7A Modular Computer starts/turns on, but the Internet connection does not work while using an Ethernet
cable.
• Ensure that the Ethernet cable is securely connected to both your X7A Modular Computer and the Ethernet Port in the
wall (or in your router).
• If the Ethernet cable was not connected securely, reconnecting your Ethernet cable should restore Internet access.
• If your Ethernet cable is securely connected to your X7A Modular Computer and your Internet router/gateway, and
Internet access is not restored, is your Internet Router/Gateway turned on? If your Internet Router/Gateway is turned
on but you do not have Internet access, restart your Internet Router/Gateway; this should restore Internet access.
• If your Internet Router/Gateway is turned off, restart your Router/Gateway; this should restore Internet access.
• If you have restarted your Router/Gateway but Internet access is not restored, it’s possible that there may be a problem
with your Internet Service Provider (ISP). Please contact your ISP to confirm that you are connected with their service.
• If your Internet connection with your ISP is still operational, but Internet access is not restored, contact Xi3 Technical
Support at 1-855-Xi3-HELP (1-855-943-4357) or email support @Xi3.com.
CONDITION: Computer will not boot from a desired external device.
• Follow the instructions on Page 9 for “Changing the boot device priority”.
CONDITION: “No OS Found” message displayed when system turned on.
• “Power Cycle” the computer by powering down the machine (depress and hold the Power Button for approximately 5
seconds until the computer shuts off). Next, unplug the Power Cord for a few seconds and then plug it back in. Restart
the computer. It should boot up properly into the Operating System (OS).
• If the “No OS Found” message still appears after performing the above Power Cycle step, ensure that there are no USB
storage devices (e.g. thumb drives) plugged into the computer, as the computer may be attempting to boot from one of
them. If this is the case, remove the USB storage device and try restarting your X7A Modular Computer.
• If your X7A Modular Computer does not boot up properly after following these steps, please contact Technical Support at
Xi3 Corporation.
CONDITION: Fan making loud noises.
• If the system starts making loud noises, it is probably due to a fan bearing going bad. Eventually the fan will stop working
and the machine will overheat and shut down to protect components from getting damaged. The fan simply needs to be
replaced. Most customers can fix this problem themselves with a replacement fan, Torx wrench, needle nose pliers and
some basic instructions.
• The X7A Modular Computer has two fans. If one goes bad, it is recommended that you replace both at the same time as
a preventative measure.
• Another possible reason for loud fan noises is a fan becoming slightly turned or leaning in one direction or another. Before
replacing a fan, try picking up the computer and rotating the computer in the air while it is on. This can help a fan settle
back into its original position.
• Some customers may be inclined to remove an endcap and cinch down the fan screws, but this is not recommended.
The screws should be finger-tightened with a Torx T-10 wrench.
• If the system continues to make loud noises, please contact Xi3 Technical Support at 1-855-Xi3-HELP (1-855-943-4357)
or email support @Xi3.com.
Chapter 5 Troubleshooting 11
CONDITION: Computer “goes to sleep” and does not wake up.
• One possible solution for this problem is to refresh the BIOS. Xi3 Technical Support can provide customers with the files
they need to reload the BIOS, and all you need is a bootable USB device to put them on. Call Xi3 Tech Support for details
at 1-855-Xi3-HELP (1-855-943-4357).
• Another workaround is to set the sleep mode in Windows to “Never.” Windows will still shut the screen off and the
computer will still go into hibernation mode, indicated by an orange light on the side of the chassis. But the computer
should then wake up consistently when you move the mouse or touch one or more keys on the keyboard.
• If, after following these steps, your X7A Modular Computer will not boot up, please contact Xi3 Technical Support at
1-855-Xi3-HELP (1-855-943-4357).
CONDITION: Can’t find password for ROOT access on openSUSE Linux.
• The default password is: xi3password
• We recommend that you change your password and record it in a secure location.
Xi3 Modular Computers Hate These
There are certain things that can damage or destroy your X7A Modular Computer. To ensure optimal operations and the
longest possible life for your X7A Modular Computer, please keep it away from
• Water (and liquids of any kind) • Non-Operating Temps
• Dirt (and high dust levels) (Lower than -4F° or greater • Static Electricity than 158F°) • Magnets • Elevation (above 10,000 Ft.)
We also recommend that you plug your X7A Modular Computer into a wall outlet via a surge protector/power strip to help
prevent damaging your X7A Modular Computer from electricity spikes and surges or “dirty” electrical power.
Energy Saving Settings
Your X7A Modular Computer is designed to be energy efficient in accordance with ENERGY STAR guidelines. It initially has
been configured with default settings intended to provide a good balance between performance and energy consumption.
Your computer runs on 30 Watts of power, or about 30-90 percent less electricity than used by traditional desktop computers. To find out more about potential savings, visit our Energy Savings Calculator.
Lower energy consumption by your X7A is good for the environment. Other environmental benefits include its modular design
to extend computer life by up to 10 years; the chassis is recyclable; and its small size means a reduction of materials and
e-waste in the manufacturing process.
Setting
Default Timing
Turn off display
• Disables video output to the monitor and allows the
monitor to enter a power-saving mode.
• Video and monitor will automatically power-on upon
user activity (e.g. mouse or keyboard).
• X7A Modular Computer keeps running while screen is
blank.
10 Minutes (after no keyboard or mouse activity).
Sleep Mode
• The X7A Modular Computer enters a power-saving
state and stops running.
• Your work, applications and system state remain saved
in memory as long as the power supply is not disconnected.
• The system will resume upon any user input (keyboard
or mouse).
30 Minutes (after no keyboard or mouse activity).
Chapter 5 Troubleshooting 12
To wake your X7A Modular Computer from Sleep Mode, simply move your mouse or press any key on the keyboard. By default, a welcome screen will appear and prompt you to enter your password before resuming your saved session. Only the top
two USB 2.0 / eSATAp ports on your X7A provide power during the Sleep Mode, so your keyboard, mouse or other device
must be plugged into one of these two ports to be able to wake up the system from Sleep Mode.
These power settings can easily be changed to suit your needs from within the Operating System as follows—
Windows 7 users:
1. Click on “Start” icon at bottom left of screen, then click on “Control Panel.”
2. In the “Control Panel” window, click on “System and Security.”
3. In the “System and Security” window, click on “Power Options.”
4. In the “Select a Power Plan” window, click on “Change plan settings” to the right of whichever power plan is highlighted (by default the one called “Balanced”).
5. Use the “Turn off the display” control to adjust the amount of inactive time before the display goes into power-saving mode.
6. Use the “Put the computer to sleep” control to adjust the amount of inactive time before the system enters Sleep Mode.
openSUSE users:
1. In the “Desktop Folder” window, double-click on “Personal Settings.”
2. In the “Personal Settings” window, double-click on “Power Management.”
3. Click on “Power Profiles” icon in the left column of window.
4. Use the “Screen Energy Saving” control to adjust the amount of inactive time before the display goes into power-saving mode.
5. In the “Default Timing” setting, 10 minutes of no keyboard or mouse activity automatically disables video output to the
computer monitor/display and allows the monitor to enter power-saving mode. Please note that video output is automatically powered-on upon new user activity, such as using the mouse or keyboard. This is possible because your Xi3
Modular Computer keeps running while the screen is blank.
6. After 30 minutes of no keyboard or mouse activity, the X7A Modular Computer enters “Sleep Mode,” a power-saving
state that temporarily halts computer operations. Please note that your work, applications, and system state remain
saved in memory as long as the power supply is not disconnected. This is important because system activities will
resume upon any user input (keyboard or mouse). You can use the “Suspend Session” control to adjust the amount of
inactive time before your X7A Modular Computer enters Sleep Mode.
Service & Support
Your X7A Modular Computer comes with a 3-year Limited Warranty from Xi3 Corporation and Authorized Dealers, Distributors
or Service Providers. {NOTE: A printed copy of the official terms and conditions of our Limited Warranty was enclosed inside
your X7A Modular Computer packaging.}
If you need service or support, contact Xi3 Corporation or take your X7A Modular Computer to an Authorized Xi3 Retailer or
an Authorized Xi3 Service Provider.
Feel free to visit www.Xi3.com/Support for the latest online service, support, information and news about your X7A Modular
Computer.
Chapter 5 Troubleshooting 13
If you want to contact Customer Support at Xi3 Corporation, you will need the Serial Number of your X7A Modular Computer.
This is the number found on the I/O Plate of your X7A Modular Computer underneath the barcode (as shown in the illustration
below).
Customer Support
Web: www.Xi3.com/Support
Phone: 1-855-Xi3-HELP (1-855-943-4357)
Xi3 Support Technicians answer all Phone Tech Support calls quickly, efficiently and expertly. These are computer
professionals who are intimately familiar with all technical aspects of Xi3 Modular Computers, not individuals reading off a
script who don’t really know computers.
Chapter 5 Troubleshooting 14
Chapter 6 – Legal Stuff
A printed copy of the official terms and conditions of our Limited Warranty was enclosed inside your X7A Modular Computer
packaging.
Important Safety Information
WARNING: Incorrect use of your Xi3 Modular Computer may void the manufacturer’s warranty.
Components – DO NOT remove or replace any of the individual components found on any of the boards inside your X7A
Modular Computer. Doing so will void the warranty.
Airflow/Circulation – DO NOT permanently or semi-permanently block or in any way cover one or both of the honeycombed
endcaps of the X7A Modular Computer as this will stop or minimize the potential cooling of the various parts and components. Doing so will void the warranty.
Replacement Parts – Only Authorized Replacement Parts may be used on or inside an X7A Modular Computer. Using
non-authorized replacement parts will void the warranty.
Water & Liquids – Electricity and water/liquids do not mix. Keep your X7A Modular Computer away from water and liquids. An
X7A Modular Computer suffering water or liquid damage voids the warranty.
Additionally, an Xi3 Modular Computer is designed to be installed in a permanent position like a “Desktop Computer” or a
“Rack Mounted Server.” It is not intended to be routinely moved or carried from place to place.
Important Handling Information
WARNING: If you do not follow these handling instructions, you could damage your X7A Modular Computer, other property and void the warranty.
Operating Environment – Operating your X7A Modular Computer outside of these ranges may impair its performance and/or
void the warranty:
• Non-Operating Temperatures: Lower than -4F° or greater than 158F°
• Operating Elevation: Above 10,000 Ft.
Transporting or Carrying your X7A Modular Computer – If you need to carry your X7A Modular Computer from one place to
another, we recommend carrying it inside a padded bag or carrying case. If you are shipping your X7A Modular Computer,
please pack it securely inside a box or shipping container with an appropriate amount of padding to protect it during shipment. In either instance, please ensure that there are no small loose objects inside the shipping box, bag or carrying case.
Avoid Powerful Magnets – Your X7A Modular Computer contains long- and short-term memory/storage solutions that can be
erased if they come in contact with or close to a powerful magnet.
Protect Connectors & Ports – Make sure that all ports on your X7A Modular Computer DO NOT contain any debris before
attempting to connect a cable or device to the ports. It is important that you correctly align the correct cable/connector with
the proper port. And never attempt to force a connector into a port.
Connecting an HDMI cable — Additionally, if you want to connect an HDMI cable to the combo DisplayPort/HDMI Port on
your X7A Modular Computer, you MUST turn the HDMI cable upside down before inserting it into the combo DisplayPort/
HDMI Port of your X7A Modular Computer.
Chapter 6 Legal Stuff 15
NOTE: You must connect your cable properly to avoid damaging this port.
Failure to do so will void your warranty. Do NOT force the cable into the
port. (The illustration to the right shows the proper way to plug either cable
into this port.)
Cleaning your X7A Modular Computer – To remove dust from (or buff the
outer chassis of) your X7A Modular Computer chassis, use a clean, lint-free
soft cloth. DO NOT spray any type of cleaning solution or apply any liquid
cleaner directly to your X7A Modular Computer at any time, but especially
when the computer is turned on or running.
In fact, if you need to use a liquid cleaner to clean the outer chassis of your
X7A Modular Computer, turn off your computer first (see Page 8). Then
apply only enough liquid cleaner to a clean and soft cloth so as to dampen
the cloth, and use this dampened cloth to clean the outer chassis of your
X7A Modular Computer.
If you notice an accumulation of dust inside the chassis of your X7A Modular Computer, use a liquid-free, compressed air aerosol can to spray out the
inside of your computer. DO NOT use liquids of any type to attempt to clean
the Boards or components of your X7A Modular Computer. Doing so will
void the warranty.
Patents, Trademarks & Copyrights
Protected by U.S. Patents 7,075,784; 7,242,574; 7,256,991; 7,733,635; 7,764,506; 7,817,412; 8,405,969; multiple international patents; and other patents pending. The shape of the three-sided single piece chassis, the endcaps, the mounting
brackets, the anodized aluminum chassis with metallic finish/accent, the rounded concave polygon, the honeycomb, the
packaging, the interconnective structures, and the overall shape of the X7A Modular Computer and other Xi3 products,
including, but not limited to other Xi3 Modular Computers, microSERV3R, PISTON, and Z3RO are copyrights, trademarks
and/or unique trade dress of Xi3 Corporation. Xi3 and the Xi3 logo are registered trademarks of Xi3 Corporation. Modular, Xi3
Modular, microSERV3R, PISTON, and Z3RO are trademarks of Xi3 Corporation. All other trademarks or trade names are the
property of their respective owners.
CAUTION: Risk of explosion if battery is replaced by an incorrect type. Dispose of used batteries according to the
instructions.
Regulatory Information — United States Federal Communications Commission Notice
This device has been verified to comply with Part 15 of the FCC Rules. Operation is subject to the following two conditions:
1. This device may not cause harmful interference, and
2. This device must accept any interference received, including interference that may cause undesired operation.
The following information is for FCC compliance of Class B devices: This equipment has been tested and verified to comply
with the limits for a Class B digital device, pursuant to Part 15 of the FCC rules. These limits are designed to provide reasonable protection against harmful interference in a residential installation. This equipment generates, uses and can radiate radio
frequency energy and, if not installed and used in accordance with Xi3’s instructions, may cause harmful interference to radio
communications. However, there is no guarantee that interference will not occur in a particular installation.
If the equipment causes interference to radio or television reception, which can be determined by turning the equipment off
and on, users are encouraged to try to correct the interference by using one or more of the following measures:
• Reorient or relocate the receiving antenna.
• Increase the separation between the equipment and receiver.
• Connect the equipment into an outlet on a circuit different from that to which the receiver is connected.
• Consult the dealer or an experienced radio/TV technician for help.
Modifications to this product not authorized by Xi3 could void the FCC approval and negate your authority to operate the
product.
Chapter 6 Legal Stuff 16
Glossary
A complete glossary of names, words and terms associated with the Xi3 Modular Computer can be found at www.Xi3.com/
news/glossary.
Corporate Information
Xi3 Corporation can be reached at our corporate headquarters:
299 South Main Street #1300
Salt Lake City, UT 84111
801-478-3800
www.Xi3.com
Customer Service:
855-Xi3-HELP (855-943-4357)
[email protected]
Sales:
877-880-4289
[email protected]
*Actual wattage may vary depending on individual computer configurations. The wattages cited herein represent the average or typical wattage usage by Xi3
Modular Computer solutions.
Information in this document is subject to change without notice. © 2014 Xi3 Corporation. All rights reserved.
Reproduction of these materials in any manner, in whole or in part, without the written permission of Xi3 Corporation is strictly prohibited.
Glossary & Corporate Information 17