1
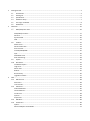
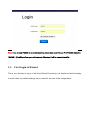
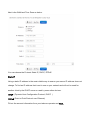
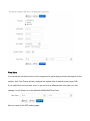
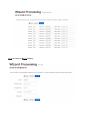
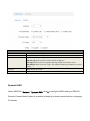
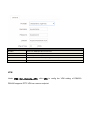
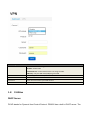
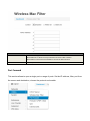
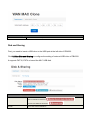
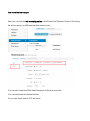
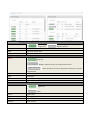
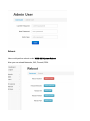
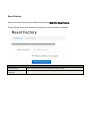
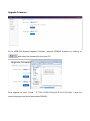
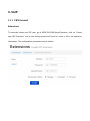
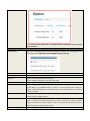
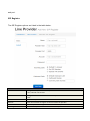
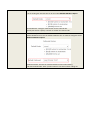
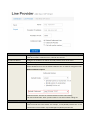
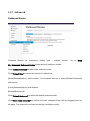
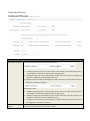
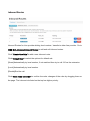
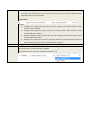
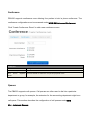
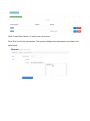
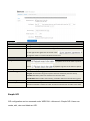
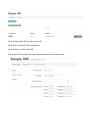
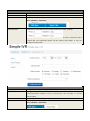
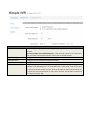
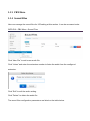
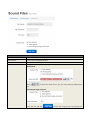
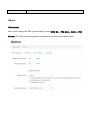
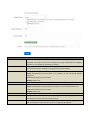
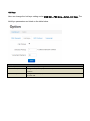
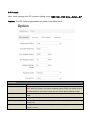
SPEEDYTEL TECHNOLOGY LIMITED
Deploying the
PBX220 IP Telephone System
Technical Manual
PBX220
1.
2.
Getting Started .................................................................................................................................................... 3
1.1
Introduction ............................................................................................................................................. 4
1.2
Packing list ............................................................................................................................................... 5
1.3
Specification ............................................................................................................................................. 5
1.4
Hardware Setup ....................................................................................................................................... 7
1.5
First Login to Wizard ................................................................................................................................ 8
1.6
Dashboard .............................................................................................................................................. 15
Networks ............................................................................................................................................................ 16
1.7
3.
WAN/LAN/Time Zone ............................................................................................................................ 16
WAN/LAN/Time Zone ................................................................................................................................ 17
Wireless ..................................................................................................................................................... 19
Dynamic DNS ............................................................................................................................................. 20
VPN ............................................................................................................................................................ 21
1.8
Utilities ................................................................................................................................................... 22
DHCP Server ............................................................................................................................................... 22
Wireless Mac Filter .................................................................................................................................... 23
Port Forward .............................................................................................................................................. 24
Firewall/UPNP/DMZ ................................................................................................................................... 25
QoS............................................................................................................................................................. 26
WAN MAC Clone ........................................................................................................................................ 27
Disk and Sharing......................................................................................................................................... 28
1.9
System .................................................................................................................................................... 32
1.10 Real Status ............................................................................................................................................. 32
Call Details Report...................................................................................................................................... 34
Logs View ................................................................................................................................................... 34
Admin User ................................................................................................................................................ 34
Reboot........................................................................................................................................................ 35
Reset Factory ............................................................................................................................................. 36
Upgrade Firmware ..................................................................................................................................... 37
VoIP .................................................................................................................................................................... 38
1.11 PBX General ........................................................................................................................................... 38
Extensions .................................................................................................................................................. 38
Line Provider .............................................................................................................................................. 43
1.12 Advanced ............................................................................................................................................... 50
Outbound Routes ....................................................................................................................................... 50
Inbound Routes .......................................................................................................................................... 54
Conference ................................................................................................................................................. 58
Queues ....................................................................................................................................................... 58
Simple IVR .................................................................................................................................................. 60
1.13 PBX More ............................................................................................................................................... 64
1.14 Sound Files ............................................................................................................................................. 64
Option ........................................................................................................................................................ 66
Advanced Option-Turbo Mode .................................................................................................................. 72
4.
Glossary ............................................................................................................................................................. 72
Welcome to
Wi-Fi IP PBX
PBX220
1. Getting Started
Thank you for purchasing Speedytel PBX220 ( WiFi Router+ IP PBX).It is one cost-efficient
yet easy-to-configure IP PBX in the market today.
Administrating a VoIP system can be a daunting task for administrators unfamiliar with VoIP.
This guide is designed to help you plan and configure Speedytel PBX220 Voice over IP
(VoIP) deployments.
1.1
Introduction
The Speedytel PBX220 (300M WiFi Router+ IP PBX) is the ideal system for small
businesses and home offices requiring a pint-sized yet powerful on-premise wifi router IP
PBX.
The compact solid-state device supports 16 extensions and offers a wide range of IP PBX
telephony features.
Keeping up with the demands of sustainability, the speedytel PBX220 is based on a
low-power, high performance MIPS processor, providing the complicated communication
features including the hardest HD communication protocol, complete router features and
QoS (Ensure the voice quality in a case the bandwidth is not enough).Meanwhile, the
feature of one touch to deploy the phones makes the configuration of phones easy and
enjoyable thing.
1.2
Packing list
1 unit PBX220
1 Piece Power Supply (12V,1A)
1 piece of 2-meter Network cables
1.3
Specification
Hardware
WiFi Router
Networks
Processor: MIPS RAM: 64MB FLASH: 16MB
WAN: 1xRJ45 10/100MB Ethernet port
LAN: 4xRJ45 10/100MB Ethernet port
Button: Reset Button, Feature Button
Power adapter: AC 100~240V input and DC 12V/1A output
Power Consumption: 1.2-2.0W
Operating humidity: 10~95%
Operating temperature: 0~45°C
Net weight 230g, Gross weight 600g
Dimension: 168X106X71mm Box dimension: 19.5X13.8X8.5cm
Channels: Support 1-13 channels and auto mode
TxPower: 802.11n 300M 14dBm, 802.11g 54M 16dBm, 802.11b 11M 17-19dBm
Antenna: Internal 2T2R 3dBi
Coverage Area: Indoor 100 meters, Outdoor 300 meters
Encryption:WEP-Auto,WPA-PSK,WPA-PSK2
HT Bandwidth: 20Mhz, 40Mhz
DHCP: Server / Client
Port Forward: Supported
Firewall: Support flood attack protect
DMZ: Supported
uPNP & NAT-PMP: Supported
Qos: WMM, DSCP
External Disk: USB 2.0 in Fat32 , Ext3, Ext4
WAN: DHCP, STATIC, PPPoE
LAN: Static IP
Time Zone: Multinational
Dynamic DNS: Supported
VPN: PPTP in Tunnel, PPTP in PBX only
Wan Mac Clone
Extensions: 16 SIP extensions, up to 32 SIP extensions in Turbo mode
4 concurrent calls, up to 8 concurrent in Turbo mode
Extension Features: Support Ring Group, Follow Me, Extension Outbound Routes,
PBX Features
Extension dialing intelligent analysis, Extension for BLF support, MWI(Message
Waiting Indicator)
Support SIP trunk:Registration mode、IP docking mode(SIP Direct)
SIP Trunk Failover
Trunk features:DID set, routes way, Inbound call system support routing, Support for
multiple devices in the cluster, Support automatic looking for the callee’s number.
Call Pickup, Voicemail
One Touch to Config
Codec: .722,G.711U/A,G.729,GSM, H.264
SIP Protocol: Over TCP/UDP, RFC3261
DTMF:In-Band,RFC2833,SIP Info
Conference: Up to 4 parties conference system, support multiple independent
meeting room
Queues: Call queue strategy support random,ring all,rotate members call
IVR: Support voice menu, multi-level and key recognition
Background Music: Supported
IVR Voice file: play, record or upload
Call record: Call record will automatically store in the external disk
Time Frames: Support the IVR auto-switch based on the time
SIP Behind NAT: Supported
AMI port allows to connect PBX220 to the third parties’ software
1.4
Hardware Setup
You may check the picture above to config your system
Step 1: Connect the LAN port of PBX220 with your corporate IP network. Before you
connect the PBX220 to the network, please check if your network can work normally.
Step 2: Plug in and open your browser to visit the web address: Http://192.168.1.1
Make sure your PC IP address is 192.168.1.XXX
(If you use IE6 and above, the prefix address http:// can’t be left out)
Now we access to the Wizard page.
Username: admin (By default)
Password: admin (By default)
Or you can find the WiFi SSID :
Http://192.168.1.1
and log in. And visit the web:
You can also choose the web language.
Note: If you connect PBX220 to your exist network, please make sure that Lan IP of PBX220 (default is
192.168.1.1) is different from your exist network. Otherwise, it will be a network conflict.
1.5
First Login to Wizard
This is your first time to log in, it will show Wizard Processing. It is simple and brief to deploy.
In most cases, the default settings can be used for the rest of the configuration.
.
If you want to quit the Wizard, just Abort it. And if you want to access Wizard, just click the
Wizad.
You can click Prev to return and Next to do the following steps.
On the Wizard page, you can set the WAN IP and Time Zone, WiFi, Extension, line provider
and PBX.
You can select which part need to set then do the Next.
(You can also follow all the default settings and confirm)
Next is the WAN and Time Zone as below:
You can choose the Protocol Static IP, DHCP, PPPoE.
Static IP
Using a static IP address is the most reliable way to ensure your server IP address does not
change. To find an IP address that is not in use on your network and will not be used for
another client by the DHCP server or used by some other devices.
DHCP(Dynamic Host Configuration Protocol, DHCP)
PPPoE (Point to Point Protocol over Ethernet)
Fill out the account information from your telecom operator and Next.
Time Zone
You can set the local time here and it is important for generating accurate call reports for the
system. And Time Frame will also analysis the system time to switch to the proper IVR.
If you select the incorrect time zone, or you move to a different time zone later, you can
change it in the Wizard or in the Network-WAN/LAN/Time Zone.
Now we came to the WiFi setting page:
Here you can set the WiFi option.
Enable WiFi and set the SSID(Service Set Identifier)
According to the tip in the black, choose your encryption, crypto and key.
Caution: PBX220’s WiFi is enabled by default. Setup your WiFi access password here to protect your
network
Now we come to the Extension page.
The system has already auto generated 16 SIP extension by default.
(PBX220 supports max 16 SIP extensions.)
You can set the extension number, password and the caller name manually
If want to set the extensions quantity as you like, just amend this in Extension table.
Next we come to Trunk Setting.
Set a SIP Trunk here. Fill out the Provider Host, account and password from your Internet
Telephony Service Provider then one SIP Trunk will be built.
PBX220 supports maximum 8 SIP trunks. If you want to build more, just do it in the Line
Provider.
Next is PBX setting :
Here you can set how the system will deal with when make outbound calls or receive
the inbound calls.
Outbound calls: Auto-select the Trunk which you set it as the default outbound line.
Incoming calls: Ring all the numbers when the call comes in or just into a IVR.
If want to set other routes, you can do it in Outbound Routes and Inbound Routes after the
Wizard.
You can also set the conference number here. By default is 300.
Next, well done! Just confirm to process.
Then the PBX220 begin to configure. Now enjoy the HTML5 interface.
It will auto-restart the PBX and if you can’t see the page you can refresh it. If you amended
the static IP address, re-visit the changed IP. Re-log in, you will see its IP at the dashboard
of PBX220.
OK. This is the first time to access the PBX220.
1.6
Dashboard
You can see the status of WAN, LAN, VPN, WiFi, System and PBX in the dashboard.
2. Networks
1.7
WAN/LAN/Time Zone
After successfully connecting the PBX220 to the network for the first time, users could login
the Web GUI and go to Networks to configure the network parameters for the device.
WAN/LAN/Time Zone
Please refer to the following tables for basic network configuration parameters on WAN
setting.
WAN Setting
Protocol
Select DHCP, Static IP, or PPPoE. The default setting is DHCP
IP Address
Enter the IP address for static IP settings.
Netmask
Enter the subnet mask address for static IP settings.
Gateway
Enter the gateway IP address for static IP settings.
DNS 1
Enter the DNS server 1 address for static IP settings.
DNS 2
Enter the DNS server 2 address for static IP settings.
Username
Enter the user name to connect via PPPoE
Password
Enter the pass word to connect via PPPoE
Service
Enter the ISP service name(optional)
DNS Mode
Select the DNS mode for PPPoE:
Assigned: DNS is assigned by your ISP. Set: Manually set your DNS
Connect Mode
Select the either always or demand
Please refer to the following tables for basic network configuration parameters on LAN
setting.
LAN Setting
IP Address
Enter the IP address assigned to LAN port. The default setting is 192.168.1.1
Netmask
Enter the subnet mask. The default setting is 255.255.255.0
Please refer to the following tables for basic network configuration parameters on Time Zone
setting.
Time Zone Setting
Server Time
The current time from the NTP server
Time Zone
Select the proper time zone option for PBX220
NTP Server
Specify the URL or IP address of the NTP server for the PBX220 to
synchronize the date and time.
Task Timer
Select enable or disable task timer
Reboot at
Select the auto reboot time
Wireless
Under WEB GUI--Network—Wireless, click Wireless to config the WiFi setting of PBX220
General Setting
Enable WiFi
Select Yes to enable your WiFi network, No to disable it
SSID
SSID is the name of your wireless network. Create your name here.
Check Hide SSID box to hide your wireless network name.
Encryption
Select the encryption option for your wireless network
Crypto
Select the crypto option
Key
Enter the password for your wireless network
Expert Setting
Channel
Select the channel setting for PBX220.
HT Bandwidth
Configure HT bandwidth option.
Wireless Mode
Select one of the following:
802.11n only-Select if all your wireless clients are 802.11n
802.11g/n-Select if you are using both 802.11g and 802.11n wireless clients
802.11b/g/n-Select if you are using a mix of 802.11b, 802.11g and 802.11n wireless
clients
Tx Power
Manually set the Tx rate
WMM
Select to enable or disable WiFi Multimedia
Dynamic DNS
Under WEB GUI--Network—Dynamic DNS, click it to config the DDNS setting of PBX220.
Dynamic Domain Name System is a method of keeping a domain name linked to a changing
IP address.
General Setting
Provider
Select one DDNS provider from the list.
Username
Enter the user name of your DDNS account.
Password
Enter the password of your DDNS account.
Domain
Enter the domain name that you registered with your DDNS service provider
Check Time
Enter the check time value
VPN
Under WEB GUI—Networks—VPN, click VPN to config the VPN setting of PBX220.
PBX220 supports PPTP VPN as a server endpoint.
VPN Setting
VPN Mode
Select one of the following;
Disable—disable VPN
Permission Lan—all the data from the Lan will go via VPN
PBX only—only the PBX data (VoIP)will go via VPN
Protocol
PBX220 supports PPTP VPN protocol.
Server
Enter the VPN server IP address.
Username
Enter the user name of your VPN account.
Password
Enter the password of your VON account.
1.8
Utilities
DHCP Server
DCHP stands for Dynamic Host Control Protocol. PBX220 has a built in DHCP server. The
DHCP server will automatically assign an IP address to the computers on the LAN. Be sure
to set your computers to be DHCP clients by setting their TCP/IP setting to “Obtain an IP
address automatically”. The DHCP server will automatically allocate an unused IP address
from the IP address pool. You must specify the starting IP address and the clients’ quantity.
DHCP Server Setting
Lease Expiry
DHCP client expiry time
MAC
DHCP client MAC address
IP Address
DHCP client assigned IP address
Device Name
DHCP client name
Enable DHCP
Select Yes to enable, no to disable
Client IP Start
Specify the starting IP for the DHCP server assignment
Max Clients
Enter the DHCP clients max quantity
Wireless Mac Filter
Use Wireless Mac Filter to allow or deny wireless devices by their MAC addresses from
accessing the network. You can manually set the white list or black list to manage the
access.
Wireless MAC Filter Setting
Control
Select filter list type.
MAC addresses in white list are permitted to access the WiFi network
MAC address in black list are forbidden to access the WiFi network
MAC Address
Manually add the filter MAC address into the list
Port Forward
This section allows to open a single port or range of ports. Set the IP address, Mac, port from
the source and destination, choose the protocol and enable.
Port Forwarding Setting
Enable
Check the box to enable the port forwarding rule
Source
Zone: Configure Zone setting for source.
IP: Enter the IP address of the source device.
Port: Enter a port or port range.
Destination
Zone: Configure Zone setting for destination.
IP: Enter the IP address of the device on your local network that you want to allow
the incoming service to.
Port: Enter a port or port range for the public and private port
Protocol
Select the type of protocol you’d like to assign to the rule
Firewall/UPNP/DMZ
A firewall protects your network from the outside work. PBX220 provides a simple protection
of your network.
Firewall, DMZ&UPNP Setting
DMZ PC IP
Specify the IP address of the device on the LAN that you want to have unrestricted
Internect communication.
UPNP&NAT-PMP
Enable UPNP&NAT-PMP or Disable UPNP&NAT-PMP
WAN Ping Response
Select Yes to enable WAN Ping Response, Select No to disable it.
WAN Ftp Access
Select Yes to enable WAN Ftp Access, Select No to disable it.
WAN Web Access
Select Yes to enable WAN Web Access, Slect No to disable it.
Note:WAN Web Access is disable by default. If you would like to visit the WEB GUI
through WAN of PBX220, please enable it at the first time when you log into the
system.
WAN PBX Access
Select Yes to enable Wan PBX Access and set the access port no. , Select no to disabl
e it.
Note: Default Wan PBX Access port no. is 6620. Please change your SIP phone’s SIP
port no. to 6620 before you register it to PBX220.
QoS
Quality of service. It ensures the voice quality in case the bandwidth is not enough. You can
also set the WAN download/upload bandwidth.
QoS Setting
Enable WAN QoS
Select Yes to enable WAN QoS, Select No to disable it. The default setting is disable.
WAN
Download Bandwidth
Enter the WAN download bandwidth value.
WAN Upload Bandwidth
Enter the Wan upload bandwidth value.
WAN MAC Clone
Some ISPs require that you clone (copy) the MAC address of your computer's network card
into the Router. If you are not sure then simply clone the MAC address of the computer that
was originally connected to the modem before installing the Router. Cloning your MAC
address will not cause any problems with your network.
WAN MAC Clone Setting
WAN MAC Address
Enter the MAC address you would like to clone
Disk and Sharing
First, you need to insert a USB drive to the USB port at the left side of PBX220.
Click Utilities-Disk and Sharing to configure the setting of external USB drive of PBX220.
It supports FAT32, EXT4 or based the MLC USB disk.
External Disk Setting
Disk Status
External USB drive detected
No external USB drive detected
Vendor
Info of the external USB drive
Free
It displays the unused space of the external USB drive.
Usage
It shows the used space percentage of the external USB drive.
Click to enable or disable records in disk.
Note: Records in Disk has to be enabled if you need to record calls or config voice
mail of each extension.
Click it before you remove the disk
Click to view the files in web browser.
File Sharing Setting
IP
FTP server IP address
Port
FTP port no.
Username
FTP access user name
Note: Administration FTP access user name is admin
Password
Enter FTP access password.
Note: Administration FTP access password is admin
View files via browser
Click to view the files via web browser
------------------------------------------------------------------------------------------------------------------------------------------Note: You can use any standard FTP client to access the FTP server and share files. FTP IP, Port and
User name can’t be changed.
Now you can find the call recording option in the Extensions-Extension-Expert. Recording
file will be saving on USB external disk memory only.
You can also check the PBX data-Extensions to find the record file.
You can download and delete the files.
Or you can check them in FTP as below.
When you want to extract the USB, close all the files related to USB before click the safety
remove disk and wait around 1-3 seconds. Then it will be ok as below.
File Sharing
You can treat the PBX220 as a file sharing server now.
1.9
System
1.10 Real Status
The PBX220 system status can be accessed via WEB GUI-System-Real Status, which
displays the following system information.
PBX Location number status including extension status and other source.
PBX Line provider status including trunk register and trunk connect status.
Extension Status
Status
Registered
Number
It shows the extension number
Type
Extension number type
Address
Extension IP address
Registered failed
Trunk Register
Status
Registered
Register request sent, but no response from server.
Filed to authorize the user and password. Check your account
and password.
Refresh
Refresh time
Type
Trunk type
Host
Host server address
Account
Trunk account
Trunk Connect
Status
Registered
Failed
Trunk
Trunk name
Type
Trunk type
Host
Host server address
Account
Trunk account
Call Details Report
A call details record is a data record produced by telephone exchange activities or other
telecommunication equipment documenting the details of a phone call that pass through the
PBX. The CDR is composed of the following data files on the PBX220
Call Detail Record
Account
Extension
Source
Caller ID
Destination
Callee ID
Calldate
Call Date
Duration/Answer
Duration: Call time
Answer: Talk time
Status
Format NO ANSWER, BUSY, ANSWERED OR FAILED
Logs View
Under WEG GUI-System-Logs View, you can find the system logs here. It is very convenient
to check any problem. Click to Refresh, it will show the latest logs.
Admin User
Under WEB GUI-System-Admin User, you can change the sign-in password here.
Reboot
User could perform reboot under WEB GUI-System-Reboot
Also you can reload Networks, Wifi, Firewall, PBX.
Reset Factory
User could restore the factory default setting under WEB GUI-Reset Factory.
Factory Mode: Input your password to reset your device.(Admin by default)
Reset Factory
Login Password
Keeping
Languages
Enter the login password to reset PBX220. Default is admin
Additional
Check the box if you have additional languages to keep after reset
Upgrade Firmware
Go to WEB GUI-System-Upgrade Firmware, upgrade PBX220 firmware by clicking on
and select the firmware file from your PC
Click upgrade to start. Check
current language and sound data inside PBX220.
to wipe the
3. VoIP
1.11 PBX General
Extensions
To manually create new SIP user, go to WEB GUI-PBX More-Extension, click on “Create
new SIP Extension” and a new dialog window will show for users to fill in the extension
information. The configuration parameters are as follows.
Extension Basic
Number
The extension number associated with the user, not less than 3 digits
Password
Configure the password for the user, not less than 8 digits
CallerID Name
Configure the caller ID name that would be applied for outbound calls from this user
No-Answer Option
Hangup: if nobody answer after ring, the call will be hangup
Voicemail: if nobody answer after ring, allow to leave a voice message.
Forward: if nobody answer after ring, forward the call to a specify number
The ring time could be configured at WEB GUI-PBX More-Option
Note:Voice mail only valid when an external USB disk is mounted and record mode
is external disk.
Extension Expert
Calling Record
Check the recording option for the user. Default is disabled. The recording files can
be accessed under WEB GUI-Utilities-Disk&Sharing-External Disk
Video Support
Check Yes to enable video, check no to disable video of the user
IP Address
Configure IP address option.
Caller ID
Default: use the default caller ID number
Set as: configure a number as the caller ID number
Directmedia
If enabled, the voice data will not be transferred. Default setting is disable
NAT
Use NAT when the PBX220 is on a public IP communicating with devices hidden
behind NAT (e.g., broadband router). If there is one-way audio issue, usually it's
related to NAT configuration or Firewall's support of SIP and RTP ports. The default
setting is enabled
Keep Alive
Configure the Keep-alive interval (in milliseconds) to check if the host is up. The
default setting is 10000 seconds
DTMF Mode
Select DTMF mode for the user to send DTMF. The default setting is "RFC2833". If
"Info" is selected, SIP INFO message will be used. If "Inband" is selected, 64-kbit
PCMU and PCMA are required. When "Auto" is selected, RFC2833 will be used if
offered, otherwise "Inband" will be used.
Codec Priority
Select audio and video codec for the extension. The available codecs
are: GSM, G.729, G.722, ALAW, ULAW,H.264, H.263
If need to modify the setting or have a view, just click
your system permanently, click
. Click
. To remove an extension from
, you can go to check the call
record directly.
Follow Me
If you have more than one number, when a call comes in, the system will ring your numbers
one by one until you answer it. This feature called follow me. The configuration parameters
are as follows.
Follow Me
Number
Enter the extension number for follow me
Internal Extensions
Select the extensions from the list on the right side to the left side for follow me. The
order can be selected by clicking on
External Number
Enter the external number as a forward option if the internal extensions failed to
answer
Ring Group
Users could assign extensions to different ring groups to better manage the configurations
on the PBX220. For example, when there is a sales hotline, users could select a group of
sales extensions instead of each person's extension to assign. When a call comes in, the
system will ring all extensions in the group simultaneously. This feature simplifies the
configuration process and helps manage and categorize the extensions for business
environment.
Ring Group
Number
Enter the extension number for the ring group
Numbers
Select the extensions from the list on the right side to the left side for ring group
Line Provider
Line provider can be configured in PBX220 under WEB GUI-PBX General-Line Provider
Click “SIP Register” to use SIP account and password to register to Internet Telephony
Service Provider.
Click “SIP Direct” for directly point to point connect other SIP server and authenticate by IP
and port.
SIP Register
The SIP Register options are listed in the table below.
Line Provider Basic
Name
Configure a unique label to identify this trunk when listed in outbound
rules, inbound rules and etc.
Provider Host
Configure the IP address or URL for the VoIP provider’s server of the
trunk
Provider Port
Enter the SIP port number of the trunk
Account
Enter the username to register to the trunk from the provider
Password
Enter the password to register to the trunk from the provider
Incoming Calls
Check how to process the inbound calls from the provider
Default to Answer: The inbound calls will be handled by the default rule. The default
rule of handing the inbound calls can be set under WEB GUI-PBX More-Option
Set DID Number: Configure a DID number for the inbound calls
Specify who answer: Specify a number to answer the inbound calls
Outbound Calls
Check how to process the outbound calls
Default Outbound Line: Use the default outbound line. It could be configured under
WEB GUI-PBX More-Option
Outbound Routes: Execute the matched outbound routes when dialing
Call with Prefix Number: Enter a prefix number to use this line when calling out
.
Line Provider Expert
From Domain
Configure the actual domain name where the extension comes from. This can be
used to override the From Header. For example, “trunk.pbx220.provider.com” is the
from domain in from header: sip: [email protected]
Auth. Name
This is the authentication name for the PBX220 to register to the trunk if required by
the provider. If not specified, the CallerID name will be used for authentication
Auth. Contac is
Check to choose the auth. Contact
Default Reg. Expiry
Configure the refresh interval when register to the trunk
Failover Trunk 1
Configure failover trunk 1 for the current SIP trunk
Busy: the current SIP trunk server returns “busy”
No Answer: the current SIP trunk server returns “no answer”
Cancel: the current SIP trunk server returns “cancel”
Congestion: the current SIP trunk server returns “congestion”
Chanunavail: the current SIP trunk server returns “Chanunavailable”
Failover Trunk 2
Configure failover trunk 2 for the current SIP trunk
Outbound force callerid
Configure the outbound force callerid.
Callee Number
Check the callee number option.
Allow Callin
Check yes to allow callin, check no to disable it
SIP Progress
Check the SIP progress option.
Keep Alive
Configure the Keep-alive interval (in milliseconds) to check if the host is up. The
default setting is 10000 seconds
NAT
Check Yes to enable NAT, check No to disable it
Video Support
Check Yes to enable Video, check No to disable it
DTMF Mode
Select DTMF mode for the user to send DTMF. The default setting is "RFC2833". If
"Info" is selected, SIP INFO message will be used. If "Inband" is selected, 64-kbit
PCMU and PCMA are required. When "Auto" is selected, RFC2833 will be used if
offered, otherwise "Inband" will be used.
Codec Priority
Select audio and video codec for the extension. The available codecs are: GSM,
G.729, G.722, ALAW, ULAW,H.264, H.263
SIP Direct
The SIP Direct options are listed below.
SIP Direct Basic
Name
Configure the provider name for the VoIP trunk. This is a unique label to identify the
trunk when listed in outbound rules, inbound rules and etc.
Provider IP Address
Configure the IP address or URL for the VoIP provider server of the trunk.
Provider IP Port
Enter the SIP port number of the trunk
Outbound Calls
Check how to process the outbound calls
Default Outbound Line: Use the default outbound line. It could be configured under
WEB GUI-PBX More-Option
Outbound Routes: Execute the matched outbound routes when dialing
Call with Prefix Number: Enter a prefix number to use this line when calling out
Line Provider Expert
From Domain
Configure the actual domain name where the extension comes from. This can be
used to override the From Header. For example, “trunk.pbx220.provider.com” is the
from domain in from header: sip: [email protected]
Default Reg. Expiry
Configure the refresh interval when register to the trunk
Failover Trunk 1
Configure failover trunk 1 for the current SIP trunk
Busy: the current SIP trunk server returns “busy”
No Answer: the current SIP trunk server returns “no answer”
Cancel: the current SIP trunk server returns “cancel”
Congestion: the current SIP trunk server returns “congestion”
Chanunavail: the current SIP trunk server returns “Chanunavailable”
Failover Trunk 2
Configure failover trunk 2 for the current SIP trunk
Outbound force callerid
Configure the outbound force callerid.
Allow Callin
Check yes to allow callin, check no to disable it
SIP Progress
Check the SIP progress option.
Keep Alive
Configure the Keep-alive interval (in milliseconds) to check if the host is up. The
default setting is 10000 seconds
NAT
Check Yes to enable NAT, check No to disable it
Video Support
Check Yes to enable Video, check No to disable it
DTMF Mode
Select DTMF mode for the user to send DTMF. The default setting is "RFC2833". If
"Info" is selected, SIP INFO message will be used. If "Inband" is selected, 64-kbit
PCMU and PCMA are required. When "Auto" is selected, RFC2833 will be used if
offered, otherwise "Inband" will be used.
Codec Priority
Select audio and video codec for the extension. The available codecs are: GSM,
G.729, G.722, ALAW, ULAW,H.264, H.263
.
1.12 Advanced
Outbound Routes
Outbound Routes for extensions dialing local / outside number. Go to WEB
GUI-Advanced-Outbound Routes to add and edit outbound routes.
Click “Create New Rule” to add a new outbound route.
Click “Default Rule” to select the options for default rule.
[Smart]Automatically try local number, if not matched then try to select [Default Outbound]
and call out.
[Local] Automatically try local number
[Disable]End the call
Click “Default Outbound” to select the default outbound trunk.
Click “Save rules new order” to confirm the order changes of the rules by dragging them on
the page. The outbound rule listed on the top has higher priority.
Create New Rule first:
Outbound Routes
Rule Match Condition
The rule can be matched by caller or by called party.
Examples by caller:
1. Configure caller ID prefix is 9, leave length as Null. When the caller ID with prefix 9,
the condition is matched no matter how many digits it has
2. Configure length is 4, leave caller ID prefix as Null. When the caller ID is 4 digits, the
condition is matched no matter what prefix it has
3. Configure caller ID prefix is 9 and length is 4. When the caller ID with prefix 9 and has 4
digits, the condition is matched
Examples by callee:
1. Configure callee ID prefix is 9, leave length as Null. When the callee ID with prefix 9,
the condition is matched no matter how many digits it has
2. Configure length is 4, leave callee ID prefix as Null. When the callee ID is 4 digits, the
condition is matched no matter what prefix it has
3. Configure callee ID prefix is 9 and length is 4. When the callee ID with prefix 9 and
has 4 digits, the condition is matched
CallerID
Option
Format
Once the condition is matched, select the format option at the drop down list if
necessary. Default setting is format caller number.
Format caller number: Once the condition is matched, only format the caller number
Format caller name: Once the condition is matched, only format the caller name
Format caller both: Once the condition is matched, format both the number and name of
the caller
Caller&Callee Format
Configuration
Format caller at “Format caller number” option
Example:
1. Configure Trim 1 digits from caller ID, leave other settings as Null. When you dial
number from extension 910 and extension name is May, caller ID number 10 and
name May will be sent to the called party.
2. Configure add number 8 in prefix, leave other settings as Null. When you dial number
from extension 910 and name May, caller ID number 8910 and name May will be sent
to the called party.
3. Configure append number 8 with end, leave other settings as Null. When you dial
number from extension 910 and May, caller ID number 9108 and name May will be
sent to the called party
4. Configure Trim 1 digits from caller ID, and add number 8 in prefix and append
number 8 with end. When you dial number from extension 910 and name May, caller
ID number 8108 and name May will be sent to the called party
Format caller at “Format caller name” option
Example:
1. Configure Trim 1 digits from caller ID, leave other settings as Null. When you dial
number from extension 910 and extension name is May, caller ID number 910 and
name ay will be sent to the called party.
2. Configure add number 8 in prefix, leave other settings as Null. When you dial number
from extension 910 and name May, caller ID number 910 and name 8May will be sent
to the called party.
3. Configure append number 8 with end, leave other settings as Null. When you dial
number from extension 910 and May, caller ID number 910 and name May8 will be
sent to the called party
4. Configure Trim 1 digits from caller ID, and add number 8 in prefix and append
number 8 with end. When you dial number from extension 910 and name May, caller
ID number 910 and name 8ay8 will be sent to the called party.
Format caller at “Format caller both” option
Example:
1. Configure Trim 1 digits from caller ID, leave other settings as Null. When you dial
number from extension 910 and extension name is May, caller ID number 10 and
name ay will be sent to the called party.
2. Configure add number 8 in prefix, leave other settings as Null. When you dial number
from extension 910 and name May, caller ID number 8910 and name 8May will be
sent to the called party.
3. Configure append number 8 with end, leave other settings as Null. When you dial
number from extension 910 and May, caller ID number 9108 and name May8 will be
sent to the called party
4. Configure Trim 1 digits from caller ID, and add number 8 in prefix and append
number 8 with end. When you dial number from extension 910 and name May, caller
ID number 8108 and name 8ay8 will be sent to the called party.
Format callee
Example:
1. Configure Trim 1 digits from callee ID, leave other settings as Null. When you dial
810, number 10 will be dialed.
2. Configure add number 8 in prefix, leave other settings as Null. When you dial
810, number 8810 will be dialed.
3. Configure append number 8 with end, leave other settings as Null. When you dial
810, number 8108 will be dialed.
4. Configure Trim 1 digits from callee ID, and add number 8 in prefix and append
number 8 with end. When you dial number 810, number 8108 will be dialed.
Rule Name
Configure the name of outbound route
Handling
Call Deny: Deny the call
Call Local Number: Call local number in PBX220
Using Outbound Line: Select the outbound trunk for the call
Inbound Routes
Inbound Routes for Line provider dialing local number / transfer to other line provider. Go to
WEB GUI-Advanced-Inbound Routes to add and edit inbound routes.
Click “Create New Rule” to add a new inbound route.
Click “Default Rule” to select the options for default rule.
[Smart]Automatically try local number, if not matched then try to call 310 as the extension.
[Local] Automatically try local number
[Disable]End the call
Click “Save rules new order” to confirm the order changes of the rules by dragging them on
the page. The inbound rule listed on the top has higher priority.
Create a new rule as below.
Inbound Routes
Match From
Line
Select the SIP trunk line to configure the inbound route.
Rule Match
Condition
The rule can be matched by caller or by called party.
Examples by caller:
1. Configure caller ID prefix is 9, leave length as Null. When the caller ID with prefix 9, the
condition is matched no matter how many digits it has
2. Configure length is 4, leave caller ID prefix as Null. When the caller ID is 4 digits, the condition
is matched no matter what prefix it has
3. Configure caller ID prefix is 9 and length is 4. When the caller ID with prefix 9 and has 4 digits,
the condition is matched
Examples by callee:
3. Configure callee ID prefix is 9, leave length as Null. When the callee ID with prefix 9, the
condition is matched no matter how many digits it has
4. Configure length is 4, leave callee ID prefix as Null. When the callee ID is 4 digits, the condition
is matched no matter what prefix it has
3. Configure callee ID prefix is 9 and length is 4. When the callee ID with prefix 9 and has 4
digits, the condition is matched
CallerID
Format
Option
Once the condition is matched, select the format option at the drop down list if necessary. Default
setting is format caller number.
Format caller number: Once the condition is matched, only format the caller number
Format caller name: Once the condition is matched, only format the caller name
Format caller both: Once the condition is matched, format both the number and name of the
caller
Caller&Callee
Format
Configuration
Format caller at “Format caller number” option
Example:
5. Configure Trim 1 digits from caller ID, leave other settings as Null. When the inbound caller ID
is 910 and name is May, caller ID number 10 and name May will be sent to the called party.
6. Configure add number 8 in prefix, leave other settings as Null. When the inbound caller ID is
910 and name is May, caller ID number 8910 and name May will be sent to the called party.
7. Configure append number 8 with end, leave other settings as Null. When the inbound caller
ID is 910 and name is May, caller ID number 9108 and name May will be sent to the called
party
8. Configure Trim 1 digits from caller ID, and add number 8 in prefix and append number 8 with
end. When the inbound caller ID is 910 and name May, caller ID number 8108 and name May
will be sent to the called party
Format caller at “Format caller name” option
Example:
5. Configure Trim 1 digits from caller ID, leave other settings as Null. When the inbound caller ID
is 910 and name is May, caller ID number 910 and name ay will be sent to the called party.
6. Configure add number 8 in prefix, leave other settings as Null. When the inbound caller ID is
910 and name is May, caller ID number 910 and name 8May will be sent to the called party.
7. Configure append number 8 with end, leave other settings as Null. When the inbound caller
ID is 910 and name is May, caller ID number 910 and name May8 will be sent to the called
party
8. Configure Trim 1 digits from caller ID, and add number 8 in prefix and append number 8 with
end. When the inbound caller ID is 910 and name is May, caller ID number 910 and name
8ay8 will be sent to the called party.
Format caller at “Format caller both” option
Example:
5. Configure Trim 1 digits from caller ID, leave other settings as Null. When the inbound caller ID
is 910 and name is May, caller ID number 10 and name ay will be sent to the called party.
6. Configure add number 8 in prefix, leave other settings as Null. When the inbound caller ID is
910 and name is May, caller ID number 8910 and name 8May will be sent to the called party.
7. Configure append number 8 with end, leave other settings as Null. When the inbound caller
ID is 910 and name is May, caller ID number 9108 and name May8 will be sent to the called
party
8. Configure Trim 1 digits from caller ID, and add number 8 in prefix and append number 8 with
end. When the inbound caller ID is 910 and name is May, caller ID number 8108 and name
8ay8 will be sent to the called party.
Format callee
Example:
5. Configure Trim 1 digits from callee ID, leave other settings as Null. When callee ID is 810,
number 10 will be dialed.
6. Configure add number 8 in prefix, leave other settings as Null. When callee ID is 810,
number 8810 will be dialed.
7. Configure append number 8 with end, leave other settings as Null. When callee ID 810,
number 8108 will be dialed.
8. Configure Trim 1 digits from callee ID, and add number 8 in prefix and append number 8
with end. When callee ID is 810, number 8108 will be dialed.
Rule Name
Configure the name of inbound route
Handling
Call Deny: Deny the call
Call Local Number: Call local number in PBX220
Using Outbound Line: Select the outbound trunk for the call
Conference
PBX220 supports conference room allowing four parties to hold a phone conference. The
conference configurations can be accessed under WEG GUI-Advanced-Conference.
Click “Create Conference Room” to add a new conference room.
Conference
Room Number
Configure the conference number for the users to dial into the conference.
Announce Join/Leave
Check to disable or enable the announcement when join and leave of the conference
One Person
Music
Check to disable or enable the one person play back music
Playback
Queues
The PBX220 supports call queues. Call queues are often used to dial into a particular
department or group; for example, the extension for the accounting department might be a
call queue. This section describes the configuration of call queues under WEG
GUI—Advanced-Queues
Click “Create New Queue” to add a new call queues.
Click “Edit” to edit the call queues. The queues configuration parameters are listed in the
table below.
Queues Basic
Queues Number
Configure the call queues extension number.
Remark
Configure the call queues name to identify the queues.
Numbers
Select the available extensions to be the agents in the queues. Choose the extensions
on the right to the agents list on the left. Click
to
arrange the order or remove extensions from the list.
Queues Expert
Background Music
Check
to playback music to the caller in queues.
Check
to playback ring tone to the caller in queues.
Call Progress
Configure call progress details.
Service Strategy
Select the service strategy option
Ring All: All extensions ring in the queues until one extension picks the call up
Random: Randomly select one extension to serve the caller
Round Robin: Round robin with memory, remember where we left off last ring pass.
Member Rings Time
Enter the member rings time.
When Pickup
Direct Answer: directly answer the caller.
Announce member’s number to caller: announce the extension number to the caller.
Simple IVR
IVR configuration can be accessed under WEB GUI—Advanced—Simple IVR. Users can
create, edit, view and delete an IVR.
Click “Create New IVR” to add a new IVR.
Click “Edit” to edit the IVR configuration.
Click “Delete” to delete the IVR.
The simple IVR configuration parameters are listed in the tables below.
IVR Basic
IVR Number
Configure the extension number for the IVR.
Remark
Configure the name of the IVR
Playback File
Select the audio file to play for the IVR. Add additional audio file under WEB
GUI—PBX More—Sound Files.
Input Detected
Configure the input digit and the transfer destination number. Example:
When caller dial 0 in IVR, transfer the call to number 900. Dial 1, transfer the call to
number 901. The transferred number can be another IVR number, so user can
arrange multi-level IVRs.
Time Frames
Working hours
Configure the time frame to play the IVR.
Offwork date
Configure the offwork date for the IVR. Fill in with MM-DD format. Multiple
comma-separated. Example: 12-24, 5-1 means Dec. 24th and May. 1st are the
offework date.
Offwork week
Configure offwork date within one week.
Offwork Playback
Select the audio file to play for offwork time. Add additional audio file under WEB
GUI—PBX More—Sound Files.
IVR Expert
Input Invalid Mode
Invalid Playback: play an invalid voice prompt when the caller enters an invalid
number.
Try Local number and Invalid Playback: try call the local number first if failed then
play an invalid voice prompt when the caller enters an invalid number.
Input Max Digit Len.
Configure the max digit length for the input.
Input Max Time
Configure the max timeout seconds for the input.
Input Retry
Configure the retry times for the input.
Outride to transfer to
Enter the extension number when the input exceeds the above configuration.
Example: Input Max Digit Len is 12, Input Max Time is 10 seconds, Input retry max is
6, outride to transfer to 300. It means when the number the caller inputs exceeds 12,
or input time exceeds 10 seconds, or retry times exceed 6, the call will be transferred
to extension number 300.
1.13 PBX More
1.14 Sound Files
User can manage the sound files for IVR setting at this section. It can be accessed under
WEG GUI—PBX More—Sound Files.
Click “New File” to add a new audio file.
Click “Listen” and enter the extension number to listen the audio from the configured
extension.
Click “Edit” to edit the audio setting.
Click “Delete” to delete the audio file.
The sound files configuration parameters are listed on the table below.
Sound Files
File Name
The name can not be changed by default.
File Extname
It can not be changed by default.
File Size
The file size will be displayed.
Upload File
Configure the upload file option.
Web upload:
Click
to select the audio file on your PC. Only supports GSM format
file.
Recording through extension:
Enter the ext. and click
, the ext. will ring and you can pick up the
phone and record the audio file through the extension.
Option
PBX General:
User could change the PBX general setting under WEB GUI—PBX More—Option—PBX
General. The PBX general configuration parameters are listed in the tables below.
PBX General
Outbound Ring Time
Trunk line has a timeout to determine if there was a hang up before the line is
answered. This value can be used to configure how long it takes before the PBX220
considers a non-ringing line with hang up activity.
Internal Ring Time
Configure the number of seconds to ring the user before the call is forwarded to
voicemail (voicemail is enabled) or hang up (voicemail is disabled).
Outbound Routes
Default mode
Smart: Automatically try local number, if no match try to call out through default
outbound.
Local: Automatically try local number.
Disable: End the call.
Default Outbound
Select the default outbound line.
Trunk Inbound Routes
Default mode
Smart: Automatically try local number, if no match try to call “Default Extension”.
Local: Automatically try local number.
Disable: End the call.
Default Extension
Configure the default extension number.
IVR Max Retry
Configure IVR max retry times. Example, configure max retry as 2, the system will
automatically try quite when the IVR plays twice.
Call Notification
Configure the call notification URL. When there is a call to extensions, group, queues,
IVR. A notification request will be sent to the configured URL address.
Hot Keys
User can change the hot keys setting under WEB GUI—PBX More—Option--Hot Keys. The
Hot Keys parameters are listed on the table below.
Hot Keys
Call Pickup
Default call pick up setting is *8
Directed Pickup
Configure call pick up option directly from extension. Default is “*”+”Extension
number”
Voicemail Playback
Configure voice mail playback number. Dial the number on the extension to listen to
its voice mail.
SIP Protocol
User could manage the SIP protocol setting under WEB GUI—PBX More—Option—SIP
Protocol. The SIP Protocol parameters are listed on the table below.
SIP Protocol
Anonymous Call In
Check yes to allow anonymous call in, check no to disable it.
TCP/UDP Bind Port
Configure TCP/UDP port number used for SIP. Default setting is 6620.
Note: When you register an IP Phone to PBX220, please modify your phone SIP port
to 6620. Otherwise, you need to modify the port number 6620 in PBX220 to 5060.
Max Register Expiry
Configure the maximum period (in seconds) of registration. The default setting is
3600.
Min Register Expiry
Configure the minimum period (in seconds) of registration. The default setting is 20.
Default Register Expiry
Configure the default minimum period (in seconds) of registration. The default
setting is 60.
Progress Mode
Configure whether PBX220 should generate inbound ringing or not. The default
setting is “never”.
Yes: The PBX220 will send 180 Ringing followed by 183 Session Progress and in-band
audio.
No: The PBX220 will send 180 Ringing if 183 Session Progress has not been sent yet.
If audio path is established already with 183 then send in-band ringing.
Never: Whenever ringing occurs, the PBX220 will send 180 Ringing as long as 200OK
has not been set yet. Inband ringing will not be generated even the end point device
is not working properly.
T.38UDPTL
Select the T.38UDPTL option from the pickup list.
Jitter Buffer
Enable
Check Yes to enable jitter buffer. Check No to disable it.
Force Receive
Check Yes to enable force receive. Check No to disable it.
Max Length
Configure the maximum time (in ms) to buffer for "Adaptive" jitter buffer
implementation, or used as the jitter buffer size for "Fixed" jitter buffer
implementation. The default setting is 200.
Resync Threshold
Eenter the resync threshold data.
Implementation
Configure the jitter buffer implementation on the sending side of a SIP channel. The
default setting is "Fixed".
Fixed
The size is always equal to the value of "Max Jitter Buffer".
Adaptive
The size is adjusted automatically and the maximum value equals to the value of
"Max Jitter Buffer".
Target Extra
Enter a target extra data.
SIP NAT
SIP Behind NAT
Disable
Check to disable SIP behind Nat
External IP
Check to Configure a static address and port (optional) that will be used in outbound
SIP messages if the PBX220 is behind NAT. If it's a hostname, it will only be looked up
once.
External DOMAIN
Specify an external domain name, which is similar to External Address except the
domain name will be looked up periodically.
Voicemail
Voice Mail
Say Datetime
Check yes to say day time when play the voice mail.
Say Callerid
Check yes to say caller ID when play the voice mail.
Advanced Option-Turbo Mode
1: Via the Turbo in the Advanced Option, you can double the number of the PBX’s Sip
Extensions and the Concurrent Calls.
2: Choose“Yes” and Press“Save”, and then this Operation come into effect.(After this
Operation, PBX210 will support 64 Sip Extensions and 16 Concurrent Calls; PBX 220 will
support 32 Sip Extensions and 8 Concurrent Calls).
3: Warning! This function only fits the users who use the system basically. Please disable it
immediately once the system works unstably in the Turbo mode!
4. Glossary
ATA (Analog Telephony Adapter)
A device used to connect one or more standard analog telephones to a digital and/or
non-standard telephone system such as a Voice Over IP based network.
DID (Direct Inward Dial)
A feature offered by telephone companies for use with their customers’ private branch
exchange (PBX) systems. In DID service, the telephone company provides one or more
trunk lines to the customer for connection to the customer’s PBX and allocates a range of
telephone numbers to this line (or group of lines) and forwards all calls to such numbers via
the trunk. As calls are presented to the PBX, the dialed destination number (DNIS) is
transmitted, usually partially (e.g., last four digits), so that the PBX can route the call directly
to the desired telephone extension within the organization without the need for an operator
or attendant.
DID numbers are assigned to a communications gateway connected by a trunk to the public
switched telephone network (PSTN) and the VoIP network. The gateway routes and
translates calls between the two networks for the VoIP user. Calls originating in the VoIP
network will appear to users on the PSTN as originating from one of the assigned DID
numbers.
DNS (domain name system)
The Internet’s name/address resolution service that translates alphabetic domain names into
numeric IP addresses. For example, the domain name www.pbx.com might translate to
198.105.232.4. If a computer cannot access DNS, the user’s web browser will not be able to
find web sites and the user will not be able to receive or send email. The DNS system
consists of three components: DNS data,name servers, and Internet protocols for getting the
data from the servers.
Domain name server
A computer that runs a program that converts a fully qualified domain name (FQDN) into its
numeric
IP address and vice versa.
DTMF (Dual-Tone Multi-Frequency)
The signal that is generated when a user presses the touch keys of an ordinary telephone.
Also known as “Touchtone,” DTMF has essentially replaced pulse dialling. When a user
presses touch keys, two tones of specific frequencies are generated (one from a
high-frequency group and the other from a lowfrequency
group), so it’s impossible for the voice to imitate the tones.
FTP (File Transfer Protocol)
A standard Internet protocol used to upload and download files between computers that are
connected to the Internet. FTP uses the Internet’s TCP/IP protocols as does HTTP, which
transfers displayable Web pages and related files, and SMTP, which transfers e-mail.
GSM (Global System for Mobile communication)
A wireless telephone standard in Europe and other parts of the world.GSM uses a variation
of time division multiple access (TDMA), which is the most widely used of the three digital
wireless telephony technologies (TDMA, GSM, and CDMA). GSM digitizes and compresses
data, then sends it down a channel with two other streams of user data, each in its own time
slot. It operates at either the 900 MHz or 1800 MHz frequency band.
IP-PBX (Internet Protocol Private Branch Exchange)
A telephone switch (see “PBX”) located on a customer’s premises that utilize VoIP to
manage and deliver calls.
ITSP (Internet Telephone Service Provider)
A company that offers an Internet data service for making telephone calls using VoIP. Most
ITSPs use SIP, H.323, or IAX for transmitting telephone calls as IP data packets. Customers
may use VoIP phones or traditional telephones with an analog telephony adapter (ATA).
ITU (International Telecommunication Union)
A telecommunications standards body that is guided by the United Nations. It was founded
as the International Telegraph Union in Paris on May 17, 1865. The ITU acts as the global
focal point for governments and the private sector in developing networks and services and
is comprised of more than 185 countries and produces over 200 standards
recommendations annually in the areas of information
technology, consumer electronics, broadcasting, and multimedia communications.
IVR (Interactive Voice Response)
A telephone technology that allows a caller to respond to configured voice menus through
voice and
touch tone. The IVR system responds with pre-recorded audio to further direct callers on
how to proceed.
LAN (Local Area Network)
A computer network covering a small physical area, like a home, office, or small group of
buildings, such as a school, or an office park. LANs are connected primarily through
Ethernet and can be connected to other LANs over any distance via telephone lines and
radio waves. LANs have a high data transfer rate and are not very expensive to set up. See
also “WAN.”
MAC (Media Access Control) address
A hardware address that uniquely identifies most network adapters or network interface
cards (NICs) by the manufacturer for identification. The manufacturer’s registered
identification number is usually part of the MAC address if it was assigned by the
manufacturer. The MAC address is used by the Media Access Control protocol sub-layer of
the Data-Link Layer (DLC) of telecommunication protocols.
MIPS (million instructions per second)
An old method for measuring a computer’s speed and power and, by implication, for
determining the amount of work a computer can do. It measures the approximate number of
machine instructions the computer can execute in 1 second (i.e., it measures CPU speed).
Because there are so many variables with computer performance (e.g., varying amounts of
time for different instructions, importance of I/O speed, etc.), MIPS ratings are not used that
often anymore. However, a MIPS rating can give you a general idea of a computer’s speed.
NAT (Network Address Translation or Network Address Translator)
The method for translating an IP address used within one network to a different IP address
known within another network (one network is designated the inside network and the other is
the outside network). NAT allows as a router, for example, to act as an agent between the
public network (e.g., the Internet) and a private network (i.e., a local network), which means
that a single, unique IP address can represent an entire group of computers.
PBX (Private Branch exchange)
A telephone exchange that serves a particular business or office, as opposed to one that is
owned by a common carrier or telephone company and is used by many businesses or the
general public. Users of the PBX share a certain number of outside lines for making
telephone calls external to the PBX.PBXs have evolved over time, beginning as a manual
switchboard or attendant console that was operated by a telephone operator (circuit
switching) to the modern IP PBX. See also “IP PBX.”
PSTN (Public Switched Telephone Network)
The network of the world’s public circuit-switched telephone networks. Originally a network
of fixed line analog telephone systems, the PSTN is now almost entirely digital in its core and
includes mobile as well as fixed (plain old telephone service, POTS) telephones. The PSTN
is largely governed by technical standards created by the ITU-T, and uses E.163/E.164
telephone numbers for addressing.
Proxy Server
A server (a computer system or an application program) that acts as an intermediary for
requests from clients seeking resources from other servers. The VoIP proxy server is used in
a DMZ of a company’s secure internal communication network and receives VoIP control
messages and VoIP media streams.
Using the MAC address and source IP address contained in the control message, the proxy
server pushes a policy change to the internal network’s external firewall to open call control
protocol ports and Real Time Protocol (RTP) ports only for packets from the source IP
address. The VoIP proxy server hides the company’s internal network address and directs
incoming VoIP packets to an IP-PBX connected to the company’s internal network.
RAM (Random Access Memory)
A form of computer data storage that allows stored data to be accessed in any order (i.e.,
“random access”).
RAM is used by a computer’s operating system, application programs, and currently used
data, so that they can quickly be reached by the computer’s processor. RAM is quickly
readable and writeable compared to other kinds of computer storage (e.g., the hard disk,
floppy disk, and CD-ROM);However, data in RAM remains only as long as the computer is
running. Once the computer has been turned off, RAM loses its data. When the computer is
turned on again, the operating system and other files are once again loaded into RAM.
Router
A device for connecting one or more computers to other computers, networked devices, or to
other networks. Compared to hubs and switches (which are also connecting types of
devices), a router is the smartest and most complicated of the three. Routers can be
programmed to understand and route the data its being asked to handle. Configuration is
done through a user interface. Larger routers are capable of being programmed to
communicate with other routers to determine the best method of getting network traffic from
point A to point B. Hubs work at the data link and network layers (layers
2 and 3) of the OSI model.
SIP (Session Initiation Protocol) [RFC 3261, 3262, 3263, 3264, and 3265]
A signalling protocol for initiating and terminating an interactive user session that involves
multimedia elements such as video, voice, chat, gaming, and virtual reality (it is used mainly
for voice and video calls over the Internet or data networks).
SIP Trunk
A service offered by an ITSP that allows businesses that have a PBX for their internal calls
to use VoIP to go outside the enterprise network by using the same connection as the
Internet connection. Before SIP trunks can be deployed, a business must have a PBX with a
SIP-enabled trunk side, an enterprise edge device that understands SIP, and an ITSP. See
“ITSP.”
Soft-switch (software switch)
A term used to describe the software that is used to bridge a public switched telephone
network (PSTN) and VoIP. This is done by separating the call control functions of a phone
call from the media gateway (transport layer). The soft-switch is typically used to control
connections at the junction point between circuit and packet networks.
UDP (User Datagram Protocol) [RFC 768]
A communications protocol that offers a limited amount of service when messages are
exchanged between computers in a network that is using the Internet Protocol (IP). UDP
merely performs IP traffic demultiplexing based on UDP port numbers, after which it
provides a checksum that can be used by end systems to determine whether the datagrams
received were corrupted by the network.
WAN (Wide Area Network)
A computer network that covers a broad area (e.g., any network that links across
metropolitan, regional, or national boundaries). WANs are similar to the Internet in that they
are not owned by a single organization. They exist under collective or distributed ownership
and management. For WAN connectivity over the longer distances, ATM, frame relay, and
X.25 are used. Computers connected to
a WAN can be connected via the telephone system, leased lines, or satellites. WANs have a
lower data transfer rate when compared to LANs. See also “LAN.”