1
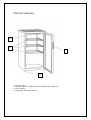
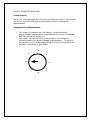
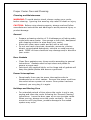
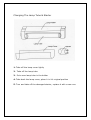
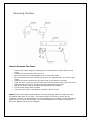
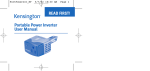
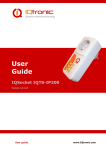
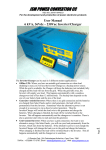
BUDGET GLASS DOOR REFRIGERATOR AND WINE COOLER
MANUAL OF INSTRUCTIONS FOR USE AND INSTALLATION
SAFETY PRECAUTIONS
Read all of the instructions before using this
appliance. When in use always exercise basic safety
precautions including the following:
•
•
•
•
•
•
•
•
Use of the is appliance is intended only for it’s intended
purpose as described in the manual
The cooler must be properly installed in accordance with the
installation instructions before it is used. See grounding
instructions in the installation section
Never unplug your cooler by pulling on the power cord.
Always grasp the plug firmly and pull straight from the socket
Repair or replace immediately, all electrical service cords that
have become frayed or otherwise damaged. Do not use a
cord that shows cracks or abrasion damage along it’s length,
the plug or connector end
Unplug your cooler before cleaning or carrying out any repairs
If your old cooler is not being used, we recommend you
remove the doors, this reduce the possibility of danger to
children
The cooler should not be recessed or built into a cabinet, it is
designed for free standing installation only
Do not operate your cooler in the presence of explosive fumes
Parts & Features
1
2
3
4
1.
2.
3.
4.
Interior light
Flat wire shelves (WINE105 has scalloped wine shelves)
Door handle
Adjustable feet (Not shown)
Installing Your Cooler
Unpacking Your Cooler
1. Remove all packaging material. This includes the foam base
and all adhesive tape.
2. Inspect and remove any remains of packing, tape or printed
materials before powering on the cooler.
Levelling Your Cooler
•
•
You cooler has four feet for levelling, these are located
underneath at the four corners of the cooler. After properly
siting your cooler, you can begin levelling it.
Levelling feet can be adjusted by turning them clockwise to
raise your cooler or anti-clockwise to lower. The cooler door
will close easier when the feet are extended.
Proper Air Circulation
•
•
•
To ensure your cooler works at the maximum efficiency it was
designed for, you should site it in a location where there is
proper air circulation, plumbing and electrical connections.
It is recommended that you leave approx 50mm clearance on
all sides of the cabinet
Do not overfill your cooler for proper internal air circulation
Electrical Requirement
•
•
Ensure there is a suitable power outlet (220 – 230~volts,
15amps outlet)
Only use an earthed plug
Instalment Limitations
•
•
•
Do not install your cooler in any location not properly
insulated or heated e.g. garages etc. This cooler is not
designed to operate in temperatures lower than 13˚C
Select a suitable location for the cooer on a hard, even
surface away from direct heat sources such as radiators,
cookers etc. Any unevenness on the floor should be corrected
with the levelling feet
Your cooler is designed for free standing installation only. It
is not designed for built-in application.
Cooler Features and Use
Initial Setup
Once you have plugged the unit into an electrical outlet, let the unit
run for at least 30 minutes to acclimatise before making any
adjustments.
Temperature Adjustments
•
•
The cooler is preset from the factory to automatically
accommodate temperature requirement for wines by setting
the thermostat to position 4
The cooler can be set to the temperature you desire to
accommodate your drink storage requirements. To set the
temperature, turn thermostat knob clockwise to get warmer,
and anti-clockwise to get colder
2
1
3
0
4
5
6
There will be a three degree deviation +/- from the temperature
you select and the temperature indicated on the LED readout.
This occurs because the cooler activates and deactivates trying
to maintain your desired temperature. There is often a ten
degree deviation between the top and bottom shelves of the
cooler, therefore, if you have set the cooler at 10˚c and have a
mix of red and white wines, you may want to put the white wine
on the bottom shelf where the temperature will be 7˚c and red
wine on the top shelf which will be 13˚c.
Shelving
•
The shelves are painted for appearance and easy cleaning. To
accommodate different sized bottles the shelves slide out and
can be moved up or down into any of the tracks moulded into
the cabinet. This allows free air movement and provides
more space.
Interior light
•
To complement the look of your stock, a soft light has been
built into the bottle cooler. Simply turn the switch button and
the light comes on, turn it back and the light goes off. For
maximum energy efficiency, leave the light off when not
displaying your stock.
Normal Operating Sounds You May Hear
•
•
Boiling water, gurgling sounds or slight vibration is due to the
refrigerant circulating through the cooling coils
The Thermostat control will click when it cycles on and off.
Proper Cooler Care and Cleaning
Cleaning and Maintenance
WARNING: To avoid electric shock, always unplug your cooler
before cleaning. Ignoring this warning may result in death or injury
CAUTION: Before using cleaning agents, always read and follow
manufacturers instructions and warnings to avoid personal injury or
product damage
General
•
•
•
Prepare a cleaning solution of 3-4 tablespoons of baking soda
mixed with warm water. Use sponge or soft cloth, dampened
with cleaning solution to wipe down your cooler
Rinse with clean warm water and dry with a soft cloth
Do not use harsh chemicals, abrasives, ammonia, chlorine
bleach, concentrated detergents, solvents or metal scouring
pads. SOME of these chemicals may damage and/or discolour
your cooler.
Door Gaskets
•
•
Clean Door gaskets every three months according to general
instructions. Gaskets must be kept clean and pliable to
ensure a proper seal.
Petroleum jelly applied lightly on the hinge side of gaskets will
keep the gasket pliable and assure a good seal.
Power Interruptions
•
Occasionally there may be power interruptions due to
thunderstorms or other causes. Remove the power cord from
the socket when a power cut occurs. Once power has been
restored, you may plug it in again.
Holidays and Moving Care
•
For extended periods of time where the cooler is not in use,
unplug and clean the cooler following the ‘General Cleaning’
instructions. Leave the door open so air can circulate inside.
When moving, always move the cooler vertically. Do not
move the unit lying down, possible damage to the sealed
system may occur.
Troubleshooting
Cooler Does Not Operate
•
•
Check the cooler is plugged in
Check there is power going to the socket it is plugged in
Cooler Appears Too Warm
•
•
•
•
•
Frequent door opening
Allow time for recently added stock to reach desired
temperature
Check gaskets for proper seal
Clean condenser coils
Adjust temperature control to colder setting
Cooler Temperature Is Too Cold
•
If temperature control setting is too cold, adjust to a warmer
setting
Cooler Runs Too Frequently
•
•
•
•
•
This may be normal to maintain constant temperature on
warmer and more humid days
Doors may have been opened frequently or for an extended
period of time
Clean condenser coils
Check gasket for proper seal
Check to see if doors are completely closed
Moisture Build-Up on Inside and Outside of Cooler
•
•
•
This is normal during high humidity periods
Prolonged or frequent door openings
Check door gaskets for proper seal
Cooler Door Does Not Shut Properly
•
•
Level the bottle cooler
Check for blockages e.g. shelves
Changing The Lamp Tube & Starter
1. Take off the lamp cover lightly
2. Take off the lamp tube
3. Put a new lamp tube in the holder
4. Take back the lamp cover, place it in it’s original position
5. Turn and take off the damaged starter, replace it with a new one
Reversing The Door
How to Reverse The Door
•
•
•
•
•
•
•
•
•
Remove the lower hinge by loosening and removing the screws with a screw
driver
Carefully lower the door and remove it
Move the pivot pin to the opposite hole on the lower hinge
Move the pivot pin from the top left hinge to the opposite hole on the top right
hinge
Remove the two screws from the right holes in the bottom cross bar
Take the door, insert the lower hinge axle into the bottom right hole of the door,
take the top right hole in the door into the right hand hinge axle
Adjust the door, make it straight and aligned with the cabinet
Fix the lower hinge with 2 screws
Cover the left holes in the bottom cross bar with 2 screws
Notes: As the door gasket gets pressed in during shipping, after reversing the door,
the gasket may have to be reset. This will be good for the seal to avoid any air
escaping. If there is a gap between the door gasket and the cabinet, set the gasket by
gently pulling it out to seal the gap. It is recommended to use a warm hair drier to
warm the gasket and get rid of the gap.